
DIY: How to Make a Trunk Beauty Panel (a dummy approach to complex curves!)

Thread Starter
Fearless DIY Guy
iTrader: (2)
Joined: Jan 2008
Posts: 3,003
Likes: 376
From: Jersey 'Burbs
DIY: How to Make a Trunk Beauty Panel (a dummy approach to complex curves!)
For anyone who's ever slapped a sub in their trunk, I'm quite sure at some point in time you've asked yourself, "Should I do anything other than just tossing the equipment in there?" Well, there's plenty of members whom have done AMAZING work on their trunk, but you may be one of those guys whom took a good look at the trunk, looked at all the angles and thought, "YEAH, OK." and walked away none the wiser.
Well, I'll share with you one technique ANYONE can use and get you some damn good results for a very low cost. What I am going to detail is one approach to fabricating a beauty panel for the trunk. Let's proceed.
Props to Jamie (jplt04), you gave me the inspiration for this after I reviewed your approach to horizontal angles.
THEORY
If you examine the angles of the trunk, it's easy to see that accurately conforming to the shape is no easy task. I had thought of modeling the curves at one point in time, when it dawned upon me that the very math I was doing, and integral, aka a REIMANN SUM, could easily be replicated IRL with Popsicle sticks! Let's roll.
STEP 1 - CENTERLINE MARKINGS
Position your box and mark the centerline. THIS IS VERY IMPORTANT, DO NOT RUSH THIS STEP! Once you have your centerline marked, use some painter's tape to mark the line where the fron of your box will be.


STEP 2 - THE REIMANN SUM
A Reimann sum works by approximating the area under a curve through a series of boxes, if you will - we're going to do the same. Using popsicle sticks, stack them atop of one another using a hot glue gun and trace the shape of the curve you're going to need to cover with the panel. Taoe the first stick parallel to the centerline tape and start stacking.
You're going to stack the popsicle sticks IN A STRAIGHT STACK, GOT IT?! A STRAIGHT STACK. THIS ISN'T ROCKET SCIENCE, MAKE IT STRAIGHT UP. Push each stick to the left until it stops against the panel and walk it up to the top.


STEP 3 - TEST FITTING
Now take the piece and trace out the stack.

Test fit 'er up.
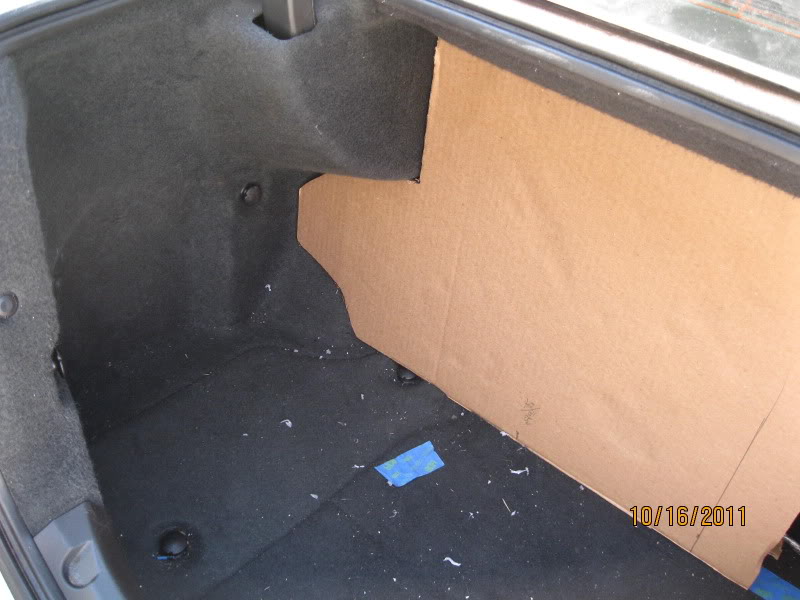
From here you can now go back and cut some new cardboard to fill if necessary.
STEP 4 - CENTERLINE MARKING FOR CUT
Remember that all-important center line I spoke of earlier? Well, here's where it really comes in to play. Once you're happy with your cardboard cuts, mark the center line of the board w/ the CL of the tape - THIS TELLS YOU WHERE TO MIRROR THE PANEL, AND HOW WIDE YOUR PANEL WILL BE.

STEP 5 - FINAL EXAM
Trace your carboard on your panel - I'm using 1/8" mason board since I need to bend this fucker to get it in (figures I'm at the widest point)
AFTER THIS STEP YOU ARE ESSENTIALLY DONE AND CAN MODIFY YOUR HOLES/PLEXIGLASS/LIGHTS AS YOU SEE FIT! HOPEFULLY THIS SHOWS YOU HOW TO APPROACH THE ANGLES!


STEP 6 - SUBHOLE
I really, REALLY suck at cutting holes in boards. REALLY suck. Here's my crap attempt. This will vary depending on your setup, but this is one method.

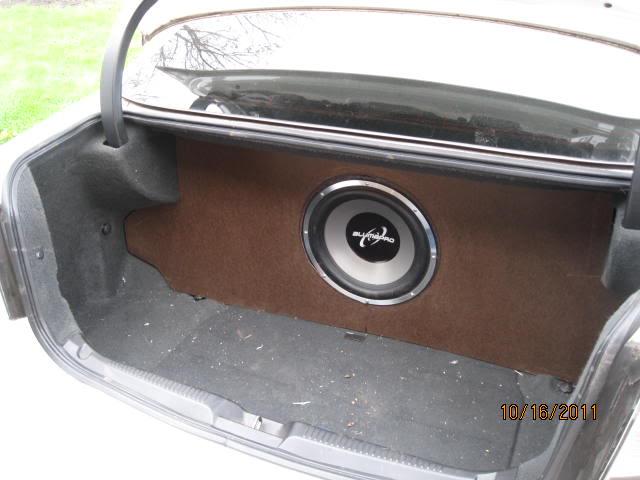
STEP 7 - FINAL REVIEW AND CLEAN-UP
Ok, well, it's damn good. Not perfect, but damn good. I still have plenty of board left over, and seeing as how the hard part is done, I will trace and cut a new one with cleaner angles and add maybe some cool plexiglass and whatnot. I'll post some more pics later once I determine how I want to liven it up, but I'm DAMN happy with the fit.

Well, I'll share with you one technique ANYONE can use and get you some damn good results for a very low cost. What I am going to detail is one approach to fabricating a beauty panel for the trunk. Let's proceed.
Props to Jamie (jplt04), you gave me the inspiration for this after I reviewed your approach to horizontal angles.
THEORY
If you examine the angles of the trunk, it's easy to see that accurately conforming to the shape is no easy task. I had thought of modeling the curves at one point in time, when it dawned upon me that the very math I was doing, and integral, aka a REIMANN SUM, could easily be replicated IRL with Popsicle sticks! Let's roll.
STEP 1 - CENTERLINE MARKINGS
Position your box and mark the centerline. THIS IS VERY IMPORTANT, DO NOT RUSH THIS STEP! Once you have your centerline marked, use some painter's tape to mark the line where the fron of your box will be.
STEP 2 - THE REIMANN SUM
A Reimann sum works by approximating the area under a curve through a series of boxes, if you will - we're going to do the same. Using popsicle sticks, stack them atop of one another using a hot glue gun and trace the shape of the curve you're going to need to cover with the panel. Taoe the first stick parallel to the centerline tape and start stacking.
You're going to stack the popsicle sticks IN A STRAIGHT STACK, GOT IT?! A STRAIGHT STACK. THIS ISN'T ROCKET SCIENCE, MAKE IT STRAIGHT UP. Push each stick to the left until it stops against the panel and walk it up to the top.
STEP 3 - TEST FITTING
Now take the piece and trace out the stack.
Test fit 'er up.
From here you can now go back and cut some new cardboard to fill if necessary.
STEP 4 - CENTERLINE MARKING FOR CUT
Remember that all-important center line I spoke of earlier? Well, here's where it really comes in to play. Once you're happy with your cardboard cuts, mark the center line of the board w/ the CL of the tape - THIS TELLS YOU WHERE TO MIRROR THE PANEL, AND HOW WIDE YOUR PANEL WILL BE.
STEP 5 - FINAL EXAM
Trace your carboard on your panel - I'm using 1/8" mason board since I need to bend this fucker to get it in (figures I'm at the widest point)
AFTER THIS STEP YOU ARE ESSENTIALLY DONE AND CAN MODIFY YOUR HOLES/PLEXIGLASS/LIGHTS AS YOU SEE FIT! HOPEFULLY THIS SHOWS YOU HOW TO APPROACH THE ANGLES!
STEP 6 - SUBHOLE
I really, REALLY suck at cutting holes in boards. REALLY suck. Here's my crap attempt. This will vary depending on your setup, but this is one method.
STEP 7 - FINAL REVIEW AND CLEAN-UP
Ok, well, it's damn good. Not perfect, but damn good. I still have plenty of board left over, and seeing as how the hard part is done, I will trace and cut a new one with cleaner angles and add maybe some cool plexiglass and whatnot. I'll post some more pics later once I determine how I want to liven it up, but I'm DAMN happy with the fit.


Very nice!! I'm getting a new box soon and was gonna make a faceplate to cover the sides to clean it up. Let me ask though, how hard is it to get that face piece out or did you split it in half. Cause I was thinking of splitting it so I can get the box out when needed cause I do carry the spare tire with me.
Also what are you using to secure it?
Also what are you using to secure it?
Last edited by CubanLynx84; Oct 16, 2011 at 07:10 PM.
Thread Starter
Fearless DIY Guy
iTrader: (2)
Joined: Jan 2008
Posts: 3,003
Likes: 376
From: Jersey 'Burbs
Very nice!! I'm getting a new box soon and was gonna make a faceplate to cover the sides to clean it up. Let me ask though, how hard is it to get that face piece out or did you split it in half. Cause I was thinking of splitting it so I can get the box out when needed cause I do carry the spare tire with me.
Also what are you using to secure it?
Also what are you using to secure it?

Now, the real magic in this is that the fit is DAMN precise...so much so that by interference-fit ALONE it's well in position! I'll be using some velcro in key spots, more to come on this!
Ah, yes, let's talk a key point - FUNCTIONALITY! Now, if you split it in half you lose the "look" of a true beauty panel, so I used 1/8" mortar board - this stuff is light, flexible, and easy to take in and out...so if you forsee the need to remove the panel for life's contingencies, I recommend using it. I will also be cutting in some stealth panels that will allow me to access my wheel locks, roadside kit, and lifting belt, which are all staples of my trunk...I'll be detailing those items this week / next weekend as time permits me to work on this. Bottom line - flexible panels will give you the best of BOTH worlds!
Now, the real magic in this is that the fit is DAMN precise...so much so that by interference-fit ALONE it's well in position! I'll be using some velcro in key spots, more to come on this!
Now, the real magic in this is that the fit is DAMN precise...so much so that by interference-fit ALONE it's well in position! I'll be using some velcro in key spots, more to come on this!
Thread Starter
Fearless DIY Guy
iTrader: (2)
Joined: Jan 2008
Posts: 3,003
Likes: 376
From: Jersey 'Burbs

Yes, it can retain a crap position over time, but I'll deal with that as it comes. But as far as making the template is concerned, I do recommend this method!
Trending Topics

Mistuh DRiiVA
Joined: May 2006
Posts: 582
Likes: 13
From: Queens Village, NY
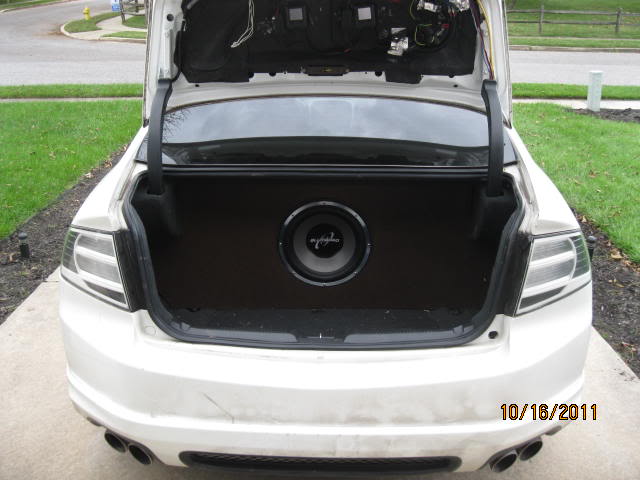
Looks like I wasn't the only one this weekend making a Trunk Beauty Panel. Not trying to hijack your thread DeathMetal, just wanted to show what I did this weekend too. It makes the trunk look so much cleaner than just having a box in there.
BTW major thanks to JPTL04 for all his help with this (advice and very detailed instructions), your trunk setup inspired me to attempt something like what you have and I don't think it came out too bad for a first attempt. Sorry for crappy phone pics...it was late at night when I finished.


BTW major thanks to JPTL04 for all his help with this (advice and very detailed instructions), your trunk setup inspired me to attempt something like what you have and I don't think it came out too bad for a first attempt. Sorry for crappy phone pics...it was late at night when I finished.
Dan, thanks for the thread, should help out alot of beginners here. Great idea. You could also use thin cardboard cut into slats like the sticks. And hot glue those.
Maddsiick, the trunk looks sweet man, came out great! Looks like there's 8 subs in your trunk! Lol! That mirrored plexi and clear rear wall makes any enclosure look super custom then add the led lighting. That's just icing on the cake! Again awesome job!
Maddsiick, the trunk looks sweet man, came out great! Looks like there's 8 subs in your trunk! Lol! That mirrored plexi and clear rear wall makes any enclosure look super custom then add the led lighting. That's just icing on the cake! Again awesome job!
Mistuh DRiiVA
Joined: May 2006
Posts: 582
Likes: 13
From: Queens Village, NY
Dan, thanks for the thread, should help out alot of beginners here. Great idea. You could also use thin cardboard cut into slats like the sticks. And hot glue those.
Maddsiick, the trunk looks sweet man, came out great! Looks like there's 8 subs in your trunk! Lol! That mirrored plexi and clear rear wall makes any enclosure look super custom then add the led lighting. That's just icing on the cake! Again awesome job!
Maddsiick, the trunk looks sweet man, came out great! Looks like there's 8 subs in your trunk! Lol! That mirrored plexi and clear rear wall makes any enclosure look super custom then add the led lighting. That's just icing on the cake! Again awesome job!


Burning Brakes
Joined: Aug 2010
Posts: 750
Likes: 69
FYI....it is soooooo much easier to just take thin cardboard (I use the cardboard from 24 packs of coke we buy), cut some big and small pieces and superglue or hot glue it the way you did. It goes really fast that way. Then transfer to the wood....measure in between the left and right sides so you know how much should be between them and you are done.
Good write up though!
Good write up though!
Thread Starter
Fearless DIY Guy
iTrader: (2)
Joined: Jan 2008
Posts: 3,003
Likes: 376
From: Jersey 'Burbs
Anytime, my friend. If you have any questions during your attempt, feel free to give me a shout.

Thread Starter
Fearless DIY Guy
iTrader: (2)
Joined: Jan 2008
Posts: 3,003
Likes: 376
From: Jersey 'Burbs
 , so I'm here for some good info now. (dip in here to check it out https://acurazine.com/forums/showthr...819556&page=10)
I'll be here more often these days, gotta figure out wtf is going on...and catch up on your ride, of course!
Joined: Sep 2008
Posts: 78,249
Likes: 20,202
Indeed, my friend. These poor saps have all had to settle for my sorry excuse for wit and sarcasm in your absence. 
Tires, huh?!?! But you had it aligned?!
I went with continental contiextreme dw's and couldn't be happier, maybe look into the dws's?!!? I know Steven Bell swears by his.
Tires, huh?!?! But you had it aligned?!
I went with continental contiextreme dw's and couldn't be happier, maybe look into the dws's?!!? I know Steven Bell swears by his.

Intermediate
Joined: Dec 2010
Posts: 25
Likes: 2
From: Ottawa
For anyone who's ever slapped a sub in their trunk, I'm quite sure at some point in time you've asked yourself, "Should I do anything other than just tossing the equipment in there?" Well, there's plenty of members whom have done AMAZING work on their trunk, but you may be one of those guys whom took a good look at the trunk, looked at all the angles and thought, "YEAH, OK." and walked away none the wiser.
Well, I'll share with you one technique ANYONE can use and get you some damn good results for a very low cost. What I am going to detail is one approach to fabricating a beauty panel for the trunk. Let's proceed.
Props to Jamie (jplt04), you gave me the inspiration for this after I reviewed your approach to horizontal angles.
THEORY
If you examine the angles of the trunk, it's easy to see that accurately conforming to the shape is no easy task. I had thought of modeling the curves at one point in time, when it dawned upon me that the very math I was doing, and integral, aka a REIMANN SUM, could easily be replicated IRL with Popsicle sticks! Let's roll.
STEP 1 - CENTERLINE MARKINGS
Position your box and mark the centerline. THIS IS VERY IMPORTANT, DO NOT RUSH THIS STEP! Once you have your centerline marked, use some painter's tape to mark the line where the fron of your box will be.

STEP 2 - THE REIMANN SUM
A Reimann sum works by approximating the area under a curve through a series of boxes, if you will - we're going to do the same. Using popsicle sticks, stack them atop of one another using a hot glue gun and trace the shape of the curve you're going to need to cover with the panel. Taoe the first stick parallel to the centerline tape and start stacking.
You're going to stack the popsicle sticks IN A STRAIGHT STACK, GOT IT?! A STRAIGHT STACK. THIS ISN'T ROCKET SCIENCE, MAKE IT STRAIGHT UP. Push each stick to the left until it stops against the panel and walk it up to the top.


STEP 3 - TEST FITTING
Now take the piece and trace out the stack.

Test fit 'er up.

From here you can now go back and cut some new cardboard to fill if necessary.
STEP 4 - CENTERLINE MARKING FOR CUT
Remember that all-important center line I spoke of earlier? Well, here's where it really comes in to play. Once you're happy with your cardboard cuts, mark the center line of the board w/ the CL of the tape - THIS TELLS YOU WHERE TO MIRROR THE PANEL, AND HOW WIDE YOUR PANEL WILL BE.

STEP 5 - FINAL EXAM
Trace your carboard on your panel - I'm using 1/8" mason board since I need to bend this fucker to get it in (figures I'm at the widest point)
AFTER THIS STEP YOU ARE ESSENTIALLY DONE AND CAN MODIFY YOUR HOLES/PLEXIGLASS/LIGHTS AS YOU SEE FIT! HOPEFULLY THIS SHOWS YOU HOW TO APPROACH THE ANGLES!


STEP 6 - SUBHOLE
I really, REALLY suck at cutting holes in boards. REALLY suck. Here's my crap attempt. This will vary depending on your setup, but this is one method.

STEP 7 - FINAL REVIEW AND CLEAN-UP
Ok, well, it's damn good. Not perfect, but damn good. I still have plenty of board left over, and seeing as how the hard part is done, I will trace and cut a new one with cleaner angles and add maybe some cool plexiglass and whatnot. I'll post some more pics later once I determine how I want to liven it up, but I'm DAMN happy with the fit.


Well, I'll share with you one technique ANYONE can use and get you some damn good results for a very low cost. What I am going to detail is one approach to fabricating a beauty panel for the trunk. Let's proceed.
Props to Jamie (jplt04), you gave me the inspiration for this after I reviewed your approach to horizontal angles.
THEORY
If you examine the angles of the trunk, it's easy to see that accurately conforming to the shape is no easy task. I had thought of modeling the curves at one point in time, when it dawned upon me that the very math I was doing, and integral, aka a REIMANN SUM, could easily be replicated IRL with Popsicle sticks! Let's roll.
STEP 1 - CENTERLINE MARKINGS
Position your box and mark the centerline. THIS IS VERY IMPORTANT, DO NOT RUSH THIS STEP! Once you have your centerline marked, use some painter's tape to mark the line where the fron of your box will be.
STEP 2 - THE REIMANN SUM
A Reimann sum works by approximating the area under a curve through a series of boxes, if you will - we're going to do the same. Using popsicle sticks, stack them atop of one another using a hot glue gun and trace the shape of the curve you're going to need to cover with the panel. Taoe the first stick parallel to the centerline tape and start stacking.
You're going to stack the popsicle sticks IN A STRAIGHT STACK, GOT IT?! A STRAIGHT STACK. THIS ISN'T ROCKET SCIENCE, MAKE IT STRAIGHT UP. Push each stick to the left until it stops against the panel and walk it up to the top.
STEP 3 - TEST FITTING
Now take the piece and trace out the stack.
Test fit 'er up.
From here you can now go back and cut some new cardboard to fill if necessary.
STEP 4 - CENTERLINE MARKING FOR CUT
Remember that all-important center line I spoke of earlier? Well, here's where it really comes in to play. Once you're happy with your cardboard cuts, mark the center line of the board w/ the CL of the tape - THIS TELLS YOU WHERE TO MIRROR THE PANEL, AND HOW WIDE YOUR PANEL WILL BE.
STEP 5 - FINAL EXAM
Trace your carboard on your panel - I'm using 1/8" mason board since I need to bend this fucker to get it in (figures I'm at the widest point)
AFTER THIS STEP YOU ARE ESSENTIALLY DONE AND CAN MODIFY YOUR HOLES/PLEXIGLASS/LIGHTS AS YOU SEE FIT! HOPEFULLY THIS SHOWS YOU HOW TO APPROACH THE ANGLES!
STEP 6 - SUBHOLE
I really, REALLY suck at cutting holes in boards. REALLY suck. Here's my crap attempt. This will vary depending on your setup, but this is one method.
STEP 7 - FINAL REVIEW AND CLEAN-UP
Ok, well, it's damn good. Not perfect, but damn good. I still have plenty of board left over, and seeing as how the hard part is done, I will trace and cut a new one with cleaner angles and add maybe some cool plexiglass and whatnot. I'll post some more pics later once I determine how I want to liven it up, but I'm DAMN happy with the fit.

Thread
Thread Starter
Forum
Replies
Last Post
rockyboy
2G RDX (2013-2018)
171
Aug 4, 2024 10:35 AM
handsom-hustla
Car Parts for Sale
70
Nov 13, 2015 05:04 PM
Oakes
Wash & Wax
10
Oct 12, 2015 11:17 AM