
A-Spec rear underspoiler alignment

Thread Starter
#1 Super Guy!
Joined: May 2007
Posts: 2,337
Likes: 512
A-Spec rear underspoiler alignment
Hey everyone,
I recently received my A-spec underspoiler kit and have saved the best part for last. The rear underspoiler. Now having browsed many many pictures, I've noticed most rear lips seems to sit much further below the horizontal line between the bumper and the quarter panel. The instructions clearly emphasise that the lip should line up even with this spot. After much searching, I've found that nobody seems to detail this portion of the install.
Normally I wouldn't care and simply install like everyone elses about a quarter to a half inch low. But my rear bumper has nasty scratches in this area and really want to makes sure these get covered up (so does my wife). Anyways, here is reference pics of the Team Honda Resarch "Thunderhill" car. This was assembled by the folks that actually designed the TL, so I'm sure they put it together extra correct...


Here is a image of the stupid part of the instruction manual (and a link to the pdf). The questionable area is setp #7 that describe preparing to make a new hole nearby an existing hole. And step #8 that shows you drilling into a bracket that doesn't get attached till step 10 or 11. In fact, you haven't even put the bumper back on the car at this point!!! WTF?
http://photos.imageevent.com/astrobo...er_spoiler.pdf

Any insight would make me a happy dude...
I recently received my A-spec underspoiler kit and have saved the best part for last. The rear underspoiler.
Now having browsed many many pictures, I've noticed most rear lips seems to sit much further below the horizontal line between the bumper and the quarter panel. The instructions clearly emphasise that the lip should line up even with this spot. After much searching, I've found that nobody seems to detail this portion of the install.Normally I wouldn't care and simply install like everyone elses about a quarter to a half inch low. But my rear bumper has nasty scratches in this area and really want to makes sure these get covered up (so does my wife). Anyways, here is reference pics of the Team Honda Resarch "Thunderhill" car. This was assembled by the folks that actually designed the TL, so I'm sure they put it together extra correct...
Here is a image of the stupid part of the instruction manual (and a link to the pdf). The questionable area is setp #7 that describe preparing to make a new hole nearby an existing hole. And step #8 that shows you drilling into a bracket that doesn't get attached till step 10 or 11. In fact, you haven't even put the bumper back on the car at this point!!! WTF?
http://photos.imageevent.com/astrobo...er_spoiler.pdf
Any insight would make me a happy dude...
Last edited by 94eg!; Mar 29, 2012 at 04:28 PM.

Instructor
Joined: Apr 2009
Posts: 213
Likes: 20
From: Los Angeles
you're making a new hole so you can get to the mounting screws of the bracket... i want to completely apologize for how dirty my car is. i know i can do better... hahaha

in measuring i was off by a few eighths. this was the best i can do.

as you can see the bumper is separating from the lip. i'm going to redo it and hopefully i can pull the lip up a little more.
i know i can do better... hahaha in measuring i was off by a few eighths. this was the best i can do.
as you can see the bumper is separating from the lip. i'm going to redo it and hopefully i can pull the lip up a little more.
Thread Starter
#1 Super Guy!
Joined: May 2007
Posts: 2,337
Likes: 512
Oh, so that extra hole is to allow removal of the bumper assembly with the spoiler still stuck to it (at a later date)? Those photos help to understand quite a bit thanks. Especially since the purpose of this hole is not explained in the instructions. So you could easily get away without drilling that hole until you actually need to remove the rear bumper correct?
So the thing I still don't understand is how you can adjust the height of the rear lip. Since your only using the manufactured holes to mount it, how are some able mount right up to the line?
I imagine there's some give in the holes and perhaps you could tweak the brackets.
Perhaps you can tweak the bracket just enough before pulling the tape off and sticking it down?
Thread Starter
#1 Super Guy!
Joined: May 2007
Posts: 2,337
Likes: 512
Okay cool. So I assume the bottom-most bracket screw is unobstructed then. Now I'm actually looking forward to this.
I'm gonna monkey around with these brackets until I get the thing right where i want it. Only then am I gonna stick it down. I gotta post some pictures of the scratches on my lower bumper so you guys can see why I'm so concerned... Hopefully when I'm done this will be a nice little thread with all the details about getting these things aligned just right.
I'm gonna monkey around with these brackets until I get the thing right where i want it. Only then am I gonna stick it down. I gotta post some pictures of the scratches on my lower bumper so you guys can see why I'm so concerned...
Hopefully when I'm done this will be a nice little thread with all the details about getting these things aligned just right.
Last edited by 94eg!; Mar 29, 2012 at 07:08 PM.


Trending Topics
 I drilled the hole on the side where the template was and it still isn't up to the quarter panel. It's still the same gap like JETSPD


i got my rear lip to line up very close to that line on the bumper. i'll post a pic later.
it's best to have 2 people on the job, so one can line it up and one can tighten everything down.
it's best to have 2 people on the job, so one can line it up and one can tighten everything down.
Needs a 930
Joined: Feb 2012
Posts: 5,146
Likes: 759
From: Texas
Did mine last weekend and have a gap. I tried researching it and from what I understood there is a gap regardless? Maybe I didn't research enough but I have about a 1/2" gap but it still looks good.
Thread Starter
#1 Super Guy!
Joined: May 2007
Posts: 2,337
Likes: 512
After searching around, it seems that even Acura's best example (with the excption of the Thunderhill car in the 1st post) has a tiny 1/8" gap. And this is what is shown in the sales brochure photos for the kit. Even the 2004 test mule cars have a varying amounts of gap at the back:
Acura's magazine test cars:
http://www.car-specifications.net/Au...8-Gallery.html
Acura's A-spec brochure photo (click pic to enlarge):

Acura's magazine test cars:
http://www.car-specifications.net/Au...8-Gallery.html
Acura's A-spec brochure photo (click pic to enlarge):
its hard to tell on the thunderhill car since its two different colors. but i have that small gap also and im fine with it. i thought the same thing you did and tried to move it up but i realized that it wasnt budging so i just left it alone.
Thread Starter
#1 Super Guy!
Joined: May 2007
Posts: 2,337
Likes: 512
 Had to shave off the very upper most corners of the bumper closest to the wheel. Then I had to oval out the holes that connect the brackets to the bumper to move them a ~1/4" higher. Now the lip mounts flush to the bumper line.
It's gonna take a little work this afternoon, but I feel I can make it perfect. I just hope that double-sided tape can hold cause I can tell moving it up makes for a tighter fit running down the side.
Thread Starter
#1 Super Guy!
Joined: May 2007
Posts: 2,337
Likes: 512
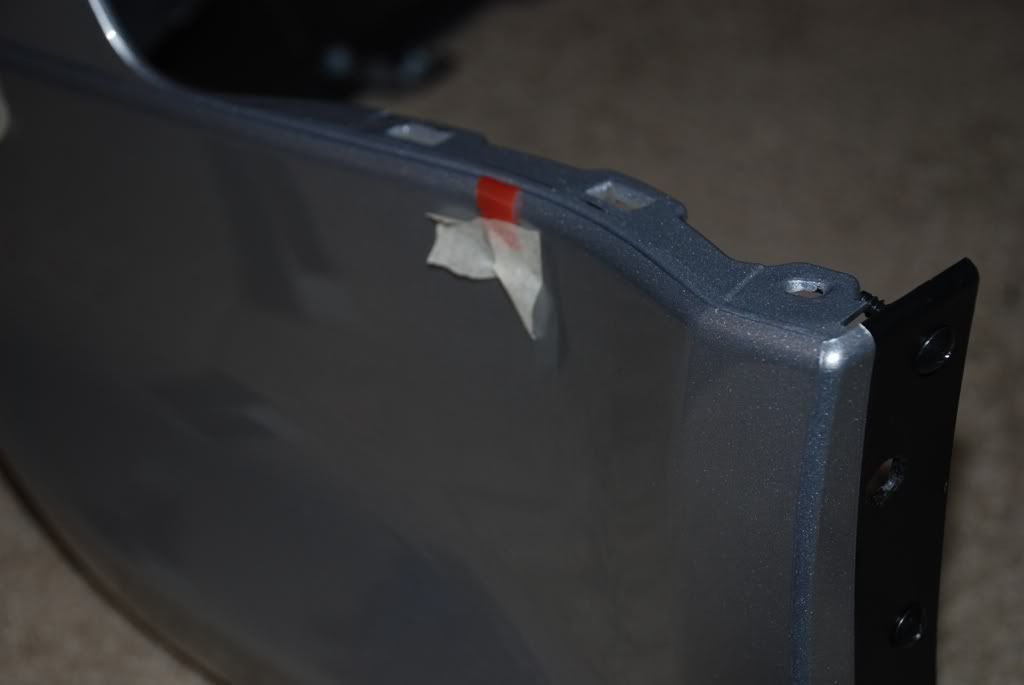
Okay I'm finally ready to bolt this thing onto the car. Here is how I trimmed the rear bumper to let the lip slide up to the seam. I used a utility knife and sliced upward shaving off a little at a time. Then I cut a very small notch at the very top so shape of the lip would kinda hook onto it at the top.

Here's a picture of the mock-up with all the bolts installed. Looks nice & flush. I hope that stupid tape holds. :/ I did sand the surface of the bumper where the tape will stick and cleaned the hell out of it with denatured alcohol. I plan on scrubbing the surface with alcohol one more time before I finally stick everything down. (fingers crossed)
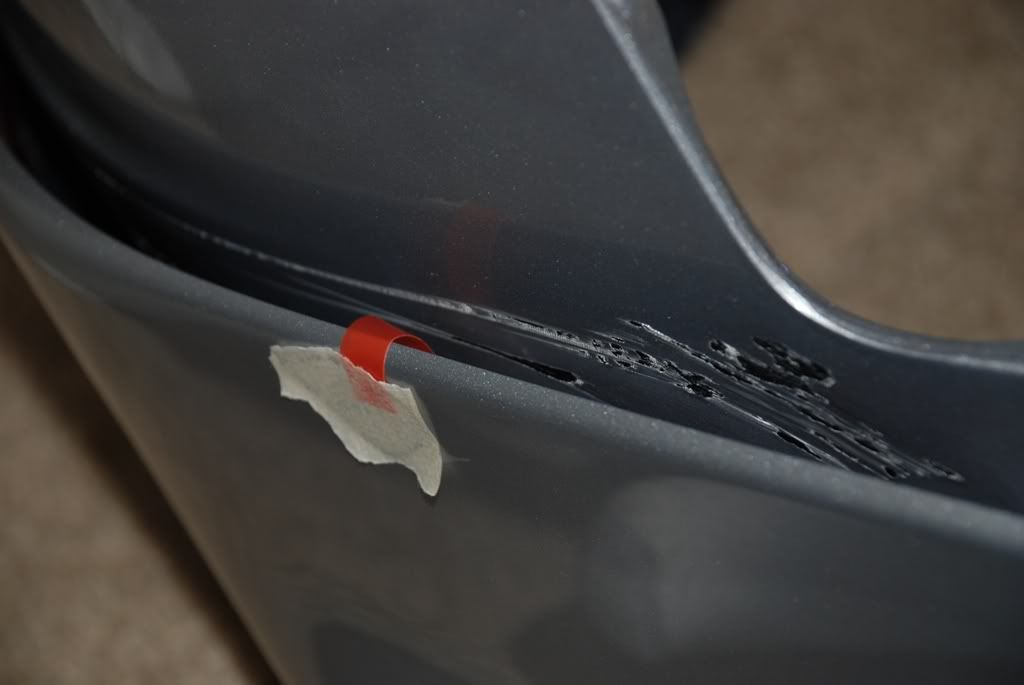
Oh, and here is what all the fuss was about. This is the nasty scratches I had on the lower bumper. In the normal position, one spot would just barely stick above the lip. This is why I decided to do all this BS. If your not trying to cover something up, then I wouldn't recommend bothering with any of this. Just bolt it on and go.
Here's a picture of the mock-up with all the bolts installed. Looks nice & flush. I hope that stupid tape holds. :/ I did sand the surface of the bumper where the tape will stick and cleaned the hell out of it with denatured alcohol. I plan on scrubbing the surface with alcohol one more time before I finally stick everything down. (fingers crossed)
Oh, and here is what all the fuss was about. This is the nasty scratches I had on the lower bumper. In the normal position, one spot would just barely stick above the lip. This is why I decided to do all this BS. If your not trying to cover something up, then I wouldn't recommend bothering with any of this. Just bolt it on and go.
Wow you have a 1/2 inch gap? Do you have a picture of your rear a-spec lip kit?

I don't think I've seen anyone's rear lip sit as flush as mine does after I fixed it. It's got pretty much no gap. I'll post a pic of it when I get a chance. It's even more flush than the model pic of the TL a couple posts up
The rear aspec lip should sit flush with the line, but not cross the line. You break the rubber seal created if you have it sitting slightly higher than that horizontal line whether the bumper and quarter panel meet.

Thread Starter
#1 Super Guy!
Joined: May 2007
Posts: 2,337
Likes: 512
Adding that rubber molding is cheating IMO.  I see you have a Type-S, so perhaps that's standard. Of course it's hard to compare the Type-S parts to the Base parts as every component is different.
Unfortunately you have to modify the bumper to get a base rear lip completely flush. It's definitely made to sit 1/4"-1/2" below the seam.
I see you have a Type-S, so perhaps that's standard. Of course it's hard to compare the Type-S parts to the Base parts as every component is different.Unfortunately you have to modify the bumper to get a base rear lip completely flush. It's definitely made to sit 1/4"-1/2" below the seam.
Last edited by 94eg!; Jul 29, 2013 at 04:04 PM.
The rubber molding helps divert water away from getting between the bumper and the lip and weakening the 3M tape. I think it's best that it sit flushly below the line so that you maintain a consistent seal if that makes sense. If it crosses that line, water can get down in it.

Thread
Thread Starter
Forum
Replies
Last Post