
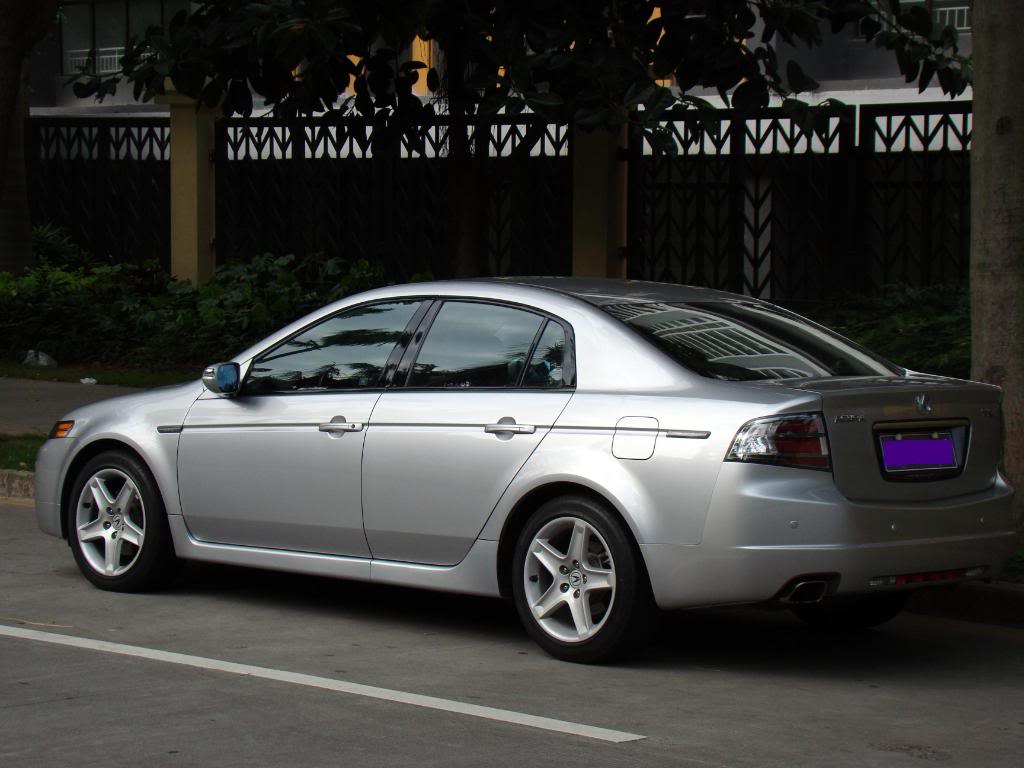
The Official OEM Tail Light Difference Thread


Seeing another thread asking about tail lights made me want to create another �difference� thread, similar to the one I did for the A-Spec lip kit which can be found here: https://acurazine.com/forums/3g-tl-2004-2008-93/unofficial-spec-difference-thread-853331/
****Before we begin...ALL 3G TL tail lights are interchangeable. Listed below are the different types.****
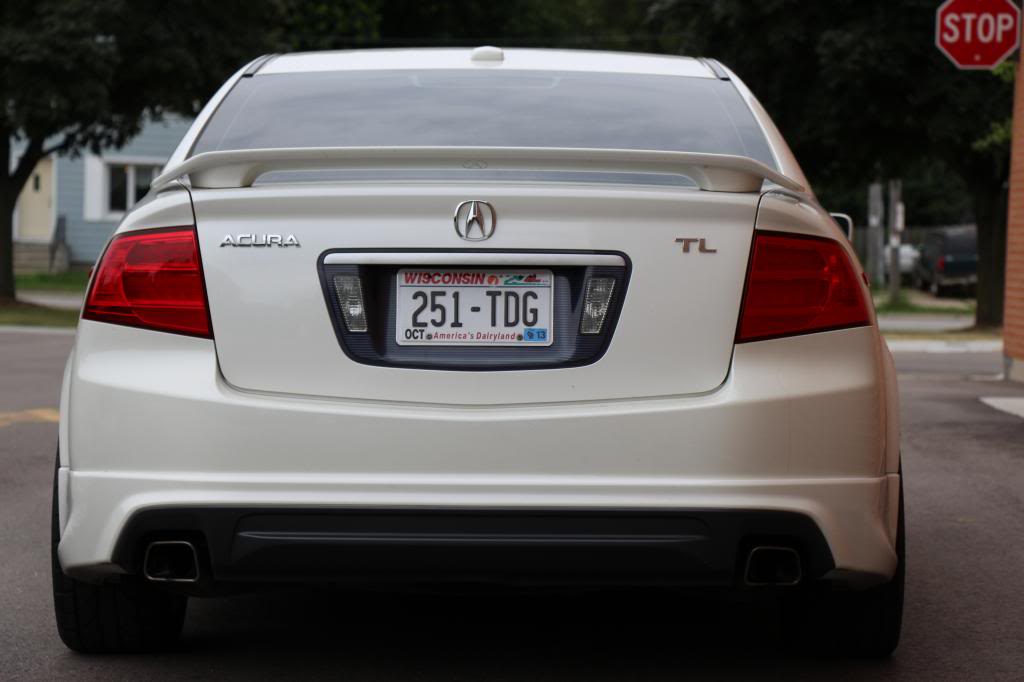
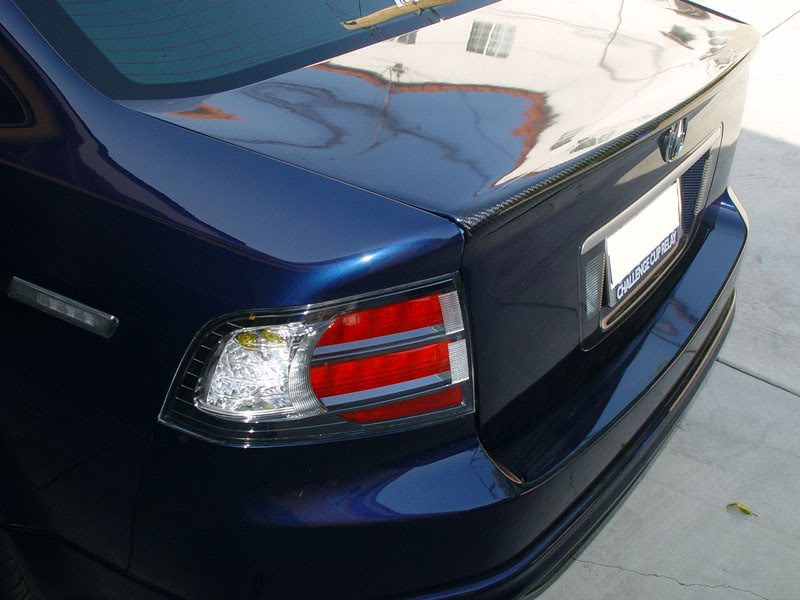
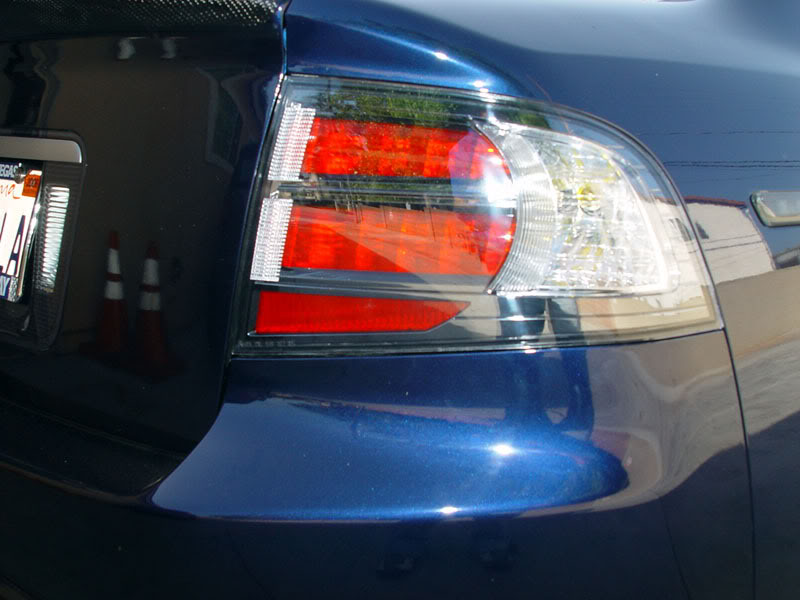
2004-2006 Tail Lights
- These tail lights are solid red and were equipped on every USDM 2004-2006 TL. The whole outer lens is red while the reflector, turn signal, and area in front of the LEDs are clear. The housing/bezel is chrome.


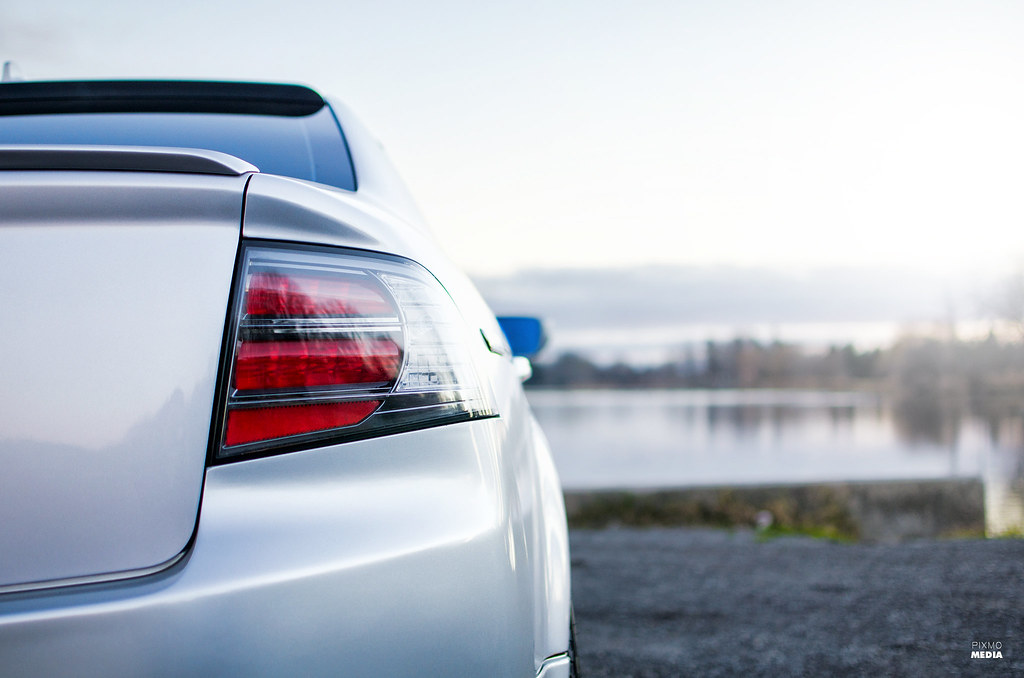
2007-2008 Base Tail Lights
- These tail lights were on every 07-08 NON-TL Type-S. Compared to the 04-06 lights, the outside lens is clear, meaning if you take apart the assembly, the only red parts are the housing, lower reflector, and the corner turn signal piece. Also, you�ll notice that the area in front of the LEDs is clear.

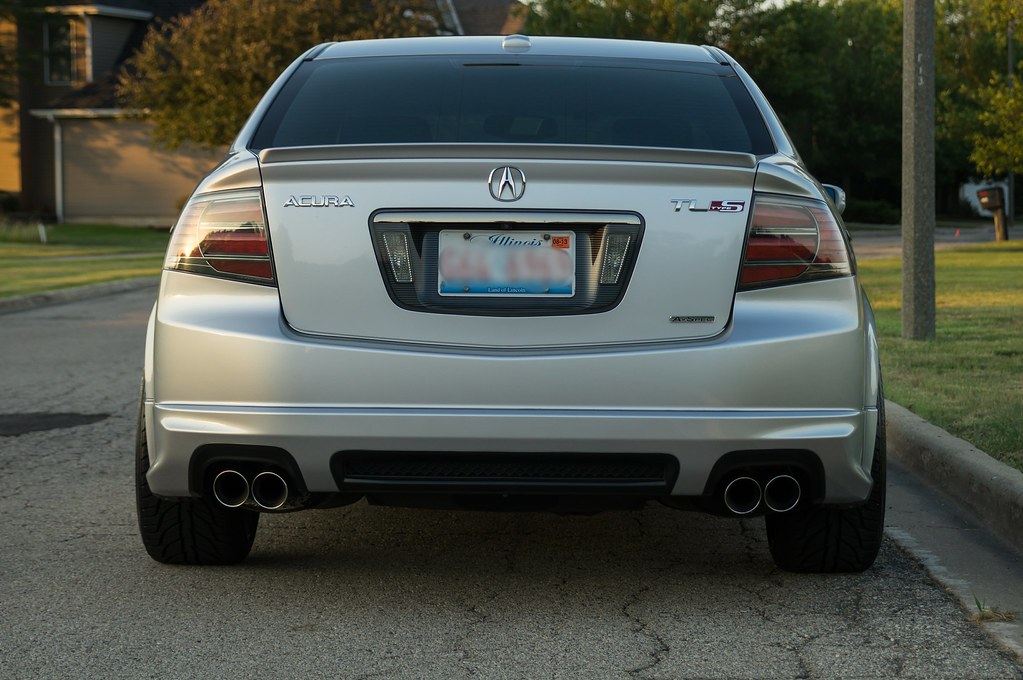
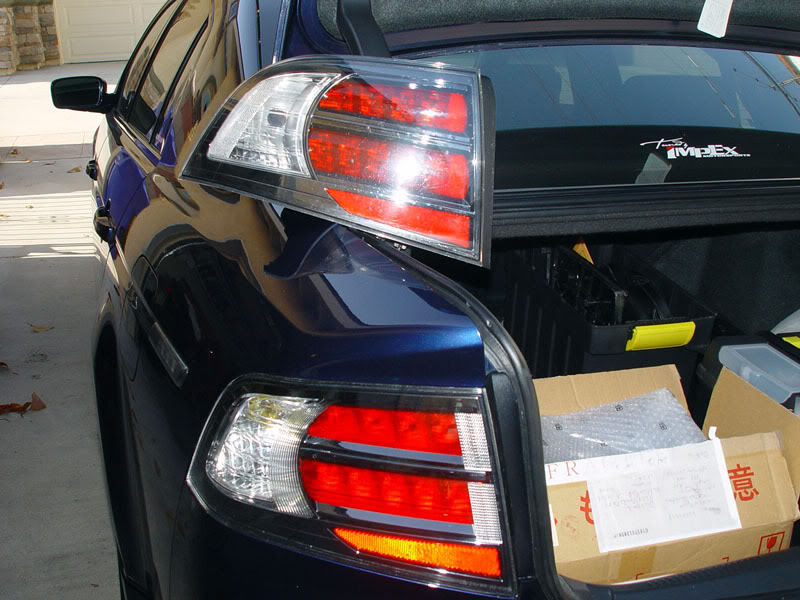
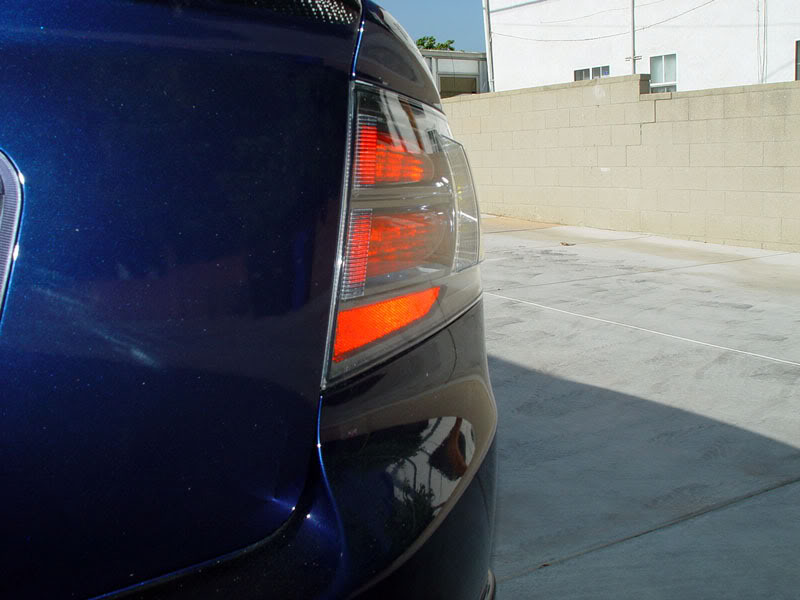
2007-2008 Type-S Tail Lights
- These tail lights have a dark chrome housing compared to the red or bright chrome housing on the 04-06 and 07-08 Base lights. Just like the 07-08 Base tails, the outer lens is clear, but the area in front of the LED board is red, as well as the turn signal and lower reflector. These tail lights were standard ONLY on Type-S models.

2006-2008 CDM (Chinese Domestic Market) Tail Lights
- The CDM tail lights are the least common out of the 4 total. They are most similar to the Type-S tails but these have a clear corner lens for the turn signal, meaning you could swap in an amber bulb if desired. Also, these tails have an extra set of reflectors, mounted vertically where the LEDs are. They mount to the car the exact same way and have the same connecting wires on the back.
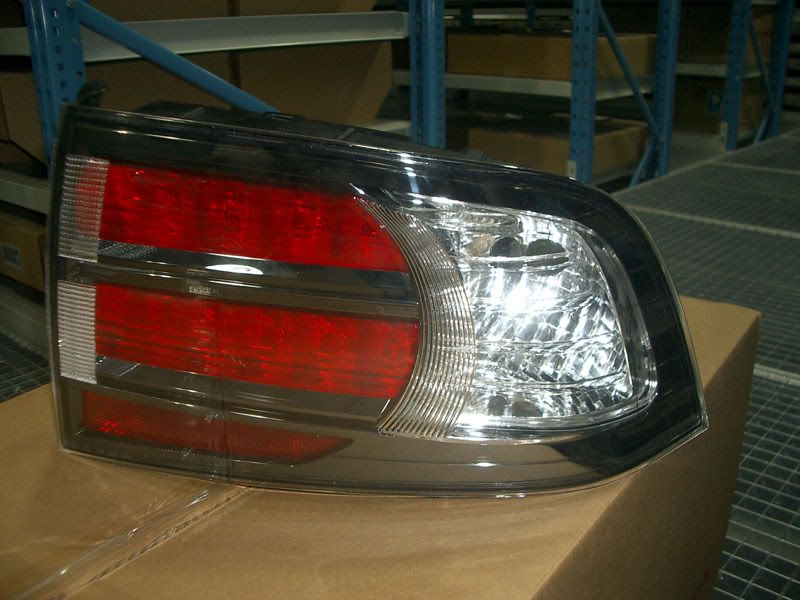

*The picture above does not show actual CDM tails, rather ones that were modified to look similar. You can see that the vertical clear reflectors are missing. I had a hard time finding actual CDM tails installed

- When it comes to installing your new tail lights, the install is exactly the same no matter which housing you bought. This DIY is from �jnc2000� that is in the 3G Garage here: https://acurazine.com/forums/3g-tl-2004-2008-93/g-094-diy-installing-type-s-tail-lights-716996/
- Small flat head screwdriver
- #2 Phillips screwdriver
- Jack and jack stands
- 10mm wrench / socket
- 8mm wrench
- helper
NOTE: These pictures do show bumper removal with the A-spec kit installed. If you do not have the A-Spec kit you're proccess will be slightly different.
The first step is to jack the vehicle up. Make sure to use jack stands.


After the vehicle is secure, you'll want to remove the screws securing the rear bumper to the vehicle behind the wheels. You may need to remove the rear wheels thus was my reasoning for jacking the car up in the first place.


Next, pop open the trunk. Take note of the two smaller plastic covers in the bottom corner. You'll need to pop these off with a small flat head screwdriver take care not to scratch the paint. Behind the cover you'll see a 10mm bolt. Remove the bolt from both sides.


Next step is to remove the 10mm bolts from the bottom of the bumper. In these pictures, take note at the black bolts, not the silver screws. You'll want to remove all the bolts.
--This is where the A-spec and base bumper will differ. The base bumper you'll also be removing some additional screws / plastic pieces.


This is the part where you'll need a helper. After taking all the screws off you'll want to start at each corner and gently pry the bumper cover off. You'll feel/hear it snap off - thats good you want that. It sits into plastic grooves and you'll need to work it out of those grooves. When its all loose you'll know.. take the bumper and set it aside.
This next picture already shows the light removed... but I'll use it for illustrative purposes. I'll show the removal of the light below.

Next, you'll want to remove the stock light. You'll repeat this process for both sides... so it doesn't matter which side you start on. There are two 10mm bolts and 1 Philips screw you need to remove. on the outside. the screw goes up into the light itself, and the bolts into the car body. Start by remove these three pieces of hardware.

Next, on the inside you'll want to remove the 8mm bolts that are threaded onto securing the light to the interior sheet metal. There are a total of 4 per side. Once all these are removed, unplug the wiring harness and the light should just pop off.


With the light off the next step is swapping the LED board. There are 4 small Phillips screws that you'll need to remove. When you are swapping the LED removing the LED board, make sure you remove the foam grommets too as you'll need to reuse them when you install the new light.


Next, you'll want to reinstall and route the small plug from the stock light into the Type-S tails. This can be tricky so take your time.


Reinstall the LED board - put the screws back in and make sure to reuse the foam gaskets. To install the light - go in the reverse order from the initial removal. Take care not to over tighten any bolts.
Repeat these steps for both lights.
Grab your friend and put the bumper back on. Loosely fit the bumper on the vehicle and check alignment. then press the bumper into the fittings. You'll hear it snap into place. Reinstall all the hardware and sit back and enjoy the fruits of your labor.
- If you�re interested in modifying your tail lights yourself, look under �Section G � Lighting� of the 3G Garage here: https://acurazine.com/forums/3g-tl-2004-2008-93/3g-tl-garage-faq-3g-tl-newbies-553554/
- There are multiple vendors who can modify your tail lights for a fee if you�re not up to the task. If you�re not sure how you would like you tail lights to look, please look at this thread for ideas: https://acurazine.com/forums/3g-tl-photograph-gallery-96/custom-tail-light-pictures-only-876026/
*If I used a picture owned by you and you would like it removed, please let me know and I�ll have a moderator edit my post. I used your picture strictly for educational purposes.
*If you see that any of the above information is incorrect, please let me know so it can be corrected.
**Big thanks to jnc2000 and KB1Spec for information found in their threads and their pictures

Last edited by CLtotheTL32; Aug 23, 2013 at 04:01 PM.


Trending Topics


Actually you don't need to take out the whole rear bumper. When I did my I just loosen some bolts on the bumper and barely enough space to use my socket wrench and nudge in to loosen the bolts of the bracket of the tail lamp.
Good info, but in the bumper removale DIY you do not need to completely remove the bumper as it states. Infact, all you have to do is pull out the upper portion of the bumper just enough to get to the two bolts under each tail light.


Depending on how you look at it. Its not worth getting it. I see some floating around on Ebay selling copies of the CDM style tail light. I used to do tail lamp conversion back in the days where I swap out the outer lens of the base TL tail lamp with the TL-S tail lamp
Head a da Family
Joined: Jul 2003
Posts: 5,505
Likes: 568
From: New Friggin Jerzy
Where can I purchase the 2006-2008 CDM (Chinese Domestic Market) Tail Lights? All TL's should have had amber turn signals!
I see someone is selling only the driver's side on ebaY. Asking them where I can get the other side is like talking to a brick wall.
.
.
I see someone is selling only the driver's side on ebaY. Asking them where I can get the other side is like talking to a brick wall.
.
.
Three Wheelin'


Joined: Apr 2015
Posts: 1,298
Likes: 257
From: Grand Rapids, MI
I think everyone and their brother has tried asking that eBay seller for the passenger side. I can confirm that they responded to me a looong time ago saying that they do not have the passenger side available.
Good luck lol
Good luck lol
Last edited by wusty23jd; Sep 5, 2018 at 04:30 PM.


Head a da Family
Joined: Jul 2003
Posts: 5,505
Likes: 568
From: New Friggin Jerzy
I was one of those people. I called them to ask and remember getting a brain dead pleeb on the other end of the phone.
Late to the 3G Party
Joined: Mar 2016
Posts: 291
Likes: 246

Late to the 3G Party
Joined: Mar 2016
Posts: 291
Likes: 246
Late to the 3G Party
Joined: Mar 2016
Posts: 291
Likes: 246