

My modding mistake of the day
 09-19-2012, 05:07 PM
#1
contemplating future mods
Thread Starter
iTrader: (4)
I'm sure that we have all made mistakes while modding our cars... That is how we learn, Right? I figure that I could make a thread about the mistakes that we have made and by doing so, we could help to try a prevent others from making the same mistakes that have already been made. I'll post my story with the lesson that I had learned at the end 
I should have searched a bit more before spending the money... but I didn't I had no idea that the Covers for the engine bay are different between the 04-06 TL and my 08 TL-S... Maybe the TL-S covers are different then the base TL covers... Please tell me that I am not the only one who thought that the engine plastics were the same for all 3G TL's. [/B]
Anyway, i just purchased CF engine bay covers from another member. I really love the CF ( maybe just as much as our favorite Steven Bell)... I figured that the new pieces would look great if i decided to go to any meets/car shows. The package arrived and the member did a great job of packing the parts. I went to install... and realized that they weren't fitting right. I went into my attic (where I keep all my stock parts that have been taken off or upgraded) and realized that Acura made a little change in the design of the "plastics." Now I am out the cost for the Carbon Fiber engine bay covers I'll post up some pictures when I get home to my camera. I just had to vent a little about my stupidity...
Moral of the story/lesson learned:
The engine bay plastics are not the same for the 08 TL-S as they are for earlier 3G models
I should have searched a bit more before spending the money... but I didn't
I had no idea that the Covers for the engine bay are different between the 04-06 TL and my 08 TL-S... Maybe the TL-S covers are different then the base TL covers... Please tell me that I am not the only one who thought that the engine plastics were the same for all 3G TL's. [/B]Anyway, i just purchased CF engine bay covers from another member. I really love the CF ( maybe just as much as our favorite Steven Bell)... I figured that the new pieces would look great if i decided to go to any meets/car shows. The package arrived and the member did a great job of packing the parts. I went to install... and realized that they weren't fitting right. I went into my attic (where I keep all my stock parts that have been taken off or upgraded) and realized that Acura made a little change in the design of the "plastics." Now I am out the cost for the Carbon Fiber engine bay covers
I'll post up some pictures when I get home to my camera. I just had to vent a little about my stupidity...Moral of the story/lesson learned:
The engine bay plastics are not the same for the 08 TL-S as they are for earlier 3G models
 09-19-2012, 05:45 PM
#3
Suzuka Master
Ya thats rough maybe you will have better luck trying to sell them to another member
09-19-2012, 05:45 PM
#4
Suzuka Master
yeah TL-S and base have differences in plastic engine cover.
09-19-2012, 06:42 PM
#7
Yes. They're not the same
BUT
With minimal effort you can easily swap engine covers from different models.
I just intstalled a Type-S engine cover on my 04.
The engine covers are different and so are the brackets. You could easily sell the CF engine cover, or just buy the bracket for 04-06 engine covers from DelRay Acura. I think its like 25$.
Here are pics for comparison. Note where the Type-S engine cover screws are (only 2 on the far ends) The Base 04-06 engine cover has three in the middle. That is why you need to replace the bracket. Its directly bolt on, 2 bolts and both brackets have the bolt holes in the same place. Its a very easy swap.
04-08 engine cover & bracket

Type-S Engine cover:

BUT
With minimal effort you can easily swap engine covers from different models.
I just intstalled a Type-S engine cover on my 04.
The engine covers are different and so are the brackets. You could easily sell the CF engine cover, or just buy the bracket for 04-06 engine covers from DelRay Acura. I think its like 25$.
Here are pics for comparison. Note where the Type-S engine cover screws are (only 2 on the far ends) The Base 04-06 engine cover has three in the middle. That is why you need to replace the bracket. Its directly bolt on, 2 bolts and both brackets have the bolt holes in the same place. Its a very easy swap.
04-08 engine cover & bracket
Type-S Engine cover:
Last edited by quanaman; 09-19-2012 at 06:44 PM.
Trending Topics
09-19-2012, 06:54 PM
#8
contemplating future mods
Thread Starter
iTrader: (4)
The engine cover itself was fine... As well as the plastic cover by the good latch. The ones that are different are the two closest to the windshield...
09-19-2012, 07:24 PM
#9
contemplating future mods
Thread Starter
iTrader: (4)
I know it is a horrible shot but it is dark and I only have my phone to take pictures... but you will get the point. In this shot you can see the different style of cover. The 08 type-s is the one on the bottom.
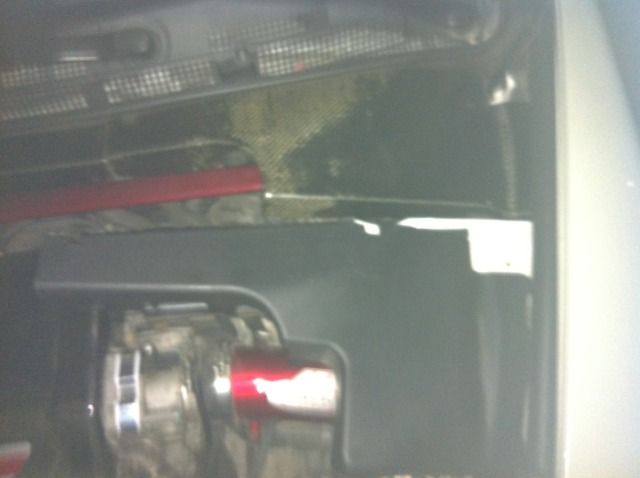
The CF cover makes contact with the fuse box and it doesn't sit right. Will it stay you ask... Yes, it will. Can I keep the covers??? Sure can... It is more of a disappointment on my end because I didn't research enough.
I still want to read some other members modding mishaps and mistakes...
The CF cover makes contact with the fuse box and it doesn't sit right. Will it stay you ask... Yes, it will. Can I keep the covers??? Sure can... It is more of a disappointment on my end because I didn't research enough.
I still want to read some other members modding mishaps and mistakes...
09-19-2012, 09:17 PM
#10
Team Owner
iTrader: (2)
Join Date: Jan 2008
Location: Kansas City, MO (Overland Park, KS)
Posts: 36,545
Received 6,470 Likes
on
5,162 Posts
Morrissey, sorry about this. I hope this all works out well. And trust me, I know what Carbon Fiber can do to a man....
09-19-2012, 11:32 PM
#13
A member here on Azine talked about the switchback LED turn signals and how great they were, even provided a link to the product.
I clicked the link and bought the LEDs trusting the person linked the product that they purchased. $80 worth of orders later the fitment guide tells me I ordered the wrong part number.
The moral is verify! Don't trust it's right, make sure first.
I clicked the link and bought the LEDs trusting the person linked the product that they purchased. $80 worth of orders later the fitment guide tells me I ordered the wrong part number.
The moral is verify! Don't trust it's right, make sure first.
09-20-2012, 11:36 AM
#15
contemplating future mods
Thread Starter
iTrader: (4)
A different blunder that I had was that I ordered HT-Spec Chassie Bracing form another member. I installed the side rails but encountered a problem with the front and rear braces. Because I had an aftermarket exhaust (RV-6 J-Pipe and True Dual Exhaust), the bracing did not fit. I tried to use spacers on the front brace but in the end it wasn't worth it. The vibration of the J-pipe and the brace was rediculous. I didn't even try to modify the rear brace.
Moral: HT-Spec Chassie bracing (Front and Rear) is not compatible with an after market exhaust
Moral: HT-Spec Chassie bracing (Front and Rear) is not compatible with an after market exhaust
09-20-2012, 11:50 AM
#16
those are simple mistakes and a little time to verify and or confirm can help.
try pouring the wrong fluid into your brake master cylinder reservoir....fucking up all the rubber seals inside the MC.
or
using a jack, I tried to lower the car off the jack stands....
the jack slipped and punched a hole into the radiator....
I have many others.
try pouring the wrong fluid into your brake master cylinder reservoir....fucking up all the rubber seals inside the MC.
or
using a jack, I tried to lower the car off the jack stands....
the jack slipped and punched a hole into the radiator....
I have many others.
The following 2 users liked this post by justnspace:
Morrissey25 (09-20-2012),
SharksBreath (09-20-2012)
09-20-2012, 12:27 PM
#18
BANNED
iTrader: (33)

one time i was replacing pressure switches and doing a 3x3 ATF drain and fill for a member here, and went to fill the ATF res with new fluid.
so i pour the new fluid into the funnel and the fluid would not drain out of the funnel, so i was like "what is going on here?". i looked down into the engine bay, and saw a big 19mm bolt labeled ATF still in place. apparently, i had taken off a transmission mount bolt that was directly next to the ATF fill bolt. whoops. at least his tranny mount is well lubricated now.
so i pour the new fluid into the funnel and the fluid would not drain out of the funnel, so i was like "what is going on here?". i looked down into the engine bay, and saw a big 19mm bolt labeled ATF still in place. apparently, i had taken off a transmission mount bolt that was directly next to the ATF fill bolt. whoops. at least his tranny mount is well lubricated now.
09-20-2012, 04:16 PM
#19
Drifting
iTrader: (1)
Join Date: Nov 2010
Location: Salt Lake City, UT
Age: 43
Posts: 3,490
Received 853 Likes
on
606 Posts
I've got a pretty good one. I wouldn't call it a modding mistake. More of a "learning experience".
I accidentally the whole thing. Plasti-dipped that is :
:
Before picture for reference:

After:


I used the method that Fonzi provides in his Youtube channel using the Wagner paint gun. It actually turned out pretty good. It took me probably 6 hours to prep, paint then remove overspray. It cost just shy of $200 after the gun, plasti-dip and thinner.
I did this about six weeks ago. I wasn't in love with it at first but it grew on me. However, I encountered a few problems over that time:
1. Plasti-dip is no where as durable as clear coat. What might normally buff out or not even scratch clear coat can cause a significant scuff or even a tear in the plast-dip. While this isn't a huge deal, repairing it is. Fonzi provided an instructional video on repairing plasti-dip but I just couldn't get it to work so well. Here's one of my many fixes that looks like crap. This happened when I rubbed up against the car and the button on the back of my pants peeled off the door:

I did my best to fix it but it looked like crap. That's just one of several. And don't try to put a new layer of plasti-dip over it plasti-dip is so anti-bonding with other compounds, that it's actually anti-bonding against itself. You'll find it rubbing or peeling off. You're left with one options. Peel the whole panel off and re-paint it which is a pain in the arse.
2. Plasti-dip sucks to clean. And yes, it gets dirty. Water spots stick out like a sore thumb. This goes for black at least. Eventually I began to armor-all my whole car, which worked pretty well. It made it look a bit glossier but didn't necessarily keep it from getting all crappy and dirty again.
3. Your door jams, underside of hood, trunk, etc. will be a different color. This isn't a huge deal, but it kind of bugged me to have a glossy silver door jam with a matte black car. Looked kind of ghetto. And forget about plasti dipping those. The friction and contact between the door and frame will rub it so you're just stuck with it.
So what was the solution? Strip the sh!t off:
Came off rather easy:

I should just leave it like this!!......not

After an hour:

Got 99% of it off after about two hours. Still have little specs under the door handles, between the lights and fenders, etc. I'll get those in time. Absolutely no harm to the paint. Looks as good as new
My little girl supported me in my cause:

But if I had to caption this is would probably be something like "Oh Daddy, you're such a dumbass".
I accidentally the whole thing. Plasti-dipped that is
:Before picture for reference:
After:
I used the method that Fonzi provides in his Youtube channel using the Wagner paint gun. It actually turned out pretty good. It took me probably 6 hours to prep, paint then remove overspray. It cost just shy of $200 after the gun, plasti-dip and thinner.
I did this about six weeks ago. I wasn't in love with it at first but it grew on me. However, I encountered a few problems over that time:
1. Plasti-dip is no where as durable as clear coat. What might normally buff out or not even scratch clear coat can cause a significant scuff or even a tear in the plast-dip. While this isn't a huge deal, repairing it is. Fonzi provided an instructional video on repairing plasti-dip but I just couldn't get it to work so well. Here's one of my many fixes that looks like crap. This happened when I rubbed up against the car and the button on the back of my pants peeled off the door:
I did my best to fix it but it looked like crap. That's just one of several. And don't try to put a new layer of plasti-dip over it plasti-dip is so anti-bonding with other compounds, that it's actually anti-bonding against itself. You'll find it rubbing or peeling off. You're left with one options. Peel the whole panel off and re-paint it which is a pain in the arse.
2. Plasti-dip sucks to clean. And yes, it gets dirty. Water spots stick out like a sore thumb. This goes for black at least. Eventually I began to armor-all my whole car, which worked pretty well. It made it look a bit glossier but didn't necessarily keep it from getting all crappy and dirty again.
3. Your door jams, underside of hood, trunk, etc. will be a different color. This isn't a huge deal, but it kind of bugged me to have a glossy silver door jam with a matte black car. Looked kind of ghetto. And forget about plasti dipping those. The friction and contact between the door and frame will rub it so you're just stuck with it.
So what was the solution? Strip the sh!t off:
Came off rather easy:
I should just leave it like this!!......not
After an hour:
Got 99% of it off after about two hours. Still have little specs under the door handles, between the lights and fenders, etc. I'll get those in time. Absolutely no harm to the paint. Looks as good as new
My little girl supported me in my cause:
But if I had to caption this is would probably be something like "Oh Daddy, you're such a dumbass".
The following users liked this post:
Morrissey25 (09-20-2012)
09-20-2012, 05:36 PM
#20
contemplating future mods
Thread Starter
iTrader: (4)
This shot reminds me of the Mercedes commercial.
Great story though. I was always curious how a plastidipped TL would look. I never thought about what a PITA it would be to maintain.
Great story though. I was always curious how a plastidipped TL would look. I never thought about what a PITA it would be to maintain.
 09-20-2012, 10:18 PM
#22
Drifting
iTrader: (1)
Join Date: Nov 2010
Location: Salt Lake City, UT
Age: 43
Posts: 3,490
Received 853 Likes
on
606 Posts
^ Yes, stick to that. I would not recommend doing the whole car like I did unless the paint was in very poor condition. In that case it might be worth the trouble to maintain. But if your paint is in even remotely good shape I would advise against it.
I don't regret doing it at all though. I lost a few hundred bucks and some time but hey, you live and learn I certainly got some heads turning. Matte black is certainly unique.
I don't regret doing it at all though. I lost a few hundred bucks and some time but hey, you live and learn
I certainly got some heads turning. Matte black is certainly unique.

Thread
Thread Starter
Forum
Replies
Last Post
TLDude876
Car Talk
134
12-28-2016 03:18 PM
BlkTxAcuraTypeS
Member Cars for Sale
3
10-18-2015 08:05 PM