
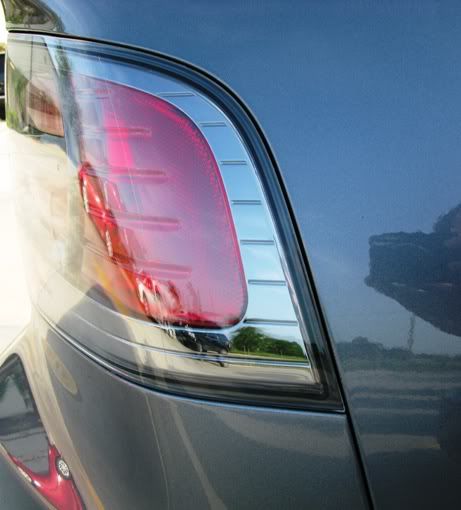
Pro
"Next, you'll want to reinstall and route the small plug from the stock light into the Type-S tails. This can be tricky so take your time."
can someone elaborate this for me? Thanks
can someone elaborate this for me? Thanks
Remove the small 3pin plug from the first set of lights... and feed in into the second set of lights.
Looks like this

Looks like this
Intermediate
good write and nice contributions.
I would like to do this as 1st Mod any night shots guys ?
would like to see difference if possible.
thanks
I would like to do this as 1st Mod any night shots guys ?
would like to see difference if possible.
thanks

10th Gear
I have a 04 TL and wanted to put the newer Tl-s Lights on it will they fit and what year should i buy??? Thank for the help
Safety Car
EvilVirus
Safety Car
close
Jan 26, 2021
- Join DateApr 2011
- LocationHouston
- Posts:4,227
-
iTrader Positive Feedback100
-
iTrader Feedback Score(8)
-
Likes:6,471
-
Liked:1,120 Times in 893 Posts
^ Doesnt matter if its 07 or 08; they will fit. Mine are OEM 08 but I didnt have to jack my car up but I did remove the bumper only so it I can work on it easier. Took me about a hour.
2007 Acura TL
Thank you for this. I'll be following these steps once I receive my custom tail lights.

Cruisin'
Looks good! prob woulda been cheaper just to buy a TL-S.. HA! jk.. looks tits!


Pro
Quite an old thread, but still, how was the fit of the bumper when it was reattached? I skimmed over the pics and didn't see whether the fasteners are clips or bolts and screws only?

Intermediate
I dont know about you all but i dont know why in the hell you would pull the bumper off.
I just did this install to include the front and rear side markers.
All i did was partially pull one side of the bumper off and swapped out lights since i now had access to the 10mm bolts.
For the rear side markers you dont need to remove the rear trunk side lining.....just pull it down where the liner has a break in it by the trunk hinge.
For the front side markers you DO NOT have to remove the entire wheel liner. Just turn wheels out for side you are goning to access and take out screws, pull back liner far enough to get hand behind fender and pop out light.
The only time you need to jack up the car is for the rear...this allows a screw driver to easily fit between tire and fender liner(your best bet here is a stubby phillips). Also, the screw that holds the rear bumper to the rear qauter panel (the screw that is pointing up a.d is tucked vertically inside the fender) was covered in rust. Nail it with some PB blaster or WD40 or some rust penetrater.....if you dont you risk stripping out screw head and good luck then getting bumper pulled of.
This was a 45 minute swap for everything.
Wiggy Wiggy Wiggy
Quote:
I'm sure people remove the entire bumper because it gives you more room to work with, 70% of the fasteners are already off, allow easy adjustments if the fit isn't right, and most people are not in a race to get it done. It can be done either way, partially on, or entirely off.Originally Posted by FC3S Murray
I dont know about you all but i dont know why in the hell you would pull the bumper off.
Wiggy Wiggy Wiggy
Make sure the tail lamp edge is not touching the quarter panel. There should be a small, consistent gap. The lamp can rub away the paint on the quarter if its too tight. I've seen this on new 3G's and on repaired 3G's where the tail lamp was not fitted or adjusted properly during the repair.
Proper Gap
Improper Gap Problems (paint needs to be touched up)
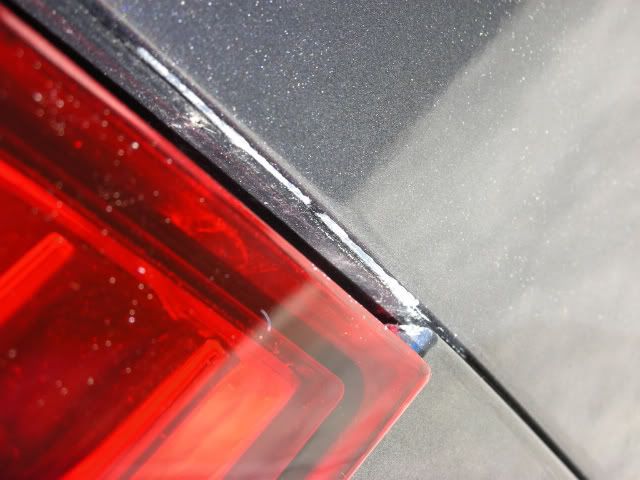
Proper Gap
Improper Gap Problems (paint needs to be touched up)
10th Gear
Quote:
My tl had depo lights when I bought it and the passenger side leaked. I put silicone sealant in the little space between the outer lense and the housing and it has been fine since.Originally Posted by henrylo
has any1 have problem with depos lights? let me know

10th Gear
Hey, I'm planning on changing out my lights with a pair of DEPOs, do you know how much it won't fit the same? Also, I'm going to try and replace the side markers as well while I'm in there--any advice?
Safety Car
EvilVirus
Safety Car
close
Jan 26, 2021
- Join DateApr 2011
- LocationHouston
- Posts:4,227
-
iTrader Positive Feedback100
-
iTrader Feedback Score(8)
-
Likes:6,471
-
Liked:1,120 Times in 893 Posts
^ depos will fit
I changed mine from OEM Type S to the DEPO ghost tail. You can remove the whole bumper to get familar with your car or just pull it back it enough to get to the tail lights.
Side makers are easy. Just pull back the interior and you should have access. It just like changing your rear bulbs.
I changed mine from OEM Type S to the DEPO ghost tail. You can remove the whole bumper to get familar with your car or just pull it back it enough to get to the tail lights.
Side makers are easy. Just pull back the interior and you should have access. It just like changing your rear bulbs.
Intermediate
I'm a total modification novice, as in have never messed with my '08 TL before much at all, but was genuinely surprised at how easy most this stuff is, once you put your mind to doing it. Remember, a majority of this car is held together by 10mm bolts, plastic screws, foam gaskets and pressure/friction fit lights. I recently ordered a set of OEM TL-S rear smoke side markers, and literally replaced my OEM side markers perfectly within 20 minutes using one screwdriver. I also replaced and adjusted (or leveled, whatever) my stock headlights with customs from another forum member in under an hour, and that was with taking off the front bumper. Point being, if you plan to keep working on your car, go with the OP's advice, take the extra step, be careful and not hurried, and learn how to remove your front and rear bumpers instead of doing it the quick way. It's nearly impossible to mess up because of the way the car is constructed, and you'll thank yourself later for having the knowledge. There's something to be said for knowing how to do your own work, and you'll appreciate it more knowing it's done right. Just my $.02 
BTW, my local dealership (Ron Tonkin Acura of Portland) from whom I've now bought 3 TL's from, quoted the following to do this work at their shop:
Adjust/Level Headlights (basically turn a 10mm screw on each side until offset): - $60 or 1/2 hour of labor
Replace/Install OEM Taillights: $240 or 2 hours of labor (because they have to remove the rear bumper, WITH full lifts in their shop and all pneumatic tools)
Install complete ASPEC suspension (pre-assembled springs + struts that retail for $630) : $720 or 6 hours in labor, without alignment (because they have to remove the rear bench seat to access the rear struts)
Install/replace rear stock side markers for TL-S side markers: $120 or 1 hour in labor because they say they have to remove the ENTIRE trunk liner to gain access)
Anyway, sorry for the novel, but just sayin', this stuff is definitely worth learning on your own, especially considering what dealerships charge to do this simple work with all the necessary tools and lifts at their disposal. Shit, maybe I should submit an application to work in their garage . . . ha.
Good write-up JnC, can't wait to get my tails!
cw
Two Words, Get Paid!
definition of a perfect DIY! Thanks helped me a bunch today!


1st Gear
Any body knows what the gray piece that the fuse plugs into is called? Mine replacement didn't come with one and it needs replacing.
Instructor
why is it that none of the pictures load? is there another way to see them?

Intermediate
Quote:
cw
ceed, Originally Posted by ceedubb2000
I'm a total modification novi.....-up JnC, can't wait to get my tails!cw
It would be great to see some photos of the recent work done. I'd like to see them.
Thanks for sharing.