
G-094: DIY - Installing Type S Tail Lights
 03-23-2009 | 09:13 PM
#1
Thread Starter
Three Wheelin'
Joined: Feb 2008
Posts: 1,439
Likes: 114
From: Pittsburgh
G-094: DIY - Installing Type S Tail Lights
I've seen countless threads on this and questions so the time has come for my attempt at a DIY. I took all these pictures last summer when I was replacing a damaged light with a new one.
Tools needed:
NOTE: These pictures do show bumper removal with the A-spec kit installed. If you do not have the A-Spec kit you're proccess will be slightly different.
The first step is to jack the vehicle up. Make sure to use jack stands.


After the vehicle is secure, you'll want to remove the screws securing the rear bumper to the vehicle behind the wheels. You may need to remove the rear wheels thus was my reasoning for jacking the car up in the first place.


Next, pop open the trunk. Take note of the two smaller plastic covers in the bottom corner. You'll need to pop these off with a small flat head screwdriver take care not to scratch the paint. Behind the cover you'll see a 10mm bolt. Remove the bolt from both sides.


Next step is to remove the 10mm bolts from the bottom of the bumper. In these pictures, take note at the black bolts, not the silver screws. You'll want to remove all the bolts.
--This is where the A-spec and base bumper will differ. The base bumper you'll also be removing some additional screws / plastic pieces.


This is the part where you'll need a helper. After taking all the screws off you'll want to start at each corner and gently pry the bumper cover off. You'll feel/hear it snap off - thats good you want that. It sits into plastic grooves and you'll need to work it out of those grooves. When its all loose you'll know.. take the bumper and set it aside.
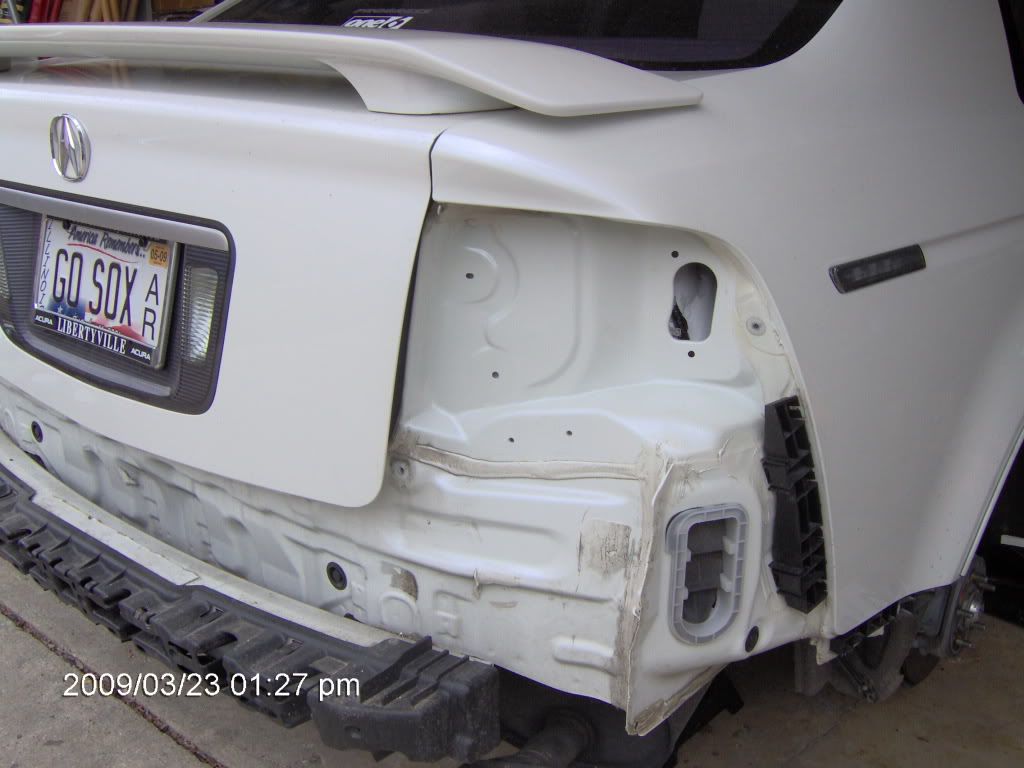
This next picure already shows the light removed... but I'll use it for illustrative purposes. I'll show the removal of the light below.

Next, you'll want to remove the stock light. You'll repeat this process for both sides... so it doesn't matter which side you start on. There are two 10mm bolts and 1 philips screw you need to remove. on the outside. the screw goes up into the light itself, and the bolts into the car body. Start by remove these three pieces of hardware.

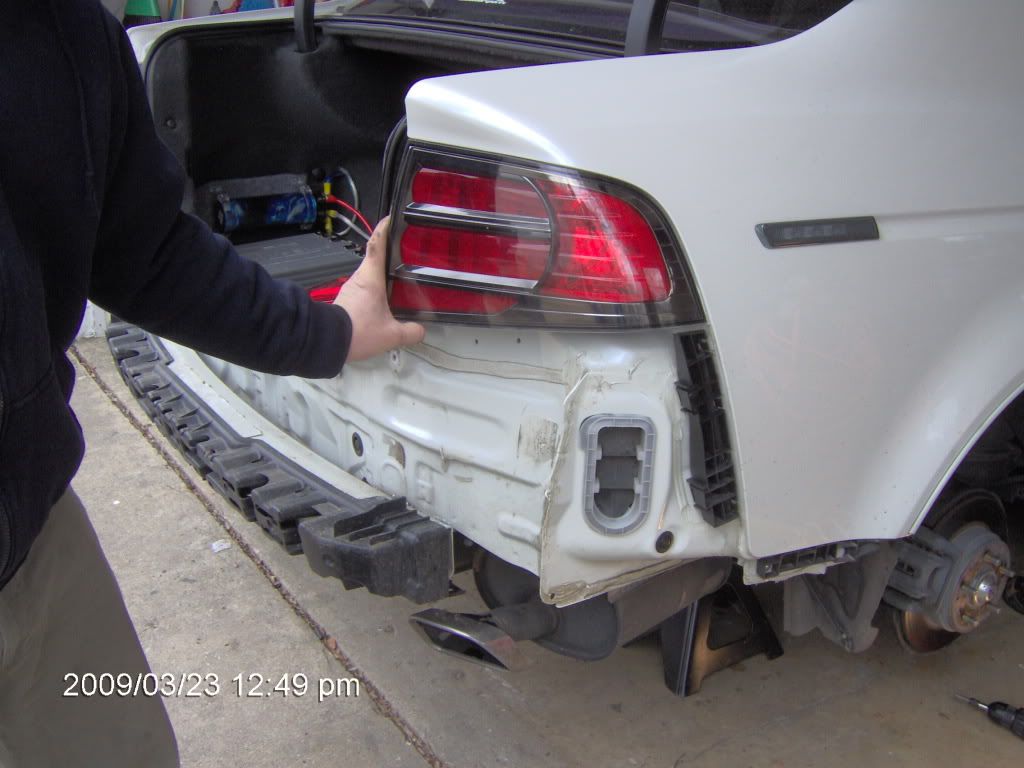
Next, on the inside you'll want to remove the 8mm bolts that are threaded onto securing the light to the interior sheet metal. There are a total of 4 per side. Once all these are removed, unplug the wiring harness and the light should just pop off.


With the light off the next step is swapping the LED board. There are 4 small phillips screws that you'll need to remove. When you are swaping the LED removing the LED board, make sure you remove the foam grommets too as you'll need to reuse them when you install the new light.


Next, you'll want to reinstall and route the small plug from the stock light into the Type-S tails. This can be tricky so take your time.


Reinstall the LED board - put the screws back in and make sure to reuse the foam gaskets. To install the light - go in the reverse order from the initial removal. Take care not to over tighten any bolts.
Repeat these steps for both lights.
Grab your friend and put the bumper back on. Loosely fit the bumper on the vehicle and check alignment. then press the bumper into the fittings. You'll hear it snap into place. Reinstall all the hardware and sit back and enjoy the fruits of your labor.

Tools needed:
- Small flat head screwdriver
- #2 Phillips screwdriver
- Jack and jack stands
- 10mm wrench / socket
- 8mm wrench
- helper
NOTE: These pictures do show bumper removal with the A-spec kit installed. If you do not have the A-Spec kit you're proccess will be slightly different.
The first step is to jack the vehicle up. Make sure to use jack stands.
After the vehicle is secure, you'll want to remove the screws securing the rear bumper to the vehicle behind the wheels. You may need to remove the rear wheels thus was my reasoning for jacking the car up in the first place.
Next, pop open the trunk. Take note of the two smaller plastic covers in the bottom corner. You'll need to pop these off with a small flat head screwdriver take care not to scratch the paint. Behind the cover you'll see a 10mm bolt. Remove the bolt from both sides.
Next step is to remove the 10mm bolts from the bottom of the bumper. In these pictures, take note at the black bolts, not the silver screws. You'll want to remove all the bolts.
--This is where the A-spec and base bumper will differ. The base bumper you'll also be removing some additional screws / plastic pieces.
This is the part where you'll need a helper. After taking all the screws off you'll want to start at each corner and gently pry the bumper cover off. You'll feel/hear it snap off - thats good you want that. It sits into plastic grooves and you'll need to work it out of those grooves. When its all loose you'll know.. take the bumper and set it aside.
This next picure already shows the light removed... but I'll use it for illustrative purposes. I'll show the removal of the light below.
Next, you'll want to remove the stock light. You'll repeat this process for both sides... so it doesn't matter which side you start on. There are two 10mm bolts and 1 philips screw you need to remove. on the outside. the screw goes up into the light itself, and the bolts into the car body. Start by remove these three pieces of hardware.
Next, on the inside you'll want to remove the 8mm bolts that are threaded onto securing the light to the interior sheet metal. There are a total of 4 per side. Once all these are removed, unplug the wiring harness and the light should just pop off.
With the light off the next step is swapping the LED board. There are 4 small phillips screws that you'll need to remove. When you are swaping the LED removing the LED board, make sure you remove the foam grommets too as you'll need to reuse them when you install the new light.
Next, you'll want to reinstall and route the small plug from the stock light into the Type-S tails. This can be tricky so take your time.
Reinstall the LED board - put the screws back in and make sure to reuse the foam gaskets. To install the light - go in the reverse order from the initial removal. Take care not to over tighten any bolts.
Repeat these steps for both lights.
Grab your friend and put the bumper back on. Loosely fit the bumper on the vehicle and check alignment. then press the bumper into the fittings. You'll hear it snap into place. Reinstall all the hardware and sit back and enjoy the fruits of your labor.
The following 8 users liked this post by jnc2000:
04WDPSeDaN (10-14-2014),
AyFeltaTL (06-26-2012),
eduthesamurai (01-23-2012),
jimsta (02-03-2013),
kane337 (02-07-2012),
and 3 others liked this post.


 03-24-2009 | 12:42 AM
#7
Lets see if My Photobucket is working NOW with my NEW Video Card.
<a href="http://s192.photobucket.com/albums/z40/JGD129/?action=view¤t=003-13.jpg" target="_blank"><img src="http://i192.photobucket.com/albums/z40/JGD129/003-13.jpg" border="0" alt="Photobucket"></a>
<a href="http://s192.photobucket.com/albums/z40/JGD129/?action=view¤t=007-11.jpg" target="_blank"><img src="http://i192.photobucket.com/albums/z40/JGD129/007-11.jpg" border="0" alt="Photobucket"></a>
Last edited by JD TL-S; 03-24-2009 at 12:45 AM.
Trending Topics


 03-24-2009 | 03:32 PM
#11
Advanced
Joined: Mar 2009
Posts: 80
Likes: 1
From: Central Illinois
DIY took my about 4 hours... it was my first mod so I was EXTRA careful getting the bumper off, etc. Getting the LED board off the first light took some time, but once I figured out how to do it, the second one went much quicker.
As far as fit, you cant really tell standing 2-3 feet away from the car. As is with anything aftermarket, if you are looking for a slight flaw/defect, you will probably find it. My Depo's are within millimeters of being flush all the way around... overall, I am happy with the fit.
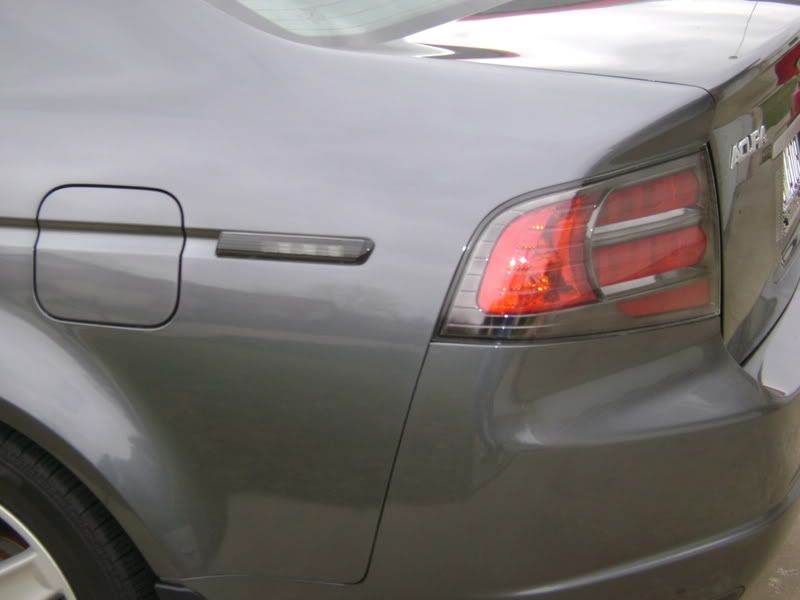
As far as fit, you cant really tell standing 2-3 feet away from the car. As is with anything aftermarket, if you are looking for a slight flaw/defect, you will probably find it. My Depo's are within millimeters of being flush all the way around... overall, I am happy with the fit.
03-24-2009 | 05:14 PM
#13
Cruisin'
Joined: Apr 2008
Posts: 18
Likes: 0
DIY took my about 4 hours... it was my first mod so I was EXTRA careful getting the bumper off, etc. Getting the LED board off the first light took some time, but once I figured out how to do it, the second one went much quicker.
As far as fit, you cant really tell standing 2-3 feet away from the car. As is with anything aftermarket, if you are looking for a slight flaw/defect, you will probably find it. My Depo's are within millimeters of being flush all the way around... overall, I am happy with the fit.
As far as fit, you cant really tell standing 2-3 feet away from the car. As is with anything aftermarket, if you are looking for a slight flaw/defect, you will probably find it. My Depo's are within millimeters of being flush all the way around... overall, I am happy with the fit.
How bout a night time pic with the lights on. I would like to see how the depos light up.
03-30-2009 | 10:27 AM
#15
Instructor
Joined: Sep 2005
Posts: 188
Likes: 0
From: Gulfport, MS
I just installed my tail lights saturday and you really don't need to take off both wheels or the bumper even with the Aspec kit. All you have to do is take off the screws on both sides inside the fenderwell well to get to the screw that is holding the Aspec lip to the bumper and just kind of ease it loose and you should be able to see the bottom bolt where the tail light is being secured to the frame from underneath the bumper. Get some extra 3m double sided tape just in case you ease too much and the original double sided tape needs to be replaced. Took me and a buddy to do it in about 1 1/2 or 2 hours. Glad it wasn't raining still and sunny. Oh yeah, after the install I wash and waxed my car and as soon as I sprayed the car my lights started to fog up on the inside. I'm thinking there is a leak somewhere around the edges but dont know where. Does anyone know if you install your own tail lights does the manufacture warranty still good? I purchase the tail lights from Ray Laks Acura from NYC for $180 shipped if anyone was wondering.
Last edited by Usalinh; 03-30-2009 at 10:29 AM.
03-30-2009 | 10:53 PM
#17
Instructor
Joined: Sep 2005
Posts: 188
Likes: 0
From: Gulfport, MS
I reused the same gaskets from the original tail lights and made sure they were on perfect. It looked like the fogging start from the top part of the tail light. I guess I'll find out when it rains tomorrow and see how it does. I guess if it fogs up again I can contact the dealer back and see if he can send me some replacement ones.

 06-30-2009 | 01:51 PM
#22
Senior Moderator
Joined: Feb 2006
Posts: 20,928
Likes: 2,019
From: Space Coast, FL
06-30-2009 | 10:32 PM
#23
If you dont have a small screwdriver you cant get the screws in the wheel well out because the wheels are in the way. I bought a short screw driver from sears because I have had this problem with removing bumpers before.
08-01-2009 | 09:03 PM
#24
Instructor
Joined: Jul 2009
Posts: 189
Likes: 0
From: Long Island, NY
Oh great, the depos LEAK? I keep hearing these horror stories about them, i swear im just throwing them in the oven and baking them to get a tighter seal. Are there aftermarket foam pieces we can use to replace the ones that are all soggy and crusty from the original tails?
 11-10-2009 | 10:34 AM
#29
11-10-2009 | 01:08 PM
#31

Advanced
Joined: Jul 2009
Posts: 85
Likes: 0
From: TX
Just got done putting my tails on. this write-up along with the garage video for removing the bumper made the process easy. took just a few hours. looks great!
I didn't fully remove the bumper, just dropped each side as needed. those little clips can be a pain though. swapping the LED boards was pretty easy too, just remember to re-use the gaskets
I didn't fully remove the bumper, just dropped each side as needed. those little clips can be a pain though. swapping the LED boards was pretty easy too, just remember to re-use the gaskets
11-10-2009 | 03:23 PM
#32
Sure, I started by jacking up the car. There are 2 screws on the outer rear fender wall and attach to the lower bumper and 1 screw on the inner rear fender wall that i took off. Then I followed all the other steps in this thread, and the bumper sort of just hung off towards the top but gives you enough clearance to access the two 10mm bolts attached to the bottom of the tail light. Not sure if what I said makes sense, but it wasn't too difficult.
 11-06-2011 | 06:30 PM
#39
Jokerman
Joined: Aug 2007
Posts: 875
Likes: 51
From: Norfolk, VA
That bracket helps hold the bumper face in place, without it, your bumper will not line up properly. I know this personally, because i bend the hell out of them when i put my TL-s tails on my WDP
11-07-2011 | 06:22 AM
#40

Advanced
Joined: Aug 2011
Posts: 81
Likes: 5
Hmm. Personally, I haven't had that issue. I'll be swapping tails soon, and I'm happy to nit have to deal with the bumper removal again. Should be a quick install. Btw, the bumper bolts into the chassis about two inches away near the trunk weatherstripping.