3G TL (2004-2008)
Sponsored by:
Sponsored by:

DIY: White front sidemarkers (best thread!)

Thread Tools
 
Search this Thread
 
Old 06-23-2013, 08:57 PM
  #81  
oops is that your face?
iTrader: (3)
 
cazio's Avatar
 
Join Date: Sep 2011
Location: CT
Age: 38
Posts: 999
Received 113 Likes on 92 Posts
Originally Posted by Nick216
usr's got white side markers on sale for $40. unless you prefer the type s look over clear lenses.
usr's are ugly man, just mod ur oems like paperboy and I as well
as others. looks soooooooo much better
Old 06-23-2013, 09:11 PM
  #82  
Drifting
iTrader: (9)
 
KJ TL-S's Avatar
 
Join Date: Nov 2011
Location: Chicago Burbs
Age: 39
Posts: 2,710
Received 663 Likes on 539 Posts
Originally Posted by cazio
buy a solder sipper, or just mail them to me with $40 cash lol
Haha, $40 is a bit steep, but now that i have the things taken apart, I would probably drop em in the mail with the new resistors and LEDs, along with $20, if someone wanted to save me the headache due to my inexperience and pull the old stuff and solder in the new LEDs. Any takers??? I'll also include the several extra resistors and LEDs that i bought, enough to do the mod at least one more time.
Old 06-23-2013, 09:20 PM
  #83  
oops is that your face?
iTrader: (3)
 
cazio's Avatar
 
Join Date: Sep 2011
Location: CT
Age: 38
Posts: 999
Received 113 Likes on 92 Posts
Originally Posted by KJ TL-S
Haha, $40 is a bit steep, but now that i have the things taken apart, I would probably drop em in the mail with the new resistors and LEDs, along with $20, if someone wanted to save me the headache due to my inexperience and pull the old stuff and solder in the new LEDs. Any takers??? I'll also include the several extra resistors and LEDs that i bought, enough to do the mod at least one more time.
lol I have tons of resistors and basically eveything needed except for the actual side markers. just buy a solder sipper, there really isn't any other way around it, u need to desolder the power prongs, LEDs, and resistors before adding anything anyway
Old 06-23-2013, 09:21 PM
  #84  
oops is that your face?
iTrader: (3)
 
cazio's Avatar
 
Join Date: Sep 2011
Location: CT
Age: 38
Posts: 999
Received 113 Likes on 92 Posts
I have some pic in my progress thread I believe just follow the DIY just as I did, had them both done and in the car within an hour and a half
Old 06-23-2013, 09:24 PM
  #85  
Drifting
iTrader: (9)
 
KJ TL-S's Avatar
 
Join Date: Nov 2011
Location: Chicago Burbs
Age: 39
Posts: 2,710
Received 663 Likes on 539 Posts
I was trying to use desoldering wick....maybe I should pick up the solder sucker tho instead.
Old 06-23-2013, 09:36 PM
  #86  
oops is that your face?
iTrader: (3)
 
cazio's Avatar
 
Join Date: Sep 2011
Location: CT
Age: 38
Posts: 999
Received 113 Likes on 92 Posts
yes u should! don't use anything other than the solder sipper. y break ur balls, it's much easier
Old 06-23-2013, 09:39 PM
  #87  
Drifting
iTrader: (9)
 
KJ TL-S's Avatar
 
Join Date: Nov 2011
Location: Chicago Burbs
Age: 39
Posts: 2,710
Received 663 Likes on 539 Posts
Never done this before, I thought I had heard that the suckers didn't work great. But if it will make the job easier, I'm all for it. Probably try to pick one up tomorrow.
Old 06-23-2013, 09:53 PM
  #88  
oops is that your face?
iTrader: (3)
 
cazio's Avatar
 
Join Date: Sep 2011
Location: CT
Age: 38
Posts: 999
Received 113 Likes on 92 Posts
Originally Posted by KJ TL-S
Never done this before, I thought I had heard that the suckers didn't work great. But if it will make the job easier, I'm all for it. Probably try to pick one up tomorrow.
bro I may be a union electrician but I don't mess with electronics and have never soldered before attempting this mod. all u need are the right tools and paperboys DIY trust me. he's very good at answering questions and I'm also here. just take ur time cause if u damage any of the thin wires on the circuit board ur fucked. those ribbons complete the circuit and run all over the board, thru the 330ohm resistor ur adding as well as that black diode and LEDs so BE CAREFUL!
The following users liked this post:
paperboy42190 (06-24-2013)
Old 06-23-2013, 10:20 PM
  #89  
Engineer in Training
 
LockDots's Avatar
 
Join Date: Mar 2012
Location: Long Island, NY
Age: 39
Posts: 599
Received 127 Likes on 98 Posts
Originally Posted by KJ TL-S
Never done this before, I thought I had heard that the suckers didn't work great. But if it will make the job easier, I'm all for it. Probably try to pick one up tomorrow.
Either can get the job done. When using solder wick it's good to remember that there are different grades/types. The downside to a solder sucker is that you have to melt the solder then quickly move/remove the iron to get the sucker in place and release the spring before the solder starts to cool/harden. A solder wick (solder braid) goes between the solder and the iron and will pull the solder into it.
Old 07-24-2013, 09:45 PM
  #90  
oops is that your face?
iTrader: (3)
 
cazio's Avatar
 
Join Date: Sep 2011
Location: CT
Age: 38
Posts: 999
Received 113 Likes on 92 Posts
thanks to paperboy I've become pretty efficient at this mod and recently purchased 100 of these LEDs, so if anyone needs some assistance feel free to PM me and ill see if I can mod for some of u
The following users liked this post:
paperboy42190 (07-25-2013)
Old 07-24-2013, 10:29 PM
  #91  
Burning Brakes
iTrader: (4)
 
bluetl04's Avatar
 
Join Date: Apr 2010
Location: Connecticut
Age: 40
Posts: 1,167
Received 140 Likes on 122 Posts
I love my usr white side markers...I also have them on my girls TL. No issues with them at all..like they say, different strokes for different folks...keep modding!!!!
Old 07-25-2013, 01:52 AM
  #92  
Moderator
Thread Starter
iTrader: (7)
 
paperboy42190's Avatar
 
Join Date: Feb 2011
Location: Alhambra, CA
Age: 34
Posts: 6,992
Received 1,162 Likes on 847 Posts
lets get some more posts in here so this can make it into the 3G garage
Old 07-25-2013, 09:11 AM
  #93  
Moderator
Chapter Leader (South Florida Region)
iTrader: (6)
 
rockstar143's Avatar
 
Join Date: Sep 2008
Posts: 77,908
Received 19,916 Likes on 14,458 Posts
I'm shocked it's not ALREADY in there!
Old 07-25-2013, 12:09 PM
  #94  
Mechanical Engineer
 
AdAstra's Avatar
 
Join Date: Dec 2012
Location: West MI
Age: 34
Posts: 58
Received 10 Likes on 9 Posts
Paperboy, huge props for including the calculations! I'm a mechanical engineering student but I've taken an EE class, so I immediately scrolled down when I read you included them haha. They're basic, but an essential part of any type of circuit analysis. My point is, no one should have questioned this mod's functionality if they would have just quickly read through those. Great simple and effective mod.
The following users liked this post:
paperboy42190 (07-26-2013)
Old 07-25-2013, 12:20 PM
  #95  
Moderator
Chapter Leader (South Florida Region)
iTrader: (6)
 
rockstar143's Avatar
 
Join Date: Sep 2008
Posts: 77,908
Received 19,916 Likes on 14,458 Posts
and for me, looked like greek but I appreciated the effort!
Old 08-25-2013, 09:58 AM
  #96  
Drifting
iTrader: (9)
 
KJ TL-S's Avatar
 
Join Date: Nov 2011
Location: Chicago Burbs
Age: 39
Posts: 2,710
Received 663 Likes on 539 Posts
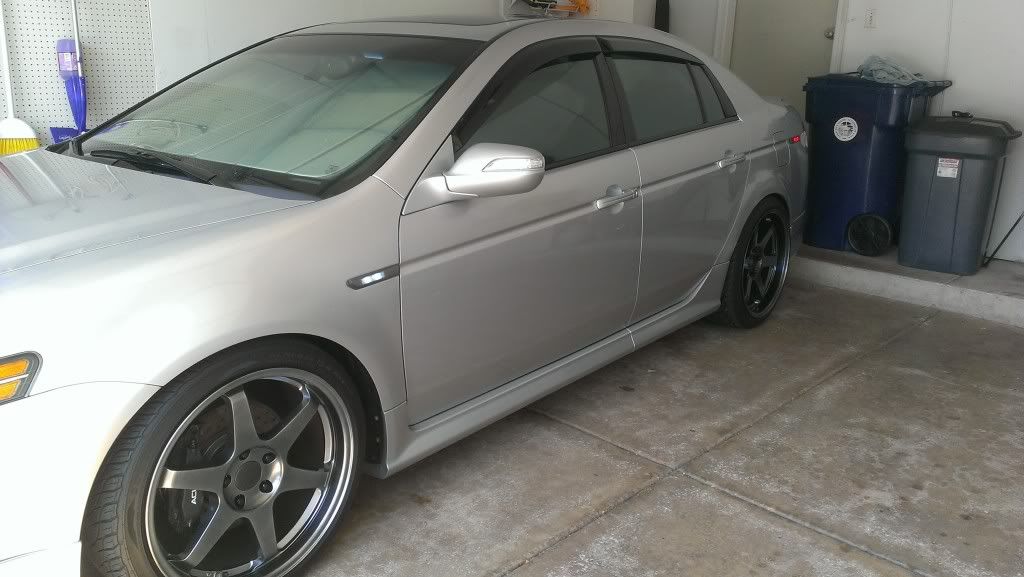
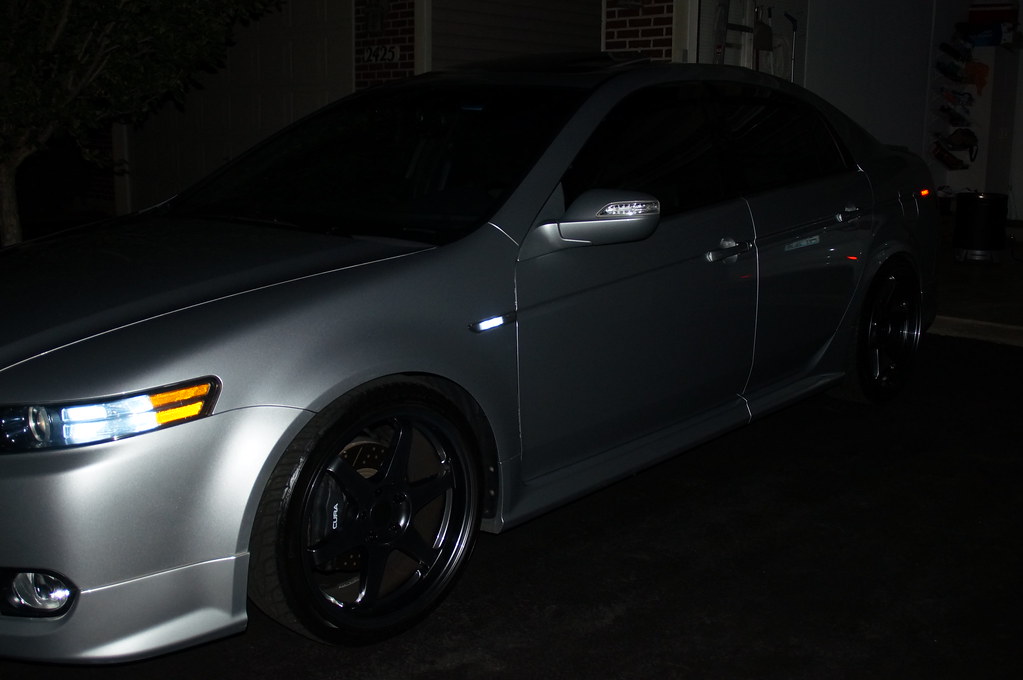
Huge thanks to OP and other contributors to this method, and to Cazio for lending a hand to get this project completed finally! Wanted to post up the results of his handywork:

Daytime:


Nighttime:
Old 08-25-2013, 01:24 PM
  #97  
Phmbm12
 
Phambam12's Avatar
 
Join Date: May 2009
Location: West Valley City, UT
Age: 33
Posts: 740
Received 26 Likes on 18 Posts
my turn. Teach me your ways
Old 08-25-2013, 01:44 PM
  #98  
oops is that your face?
iTrader: (3)
 
cazio's Avatar
 
Join Date: Sep 2011
Location: CT
Age: 38
Posts: 999
Received 113 Likes on 92 Posts
Originally Posted by Phambam12
my turn. Teach me your ways
follow the DIY or just buy the materials and mail them to me lol
Old 08-25-2013, 03:06 PM
  #99  
Phmbm12
 
Phambam12's Avatar
 
Join Date: May 2009
Location: West Valley City, UT
Age: 33
Posts: 740
Received 26 Likes on 18 Posts
Just so i'm clear of the steps:

1. remove and cut sidemarkers
2. remove all the LEDs and just one of the resistors?
-*using solder sipper to remove previous solder*
3. solder on LEDs and 330 ohm resistor
4. put it back together with an adhesive

i just want to be sure haha.
Old 08-25-2013, 03:12 PM
  #100  
oops is that your face?
iTrader: (3)
 
cazio's Avatar
 
Join Date: Sep 2011
Location: CT
Age: 38
Posts: 999
Received 113 Likes on 92 Posts
Originally Posted by Phambam12
Just so i'm clear of the steps:

1. remove and cut sidemarkers
2. remove all the LEDs and just one of the resistors?
-*using solder sipper to remove previous solder*
3. solder on LEDs and 330 ohm resistor
4. put it back together with an adhesive

i just want to be sure haha.
u remove everything except the one black diode and solder in one 330ohm resistors and LEDs
Old 08-26-2013, 03:26 AM
  #101  
Moderator
Thread Starter
iTrader: (7)
 
paperboy42190's Avatar
 
Join Date: Feb 2011
Location: Alhambra, CA
Age: 34
Posts: 6,992
Received 1,162 Likes on 847 Posts
yep!
Old 08-26-2013, 08:34 AM
  #102  
Phmbm12
 
Phambam12's Avatar
 
Join Date: May 2009
Location: West Valley City, UT
Age: 33
Posts: 740
Received 26 Likes on 18 Posts
so ALL OF THE resisters except the black one?
Old 08-26-2013, 08:52 AM
  #103  
oops is that your face?
iTrader: (3)
 
cazio's Avatar
 
Join Date: Sep 2011
Location: CT
Age: 38
Posts: 999
Received 113 Likes on 92 Posts
Originally Posted by Phambam12
so ALL OF THE resisters except the black one?
there are two LEDs, three resistors, and one diode. remove everything except the one black diode. solder in ur two LEDs and one 330ohm resistor and seal back up
Old 08-26-2013, 02:52 PM
  #104  
Moderator
Thread Starter
iTrader: (7)
 
paperboy42190's Avatar
 
Join Date: Feb 2011
Location: Alhambra, CA
Age: 34
Posts: 6,992
Received 1,162 Likes on 847 Posts
^thats correct. The black one is a diode not resistor
Old 09-02-2013, 02:02 AM
  #105  
Phmbm12
 
Phambam12's Avatar
 
Join Date: May 2009
Location: West Valley City, UT
Age: 33
Posts: 740
Received 26 Likes on 18 Posts
was i the only one attempted this and failed?
Old 09-02-2013, 02:12 AM
  #106  
Moderator
Thread Starter
iTrader: (7)
 
paperboy42190's Avatar
 
Join Date: Feb 2011
Location: Alhambra, CA
Age: 34
Posts: 6,992
Received 1,162 Likes on 847 Posts
what part went wrong?
Old 09-02-2013, 08:10 AM
  #107  
oops is that your face?
iTrader: (3)
 
cazio's Avatar
 
Join Date: Sep 2011
Location: CT
Age: 38
Posts: 999
Received 113 Likes on 92 Posts
^^^seriously
Old 09-04-2013, 08:56 PM
  #108  
Intermediate
 
BOSSTLtypes-S's Avatar
 
Join Date: Dec 2012
Location: california
Posts: 44
Received 2 Likes on 2 Posts
why doesnt anyone just buy the USR switchback sidemarkers???
Old 09-04-2013, 09:02 PM
  #109  
oops is that your face?
iTrader: (3)
 
cazio's Avatar
 
Join Date: Sep 2011
Location: CT
Age: 38
Posts: 999
Received 113 Likes on 92 Posts
Originally Posted by BOSSTLtypes-S
why doesnt anyone just buy the USR switchback sidemarkers???
cuz they look nuttin like the oem ones, no one needs them to blink, and lastly they get water in them most of the time. why spend money when u can just mod them urself
Old 09-04-2013, 09:16 PM
  #110  
Intermediate
 
BOSSTLtypes-S's Avatar
 
Join Date: Dec 2012
Location: california
Posts: 44
Received 2 Likes on 2 Posts
are they just not as bright as the OEM, i want mine to be bright but i also would like them to blink in sink and amber in front adn red in the back
Old 09-04-2013, 09:43 PM
  #111  
Engineer in Training
 
LockDots's Avatar
 
Join Date: Mar 2012
Location: Long Island, NY
Age: 39
Posts: 599
Received 127 Likes on 98 Posts
Originally Posted by BOSSTLtypes-S
are they just not as bright as the OEM, i want mine to be bright but i also would like them to blink in sink and amber in front adn red in the back
What he means is that the design of the housing, the 'reflector' part of the enclosure will look different whether a bulb is on or off. It can affect brightness as well but overall, they look physically different, while maintaining the same exterior shape. If that makes sense...
Old 09-04-2013, 10:11 PM
  #112  
Instructor
 
bpham's Avatar
 
Join Date: Oct 2007
Age: 36
Posts: 145
Likes: 0
Received 1 Like on 1 Post
Doesn't seem too complicated. Will be doing this once the parts come in.
Old 09-05-2013, 04:02 AM
  #113  
Moderator
Thread Starter
iTrader: (7)
 
paperboy42190's Avatar
 
Join Date: Feb 2011
Location: Alhambra, CA
Age: 34
Posts: 6,992
Received 1,162 Likes on 847 Posts
Originally Posted by BOSSTLtypes-S
are they just not as bright as the OEM, i want mine to be bright but i also would like them to blink in sink and amber in front adn red in the back
oem sidemarkers can be bright if you use bright leds. they can also blink too with enough electrical work
Old 09-14-2013, 06:44 PM
  #114  
the overexplainer
 
ez12a's Avatar
 
Join Date: Feb 2011
Location: OC, CA
Age: 36
Posts: 3,287
Received 385 Likes on 337 Posts
both my sidemarkers are now flickering ugh. I'll grab a soldering station and some parts soon.
Old 09-14-2013, 07:42 PM
  #115  
Moderator
Thread Starter
iTrader: (7)
 
paperboy42190's Avatar
 
Join Date: Feb 2011
Location: Alhambra, CA
Age: 34
Posts: 6,992
Received 1,162 Likes on 847 Posts
^i have my stock leds if you want for free, or i have white ones too i can give you if you ever come up to alhambra
Related Topics
Thread
Thread Starter
Forum
Replies
Last Post
rockyboy
2G RDX (2013-2018)
170
12-06-2022 02:29 PM
Yumcha
Automotive News
9
02-25-2020 09:57 AM
sockr1
Car Parts for Sale
22
10-01-2015 01:31 AM
08 NBP TL
3G TL Problems & Fixes
7
09-08-2015 08:49 PM
KillerG
2G TSX (2009-2014)
1
09-04-2015 02:02 PM


Quick Reply: DIY: White front sidemarkers (best thread!)


All times are GMT -5. The time now is 06:26 AM.