DIY - Modifying Front Side Marker Lights (3G Garage Ref#G-064)


I wanted to take a minute to update this thread, as I just updated my rear side markers from 3mm to 5mm to match the fronts.
As noted above, when I replaced the front yellow 3mm leds with 5mm white leds (superbrightleds.com PN HF5-W7590), the look was imbalanced due to the fronts being so much brighter than the rears.
So I ordered 6 red high flux 5mm leds (superbrightleds.com HF5-R5590) to brighten up the rear to match. Using the procedures outlined in this thread, I just finished up and snapped a few pics:
Here you can see the difference in LED sizes, 5mm is on the right:

Here's the rear lights cut open:

LEDs soldered in:

Epoxying back together:

All done:

BEFORE:

AFTER:

The pictures don't show the improved brightness in the day well. I'll add a few more pictures tonight when it gets dark. This is more to show the rears can be done in the same manner as the fronts.
As noted above, when I replaced the front yellow 3mm leds with 5mm white leds (superbrightleds.com PN HF5-W7590), the look was imbalanced due to the fronts being so much brighter than the rears.
So I ordered 6 red high flux 5mm leds (superbrightleds.com HF5-R5590) to brighten up the rear to match. Using the procedures outlined in this thread, I just finished up and snapped a few pics:
Here you can see the difference in LED sizes, 5mm is on the right:
Here's the rear lights cut open:
LEDs soldered in:
Epoxying back together:
All done:
BEFORE:
AFTER:
The pictures don't show the improved brightness in the day well. I'll add a few more pictures tonight when it gets dark. This is more to show the rears can be done in the same manner as the fronts.
Terminex
Joined: Jan 2007
Posts: 320
Likes: 0
From: St. Louis, MO
assuming you didn't change the resistors
Kennedy,
after our discussion in the other thread I am assuming you didn't change the resistors on the board for the markers and you didn't have any problems, correct?
after our discussion in the other thread I am assuming you didn't change the resistors on the board for the markers and you didn't have any problems, correct?
Originally Posted by terminex
Kennedy,
after our discussion in the other thread I am assuming you didn't change the resistors on the board for the markers and you didn't have any problems, correct?
after our discussion in the other thread I am assuming you didn't change the resistors on the board for the markers and you didn't have any problems, correct?

terminex, you should definately go for this, as it's a $10 mod (leds and epoxy)...
aznbo, are you asking for a picture of the stock fronts? I didn't take a picture of that, sorry. What are you looking for?
aznbo, are you asking for a picture of the stock fronts? I didn't take a picture of that, sorry. What are you looking for?
Originally Posted by aznbo187
Oh, I thought you changed the amber to yellow, or did you just mean yellow as the stock amber, yellow? I had the piss yellow in mind, which is what I was looking for.
I changed the fronts to white...
Godfather of Chrome
Joined: Dec 2006
Posts: 1,297
Likes: 1
From: Santa Cruz, and yes I'm a hippie with retro 1970s sideburns and a chrome fetish
A couple quick notes:
1) Cool deal for changing out the rears. It's really hard for me to tell in the before and after pictures you posted how much of a difference it makes, but I'm assuming the balance is where you want it now. I would love to see a pic of the front and rear side markers lit up (in the same picture) in twighlight or full-on darkness to really get the full effect.
2) I really like how you added the electrical tape to the outside of the marker housing after you plastic welded it back together. Good idea; I can't believe I didn't think of that. Not that you'll have to worry about moisture, but that's a nice extra layer of protection.
Lookin' good!
1) Cool deal for changing out the rears. It's really hard for me to tell in the before and after pictures you posted how much of a difference it makes, but I'm assuming the balance is where you want it now. I would love to see a pic of the front and rear side markers lit up (in the same picture) in twighlight or full-on darkness to really get the full effect.
2) I really like how you added the electrical tape to the outside of the marker housing after you plastic welded it back together. Good idea; I can't believe I didn't think of that. Not that you'll have to worry about moisture, but that's a nice extra layer of protection.
Lookin' good!
Originally Posted by brettallica
A couple quick notes:
1) Cool deal for changing out the rears. It's really hard for me to tell in the before and after pictures you posted how much of a difference it makes, but I'm assuming the balance is where you want it now. I would love to see a pic of the front and rear side markers lit up (in the same picture) in twighlight or full-on darkness to really get the full effect.
2) I really like how you added the electrical tape to the outside of the marker housing after you plastic welded it back together. Good idea; I can't believe I didn't think of that. Not that you'll have to worry about moisture, but that's a nice extra layer of protection.
Lookin' good!
1) Cool deal for changing out the rears. It's really hard for me to tell in the before and after pictures you posted how much of a difference it makes, but I'm assuming the balance is where you want it now. I would love to see a pic of the front and rear side markers lit up (in the same picture) in twighlight or full-on darkness to really get the full effect.
2) I really like how you added the electrical tape to the outside of the marker housing after you plastic welded it back together. Good idea; I can't believe I didn't think of that. Not that you'll have to worry about moisture, but that's a nice extra layer of protection.
Lookin' good!
1) I'll try at twilight tonight. I ran out and tried last night but my camera just takes pictures of the red and white starbursts...
You can signifcantly see the brightness difference though, and it's a worthwhile mod. The day pics don't show the difference.
2) Yeah, I didn't do this to the fronts either, so one day I've gotta get my hand back up in there to do them too. You can only add one layer or it gets to thick to put back un the hole.
Bret, here are some crappy night pics of my side marker upgrade.
This seems to be about as good as it's gonna get with my camera...
Good thing is, you can clearly see the noticeable brightness improvement in the rear... I'm very pleased, and finally balance between the front and rear sidemarkers.
Now I just have to get my headlights cleared.


This seems to be about as good as it's gonna get with my camera...
Good thing is, you can clearly see the noticeable brightness improvement in the rear... I'm very pleased, and finally balance between the front and rear sidemarkers.
Now I just have to get my headlights cleared.
Godfather of Chrome
Joined: Dec 2006
Posts: 1,297
Likes: 1
From: Santa Cruz, and yes I'm a hippie with retro 1970s sideburns and a chrome fetish
Yeah, that does look good. You've definitely got a nice brightness match now between your front and rear side markers. Even though those pics aren't that great, which you already pointed out, you can still see that they're nicely balanced. I'm glad you went ahead and did that.
For me, I'm going to see how it all looks once I have my cleared headlights before going through with the modificiation for the rear side markers. The way I see it, since I'm working off three different colors -- from front to back: amber, white, red, red -- it'll be best to see what the clear headlights do for the overall look. My guess is that it'll balance out the look simply by having a matching color to the front side markers: white, white, red, red. Not sure if I worded that all just right so that you're able to follow the point I'm trying to make, but it makes sense in my head! :-)
Also, I set up a guy who's going to be the new "headlight clear out guy" for Acurazine. I'm pretty sure he's signed up already as an official vendor, but I can't recall his screen name for the life of me. You should look into getting your headlights done through him if you're not going to do them yourself. I actually bought a used set of headlight housings and he's working on them now for me.
For me, I'm going to see how it all looks once I have my cleared headlights before going through with the modificiation for the rear side markers. The way I see it, since I'm working off three different colors -- from front to back: amber, white, red, red -- it'll be best to see what the clear headlights do for the overall look. My guess is that it'll balance out the look simply by having a matching color to the front side markers: white, white, red, red. Not sure if I worded that all just right so that you're able to follow the point I'm trying to make, but it makes sense in my head! :-)
Also, I set up a guy who's going to be the new "headlight clear out guy" for Acurazine. I'm pretty sure he's signed up already as an official vendor, but I can't recall his screen name for the life of me. You should look into getting your headlights done through him if you're not going to do them yourself. I actually bought a used set of headlight housings and he's working on them now for me.

Well here's a bummer of an update...
Driving to work this morning (very early, still dark out), I notice my front drivers side white marker is "flickering" in the reflection of the car to my right.
I get to work and it's dead, no lights at all...
I washed the car yesterday, wonder if I have any water leakage... I guess I'll pull it tonight and inspect. Passenger side is rock solid.
Anyone else out there have thier LED mod die on them?
Driving to work this morning (very early, still dark out), I notice my front drivers side white marker is "flickering" in the reflection of the car to my right.
I get to work and it's dead, no lights at all...
I washed the car yesterday, wonder if I have any water leakage... I guess I'll pull it tonight and inspect. Passenger side is rock solid.
Anyone else out there have thier LED mod die on them?
Godfather of Chrome
Joined: Dec 2006
Posts: 1,297
Likes: 1
From: Santa Cruz, and yes I'm a hippie with retro 1970s sideburns and a chrome fetish
All I can say is make sure your solder connections are solid. Also, make sure that you didn't accidentally damage any of the traces on the board when you were cutting or soldering...or de-soldering.
Originally Posted by brettallica
All I can say is make sure your solder connections are solid. Also, make sure that you didn't accidentally damage any of the traces on the board when you were cutting or soldering...or de-soldering.
When I was obseving the flickering, both LEDS flickered in unison... which leads me to believe the problem is a "shared contact". I'm worried the larger 5mm bright white leds might have burnt the resistor out due to the higher current draw.
Godfather of Chrome
Joined: Dec 2006
Posts: 1,297
Likes: 1
From: Santa Cruz, and yes I'm a hippie with retro 1970s sideburns and a chrome fetish
Originally Posted by Kennedy
Yeah... I know my solder joints are solid... I haven't had an issue since doing the mod 5-6 weeks ago.
When I was obseving the flickering, both LEDS flickered in unison... which leads me to believe the problem is a "shared contact". I'm worried the larger 5mm bright white leds might have burnt the resistor out due to the higher current draw.
When I was obseving the flickering, both LEDS flickered in unison... which leads me to believe the problem is a "shared contact". I'm worried the larger 5mm bright white leds might have burnt the resistor out due to the higher current draw.
When I went to go inside the marker that was having issues, I took a look at the board and it looked suspect, like perhaps I damaged it while modifying it. It was the first one I modified, so I could see a lot of "mistakes" that I didn't do to the side marker on the other side of my car. I discarded that marker and ended up modifying my original marker, so now I'm good to go. I guess we'll really know in about four or five weeks if your "current draw" theory is applicable. It makes sense, though, so I'm keeping a close eye on the situation. The funny thing is that the other marker is golden, so I don't know. I guess time will tell.
Godfather of Chrome
Joined: Dec 2006
Posts: 1,297
Likes: 1
From: Santa Cruz, and yes I'm a hippie with retro 1970s sideburns and a chrome fetish
It's about the same, dude. Sorry. The plastic weld really does its job in that regard. Remember, though, that I used a Dremel. I seem to recall that you used a hacksaw. Perhaps you might consider going the Dremel route. I love that friggin' tool.
Brett...
I just cut it open again. I can't see anything that indicates what has failed. No burn't traces, no indication of a burnt resistor (doesn't mean it's not bad though). Everything appears to be OK.
I'm not enough of an electrician to know more than:
V= IR and P=VI and
V= 13.5 V
P = .8W (it's on the casing)
Wish I had paid better attention in the EE101 now.
The circuit is bit more complex, with the two leds in parallel and a 4 resistors... So I'm unsure how to calcualte what size resitor(s) should go in this thing... or if it's even needed.
I grabbed a 9V battery and directly connected it one LED's terminals. It flashed for a second, then promptly burnt the LED out. That tells me the problem is in the traces or in the resistors, as the LEDs were good before I mucked with battery.
Looks like I'm gonna have to do another...
I guess I need a Voltmeter to get serious about this. off to borrow the neighbors.
Did you use the 5mm white leds?
Anyone out there with some serious EE skills? here's the tech sheets on the LED's:
Yellow - http://www.superbrightleds.com/specs/hf3-y5570.htm
New white ones - http://www.superbrightleds.com/specs/hf5-w7590.htm
I wish i could read the circuit from the PCB...
I just cut it open again. I can't see anything that indicates what has failed. No burn't traces, no indication of a burnt resistor (doesn't mean it's not bad though). Everything appears to be OK.
I'm not enough of an electrician to know more than:
V= IR and P=VI and
V= 13.5 V
P = .8W (it's on the casing)
Wish I had paid better attention in the EE101 now.
The circuit is bit more complex, with the two leds in parallel and a 4 resistors... So I'm unsure how to calcualte what size resitor(s) should go in this thing... or if it's even needed.
I grabbed a 9V battery and directly connected it one LED's terminals. It flashed for a second, then promptly burnt the LED out. That tells me the problem is in the traces or in the resistors, as the LEDs were good before I mucked with battery.
Looks like I'm gonna have to do another...
I guess I need a Voltmeter to get serious about this. off to borrow the neighbors.
Did you use the 5mm white leds?
Anyone out there with some serious EE skills? here's the tech sheets on the LED's:
Yellow - http://www.superbrightleds.com/specs/hf3-y5570.htm
New white ones - http://www.superbrightleds.com/specs/hf5-w7590.htm
I wish i could read the circuit from the PCB...
Godfather of Chrome
Joined: Dec 2006
Posts: 1,297
Likes: 1
From: Santa Cruz, and yes I'm a hippie with retro 1970s sideburns and a chrome fetish
I used the same exact LEDs from the DIY - the 5mm white jobbies. It's going to be interesting to see how it turns out. I wonder if the current draw is relevant to all of this. The funny thing is my other marker has never had a problem and I used the same LEDs.
Also, I burned an LED in the beginning the same way you did with the 9V battery! :-) That's actually why I had to start one weekend then finish the next: because I burnt out an LED and couldn't finish the job.
Keep us (me) updated.
Also, I burned an LED in the beginning the same way you did with the 9V battery! :-) That's actually why I had to start one weekend then finish the next: because I burnt out an LED and couldn't finish the job.
Keep us (me) updated.
Brett,
Bad news... Dammit.
My passenger side front side marker started flickering this morning. That's 2 failures, one on each side.
Those 5mm white leds are the problem for sure. The fact that these white leds are being overdriven has to be part of the problem.
I drive about 2 hours a day, mostly at night (early morning and evenings... lights on). I figure it's just a matter of time before yours fail too.
I just replaced the left one with another set of white ones too
Another $100 down the drain. shit.
I'm doing 1 more set, with brighter yellow 5mm leds... I'm gonna do the blinker mod, and call it quits.
Bad news... Dammit.
My passenger side front side marker started flickering this morning. That's 2 failures, one on each side.
Those 5mm white leds are the problem for sure. The fact that these white leds are being overdriven has to be part of the problem.
I drive about 2 hours a day, mostly at night (early morning and evenings... lights on). I figure it's just a matter of time before yours fail too.
I just replaced the left one with another set of white ones too
Another $100 down the drain. shit.
I'm doing 1 more set, with brighter yellow 5mm leds... I'm gonna do the blinker mod, and call it quits.
Godfather of Chrome
Joined: Dec 2006
Posts: 1,297
Likes: 1
From: Santa Cruz, and yes I'm a hippie with retro 1970s sideburns and a chrome fetish
Oh no!!! I wonder why this hasn't been reported yet by anyone else other than you or me. So you think that the 5mm LEDs are drawing too much current for the resistors and it's blowing those out? If that's the case, do you think 3mm LEDs is the answer? I certainly don't want to be doing this over and over again until it's right because it's kind of an expensive mod for how little you get in return.

Instructor
Joined: Jun 2004
Posts: 242
Likes: 0
From: Pittsburg, CA
Well I had mine done last year on Dec'06. I had the blinking side marker mods over a year before I replaced them with 5mm white LEDs. My driver side started to flicker last week too. Passenger side side marker is working fine so far. Good thing that I bought 4 extra LEDs but I don't want to replace them until I find the solution.
Godfather of Chrome
Joined: Dec 2006
Posts: 1,297
Likes: 1
From: Santa Cruz, and yes I'm a hippie with retro 1970s sideburns and a chrome fetish
Kennedy, others... I am gonna go down to my local electronics shop today and see if they have the resistors that are on the circuit board inside the side marker. If they do, I'm going to replace all of them on the one of mine that failed on me (which is not on my car), and see if that's what the problem is. If they light up, then, Kennedy, your circuit load/draw theory may be pretty accurate. If they light up, then I think it might be time to switch to 3mm LEDs. Anyway, I'll keep ya posted.
Godfather of Chrome
Joined: Dec 2006
Posts: 1,297
Likes: 1
From: Santa Cruz, and yes I'm a hippie with retro 1970s sideburns and a chrome fetish
So, going off Kennedy's idea, I went ahead and started messing with the blown side marker. His theory was right: busted resistors! I removed all of the resistors, then drove down to the local electronics store and got similar resistors. I was unable to get another one like the black one on the right side, so I just re-used that one hoping that it wasn't one that was blown. Well, as you can see, the side marker works again.

I believe the solution is to go with a different type of LED from the beginning; something other than the 5mm. What I have in there now (in that picture and on my car) is 5mm, but I think I'll go ahead and order some 3mm for just in case purposes. I need to make an order for interior lights anyway.
I believe the solution is to go with a different type of LED from the beginning; something other than the 5mm. What I have in there now (in that picture and on my car) is 5mm, but I think I'll go ahead and order some 3mm for just in case purposes. I need to make an order for interior lights anyway.
Brett,
Firts off, great work.
The issue isn'to much the size of the LEDs, but rather the color...
The stock orange LEDs run at about 2.2 , where the 5mm run at about 3.2 V (both at 20mA).
Two websites that will help:
Resistor values: http://www.dannyg.com/examples/res2/resistor.htm
LED resistance calculator: http://led.linear1.org/led.wiz
According to the resistor value calculator, those small resistors are 3.9Kohm. and black one is, well, I can't figure that one out. It appears you replaced the 3.9 KO with a 20 KO
Now, if these LED's were wired in series with only one resistor, you'd only need a 470 ohm resistor. I can't figure out whay tey use such high value resistors...
I agree though, for now, I'm just gonna replace the yellow with brighter Yellow (same V and current draw).
I hope someone with some EE experience can come in here and help us out.
Foot3H, it's just a matter of time before the other sidemarker burns out.
Firts off, great work.
The issue isn'to much the size of the LEDs, but rather the color...
The stock orange LEDs run at about 2.2 , where the 5mm run at about 3.2 V (both at 20mA).
Two websites that will help:
Resistor values: http://www.dannyg.com/examples/res2/resistor.htm
LED resistance calculator: http://led.linear1.org/led.wiz
According to the resistor value calculator, those small resistors are 3.9Kohm. and black one is, well, I can't figure that one out. It appears you replaced the 3.9 KO with a 20 KO
Now, if these LED's were wired in series with only one resistor, you'd only need a 470 ohm resistor. I can't figure out whay tey use such high value resistors...
I agree though, for now, I'm just gonna replace the yellow with brighter Yellow (same V and current draw).
I hope someone with some EE experience can come in here and help us out.
Foot3H, it's just a matter of time before the other sidemarker burns out.
Godfather of Chrome
Joined: Dec 2006
Posts: 1,297
Likes: 1
From: Santa Cruz, and yes I'm a hippie with retro 1970s sideburns and a chrome fetish
Originally Posted by Kennedy
Brett,
Firts off, great work.
The issue isn'to much the size of the LEDs, but rather the color...
The stock orange LEDs run at about 2.2 , where the 5mm run at about 3.2 V (both at 20mA).
Two websites that will help:
Resistor values: http://www.dannyg.com/examples/res2/resistor.htm
LED resistance calculator: http://led.linear1.org/led.wiz
According to the resistor value calculator, those small resistors are 3.9Kohm. and black one is, well, I can't figure that one out. It appears you replaced the 3.9 KO with a 20 KO
Now, if these LED's were wired in series with only one resistor, you'd only need a 470 ohm resistor. I can't figure out whay tey use such high value resistors...
I agree though, for now, I'm just gonna replace the yellow with brighter Yellow (same V and current draw).
I hope someone with some EE experience can come in here and help us out.
Foot3H, it's just a matter of time before the other sidemarker burns out.
Firts off, great work.
The issue isn'to much the size of the LEDs, but rather the color...
The stock orange LEDs run at about 2.2 , where the 5mm run at about 3.2 V (both at 20mA).
Two websites that will help:
Resistor values: http://www.dannyg.com/examples/res2/resistor.htm
LED resistance calculator: http://led.linear1.org/led.wiz
According to the resistor value calculator, those small resistors are 3.9Kohm. and black one is, well, I can't figure that one out. It appears you replaced the 3.9 KO with a 20 KO
Now, if these LED's were wired in series with only one resistor, you'd only need a 470 ohm resistor. I can't figure out whay tey use such high value resistors...
I agree though, for now, I'm just gonna replace the yellow with brighter Yellow (same V and current draw).
I hope someone with some EE experience can come in here and help us out.
Foot3H, it's just a matter of time before the other sidemarker burns out.

Instructor
Joined: Dec 2004
Posts: 179
Likes: 0
From: Chicago, IL
The black thing is a diode. It protects the car's electrical system by allowing the current to only flow in one direction. From the pics, it looks like the two LEDs are connected in series and the three resistors are in parallel.
Godfather of Chrome
Joined: Dec 2006
Posts: 1,297
Likes: 1
From: Santa Cruz, and yes I'm a hippie with retro 1970s sideburns and a chrome fetish
Originally Posted by TL-773
The black thing is a diode. It protects the car's electrical system by allowing the current to only flow in one direction. From the pics, it looks like the two LEDs are connected in series and the three resistors are in parallel.

This has been fun:
I dug some books out. Assuming the black thing is a diode (no effect on the) calculation, and that TL-773 is correct about the three resistors in parallel with 2 leds in series...
Remember:
Parallel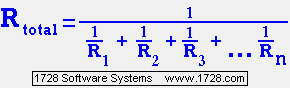
and series you just add the resistance.
Assuming the leds are standard yellow leds (13.5V at 3.2V 20mA)... The total resistance is 1300 ohm, where the two series leds should only need 470 ohm. Not sure why they used so high value resistors, other then to reduce the brightness.
- If you replace the yellow leds with more effecient white (13.5V, 2.2V at 20mA), in series, you should only need a sum of 390 ohms (thus the 1300 should be more than enough)
Assuming the same ratio of minimum resistance to applied resisance... 1078 Ohms
broken into 3 parrallel resistors = 360 ohm.
So, to be clear - we should replace the 3900 ohm resistors with 3200 ohm resistors to run the white leds.
Please don't bash me if I'm wrong, it's been a long time... can someone check my math?
I dug some books out. Assuming the black thing is a diode (no effect on the) calculation, and that TL-773 is correct about the three resistors in parallel with 2 leds in series...
Remember:
Parallel
and series you just add the resistance.
Assuming the leds are standard yellow leds (13.5V at 3.2V 20mA)... The total resistance is 1300 ohm, where the two series leds should only need 470 ohm. Not sure why they used so high value resistors, other then to reduce the brightness.
- If you replace the yellow leds with more effecient white (13.5V, 2.2V at 20mA), in series, you should only need a sum of 390 ohms (thus the 1300 should be more than enough)
Assuming the same ratio of minimum resistance to applied resisance... 1078 Ohms
broken into 3 parrallel resistors = 360 ohm.
So, to be clear - we should replace the 3900 ohm resistors with 3200 ohm resistors to run the white leds.
Please don't bash me if I'm wrong, it's been a long time... can someone check my math?
Instructor
Joined: Dec 2004
Posts: 179
Likes: 0
From: Chicago, IL
Maybe thats why your 5mm LEDs starting flickering. There wasn't enough current going to them. Either that or a bad solder connection. I did some math and you probably don't want to go lower than 1.2k ohms. 1.2k would give you about 17 mA to each LED. I don't if that would be too bright though. In your pics it already looked bright with the original 3.9k ohms.
So maybe you want to with something between 1.2k and 3.3k ohms. I'm not an expert, hopefully someone with more EE experience can give an opinion.
So maybe you want to with something between 1.2k and 3.3k ohms. I'm not an expert, hopefully someone with more EE experience can give an opinion.
Godfather of Chrome
Joined: Dec 2006
Posts: 1,297
Likes: 1
From: Santa Cruz, and yes I'm a hippie with retro 1970s sideburns and a chrome fetish
Originally Posted by TL-773
Maybe thats why your 5mm LEDs starting flickering. There wasn't enough current going to them. Either that or a bad solder connection. I did some math and you probably don't want to go lower than 1.2k ohms. 1.2k would give you about 17 mA to each LED. I don't if that would be too bright though. In your pics it already looked bright with the original 3.9k ohms.
So maybe you want to with something between 1.2k and 3.3k ohms. I'm not an expert, hopefully someone with more EE experience can give an opinion.
So maybe you want to with something between 1.2k and 3.3k ohms. I'm not an expert, hopefully someone with more EE experience can give an opinion.
Instructor
Joined: Dec 2004
Posts: 179
Likes: 0
From: Chicago, IL
Originally Posted by brettallica
If there wasn't enough current, would that cause a resistor failure? I'm certainly not an expert, but that doesn't quite add up to me.
Godfather of Chrome
Joined: Dec 2006
Posts: 1,297
Likes: 1
From: Santa Cruz, and yes I'm a hippie with retro 1970s sideburns and a chrome fetish
Originally Posted by TL-773
No, too much current would cause a resistor failure, and the resistors would look over-heated if they failed.
Maybe thats why your 5mm LEDs starting flickering. There wasn't enough current going to them
Instructor
Joined: Dec 2004
Posts: 179
Likes: 0
From: Chicago, IL
Well, it looks like you used different value resistors than the original ones. That would change the amount of current going to the LEDs. Its hard to determine the resistor values just from looking at pictures. The best way is to measure them using a multimeter.
It is possible that the original resistors failed. I can't tell you from sure just by looking at pics. Im just saying that usually when a resistor fails, there are some burnt marks.
Maybe try posting for help in the audio forum. There are probably members that know more about this stuff there.
It is possible that the original resistors failed. I can't tell you from sure just by looking at pics. Im just saying that usually when a resistor fails, there are some burnt marks.
Maybe try posting for help in the audio forum. There are probably members that know more about this stuff there.
Godfather of Chrome
Joined: Dec 2006
Posts: 1,297
Likes: 1
From: Santa Cruz, and yes I'm a hippie with retro 1970s sideburns and a chrome fetish
I see. Well I can tell you for sure that the resistors failed. My "test" - if you will - proves that. The side marker didn't work at all, then I changed the resistors it did. But yeah, it looks like I did use different resistors...but that doesn't change the results - know what I mean? The test still shows that the resistors failed.
I guess what I really want to know is: how in the heck can we continue to use the white LEDs and not have to worry about side marker failure?
I guess what I really want to know is: how in the heck can we continue to use the white LEDs and not have to worry about side marker failure?