

A-122: DIY - 105k Service: Timing Belt, Water Pump, Spark Plugs, Thermostat *PICS*
 01-11-2011, 12:05 PM
#201
Chapter Leader (Southern Region)
Thread Starter
I tried fucking around with that cover for at least a good hour, trying to figure out how to do it with the tensioner on.. walked away.. then said fuck it.. it has to go, no other way. Yep.. that damn rear cam rocked 1 tooth each way on me before I man handled it and got it lined up. 
Glad you got it replaced and running again!
Glad you got it replaced and running again!
 01-11-2011, 08:11 PM
#202
Instructor

Join Date: Dec 2003
Location: Lower Saucon, PA
Age: 49
Posts: 118
Likes: 0
Received 0 Likes
on
0 Posts
Breaker bar = failed.
Air gun = failed
I was ready to do the whole breaker bar + 5' cheater bar and decided "F it.. let me try this bump start thing everyone talks about"
Here was my setup:
http://www.flickr.com/photos/58194987@N02/5347405077/http://www.flickr.com/photos/58194987@N02/5347405077/ by http://www.flickr.com/people/58194987@N02/, on Flickr
1 crank on the starter and 2 seconds later.. DONE!
God I wish I did this as the first thing to get that stupid F'n bolt off!
Can't believe I wasted soo much time with the breaker bar, upgrading air lines to the air compressor.. etc..
I highly recommend the above setup! Position the bar and give her a crank!
-Motavar
01-11-2011, 09:10 PM
#203
Race Director
Yeah, without the cheater bar you weren't gonna get that thing off. I had 8' of iron pipe I used and the iron pipe is bent at the point where it extended beyond the breaker bar.
I had a heck of a time trying to get the breaker bar attached to the hex tool wedged. I finally cut a slot in a 1x6, bolted the 1x6 to a car ramp and slid it under the car to hold the breaker bar. I put 400lbs (8 bags) of mortar on the ramp to hold it. First time I tried to break it loose, it just slid the ramp and 400lbs like it was nothing. Tried the same setup, but also wedged a 2x4 between the end of the ramp and my garage door. Bazinga!!!
What is the length of that breaker bar? It looks like about 30", but hard to tell from the photo? I wish I had tried the bump method first thing, but I was discouraged by posts in the UR pulley thread where it didn't work. I spent way too much time trying to get the hex tool wedged....Also looks like the whole fender was removed?
I guess you saw from my post that I had the same issue with the rear cam springing out of TDC. Based on the valve spring pressure on the cam, that baby's gonna move if it wants to. When it's at TDC, the cam is sitting on the apex of the lobes and there's not much to keep it from sliding off either direction...
Last edited by nfnsquared; 01-11-2011 at 09:14 PM.
01-13-2011, 10:30 AM
#204
Race Director
Thought of a couple more things to make your life easier during this task:
1. Get a 3/8" 1.5" extension. It will help on some of the recessed TB cover bolts and still allow a ratchet to fit in the tight space.
2. Highly recommend a 10mm ratcheting box wrench.
3. Magnetic grabber. Trust me.
4. Last, but not least: try to locate a good Zulu witch doctor who can temporarily shrink your hands and forearms to the size of a 10-year old boy
Here's a picture of my ramp contraption to hold the breaker bar. And my iron cheater bar. Note the slight bend in the bar. Yikes!
01-13-2011, 10:37 AM
#205
Chapter Leader (Southern Region)
Thread Starter
+1 on the zulu witch doctor and aforementioned tips..
Just make sure he doesn't shrink anything else to the size of 10 yr olds
Just make sure he doesn't shrink anything else to the size of 10 yr olds
01-16-2011, 08:44 PM
#206
Chapter Leader (Houston)
iTrader: (7)
Thanks for the writeup and tips guys. I completed the service today with the help of a fellow member. Overall, not a very difficult job, just need the correct tools and small hands . The TB covers were a PITA
The following users liked this post:
JD TL-S (03-19-2015)
01-16-2011, 08:56 PM
#207
Race Director
A heads up: If you notice a strange humming/moaning/whining sound in the next few days, it's probably the drive belt auto tensioner or the path of the drive belt on the auto tensioner pulleys. About day 3 I noticed the noise. I popped the drive belt off the crank pulley and started the engine...noise was gone. Put the belt back on...no noise. Don't know if flexing the AT did the job or if repositioning the belt on the AT pulleys did. I pretty much had the belt centered on both pulleys before and after...
BTW and FYI, my old TB looked to be in excellent shape...
The following users liked this post:
JD TL-S (03-19-2015)
01-16-2011, 09:11 PM
#208

just finished this service on my tl yesterday and wanted to say VERY nice write up. also just to make some of you feel better my crank pulley bolt was a major pain to get off(2 broken extensions, 2 broken sockets, 1 broken ratchet, and about 3 hours of my life) could not bring myself to the bump the starter trick. overall after the cp bolt came loose the rest was smooth sailing.
The following users liked this post:
JD TL-S (03-19-2015)
01-16-2011, 09:13 PM
#209
Chapter Leader (Houston)
iTrader: (7)
I replaced the drive belt and tensioner last week after I couldn't get the crank pulley bolt loose so I think the belt was broken in. I think the engine tick sound seems a bit louder but it could be my mind as well as I dont have the engine compartment covers on there. Just paranoid at this point but I think it should be fine. I drove 25 miles home and everything felt normal.
01-16-2011, 09:15 PM
#210
Chapter Leader (Houston)
iTrader: (7)
just finished this service on my tl yesterday and wanted to say VERY nice write up. also just to make some of you feel better my crank pulley bolt was a major pain to get off(2 broken extensions, 2 broken sockets, 1 broken ratchet, and about 3 hours of my life) could not bring myself to the bump the starter trick. overall after the cp bolt came loose the rest was smooth sailing.
Good job man. We tried everything last week and the bolt didnt move. I did the bump starter trick and bam, the bolt was loose.
01-16-2011, 09:18 PM
#211
Race Director
Breaker bar = failed.
Air gun = failed
I was ready to do the whole breaker bar + 5' cheater bar and decided "F it.. let me try this bump start thing everyone talks about"
Here was my setup:
1 crank on the starter and 2 seconds later.. DONE!
God I wish I did this as the first thing to get that stupid F'n bolt off!
Can't believe I wasted soo much time with the breaker bar, upgrading air lines to the air compressor.. etc..
I highly recommend the above setup! Position the bar and give her a crank!
-Motavar
01-17-2011, 03:16 PM
#213
01-17-2011, 03:18 PM
#214
Chapter Leader (Southern Region)
Thread Starter
Clean out the area with brake cleaner and make sure you lube the threads with fresh oil. Don't torque it in if it locks up. You should be able to screw it in completely by hand. Then torque it to spec using a similar technique to removal if using breaker bar.
01-17-2011, 03:36 PM
#216
Chapter Leader (Southern Region)
Thread Starter
I would use a wire brush and comb the threads a little bit then clean it up and oil it.. might even chase the crank threads but doesn't sound like a great proposition either way. Do you see any wear marks on the CP bolt?
01-17-2011, 03:39 PM
#217
Chapter Leader (Southern Region)
Thread Starter
Congrats!
A heads up: If you notice a strange humming/moaning/whining sound in the next few days, it's probably the drive belt auto tensioner or the path of the drive belt on the auto tensioner pulleys. About day 3 I noticed the noise. I popped the drive belt off the crank pulley and started the engine...noise was gone. Put the belt back on...no noise. Don't know if flexing the AT did the job or if repositioning the belt on the AT pulleys did. I pretty much had the belt centered on both pulleys before and after...
BTW and FYI, my old TB looked to be in excellent shape...
 01-17-2011, 03:44 PM
#218
Chapter Leader (Houston)
iTrader: (7)
That's the weird part. I installed and removed the several times during the process. On the last round when I was ready to tighten it fully, I noticed the bold would stop after a few threads in. I inspected, cleaned and oiled and no difference so I used an impact to get it on tight. Now im wondering if I should just leave it or replace the bolt with a new one.
01-17-2011, 04:53 PM
#219
Race Director
That's the weird part. I installed and removed the several times during the process. On the last round when I was ready to tighten it fully, I noticed the bold would stop after a few threads in. I inspected, cleaned and oiled and no difference so I used an impact to get it on tight. Now im wondering if I should just leave it or replace the bolt with a new one.
I wiped down the bolt, re-oiled it, gave the crank threads a finger cleaning, and tried it again. Worked fine. I assume a small shaving or particle got on either the male or female threads. Never found it though.
If the bolt is in there and it's not cross threaded, I'd say you're fine. It might be a bitch to get out at 210K, but who knows (or cares)?
01-17-2011, 04:59 PM
#220
Race Director
01-21-2011, 09:59 PM
#221
Instructor
Talked to Rick at Hansel Prestige Acura and he said Kaleb moved to their Honda store and the prices are still good, good guy. Thanks to Majofo for his Great DIY https://acurazine.com/forums/showthread.php?t=784622 .
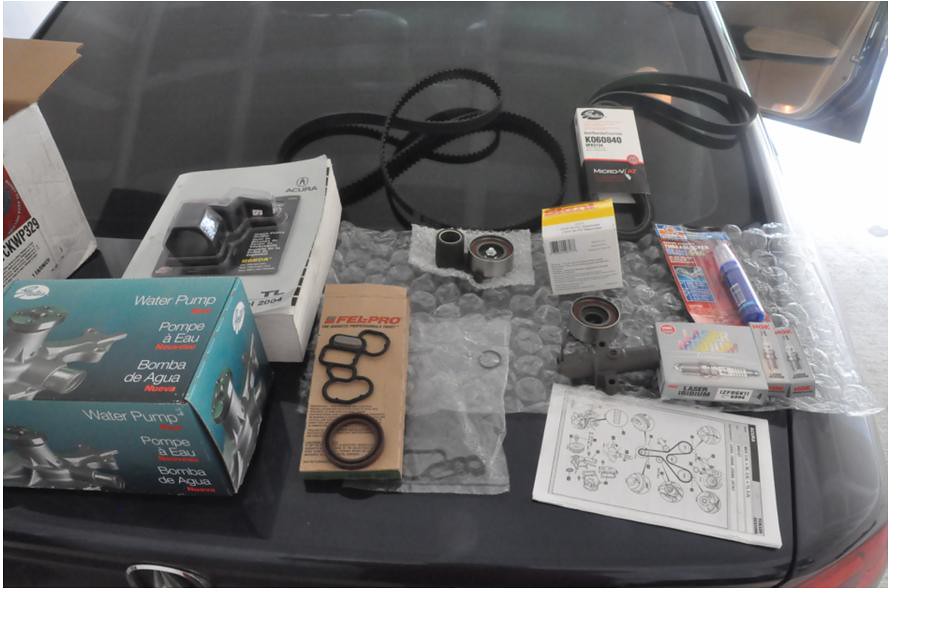
It does seem intimidating but I think I have what it takes. Worked on cars alot and fixed alot of our machines we use in our business. Here is the list of parts I ordered today, if I missed something please let me know.
Timing Belt - 14400-RCA-A01
Drive Belt - 3892-RCA-A03
Water Pump w/ gasket - 19200-RDV-J01
Timing Belt Adjuster - 14510-RCA-A01
Timing Belt Auto Tensioner - 14520-RCA-A01
Timing Belt Idler Pulley - 14550-RCA-A01
Thermostat w/ gasket - 19301-P(S or 8)E-A10
Cam and Crank seals, no # sorry.
Valve Cover Gaskets and Spark Plug Seals
I already have Spark Plugs, Coolant, Transmission filter and fluid, 3rd & 4th Trans pressure switches(w/ new washers or gaskets) and all tools and supplies from DIY thread. So I know I have alot of work ahead and will do it one weekend in near future. Anything else why I'm in there? Wish I could just rebuild whole motor for the Turbo, have to wait for lottery for that though, for now.
01-21-2011, 11:44 PM
#222
Race Director
^^^Looks pretty complete.
I take it you are doing a valve adjustment? If so, you should consider the intake manifold gaskets (there are two IIRC, one for the intake and one for the intake cover). The SM says to use new gaskets. I missed this and did not put new ones back on and everything seems
fine.
I bought new spark plug seals, but wound up not using them. The existing ones were in great shape.
Be very careful when torqueing the valve cover bolts. They have stop washers on them. You will feel when they hit. Stop there, even if you haven't reached the torque spec (think it's 8.7 ft-lbs).
If you don't have a 3/8" torque wrench, I'd consider adding it to your tool collection. It will fit much better than the 1/2".
Highly recommend getting some 5/16" inside diameter tubing (about 7") to start threading the spark plugs. Works like a champ. And I used two 3" extensions for the rear plugs.

And remove the tower strut bar....
Thread lock?
Anti-sieze?
I take it you are doing a valve adjustment? If so, you should consider the intake manifold gaskets (there are two IIRC, one for the intake and one for the intake cover). The SM says to use new gaskets. I missed this and did not put new ones back on and everything seems
fine.
I bought new spark plug seals, but wound up not using them. The existing ones were in great shape.
Be very careful when torqueing the valve cover bolts. They have stop washers on them. You will feel when they hit. Stop there, even if you haven't reached the torque spec (think it's 8.7 ft-lbs).
If you don't have a 3/8" torque wrench, I'd consider adding it to your tool collection. It will fit much better than the 1/2".
Highly recommend getting some 5/16" inside diameter tubing (about 7") to start threading the spark plugs. Works like a champ. And I used two 3" extensions for the rear plugs.
And remove the tower strut bar....
Thread lock?
Anti-sieze?
Last edited by nfnsquared; 01-21-2011 at 11:57 PM.
01-22-2011, 07:42 AM
#223
Instructor
I will be adding intake gaskets today, forgot that too. I have 3 torque wrenches 1/4, 3/8 and 1/2. I have anti-seize & threadlocker. I have been using fuel line(5/16) for years, differant lengths for differant cars. Thank you for the reminders and tips, it never hurts to repeat, its like measure twice, cut once. Thanks again.
01-22-2011, 07:55 AM
#224
Race Director
I will be adding intake gaskets today, forgot that too. I have 3 torque wrenches 1/4, 3/8 and 1/2. I have anti-seize & threadlocker. I have been using fuel line(5/16) for years, differant lengths for differant cars. Thank you for the reminders and tips, it never hurts to repeat, its like measure twice, cut once. Thanks again.
Good luck, let us know how it all turned out. I'll be interested to see what your valve clearances are at when you get in there. For me, the exhaust were tight and the intakes were loose (all at about 0.010").
01-22-2011, 08:18 AM
#225
Instructor
Interested too(valves). Got car 1.5 years ago with ~92,000 miles and only done oil change, air filter and this done https://acurazine.com/forums/3g-tl-problems-fixes-114/motorvac-759087/. With 22 mpg city and 31~32 mpg highway, just wondering what differences I will notice after doing all the trans stuff, oil change, timing belt, spark plugs, valves and cleaning parts coming off compared to what others have noticed doing these either seperately or collectively. Will update when finished. Thanks!
01-22-2011, 10:11 AM
#226
Race Director
Honestly, I can't tell a difference in performance or cold/warm idling. I was getting the same mileage figures as you (on winter gas).
I switched to M1 0w40 a couple of weeks before I did the TB/valves and noticed it appears my mileage has taken about a 2 mpg hit with the higher vis oil. It's really a little too early to make that conclusion, but I may switch back to 5w20 next oil change. Will need to weight the cost/benefit aspects of the higher HTHS spec and full syn properties of the 0W40....
I switched to M1 0w40 a couple of weeks before I did the TB/valves and noticed it appears my mileage has taken about a 2 mpg hit with the higher vis oil. It's really a little too early to make that conclusion, but I may switch back to 5w20 next oil change. Will need to weight the cost/benefit aspects of the higher HTHS spec and full syn properties of the 0W40....
01-22-2011, 11:44 AM
#227
Instructor
I use M1 filters and Schaeffer Oil and when I do the trans I'm using Schaeffer Trans fluid. I own small business with a 2000 & 2001 F-350 93 F-150 so I just order enough for personal vehicles also. We get good discounts for bulk buying and free shipping. Here are some links on products we use:
http://schaefferoil.com/supreme_9000.html for TL, Mustang & F-150, 5w-30
http://schaefferoil.com/supreme_7000.html for F-350's, 15w40
http://schaefferoil.com/neutra_plus.html for gas vehicles
http://schaefferoil.com/soy_shield.html for gas vehicles
http://schaefferoil.com/204_transmission_fluid.html all vehicles
http://schaefferoil.com/specialty/190_Penetro.html better than PB Blaster and WD-40
http://schaefferoil.com/specialty/266_citrol.html great cleaner
http://schaefferoil.com/specialty/132.html oil additive, can not tell if it helps just peace of mind I guess. Same with fuel additives.
http://schaefferoil.com/specialty/Ne...ing_fluid.html seems to work but really need before/after pics.

 05-07-2011, 08:35 PM
#229
Advanced
Join Date: Jul 2006
Location: Chesterfield, VA
Age: 53
Posts: 83
Likes: 0
Received 2 Likes
on
2 Posts
105k Service @ 115k mi
Just did this today and finished cleaning up. Wow! I bought a 1/2" Impact Wrench thinking that would do the trick on the crank bolt. Unfortunately it only went up to 200 ft lbs, which didn't work. My 1/2" torque wrench topped out at 250 ft lbs and that didn't work either. I ended up borrowing a 1/2" x 24" breakover from AZ and kept tugging at it like a dog on a rope. Finally it broke free. The only other trouble I had was breaking the 14mm bolt on the auto tensioner pulley for the accessory belt. Had to use a pipe on the ratchet and bounce it a few times too.
All in all, everything else went smoothly. Of course I had this thread open (beside the Acura TL manual!) and it was a great companion. Thanks again for putting this together. After all this work, to document the steps like you did would not have happened. It took so long that my truck battery died because I was listening to some tunes while I worked. DOH!!
All in all, everything else went smoothly. Of course I had this thread open (beside the Acura TL manual!) and it was a great companion. Thanks again for putting this together. After all this work, to document the steps like you did would not have happened. It took so long that my truck battery died because I was listening to some tunes while I worked. DOH!!
The following users liked this post:
JD TL-S (03-19-2015)
05-07-2011, 09:25 PM
#230
Chapter Leader (Southern Region)
Thread Starter
Awesome!
05-07-2011, 09:54 PM
#231
Race Director
Now for a soak in the hot tub, eh?
05-31-2011, 12:42 AM
#232

I am getting ready to do the Timing Belt on my TL. It is a 2004 with right at 50K. I am 7 years, so I think I should be safe and just have it done. I drive 7-8k/year. What should I do with the water pump and spark plugs? I have had the water pump done on both my last cars, but the miles warranted it. Should I just do it? Also. what about the plugs? Also, should I consider adjusting the valves at the same time?
Thanks for the help and advice in advance!
Thanks for the help and advice in advance!
05-31-2011, 09:10 AM
#233
Race Director
I am getting ready to do the Timing Belt on my TL. It is a 2004 with right at 50K. I am 7 years, so I think I should be safe and just have it done. I drive 7-8k/year. What should I do with the water pump and spark plugs? I have had the water pump done on both my last cars, but the miles warranted it. Should I just do it? Also. what about the plugs? Also, should I consider adjusting the valves at the same time?
Thanks for the help and advice in advance!
Thanks for the help and advice in advance!
I'd probably replace the pump. It's only $90, IIRC.
05-31-2011, 09:33 AM
#234
Chapter Leader (Southern Region)
Thread Starter
I would agree, definitely replace the WP, timing belt, adjuster, auto tensioner and idler pulley.. the plugs & valves can wait. Have fun! 
05-31-2011, 11:14 AM
#235
Thanks for the reply. I am either having the dealer or a friend (ASE Certified and did the belt on my last 2) do the replacement, so it is about a $200 difference. I don't want to not do the water pump and regret it 5,000-10,000 miles later, but at the rate I drive, if it goes out at 95K, not so bad because I would need a new timing belt anyway!
06-14-2011, 08:20 PM
#236
N00b Extraordinaire
Thanx Majofo and everyone who suggested the bump method!
Thanx for the excellent walk-thru Majofo. I'd also like to thank the guys for reminding me about the bump method. Heh, it's been 26 years since I put a timing belt on my old '77 Civic, and completely forgot about the breaker bar on the crankshaft that a friend taught me. The reminder saved me from going insane. It took me about 10 bumps to get it off, but I did in the end. I also ran into the drive belt tensioner being in the way of removing the forward upper half of the timing belt cover. Neither the instructions scaned from the Acura manual nor AllData included this step. Unlike you, I ended up removing only the upper tensioner. This job really brought back my ba...., ur, uh, good old college days when working on my or a friend's car wasn't an uncommon way to spend a weekend. Fun, fun. Really, too much fun for me. I think after I replace my left axle and leaking rack and pinion, I'm done with anything beyond oil, wipers, and air filters.
06-14-2011, 08:52 PM
#237
Chapter Leader (Southern Region)
Thread Starter
lol.. I hear ya. Glad it went well!
 06-16-2011, 11:45 AM
#239
N00b Extraordinaire
@Majofo
Heh, actually, I only got it half done in the time I had day before yesterday (everything off, water pump replaced). Went back at it yesterday evening and ran into something that has led me to stop and ask for some advice. Please be gentle as I've only done a timing belt twice before and they were both Honda inline four-cylinder engines; i.e. I've never done a V6 before, perhaps my understanding of the mechanics is f'd up.
I followed the instructions from AllDataDIY.com while removing the timing belt, and only came across your instructions while looking for info on the difficulty of removing the crankshaft pulley. AllData's instructions TB removal instructions said to verify the front camshaft and crankshaft pulleys were at TDC before removal of the crankshaft bolt; I stupidly followed these instructions instead of verifying the position of both camshaft pulleys, and this came to bite me in the ass while installing the new TB. Step five of your instructions much more wisely state to check the position of all three. How I wish I had come across your instructions BEFORE I 'bump'd' the crankshaft bolt. When it came time to reinstall the TB I verified the position of the front camshaft pulley and noticed it had moved forward during the 'bumping' process, as had the crankshaft pulley. I rotated the front camshaft pulley to TDC, and moved on to the rear camshaft pulley. I simply noted that the rear camshaft pulley wasn't at TDC, but didn't mark where it was in relation to TDC when I started to correct its position. I rotated the rear camshaft and was surprised when it didn't come to TDC in the same number of turns as the front camshaft pulley; thinking I had merely miscounted the number of rotations I simply continued to rotate it until it stopped at TDC. Well, it never stopped at TDC, and herein lies my question. The front camshaft pulley(CSP) has marked spokes 1 - 6 for each cylinder. When rotating the CSP's they each come to rest in three positions. By this I mean that during the manual rotation of the CSP it naturally stops rotating at three positions due, I think, to springs being released or no longer compressed by bumps on the camshaft. On the front CSP these stopping points are marked "1," "2," and "3" with "1" being TDC. These markings correspond to every 2nd spoke of the six-spoke pulley, or every 120�. The rear CSP likewise comes to rest every 120�, however these resting spots do not correspond to the TDC mark. The resting spots are 60� past TDC, 180� past TDC, and 60� before TDC. Shouldn't the rear camshaft come to a resting point where the TDC mark on the pulley aligns with the TDC mark on the rear half of the TB cover, as is the case for the front CSP? This, at least, is my working assumption. As such, I'm disconcerted that the rear CSP never comes to rest with the TDC marks aligned. To align these marks I'd have to stop the rotation between stopping points and attempt to mount the belt. This would be quite hazardous as a slight move of the CSP will cause it to suddenly and rapidly rotate forward.
Because of my working assumption that the rear CSP should come to rest at a point where the TDC marks are aligned, I think the CSP was installed incorrectly at the factory. Or am I smoking crack? Should the alignment marks of the rear CSP indeed come in between the natural stopping points of the CSP rotation cycle?
You probably understand my concern as not getting this right will cause severe damage to the motor. I'd appreciate some input on this!
06-16-2011, 12:01 PM
#240

Thanks for the reply. I am either having the dealer or a friend (ASE Certified and did the belt on my last 2) do the replacement, so it is about a $200 difference. I don't want to not do the water pump and regret it 5,000-10,000 miles later, but at the rate I drive, if it goes out at 95K, not so bad because I would need a new timing belt anyway!