
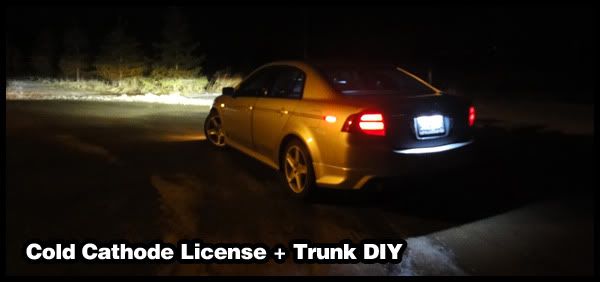
[DIY] Cold Cathode License Plate Light + Trunk Light
 02-09-2012, 08:20 PM
#1
Race Director
Thread Starter
iTrader: (8)
[DIY] Cold Cathode License Plate Light + Trunk Light
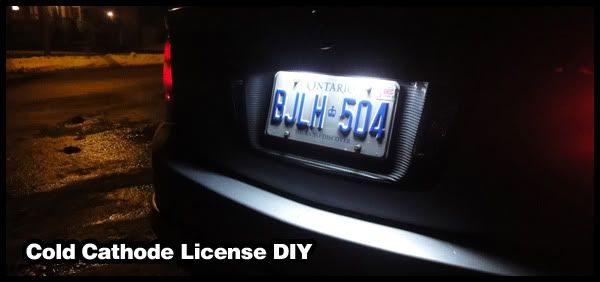
So what is this cold cathode light you speak about?
Well, in short, it's SUPER bright lighting.
Cold cathode tubes are mainly sold for computer case modding use.
They do take a little bit to warm up to full brightness, which is the only downside.
On the other hand, if you're looking for a bright, and instant-on light, check out LEDs.
Also, cold cathodes aren't exactly plug and play, although it's very close!
The best part? Cold cathode kits are VERY cheap.
You can find the kit for around $7.
This DIY is very easy.
It's not nearly as hard as the accord fog DIY, but it won't take 15 minutes like polishing your exhaust tips.
I'd say, it takes about 45 minutes to an hour to do.
I'll be splitting this DIY into two sections.
One for the license plate lights, and one for the trunk lights.
As always, you perform this DIY under your own RISK.
I will not be held liable for any damage that may occur.
Lets start off with the materials list, shall we?
Materials:
1. Cold Cathode Kit (12" WHITE) - I bought mine from "all_city".
Make sure it's from the brand "Logisys", most are made by Logisys anywho.
2. Industrial Strength Mounting Tape - I used LePage "No More Nails" Mounting Tape.
3. Reflective Tape, Foil Tape, or Aluminum Foil.
I bought a roll of "Foil Tape" used for duct work which costed me $8.
You can try finding them in dollar stores for much cheaper!
The cheapest method which works essentially the same way is to use Aluminum Foil. The purpose of this reflective material is well - to reflect the light better, improving the output of the cold cathodes.
4. Quick Connects aka "T-Taps", or splice connectors.
5. Zip ties
6. Scissors
7. Wire strippers & crimper
8. Flat-head screwdriver
9. Philips screwdriver
Gathered everything?
Now lets get started on the DIY!
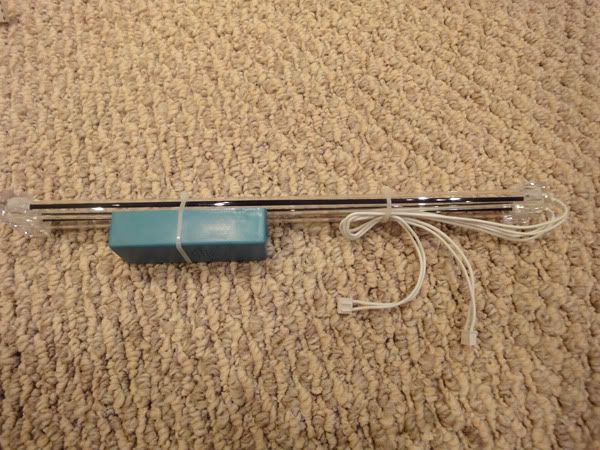
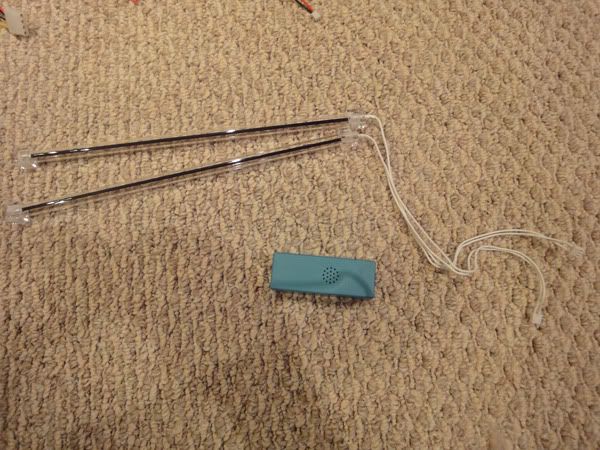
1. Open up your cold cathode kit and lay it all out.
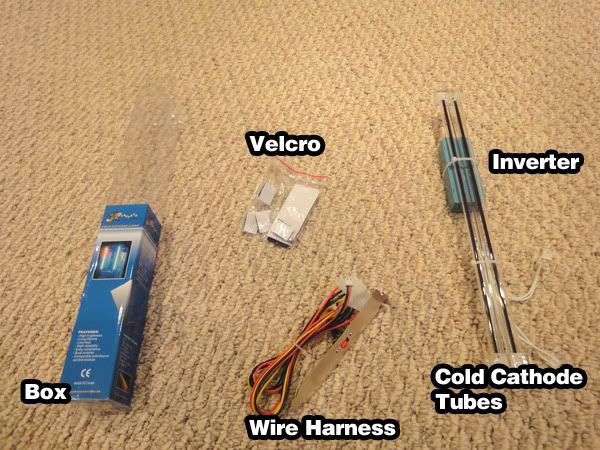
You should have a pack of velcro, your cold cathode tubes attached to your inverter, the wire harness, and the box.
You won't be needing the velcro included since it's not strong enough and we're using mounting tape instead.
DO NOT throw away the box as you will need it later in the DIY.
Prepping your wire harness.
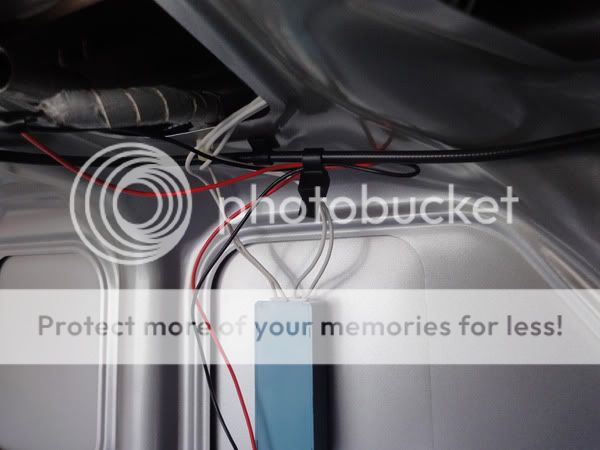
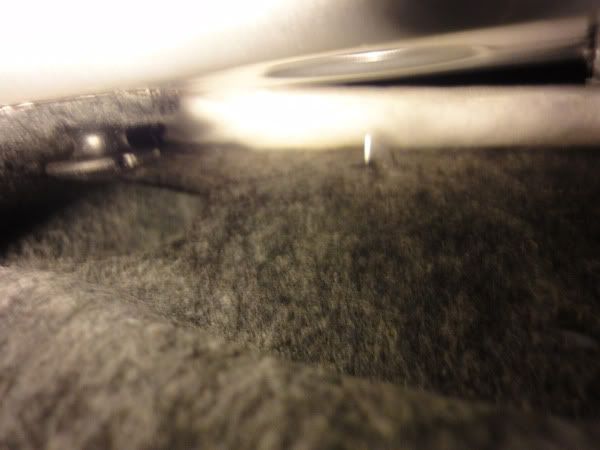
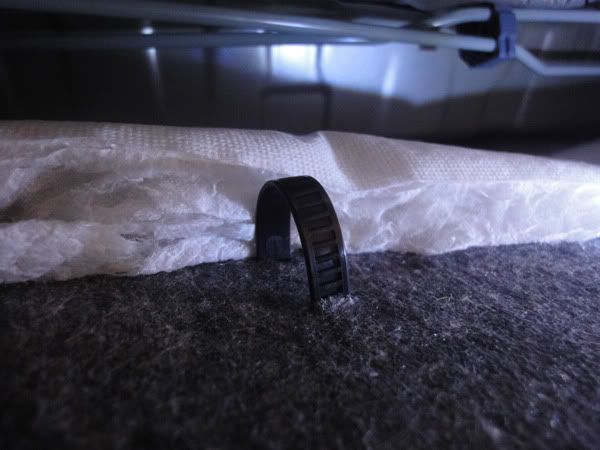
1. Take your wire harness. There will be 3 zip ties on it.
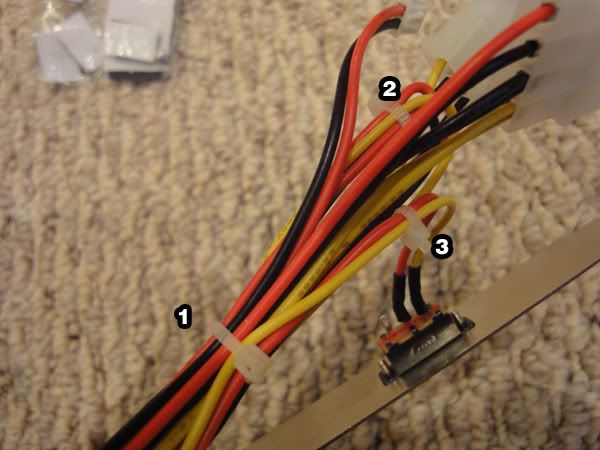
Cut off the zip ties. Unravel everything.
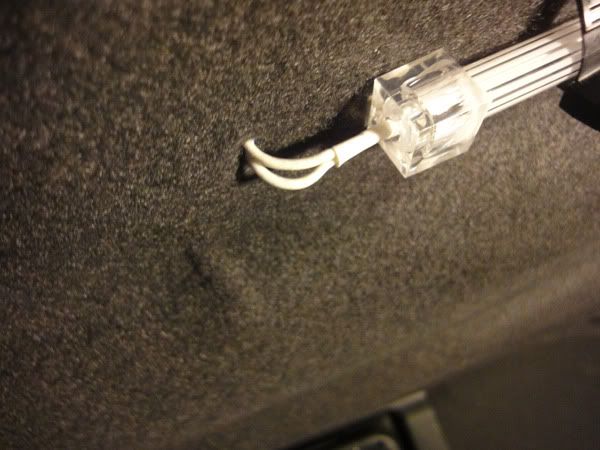
2. You only need the two wires, black and red, and its connector that plugs into the inverter.
cut the two wires as shown in the picture.
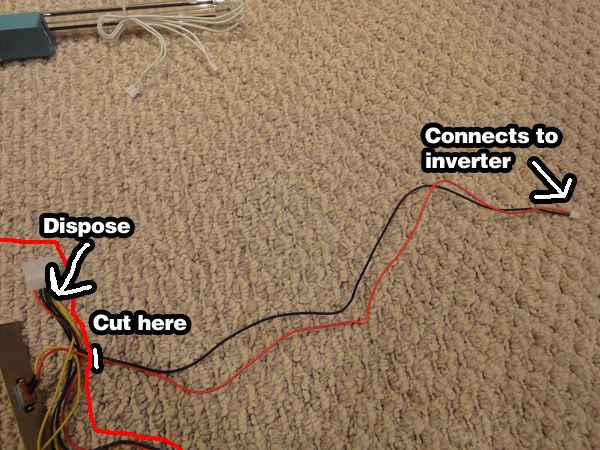
You can discard the computer connectors and the switch, as we only need the red and black wires that lead to the connector that goes into the inverter.
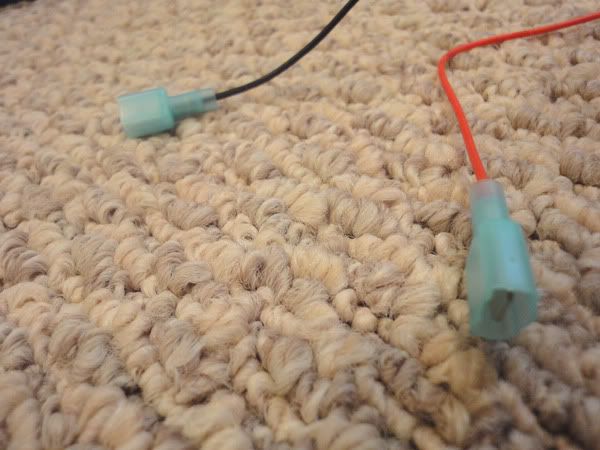
3. Strip back the insulation at the end of the two wires where you cut, and crimp down a "quick connector" to each of them.
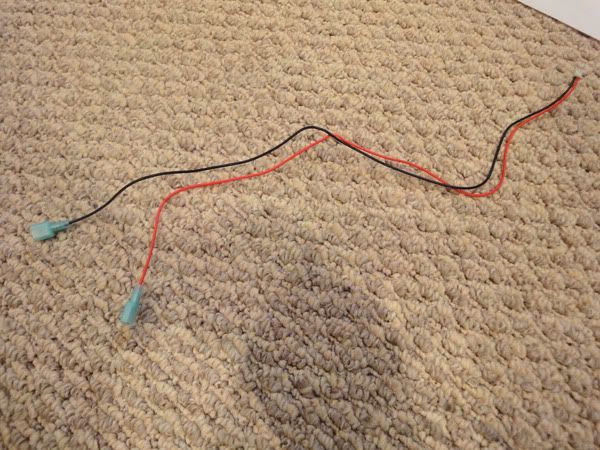
4. Put this aside, as we are done with it until we head to the car!
Now time to prep the cold cathode tubes.
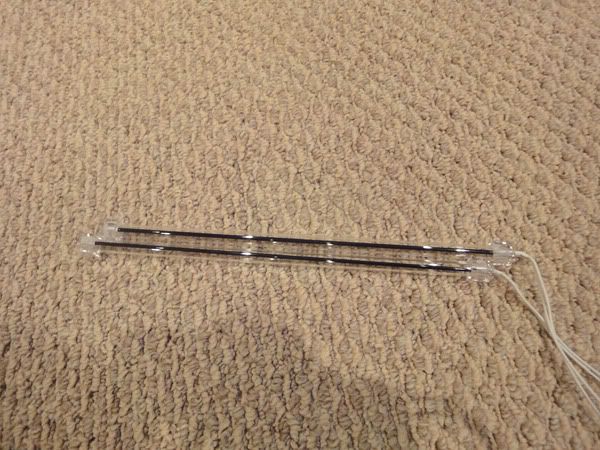
1. Lay out the cold cathode tubes infront of you.
Cut the zip tie holding the tubes to the inverter, and the zip tie on the tube's wiring.
2. Place the inverter aside, and focus on just the cold cathode tubes.

3. Push the two cold cathodes together side by side, offsetting them like so:
Note the wires coming out to your right, and the tube closest to you is offset the furthest left and the tube farthest from you is offset farthest right.
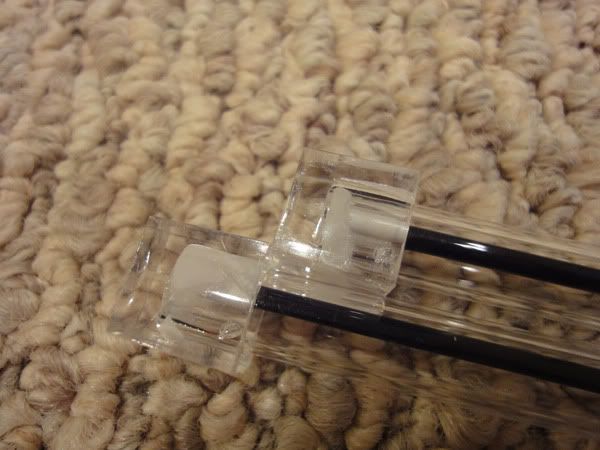
4. Now take your reflective tape, foil, aluminum foil or whatever you use to reflect light, and cut it these dimensions:
10 and 1/2 inch is the length
1 and 1/2 inch is the width
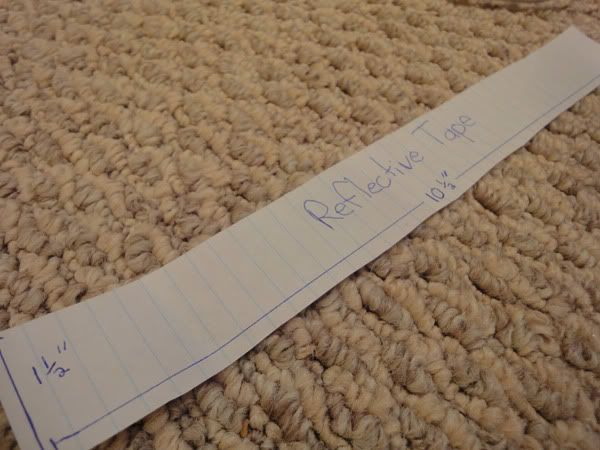
5. It should fit perfectly between your two tubes because I did all the measuring for you already.


6. It should sit evenly halfway down the tubes on both sides.
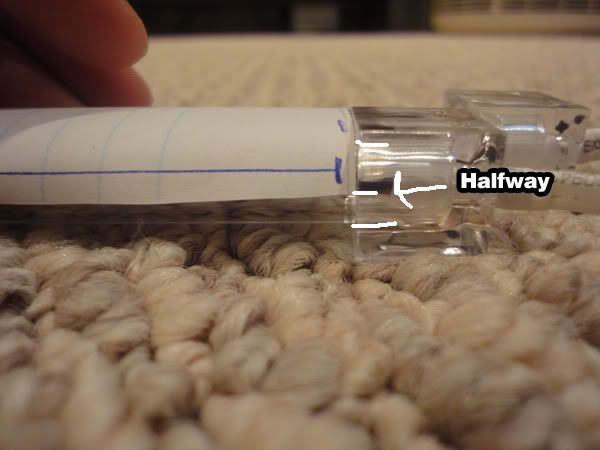
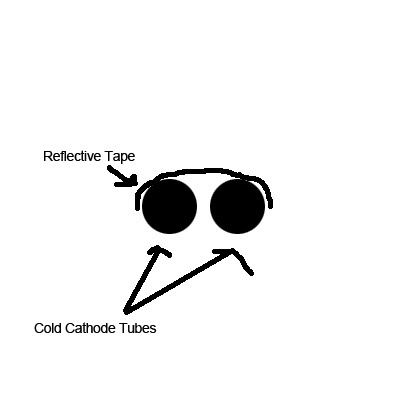
7. Once you're happy, take 3 zip ties, and place one zip tie at each end and one in the middle, securing the two cold cathode tubes together as well as the reflective tape.
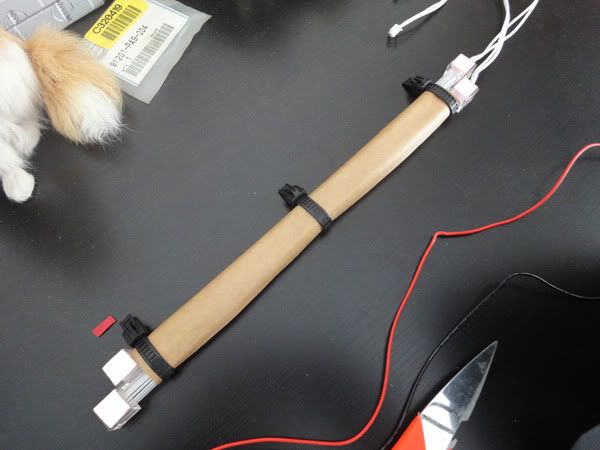
Cut off the excess from the zip tie.
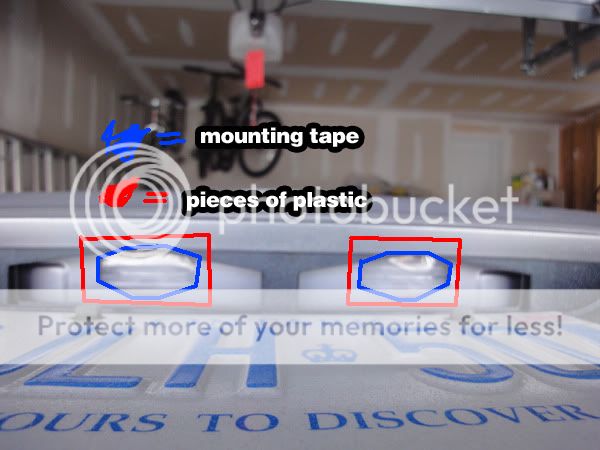
8. Now, flip over your apparatus (so you now see the tubes side) and cut four squares of your mounting tape to the same size as the four corners of the cold cathode tubes.
9. Stick them on, but don't take off the red tape on the other side yet (obvious much?)
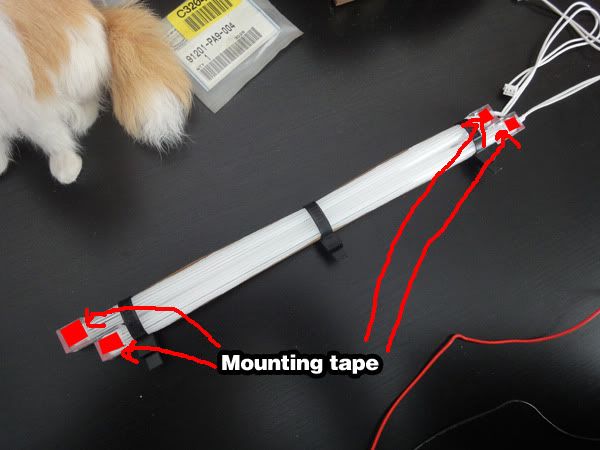
We're done prepping the wire and the cold cathodes!
Now grab your wires with the quick connectors on them, and grab your cold cathode tubes and head out to the car!
Sorry, I forgot to take pics, but I can explain best as I could using other's pictures until I can get my own.
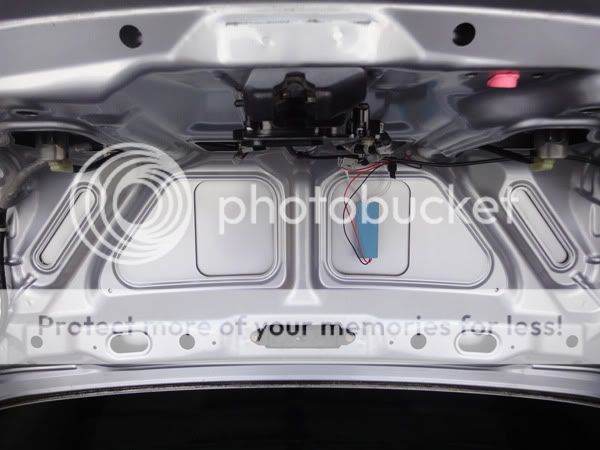
Preparing your trunk:
1. Remove your trunk liner.
Pretty simple. 11 clips. 1 screw.
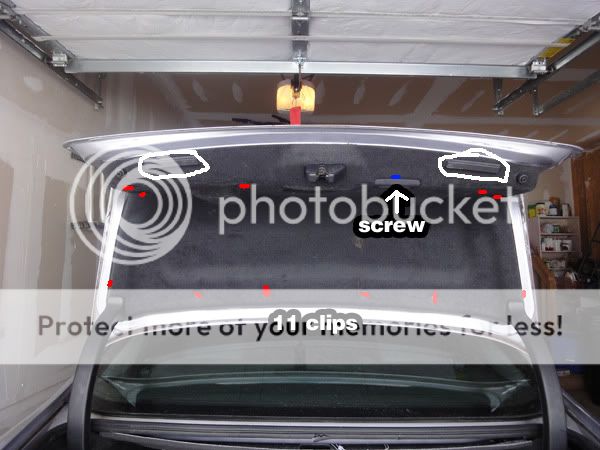
https://acurazine.com/forums/3g-tl-2004-2008-93/e-035-diy-how-remove-trunk-liner-pics-763693/
http://img.photobucket.com/albums/v2...moval20-69.jpg
2. Unplug the license plate light connectors and disconnect the reverse light connectors.
4 disconnected connectors in total... easy math?
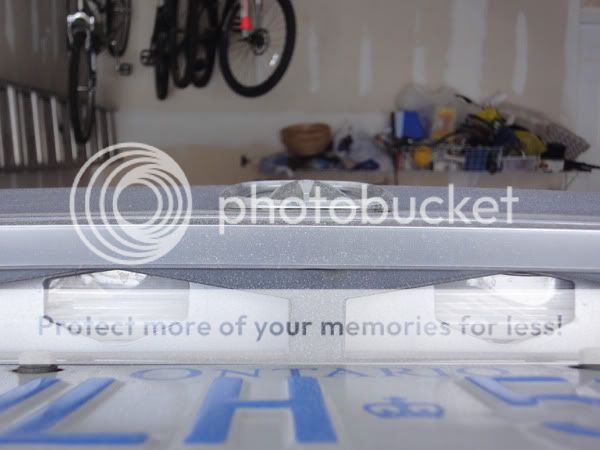
3. Remove the license plate frame/assembly.
It's just 4 bolts, 2 on each side, and the rest are clips that hold it in that you could just "disengage" with pressure.
http://img.photobucket.com/albums/v2...ment20-138.jpg
4. Remove the old license plate bulb housings.
There's a clip on each side you push in and slide the housing out after you push in the clip.
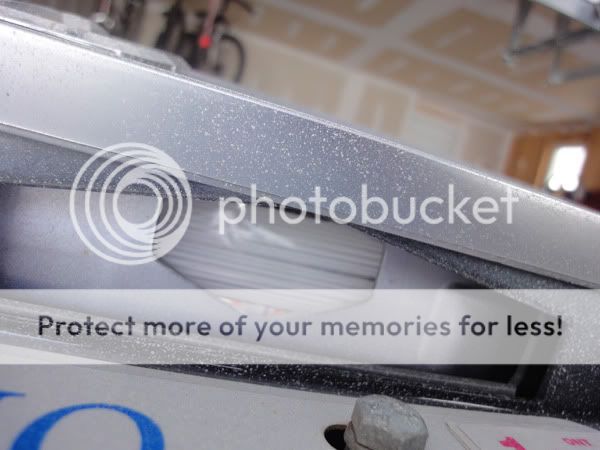
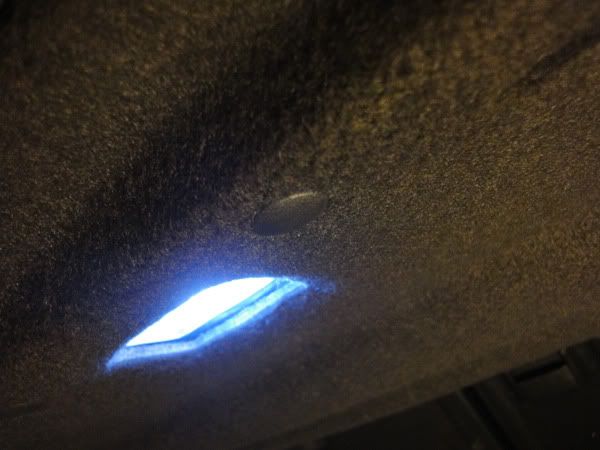
5. We need something to replace the bulb housing, so water can't get in.
You can get creative...
What I did, was take the plastic box the Logisys cold cathodes came in, and cut it to a rectangular shape big enough to cover the opening. You'll have to make two of these, one for each opening.
You can also use Lexan, if want.
6. To secure the plastic "lens" in, I took mounting tape (same one used throughout this DIY), and ran it all along the opening in the inside. Then remove the red tape, and push the new plastic lens down on it.
(I took these pictures after I mounted the cold cathode tubes)
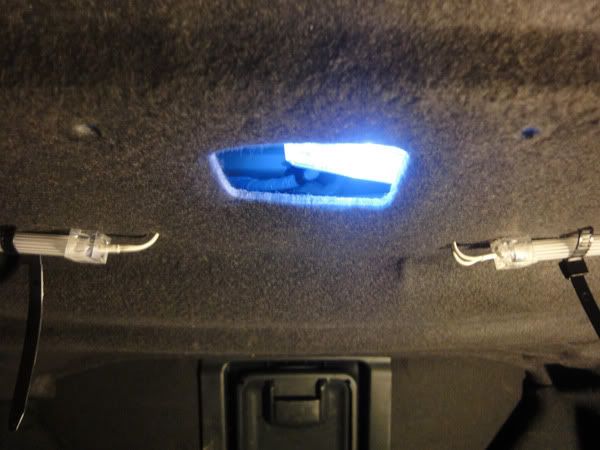
Done. Your trunk is now prepped!
Time to actually mount the cold cathode tubes...
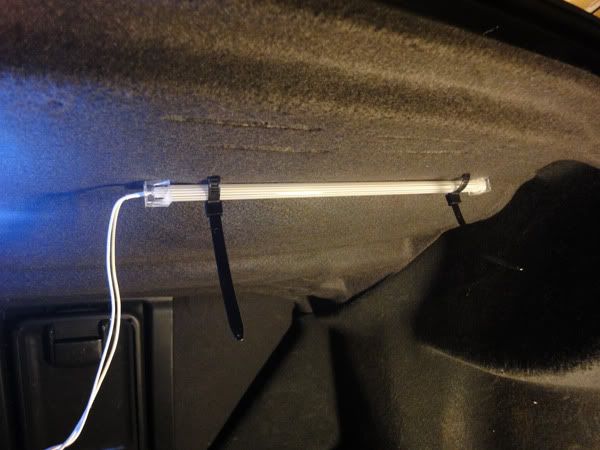
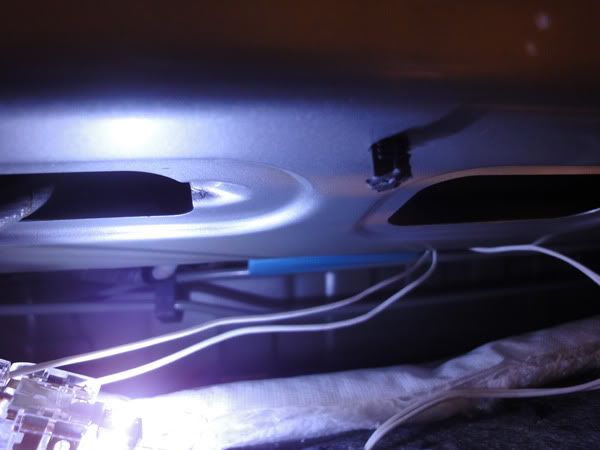
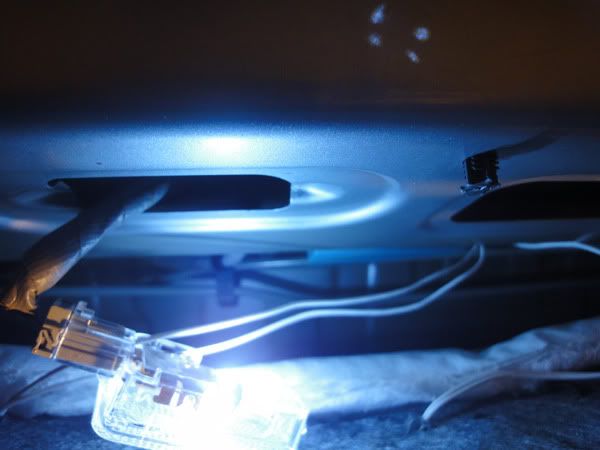
1. Take your cold cathodes, and take off the red tape.
2. Stick the cold cathodes in your trunk, with the wires coming to the passenger side.
3. Press them DOWN now once you're happy with their position, making sure you don't see your zip ties.
4. You might want to add even more double sided tape if you want. That's what I did. I also taped them down on both sides using electric tape just for good measures.

You should be happy with what you got.
Time to wire them!
Check out the next post to see how to wire them without splicing any wires!
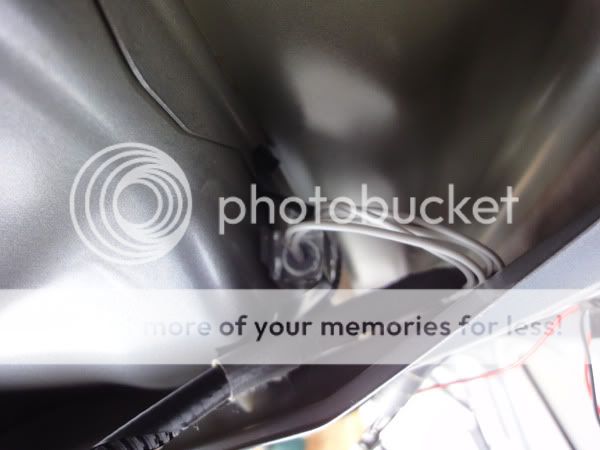
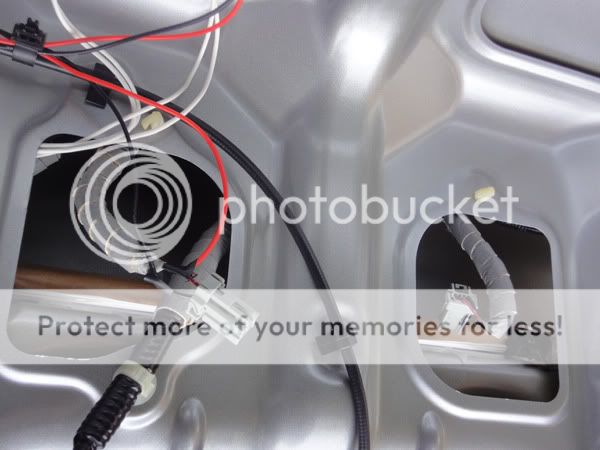
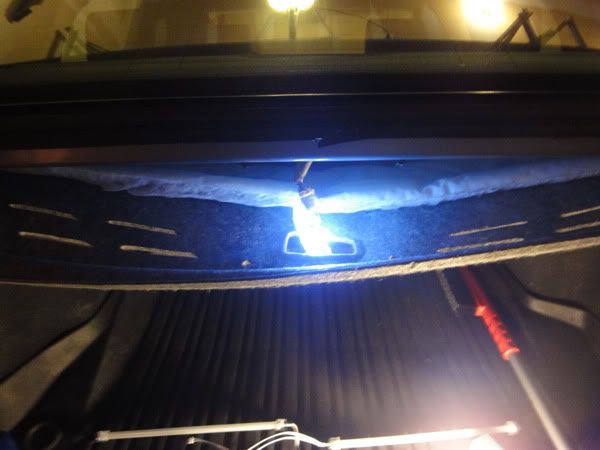
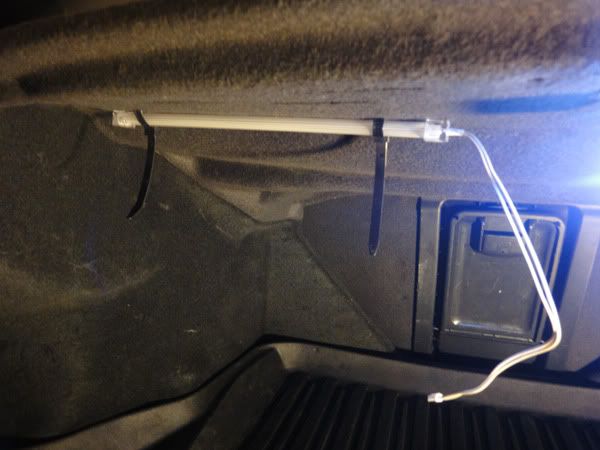
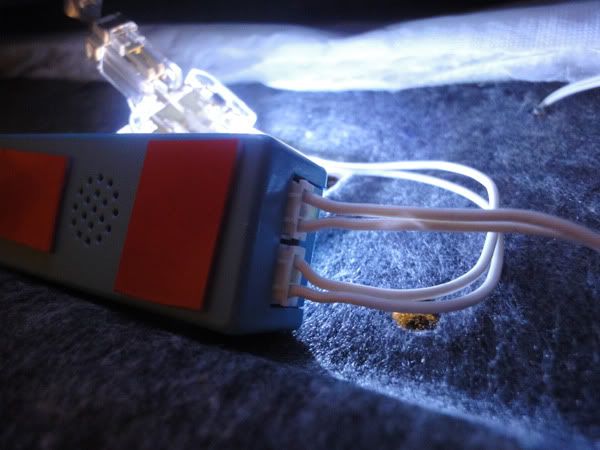
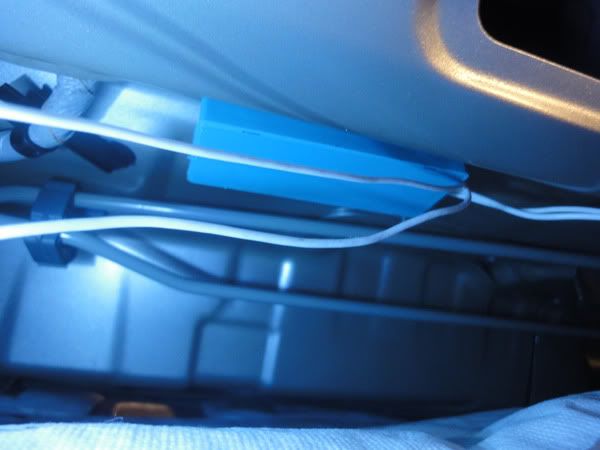
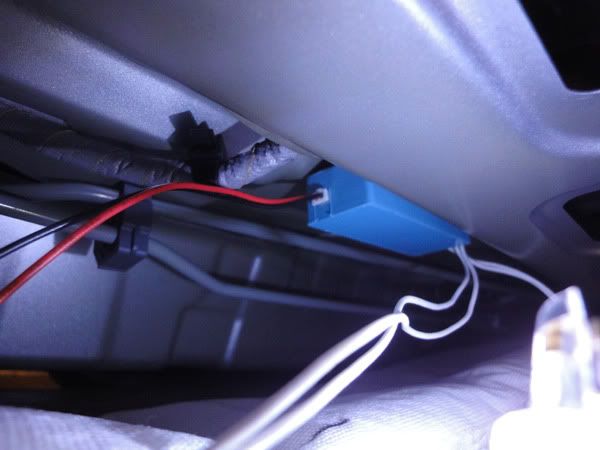
1. Mount the inverter.
2. I mounted my inverter on the decklid.
3. Connect your cold cathode tubes to your inverter.
Pretty easy... just push them into the slot until they click.
4. Take your power wire harness, and click it into the inverter.
Easy eh?
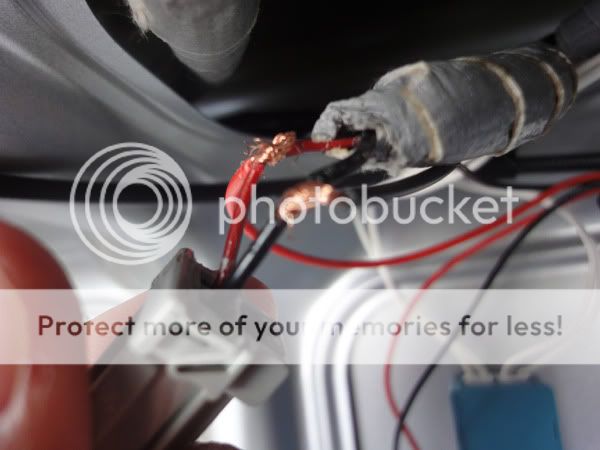
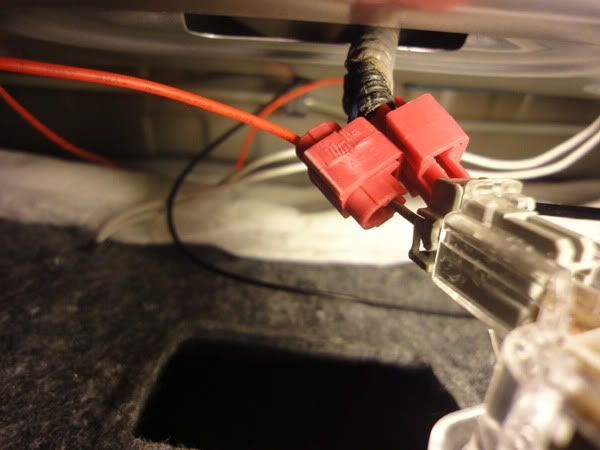
5. Take your T-Tap female connector, and crimp it down on the red wire of the STOCK passenger side license plate light harness. You should see the red wire and black wire if you look at the stock license plate light connector.
6. Do the same to the black wire of the STOCK passenger side license plate harness.
7. OH!! The license plate light wires are black and red and the inverter's power wires are black and red!
Red goes to red. Black goes to black. Push in the male connectors of the power wire harness, into the female connectors we just crimped down, to the correct coloured wire.
If you're using splice connectors, crimp down the black wire to the black wire. Do the same for the red wire.
If you want to ghetto-rig it, (stripping back the insulation on the license plate light wires, then twisting the red and black wire to the corresponding wire, then electric taping the whole thing)
This is what it would look like:
8. Done wiring!
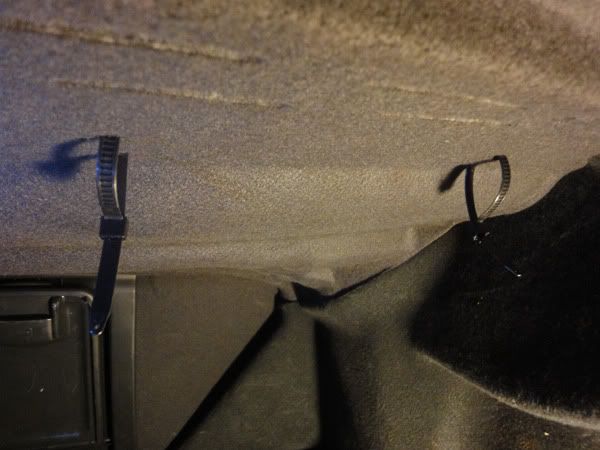
9. Zip tie your wires together to clean it up.
Simple mod?
Test them out!!
For the first time I tested them, one bulb took longer to warm up. Normal.
Last edited by Steven Bell; 02-12-2012 at 10:42 AM.

The following users liked this post:
perilousp (11-16-2012)
02-09-2012, 08:21 PM
#2
Race Director
Thread Starter
iTrader: (8)
RESERVED.
This post is for the wiring part WITHOUT using splice connectors or T-Taps.
I still have to perform this DIY myself, so I'll take pics of the process, AND take pics of the part where I missed a lot of pictures, such as the mounting and wiring (splicing method).
This post is for the wiring part WITHOUT using splice connectors or T-Taps.
I still have to perform this DIY myself, so I'll take pics of the process, AND take pics of the part where I missed a lot of pictures, such as the mounting and wiring (splicing method).
02-09-2012, 08:22 PM
#3
Race Director
Thread Starter
iTrader: (8)
What? You can use those super bright lights called cold cathodes in your trunk as well?
Yes you can!
Don't cold cathodes take a little bit to warm to full brightness?
Well, yes they do, but we'll be tapping into the existing trunk light, so the trunk light still works so you can quickly grab whatever while being able to see using the stock light, but if you have your trunk open for a little longer, eventually the cold cathodes will overpower the stock lighting and you'll have a super bright trunk!
Think of cold cathode trunk lights as an ADDITION to the stock lighting, as opposed to cold cathode license plate lights as a REPLACEMENT to the stock license plate lights.
Lets continue onto the materials list...
Materials:
Cold Cathode Tube kit (preferably made from Logisys)
Scissors
X-ACTO Knife or sharp blade
Zip ties
Mounting Tape
Splice Connectors or T-Tap connectors
Preparing:
Prepare the cold cathode wiring the same way as you do with the license plate cold cathodes.
That means disposing of the computer connects and just taking the red and black wire with the inverter connector on it.
If you didn't do license plate cold cathodes, just head up to the post above where it will tell you how to" prepare your wire harness".
Don't bother preparing your cold cathode tubes.
Just grab the tubes, the power wires, and the inverter and head to your car.
If you're working in the dark, take a light because you'll need it when your trunk light goes out after disconnecting the battery.
For now, we're not doing any wiring, so you can used the combined light of your trunk light and a work light.
1. There are four clips on the top trunk panel that you want to remove.
They are all along the front...
Now you can see what you're working on!
2. You need to find a place to mount your cold cathodes on the trunk panel. We'll be using zip ties to mount the cold cathode tubes. You'll notice there is nowhere to thread the zip ties through on the trunk panel, so you'll need to make slits in the trunk panel to thread your zip tie through. Now take your exacto knife or blade and cut slits into where you want your zip ties to hold your cold cathode tube.
3. Slot your zip tie through.

4. Repeat on the other end where it holds the cold cathode tube up.
Then slide your cold cathode tube on. Make sure the wires come out toward the center.
http://i136.photobucket.com/albums/q.../trunkcc/7.jpg
5. Fasten the zip ties.
6. Repeat the same, for the other cold cathode.
7. Now take your blade or exacto again, and cut a small hole right beside the wiring of the cold cathode tube so you can bring the wire up the panel.
8. Do the same for the other side; make a hole to bring the wire up.

9. Now our cold cathodes are mounted and in place, it's time to start wiring.
10. Grab your inverter, and apply double sided tape to it.
11. Hook up your cold cathode tube wires to it, and hook up the power connector for the cold cathode.
12. Mount your inverter.
Here's where I mounted mine.
13. Strip back all the tape around the the trunk light wires.
This took me a while. Careful not to cut the wires inside.
At this point wince we're tapping into a wire that's delivering power to run your EXISTING trunk light (since the trunk is open, of course), you want to unplug your negative battery terminal.
14. Now that we can see the wires, take your splice connector and splice the red wire from the inverter to the blue wire with yellow stripes.
15. Now take the black wire from the inverter and tap it into the gray with blue stripes wire with a splice connector.
16. Close your trunk.
17. Connect your negative terminal back on.
18. Pop open your trunk and see them turn on!
I don't have any finished pictures because for some reason, my inverter fried when I opened my trunk.
I know for sure i connected the right wires, because I even tested the polarity with my multimeter.
Maybe my splice connector made contact with the positive but the negative splice connector didn't make contact with the wire?
I don't know, all I know is my inverter fried and I saw smoke.
Yes you can!
Don't cold cathodes take a little bit to warm to full brightness?
Well, yes they do, but we'll be tapping into the existing trunk light, so the trunk light still works so you can quickly grab whatever while being able to see using the stock light, but if you have your trunk open for a little longer, eventually the cold cathodes will overpower the stock lighting and you'll have a super bright trunk!
Think of cold cathode trunk lights as an ADDITION to the stock lighting, as opposed to cold cathode license plate lights as a REPLACEMENT to the stock license plate lights.
Lets continue onto the materials list...
Materials:
Cold Cathode Tube kit (preferably made from Logisys)
Scissors
X-ACTO Knife or sharp blade
Zip ties
Mounting Tape
Splice Connectors or T-Tap connectors
Preparing:
Prepare the cold cathode wiring the same way as you do with the license plate cold cathodes.
That means disposing of the computer connects and just taking the red and black wire with the inverter connector on it.
If you didn't do license plate cold cathodes, just head up to the post above where it will tell you how to" prepare your wire harness".
Don't bother preparing your cold cathode tubes.
Just grab the tubes, the power wires, and the inverter and head to your car.
If you're working in the dark, take a light because you'll need it when your trunk light goes out after disconnecting the battery.
For now, we're not doing any wiring, so you can used the combined light of your trunk light and a work light.
1. There are four clips on the top trunk panel that you want to remove.
They are all along the front...
Now you can see what you're working on!
2. You need to find a place to mount your cold cathodes on the trunk panel. We'll be using zip ties to mount the cold cathode tubes. You'll notice there is nowhere to thread the zip ties through on the trunk panel, so you'll need to make slits in the trunk panel to thread your zip tie through. Now take your exacto knife or blade and cut slits into where you want your zip ties to hold your cold cathode tube.
3. Slot your zip tie through.
4. Repeat on the other end where it holds the cold cathode tube up.
Then slide your cold cathode tube on. Make sure the wires come out toward the center.
http://i136.photobucket.com/albums/q.../trunkcc/7.jpg
5. Fasten the zip ties.
6. Repeat the same, for the other cold cathode.
7. Now take your blade or exacto again, and cut a small hole right beside the wiring of the cold cathode tube so you can bring the wire up the panel.
8. Do the same for the other side; make a hole to bring the wire up.
9. Now our cold cathodes are mounted and in place, it's time to start wiring.
10. Grab your inverter, and apply double sided tape to it.
11. Hook up your cold cathode tube wires to it, and hook up the power connector for the cold cathode.
12. Mount your inverter.
Here's where I mounted mine.
13. Strip back all the tape around the the trunk light wires.
This took me a while. Careful not to cut the wires inside.
At this point wince we're tapping into a wire that's delivering power to run your EXISTING trunk light (since the trunk is open, of course), you want to unplug your negative battery terminal.
14. Now that we can see the wires, take your splice connector and splice the red wire from the inverter to the blue wire with yellow stripes.
15. Now take the black wire from the inverter and tap it into the gray with blue stripes wire with a splice connector.
16. Close your trunk.
17. Connect your negative terminal back on.
18. Pop open your trunk and see them turn on!
I don't have any finished pictures because for some reason, my inverter fried when I opened my trunk.
I know for sure i connected the right wires, because I even tested the polarity with my multimeter.
Maybe my splice connector made contact with the positive but the negative splice connector didn't make contact with the wire?
I don't know, all I know is my inverter fried and I saw smoke.
Last edited by guitarplayer16; 02-09-2012 at 08:33 PM.
The following users liked this post:
perilousp (11-16-2012)
The following users liked this post:
guitarplayer16 (02-09-2012)
02-09-2012, 10:56 PM
#5
nice post,
i took a easier route by using a 24cm white led strip to replace those 2 bulbs of the license plate, wonder if that's brighter than your cold cathodes, but it does bright up the bumper and the floor....
but urs certainly looks sick, i feel like it will take a semi-genius to perform the job you did while dealing all the electrical wires......
The following users liked this post:
guitarplayer16 (02-11-2012)
The following users liked this post:
guitarplayer16 (02-11-2012)
02-10-2012, 07:26 PM
#7
Race Director
Thread Starter
iTrader: (8)
Thanks jptl04!
Nah it's idiot proof.
Just not as idiot proof as LEDs.
Yup!
It looks great!
nice post,
i took a easier route by using a 24cm white led strip to replace those 2 bulbs of the license plate, wonder if that's brighter than your cold cathodes, but it does bright up the bumper and the floor....
but urs certainly looks sick, i feel like it will take a semi-genius to perform the job you did while dealing all the electrical wires......
i took a easier route by using a 24cm white led strip to replace those 2 bulbs of the license plate, wonder if that's brighter than your cold cathodes, but it does bright up the bumper and the floor....
but urs certainly looks sick, i feel like it will take a semi-genius to perform the job you did while dealing all the electrical wires......
Just not as idiot proof as LEDs.
Yup!
It looks great!
Trending Topics
02-10-2012, 08:11 PM
#8
Team Owner
iTrader: (2)
Join Date: Jan 2008
Location: Kansas City, MO (Overland Park, KS)
Posts: 36,545
Received 6,470 Likes
on
5,162 Posts
Well done, GP. Outstanding work!
The following users liked this post:
guitarplayer16 (02-11-2012)
The following users liked this post:
guitarplayer16 (02-11-2012)
02-11-2012, 11:41 AM
#10
Race Director
Thread Starter
iTrader: (8)
Thanks folks!
I like to write my DIYs as detailed as possible for those who have NO idea what they're doing lol
Perhaps how detailed my DIY is throws people off?
I mean, I have steps that tell people "gather your stuff" "lay it all infront" LOL
More pictures coming today!
I'll be able to get pictures for the mounting of the cold cathodes and wiring.
The following users liked this post:
guitarplayer16 (02-11-2012)
02-11-2012, 02:24 PM
#12
Race Director
Thread Starter
iTrader: (8)
Now I have to go buy new fuses lol
I still don't get why it popped the fuse...
I wired everything correctly... unless my "crimp" job didn't make a connection and somehow shorted everything?
02-16-2012, 10:06 PM
#13
Moderator
iTrader: (7)
one thing to note is that you should make the connection AFTER the resistor in the trunk light bracket. That may the reason you are blowing fuses. I never had an issue with my method.
this is how i made my connection:

this is how i made my connection:
Last edited by paperboy42190; 02-16-2012 at 10:16 PM.
 02-17-2012, 11:13 AM
#15
Guitarplayer, you think one is enough or two would be best. I was wondering if one ccfl would be enough to cover the whole trunk uniformly. The reason I' m asking is so that I can use the extra lamp as a reserve for my tag lights.
02-17-2012, 12:29 PM
#17
Drifting
that would actually sound like a good idea, although my question would be how it would withstand the heat near the engine like that and being exposed to the elements?
02-17-2012, 12:55 PM
#18
Previous Owner
As for the heat issue, I don't think it's too much of a problem since you're closer to the ground and that's basically where the cold air would be. I'm not an "lin-gineer"
 so someone can correct me.
People have put Cold Cathodes to underbodies so being exposed to elements shouldn't be an issue either. Though I can see building a housing for such things.
02-17-2012, 06:35 PM
#20
Race Director
Thread Starter
iTrader: (8)
Cold cathode tubes break easily, so beware =)
02-17-2012, 08:27 PM
#21
Intermediate
I have had my cathode lights for the license plate for over 2 years and I haven't had a problem. And I commute over an hour to and from work. I would recommend it. Just my 
02-17-2012, 11:54 PM
#23
Race Director
Thread Starter
iTrader: (8)
02-18-2012, 07:46 AM
#24
Oh, that's for sure...
for an outside application, was thinking that those hard clear plastic cases they have that they put around desk office fluorescent lights to be able to dim them would be good...or buy a set of blinds...they usually come in a clear box.
for an outside application, was thinking that those hard clear plastic cases they have that they put around desk office fluorescent lights to be able to dim them would be good...or buy a set of blinds...they usually come in a clear box.
02-26-2012, 08:52 AM
#25
Went ahead and did this mod last night. Looks great! I made a mistake and put the lens to protect the cathodes in the wrong openings. So basically, I wasted the clear plastic case that the cathodes come in that OP used to make the lenses and now I have no clue what I'm going to use. Any ideas?
02-26-2012, 12:50 PM
#26
Race Director
Thread Starter
iTrader: (8)
Lexan from Home Depot =)
03-15-2012, 09:47 PM
#27
Race Director
Thread Starter
iTrader: (8)
I wanted to bump this thread to show the results of the trunk cold cathodes:
I'm also updating the DIY.


I'm also updating the DIY.
The following users liked this post:
mcmguti (03-23-2012)
03-15-2012, 10:14 PM
#29
Advanced
damn i followed this DIY and i have NO IDEA why i stopped short of just doing the license plate! lol i REALLY need to do my trunk, especially after seeing that pic, and especially since the last owner of my car decided to install some really dim led light in place of what is supposed to be in there 
03-23-2012, 12:11 AM
#30
Race Director
Thread Starter
iTrader: (8)
NOTICE: IF YOU'RE DOING TRUNK COLD CATHODES
I mentioned I blew my inverter in on my first attempt.
That was because I wired them WRONG!
In the post I said the gray with blue stripes was negative and the blue and yellow stripes was positive.
It's THE OPPOSITE.
Your gray and blue stripe wire is actually the positive.
I have to mention, it seems like in newer models they changed the negative's ground wire.
paperboy's picture shows that his negative wire is ORANGE opposed to blue and yellow striped.
I will get the thread updated.
03-27-2012, 04:35 PM
#32
Pro
I have a question. Would it be considered safer to ghetto rig it by stripping the wire and wrapping it in electrical tape opposed to using a t-tap/splice connector? The reason I ask is because I was trying to google where to purchase some and found quite a few people recommending against the usage of them. Thoughts?
03-27-2012, 04:49 PM
#33
Race Director
Thread Starter
iTrader: (8)
I have a question. Would it be considered safer to ghetto rig it by stripping the wire and wrapping it in electrical tape opposed to using a t-tap/splice connector? The reason I ask is because I was trying to google where to purchase some and found quite a few people recommending against the usage of them. Thoughts?
But I like the ability to quickly remove the wires if I have to just by undoing the connector.
It also looks a lot more professional to use connectors, rather than "ghettoing" it with electric tape.
The best method will always be soldering it, which is of course a more "permananent" solution.
03-27-2012, 05:12 PM
#34
I have a question. Would it be considered safer to ghetto rig it by stripping the wire and wrapping it in electrical tape opposed to using a t-tap/splice connector? The reason I ask is because I was trying to google where to purchase some and found quite a few people recommending against the usage of them. Thoughts?
03-27-2012, 07:37 PM
#35
Pro
^ Thanks for the quick responses guys. I'll ghetto rig it and solder the wires together so it can withstand our winters 
Big thanks for the DIY too guitarplayer16. Keep up the extremely helpful DIY's!
Big thanks for the DIY too guitarplayer16. Keep up the extremely helpful DIY's!
03-28-2012, 05:13 PM
#36
Race Director
Thread Starter
iTrader: (8)
If you're doing cold cathode trunk lights, read my post where I stated that in the DIY I told everyone to wire to the wrong wire

I need to update the DIY.
07-23-2012, 12:29 AM
#37
Pro
Did this mod late last week. Instructions were excellent and very easy to follow. Just a heads up though, I'm not sure if this only applies to 07-08 but I couldn't pull off the license plate bracket assembly until I removed the top two bolts holding the license plate.
08-30-2013, 07:11 PM
#40
Burning Brakes
RESERVED.
This post is for the wiring part WITHOUT using splice connectors or T-Taps.
I still have to perform this DIY myself, so I'll take pics of the process, AND take pics of the part where I missed a lot of pictures, such as the mounting and wiring (splicing method).
This post is for the wiring part WITHOUT using splice connectors or T-Taps.
I still have to perform this DIY myself, so I'll take pics of the process, AND take pics of the part where I missed a lot of pictures, such as the mounting and wiring (splicing method).
My superlumination LED's kept flickering, so I ripped them out and put my stock bulbs back in. Waste of $30.
I'm going to attempt this mod when I have time. Stock bulbs are
One of the most detailed DIY's I've ever read btw. Thank you!

Thread
Thread Starter
Forum
Replies
Last Post
mada51589
3G TL Problems & Fixes
79
05-03-2022 08:54 PM
rockyboy
2G RDX (2013-2018)
46
01-25-2016 06:00 PM
darksky
3G TL Problems & Fixes
2
09-05-2015 03:11 AM