
Parking Brake Seized


Thread Starter
5th Gear

Joined: Jul 2010
Posts: 5
Likes: 0
Parking brake lever pulled all the way back on 2009 TSX 6MT and now it will not release. Car is not in a place I can work on it. Is there any simple work around. I realize now brake should have been adjusted to 6 or 8 clicks to set. With proper adjustment problem would not have occurred but thought as long as the brakes held and released I would leave it alone. 


^
Looks like you are going to have to remove the center console to get at E & F below to loosen?
Center Console Removal/Installation
NOTE:
-Put on gloves to protect your hands.
-Take care not to scratch the front seat, the dashboard, or the related parts.
1.Remove these items:
-Center console rear trim center console rear trim removal.
-Center trim dashboard center trim removal.
2.Disconnect the rear accessory power socket connector (A), the auxiliary jack assembly connector (B), and if equipped, the USB jack connector (C).
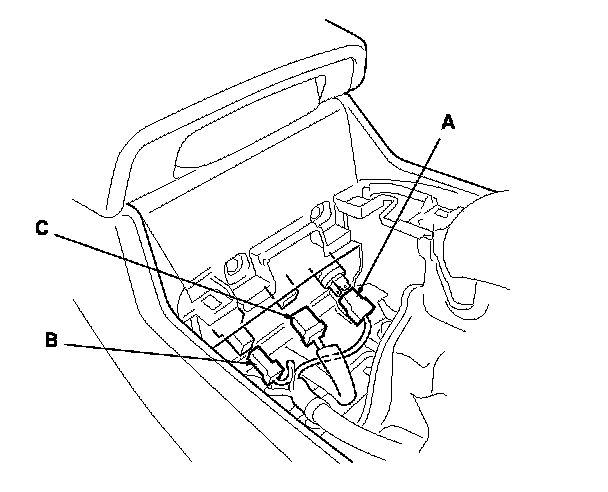
3.Remove the screws (A) and the bolts (B) securing the center console (C).
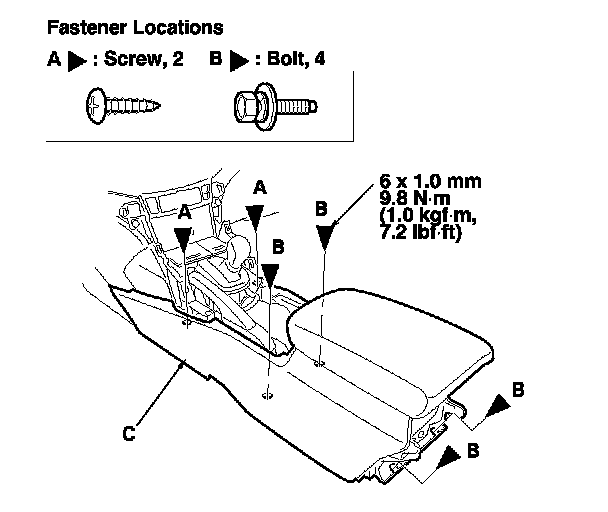
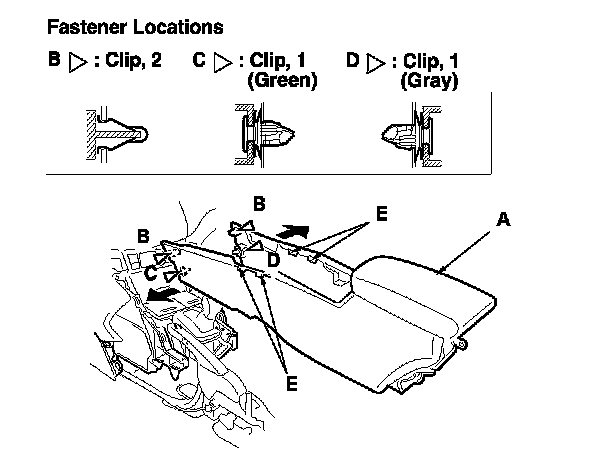
4.Remove the center console (A).
-1Detach the clips (B, C, D) by pulling the front edges of the console out from both sides.
Pull up the console to release the hooks (E).
5.Install the console in the reverse order of removal, and note these items:
-Make sure each connector is plugged in properly.
-If the clips are damaged or stress-whitened, replace them with new ones.
-Push the clips and the hooks into place securely.
-Make sure the wire harnesses are not pinched.
Parking Brake Lever Replacement
1.Release the parking brake lever fully.
2.Remove the center console.
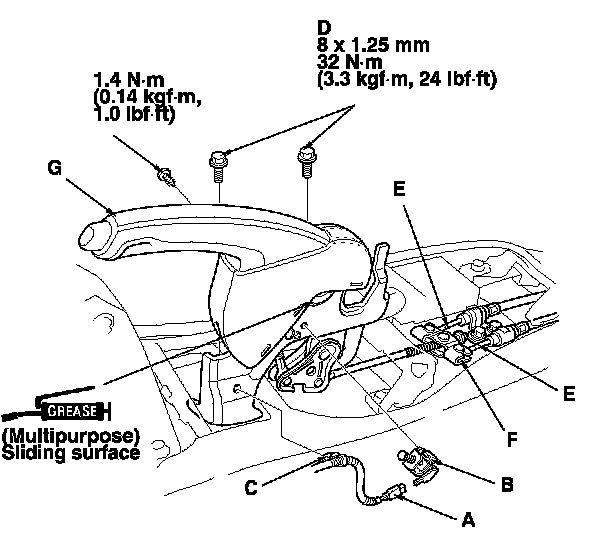
3.Disconnect the parking brake switch connector (A) from the parking brake switch (B), then remove the harness clip (C).
4.Remove the parking brake lever mount bolts (D).
5.Disconnect the parking brake lever (E) from the equalizer (F), then remove the parking brake lever (G).
6.Remove the parking brake switch.
7.Install the parking brake lever in the reverse order of removal.
NOTE: Do not scratch the coating on the link cable while handling and assembling the parking brake lever.
8.Adjust the parking brake.
Looks like you are going to have to remove the center console to get at E & F below to loosen?
Center Console Removal/Installation
NOTE:
-Put on gloves to protect your hands.
-Take care not to scratch the front seat, the dashboard, or the related parts.
1.Remove these items:
-Center console rear trim center console rear trim removal.
-Center trim dashboard center trim removal.
2.Disconnect the rear accessory power socket connector (A), the auxiliary jack assembly connector (B), and if equipped, the USB jack connector (C).
3.Remove the screws (A) and the bolts (B) securing the center console (C).
4.Remove the center console (A).
-1Detach the clips (B, C, D) by pulling the front edges of the console out from both sides.
Pull up the console to release the hooks (E).
5.Install the console in the reverse order of removal, and note these items:
-Make sure each connector is plugged in properly.
-If the clips are damaged or stress-whitened, replace them with new ones.
-Push the clips and the hooks into place securely.
-Make sure the wire harnesses are not pinched.
Parking Brake Lever Replacement
1.Release the parking brake lever fully.
2.Remove the center console.
3.Disconnect the parking brake switch connector (A) from the parking brake switch (B), then remove the harness clip (C).
4.Remove the parking brake lever mount bolts (D).
5.Disconnect the parking brake lever (E) from the equalizer (F), then remove the parking brake lever (G).
6.Remove the parking brake switch.
7.Install the parking brake lever in the reverse order of removal.
NOTE: Do not scratch the coating on the link cable while handling and assembling the parking brake lever.
8.Adjust the parking brake.

Thread
Thread Starter
Forum
Replies
Last Post