Both Brakes replaced under warranty
 05-18-2010, 12:30 AM
#1
Three Wheelin'
Thread Starter
Both Brakes replaced under warranty
Took my car in for the A1 service today, needed to have the cup holder replaced as it won't close  .
.
I asked the service manager to look at my brakes as they are making noise, the rear was replaced last year at 32,000 km (20K miles), I have 53,000Km (33K miles) on my odometer now. I showed them the letter from Acura Canada received in January regarding the rear brake recall and mentioned to them the pads they installed back last August were the old parts. The manager called me within an hour and told me Acura will replace both front and rear pads under warranty for me.
FYI-
Old front pads part # 45022-SEA-J11 New# 45022-TE0-999
Old rear pads part# 43022-TA0-A00 New # 43022-TA0-A70
. I asked the service manager to look at my brakes as they are making noise, the rear was replaced last year at 32,000 km (20K miles), I have 53,000Km (33K miles) on my odometer now. I showed them the letter from Acura Canada received in January regarding the rear brake recall and mentioned to them the pads they installed back last August were the old parts. The manager called me within an hour and told me Acura will replace both front and rear pads under warranty for me.
FYI-
Old front pads part # 45022-SEA-J11 New# 45022-TE0-999
Old rear pads part# 43022-TA0-A00 New # 43022-TA0-A70
 05-18-2010, 02:59 AM
#2
Three Wheelin'
Thread Starter
Found this on the web regarding the front brakes 45022-TE0-999
Service Bulletin
� Service Bulletin
2009 American Honda Motor Co., Inc. � All Rights Reserved ATB 42629 (0912) 1 of 3
CUSTOMER INFORMATION:
The information in this bulletin is intended for use only by skilled technicians who have the proper tools, equipment, and training to correctly and safely maintain your vehicle. These procedures should not be attempted by �do-it-yourselfers,� and you should not assume this bulletin applies to your vehicle, or that your vehicle has the condition described. To determine whether this information applies, contact an authorized Honda automobile dealer.
December 14, 2009
09-096
Applies To:
Applies To:
2008�10 Accord � See VEHICLES AFFECTED
Front Brakes Judder and/or Squeal
Front Brakes Judder and/or Squeal
SYMPTOM
When the brakes are applied normally, the driver feels a juddering vibration through the steering wheel or brake pedal, and/or hears a squealing noise.
VEHICLES AFFECTED
2008�09 Accord EX, EX-L:
When the brakes are applied normally, the driver feels a juddering vibration through the steering wheel or brake pedal, and/or hears a squealing noise.
VEHICLES AFFECTED
2008�09 Accord EX, EX-L:
ALL JHM and 1HG
2009 Accord V6 KL:
2009 Accord V6 KL:
From VIN 5KBCP3...9B000001 thru
5KBCP3...9B502866
2010 Accord 2-Door L4 (Ohio produced):
From VIN 1HGCS1...AA000001 thru
1HGCS1...AA002642
2010 Accord 2-Door V6 (Ohio produced):
From VIN 1HGCS2...AA000001 thru
1HGCS2...AA001792
2010 Accord 4-Door L4 (Ohio produced):
From VIN 1HGCP2...AA000001 thru
1HGCP2...AA028719
2010 Accord 4-Door V6 KA (Alabama produced):
From VIN 5KBCP3...AB000001 thru
5KBCP3...AB005630
2010 Accord 4-Door V6 (Ohio produced):
From VIN 1HGCP3...AA000001 thru
1HGCP3...AA002231
CORRECTIVE ACTION
Refinish the front brake discs, and install new brake pads with V-springs.
NOTE: If the vehicle already has V springs and the NS263H or NF87P brake pads installed, this service bulletin does not apply. Proceed with normal troubleshooting.
PARTS INFORMATION
Front Brake Pad Set
(includes M77 paste, shims, and V-springs):
P/N 45022-TE0-999, H/C 9405374
TOOL INFORMATION
Brake Caliper Piston Compressor:
T/N 07AAE-SEPA101
Both NS263H and NF87P are countermeasured brake materials for judder and noise.
2 of 3
09-096
WARRANTY CLAIM INFORMATION
WARRANTY CLAIM INFORMATION
In warranty:
The normal warranty applies.
Operation Number: 410820
Flat Rate Time: 1.0 hour
Failed Part: P/N 45022-SEA-J11
H/C 7609118
Defect Code: 04500
Symptom Code: 03503
Skill Level: Repair Technician
Failed Part: P/N 45022-SEA-J11
H/C 7609118
Defect Code: 04500
Symptom Code: 03503
Skill Level: Repair Technician
Out of warranty:
Any repair performed after warranty expiration may be eligible for goodwill consideration by the District Parts and Service Manager or your Zone
Office. You must request consideration, and get a decision, before starting work.
REPAIR PROCEDURE
1. Remove some brake fluid from the master cylinder.
2. Raise and support the vehicle.
3. Remove the front wheels.
4. Remove the front brake hose mounting bolt.
5. Remove the brake caliper lower flange bolt, then
pivot the caliper up out of the way.
6. Remove the front brake pads, the shims, and the retainers.
7. Check the brake disc thickness.
Maximum refinishing limit:
26.0 mm (1.02 in)
8. If the disc is within the service limit for refinishing, refinish it with a Honda-approved, commercially available on-car brake lathe. If the disc is not within
the service limit, replace the disc.
9. Apply a thin coat of M-77 assembly paste to the retainer mating surface of the caliper bracket.
10. Install the pad retainers, then wipe off any excess assembly paste.
11. Mount the brake caliper piston compressor tool on
the caliper body.
12. Press in the piston with the compressor tool so the caliper will fit over the brake pads. Make sure the piston boot is in position to prevent damaging it
when pivoting the caliper down.
FLANGE BOLT
CALIPER PIN
BRAKE HOSE MOUNTING BOLT
09-096
3 of 3
13. Apply a thin coat of assembly paste to the pad side of the shim, and to the back of the brake pads.
13. Apply a thin coat of assembly paste to the pad side of the shim, and to the back of the brake pads.
14. Install the new brake pads, shims, and V-springs.
15. Pivot the caliper down into position. Install the
flange bolt, and torque it while holding the caliper pin with a wrench, being careful not to damage the caliper pin boot.
16. Reinstall the brake hose mounting bolt.
17. Repeat steps 4 thru 16 for the other side.
18. Install the front wheels.
19. Lower the vehicle.
20. Press the brake pedal several times to make sure
the brakes work.
NOTE: Brake engagement may require a greater pedal stroke immediately after the brake pads have been replaced. Several applications of the brake pedal will restore the normal brake pedal stroke.
21. Add brake fluid as needed.
22. Test-drive the vehicle, and check for judder or
squeal.
SHIM
SHIMS NEW
BRAKE
PADS
V-SPRINGS
WEAR
INDICATOR
FLANGE BOLT
50 N.m (37 lb-ft)
CALIPER PIN
BRAKE HOSE MOUNTING BOLT
SHIMS NEW
BRAKE
PADS
V-SPRINGS
WEAR
INDICATOR
FLANGE BOLT
50 N.m (37 lb-ft)
CALIPER PIN
BRAKE HOSE MOUNTING BOLT
22 N.m (16 lb-ft)
05-18-2010, 03:06 AM
#3
Three Wheelin'
Thread Starter
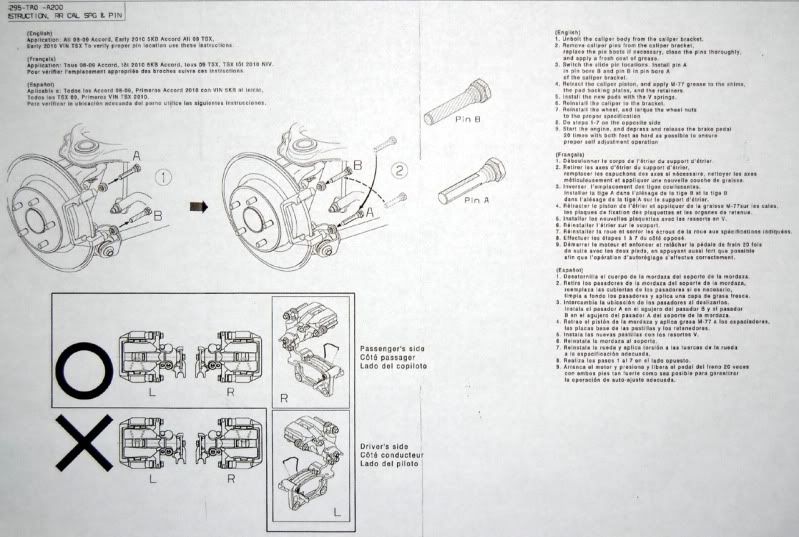
Here's the instruction for the new rear pads 43022-TA0-A70, looks like something was done to the slider pins and a V spring was added.
 thanks for the info
05-18-2010, 11:44 AM
thanks for the info
05-18-2010, 11:44 AM
#5
Burning Brakes

Took my car in for the A1 service today, needed to have the cup holder replaced as it won't close .
I asked the service manager to look at my brakes as they are making noise, the rear was replaced last year at 32,000 km (20K miles), I have 53,000Km (33K miles) on my odometer now. I showed them the letter from Acura Canada received in January regarding the rear brake recall and mentioned to them the pads they installed back last August were the old parts. The manager called me within an hour and told me Acura will replace both front and rear pads under warranty for me.
FYI-
Old front pads part # 45022-SEA-J11 New# 45022-TE0-999
Old rear pads part# 43022-TA0-A00 New # 43022-TA0-A70
. I asked the service manager to look at my brakes as they are making noise, the rear was replaced last year at 32,000 km (20K miles), I have 53,000Km (33K miles) on my odometer now. I showed them the letter from Acura Canada received in January regarding the rear brake recall and mentioned to them the pads they installed back last August were the old parts. The manager called me within an hour and told me Acura will replace both front and rear pads under warranty for me.
FYI-
Old front pads part # 45022-SEA-J11 New# 45022-TE0-999
Old rear pads part# 43022-TA0-A00 New # 43022-TA0-A70
I'll have the dealer take a look at it.
05-19-2010, 11:50 AM
#6
Three Wheelin'
Thread Starter
You should definitely go to the dealer. Just got mine installed this morning as they did not have the cupholder/lid (one single unit) in stock a couple of days ago. Took the Tech 30 minutes to job done and it's now working better than when the car was new.
05-21-2010, 05:36 PM
#7

Found this on the web regarding the front brakes 45022-TE0-999
Service Bulletin
� Service Bulletin
2009 American Honda Motor Co., Inc. � All Rights Reserved ATB 42629 (0912) 1 of 3
CUSTOMER INFORMATION:
The information in this bulletin is intended for use only by skilled technicians who have the proper tools, equipment, and training to correctly and safely maintain your vehicle. These procedures should not be attempted by �do-it-yourselfers,� and you should not assume this bulletin applies to your vehicle, or that your vehicle has the condition described. To determine whether this information applies, contact an authorized Honda automobile dealer.
December 14, 2009
09-096
09-096
Applies To:
2008�10 Accord � See VEHICLES AFFECTED
Front Brakes Judder and/or Squeal
SYMPTOM
SYMPTOM
When the brakes are applied normally, the driver feels a juddering vibration through the steering wheel or brake pedal, and/or hears a squealing noise.
VEHICLES AFFECTED
2008�09 Accord EX, EX-L:
VEHICLES AFFECTED
2008�09 Accord EX, EX-L:
ALL JHM and 1HG
2009 Accord V6 KL:
From VIN 5KBCP3...9B000001 thru
From VIN 5KBCP3...9B000001 thru
5KBCP3...9B502866
2010 Accord 2-Door L4 (Ohio produced):
From VIN 1HGCS1...AA000001 thru
1HGCS1...AA002642
2010 Accord 2-Door V6 (Ohio produced):
From VIN 1HGCS2...AA000001 thru
1HGCS2...AA001792
2010 Accord 4-Door L4 (Ohio produced):
From VIN 1HGCP2...AA000001 thru
1HGCP2...AA028719
2010 Accord 4-Door V6 KA (Alabama produced):
From VIN 5KBCP3...AB000001 thru
5KBCP3...AB005630
2010 Accord 4-Door V6 (Ohio produced):
From VIN 1HGCP3...AA000001 thru
1HGCP3...AA002231
CORRECTIVE ACTION
Refinish the front brake discs, and install new brake pads with V-springs.
NOTE: If the vehicle already has V springs and the NS263H or NF87P brake pads installed, this service bulletin does not apply. Proceed with normal troubleshooting.
PARTS INFORMATION
Front Brake Pad Set
(includes M77 paste, shims, and V-springs):
P/N 45022-TE0-999, H/C 9405374
TOOL INFORMATION
Brake Caliper Piston Compressor:
T/N 07AAE-SEPA101
Both NS263H and NF87P are countermeasured brake materials for judder and noise.
2 of 3
09-096
WARRANTY CLAIM INFORMATION
In warranty:
In warranty:
The normal warranty applies.
Operation Number: 410820
Flat Rate Time: 1.0 hour
Flat Rate Time: 1.0 hour
Failed Part: P/N 45022-SEA-J11
H/C 7609118
Defect Code: 04500
Symptom Code: 03503
Skill Level: Repair Technician
H/C 7609118
Defect Code: 04500
Symptom Code: 03503
Skill Level: Repair Technician
Out of warranty:
Any repair performed after warranty expiration may be eligible for goodwill consideration by the District Parts and Service Manager or your Zone
Office. You must request consideration, and get a decision, before starting work.
REPAIR PROCEDURE
1. Remove some brake fluid from the master cylinder.
2. Raise and support the vehicle.
3. Remove the front wheels.
4. Remove the front brake hose mounting bolt.
5. Remove the brake caliper lower flange bolt, then
pivot the caliper up out of the way.
6. Remove the front brake pads, the shims, and the retainers.
7. Check the brake disc thickness.
Maximum refinishing limit:
26.0 mm (1.02 in)
8. If the disc is within the service limit for refinishing, refinish it with a Honda-approved, commercially available on-car brake lathe. If the disc is not within
the service limit, replace the disc.
9. Apply a thin coat of M-77 assembly paste to the retainer mating surface of the caliper bracket.
10. Install the pad retainers, then wipe off any excess assembly paste.
11. Mount the brake caliper piston compressor tool on
the caliper body.
12. Press in the piston with the compressor tool so the caliper will fit over the brake pads. Make sure the piston boot is in position to prevent damaging it
when pivoting the caliper down.
FLANGE BOLT
CALIPER PIN
BRAKE HOSE MOUNTING BOLT
09-096
3 of 3
13. Apply a thin coat of assembly paste to the pad side of the shim, and to the back of the brake pads.
14. Install the new brake pads, shims, and V-springs.
15. Pivot the caliper down into position. Install the
flange bolt, and torque it while holding the caliper pin with a wrench, being careful not to damage the caliper pin boot.
16. Reinstall the brake hose mounting bolt.
17. Repeat steps 4 thru 16 for the other side.
18. Install the front wheels.
19. Lower the vehicle.
20. Press the brake pedal several times to make sure
the brakes work.
NOTE: Brake engagement may require a greater pedal stroke immediately after the brake pads have been replaced. Several applications of the brake pedal will restore the normal brake pedal stroke.
21. Add brake fluid as needed.
22. Test-drive the vehicle, and check for judder or
squeal.
SHIM
SHIMS NEW
BRAKE
PADS
V-SPRINGS
WEAR
INDICATOR
FLANGE BOLT
50 N.m (37 lb-ft)
CALIPER PIN
BRAKE HOSE MOUNTING BOLT
SHIMS NEW
BRAKE
PADS
V-SPRINGS
WEAR
INDICATOR
FLANGE BOLT
50 N.m (37 lb-ft)
CALIPER PIN
BRAKE HOSE MOUNTING BOLT
22 N.m (16 lb-ft)

Thread
Thread Starter
Forum
Replies
Last Post
mada51589
3G TL Problems & Fixes
79
05-03-2022 08:54 PM
TLDude876
Car Talk
134
12-28-2016 03:18 PM
asahrts
Member Cars for Sale
0
09-04-2015 05:55 PM