Fixing a wet Inverter/Ballast
 03-11-2009, 09:54 PM
#1
Fixing a wet Inverter/Ballast
Second generation Acura’s have issues with getting water into the headlight casing. Once water gets in there it eventually drips into the Inverter/Ballast causing all kinds of problems with the electronics in there. It can also blow the HID Bulb, and destroy the Igniter. These are things you need so that the police don’t stop you at night. If you see moisture under the headlight lens after a touch less high pressure car wash, and the low beam / HID light is out, most likely you have blown one or more of these components. You can fix the water problem and the Inverter for free provided you have 6-8 hours available and the electronics have not been completely destroyed by the moisture.
First step is to read the following link. It explains a reliable way how to get the headlights off the car, and fix the water from getting into the headlight in the first place.
http://www.cardomain.com/ride/184466/18
For the next steps you should be comfortable around electronics as you are dealing with fragile electronic components, and high voltage. Always disconnect the Inverter/Ballast from the engine wire harness. You should never touch the glass of the HID Bulb, or the inner contacts on the Igniter HID socket, as heart stopping volts and amps are available at this location.
You can use the following link to see exploded views of the components you are taking apart. In the following link select the year, and model, then click onto the Headlight (02-03) link. This site calls the Inverter/Ballast a Control Unit Assembly.
http://www.acuraautomotiveparts.org/acura/jsp/mws/catdisplay.jsp?inputstate=2&catcgry1=TL&catcgry2=2 003&catcgry3=&catcgry4=
After the headlights are off the car, take the Inverter/Ballast, Igniter, and HID Bulb from the bad side over to the working side, and swap the parts till you determine what is not working properly. It is a good idea to mark your parts before you start, and when you determine what is bad.
You can also take the Inverter/Ballast/Igniter apart and inspect for damage.
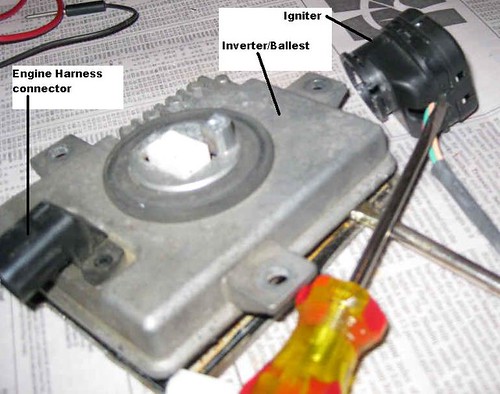
You do this by working the snap hooks around the Igniter and the metal tabs around the Inverter edges till the cover comes off. The Inverter/Ballast will need a little more effort to pry open, due the black seal between the casting and bottom metal cover. Only push your screw driver tip a quarter inch, so not to damage the internal electronics.

You can see the igniter looks pretty good but the inverter was full of rusted junk. No wonder the HID did not work. Good new is that it can be cleaned up, and there is a chance that it will still work.
Remove all the screws including the black harness connector screws. Unsolder the two leads holding the printed circuit board (PCB) to the casting, and pull the board out.
Thoroughly clean both sides of the PCB with electronics spray cleaner, found at most Radio Shack stores. You can use a soft brush to clean between all components till the PCB looks new again. Be careful not to brush two hard near small components on the ones that have fine wires. Clean the casting and metal cover of any debris till they look new. Let all parts dry before reassembly.

Reassemble the PCB to the casting, re-solder the engine harness connector, and put all the screws back where they belong. I used a clear silicone to reseal the bottom cover before bending the cover tabs to secure the bottom cover to the casting.
Check your repaired Inverter/Ballast with working parts before you reassemble the headlight, if it works you just saved yourself a few hundred dollars.
Put it all back together, and you now have low beam lights at night. Of course brand new OEM components would be more reliable in the long run, but it is nice to test your water sealing job on older parts, and it is a always a good feeling when you save a little money.
Good Luck
JeffersonTL
First step is to read the following link. It explains a reliable way how to get the headlights off the car, and fix the water from getting into the headlight in the first place.
http://www.cardomain.com/ride/184466/18
For the next steps you should be comfortable around electronics as you are dealing with fragile electronic components, and high voltage. Always disconnect the Inverter/Ballast from the engine wire harness. You should never touch the glass of the HID Bulb, or the inner contacts on the Igniter HID socket, as heart stopping volts and amps are available at this location.
You can use the following link to see exploded views of the components you are taking apart. In the following link select the year, and model, then click onto the Headlight (02-03) link. This site calls the Inverter/Ballast a Control Unit Assembly.
http://www.acuraautomotiveparts.org/acura/jsp/mws/catdisplay.jsp?inputstate=2&catcgry1=TL&catcgry2=2 003&catcgry3=&catcgry4=
After the headlights are off the car, take the Inverter/Ballast, Igniter, and HID Bulb from the bad side over to the working side, and swap the parts till you determine what is not working properly. It is a good idea to mark your parts before you start, and when you determine what is bad.
You can also take the Inverter/Ballast/Igniter apart and inspect for damage.
You do this by working the snap hooks around the Igniter and the metal tabs around the Inverter edges till the cover comes off. The Inverter/Ballast will need a little more effort to pry open, due the black seal between the casting and bottom metal cover. Only push your screw driver tip a quarter inch, so not to damage the internal electronics.
You can see the igniter looks pretty good but the inverter was full of rusted junk. No wonder the HID did not work. Good new is that it can be cleaned up, and there is a chance that it will still work.
Remove all the screws including the black harness connector screws. Unsolder the two leads holding the printed circuit board (PCB) to the casting, and pull the board out.
Thoroughly clean both sides of the PCB with electronics spray cleaner, found at most Radio Shack stores. You can use a soft brush to clean between all components till the PCB looks new again. Be careful not to brush two hard near small components on the ones that have fine wires. Clean the casting and metal cover of any debris till they look new. Let all parts dry before reassembly.
Reassemble the PCB to the casting, re-solder the engine harness connector, and put all the screws back where they belong. I used a clear silicone to reseal the bottom cover before bending the cover tabs to secure the bottom cover to the casting.
Check your repaired Inverter/Ballast with working parts before you reassemble the headlight, if it works you just saved yourself a few hundred dollars.
Put it all back together, and you now have low beam lights at night. Of course brand new OEM components would be more reliable in the long run, but it is nice to test your water sealing job on older parts, and it is a always a good feeling when you save a little money.
Good Luck
JeffersonTL

The following users liked this post:
deadbirdjb (03-21-2014)
03-12-2009, 12:26 PM
#4
6G TLX-S

Mod, put this in the DIY section please.
03-12-2009, 07:45 PM
#5
totaledTL, I did not need to replace any parts on the board, and I’ve only fix one so far. If there is no signs of internal flames most likely it is high resistance shorts created by the rusty water in the inverter. The design is robust enough to give it a good cleaning and get it working again. I’ll be sure post a date if it ever fails again. My thanks goes to juanclopez2786 and Edward’TLS for helping find my ground connection problem!
JeffersonTL
JeffersonTL
03-17-2009, 09:02 PM
#6
El Matador

Join Date: Apr 2004
Location: hamilton, ontario
Age: 47
Posts: 150
Likes: 0
Received 1 Like
on
1 Post
Thanks for this post, my ballast was not working and got one from the junkyard. this was very wet inside and follow all the procedures you showed. It worked!!! I actually did not try it before tho cause it was wet when i got it.
10-09-2009, 06:10 PM
#7
2nd Gear

Join Date: Oct 2009
Age: 55
Posts: 2
Likes: 0
Received 0 Likes
on
0 Posts
This looks great, the dealer told me the inverter needs to be replaced, is the inverter the ballast or the igniter? the problem is that the low beam doesn't work, but it flickers a little when you first turn it on, then nothing. Can anyone confirm if that's the ballast or the igniter?
Trending Topics
 , and just have to chuck it


 09-28-2011, 11:41 AM
#11

wow good search for thread!!
ck out the DIY section for complete how to reseal the lights
if you had moisture inside the lens, expect bulb and ballast failure to occur
you saw the pics above--thats happening to many of us!
ck out www.hidextra.com for a complete kit to replace all the HID parts- it will need them,,under 100 bucks for everything needed for both sides
The following users liked this post:
the_chad (12-24-2011)
12-20-2012, 03:52 PM
#12
Intermediate

So, both my high beams work but the low beam dosnt work on one side. My original assumption was that i had a defective ballast. Is is possible for the high beam to work if the ballast is bad? What else could it be?
Thanks
Thanks
12-20-2012, 04:24 PM
#13

Hey Djrx, To answer your question......the low beams are the HID's, complete with the necessary inverter/ballasts to operate them. The high beams are independent of the low beam system, being of a conventional design.
If the low beam headlamp is inoperative on the one side, and you saw no warning signs of failure such as being offcolor or flickering,.....then I'd suggest swapping the low beam bulb with the opposite working side. If the previously bad side now works with the replaced bulb from the other side, you've solved your problem as being simply a blown bulb.
They do wear out !
But, if the known good bulb fails to work on the previously bad side, then you may have a ballast problem. Check the connections and components for dampness or corrosion, as the low beam headlamp's HID system will fail when moisture is present. Good luck ! Hope it's only a bulb, check the DIY's sticky for more info.
The following users liked this post:
Djrx (12-20-2012)
12-20-2012, 04:31 PM
#14
Intermediate
Thanks 3.2TLc. I failed to mention that I'd previously tried replacing the bulb with a spare I had. I had replaced that same low beam 2 years earlier. I will try what you recommend about swapping the with the bulb from the working side. Do i have to remove the battery to access the left sided bulb? it looks very cramped. I do hope it's the bulb! thanks!
12-20-2012, 04:54 PM
#15
Be careful with touching the HID bulbs, wear latex gloves. How did you replace the bulb last time on the driver's side ? Your spare may've been bad also ?
The driver's side is very tight, some recommend pulling the front bumper cover for easier access. Check our "DIY"s and maybe try utilizing the site's "Search" feature for more specific info and pics.
The driver's side is very tight, some recommend pulling the front bumper cover for easier access. Check our "DIY"s and maybe try utilizing the site's "Search" feature for more specific info and pics.
The following users liked this post:
Djrx (12-20-2012)
12-20-2012, 05:01 PM
#16
Intermediate
Yes, the spare may have been bad. The only way to find out is to swap out with the working side. I found a tutorial on how to remove the front bumper to access the headlights. I just thought their might be an easier way. Thanks.
04-04-2013, 06:34 PM
#17
Intermediate
Does this look salvageable? If not, i dont see myself paying $150+ for a used ballast on eBay. I can just sell the one working ballast for that much and buy an aftermarket ballast. What do you think? Should i spend the time cleaning this ballast? Thanks
04-05-2013, 07:16 AM
#19
Hey Djrx, you may want to seriously consider the new replacement HID kit.
They are available through our site vendors for less than $100 and will completely replace your old worn OEM setup with a more compact design also being water resistant.
Check out the many previous posting on how to do this conversion.
They are available through our site vendors for less than $100 and will completely replace your old worn OEM setup with a more compact design also being water resistant.
Check out the many previous posting on how to do this conversion.
 05-07-2013, 10:57 AM
#21

Engine Harness
I would take off the Engine Harness Connector before throwing your ballast(s) away. My 2nd ballast just died on me after getting wet this past weekend and I removed the connector from it. Even if you get an aftermarket kit, some modification MAY be required (cutting/splicing wires). By taking the OEM harness connectors and attaching them to some extra 9005/9006 connectors I had lying around, I was able to use my AM kit with the OEM engine harness without cutting the kit wires or the wires in the engine.
Please see the attached pic.
Please see the attached pic.
05-08-2013, 12:28 PM
#22

Hello Djrx,
Our D2 kit starts at $69.99. Please visit https://www.hidextra.com/d2s/ for the D2 kit options.
And please use coupon code: newfb for 15% OFF.
Let us know if there's anything else we could assist you with.
Thanks!
HIDextra
Our D2 kit starts at $69.99. Please visit https://www.hidextra.com/d2s/ for the D2 kit options.
And please use coupon code: newfb for 15% OFF.
Let us know if there's anything else we could assist you with.
Thanks!
HIDextra
05-09-2013, 10:02 AM
#23

Hey HIDXTRA
Would that be the D2R or D2S? Or would either work?
At this point, I only know that my Drivers side has winked out. I haven't dismantled it yet to see what's going on.
I figure getting it dismantled I might as well fix it up, and since at the very least I need 2 bulbs, I figure I'd be ready for any eventuality and get the kit before dismantling the front end.
Suppose I get a kit, and only the bulb is out, can I simply replace the stock bulb with those from the kit, leaving the original ballast in place?
Again, which kit: D2R or D2S?
TIA

Thread
Thread Starter
Forum
Replies
Last Post
SidhuSaaB
3G TL Problems & Fixes
18
05-30-2020 12:40 AM