
DIY: Fix banging, clattering wipers. Acura TL

Thread Starter
2000 TL Black on Beige
iTrader: (1)
Joined: Apr 2010
Posts: 426
Likes: 44
From: SE Pennsylvania
DIY: Fix banging, clattering wipers. Acura TL
The G2 TL my brother gave me had horrendously loud wipers.
After checking everything out, I was able to piece together the fix.
Some of the information, however,was vague to the uninitiated, and many photo links were broke.
So, in the interest of the next novice who comes along, I've put together an easy-to-understand DIY.
In fact, one does not need to understand English to figure it out.
Please keep this in mind if my descriptions and photos seem simplistic.
To conserve bandwidth, please refer to picture numbers for questions and comments.
The Problem:
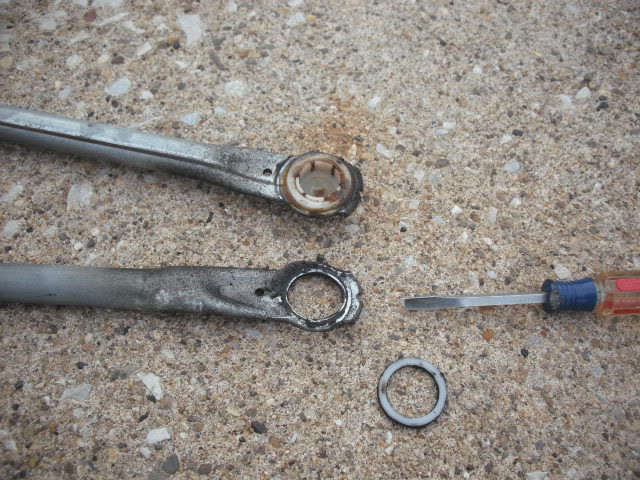
Wiper arms bang the hood, wipers bang the front cowling. General racket which one cannot seem to adjust away. The wiper system has control arms that convert the electric drive motor into back-and-forth motion. There are two control arms, an upper and a lower, each with plastic, grease-filled sockets at either end, that attach to ball fittings among the linkage. One socket in particular seems to break with wear and abuse, the upper arm driver's side.

Example 1
A healthy connecting component:
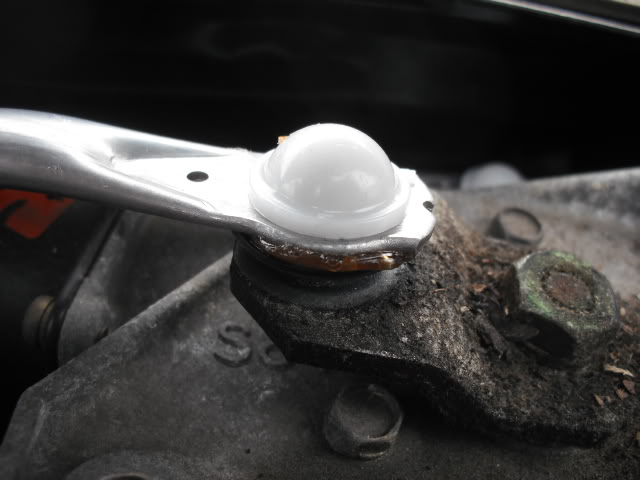
Example 2
The solution to the problem:
Example 3
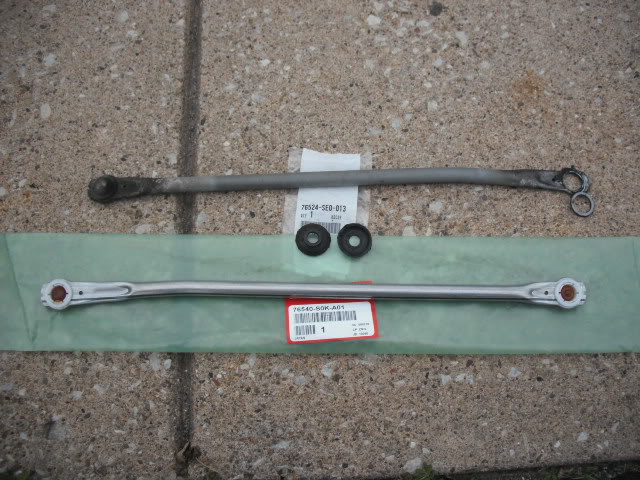
The required items: One control arm, two dust seals:
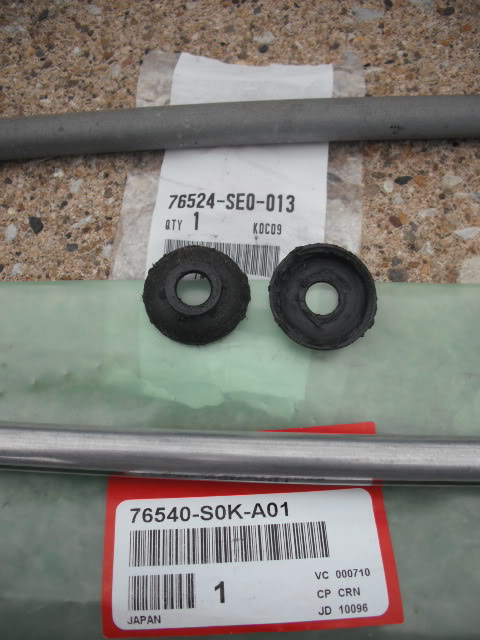
Example 4
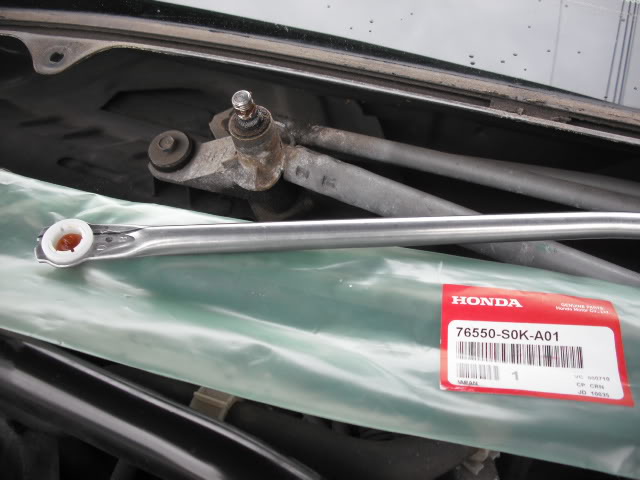
Step 1: Find a 14mm wrench
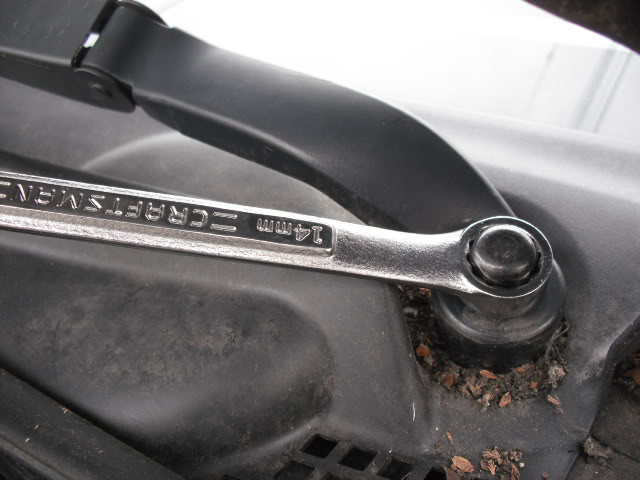
Example 5
Step 2: Remove cowling
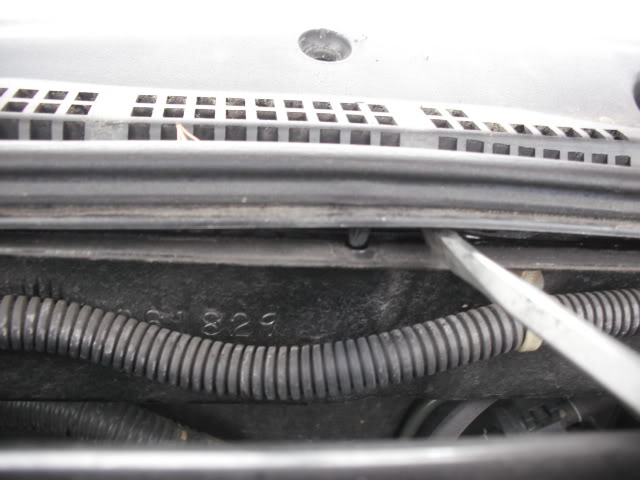
Example 6
Step 3: Replace the control rods
Example 7
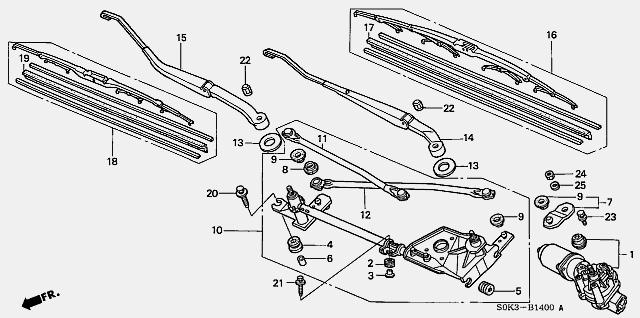
The old ones will pop off; you might want to use a little leverage, but the arms are not attached by nuts, bolts, or screws. The new ones might pop on by hand, but I eased them on with ChannelLoks, after replacing the dust seals. I replaced both arms and all four dust seals, but if doing it again, I'd probably only order the shorter, upper arm with two dust seals. The only broken socket was on this arm, and other members have commented upon the same findings. On the following diagram, the upper arm, #11, is 76540-S0K-A01, and the two dust seals, #9, are 76524-SE0-013. Even if paying list price, they'll only set you back about $30.

Example 8
After checking everything out, I was able to piece together the fix.
Some of the information, however,was vague to the uninitiated, and many photo links were broke.
So, in the interest of the next novice who comes along, I've put together an easy-to-understand DIY.
In fact, one does not need to understand English to figure it out.
Please keep this in mind if my descriptions and photos seem simplistic.
To conserve bandwidth, please refer to picture numbers for questions and comments.
The Problem:
Wiper arms bang the hood, wipers bang the front cowling. General racket which one cannot seem to adjust away. The wiper system has control arms that convert the electric drive motor into back-and-forth motion. There are two control arms, an upper and a lower, each with plastic, grease-filled sockets at either end, that attach to ball fittings among the linkage. One socket in particular seems to break with wear and abuse, the upper arm driver's side.
Example 1
A healthy connecting component:
Example 2
The solution to the problem:
Example 3
The required items: One control arm, two dust seals:
Example 4
Step 1: Find a 14mm wrench
Example 5
Step 2: Remove cowling
Example 6
Step 3: Replace the control rods
Example 7
The old ones will pop off; you might want to use a little leverage, but the arms are not attached by nuts, bolts, or screws. The new ones might pop on by hand, but I eased them on with ChannelLoks, after replacing the dust seals. I replaced both arms and all four dust seals, but if doing it again, I'd probably only order the shorter, upper arm with two dust seals. The only broken socket was on this arm, and other members have commented upon the same findings. On the following diagram, the upper arm, #11, is 76540-S0K-A01, and the two dust seals, #9, are 76524-SE0-013. Even if paying list price, they'll only set you back about $30.
Example 8


Cruisin'
Joined: Aug 2011
Posts: 24
Likes: 1
I replaced both arms and all four dust seals, but if doing it again, I'd probably only order the shorter, upper arm with two dust seals. The only broken socket was on this arm, and other members have commented upon the same findings. On the following diagram, the upper arm, #11, is 76540-S0K-A01, and the two dust seals, #9, are 76524-SE0-013. Even if paying list price, they'll only set you back about $30.
Example 8
Example 8

Sorry for bumping an old thread, but I had one question. I'm probably going to go ahead and do both control arms... Really just to be 100% sure it's all fixed, make sure I only have to tear everything apart once, and won't have to pay double the shipping charge if I possibly need to order more parts later.
So if I'm doing both, what exact parts do I need? I can't tell which dust seals I need.... 4 total? I'm guessing I need to order:
- QTY 1 x upper control bar #11
- QTY 1 x lower control bar #12
- QTY 3 x dust cover #9
- QTY 1 x dust cover #8
But wasn't sure if it was actually 4 x the #9 dust covers. Thank you!
Thread Starter
2000 TL Black on Beige
iTrader: (1)
Joined: Apr 2010
Posts: 426
Likes: 44
From: SE Pennsylvania
Yup, four seals. One of the four is not like the others, on my 2000 TL.
I'd also install new wiper arms [if existing are original], and blades.
#'s 14, 15, 16, 18.
I'd also install new wiper arms [if existing are original], and blades.
#'s 14, 15, 16, 18.

Thread Starter
2000 TL Black on Beige
iTrader: (1)
Joined: Apr 2010
Posts: 426
Likes: 44
From: SE Pennsylvania
I placed my order thru acuraoemparts, online, and had the parts within a few days.
Checking my TL work diary, I've found reference of control arms, boots, and oem blades.
Didn't replace the wiper arms [that was another car, the retired '94 850T]

Checking my TL work diary, I've found reference of control arms, boots, and oem blades.
Didn't replace the wiper arms [that was another car, the retired '94 850T]

Burning Brakes
Joined: May 2001
Posts: 756
Likes: 18
From: Glastonbury, CT
Both my wipers have a lot of slop in them now; I can grab one and move it in a 3" arc and it moves the other along with it. One my wife's MDX, I can't really move the wipers at all by hand.
Does this fit the OP's original description or was only one wiper arm affected?
Does this fit the OP's original description or was only one wiper arm affected?
Trending Topics

Thread Starter
2000 TL Black on Beige
iTrader: (1)
Joined: Apr 2010
Posts: 426
Likes: 44
From: SE Pennsylvania
Apparently, just one of the four plastic joint connectors typically fails.
The end of the control arm that attaches to the wiper motor takes all the stress.
The end of the control arm that attaches to the wiper motor takes all the stress.

3rd Gear
Joined: Sep 2011
Posts: 3
Likes: 0
i have the same problem...my wipers goes banging all over the place if i speed up...if i go 40 to 42mph it was normal...but if i speed up the wipers goes faster...it's like they wanna race me or something..lol! thanks for sharing this..ill do mine when i get a chance.

Advanced
Joined: Jun 2006
Posts: 80
Likes: 5
From: Denver
I've looked through all these wiper threads, and I think I need to just replace #11, but I wanted to see if someone else with my problem fixed it with just that part.
The only problem I'm having are the wipers not parking in the right place (about 8-10 inches up from the bottom).
There is a little play (about an inch) when the wipers are off, and the #11 moves a little when I checked everything out under the cowl cover, but it's not by very much and it doesn't look broken.
I also noticed the wiper arms, and where they connect, look about half striped...so I am considering replacing #10, #14 and #15 too. I just don't want to replace those parts if they aren't causing the problem...
Thread Starter
2000 TL Black on Beige
iTrader: (1)
Joined: Apr 2010
Posts: 426
Likes: 44
From: SE Pennsylvania
Correct. One of the plastic sockets on #11, the upper arm, cracks apart where it connects to the drive linkage.
As far as the splines on the wiper arms go, they may look chewed up, but if they tighten up, that'd be your call.
As far as the splines on the wiper arms go, they may look chewed up, but if they tighten up, that'd be your call.

Burning Brakes
Joined: May 2001
Posts: 756
Likes: 18
From: Glastonbury, CT
I've looked through all these wiper threads, and I think I need to just replace #11, but I wanted to see if someone else with my problem fixed it with just that part.
The only problem I'm having are the wipers not parking in the right place (about 8-10 inches up from the bottom).
There is a little play (about an inch) when the wipers are off, and the #11 moves a little when I checked everything out under the cowl cover, but it's not by very much and it doesn't look broken.
I also noticed the wiper arms, and where they connect, look about half striped...so I am considering replacing #10, #14 and #15 too. I just don't want to replace those parts if they aren't causing the problem...
The only problem I'm having are the wipers not parking in the right place (about 8-10 inches up from the bottom).
There is a little play (about an inch) when the wipers are off, and the #11 moves a little when I checked everything out under the cowl cover, but it's not by very much and it doesn't look broken.
I also noticed the wiper arms, and where they connect, look about half striped...so I am considering replacing #10, #14 and #15 too. I just don't want to replace those parts if they aren't causing the problem...
With that one broken, both wipers will not always wipe the full travel or park where they are supposed to. There will be a lot of play when you move an arm, and it will also cause the other arm to move likewise (in tandem).
** I second added this thread to the DIY sticky **
Thread Starter
2000 TL Black on Beige
iTrader: (1)
Joined: Apr 2010
Posts: 426
Likes: 44
From: SE Pennsylvania
They are supposed to speed up as you go faster. these are designed to accelerate with the car. This helps especially at freeway speeds. I like the feature myself.
Thread Starter
2000 TL Black on Beige
iTrader: (1)
Joined: Apr 2010
Posts: 426
Likes: 44
From: SE Pennsylvania
I've heard that there are universal plastic ball joints you can press into place on the control arm.
On our cars, the dealer only sells them attached to the control arm.
On our cars, the dealer only sells them attached to the control arm.
Thread Starter
2000 TL Black on Beige
iTrader: (1)
Joined: Apr 2010
Posts: 426
Likes: 44
From: SE Pennsylvania
The arms themselves? 14mm wrench, and the arm pops off the splined bolt.
It might be tight from being on there 12 years. The connection is tapered; wiggling it helps.
The control arms, the rods themselves? My largest screwdriver between
the socket and the connection point, and a little twist. Pops right off.
It might be tight from being on there 12 years. The connection is tapered; wiggling it helps.
The control arms, the rods themselves? My largest screwdriver between
the socket and the connection point, and a little twist. Pops right off.

Advanced
Joined: Mar 2006
Posts: 52
Likes: 0
Guys:
Thanks for the detail. My Acura 1999 TL has the same problem. Banging on both sides, and it was quite frustrating driving it for 10 hours yesterday in the rain, that I finally decided to replace this.
Both wiper blades move around 3 inches..... My question is should I replace both Part 11 and Part 12 above or just 11. Is 12 generally not worn out that much.
Burning Brakes
Joined: May 2001
Posts: 756
Likes: 18
From: Glastonbury, CT
Guys:
Thanks for the detail. My Acura 1999 TL has the same problem. Banging on both sides, and it was quite frustrating driving it for 10 hours yesterday in the rain, that I finally decided to replace this.
Both wiper blades move around 3 inches..... My question is should I replace both Part 11 and Part 12 above or just 11. Is 12 generally not worn out that much.
Thanks for the detail. My Acura 1999 TL has the same problem. Banging on both sides, and it was quite frustrating driving it for 10 hours yesterday in the rain, that I finally decided to replace this.
Both wiper blades move around 3 inches..... My question is should I replace both Part 11 and Part 12 above or just 11. Is 12 generally not worn out that much.

4th Gear
Joined: Jan 2014
Posts: 4
Likes: 1
From: Houston, TX
Hello,
I have a 1998 3.2 TL with same exact problem as original 2010 post. Parts diagram is a little different. Looks like I would need part #10 for left link rod (I assume this is upper arm driver side similar to #11 noted repeatedly above)? Also, cannot order separate dust cover without whole wiper assembly. Do you think I can repair the problem by only ordering left link rod #10 on 1998 part diagram?
Thank you for your help.

Suzuka Master
Joined: Oct 2007
Posts: 5,296
Likes: 784
Welcome Secondempire !!!
IMO, if the basic problem that you are experiencing is similar in nature to the original post.....just compare the diagrams and part # required to fix your '98 TL. The individual components of the wiper motor should serve the same function as our newer models, so look at your old worn out part and locate the associated '98 part # to fix your wiper lingage.
IMO, if the basic problem that you are experiencing is similar in nature to the original post.....just compare the diagrams and part # required to fix your '98 TL. The individual components of the wiper motor should serve the same function as our newer models, so look at your old worn out part and locate the associated '98 part # to fix your wiper lingage.
Thread Starter
2000 TL Black on Beige
iTrader: (1)
Joined: Apr 2010
Posts: 426
Likes: 44
From: SE Pennsylvania

Suzuka Master
Joined: Oct 2007
Posts: 5,296
Likes: 784
The white teflon bushings are not available separately.
The control rod which connects to the wiper motor's mechanism have the bushing pressed on
and are not replaceable. The rod assembly isn't that expensive or hard to replace.
The control rod which connects to the wiper motor's mechanism have the bushing pressed on
and are not replaceable. The rod assembly isn't that expensive or hard to replace.
Thread Starter
2000 TL Black on Beige
iTrader: (1)
Joined: Apr 2010
Posts: 426
Likes: 44
From: SE Pennsylvania
I'd probably only order the shorter, upper arm with two dust seals. The only broken socket was on this arm, and other members have commented upon the same findings. On the following diagram, the upper arm, #11, is 76540-S0K-A01, and the two dust seals, #9, are 76524-SE0-013. Even if paying list price, they'll only set you back about $30.
Advanced


Joined: Feb 2008
Posts: 53
Likes: 11
From: Kansas
Great post Sperry! Just made the exact repair on my 99 TL with 235K. Your photos and part numbers were spot on. Based upon reading the thread, I only replaced the upper arm unit and the two rubber dust boots. The wiper mechanism works great now without any slapping � thanks again.

Advanced
Joined: May 2014
Posts: 53
Likes: 4
Thanks for the write-up! My wipers were going nuts--slamming against the cowl AND going off the side past the windshield. I had a matching parts car and took it from there, so I just kept whichever dust seals looked the best. Took the control arm off the car that had working wipers, and now they work perfectly! The plastic sockets were in worse shape than your photos before I replaced them.


Thread Starter
2000 TL Black on Beige
iTrader: (1)
Joined: Apr 2010
Posts: 426
Likes: 44
From: SE Pennsylvania
I'm not sure how to edit the original post, but since Photobucket went funky, I hosted them on AmericanToolbox.
Examples 1 thru 8, as noted above.


Examples 1 thru 8, as noted above.
Last edited by Sperry; Jul 1, 2017 at 12:21 PM.

Advanced
Joined: Jan 2014
Posts: 64
Likes: 2
Someone please add this to the DIY section. I completed this one last week and only replaced the top bar and the rubber seals. Anyone looking to complete the DIY might also pick up the 3 plastic clips that hold the cowling down as more then likely the plastic will already be cracked as mine were.
Senior Moderator


Joined: Apr 2010
Posts: 48,315
Likes: 9,177
From: SoCal, CA
Someone please add this to the DIY section. I completed this one last week and only replaced the top bar and the rubber seals. Anyone looking to complete the DIY might also pick up the 3 plastic clips that hold the cowling down as more then likely the plastic will already be cracked as mine were.
