Optima Install Using Billet Bottom-Mount Holder - Photos Included
 10-20-2007, 11:01 AM
#1
Optima Install Using Billet Bottom-Mount Holder - Photos Included
Like a lot of the TLs in this forum, I have an optima battery (I have the red top 34/78 series myself). I have a 2002 TL, and I originally mounted mine in the factory plastic battery box and used the factory battery tie down. I had to use the plastic top that came with the optima underneath the battery (you can�t see it from this photo) so I could raise its overall height to get the battery posts to clear the height of the battery box. I had to leave the top of the factory battery box off the battery since the Rockford terminal posts I was using would not allow it to sit properly with the rest of the battery box. I really didn�t like the look of this set up. Also, there was not much room to add additional cables to the positive and negative posts.
.

.
So, I decided to get rid of both the factory battery box and the battery tie down by using a billet, hold-down bottom tray from www.wielandcustom.com made specifically for 34/78 group size batteries. And if you look closely at the part, Wieland custom put their initials on the top surface of the tray. They must be pretty proud of their design.
.

.
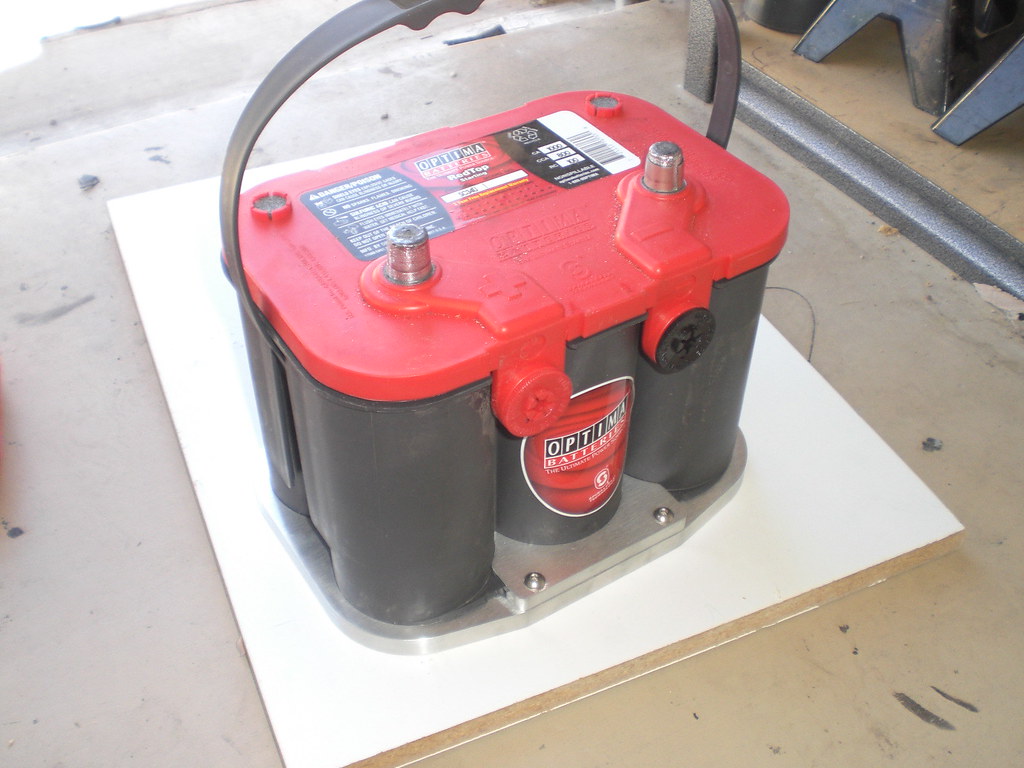
Here is the photo of a test fit of my red top optima using the bottom-mount tray. It was a perfect fit. The tolerances are so tight that I had to use a little bit of force to separate the battery from the tray.
.
.
But the problem with this aftermarket tray is that is does not sit flush on the metal factory tray. This is due to the flanges in the tray that are used to secure the factory battery tie down j-hooks.
.

.

.

.
I used a sharpie and marked off the areas I will be cutting away using an angle grinder with a thin grinding disk. WARNING If you decide to do this project and then decide to put a non-optima 34/78 battery back into the car, you will have to get a new factory tray with the j-hook flanges so you can secure the battery properly (as well as remove the nice looking billet tray).
.

.

.

.
After about 5 minutes of cutting/grinding with the angle iron, here is the factory tray minus the factory j-hook flanges
.

.
I did a quick fit check with the billet tray on the factory tray, and it was a nice fit. Now it�s time to determine how to secure the billet tray to the factory tray.
.

.
I decided to use these two mounting holes to mount the billet tray to the factory tray. There is no interference on the underside of the tray that would affect a nut to be used with a bolt in these two holes. Also, they line up with the gaps on the bottom side of the optima battery so that I can use a pan head or hex head screw in these locations and there is no interference with the bottom of the optima battery. I marked the factory tray with a sharpie through the billet tray so that I can drill them out later. I decided not to use the two other pre-drilled holes on the right side of the billet tray since the car chassis is on the underside of them and I didn�t want to drill into the chassis frame.
.

.
I decided to use this predrilled hole on the factory tray since it lined up with another gap in the bottom of the optima tray. I�ll mount the billet tray on the factory tray later and use this hole as a guide to drill through the billet tray.
.

.
When drilling into metal, I like to use a spring-loaded punch to create a small pock-mark in the material. This will keep the drill bit from walking away from the center of the hole I'm trying to drill. I also use thread cutting oil to keep the bit from getting too hot and from getting dull really quick. I filled a bottle cap with it and then dipped the drill bit in before drilling. I drilled nice and slow into the material with a small diameter bit before working up to a 1/4� bit. In my opinion, drilling fast into metal will cause the drill bit to �skip� oppose to cutting chips as well as dull the bit. When I see chips/shavings while drilling, I know I have a relatively-sharp bit and drilling at the correct speed.
.

.

.

.

.

.

.
After drilling those two holes, I fastened the billet tray to the factory tray using a couple bolts. Then I drilled though the bottom of the factory tray and though the billet tray for that 3rd bolt hole I decided to use. Here is what the factory tray and billet tray look bolted back into the car.
.

.
Finally, I�m able to mount the battery onto the billet tray. The billet tray really does a good job holding the battery in place, and it gives the battery top a much cleaner look.
.

.
Since the billet tray gets rid of the factory tie down, I can now use a Tsunami PP2001-PT Battery Power Distribution System without interference from the factory tie down. It has 4 places to connect power cables and 5 places to connect negative terminals in different sizes and is configurable. Not only do I think this setup looks great, it gives me the option to add more power and ground lines to the battery posts.
.

.
.
So, I decided to get rid of both the factory battery box and the battery tie down by using a billet, hold-down bottom tray from www.wielandcustom.com made specifically for 34/78 group size batteries. And if you look closely at the part, Wieland custom put their initials on the top surface of the tray. They must be pretty proud of their design.
.
.
Here is the photo of a test fit of my red top optima using the bottom-mount tray. It was a perfect fit. The tolerances are so tight that I had to use a little bit of force to separate the battery from the tray.
.
.
But the problem with this aftermarket tray is that is does not sit flush on the metal factory tray. This is due to the flanges in the tray that are used to secure the factory battery tie down j-hooks.
.
.
.
.
I used a sharpie and marked off the areas I will be cutting away using an angle grinder with a thin grinding disk. WARNING If you decide to do this project and then decide to put a non-optima 34/78 battery back into the car, you will have to get a new factory tray with the j-hook flanges so you can secure the battery properly (as well as remove the nice looking billet tray).
.
.
.
.
After about 5 minutes of cutting/grinding with the angle iron, here is the factory tray minus the factory j-hook flanges
.
.
I did a quick fit check with the billet tray on the factory tray, and it was a nice fit. Now it�s time to determine how to secure the billet tray to the factory tray.
.
.
I decided to use these two mounting holes to mount the billet tray to the factory tray. There is no interference on the underside of the tray that would affect a nut to be used with a bolt in these two holes. Also, they line up with the gaps on the bottom side of the optima battery so that I can use a pan head or hex head screw in these locations and there is no interference with the bottom of the optima battery. I marked the factory tray with a sharpie through the billet tray so that I can drill them out later. I decided not to use the two other pre-drilled holes on the right side of the billet tray since the car chassis is on the underside of them and I didn�t want to drill into the chassis frame.
.
.
I decided to use this predrilled hole on the factory tray since it lined up with another gap in the bottom of the optima tray. I�ll mount the billet tray on the factory tray later and use this hole as a guide to drill through the billet tray.
.
.
When drilling into metal, I like to use a spring-loaded punch to create a small pock-mark in the material. This will keep the drill bit from walking away from the center of the hole I'm trying to drill. I also use thread cutting oil to keep the bit from getting too hot and from getting dull really quick. I filled a bottle cap with it and then dipped the drill bit in before drilling. I drilled nice and slow into the material with a small diameter bit before working up to a 1/4� bit. In my opinion, drilling fast into metal will cause the drill bit to �skip� oppose to cutting chips as well as dull the bit. When I see chips/shavings while drilling, I know I have a relatively-sharp bit and drilling at the correct speed.
.
.
.
.
.
.
.
After drilling those two holes, I fastened the billet tray to the factory tray using a couple bolts. Then I drilled though the bottom of the factory tray and though the billet tray for that 3rd bolt hole I decided to use. Here is what the factory tray and billet tray look bolted back into the car.
.
.
Finally, I�m able to mount the battery onto the billet tray. The billet tray really does a good job holding the battery in place, and it gives the battery top a much cleaner look.
.
.
Since the billet tray gets rid of the factory tie down, I can now use a Tsunami PP2001-PT Battery Power Distribution System without interference from the factory tie down. It has 4 places to connect power cables and 5 places to connect negative terminals in different sizes and is configurable. Not only do I think this setup looks great, it gives me the option to add more power and ground lines to the battery posts.
.


 10-21-2007, 12:54 AM
#5
jlammers,
.
The steps described in this post were started at noon on Friday, and I put in the last cable into the Tsunami PP2001-PT Battery Power Distribution System at 5pm the same day. What took the longest was trying to figure out how to secure the billet tray to the factory battery tray. It also took me some time to figure out how to get the LOK NUT compression fittings on the Tsunami topper to work. If I had to do it again, I think I could probably crank this out in about 2 hours.
.
One thing to note is that I recently swapped out all the factory ground cables with new 4 gauge cable as well as the power line running from positive battery terminal to the fuse box in the engine bay at the passenger's side. In preparation for the Tsunami PP2001-PT, I deliberately put in approximately 6 inches of slack in each of the replaced cables to ensure they would reach the new posts (note that the PP2001-PT allows for cable installation on both the front and rear of the optima battery). Also, the added cable lengths allow me to remove the entire topper off the optima with the cables still attached and then move it to the side so that I can pull the optima out of the engine bay without disconnecting the cables. I trimmed the ground and power cables so I had just enough length to move the topper to the side of the battery. I am unsure if the factory power and ground cables in their original lengths will reach the Tsunami PP2001-PT. But if I had to guess, I would imagine they would only reach the the posts on the front side of the battery and with little to no slack.
.
The steps described in this post were started at noon on Friday, and I put in the last cable into the Tsunami PP2001-PT Battery Power Distribution System at 5pm the same day. What took the longest was trying to figure out how to secure the billet tray to the factory battery tray. It also took me some time to figure out how to get the LOK NUT compression fittings on the Tsunami topper to work. If I had to do it again, I think I could probably crank this out in about 2 hours.
.
One thing to note is that I recently swapped out all the factory ground cables with new 4 gauge cable as well as the power line running from positive battery terminal to the fuse box in the engine bay at the passenger's side. In preparation for the Tsunami PP2001-PT, I deliberately put in approximately 6 inches of slack in each of the replaced cables to ensure they would reach the new posts (note that the PP2001-PT allows for cable installation on both the front and rear of the optima battery). Also, the added cable lengths allow me to remove the entire topper off the optima with the cables still attached and then move it to the side so that I can pull the optima out of the engine bay without disconnecting the cables. I trimmed the ground and power cables so I had just enough length to move the topper to the side of the battery. I am unsure if the factory power and ground cables in their original lengths will reach the Tsunami PP2001-PT. But if I had to guess, I would imagine they would only reach the the posts on the front side of the battery and with little to no slack.
Trending Topics
 .
10-22-2007, 07:55 AM
.
10-22-2007, 07:55 AM
#10
Billy,
The battery is secured to the tray with these two brackets that come with the billet tray. They clamp the base of the optima battery to the billet tray. You can also see them in the photos in my post of my first fit check of the battery on the billet tray and the other one with the Tsunami PP2001-PT installed.

The battery is secured to the tray with these two brackets that come with the billet tray. They clamp the base of the optima battery to the billet tray. You can also see them in the photos in my post of my first fit check of the battery on the billet tray and the other one with the Tsunami PP2001-PT installed.

Thread
Thread Starter
Forum
Replies
Last Post
EvilVirus
Car Parts for Sale
8
12-10-2015 07:38 PM
asahrts
Member Cars for Sale
0
09-04-2015 05:55 PM
Mugen TSX
Eastern Canada
0
09-01-2015 11:11 PM