DIY Rotors & Pads **HOW TO w/ PICTURES**
 06-01-2008, 09:14 PM
#41
Moderator
Originally Posted by 01tl4tl
there are threads on manual brake bleeding- just search and check the DIY section
Its easy to do and acura says do it at year 3 then every year after= forever
Good synthetic fluid is 6 bucks a qt- best for cars with SS brake lines added.
Regular brake fluid is fine for stock brake lines USE DOT3 or DOT4 spec only
4 has higher boiling point and meets/exceeds spec 3 so either is good for the TL
It will say on the master cylinder cap whats required
Bleed/flush order is LF driver front then RF RR LR

 06-01-2008, 09:21 PM
#42

Dont we have such special cars!!!
The fun begins when a normal or self designed order- based on old school non abs brakes- is used, and the trouble begins
I think I have changed the brake fluid as much as the engine oil!
at least twice a year because of spirited use in mountain backroads is my trend so far, and always upgrading and playing with the brakes somehow.
Now I want to try the ET500 pads, the 300s are good- but I drove a few blocks on a TL with brand new 500s and RB rotors- wow~~ must have, need more brakes!!!!
06-02-2008, 12:32 AM
#43
Something is missing...my
I rebedded yesterday, WOW! It felt like a new setup all over again. I may try 500s when the 300s are gone. First, I will put SS/poly lines. Actually, first, I will take my happy arse out and rebleed my brakes. . .
06-02-2008, 12:55 AM
#44
AZ Community Team

Join Date: May 2007
Location: N35�03'16.75", W 080�51'0.9"
Posts: 32,488
Received 7,770 Likes
on
4,341 Posts
The Easy Way to Remove Stuck Rotors
Learned something new while replacing my rotors. I don't recall seeing it in various DIY's (I might have missed it), but I *know* some people have taken a hammer to knock stuck rotors off the hub.
Well, you don't need to do that.
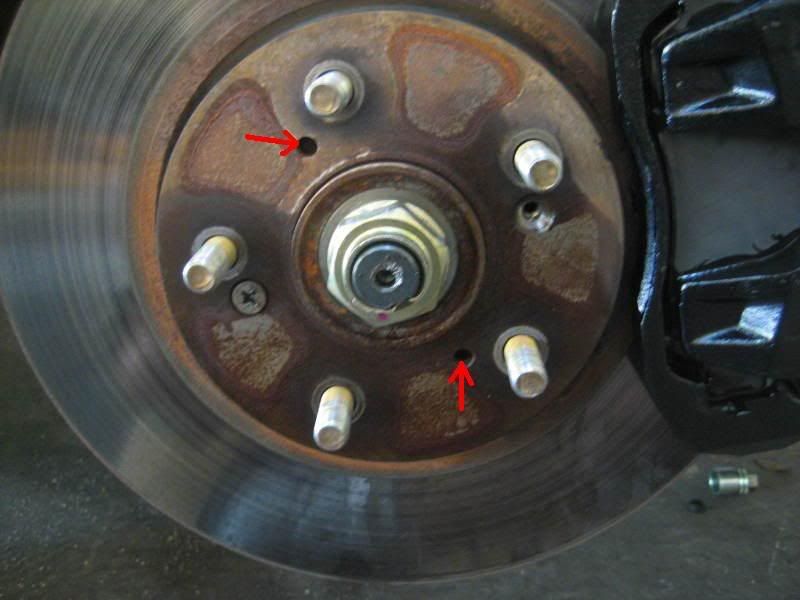
See those two holes I marked. Just screw in an M8 x 1.25 bolt in each one. Give one a couple of turns of the ratchet, then give the other a couple of turns. Keep alternating back and forth, a couple of turns at a time, until the rotor breaks loose.
Screwing the bolts in will back the rotor off the hub. Easy.
Well, you don't need to do that.
See those two holes I marked. Just screw in an M8 x 1.25 bolt in each one. Give one a couple of turns of the ratchet, then give the other a couple of turns. Keep alternating back and forth, a couple of turns at a time, until the rotor breaks loose.
Screwing the bolts in will back the rotor off the hub. Easy.
06-02-2008, 12:59 AM
#45
its a known trick but no harm in refeshing the info for those who dont want to read 14 pages of thread for that one bit of info
I happen to enjoy the hammer- but its personal choice
Nothing I work on is just getting resurfaced, its just some ziner
who wants help upgrading the rotors and calipers
I happen to enjoy the hammer- but its personal choice
Nothing I work on is just getting resurfaced, its just some ziner
who wants help upgrading the rotors and calipers
06-02-2008, 01:10 AM
#46
AZ Community Team
Join Date: May 2007
Location: N35�03'16.75", W 080�51'0.9"
Posts: 32,488
Received 7,770 Likes
on
4,341 Posts
T, you gotta get some of those ET500's.
I know it's only been two days, but the '02 TL-S stops like crazy. Great pedal feel with the new set up too.
Maybe placebo effect, but the '02 *feels* like it stops nearly as good as the '07 TL-S (which has ~1/3 OE pad life left and lower traction MXM4 tires).
Got to do Bed In #2 tomorrow.
I know it's only been two days, but the '02 TL-S stops like crazy. Great pedal feel with the new set up too.
Maybe placebo effect, but the '02 *feels* like it stops nearly as good as the '07 TL-S (which has ~1/3 OE pad life left and lower traction MXM4 tires).
Got to do Bed In #2 tomorrow.
06-02-2008, 11:19 AM
#47
Something is missing...my
Originally Posted by Bearcat94
Learned something new while replacing my rotors. I don't recall seeing it in various DIY's (I might have missed it), but I *know* some people have taken a hammer to knock stuck rotors off the hub.
Well, you don't need to do that.
See those two holes I marked. Just screw in an M8 x 1.25 bolt in each one. Give one a couple of turns of the ratchet, then give the other a couple of turns. Keep alternating back and forth, a couple of turns at a time, until the rotor breaks loose.
Screwing the bolts in will back the rotor off the hub. Easy.
lol
The following users liked this post:
JmannTLs03 (01-11-2014)
06-02-2008, 11:43 AM
#48
AZ Community Team
Join Date: May 2007
Location: N35�03'16.75", W 080�51'0.9"
Posts: 32,488
Received 7,770 Likes
on
4,341 Posts
Originally Posted by bibledriver
NOTE: Don't try those screws until you pop the other two out!. I can see it now . . .
lol
lol


Right! Retaining Screws FIRST. Then back the rotor out.
Now, that said, I did strip the screws on one rotor. Drilled the screws part way out, then used the bolts to back the rotor out AND bust of the remainder of the screw heads. But that was a "special case".
06-21-2008, 07:25 PM
#50
Drifting
Originally Posted by 01tl4tl
there are threads on manual brake bleeding- just search and check the DIY section
 07-27-2008, 11:25 AM
#52
its the same as the front but smaller- less torque spec bolts- smaller pads- and the dreaded parking brake in a rotor
- there is 1- 10mm head bolt that holds the brake line to a bracket- remove that bolt so the caliper can be moved
there is plenty of times I wrote on parking brakes cleaning and adjustment- even this month- so easy to look up that info too
I strongly encourage you-
if the brake fluid was never changed, or not that you know of in the last few months---
DO a full brake sysytem flush- bleeding-(technically is only bleeding if there is air in the system and you are watching for bubbles) We are flushing- watching for clear fresh fluid to come out the caliper
DO IT BEFORE you work on the brakes.
Assuming there is crud in the system- its in the caliper for sure - so when you compress the piston, it backwashes crud up the line and stirs it up inside the caliper while moving it around to remove and install etc.
WHEN you do a brake fluid flush- it removes all the old fluid and crud along with it, and new fluid results in better pedal feel and actual operation.
Brake fluid should be flushed/replaced fully- starting at year 3 and then every year after-- till it stops running a decade or 2 from now
07-27-2008, 11:26 AM
#53
there are a few DIY in the DIY section- some from outside sources and later ones will be ziner experience
check them out
https://acurazine.com/forums/ramblings-12/sex-jokes-142016/
check them out
https://acurazine.com/forums/ramblings-12/sex-jokes-142016/
04-06-2009, 12:50 AM
#54
Three Wheelin'
14mm -36ft/lbs
17mm - 76ft/lbs
19mm - 80ft/lbs
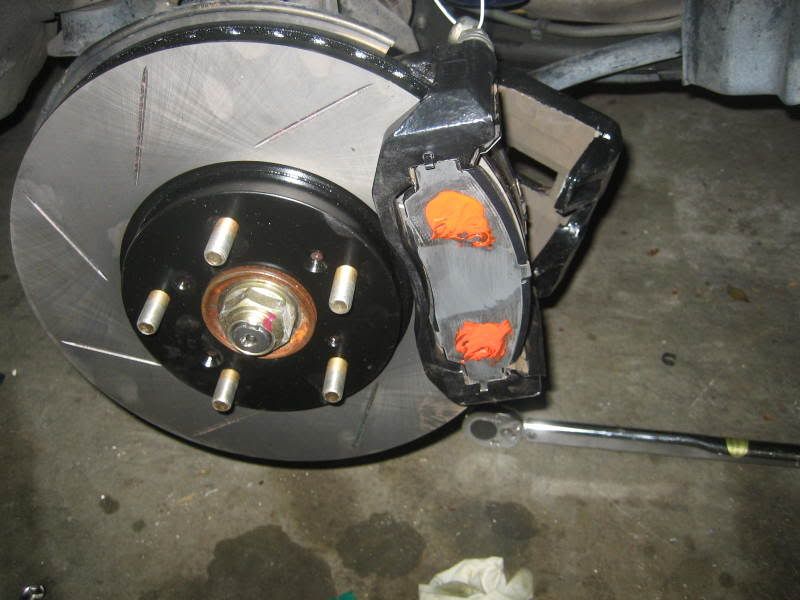
Just put on my rotors and new pads this weekend. Above in the TQ specs for the 3 different bolts you'll touch.
Job is 1 hour with an impact gun.
17mm - 76ft/lbs
19mm - 80ft/lbs
Just put on my rotors and new pads this weekend. Above in the TQ specs for the 3 different bolts you'll touch.
Job is 1 hour with an impact gun.
 04-07-2009, 02:56 PM
#56
Three Wheelin'
Braking in smooth and appears to have a little more bite. That said I've not pushed it as it takes 3-400 miles to brake in the combo I bought.
05-11-2009, 07:27 PM
#57
...WHEN you do a brake fluid flush- it removes all the old fluid and crud along with it, and new fluid results in better pedal feel and actual operation.
Brake fluid should be flushed/replaced fully- starting at year 3 and then every year after-- till it stops running a decade or 2 from now
Brake fluid should be flushed/replaced fully- starting at year 3 and then every year after-- till it stops running a decade or 2 from now
How much fluid should I have on hand if I want to do the flush before replacing my pads and rotors?
Do you approve of the technique in post #1 this thread (aside from the incorrect bleed order):
https://acurazine.com/forums/2g-cl-frequently-asked-questions-52/how-brake-lines-446803/
It looks straightforward and makes sense. Would it risk backwashing fluid?
Originally Posted by Jens_h.
This is the one man brake bleeding method I have used for years ,It flies in the face of what the service manual tells you to do but it works for me .
1 locate the master cylinder and by disconnecting the 2 electrical wires on it and the twisting it off ,set it aside .
2 Pull out the filter basket .
3 Now using that turkey baster suck out as much of the brake fluid as you can and put it in the brake bleeder .(trust me)
4 Refill the master cylinder with fresh fluid all the way to the top .
5 I start at the Left rear caliper for the next step
6 Add enough brake fluid to the brake bleeder you just built so that the end of the hose inside the bottle is completely covered .
7 using the 10 MM line wrench break loose the Left rear caliper bleeder screw about 1/8th to 1/4 of a turn (no more is needed)
8 attach the free end of the rubber hose to the brake bleeder nipple .
9 get in the car and slowly using good pressure pump the brake pedal 15 times .
10 close the brake bleeder on the caliper and remove the brake bleeder ,You will notice the level of the fluid has risen in the bottle .
11 Now refill the master cylinder again to the top with fresh fluid and repeat this procedure except this time go to the right rear caliper .
You will do each caliper 2 times using 15 pmps each time making absolutley certain that you refill the master cylinder each time .Once you have done each caliper 2 times refill the master cylinder to the correct level (indicated on the side of the plastic bottle you have been refilling all this time )
Last edited by murky; 05-11-2009 at 07:31 PM.
05-11-2009, 07:41 PM
#58
flushing the brake fluid will replace almost all the fluid in the caliper as well as in the brake lines. Two bottles from the dealer (I forget how much is in a bottle, 12 fl oz I think) should be enough for a flush.
I've always done it with two people, so can't really comment on that process. but if you're going to do it this way, make sure your have a good tight hose on the bleeder screw, air can enter the system through the sides.
I've always done it with two people, so can't really comment on that process. but if you're going to do it this way, make sure your have a good tight hose on the bleeder screw, air can enter the system through the sides.
05-14-2009, 07:24 PM
#59
flushing the brake fluid will replace almost all the fluid in the caliper as well as in the brake lines. Two bottles from the dealer (I forget how much is in a bottle, 12 fl oz I think) should be enough for a flush.
I've always done it with two people, so can't really comment on that process. but if you're going to do it this way, make sure your have a good tight hose on the bleeder screw, air can enter the system through the sides.
I've always done it with two people, so can't really comment on that process. but if you're going to do it this way, make sure your have a good tight hose on the bleeder screw, air can enter the system through the sides.
What ID hose do I need to connect to the bleeder nipple?
Funny, I saw a pressure flush demo by a couple of jokers on YouTube and they couldn't figure out where the bubbles were coming from until one of them realized the tube there was loose.
05-14-2009, 08:39 PM
#61
I'm not sure of the exact diameter of the bleeder nipple but it's roughly a quarter inch, if I remember right. You can get a rubber hose maybe 1/8" or 3/16" and stretch it over the nipple for a tight seal. Just make sure its the stretchy rubber hose.
05-18-2009, 11:24 PM
#62
Racer
Join Date: Mar 2009
Location: Toronto, Ontario
Posts: 250
Likes: 0
Received 0 Likes
on
0 Posts
Where do I put the break quiet on the inside pad where it touches the caliper ring ?
This is for the outside pad.
Why I ask is because I spreaded a thin even layer on the whole pads and yet one side is still squealing. (new pads)
This is for the outside pad.
Why I ask is because I spreaded a thin even layer on the whole pads and yet one side is still squealing. (new pads)
07-16-2009, 05:13 PM
#63

I just did this last year, and wanted to contribute. For those of you whose rotor retaining screws are stripped, go to Sears, and buy the $ 5 center punch, and center punch the screws to loosen it.
There is a dot in the phillips head screw, and you concentrate on hitting this dot it so that it rotates counter clock wise, obviously.
For extra pre-caution, I disengaged the parking brake (the seized screws happened to be in the rear on mine), so that my punching the screw didn't chip the parking brake drum pads.
Oh yeah, also, the screw were stripped because I was not using "Craftsman" screwdriver head/driver, and it went bad on the second screw. Don't go cheapo on tools, or else, it takes longer to do the job.
11-21-2009, 06:47 AM
#64
My baby's daddy

Join Date: Dec 2003
Location: A town
Age: 49
Posts: 247
Likes: 0
Received 0 Likes
on
0 Posts
great post
Thanks for doing this! Changed my fronts out yesterday to BrakeMotive's slotted, cross drilled with ceramic pads. Couple notes for others to be aware of.
WD40 worked like a charm. I soaked the retaining screws twice over two hours. They practically fell out.
One of my caliper pins was stuck and all gunked up. I cleaned it off and it now slides freely. That caused the inside pad on my drivers side to wear out in less than 10K miles. I probably should have replaced that pin and cleaned out the slide chamber better but its working great right now. I'll check it in a few weeks. I may pull it back apart to paint the calipers. It would look much nicer.

 12-07-2009, 05:35 PM
#69
2003 TL-p
basically getting something other than our terrible oem rotors (aka Warp-masters)
go ebc, ill be picking up a set of dimpled and slotted ebc rotors and red stuff pads.
cant wait!
nice diy, will put it to good use
go ebc, ill be picking up a set of dimpled and slotted ebc rotors and red stuff pads.
cant wait!
nice diy, will put it to good use

 05-10-2010, 11:14 PM
#73

Learned something new while replacing my rotors. I don't recall seeing it in various DIY's (I might have missed it), but I *know* some people have taken a hammer to knock stuck rotors off the hub.
Well, you don't need to do that.
See those two holes I marked. Just screw in an M8 x 1.25 bolt in each one. Give one a couple of turns of the ratchet, then give the other a couple of turns. Keep alternating back and forth, a couple of turns at a time, until the rotor breaks loose.
Screwing the bolts in will back the rotor off the hub. Easy.
Well, you don't need to do that.
See those two holes I marked. Just screw in an M8 x 1.25 bolt in each one. Give one a couple of turns of the ratchet, then give the other a couple of turns. Keep alternating back and forth, a couple of turns at a time, until the rotor breaks loose.
Screwing the bolts in will back the rotor off the hub. Easy.
i cant unscrew the two screws that you have to unscrew, they so rusty that i broke my screw driver
05-11-2010, 08:29 PM
#75
Yeah you definately need an impact driver, hold it really tight and wack on it hard a few times to break the corrosion off the screws. Try not to round off the screws, then you will have to drill the head of them out.
