
Low Beam installation


 01-07-2008, 07:18 AM
#2
Senior Moderator
You should buy 2 new HIDs. They should be replaced in pairs.
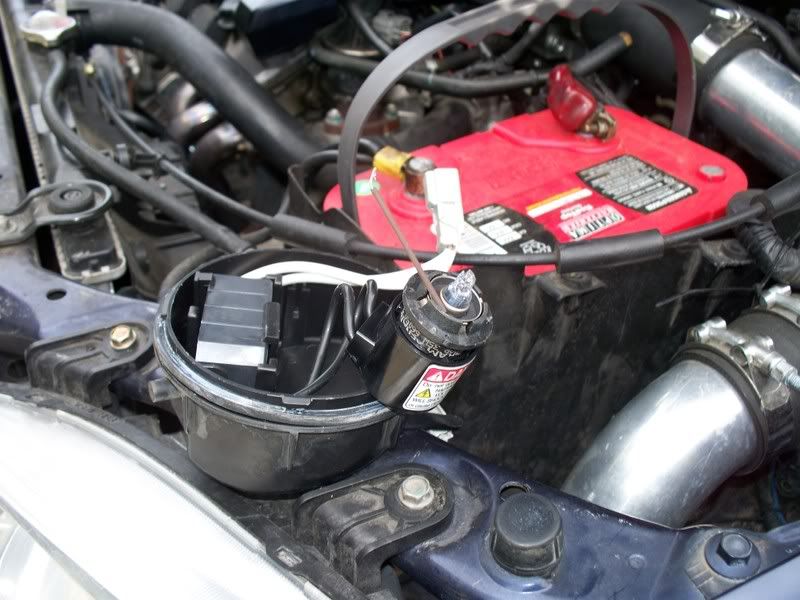
As for the instructions, there is a #20 security torx screw you have to remove.


After its removed you have to twist the black cover about a 1/4 turn (it shows on the cover which way to turn)


After its turned you can pull it out of the way. Then there is a metal clip that is a spring loaded that you push in and move to the side. Once thats is uncliped the bulb simply pulls out.
(The bulb is removed to show the clip)


Be careful not to touch the new bulb as the oils from your finger will cause them to burn out.
Contact our vendor Excelerate for good replacement bulbs.
As for the instructions, there is a #20 security torx screw you have to remove.
After its removed you have to twist the black cover about a 1/4 turn (it shows on the cover which way to turn)
After its turned you can pull it out of the way. Then there is a metal clip that is a spring loaded that you push in and move to the side. Once thats is uncliped the bulb simply pulls out.
(The bulb is removed to show the clip)
Be careful not to touch the new bulb as the oils from your finger will cause them to burn out.
Contact our vendor Excelerate for good replacement bulbs.
01-19-2008, 07:11 PM
#4

Those Kaixen bulbs from Excelerate are rocknroll
You can get 5000k which is really close to the stock color 4300k bulbs white with a little blue tint
Or the 6000k has a much bluer with white color, and is great for night and bad weather driving or those with night vision problems in general.
You can get 5000k which is really close to the stock color 4300k bulbs white with a little blue tint
Or the 6000k has a much bluer with white color, and is great for night and bad weather driving or those with night vision problems in general.
01-22-2008, 10:34 AM
#5
Pro
I just noticed that the Philips 4300k I just installed are very white, without any of the hint of blue that my 5-year-old stock (OSRAM) 4300k bulbs had. I've read that the color of HIDs settle a bit after something like 100 hours. Will they get a little bluer? 
The following 2 users liked this post by burnerjunky:
JmannTLs03 (11-17-2012),
KatabaticSaint (09-26-2011)
01-23-2008, 07:01 AM
#7
Senior Moderator
Originally Posted by bonknhead
I just noticed that the Philips 4300k I just installed are very white, without any of the hint of blue that my 5-year-old stock (OSRAM) 4300k bulbs had. I've read that the color of HIDs settle a bit after something like 100 hours. Will they get a little bluer?
Trending Topics
01-23-2008, 03:07 PM
#8
Registered Pimp
yes, it doesn't make things brighter, but, it makes things more vibrant. the road lines and reflectors come back at you in neon colors and its just like being on a big ecstasy trip 
01-23-2008, 03:22 PM
#9
Pro
Originally Posted by fsttyms1
Why would you want blue? Blue doesnt help you see. Im probably going to get a set of kaixen 5k and compare them to the 6 i have as they are just a little blue for my liking and know i can get better useable light from them.
So back to my original question, will the new 4300k bulbs eventually become a little bit bluer like my 5-yr-old stock ones did, or is that only when they're at the end of their life?
01-23-2008, 05:16 PM
#10
Registered Pimp
they go pink when they are about to die, also i noticed, you can tell how used your bulb is if you take it out and look at that little bubble in the tube, the more wear on it, the whiter and milkier it gets.
01-23-2008, 05:28 PM
#11
Senior Moderator
Originally Posted by bonknhead
I really liked that tiny bit of blue tint my stock 4300k HIDs had. IMO it looked upscale without being ricey.
So back to my original question, will the new 4300k bulbs eventually become a little bit bluer like my 5-yr-old stock ones did, or is that only when they're at the end of their life?
So back to my original question, will the new 4300k bulbs eventually become a little bit bluer like my 5-yr-old stock ones did, or is that only when they're at the end of their life?
They take about 100hrs to color shift. After that thats about all they will change. As bulbs get older they dont turn bluer. they will eventually start looking more like halogens and shift to a pinkish color as they are about to die.
01-23-2008, 06:07 PM
#12
Kris- based on info from Excelerate and info on Kx website- the rating system for color and how its measured in the old days versus now with modern equipment, the Kaixen 5000 are almost the same as OE 4300 for color white with blue, but you have to admit, having the road lines jump out is very helpful 
6k is more blue with white
Oh wait- you dont think seat heat is needed in -30F weather, so how much should we trust.....

At least you can give another ziner a good deal on slightly used bulbs if you prefer the 5s.
I'm old, I appreciate the way the lines and signs show up like they did not with the 4300.
6k is more blue with white
Oh wait- you dont think seat heat is needed in -30F weather, so how much should we trust.....
At least you can give another ziner a good deal on slightly used bulbs if you prefer the 5s.
I'm old, I appreciate the way the lines and signs show up like they did not with the 4300.
01-23-2008, 06:43 PM
#13
Senior Moderator
Originally Posted by 01tl4tl
Kris- based on info from Excelerate and info on Kx website- the rating system for color and how its measured in the old days versus now with modern equipment, the Kaixen 5000 are almost the same as OE 4300 for color white with blue, but you have to admit, having the road lines jump out is very helpful
6k is more blue with white
Oh wait- you dont think seat heat is needed in -30F weather, so how much should we trust.....
At least you can give another ziner a good deal on slightly used bulbs if you prefer the 5s.
I'm old, I appreciate the way the lines and signs show up like they did not with the 4300.
01-23-2008, 07:17 PM
#14
Pro
Originally Posted by fsttyms1
IMHO Blue doesnt make them look upscale. Pure white would, but not blue.
They take about 100hrs to color shift. After that thats about all they will change. As bulbs get older they dont turn bluer. they will eventually start looking more like halogens and shift to a pinkish color as they are about to die.
They take about 100hrs to color shift. After that thats about all they will change. As bulbs get older they dont turn bluer. they will eventually start looking more like halogens and shift to a pinkish color as they are about to die.
01-23-2008, 10:46 PM
#15
your 4300 will get a little more blue in them. If you get pink- its time to buy new bulbs
Wow Kris- blue is supposed to be easier on the eyes, I hope my reputation points havn't been cut!
I was reading today that the Kelvin color rating is about the eyes abilty to differentiate
colors- which would explain why 6000 ks make reflecto paint light up so well
Sunlight would be 12k for example and yellow fog lights are 3000
01-24-2008, 10:27 AM
#17

Originally Posted by 01tl4tl
your 4300 will get a little more blue in them. If you get pink- its time to buy new bulbs
Wow Kris- blue is supposed to be easier on the eyes, I hope my reputation points havn't been cut!
I was reading today that the Kelvin color rating is about the eyes abilty to differentiate
colors- which would explain why 6000 ks make reflecto paint light up so well
Sunlight would be 12k for example and yellow fog lights are 3000
Wow Kris- blue is supposed to be easier on the eyes, I hope my reputation points havn't been cut!
I was reading today that the Kelvin color rating is about the eyes abilty to differentiate
colors- which would explain why 6000 ks make reflecto paint light up so well
Sunlight would be 12k for example and yellow fog lights are 3000
Here's a great link with an extended discussion of this:
http://intellexual.net/hid.html
Here's an excerpt:
"....Philips is the number one manufacturer of HID bulbs. The Philips OEM D2S bulb is rated at 4100K at 12.8 volts and produces 3200 lumens of light. The Philips Ultinon D2S is 5800K at 12.8 volts and produces 2400 lumens of light. As you can see, with all other factors remaining constant, the brightness of an HID bulb declines the higher up the color index you go. Vision, a Korean bulb manufacturer, makes an 8000K bulb, which they used to advertise on Acura-Forums as 2000 lumens bright. This is barely a marked improvement over halogens, and will produce more glare and eye fatigue than it is beneficial. 4100K has been proven through tireless independent research by the Germans, Japanese, and Americans to be the most functional, truest white and thus the brightest possible color temperature (ceteris paribus).
Every car manufacturer in the world (including BMW and Audi) uses none other than a standard 4100K gas-discharge bulb. No exceptions. The reason being is that 4100K is daylight white in color and produces the same color visible light as direct sunlight. This is least fatiguing functional color on the eyes and produces the most comfortable contrast on the road."
01-24-2008, 11:04 AM
#18
How old is that info though bob?- Kaixen is the international research facilty for lighting- based in Korea (your tax dollars at work?) and they hold several new patents on design and manufacture for their factory division.
I dont have a set of 5s to compare, the 6s are working very well for my old tired eyes, thats all I care. I have run next to an 03TL and the OE lights do have more ~white~ directly in front of the car. If thats really important to you- go with the 4300 or 5000 bulbs
Look at current german cars- they sure look blue when I approach one or being passed.
Everyone has different taste, I found outdoor house flourescent floodlights-
6500k, and like them too
You can always add pinpoint beam driving lights for distance or some wide angle close range. My year didnt come with fog lights so adding lighting is normal to me
01-24-2008, 11:11 AM
#19
Originally Posted by 01tl4tl
Look at current german cars- they sure look blue when I approach one or being passed.
Here's more from that same link:
"So the million dollar question is now: Why do BMW & Audi lights appear blue when they use a white bulb?
Well, this coloration is the result of the light projectors; the lenses: it's transparency, it's curvature, the tiny grooves etched into it; the projector assembly, the shield, and the reflector bowl. All these components work together to produce a signature of light unique to that particular optic's design. On the Audi and BMW projectors, the lens curvature at the edge bends the white light producing a "prism effect". White light is broken down to it's fundemental colors. Since blue lights is high energy, it is absorbed last and thus travels farther. So with this prism effect, you'll notice that BMW HIDs are only purple and blue from the sides, the top, and the bottom edges, but are always daylight white on the road and in the beam pattern. This phenomenon can be demonstrated when you watch an oncoming BMW hit a pot hole or speed bump in the road and the car's nose pitches up and down. The headlights will flicker and "throw colors off", but returns to a solid white beam pattern directly on the road.
Trying to emulate this color-flickering effect with a solid-state blue or purple bulb is only detrimental to lighting performance, it doesn't fool anyone, but most importantly it endangers other motorists around you. Blue light has what we call a very high diffuse density, which causes it to radiate outwards as opposed to forwards. What results is a wide glow of light outside the beam pattern that is blinding to motorists you share the road with. A blue HID bulb will produce color bleed around the headlight, around the objects it lights up, outside of the beam pattern, and around the cut off line. This is effect is known as "glare", and these illegal and improperly installed HID kits are the reason why HIDs get a bad wrap. As common evidence of glare, observe a traffic light at night in a dimly lit area. There is red light and green light. Red is opposite blue and green is next to blue, thus we can substitute green for blue. If you observe the aura, or glow, of light around a red light and compare it to that of a green light, you'll notice that the green light produces much more glare than red. Blue is even worse. Purple, the worst."
05-23-2008, 05:14 PM
#20
1st Gear

Join Date: May 2008
Age: 42
Posts: 1
Likes: 0
Received 0 Likes
on
0 Posts
hey all,
im trying to replace my driver side HID lowbeams, but when trying to follow the steps, there is a plastic vent of some sort last doesnt allow me to pull out the black cover in order to get to the HID Bulb. can any1 help? am i supposed to take out the entire headlight from the front? thanx
im trying to replace my driver side HID lowbeams, but when trying to follow the steps, there is a plastic vent of some sort last doesnt allow me to pull out the black cover in order to get to the HID Bulb. can any1 help? am i supposed to take out the entire headlight from the front? thanx
05-23-2008, 08:24 PM
#21
Originally Posted by dlee1234
hey all,
im trying to replace my driver side HID lowbeams, but when trying to follow the steps, there is a plastic vent of some sort last doesnt allow me to pull out the black cover in order to get to the HID Bulb. can any1 help? am i supposed to take out the entire headlight from the front? thanx
im trying to replace my driver side HID lowbeams, but when trying to follow the steps, there is a plastic vent of some sort last doesnt allow me to pull out the black cover in order to get to the HID Bulb. can any1 help? am i supposed to take out the entire headlight from the front? thanx

 06-28-2008, 12:01 PM
#23

I just finished mine (wow, typing hurts. My fingers are so sore). It took me about an hour and a half. Learn from my mistakes. For the record, I am anything but "handy". Sometimes, it really shows, too.
My biggest mistake was not paying attention to how the bulb and harness were mounted into the lens. When you are looking down into the hood from the front of the car, the wires for the harness should be facing right. I kept trying to mount it with the wires facing down without any success. The retaining spring would never catch. There is a key in the lens that matches up with a notch in the bulb. Although it's not really a snug fit, like halogen bulbs are, and it's hard to notice because of the spring in the way, it is there.
While I was struggling with this, I thought maybe the bulb was interfering somehow. So I decided I should figure out how to asemble it without the bulb. This led to my next mistake. The retaining spring is NOT meant to secure the bulb harness. The diameter of the bulb where the spring is is smaller than the harness. So by me trying to mount an empty harness into the lens, I bent the crap out of the retaining spring. It took a lot of time to rebend it to a suitable shape.
After finally figuring out that you had to have a bulb in the harness and you have to have the harness wires pointing right, it went fairly easy. I disassembled the crap out of the driver's side so I could see what was going on.
If I had to do it again, I would. It's not that hard. I made it very difficult all on my own.
 07-12-2008, 10:11 AM
#29
3rd Gear

Join Date: May 2008
Age: 59
Posts: 3
Likes: 0
Received 0 Likes
on
0 Posts
I just replaced my low beam HIDs using this thread, made it a breeze. Only had to watch on the orientation of the bulbs when I installed the new ones, they will only seat flush if the notches in the bulb are at 11 o'clock when you are looking at them from the rear. Other than that, seating the cover was a bit tricky but all-in-all it went so much easier than I had envisioned
I replaced both bulbs, one was out and the other was blinking. The one that was out had been blinking for sometime before it went and when I pulled it out it was totally blown, exploded, like the one in the picture. Like AMGala, it had been out for awhile before I replaced.
FYI - I have a 2000 TL with 302,000 so the bulbs were due...
Originally Posted by AMGala
It exploded on its own? Or did you hit it while installing/removing it?
11-23-2008, 08:10 PM
#30
Banned
Join Date: May 2003
Location: Northwest/burbs, IL
Age: 40
Posts: 4,698
Likes: 0
Received 3 Likes
on
3 Posts
DRSMOKE, could you possibly take a pic. of how the notches should look with the bulb sitting in the power socket? I for the life of me can't get it back in properly to set the security pin. I have been trying for the past 4hrs now.. and now its dark.  So I'll have to wait until tomorrow morning to give it another shot. I have tried all sorts of placements in the power socket from it being snug and locked into that little key too having it placed half way (turned) into the power socket.
Edit* Crap.. forgot how old this thread is.
So I'll have to wait until tomorrow morning to give it another shot. I have tried all sorts of placements in the power socket from it being snug and locked into that little key too having it placed half way (turned) into the power socket.Edit* Crap.. forgot how old this thread is.
Last edited by `ill*tl; 11-23-2008 at 08:12 PM.
11-24-2008, 04:30 PM
#32
Cruisin'

Join Date: Aug 2006
Age: 36
Posts: 23
Likes: 0
Received 0 Likes
on
0 Posts
So I am facing this issue today and Im wondering about the danger of replacing the low beam. Is there a safe way to make sure there is no charge built up in the light? Also, im having difficulty finding the #20 security screw, is it any different in a '99?
11-25-2008, 03:22 AM
#34
Banned
Join Date: May 2003
Location: Northwest/burbs, IL
Age: 40
Posts: 4,698
Likes: 0
Received 3 Likes
on
3 Posts
lol, yah.. it took me tearing apart my front end to figure out what I was doing wrong. I was trying to put the power harness back in with the security pin in the way. It took me 2mins to figure it out when I had the headlight casing out on my kitchen table.. so stupid of me! 
11-25-2008, 07:28 AM
#35
Senior Moderator
lol, yah.. it took me tearing apart my front end to figure out what I was doing wrong. I was trying to put the power harness back in with the security pin in the way. It took me 2mins to figure it out when I had the headlight casing out on my kitchen table.. so stupid of me!
02-22-2011, 01:04 PM
#37
Intermediate

no need to remove the bumper to replace driver side bulb!!!
2000TL-P headlight bulb replacement
finally got around to replacing my headlights this weekend. my driver's side one went out a week or two ago so i ordered a pair of phillips D2Rs from amazon for about $90 total. when i removed the broken bulb, it was in pieces like the one 6MTUA5 showed in post #24.
anyways, i wanted to add a little to this DIY so that those looking to change their driver's side bulb will know that you don't need to remove the bumper.
1. there's a removable plastic shrouding just south of the airbox (facing the front of the car, north being driver's seat, west being passenger side, etc.) and east of the battery (sorry, i don't have a pic of this) that's held on by two clip and anchored by a third clip at the bottom. if you remove these two clips that hold the plastic piece to the frame, you will be able to pull up on the shrouding and it will come off. it might take a little encouragement, but it comes off for sure.
2. once you have that removed, you will see an air duct that opens up to the west (see below pic - i'm holding the removable duct). that piece comes off as well. just give that duct a good tug in the up direction and voila, you now have access to the igniter.

3. next, remove the security torx screw shown by the OP. after that's been removed, you can't quite twist off the igniter just yet - you should disconnect the grey clip that's connected to the turn signal, i believe. grey piece will be to the outside of the car from the igniter in either headlight assembly.
4. once you have removed that, you can twist the igniter off. it takes a bit of force, but it does come off.
5. another trick that might make this process easier is to remove the connector from the bulb before removing the bulb (and replacing it after replacing the bulb). the connector piece is the one with the "Danger" sign taped on it. that piece, obviously, may be detached from the bulb. while the bulb is still in the housing, you can push the connector towards the housing and turn it counter-clockwise slightly. the connector should come off pretty easily. after you've done that, you can simply remove the bulb by removing the metal clip shown in the 4th and 5th pics by the OP.
given the limited space, it's a bit cumbersome to try to put the new bulb back in when the connector's attached. i found putting the bulb in and clipping it makes it much easier.
sorry if none of this makes sense just reading it, but you'll understand what i mean once you're under the hood of your car.
finally got around to replacing my headlights this weekend. my driver's side one went out a week or two ago so i ordered a pair of phillips D2Rs from amazon for about $90 total. when i removed the broken bulb, it was in pieces like the one 6MTUA5 showed in post #24.
anyways, i wanted to add a little to this DIY so that those looking to change their driver's side bulb will know that you don't need to remove the bumper.
1. there's a removable plastic shrouding just south of the airbox (facing the front of the car, north being driver's seat, west being passenger side, etc.) and east of the battery (sorry, i don't have a pic of this) that's held on by two clip and anchored by a third clip at the bottom. if you remove these two clips that hold the plastic piece to the frame, you will be able to pull up on the shrouding and it will come off. it might take a little encouragement, but it comes off for sure.
2. once you have that removed, you will see an air duct that opens up to the west (see below pic - i'm holding the removable duct). that piece comes off as well. just give that duct a good tug in the up direction and voila, you now have access to the igniter.
3. next, remove the security torx screw shown by the OP. after that's been removed, you can't quite twist off the igniter just yet - you should disconnect the grey clip that's connected to the turn signal, i believe. grey piece will be to the outside of the car from the igniter in either headlight assembly.
4. once you have removed that, you can twist the igniter off. it takes a bit of force, but it does come off.
5. another trick that might make this process easier is to remove the connector from the bulb before removing the bulb (and replacing it after replacing the bulb). the connector piece is the one with the "Danger" sign taped on it. that piece, obviously, may be detached from the bulb. while the bulb is still in the housing, you can push the connector towards the housing and turn it counter-clockwise slightly. the connector should come off pretty easily. after you've done that, you can simply remove the bulb by removing the metal clip shown in the 4th and 5th pics by the OP.
given the limited space, it's a bit cumbersome to try to put the new bulb back in when the connector's attached. i found putting the bulb in and clipping it makes it much easier.
sorry if none of this makes sense just reading it, but you'll understand what i mean once you're under the hood of your car.
Last edited by jomama; 02-22-2011 at 01:07 PM.
The following users liked this post:
JmannTLs03 (11-17-2012)
 09-23-2011, 10:12 PM
#39
2nd Gear

Join Date: Sep 2011
Posts: 2
Likes: 0
Received 0 Likes
on
0 Posts
Removal of bulb?
I am all the way down to removing the bulb and can't seem to remove it from it's socket. I have tried twisting in both directions, also while pushing and pulling. I saw the direction arrows on the back of the socket for "open" and "lock", but that didn't seem to help me out at all. Is there something I'm doing wrong?
