
exterior is nearly complete, maybe.

 06-04-2009, 06:07 PM
#42
yea man, sunday night I couldnt sleep and stayed up till 330, crappy part is I gotta wake up at 630, work was not cool.
Thanks man. all the parts are stock, projectors are from a tsx, only thing I needed to add was some clean shrouds. A lot of people out there use homemade shrouds so that might be it. I got mine on ebay

If you look, there is a gap ring around the shroud, I was thinking about wiring in a red LED behind it to give it a mad headlight look, but of course, attached to a switch, because 99% of the time I wouldnt want it on. I think the headlights look better in person, those pictures doesnt show the shroud. It stands out a lot with the blacked out housing. But I'm still working on them, just taking a break because the weather has been really hot lately.
For one, I need to align the angle, its pointed down a bit
two, I need to paint the drivers side black
three, i need to install the red led
and four, I might paint the high beam yellow.
But all of these is simple and ez to do. Here is a closer look at them
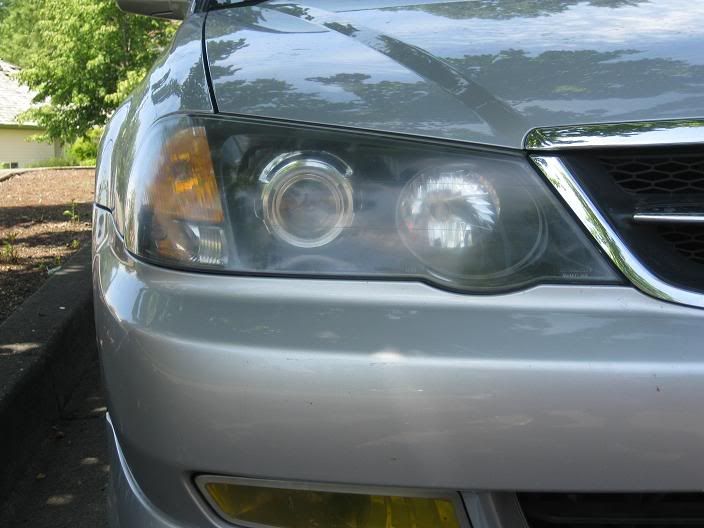
The glare kinda takes away from it, i'll post another pic when I'm done with the led and yellow highbeams. I also bought some LED corners that I need to swap in.
If you look, there is a gap ring around the shroud, I was thinking about wiring in a red LED behind it to give it a mad headlight look, but of course, attached to a switch, because 99% of the time I wouldnt want it on. I think the headlights look better in person, those pictures doesnt show the shroud. It stands out a lot with the blacked out housing. But I'm still working on them, just taking a break because the weather has been really hot lately.
For one, I need to align the angle, its pointed down a bit
two, I need to paint the drivers side black
three, i need to install the red led
and four, I might paint the high beam yellow.
But all of these is simple and ez to do. Here is a closer look at them
The glare kinda takes away from it, i'll post another pic when I'm done with the led and yellow highbeams. I also bought some LED corners that I need to swap in.
Last edited by fobstylez; 06-04-2009 at 06:09 PM.
06-05-2009, 12:06 PM
#45
Traded in my
bonk n fobs - we all live in the same area and drive SSM (which IMO gives you 8+whp over any other color  )
)
So we def gotta meet up and show off the SSMs..kinda like a mini meet thang I def need some help gettin my TL-S to where you guys are at.
Keep up the good work fobs!!
)So we def gotta meet up and show off the SSMs..kinda like a mini meet thang
I def need some help gettin my TL-S to where you guys are at.Keep up the good work fobs!!
06-05-2009, 12:10 PM
#46
bonk n fobs - we all live in the same area and drive SSM (which IMO gives you 8+whp over any other color )
So we def gotta meet up and show off the SSMs..kinda like a mini meet thang I def need some help gettin my TL-S to where you guys are at.
Keep up the good work fobs!!
)So we def gotta meet up and show off the SSMs..kinda like a mini meet thang
I def need some help gettin my TL-S to where you guys are at.Keep up the good work fobs!!
06-05-2009, 12:28 PM
#48
Pro
bonk n fobs - we all live in the same area and drive SSM (which IMO gives you 8+whp over any other color )
So we def gotta meet up and show off the SSMs..kinda like a mini meet thang I def need some help gettin my TL-S to where you guys are at.
Keep up the good work fobs!!
)So we def gotta meet up and show off the SSMs..kinda like a mini meet thang
I def need some help gettin my TL-S to where you guys are at.Keep up the good work fobs!!
 except for the drop , but sure, I'd meet up with you two youngsters to check out your rides sometime.
06-05-2009, 01:23 PM
except for the drop , but sure, I'd meet up with you two youngsters to check out your rides sometime.
06-05-2009, 01:23 PM
#49
What? how old are you? I'm like one of the older guys on these forums. I bought my car for the class and speed. I wasnt going to mod it cause i'm old, maybe just the lip kit, but after the kit, it didnt look right without rims, then when I got the rims, the gap was insane so I had to lower it. Then i needed better lighting, so I got the hid fogs, but decided I want something different so I did the retro. Then it started getting hotter so I had to tint the windows. Then my stock deck couldnt play mp3s so I got a new stereo. Then the new stereo couldnt hook up the stock sub so I had to get an amp/sub. Its getting out of control. Hehe yea ill meet with you guys.
 06-05-2009, 02:54 PM
#52
Pro
 I always wash, vacuum and (occassionally) wax her car before I do mine.
I would never say that - how do you think I've managed to stay married for 17 years?
06-07-2009, 03:08 PM
#56
Traded in my
Haha..no doubt. I'll still be moddin my cars when I get to ur age (30 years from now )
I just wish I was a little older with a better payin job so I could have more money for mods. But for now, I'm a broke college kid puttin most of my money towards that UP education...
But I'm gettin there..slowly but surely. Just got my Redstuff..waitin for my check for the Rotora X-drilled/slotted rotors. Next is CT Icebox..thanks to bonk for the push..and soon after is RJ 18" Inspyres. Somewhere along the way will be a tint but I'm not sure when..
When are you guys free..I'm thinkin maybe a Sonic run for some food and some loitering..?
)I just wish I was a little older with a better payin job so I could have more money for mods. But for now, I'm a broke college kid puttin most of my money towards that UP education...
But I'm gettin there..slowly but surely. Just got my Redstuff..waitin for my check for the Rotora X-drilled/slotted rotors. Next is CT Icebox..thanks to bonk for the push..and soon after is RJ 18" Inspyres. Somewhere along the way will be a tint but I'm not sure when..
When are you guys free..I'm thinkin maybe a Sonic run for some food and some loitering..?
06-07-2009, 07:21 PM
#57
Pro
Haha..no doubt. I'll still be moddin my cars when I get to ur age (30 years from now )I just wish I was a little older with a better payin job so I could have more money for mods. But for now, I'm a broke college kid puttin most of my money towards that UP education...
But I'm gettin there..slowly but surely. Just got my Redstuff..waitin for my check for the Rotora X-drilled/slotted rotors. Next is CT Icebox..thanks to bonk for the push..and soon after is RJ 18" Inspyres. Somewhere along the way will be a tint but I'm not sure when..
When are you guys free..I'm thinkin maybe a Sonic run for some food and some loitering..?
)I just wish I was a little older with a better payin job so I could have more money for mods. But for now, I'm a broke college kid puttin most of my money towards that UP education...But I'm gettin there..slowly but surely. Just got my Redstuff..waitin for my check for the Rotora X-drilled/slotted rotors. Next is CT Icebox..thanks to bonk for the push..and soon after is RJ 18" Inspyres. Somewhere along the way will be a tint but I'm not sure when..
When are you guys free..I'm thinkin maybe a Sonic run for some food and some loitering..?
 He's not even interested in driving yet, but he does like my TL-S.
 Eh, I'm not much of a loitering kind of guy, sorry. Kinda too old for that now, especially since my age is the same as two of you combined!
 06-08-2009, 09:58 AM
#60
Its really not that bad, just drop the rack to the bottom rack, then what I did was took a body towel, damp it with water then put it on top of the rack. That way it doesnt melt the bottom of your headlights because baking turns the heat on, on the bottom portion. Rest is cake
06-08-2009, 10:10 AM
#61
Pro
BTW Fobstylez, I always wanted to ask - how difficult an time-consuming is it to clear headlights? I'd love to do it, but I don't want mess it up and get condensation in them if I don't seal them well. Would you be able to help me?
06-08-2009, 11:49 AM
#62
1. Drop the rack to the bottom
2. Get a bath towel, make it damp, but not too damp where it will be dripping wet. This will block the heat from below. Only draw back to having a damp towel is the heat will cause a lot of steam to come from your oven, but this is normal. I like this method because its 100% safe and it wont cause your housing to melt.
3. Of course pre heat your oven to 275, I put it in there for about 7 mins. If you are scared, you can open up your oven to touch the housing, its hot, but not super burning hot.
4. Once the time is up, take them out of the oven, they will be hot so you will need towels or oven gloves.
5. Now this part requires some elbow grease, take a flat head screw driver and wedge it in between the cover and the housing, anywhere works, doesnt matter, and just run it along the housing. Once you have it spread out enough then you can just grab it with both hands and pull apart. One of my headlights was a bit tougher so I had to put them back in for another 5 mins before they came apart.
6. Once you have it apart its pretty ez to figure out yourself, do the reverse methods to put it back together. The original silicon should be enough to seal it all around but just in case, I bought extra clear silicon and applied it around the edges
I have to take apart my headlights to paint the other side and re-align, Ill snap pictures for you guys in the process.
Last edited by fobstylez; 06-08-2009 at 11:51 AM.
06-08-2009, 12:04 PM
#63
Its super ez, its just like the description above. I have done it numerous times on this car.
1. Drop the rack to the bottom
2. Get a bath towel, make it damp, but not too damp where it will be dripping wet. This will block the heat from below. Only draw back to having a damp towel is the heat will cause a lot of steam to come from your oven, but this is normal. I like this method because its 100% safe and it wont cause your housing to melt.
3. Of course pre heat your oven to 275, I put it in there for about 7 mins. If you are scared, you can open up your oven to touch the housing, its hot, but not super burning hot.
4. Once the time is up, take them out of the oven, they will be hot so you will need towels or oven gloves.
5. Now this part requires some elbow grease, take a flat head screw driver and wedge it in between the cover and the housing, anywhere works, doesnt matter, and just run it along the housing. Once you have it spread out enough then you can just grab it with both hands and pull apart. One of my headlights was a bit tougher so I had to put them back in for another 5 mins before they came apart.
6. Once you have it apart its pretty ez to figure out yourself, do the reverse methods to put it back together. The original silicon should be enough to seal it all around but just in case, I bought extra clear silicon and applied it around the edges
I have to take apart my headlights to paint the other side and re-align, Ill snap pictures for you guys in the process.
06-08-2009, 05:46 PM
#64
its really not hard man, its one of the easier mods, just a bit time consuming because you have to take out your headilghts, but once you take them out, takes no time to mod. People are just scared they will melt their housing, 275 with a towel, wont

Thread
Thread Starter
Forum
Replies
Last Post
mlody
5G TLX (2015-2020)
85
12-04-2019 02:11 PM
rp_guy
Member Cars for Sale
9
07-16-2017 07:33 AM
detailersdomain
Wash & Wax
3
10-09-2015 10:13 PM