DIY heated seat, successed! cost only $3

 10-16-2008, 12:15 PM
#122

yes- make sure the splice is solid and shrink wrapped
check all the wires for damage
That funky space over the radio in some models- or the center console top section- is designed to fit a wallet.
When its just even pressure across the wires, they seem to last longer, as in- female driven cars seem to report fewer broken wire leads in seat bottem
check all the wires for damage
That funky space over the radio in some models- or the center console top section- is designed to fit a wallet.
When its just even pressure across the wires, they seem to last longer, as in- female driven cars seem to report fewer broken wire leads in seat bottem
10-16-2008, 12:20 PM
#123
kam- dont try - just commit to fixing it! You have the power!!
If you got the seat out and apart, went to the despot and found matching wire,
the worst part is already over!!
be safe first, shield surrounding area from heat and solder dripping. Use fine wire solder.
be careful and it will be fine
the op of this thread was able to do it- surely you can~
Practice with the extra wire, cut small pieces and join together- a few tries to get the technique and time to temp will make for a perfect connection on the real thing
10-16-2008, 12:27 PM
#124
lolz... im not sure if it is matching wire... but it is copper wire... the wire in my 1st gen was very VERY small strands of wire encased in what look like a melted form of rubber that can generate heat from the electrical resistance... i think the heat is generated from the resistance in the current so i am just trying to spike the current with too large a wire...very weird... but i have the solder and the heat shrink...
my goal is to just get the current flowing back again safely, i can care less if the heat doesn't work on that 1cm section where it burned out and i replaced... just get the rest of the butt working...
my goal is to just get the current flowing back again safely, i can care less if the heat doesn't work on that 1cm section where it burned out and i replaced... just get the rest of the butt working...
10-16-2008, 01:14 PM
#125
Drifting
4 strand wire? Each strand of that wire must be relatively large- you want equal gauge wire w/ many fine strands. It will last longer and take more stress as each strand bends in a slightly different place each time it's flexed. Clean the wire first and consider using flux (rosin core) to promote solder flow for a good strong joint. You want a high quality splice in there.
 10-16-2008, 04:48 PM
#127
back to the speaker wire?
It has to be a match or you wont get the system working
It has to be a match or you wont get the system working
10-16-2008, 10:04 PM
#128
Drifting
30 ga. is very small- how are you measuring it? Get a wire stripper w/ individual holes that are marked w/ the gauge. It should be ok to use a larger gauge wire, but not smaller.
10-18-2008, 10:54 PM
#129
Drifting
Well I finally tackled this job- I knew there was a reason I put it off- it's a real pain in the a**. Both elements in driver's seat had burnt open in a place that looks to receive a lot of stress- rather poor design. Cut out burnt sections and replaced- heater working now-
I think somebody already posted this- damn seat is heavy, get help moving it. I still scratched the door threshold area.
I think somebody already posted this- damn seat is heavy, get help moving it. I still scratched the door threshold area.
11-16-2008, 10:35 PM
#130
Racer
Damn, my front bottom seat warmer died while the back one works fine. Why doesn't this happen in warmer weather. Now I have to fix this thing in 20 degree weather. I hope I can fix it with DIY as mentioned by OP. If this doesn't work, then time to go to the professional upholster. Can someone confirm what type of wires to buy at HD?
11-17-2008, 11:21 AM
#131
Drifting
Wire is small, around 24 ga., check it with a quality wire stripper first. After repair check resistance, good element measured approx. 5 ohms in my case. If all else fails you can get aftermarket replacement elements of a better design for less @ www.heatedseats.com w/ free shipping.
11-17-2008, 08:01 PM
#132
Racer
I noticed that today, in low setting, butt warmer does work, but at high setting, it doesn't. I thought if the wires were fried, then nothing worked. Any clue since low setting butt warmer works, whether I still need to fix the wires or issue to other electrical? Experts, please help me out. It's going to be freakin' cold in Canada soon.
11-17-2008, 10:53 PM
#135
Instructor
Join Date: Oct 2008
Location: Wisconsin
Age: 38
Posts: 215
Likes: 0
Received 0 Likes
on
0 Posts
Mine didn't work when I bought my TL last month and I think that I am going to fix mine on this Sunday.
This may be obvious but I just thought I'd say to make sure you buy flux core solder! When I put a dvd player in my mr2 I didn't realize that the solder I was using wasn't flux core and after 10minutes of foul words because the solder wouldn't stick to the wires I figured it out.
This may be obvious but I just thought I'd say to make sure you buy flux core solder! When I put a dvd player in my mr2 I didn't realize that the solder I was using wasn't flux core and after 10minutes of foul words because the solder wouldn't stick to the wires I figured it out.
11-18-2008, 06:43 AM
#137
Drifting
You'll have to remove the seat. It's not bad, 4 bolts & 2 connectors. The elements are completely separate (butt & back). You'll need to inspect each one separately for opens if you're getting power but no heat. There's a short DIY on here somewhere w/ a few pics.
11-18-2008, 10:43 AM
#138
Racer
Driver's side: low-both back and butt section heats up. High-only back heats up.
I phoned the dealer and they think it's the on/off switch since it's not working on high setting. Anyone with my problem confirm it's the switch? How hard would it be to change the switch? They quoted $100 for part only without labor. I would probably tackle labor myself if it is the switch.
I phoned the dealer and they think it's the on/off switch since it's not working on high setting. Anyone with my problem confirm it's the switch? How hard would it be to change the switch? They quoted $100 for part only without labor. I would probably tackle labor myself if it is the switch.
11-18-2008, 11:37 AM
#139
Intermediate

Join Date: Jun 2008
Age: 57
Posts: 48
Likes: 0
Received 0 Likes
on
0 Posts
Another tip for SOME of you who may be tipping the scales at 200 pounds or more, about repairing your heated seat elements...lose some weight. The majority of the heated seat repairs that I made when working for the dealership were for people who were overweight and caused one or more of the wires in the element to separate which is what causes the burned wire. Not the case for all, but most repairs.
 11-19-2008, 03:00 AM
#142
Advanced
Join Date: May 2008
Location: vancity bc
Age: 36
Posts: 53
Likes: 0
Received 0 Likes
on
0 Posts
heated seats
i never knew the backrest heated up 2 my driver side is out my passenger works cus my g/f has a jelly butt but i dont think the backrest heats up on that either if the backrest was burnt on the passenger side wouldnt the butt warmer not work either cant you get an aftermarket warmer and install that
11-19-2008, 11:11 PM
#144
Racer
I don't know what happened, but my seat heater is working again on high. Cross my fingers and it stays that way. I dread taking the seat out and going through the hassle.
12-01-2008, 02:17 AM
#147
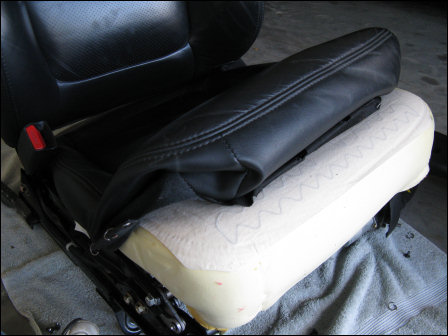
more pix
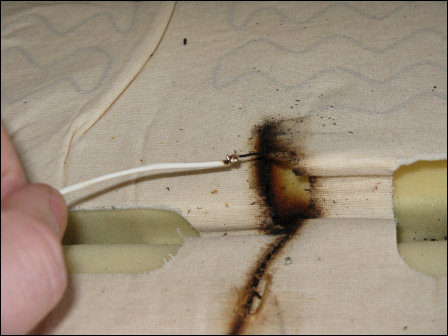
I did this seat heater fix this weekend and took some photos. I also posted more details at my blog. Overall, I didn't think this fix was too difficult, but it was time consuming for me (about 3 hours). I am not an automotive expert (mechanically speaking), but I also think $300 is a reasonable price to pay to have it repaired by a professional.
Hope this is helpful to others.


Hope this is helpful to others.
12-01-2008, 06:25 PM
#149
Sok saBai jia dtay?
Excellent pics. It looks like the 2 wires that go from the butt to the back portions are the places that take the most stress. Every time we sit down, those 2 are taking the impact of the weight - and probably could've been better designed with a longer wire & more "uncoil" distance to deal with the weight factor 
Gonna add this to my list of TTD (things to do ) for the drivers seat; passenger side is fine.
Gonna add this to my list of TTD (things to do ) for the drivers seat; passenger side is fine.
12-02-2008, 05:04 PM
#150

F..k this, I scratched the hell out my door even being as careful as possible. Finally got the leather off but how the hell do you get the middle of the leather off that has a steel rod going threw the how clips? If the answer is take hog clips out its nearly impossible to get in there. I tried unfolding the end of the rod to slide off but is that metal hard ass crap i cant even bend it.
12-02-2008, 09:02 PM
#151
Drifting
Just cut the HOG rings with some good side cutters, then replace them when you're finished. Watch out for the pieces that can fly out when you cut them. Get new ones at an upholstery shop, or try a craft or fabric store.
12-03-2008, 12:53 PM
#152
What switch would that be? Cause now im having the same problem except everything works but the forward and backward. I know 3 connectors are in the right place maybe under the seat. This whole thing has been nothing a disaster for me the heated seat doesnt even work along with scratching the plastic piece by the door, now the forward and rear of the seat wont work. I figured whats the point of the copper so i just stripped the ends soldered them together and wrapped with electrical tape. Any help would be much appreciated.
12-03-2008, 02:48 PM
#153
Drifting
The switch on the side of the seat, used to move it fore/aft, up/dn. Had same issue- it's possible to plug 2 of the connectors in the wrong spots (the one at the rear of the switch & the one to the seat back recline motor). Just swap them. Not sure what you mean by 'whats the point of the copper'- ? My elements measured approx. 5 ohms ea. when repaired. Check them with a meter before you close it up.
Last edited by totaledTL; 12-03-2008 at 02:50 PM.
12-03-2008, 02:58 PM
#154
The switch on the side of the seat, used to move it fore/aft, up/dn. Had same issue- it's possible to plug 2 of the connectors in the wrong spots (the one at the rear of the switch & the one to the seat back recline motor). Just swap them. Not sure what you mean by 'whats the point of the copper'- ? My elements measured approx. 5 ohms ea. when repaired. Check them with a meter before you close it up.
12-03-2008, 10:12 PM
#155
Drifting
There are only 2 cables to the switch. As I mentioned, the 2 that can be reversed are: 1) the one that plugs into the rear of the switch, and 2) the one that plugs into the seat back motor. Those 2 are close together. Unsure what you mean by 'bar-- ?
Probably just need to dbl. check your connections. Do the heaters work?
Probably just need to dbl. check your connections. Do the heaters work?
Last edited by totaledTL; 12-03-2008 at 10:14 PM.
12-04-2008, 02:37 PM
#156
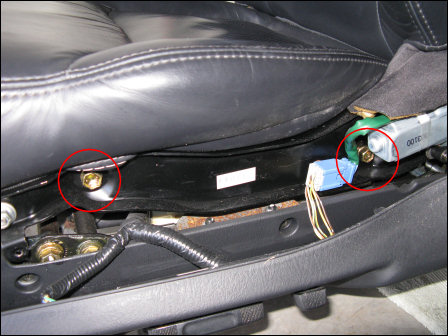
I was talking about the bar or switch that moves the seat forward and backward. That function does not work, but everything else does. In the pic below the 3 wires that go to the switch cant be swapped cause 2 wires are on one side of the harness which in turn makes impossible to switch those around.

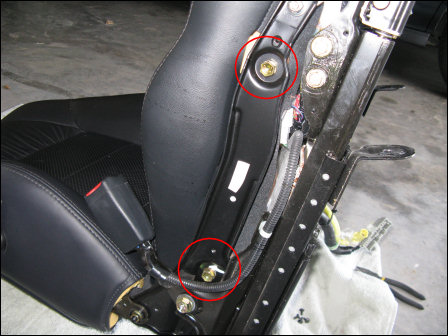
Now in this pic with the plug that's circled i cant find any extra wires that would go there. I was so mad at this hole thing i didn't mark all the wires. Is there even a wire that goes there to begin with? When I disconnected the battery I had the seat pushed all the way up so I cant even really drive till i get this worked out. My apologizes if im making this hard but iv never been so frustrated working on a car. Iv checked and checked all the connections and everything seems fine but that one empty plug. Also the seat does heat up i drove it around last night, but did not feel the back heating up and also it does get has hot as before or maybe im tripping because its been a while since that thing worked.

Now in this pic with the plug that's circled i cant find any extra wires that would go there. I was so mad at this hole thing i didn't mark all the wires. Is there even a wire that goes there to begin with? When I disconnected the battery I had the seat pushed all the way up so I cant even really drive till i get this worked out. My apologizes if im making this hard but iv never been so frustrated working on a car. Iv checked and checked all the connections and everything seems fine but that one empty plug. Also the seat does heat up i drove it around last night, but did not feel the back heating up and also it does get has hot as before or maybe im tripping because its been a while since that thing worked.
Last edited by tlzib; 12-04-2008 at 02:40 PM.
12-04-2008, 02:50 PM
#157
Drifting
Only 2 of those connectors in that 1st pic go to the side switch (one of them circled).
As far as I recall every connector had something plugged into it- maybe when you had the seat cushion up one of them got trapped somehow & you just don't see it. I must've had more than one open in my seat back element bec. it still didn't work after I repaired the burnt area I found so I just replaced that one. There is a thread on here somewhere w/ the wiring diagram. If you can't find it PM me and I'll email it to you if you want it. Good luck.
As far as I recall every connector had something plugged into it- maybe when you had the seat cushion up one of them got trapped somehow & you just don't see it. I must've had more than one open in my seat back element bec. it still didn't work after I repaired the burnt area I found so I just replaced that one. There is a thread on here somewhere w/ the wiring diagram. If you can't find it PM me and I'll email it to you if you want it. Good luck.
Last edited by totaledTL; 12-04-2008 at 02:53 PM.
12-05-2008, 08:47 PM
#159
Instructor
Join Date: Oct 2008
Location: Wisconsin
Age: 38
Posts: 215
Likes: 0
Received 0 Likes
on
0 Posts
I did mine today, it took about 2.5 hrs and I had everything that I needed so it dind't cost me a dime! Although my back isn't heating, but the but gets warm in about a minute. I will pull it out once spring comes around since it was 8degrees when I did mine...
12-07-2008, 10:33 PM
#160
Racer
I took the courage to fix it today. It took about 4 hours to start to finish, including some trial and error. I would like to thank everyone for pics and opinions in fixing this common problem.
1) Disconnected battery and waited about 10 minutes. Didn't want to trigger any warning light for the side air bag as suggested in the thread.
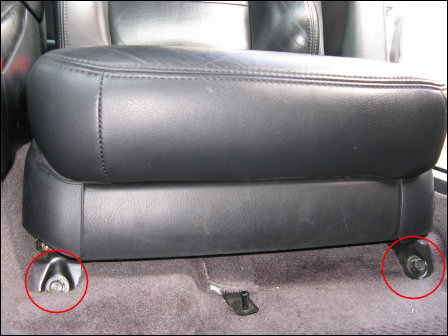
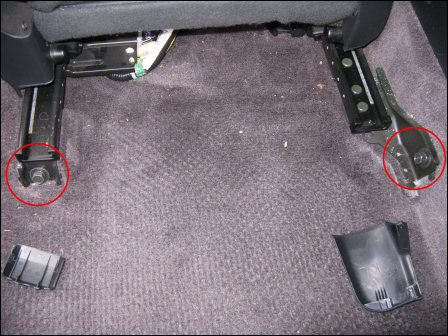
2) Took 4 bolts holding the seat rail to the frame of the car.
3) Removed the seat and took it inside the house as -15C isn't terribly warm to work inside the garage. The seat is heavy, but I put some old blanket by the door sill to prevent marring.
4) Disconnected some motors, connectors, etc. under the seat and took about a dozen hog rings holding the seat in place. I took pix of the connectors and made note with a sharpie to make sure I didn't miss anything when re-connecting. Better to be safe.
5) After peeling the bottom leather, one wire connecting from thigh to butt portion of heating element was fried where there are a lot of bending and stress from getting in and out of the car. Went to Home Depot and picked up some flexible stranded wires for $0.97/meter (18 gauge, lamp wire) and went on to solder the fried part. I did the other wire as well since it looked like it didn't have a lot of life. Used electric tape to tidy up.
6) Put the seat back in place and hooked everything back in reverse and it heated up nice and quick as before.
I have been lazy/hesitant to do this job, but when it got cold out and your butt feels like sitting on frozen ice block, this job became a necessity.
Taking off all those hog rings without proper tools made it a bit of challenge but it wasn't too bad. Unfortunately, I had the power seat connectors reversed (anxious to finish up and didn't take my time) so I had to take the seat apart to re-do it. All in all, it was worth 4 hours of my time and spent 97 cents. Woot!
1) Disconnected battery and waited about 10 minutes. Didn't want to trigger any warning light for the side air bag as suggested in the thread.
2) Took 4 bolts holding the seat rail to the frame of the car.
3) Removed the seat and took it inside the house as -15C isn't terribly warm to work inside the garage. The seat is heavy, but I put some old blanket by the door sill to prevent marring.
4) Disconnected some motors, connectors, etc. under the seat and took about a dozen hog rings holding the seat in place. I took pix of the connectors and made note with a sharpie to make sure I didn't miss anything when re-connecting. Better to be safe.
5) After peeling the bottom leather, one wire connecting from thigh to butt portion of heating element was fried where there are a lot of bending and stress from getting in and out of the car. Went to Home Depot and picked up some flexible stranded wires for $0.97/meter (18 gauge, lamp wire) and went on to solder the fried part. I did the other wire as well since it looked like it didn't have a lot of life. Used electric tape to tidy up.
6) Put the seat back in place and hooked everything back in reverse and it heated up nice and quick as before.
I have been lazy/hesitant to do this job, but when it got cold out and your butt feels like sitting on frozen ice block, this job became a necessity.
Taking off all those hog rings without proper tools made it a bit of challenge but it wasn't too bad. Unfortunately, I had the power seat connectors reversed (anxious to finish up and didn't take my time) so I had to take the seat apart to re-do it. All in all, it was worth 4 hours of my time and spent 97 cents. Woot!
Last edited by vtec260; 12-07-2008 at 10:35 PM.
The following users liked this post:
AMart83 (09-08-2014)