
DIY: 01-03 Civic fogs on 99-01 TL
 10-01-2008, 07:41 PM
#41
Yea you can do it in a day the longest part is letting the sealer stuff dry. Do the fogs first and while that is drying, you can do the wiring. I can explain the wiring.. the extra wire was to get the switch to work.. it had two power wires that went to it. One for controlling the fog lights and one for the light in the actual switch so you could see it. You can use a 02-03 switch or just pick up a universal one from Autozone or whatever and wire that up.. You can cut a hole in the blank switch to mount the universal one.
 11-24-2008, 09:58 PM
#47
Acura TL 2000
Join Date: Sep 2005
Location: Rancho Cordova, CA
Age: 39
Posts: 249
Likes: 0
Received 0 Likes
on
0 Posts
hey everyone if your doing this mod i found a website here that are selling the 01-03 Honda Civic OEM Foglights With Wire Relay here is the site
http://www.k2motor.com/9903.html
tell me what u think
http://www.k2motor.com/9903.html
tell me what u think
02-09-2009, 09:23 PM
#50
did mine recently.....
it's not done, i still have to do cutting and whatnot, it's not fitting all the way...
i really don't know how the wiring works. here are pictures of all i have. i have the foglights hookedup all the way from the lights, to the ballasts to the top of the engine bay, after that i don't know how to get the wiring into the cabin and where to start plugging things into the fuse panel. explain better???
02-09-2009, 09:33 PM
#51
Look up above your gas pedal

You'll see a circlish black thing in place where they poke the harness through
Then go look into the engine bay and your see a rubber object around the same area where you took out the black circle rubber .
Just punch it through to the inside of the car and thats where you can run the harness.
You'll see a circlish black thing in place where they poke the harness through
Then go look into the engine bay and your see a rubber object around the same area where you took out the black circle rubber .
Just punch it through to the inside of the car and thats where you can run the harness.
02-10-2009, 11:19 AM
#53
Nope.. that's the same exact wiring kit that came with mine.
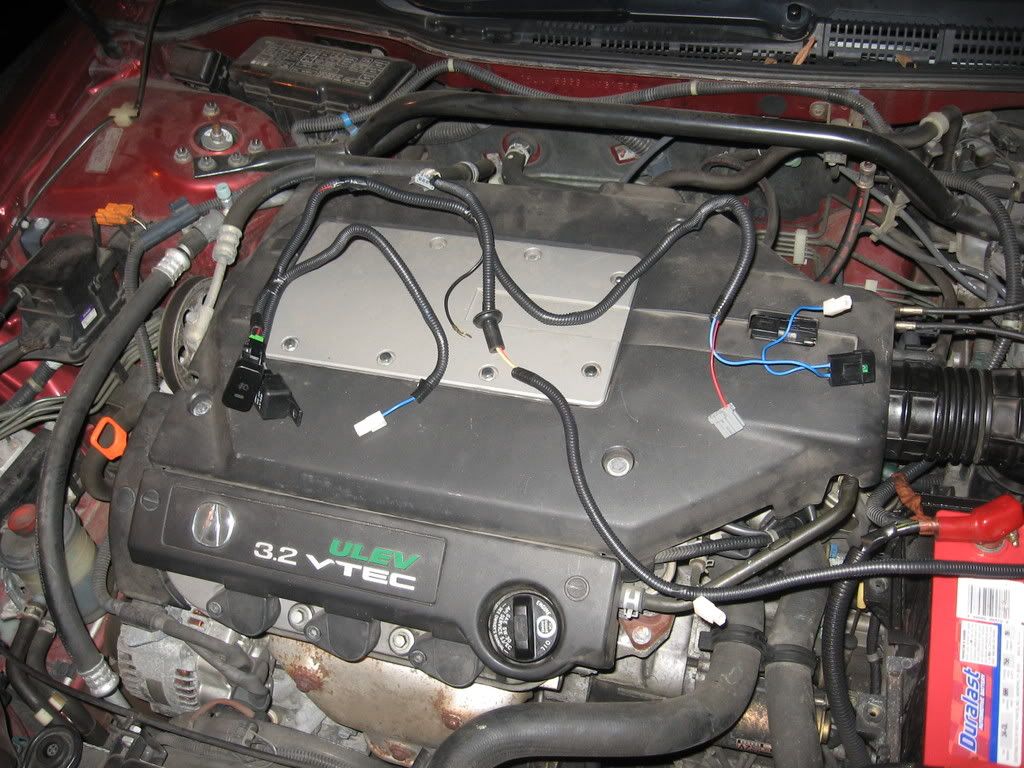
Remove the black grommet around the wires and you will see a wire can be removed completely. It is just one wire with a plastic connector on each end. Then, everything else is pretty self-explanatory and can only really go one place.
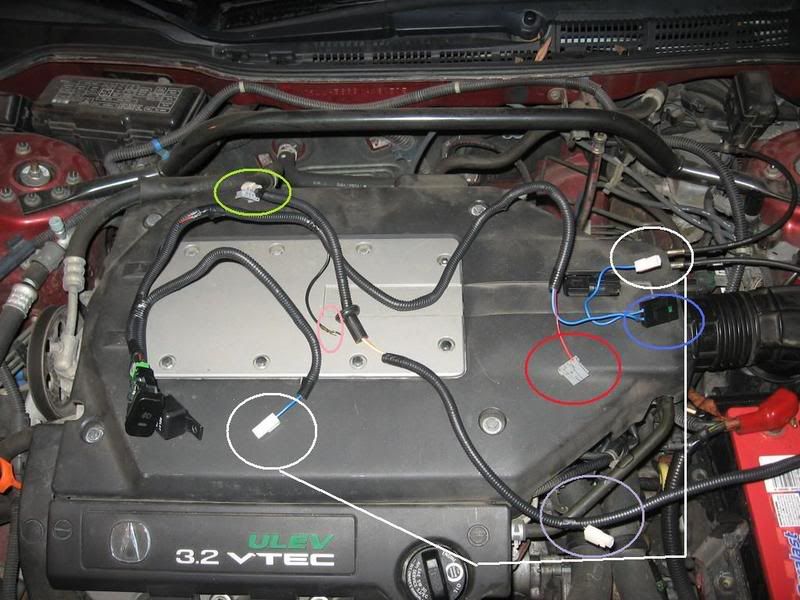
The left side is the switch and relay.. those will go inside the cabin.. mount wherever you think is a good idea. The black wire on the plenum cover in the middle of the pic is the ground for the switch. Just get that attached to the chassis somewhere near the switch.
Remove the black grommet around the wires and you will see a wire can be removed completely. It is just one wire with a plastic connector on each end. Then, everything else is pretty self-explanatory and can only really go one place.
The left side is the switch and relay.. those will go inside the cabin.. mount wherever you think is a good idea. The black wire on the plenum cover in the middle of the pic is the ground for the switch. Just get that attached to the chassis somewhere near the switch.
 02-10-2009, 02:03 PM
#55
I think one end of it is bottom right circled and the other end is one of the connectors top left circle in yellow. Just pull on one end of the wire and you will see the other end coming towards you. If not, take the black grommet from around the wire so you can see better.
02-10-2009, 06:07 PM
#57
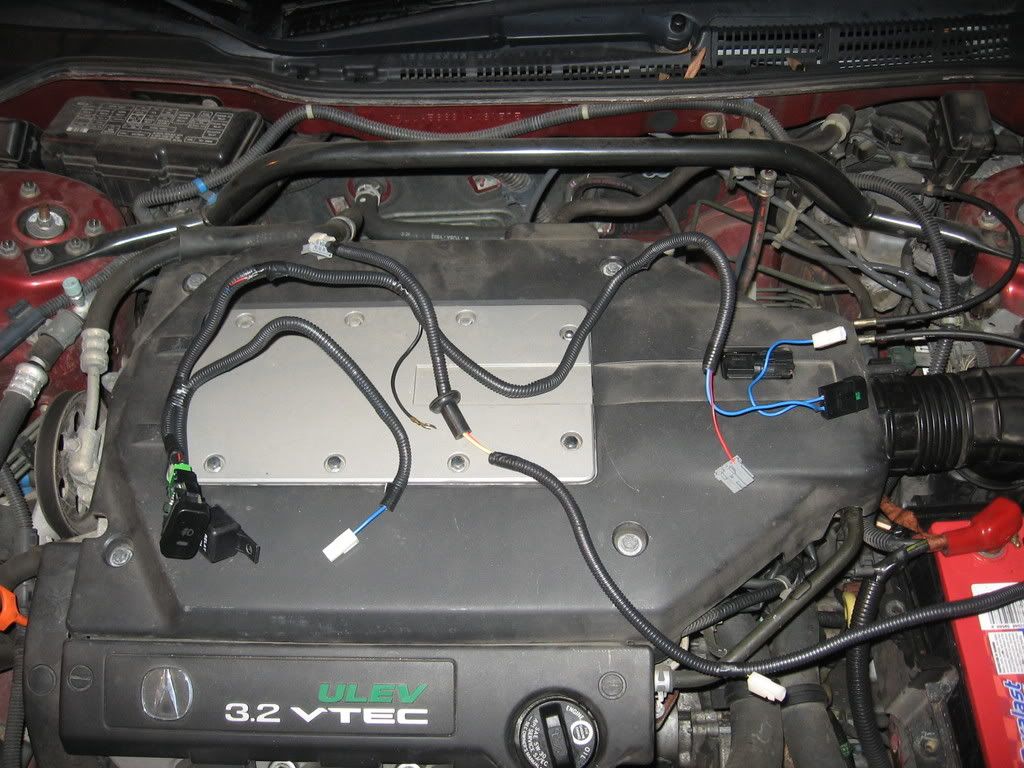
Highlighted blue just pull out that wire
Highlighted in red goes to fuse box.
The one with the grey plug just take it off and attach a bigger connector.
*Just use the wire you pulled out and use that connector since its bigger.*
Highlighted in Green Ground Wire just attach to somewhere where they have a bolt and metal part.
 haha i'm going on deployment soon so cleanliness isn't my highest priorities
02-11-2009, 04:03 PM
haha i'm going on deployment soon so cleanliness isn't my highest priorities
02-11-2009, 04:03 PM
#61
lokee, negative, see above haha. when you get off work tonite call me and we'll see what we can do.
 02-12-2009, 03:30 PM
#64
Advanced
Join Date: Sep 2007
Posts: 64
Likes: 0
Received 0 Likes
on
0 Posts
Hey guys my fogs just came in..Im not gonna start the DIY yet but I just decided to put the fog light over the corner pocket in front of the bumper, and it seems like theres is no way it would fit. The sides of the light are too long. Is that how it was for all you guys that did it..or did I get the wrong fogs.
02-12-2009, 08:36 PM
#66
Advanced
Join Date: Sep 2007
Posts: 64
Likes: 0
Received 0 Likes
on
0 Posts
I have, Ive read it over and over. It doesn't mention anything about cutting the fog light sides. I just thought I got the wrong fog lights or something, because the ones in the DIY pics look like they fit perfectly in the pocket.
02-12-2009, 08:49 PM
#67
Cut the whole pocket but leave the bottem part of the pocket attached. Then just trim away any lips or curved parts. After that align your fogs to how you want them screw the housing down to the bottem pocket tab and epoxy it. and also protect the front of your bumper by taping it with painters tape otherwise some epoxy might drip out and ruin your bumper. *That happen to me damn doo doo epoxy*
02-20-2009, 05:06 PM
#71
Update on wiring with pics
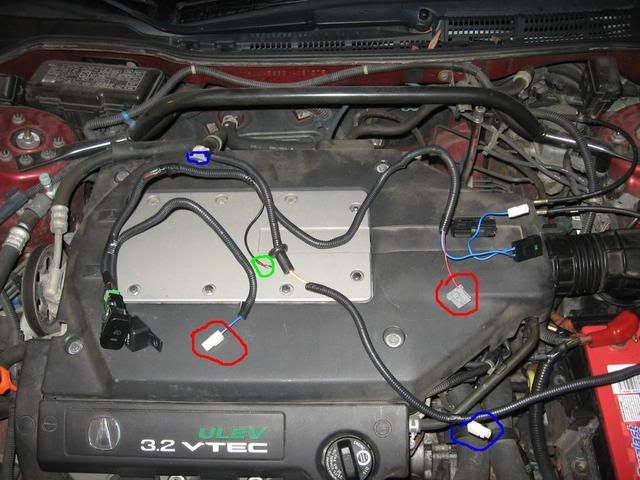
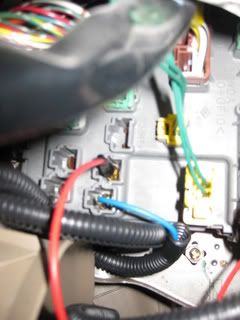
"Highlighted in red goes to fuse box:
Take off the plastic cover on the blue wire so that it just shows the connector.
Make sure the to take off the plug on the red wire and attach a new female connector like the blue wire."
"Highlighted in blue you can just take out the wire if you didn't already."
"Highlighted in green just attach it to the metal screw where it touches metal."
Right above the gas pedal remove a big rubber circle thing and some insulation just remove that and move onto the next step.
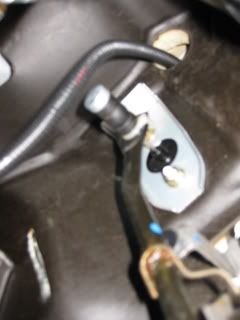
Punch the rubber through in the engine bay. Then put your harness through from inside the car.
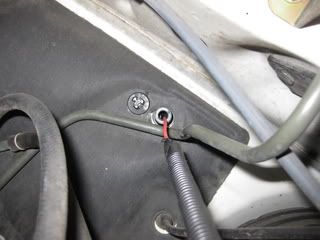
Then put the red wire with the new connector in the slot as pictured and the blue one on the bottem.
Then just mount your fog switch and your good. If your plastic connector didn't fit in with the civic fog switch then just take off the connector use some electrical tape and plug them onto the prongs on the fog switch.
If you have the 02-03 tl switch then you'll need 4 new small female connectors and replace the ones currently on there.
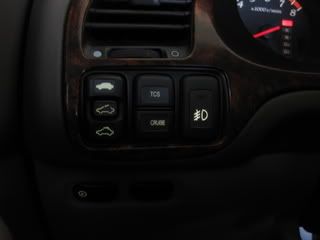
Then have the fog switch facing like the picture below
1.Then plug the First prong on top with one of the black wires,
2. Skip the second prong,
3. Third prong attach one of the red wires
4. Fourth prong attach the other red wire.
5. Fifth prong attach the last black wire
"Highlighted in red goes to fuse box:
Take off the plastic cover on the blue wire so that it just shows the connector.
Make sure the to take off the plug on the red wire and attach a new female connector like the blue wire."
"Highlighted in blue you can just take out the wire if you didn't already."
"Highlighted in green just attach it to the metal screw where it touches metal."
Right above the gas pedal remove a big rubber circle thing and some insulation just remove that and move onto the next step.
Punch the rubber through in the engine bay. Then put your harness through from inside the car.
Then put the red wire with the new connector in the slot as pictured and the blue one on the bottem.
Then just mount your fog switch and your good. If your plastic connector didn't fit in with the civic fog switch then just take off the connector use some electrical tape and plug them onto the prongs on the fog switch.
If you have the 02-03 tl switch then you'll need 4 new small female connectors and replace the ones currently on there.
Then have the fog switch facing like the picture below
1.Then plug the First prong on top with one of the black wires,
2. Skip the second prong,
3. Third prong attach one of the red wires
4. Fourth prong attach the other red wire.
5. Fifth prong attach the last black wire
03-24-2009, 12:12 AM
#76
Three Wheelin'
03-24-2009, 01:04 AM
#78
Three Wheelin'
 inspire fogs on my car soon
06-02-2009, 04:01 PM
inspire fogs on my car soon
06-02-2009, 04:01 PM
#80
Three Wheelin'
i wired up my fog light switch with a 03 fog light switch. everything works but my fog light switch dont light up. the green light on it works when i push it but the switch it self dont light up. i wired it with the red wire with yelllow light to the top and i skip the second and i put the solid red one to the third and the red with a black line in it to the fourth and the black to the last one