When you click on links to various merchants on this site and make a purchase, this can result in this site earning a commission. Affiliate programs and affiliations include, but are not limited to, the eBay Partner Network.
So after driving in the Midwest for 93K miles, my passenger side inner tie rod decided it was time to start playing every so slightly. I decided to go ahead and change my inner and outer tie rods at the same time since the outer one comes off to do the inner one. I decided to go with OEM parts, which makes things much easier with it comes to putting things back together. I recommend reading this whole thing thru at least once, as I�ll have some tidbits along the way that may be useful to you before you start. First off, you�re doing this at your own risk. Neither I nor Acurazine accept responsibility for you hurting yourself. Always observe caution when doing your own work. Work safely guys and gals!!! Here is what you�ll need to do the outer tie rod alone:
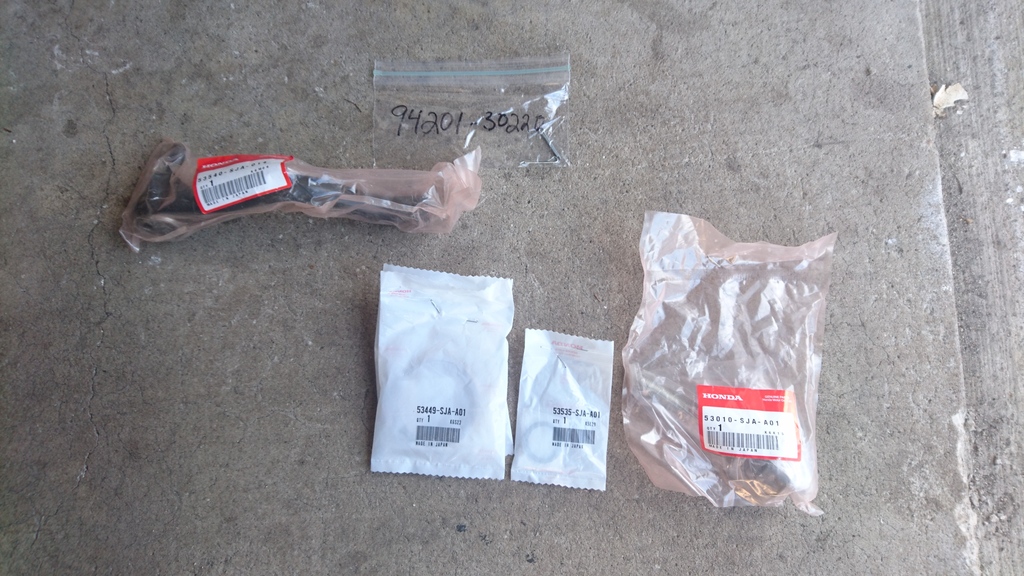
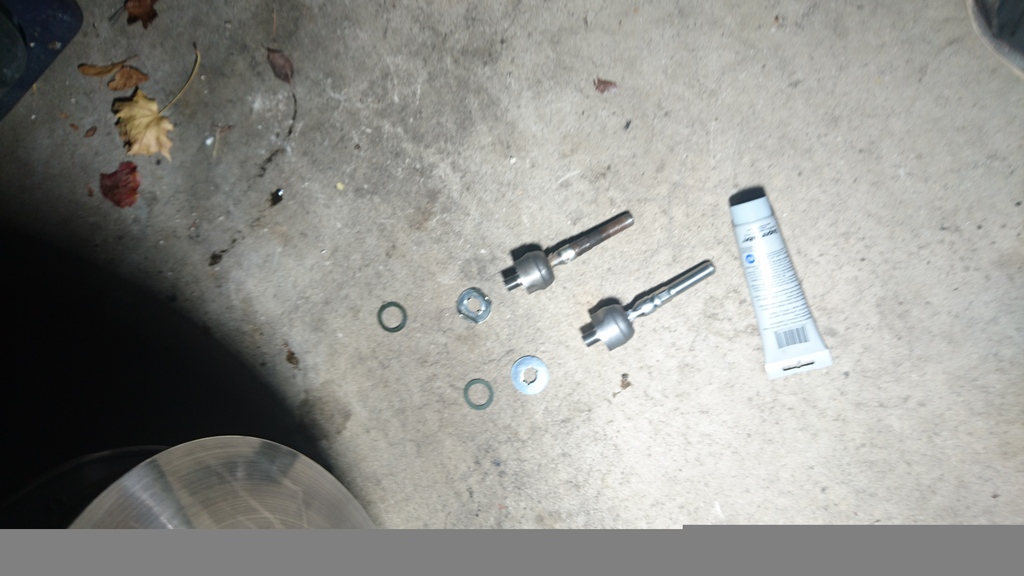
2 X 94201-30220 (Cotter pin for the castle nut)
1 X 53560-SJA-A01 (Driver side outer tie rod)
1 X 53540-SJA-A01 (Passenger side outer tie rod)
What you might want to consider, especially on a car that�s seen a lot of winter salt, but I did not buy (Not pictured below): 2x 90307-SJA-A003 (Castle Nut)
Inner Tie Rod Parts, what you�ll need:
2 X 53010-SJA-A01 (Inner Tie Rods)
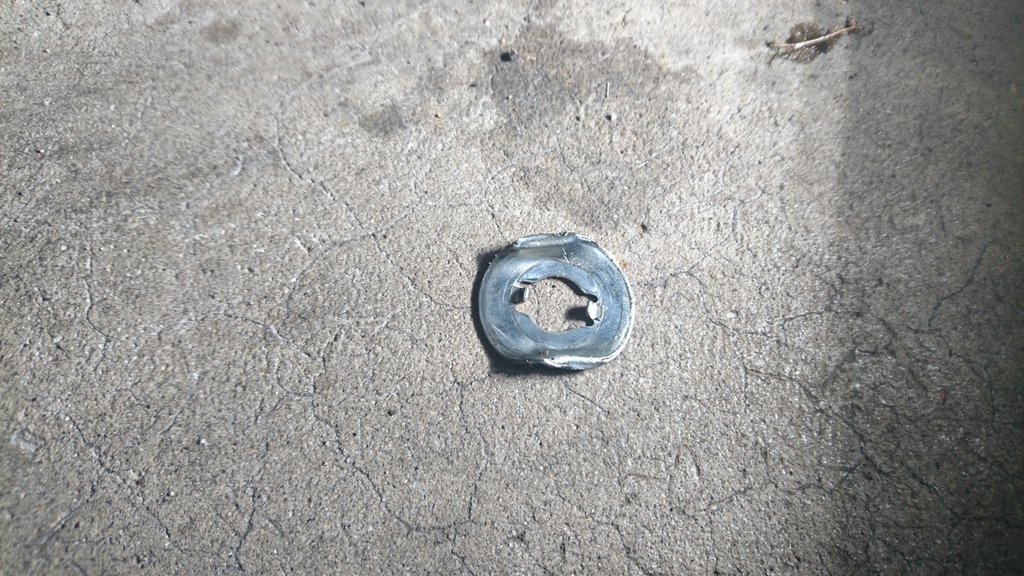
2 X 53535-SJA-A01 (Inner tie rod seal to rack and pinion), beware, this part had to be special ordered from Japan, but do not think you can get away with changing your inner tie rod without doing this! This seal is what dampens between your inner tie rod and the rack and pinion, more than likely if your tie rod is worn, this is worn too!
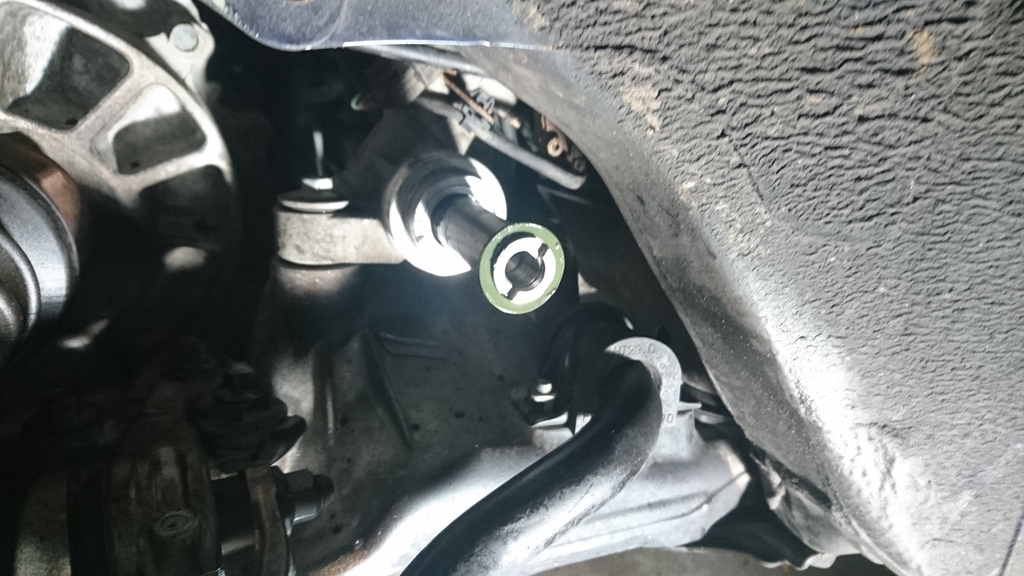
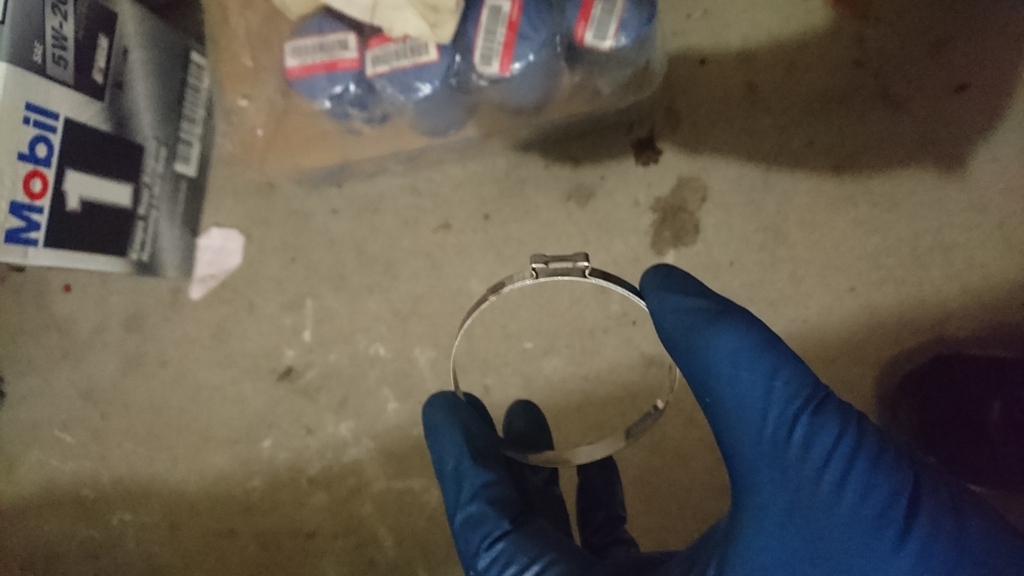
2 X 53449-SJA-A01 This is the clamp that secures the rack and pinion boot. You will need a special Oetiker 1098 tool to pinch this when reinstalling the boot. More will be discussed about this tool below
What you�ll want to think about that I haven�t bought/pictured:
2 X 53534-SJA-A01 Rack and Pinion Boot, consider this in an older RL with higher miles, will most likely crack or break on removal if already not cracked.
2 X 91411-SJA-A01 Hex nut, this nut is what locks your outer tie rod into place and screws onto your inner tie rod. In my experience, this nut sometimes fuses to the inner tie rod and becomes damn near impossible to separate off your old inner tie rod. I�m sure this nut can be substituted for a generic one from Ace or Home Depot.
Special tools needed:
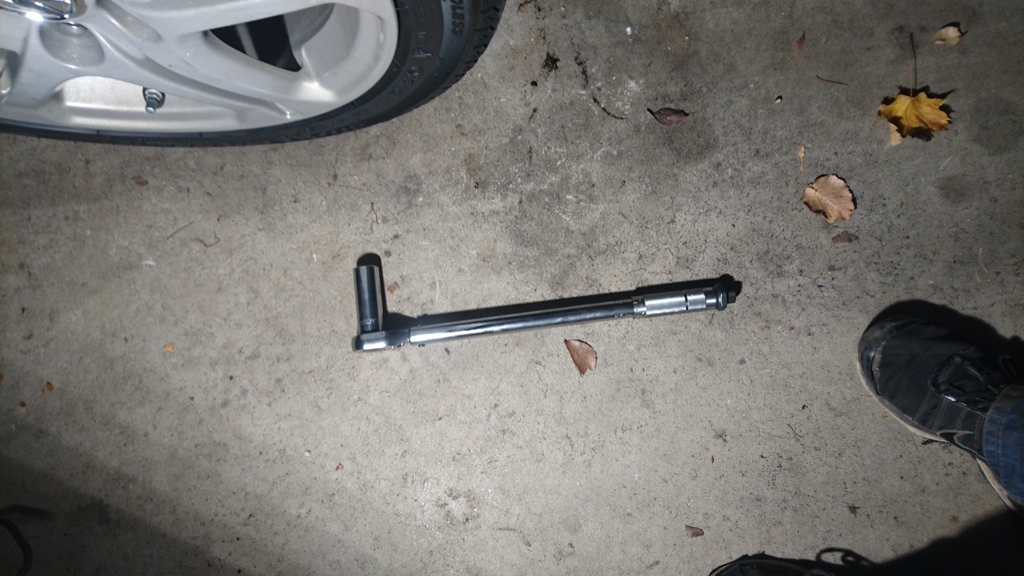
Inner Tie Rod separator: Can be loaned from your local parts store
Outer Tie Rod Separator: Can be loaned from your local parts store. You can avoid using this tool if you use a rubber mallet or hammer and bang against the hub which it goes thru. This MAY OR MAY NOT WORK!!! Don�t bank on it working as it didn�t work on my car and my car doesn�t see salt
Antiseize Grease: Very useful for any automotive suspension project, especially in a car that rolls around in the rust belt
Permatex Blue Threadlocker: May or may not use on the inner tie rod, where it screws into the rack and pinion. I bought it for photographic purposes but never actually used any.
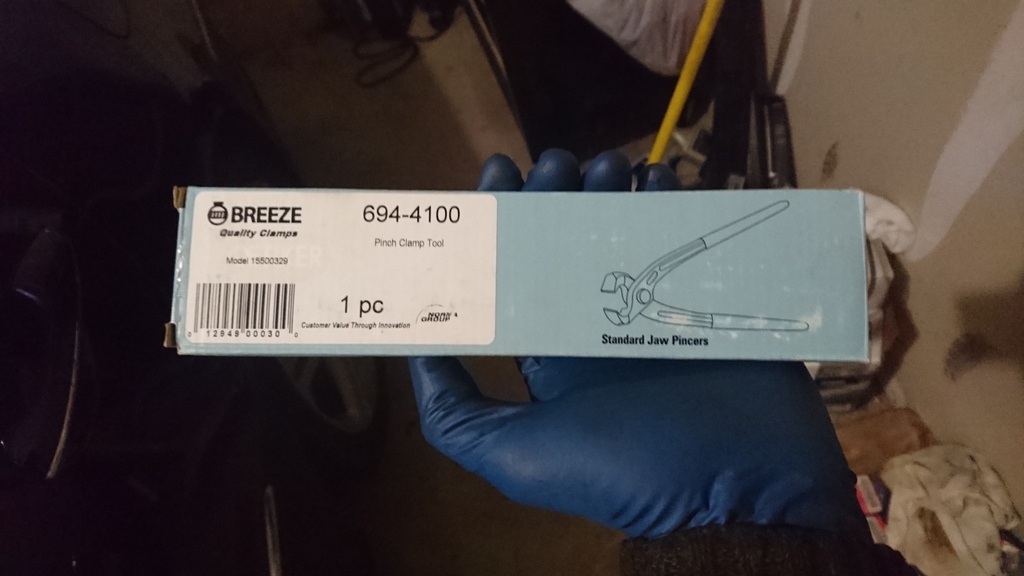
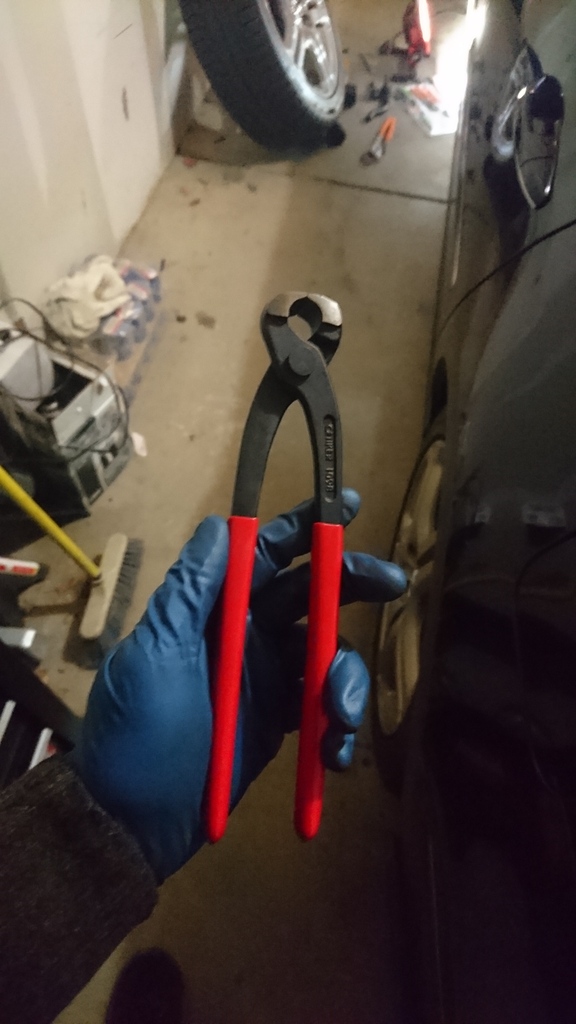
Oetiker 1098 crimp tool: Believe me, this is 10$ well spent. You will thank me later. Some people will advocate using hose clamps on the rack and pinion boot. Those were too wide and quite simply did not seat right enough for me to feel confident in using them. DO NOT USE THE TOOL PICTURED IN THE FIRST PICTURE. Head my warning and you will thank me when you�re installing the pinch clamp on the boot. I got the tool (Pictured below) from Menards for 10$. You�ll find it next to the PEX Pinch Clamps in the Plumbing Section at your local hardware store
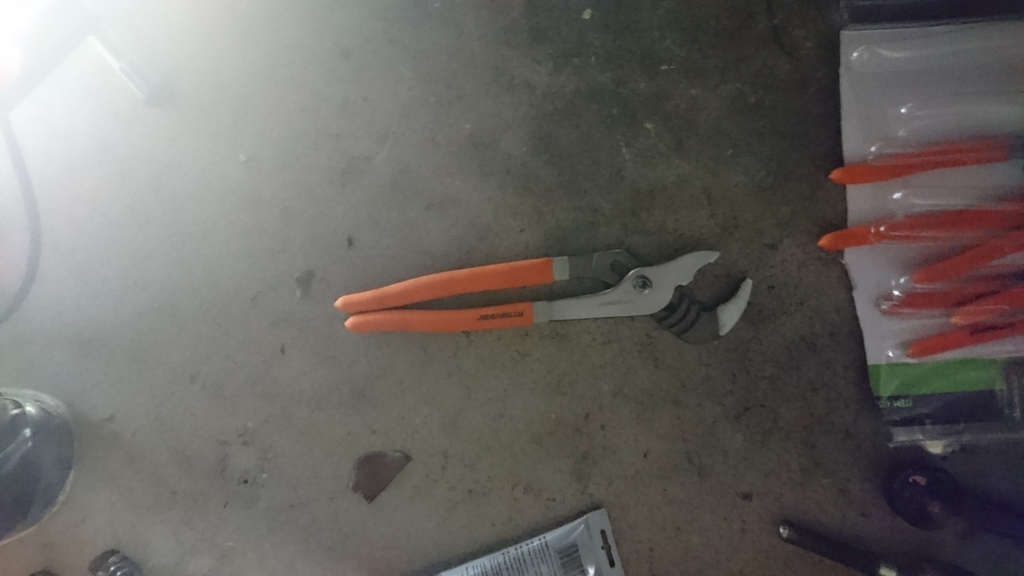
Tong and Groove Joint Pliers: These are needed to secure the locking plate for the inner tie rod. I had to make a special trip to Harbor Freight to get the largest ones they had. They came in a set of 4, I had no problem adding to my tool set as I�m a big DIYer, I figured these would come in handy at some point.
Teflon (PTFE) synthetic grease. DO NOT SUBSITUTE FOR ANY OTHER KIND OF GREASE. This will be using to rub against the rubber seal 53535-SJA-A01, only in minute amounts
Now that we have all the parts and tools needed, let�s get on to actually changing these bad boys!!
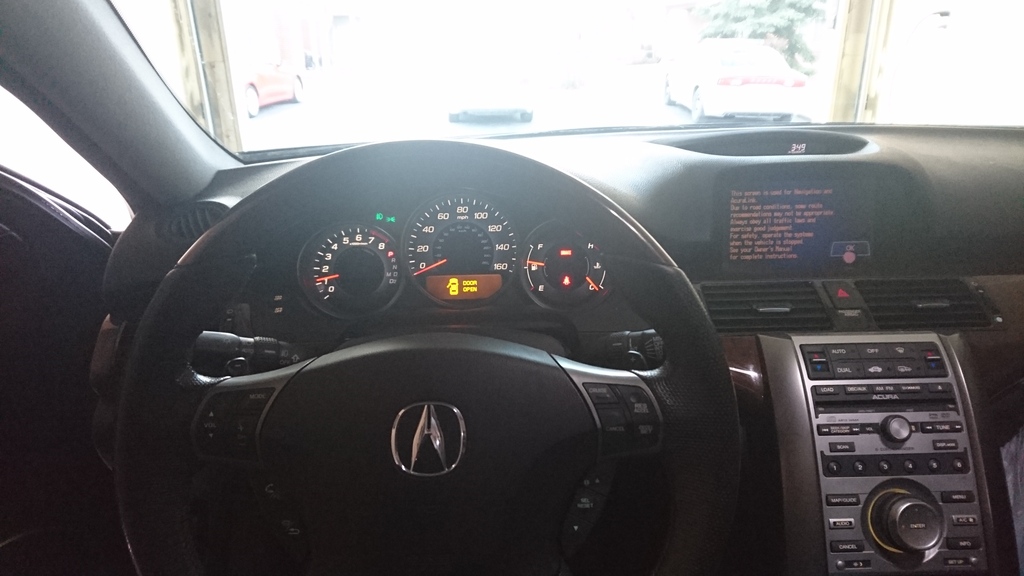
Step 1: Ensure your wheel is straight, it will lock itself once you begin wrenching
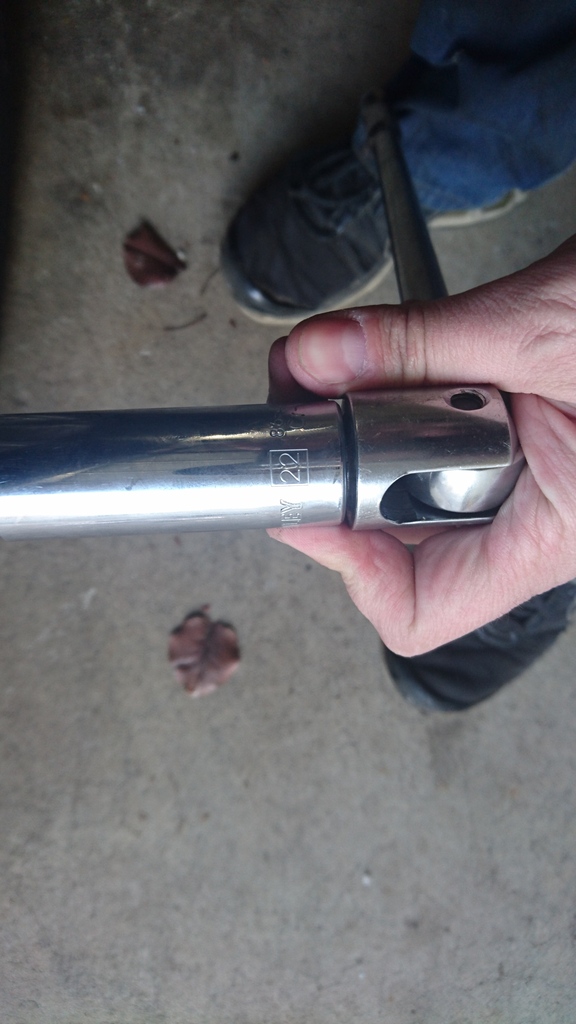
Step 2: Using a breaker bar and a 22MM deep socket, break your lug nuts loose before raising the car up
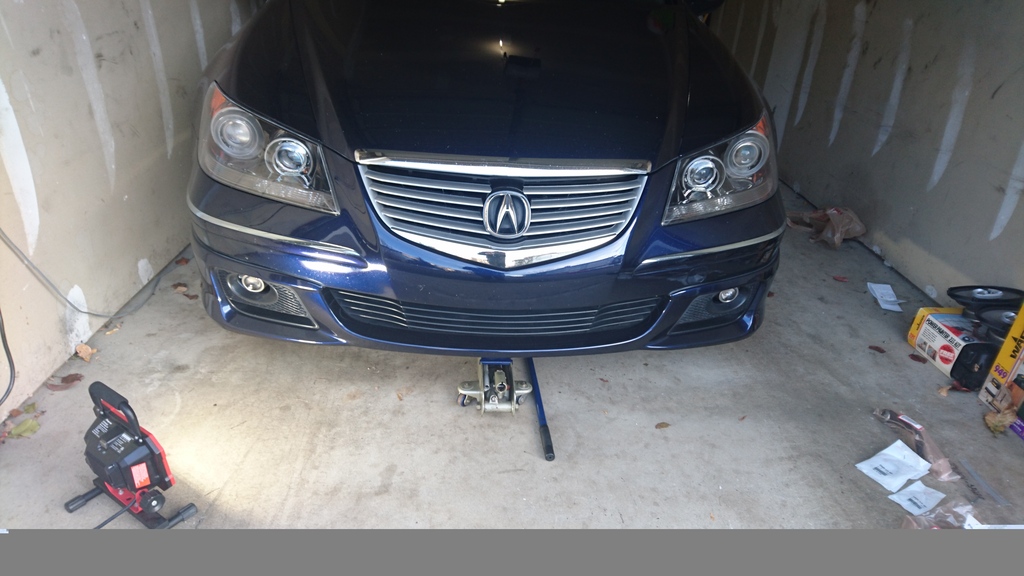
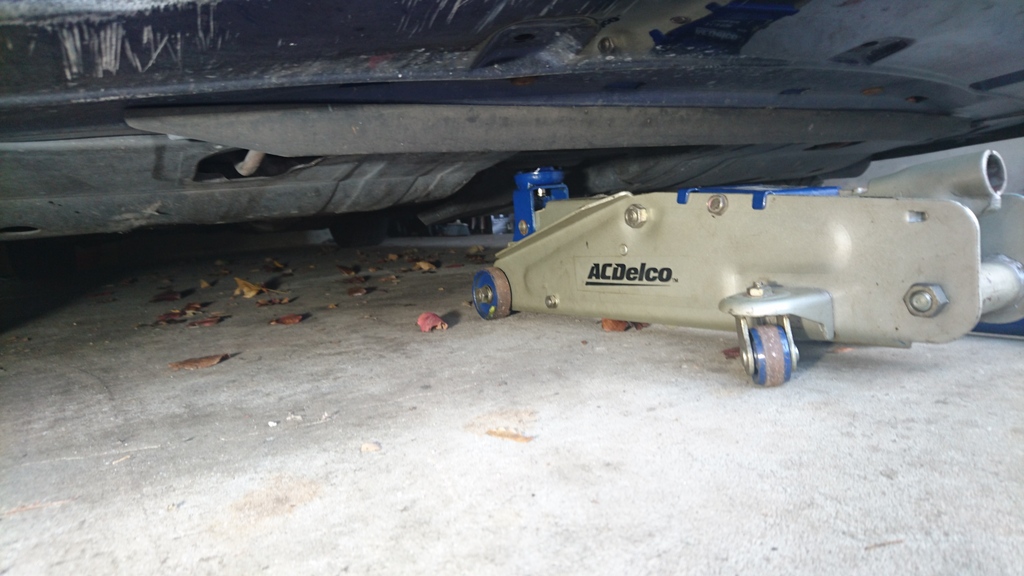
Step 3: Raise your car from the center if doing both. I raised it from the center since I was doing both using the jack point in the front subframe. It lines up quite well with the Acura logo in the grille
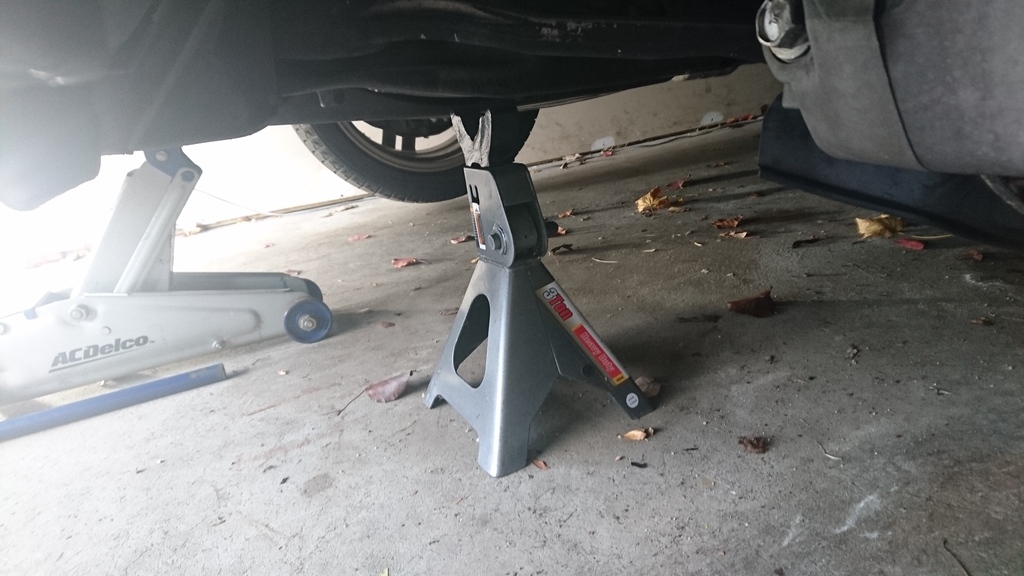
Step 4: Once you have the car raised, place it on jack stands. I cannot stress this enough, work safely people!!! If possible, it�s also good to have someone who knows you�re working under your car and have them check in on you periodically. Not necessary, but just a thought. Sh*t happens, just saying
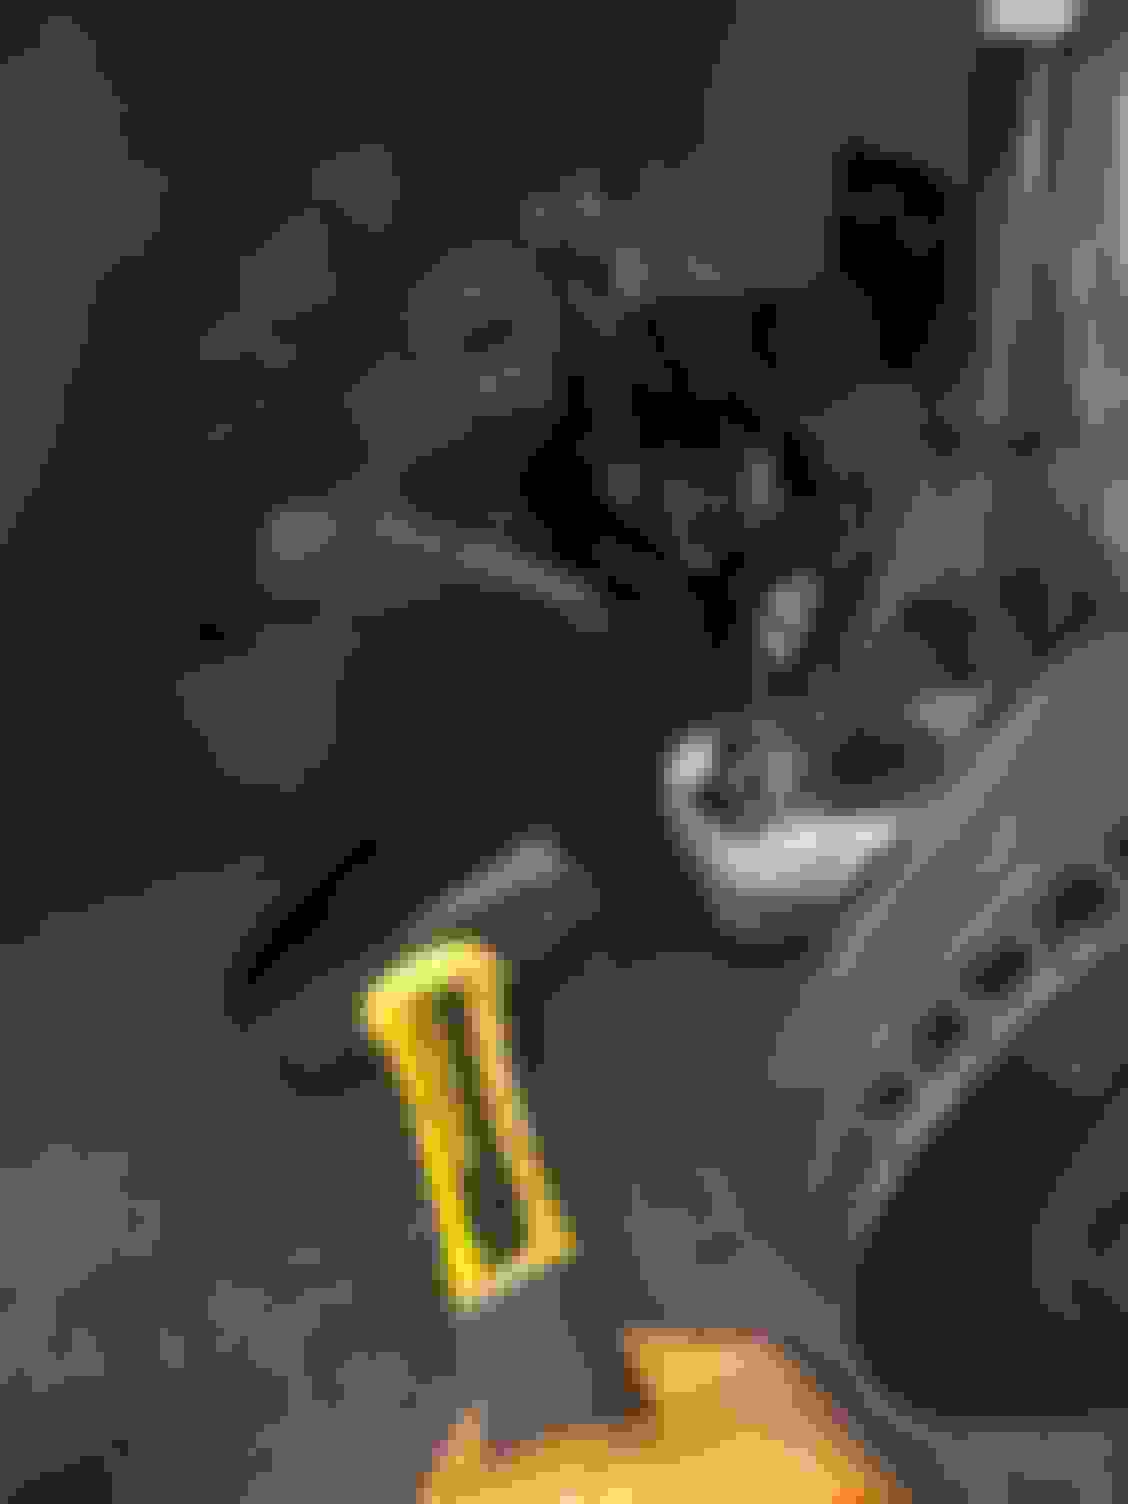
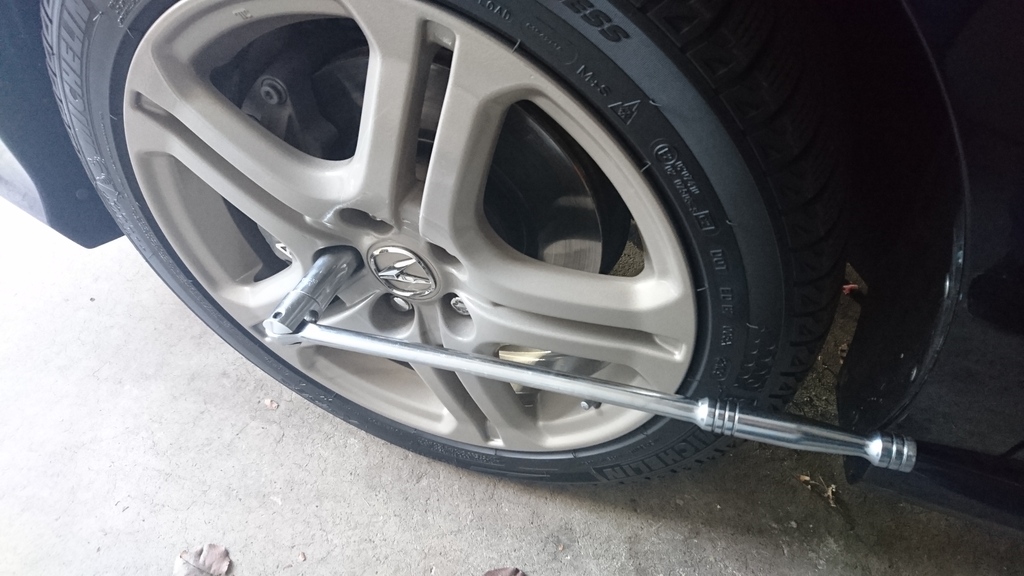
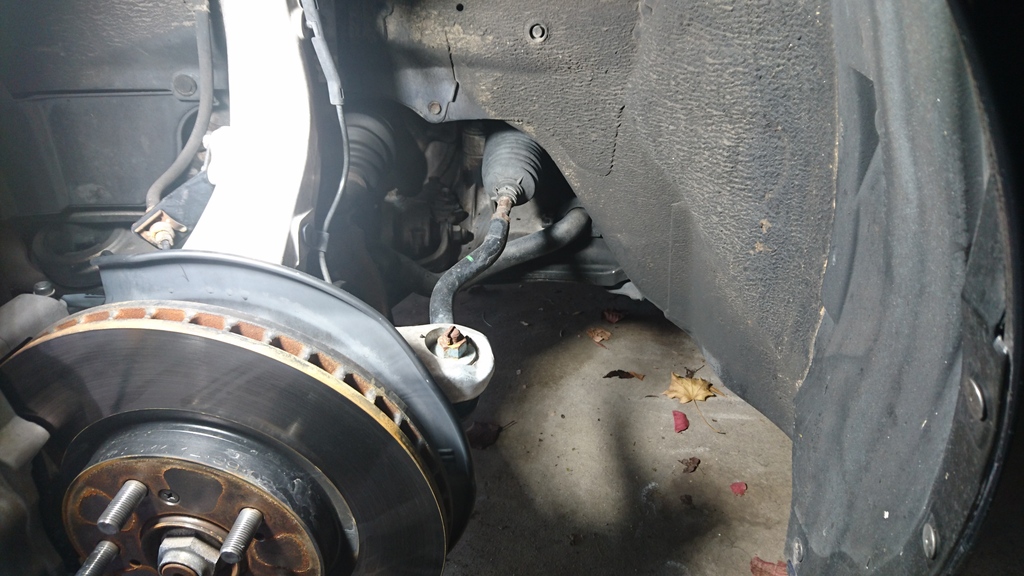
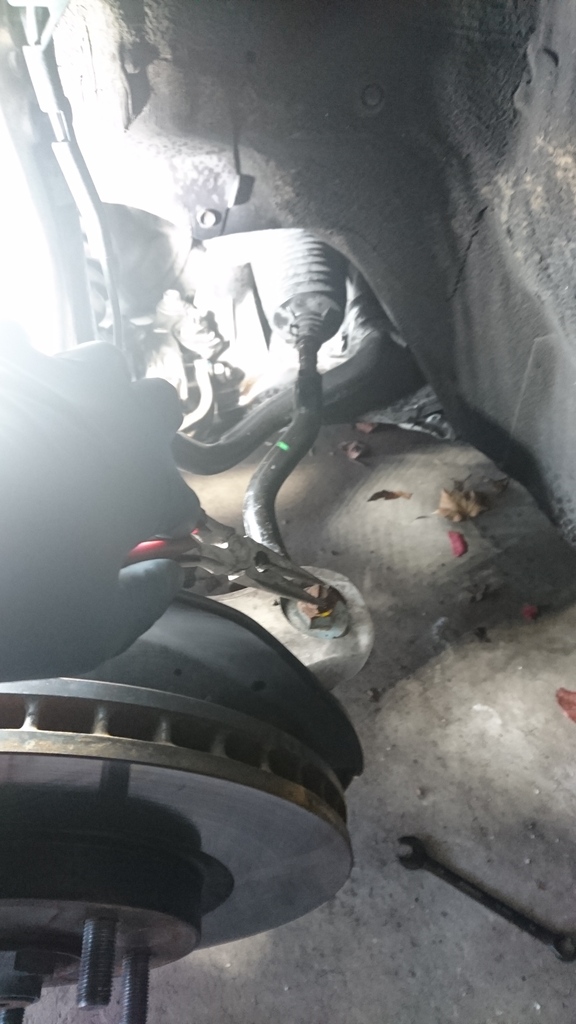
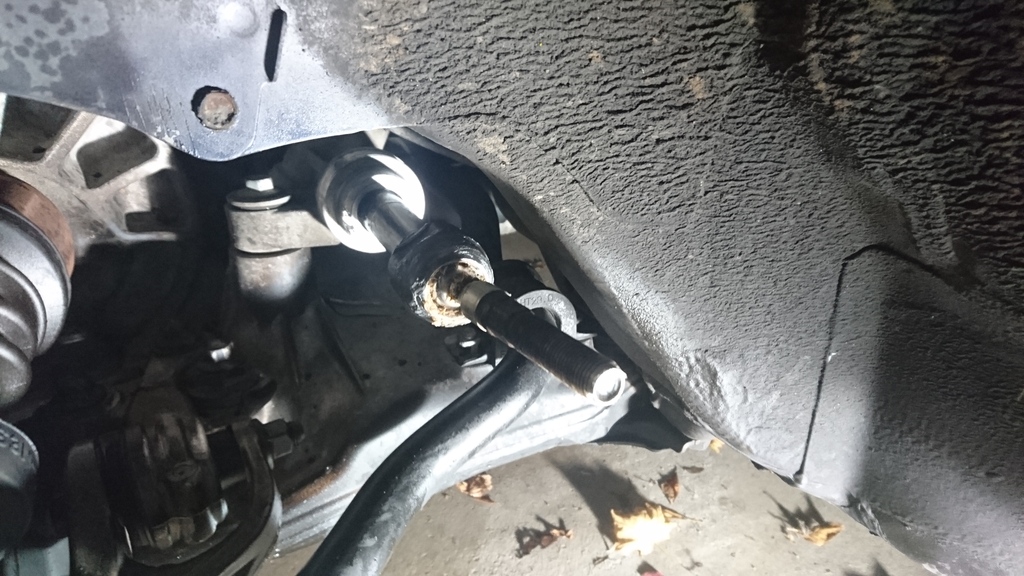
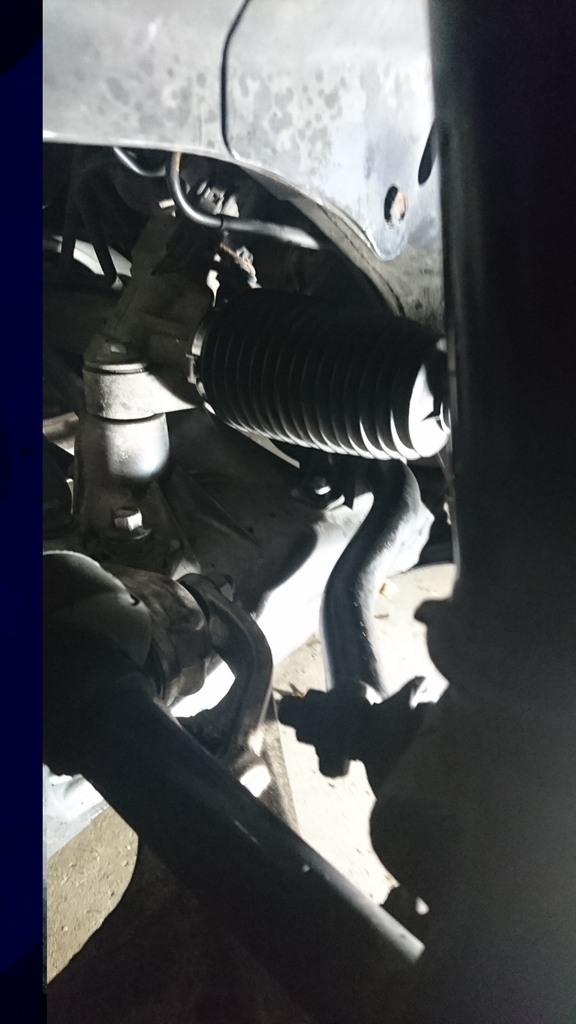
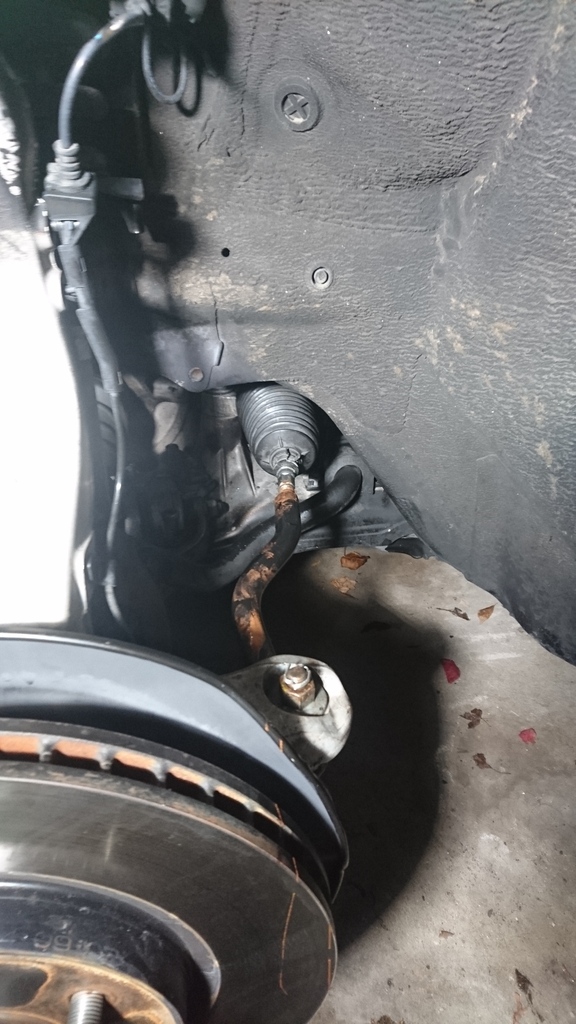
Step 5: Remove the tire, and voila, you�re looking at what you need to change
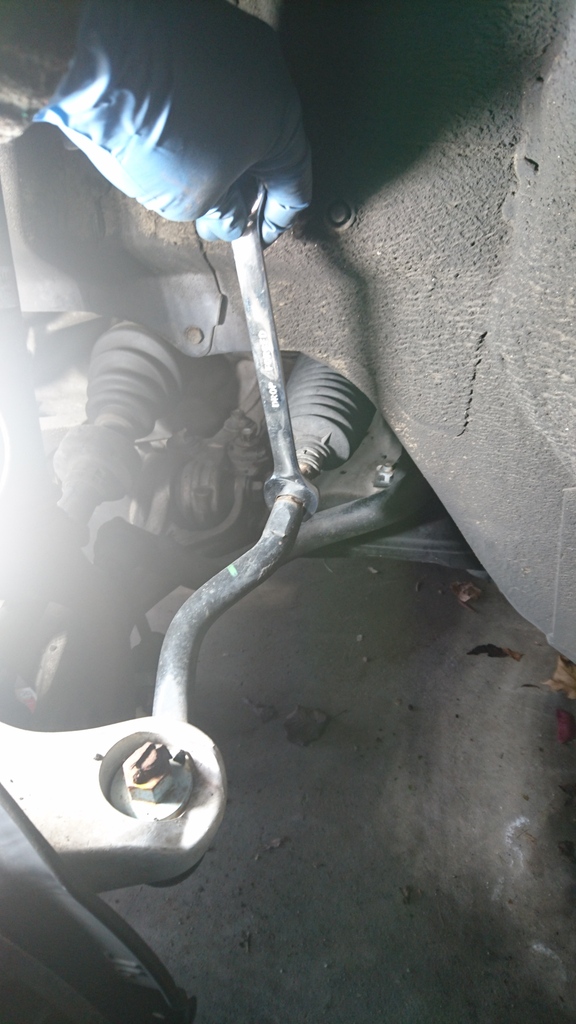
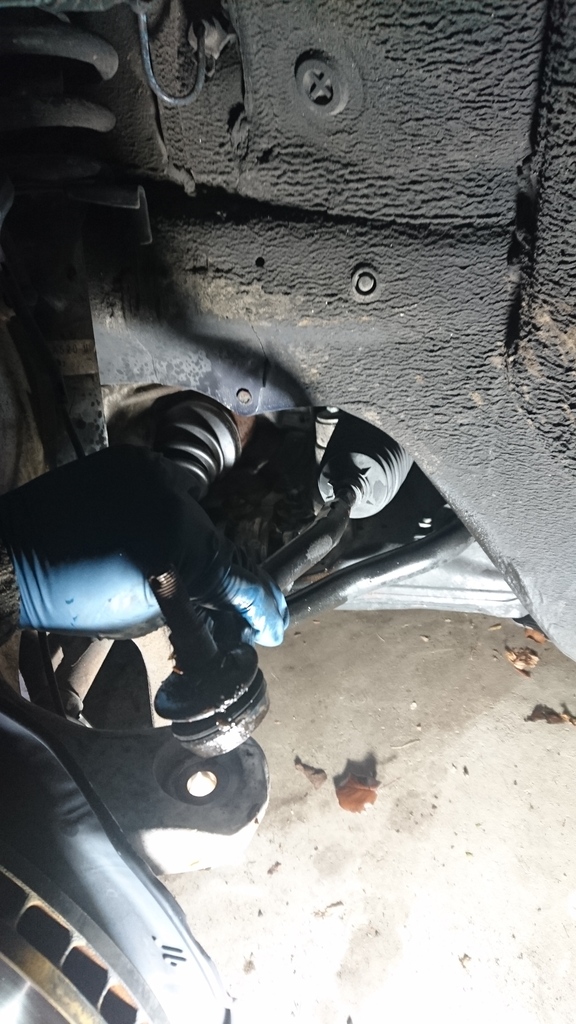
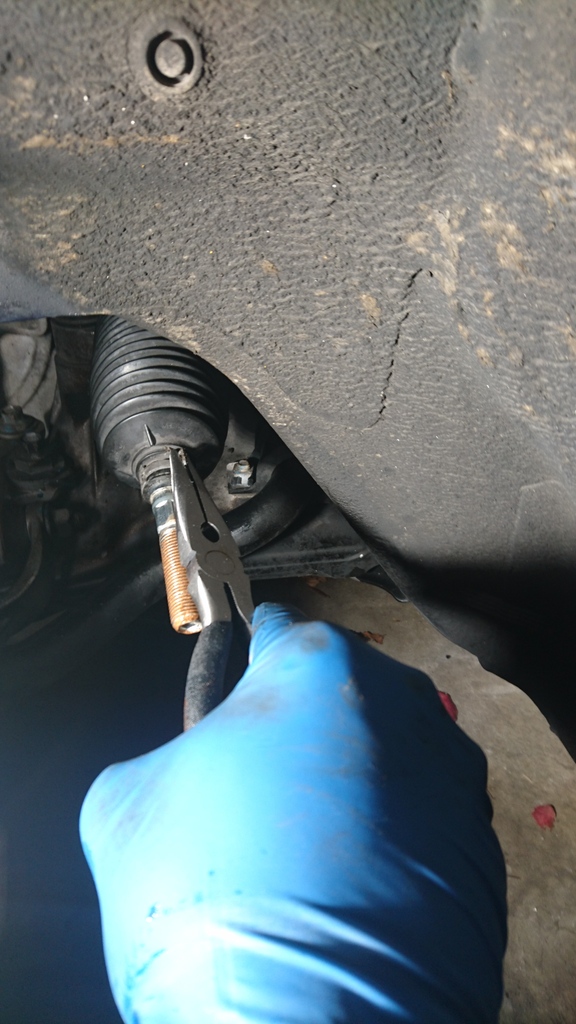
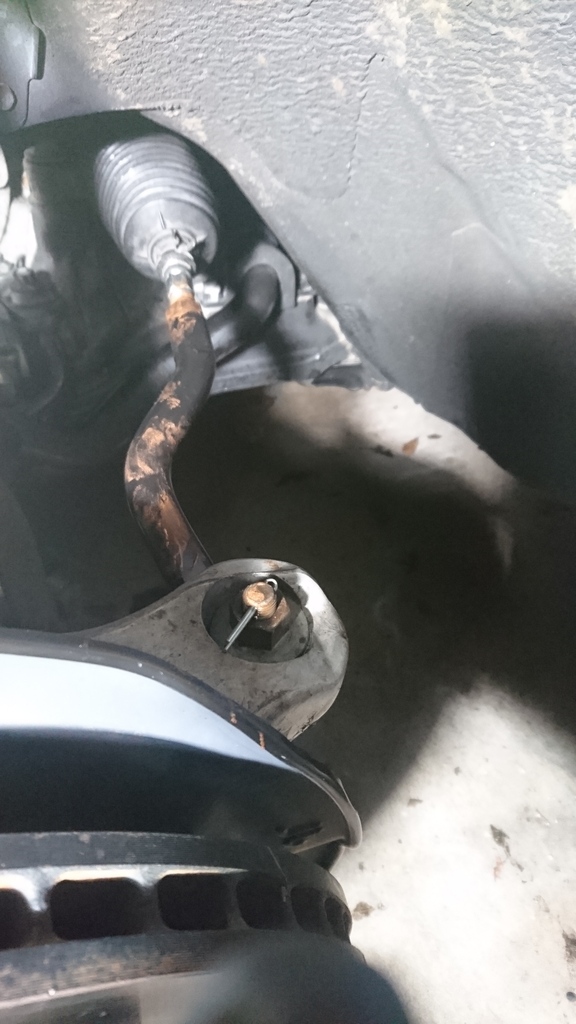
Step 6: Break the tie rod locking nut loose using a 19mm wrench
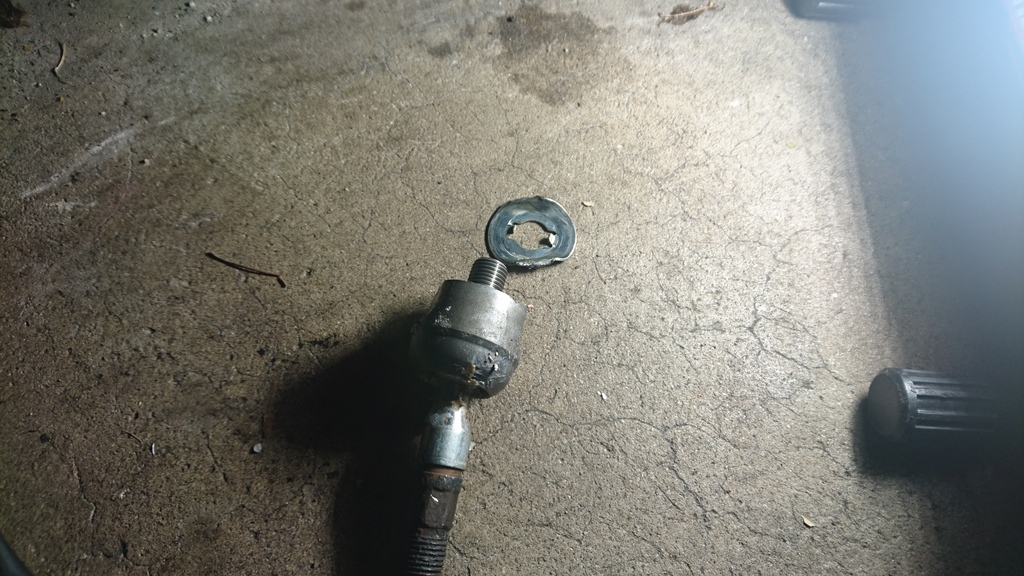
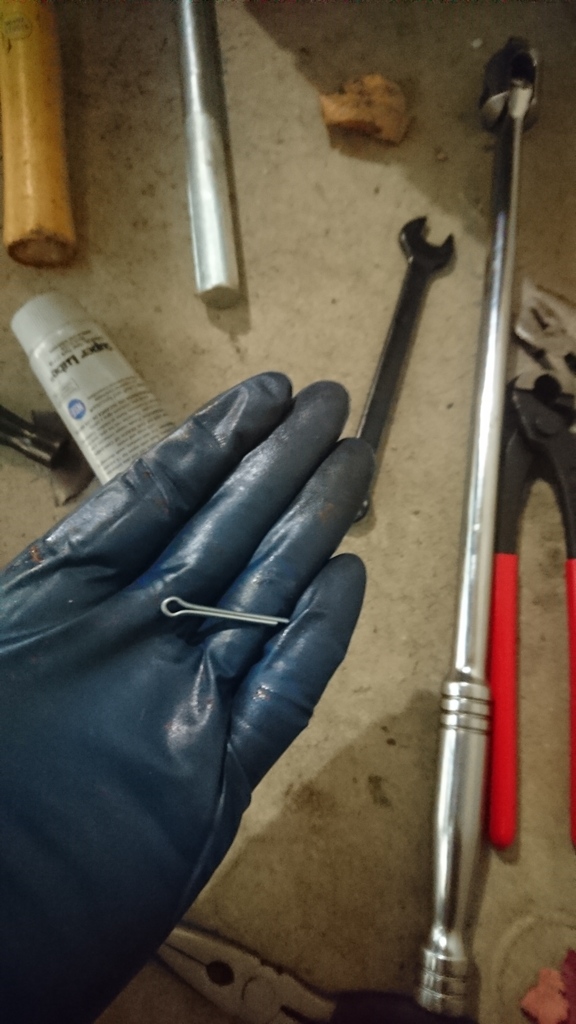
Step 7: Bend the cotter pin going thru the outer tie rod back to it�s �straight� position using needle nose pliers, and then remove the cotter pin
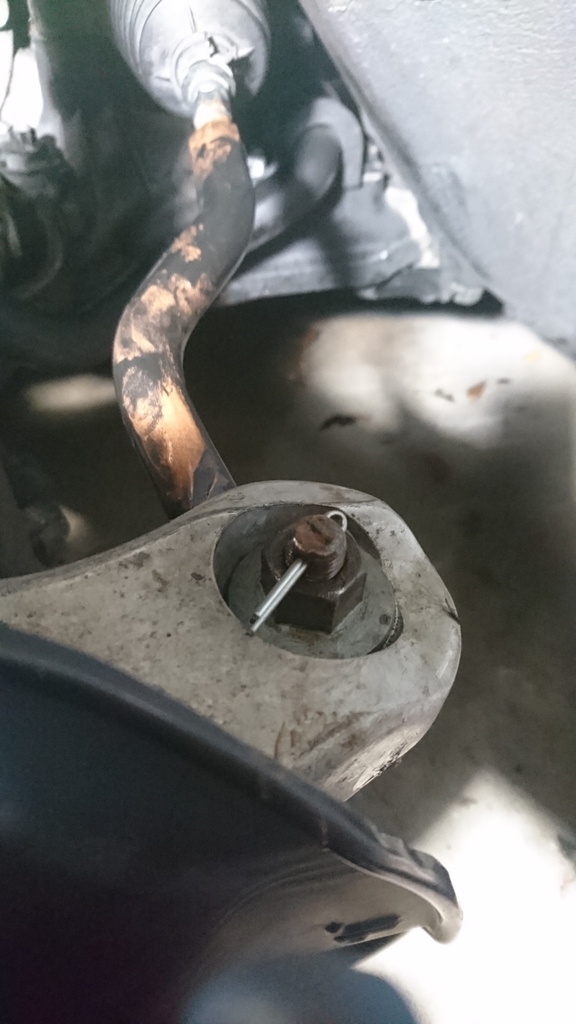
Step 8: Loosen the castle nut using a 19mm socket and rachet
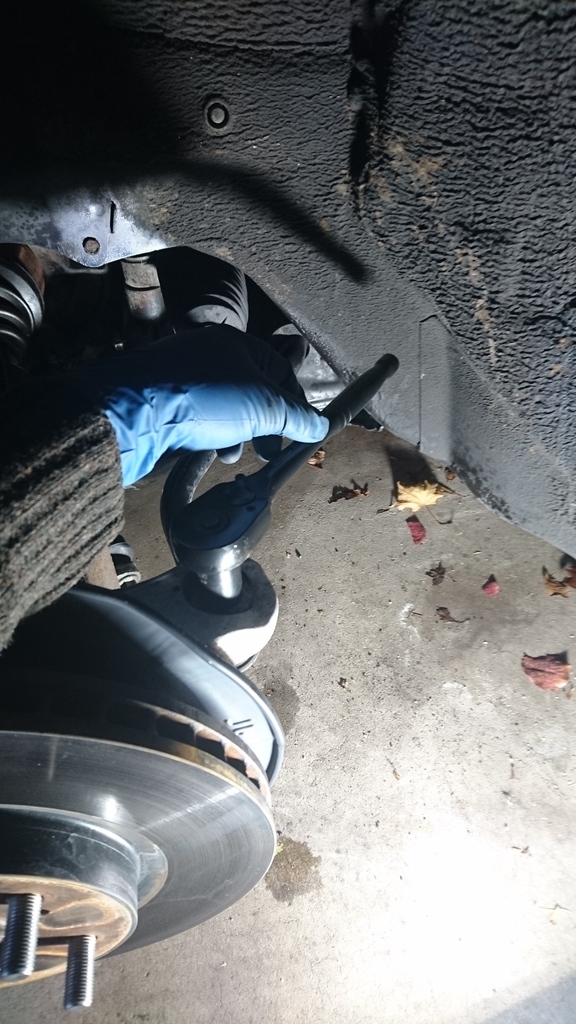
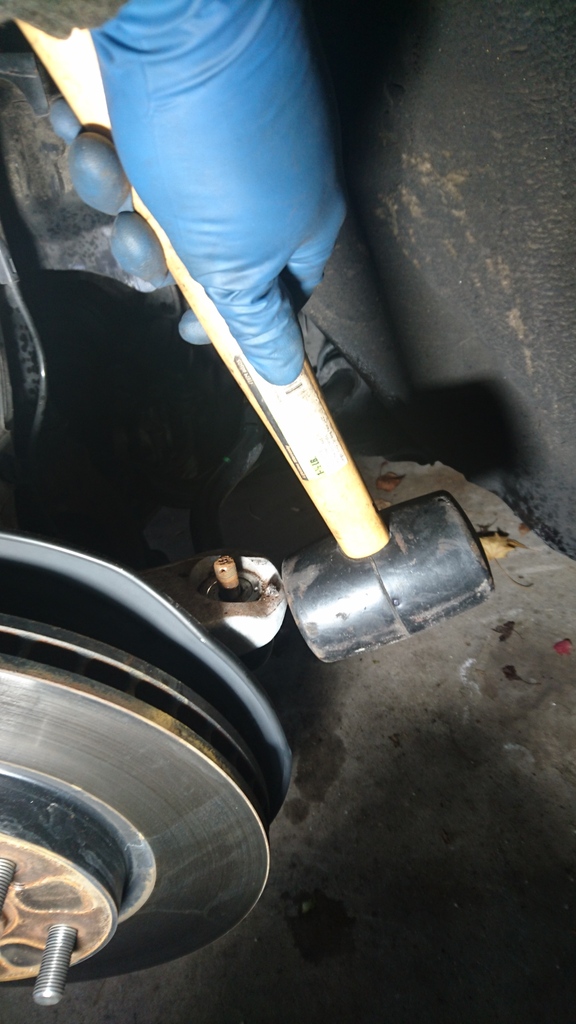
Step 9: Use a rubber mallet and hit the hub with it. This may or may not separate the outer tie rod from the hub. As Eric the Car Guy says, hit the part it goes thru and not the part itself. In my case, it did not work and I had to resort to the tie rod separator
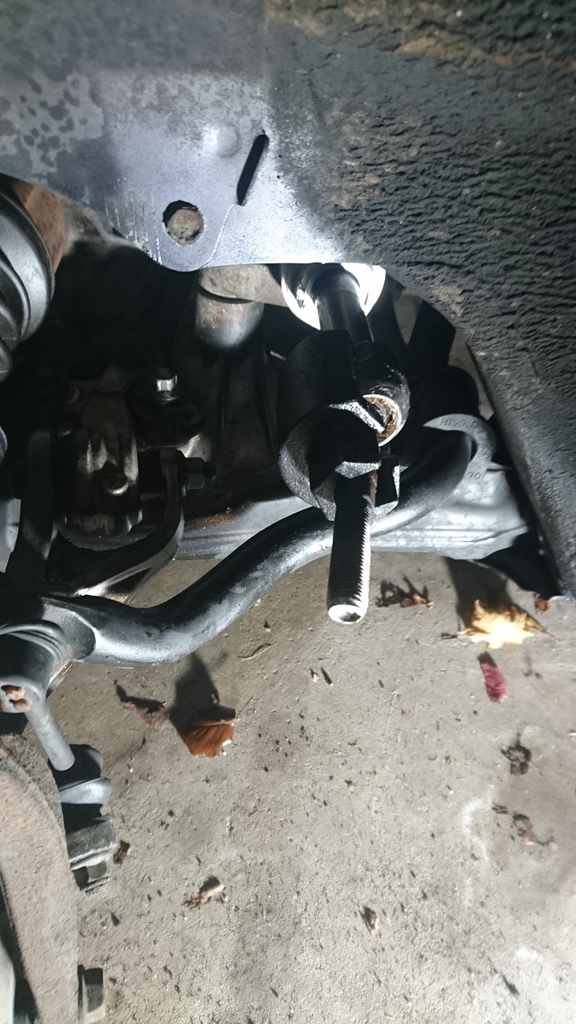
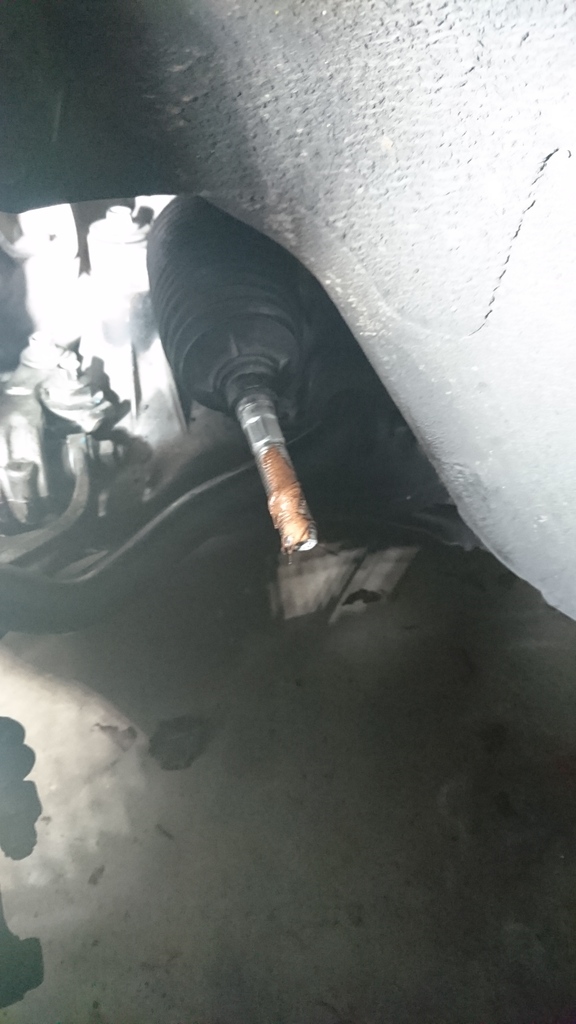
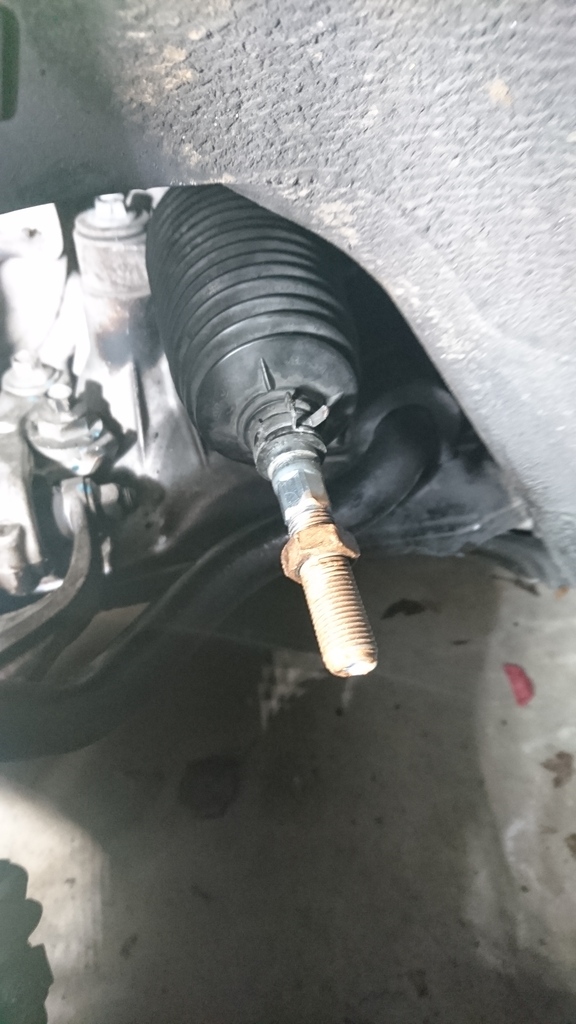
Step 10: If you went with OEM parts, then its just a matter of removing the outer tie rod by spinning it off. COUNT THE NUMBER OF TURNS IT TAKES TO REMOVE AND WRITE IT DOWN. I had 16.5 turns on the driver side and 17.5 on the passenger side. This becomes crucial on reinstallation. If you�re using aftermarket parts, the turns may not match up. This is where taking a measurement of the length of the inner plus outer tie rods together may come in handy, also write it down. Once you screw the aftermarket outer tie rod onto the aftermarket inner tie rod, make sure the lengths are the same. If you�re just changing the outer tie rod, take the new tie rod, and compare it to make sure they are similar and/or identical if you used OEM. Re-install and count the number of turns and insert a fresh cotter pin after tightening the castle nut back. An alignment is also necessary for just the outer tie rod!!
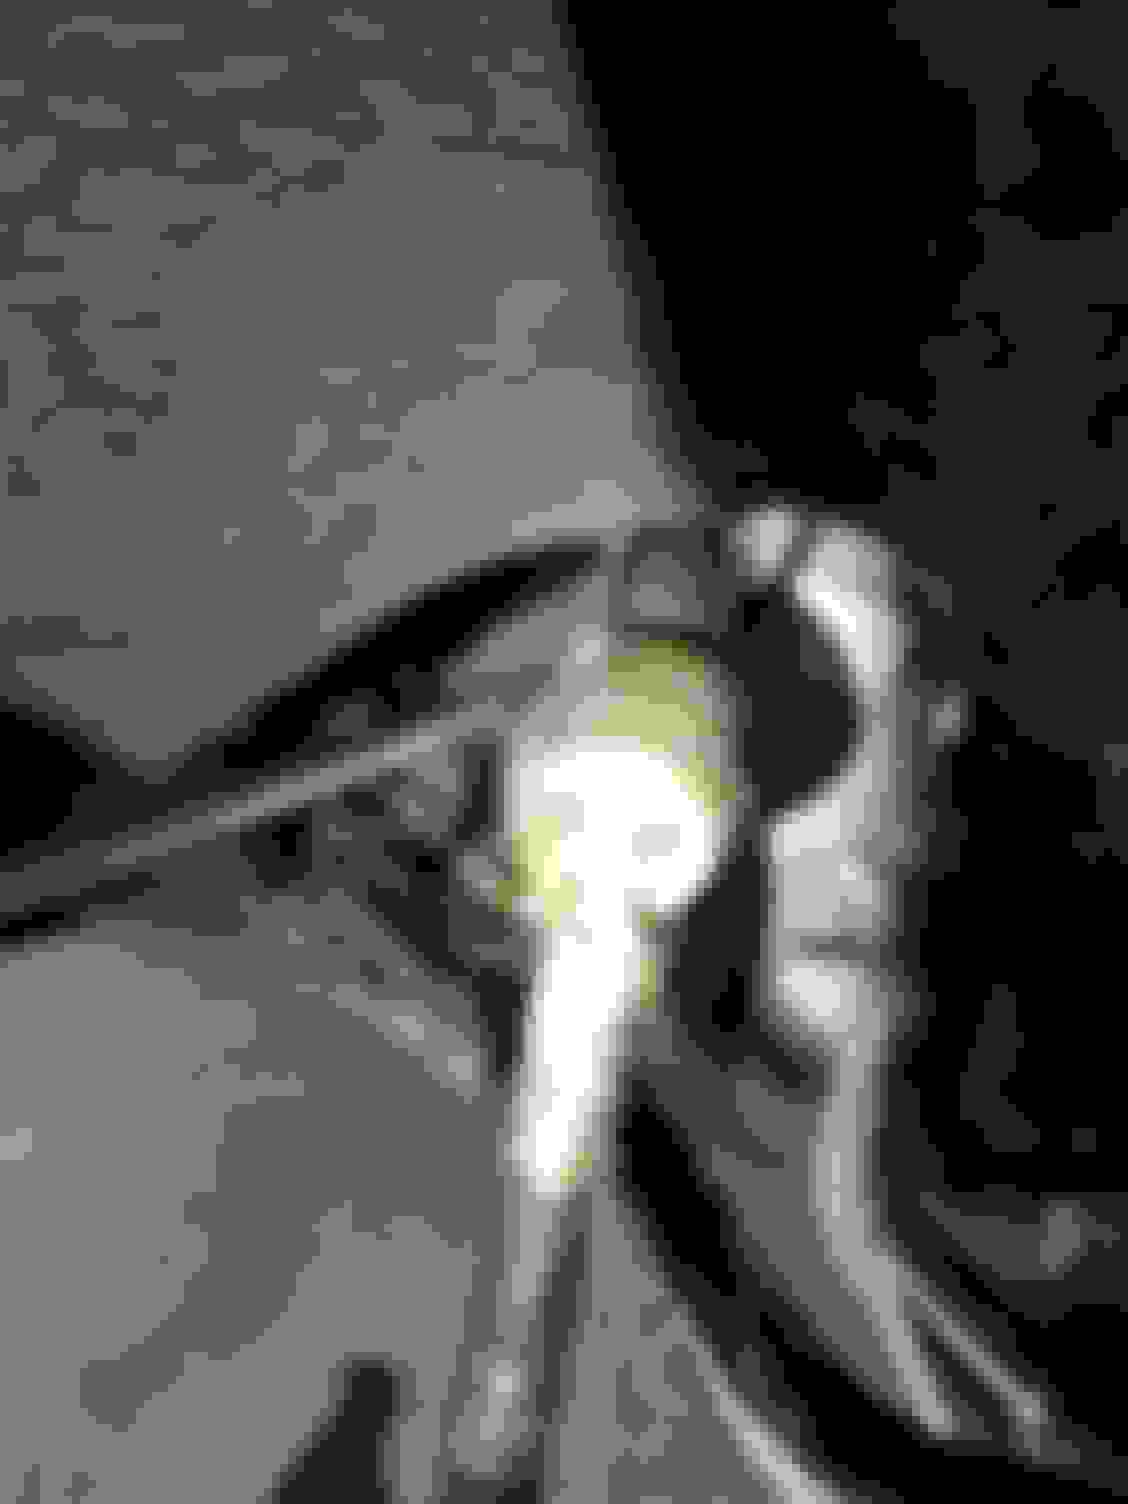
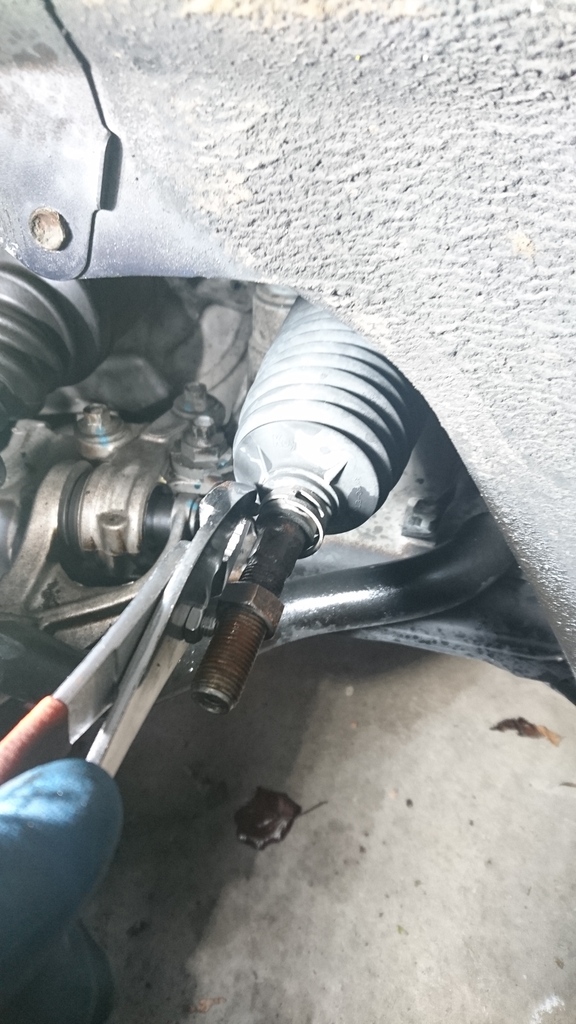
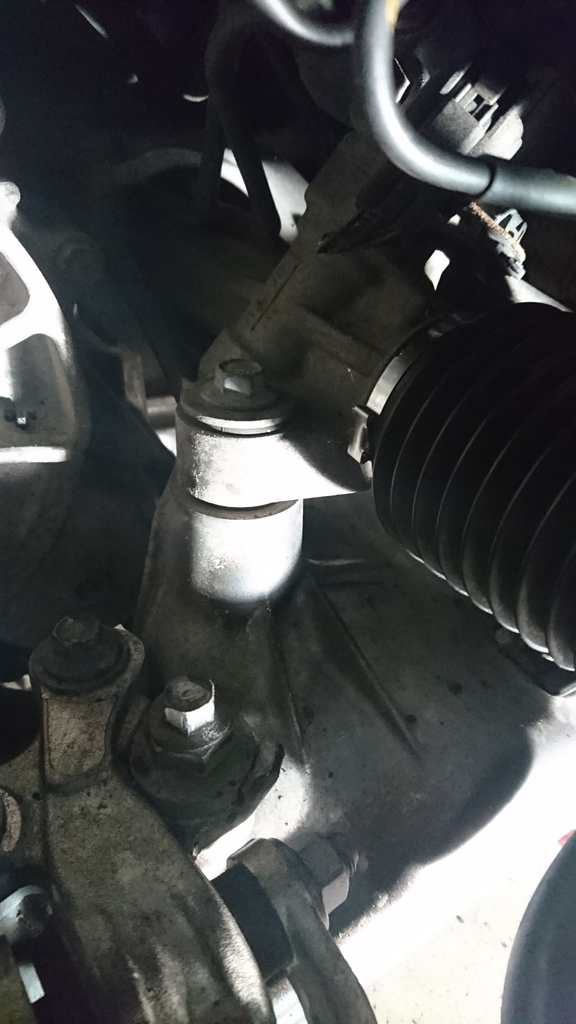
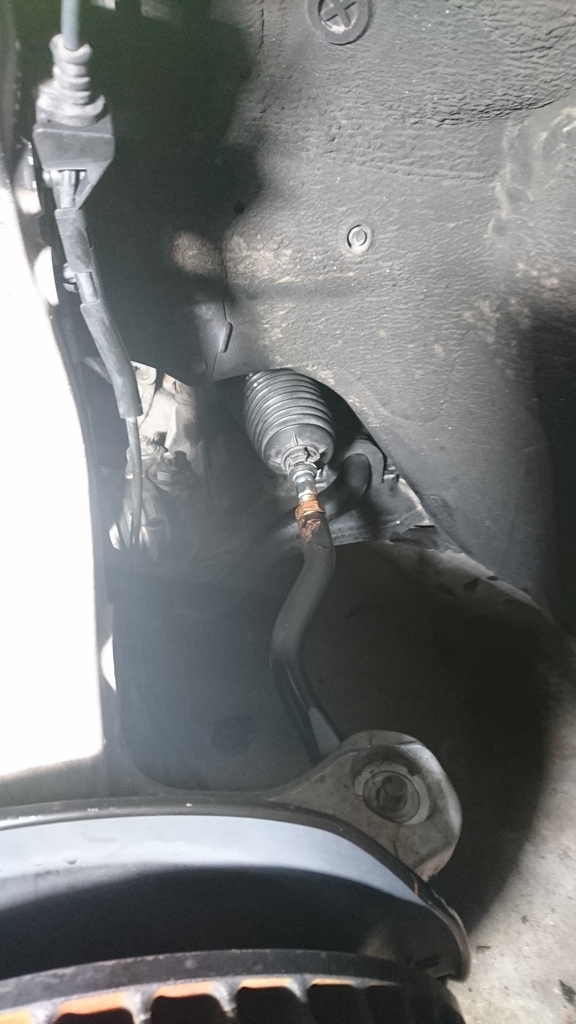
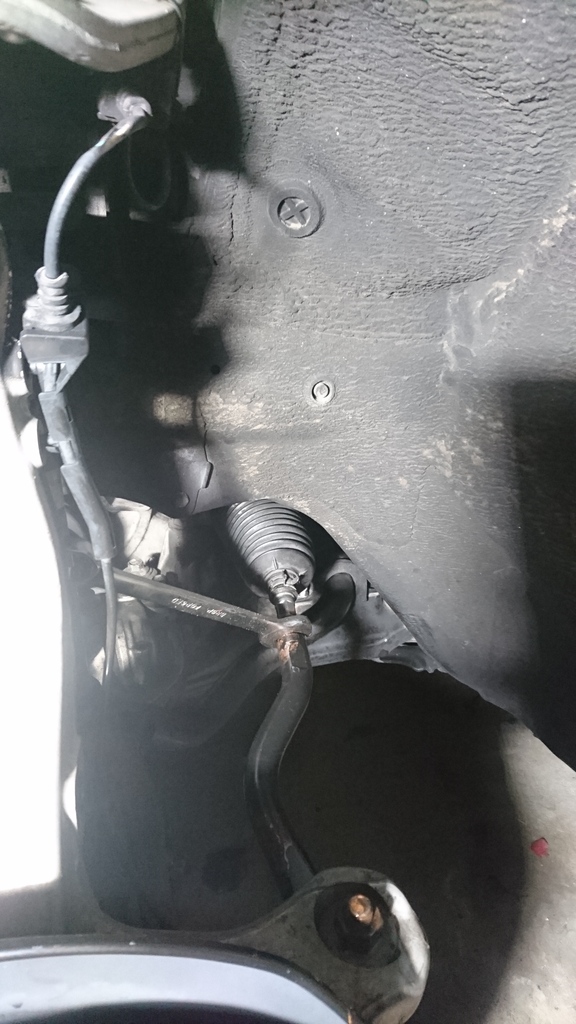
Step 11: Remove the outer clamp on the rack and pinion boot
Step 12: Remove the inner clamp by using a flat head screw driver and wedging it in the slot (more visible in the second picture). Don�t worry about breaking it, that�s the point. Hopefully you bought a new clamp that you�ll be using on re-installation
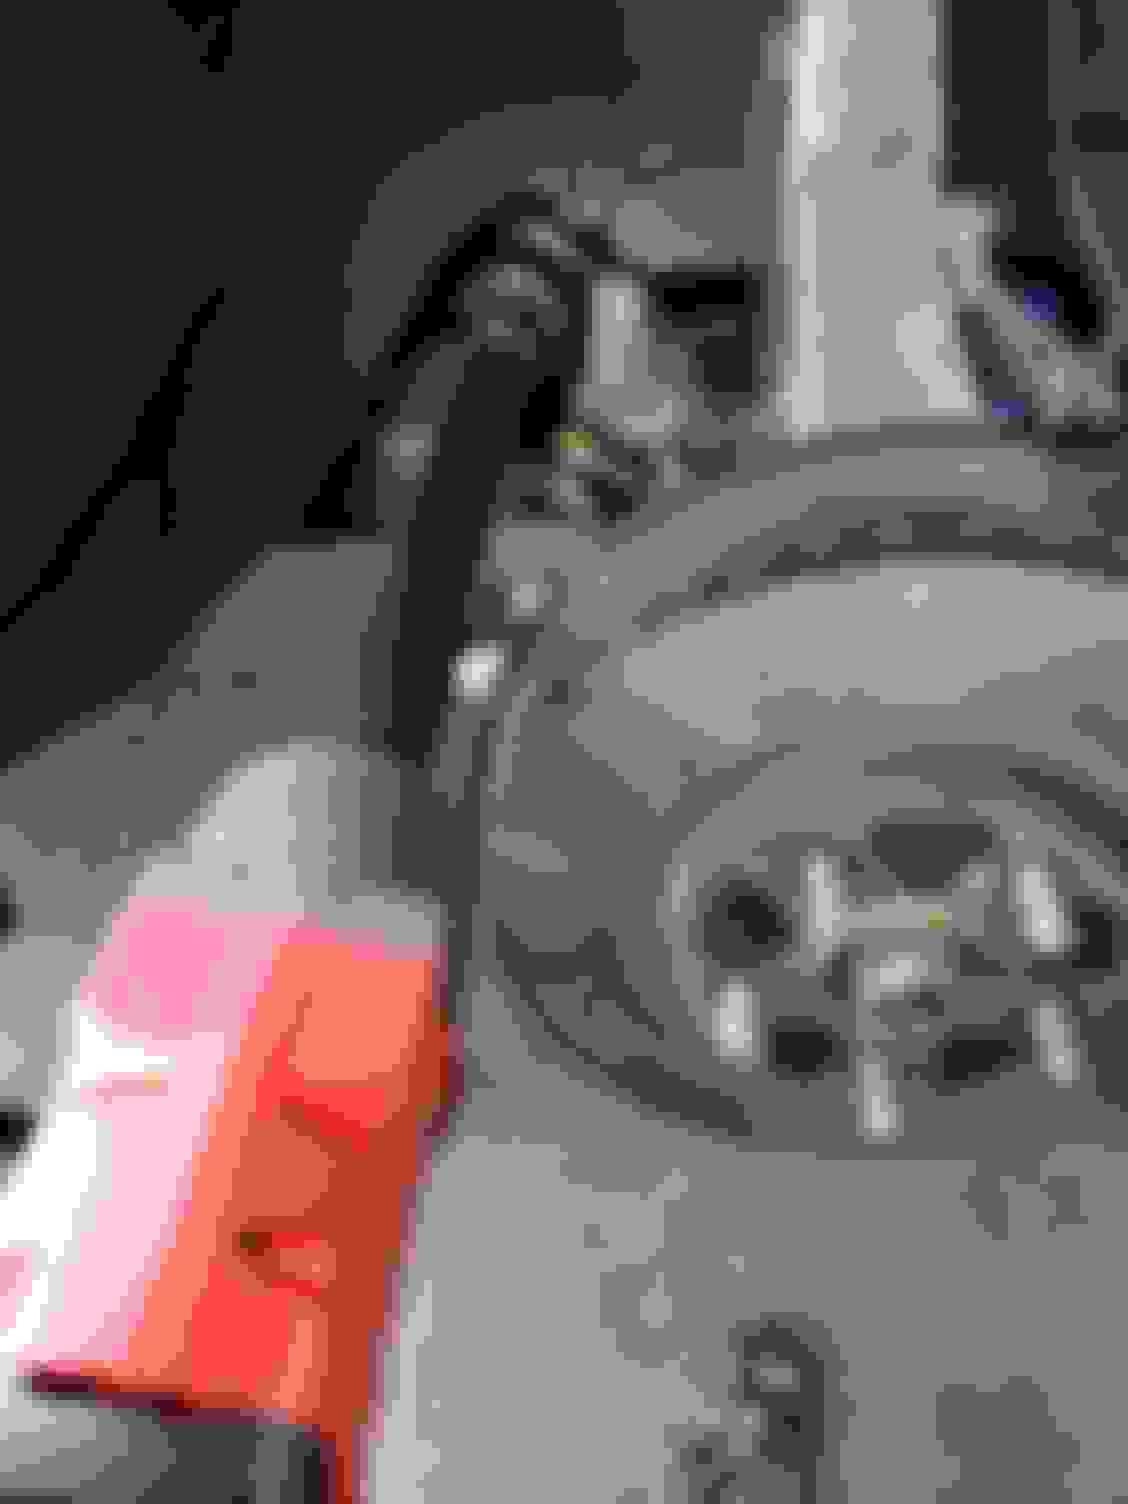
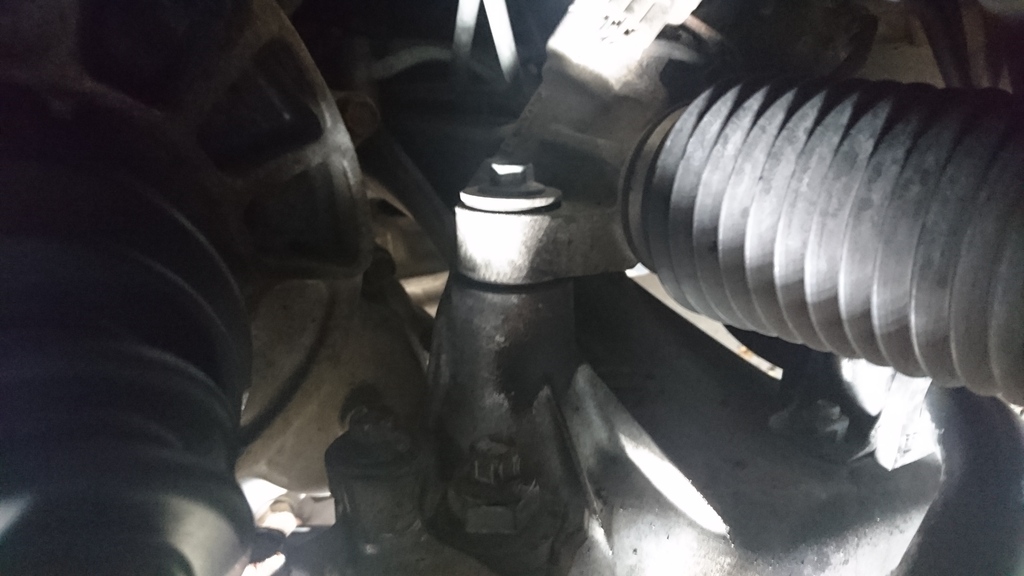
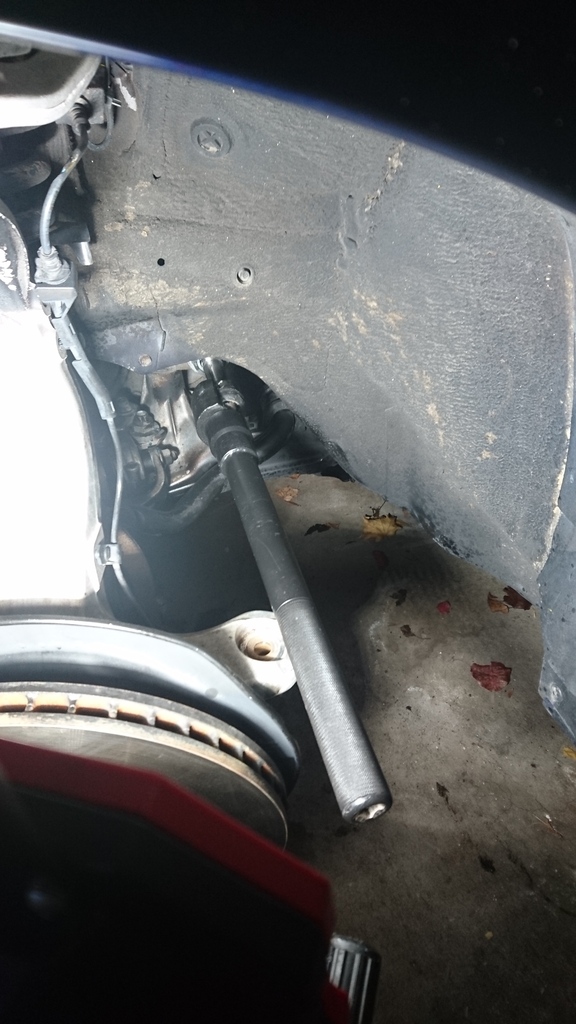
Hello inner tie rod!! The inner tie rod should be able to stay in place, if it �droops� down, or can�t stay in place, it�s definitely bad. My passenger side one would gradually droop down over the span of about two to three minutes. Drooping might happen faster if it is even more worn.
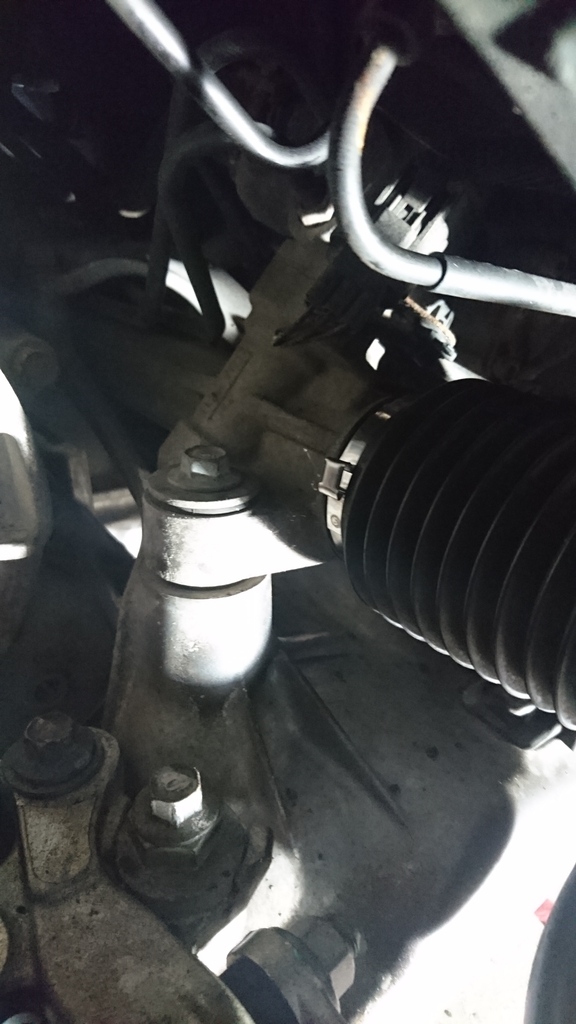
Step 13: Break/unlock the locking plate (2nd to last picture, observe how its bent out of shape outward) from the inner tie rod and then assemble the inner tie rod separator onto the inner tie rod, and using a breaker bar, loosen the inner tie rod. Once you loosen it using a breaker bar, you should be able to spin it by hand and remove it. Remove the old rubber seal.
I always like to compare my parts to make sure they are identical, or similar in specs if they are not OEM
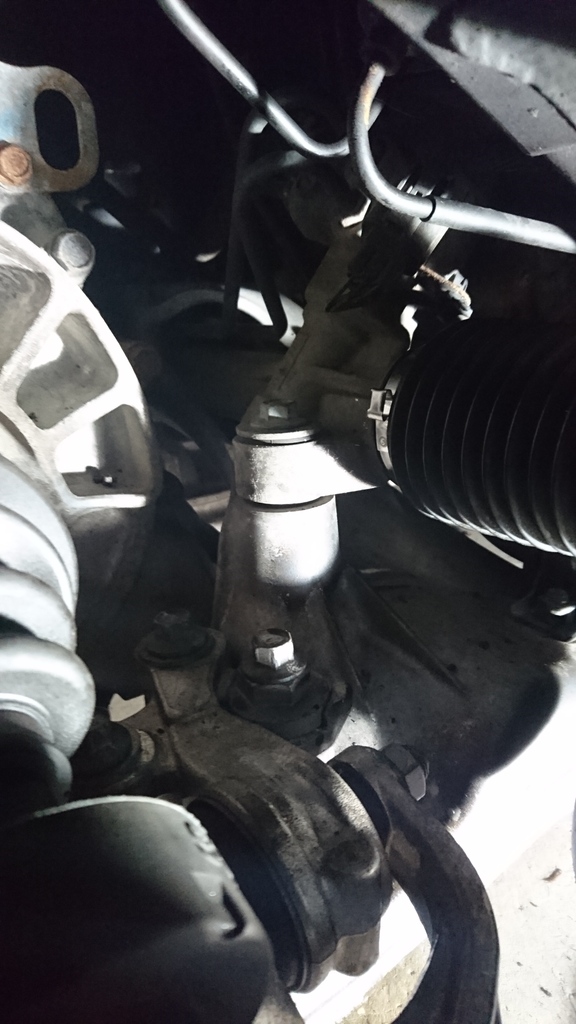
Step 14: Lubricate the new rubber seal using the Teflon grease, only use small amounts, and re-install. Observe the two notches on the second picture, you will line up your tabs on the locking plate with these notches!!! Crutial step!!
Step 15: Install new inner tie rod. You may use the blue thread locker on the threads that screw onto the rack and pinion. I think this is optional. Ensure that locking plate tabs are lined up before tightening. I chose to give one final tightening using the tie rock separator and a socket/ratcheting wrench. Clamp the locking plate in place using the tongue and groove joint pliers
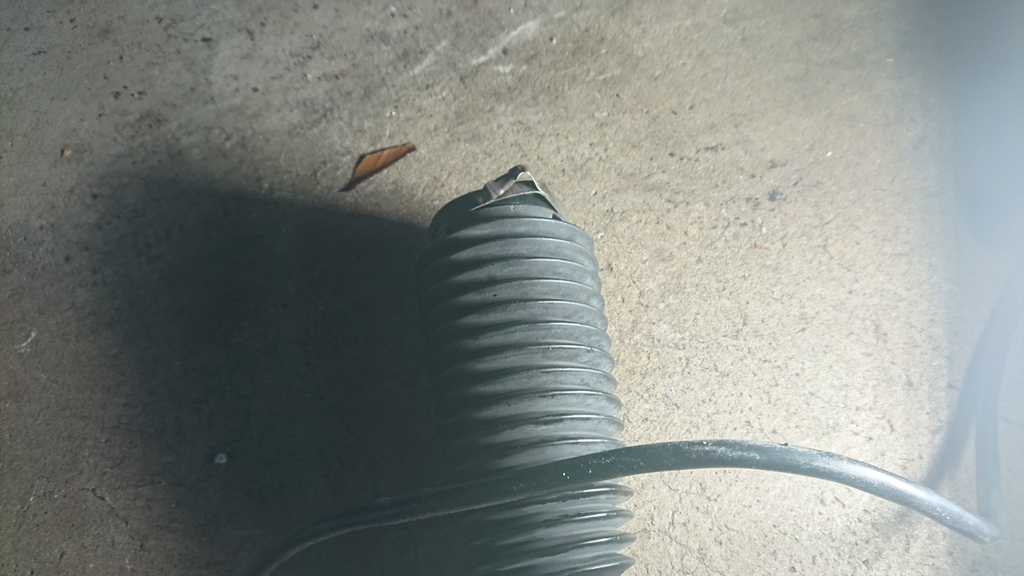
Step 16: Slide a new pinch clamp onto the rack and pinion boot and re-install the boot
Step 17: Using the oetiker 1098 pinch tool, reach in there and pinch the boot clamp on there tight. Here is a pro-tip after going thru installation on the passenger: The driver side is fairly simple to reach in there and get it pinched. The passenger side is a little tighter if a spot to work in and I wished I was able to remove the oil filter to make it easier. If you�re doing the passenger side inner tie rod, definitely consider doing an oil change along side with this
Step 18: Using needle nose pliers, reinstall the outer clamp for the rack and pinion boot
Step 19: Reinstall the outer tie rod locking nut, using a new one if you bought one. Ensure to put a dab of anti-seize here. Your future self will thank you if you ever have to remove this again. Install the new outer tie rod ensuring to count how many spins you counted on removing the old one. If you have a non-OEM replacement, in addition to the counting the spins, ensure that the overall lengths match
Step 20: Tighten the outer tie rod locking nut using a 19mm wrench
Step 21: Insert fresh cotter pin and bend into place using needle nose pliers
Step 22 (optional): I opted to clean my brakes using some brake cleaner to remove any residue I had created. Now would be a good time to look at your brakes and look over your front end components as you can see them
Voila!! You�re almost done!!
Step 23: Re-install tire, and torque lug nuts to spec. You may just tighten up super tight, but do so at your own risk. A good torque wrench can be an asset if you do a lot of DIY work. Honestly, in this entire job, the tire was the only part I felt the need to torque to spec, but that�s me. You can torque everything to spec if you like�
Step 24: Repeat on the other side. Take your car in for an alignment!! Yes, it�s necessary!!!!
Step 25: Enjoy your car again and congratulate yourself, you just changed your outer and inner tie rods!!
Hope this helps guys! Fire away any questions you might have or any corrections or additions you may have as you begin to tackle this job!
So reading this DIY thread proves me right after I was quoted a little over $1800 for suspension work when all I wanted was an alignment. I stopped at Firestone to get an alignment done because it seems like my alignment was off a bit. I also wanted them to do it because I have the lifetime alignment program for my other car and that they use Hunter alignment machine. After a test drive and a look underneath, the guy informs me that I have a bad passenger inner tie rod and that the only way to change it is to remove the entire rack & pinion assembly AND replace that too. This is on top of the $800 or so to replace all four of my tires. All four of my tires have some hairline cracks where the sidewall and top meet and some in between the treads. The tread itself is good on all four but it seems that old age and not tread wear will force me to replace them since they were made in 2011. So I tell the guy that I've replaced tie rods before (other car) which did not require the whole steering rack to be replaced. His answer back was "Well... that's what I see here on the computer". The manager and the tech who looked at the car appear to be new since I've never seen them before. So obviously I passed on the suspension work and the tires since I've already specked out the Pirellis on Tire Rack that have been mentioned on the forum. I have not experienced the tell tale signs or sounds that you hear when you have bad tie rods. I plan on jacking up the car and visually inspecting for myself.
So after driving in the Midwest for 93K miles, my passenger side inner tie rod decided it was time to start playing every so slightly. I decided to go ahead and change my inner and outer tie rods at the same time since the outer one comes off to do the inner one. I decided to go with OEM parts, which makes things much easier with it comes to putting things back together. I recommend reading this whole thing thru at least once, as I�ll have some tidbits along the way that may be useful to you before you start. First off, you�re doing this at your own risk. Neither I nor Acurazine accept responsibility for you hurting yourself. Always observe caution when doing your own work. Work safely guys and gals!!! Here is what you�ll need to do the outer tie rod alone:
2 X 94201-30220 (Cotter pin for the castle nut)
1 X 53560-SJA-A01 (Driver side outer tie rod)
1 X 53540-SJA-A01 (Passenger side outer tie rod)
What you might want to consider, especially on a car that�s seen a lot of winter salt, but I did not buy (Not pictured below): 2x 90307-SJA-A003 (Castle Nut)
Inner Tie Rod Parts, what you�ll need:
2 X 53010-SJA-A01 (Inner Tie Rods)
2 X 53535-SJA-A01 (Inner tie rod seal to rack and pinion), beware, this part had to be special ordered from Japan, but do not think you can get away with changing your inner tie rod without doing this! This seal is what dampens between your inner tie rod and the rack and pinion, more than likely if your tie rod is worn, this is worn too!
2 X 53449-SJA-A01 This is the clamp that secures the rack and pinion boot. You will need a special Oetiker 1098 tool to pinch this when reinstalling the boot. More will be discussed about this tool below
What you�ll want to think about that I haven�t bought/pictured:
2 X 53534-SJA-A01 Rack and Pinion Boot, consider this in an older RL with higher miles, will most likely crack or break on removal if already not cracked.
2 X 91411-SJA-A01 Hex nut, this nut is what locks your outer tie rod into place and screws onto your inner tie rod. In my experience, this nut sometimes fuses to the inner tie rod and becomes damn near impossible to separate off your old inner tie rod. I�m sure this nut can be substituted for a generic one from Ace or Home Depot.
Inner Tie Rod separator: Can be loaned from your local parts store
Outer Tie Rod Separator: Can be loaned from your local parts store. You can avoid using this tool if you use a rubber mallet or hammer and bang against the hub which it goes thru. This MAY OR MAY NOT WORK!!! Don�t bank on it working as it didn�t work on my car and my car doesn�t see salt
Antiseize Grease: Very useful for any automotive suspension project, especially in a car that rolls around in the rust belt
Permatex Blue Threadlocker: May or may not use on the inner tie rod, where it screws into the rack and pinion. I bought it for photographic purposes but never actually used any.
Oetiker 1098 crimp tool: Believe me, this is 10$ well spent. You will thank me later. Some people will advocate using hose clamps on the rack and pinion boot. Those were too wide and quite simply did not seat right enough for me to feel confident in using them. DO NOT USE THE TOOL PICTURED IN THE FIRST PICTURE. Head my warning and you will thank me when you�re installing the pinch clamp on the boot. I got the tool (Pictured below) from Menards for 10$. You�ll find it next to the PEX Pinch Clamps in the Plumbing Section at your local hardware store
Tong and Groove Joint Pliers: These are needed to secure the locking plate for the inner tie rod. I had to make a special trip to Harbor Freight to get the largest ones they had. They came in a set of 4, I had no problem adding to my tool set as I�m a big DIYer, I figured these would come in handy at some point.
Teflon (PTFE) synthetic grease. DO NOT SUBSITUTE FOR ANY OTHER KIND OF GREASE. This will be using to rub against the rubber seal 53535-SJA-A01, only in minute amounts
Step 3: Raise your car from the center if doing both. I raised it from the center since I was doing both using the jack point in the front subframe. It lines up quite well with the Acura logo in the grille
Step 4: Once you have the car raised, place it on jack stands. I cannot stress this enough, work safely people!!! If possible, it�s also good to have someone who knows you�re working under your car and have them check in on you periodically. Not necessary, but just a thought. Sh*t happens, just saying
Step 9: Use a rubber mallet and hit the hub with it. This may or may not separate the outer tie rod from the hub. As Eric the Car Guy says, hit the part it goes thru and not the part itself. In my case, it did not work and I had to resort to the tie rod separator
Step 10: If you went with OEM parts, then its just a matter of removing the outer tie rod by spinning it off. COUNT THE NUMBER OF TURNS IT TAKES TO REMOVE AND WRITE IT DOWN. I had 16.5 turns on the driver side and 17.5 on the passenger side. This becomes crucial on reinstallation. If you�re using aftermarket parts, the turns may not match up. This is where taking a measurement of the length of the inner plus outer tie rods together may come in handy, also write it down. Once you screw the aftermarket outer tie rod onto the aftermarket inner tie rod, make sure the lengths are the same. If you�re just changing the outer tie rod, take the new tie rod, and compare it to make sure they are similar and/or identical if you used OEM. Re-install and count the number of turns and insert a fresh cotter pin after tightening the castle nut back. An alignment is also necessary for just the outer tie rod!!
Step 11: Remove the outer clamp on the rack and pinion boot
Step 12: Remove the inner clamp by using a flat head screw driver and wedging it in the slot (more visible in the second picture). Don�t worry about breaking it, that�s the point. Hopefully you bought a new clamp that you�ll be using on re-installation
Hello inner tie rod!! The inner tie rod should be able to stay in place, if it �droops� down, or can�t stay in place, it�s definitely bad. My passenger side one would gradually droop down over the span of about two to three minutes. Drooping might happen faster if it is even more worn.
Step 13: Break/unlock the locking plate (2nd to last picture, observe how its bent out of shape outward) from the inner tie rod and then assemble the inner tie rod separator onto the inner tie rod, and using a breaker bar, loosen the inner tie rod. Once you loosen it using a breaker bar, you should be able to spin it by hand and remove it. Remove the old rubber seal.
Step 14: Lubricate the new rubber seal using the Teflon grease, only use small amounts, and re-install. Observe the two notches on the second picture, you will line up your tabs on the locking plate with these notches!!! Crutial step!!
Step 15: Install new inner tie rod. You may use the blue thread locker on the threads that screw onto the rack and pinion. I think this is optional. Ensure that locking plate tabs are lined up before tightening. I chose to give one final tightening using the tie rock separator and a socket/ratcheting wrench. Clamp the locking plate in place using the tongue and groove joint pliers
Step 17: Using the oetiker 1098 pinch tool, reach in there and pinch the boot clamp on there tight. Here is a pro-tip after going thru installation on the passenger: The driver side is fairly simple to reach in there and get it pinched. The passenger side is a little tighter if a spot to work in and I wished I was able to remove the oil filter to make it easier. If you�re doing the passenger side inner tie rod, definitely consider doing an oil change along side with this
Step 19: Reinstall the outer tie rod locking nut, using a new one if you bought one. Ensure to put a dab of anti-seize here. Your future self will thank you if you ever have to remove this again. Install the new outer tie rod ensuring to count how many spins you counted on removing the old one. If you have a non-OEM replacement, in addition to the counting the spins, ensure that the overall lengths match
Step 22 (optional): I opted to clean my brakes using some brake cleaner to remove any residue I had created. Now would be a good time to look at your brakes and look over your front end components as you can see them
Step 23: Re-install tire, and torque lug nuts to spec. You may just tighten up super tight, but do so at your own risk. A good torque wrench can be an asset if you do a lot of DIY work. Honestly, in this entire job, the tire was the only part I felt the need to torque to spec, but that�s me. You can torque everything to spec if you like�
Step 24: Repeat on the other side. Take your car in for an alignment!! Yes, it�s necessary!!!!
Step 25: Enjoy your car again and congratulate yourself, you just changed your outer and inner tie rods!!
Hope this helps guys! Fire away any questions you might have or any corrections or additions you may have as you begin to tackle this job!
I have some creaking noise when i turn wheel, the noise is like old rusty door and appears only when it's hot outside or after i have driven the car for a while. When i try to reproduce noise with car on jacks it doesn't do anything. I have checked all joints and they appear good. Only problem is ball joint at outer tie rods. I can hold the outer tie rods and wiggle it back and forth like a motorcycle accelerator. Should there be any play like o mentioned?
The outer tie rod shouldn't have much play in it to be honest. It will have some play in it, and will move back and forth like you describe but shouldn't feel very loose if that makes sense?
so finished installing my lca today and in doing so inspected other components of the suspension and noticed the outer tie rod ball joint is completely loose. I can rock it back and forth and a clunk noise is apparent when doing this. I'll be using this DIY to get it replaced..Can I get away with not getting an alignment if I am going with OEM?
so finished installing my lca today and in doing so inspected other components of the suspension and noticed the outer tie rod ball joint is completely loose. I can rock it back and forth and a clunk noise is apparent when doing this. I'll be using this DIY to get it replaced..Can I get away with not getting an alignment if I am going with OEM?
It doesn't matter what parts you use, you have to get an alignment unless you like to wear your tires faster.
Yup, I would definitely get the alignment done! It's honestly not that hard compared to Upper or lower control arms!
I was able to rock the outer tie rod back and forth with my hand. Do you think I should replace the inner tie rods too? I don't want to spend more money if not necessary. Great DIY btw.
I was able to rock the outer tie rod back and forth with my hand. Do you think I should replace the inner tie rods too? I don't want to spend more money if not necessary. Great DIY btw.
Is there any movement in the inner tie rod at all?
Ordered 2 spord spacers from acuraoemparts.com and only received 1. Thanks. /sarcasm.
Seriously, they never have anything I need in stock. Everything is backordered so I have to wait a few extra days. Even with the delay, they only manage to send half of the order.
Tie rods are already out. Was just waiting on the spacers. Need the car done this weekend and local dealer doesn't have them in stock either.
Just had to rant.
Well, reused the old rubber spacers. Got everything put it . Went for a quick drive (I'll get an alignment soon) and still clunking from the driver's side. When I turn the wheel, it clunks. Going over bumps, it clunks. Replaced sway bar end links a month or two back.
I'm beat for today. I'll recheck everything tomorrow.
How are your bushings looking on your control arms? How many miles on the car?
How are your bushings looking on your control arms? How many miles on the car?
They look ok. 230k miles. I guess it's time to replace control arms as well. Was trying to avoid that as they are kind of spendy.
Rechecked everything today, nice and tight. The tie rods are stiff.
When I push down on the front left, there's is a clunking/knocking noise. While in park, I'll do full turns on the steering wheel and no noise. Going 5mph and up I'll do quick left/right turns and the clunking/knocking is there. Highway speeds, not so much if anything at all.
I knew I should have replaced the front strut mounts when I did the struts just to rule those out.
Hello and thank you for such a detailed write up. I have found myself in a pickle.. I only wished i found this Prior to starting my DIY on my inner and outer tie rods. I'm at the point where got off both the inner and outer tie rods and is ready to install the new ones... however i did not know about the tie rod seal.. Does anyone know if this part can be substituted or if there is a cross over part that can be used? 2 X 53535-SJA-A01 i have been searching for this part and is coming up short.. it's apparently on back order EVERYWHERE....
the washers had to be special order and it took an extra week for me to get them. your best chance is to spend $10 to $20 to buy these washers on ebay that is listed for mdx and hope they fit. that's what i'd if you need them right away or take one apart and take it to a Honda and Acura dealership and see if they can find any that matches.
I had to special order mine as well since it�s not stocked at the California warehouse. And not a single dealer had one in stock when I was looking to buy...
i JUST ordered mine as well. I called to all the local dealers and no go - they said all special order from Japan. Guess its just not that in demand to stock em
just looking over your diy photos again and it looks like the front anti sway bar bushings would be easy to swap out with the inner tie rod out of the way..but i doubt mines need to be replaced at 132k.
Can someone describe this part for me? the old one is very worn out... It looks to me like a square shaped oring 19mm in size but is it made of a hard plastic or a pliable rubber? Also it looks like it slides on the actual rack that the inner tie rod screws into and is stopped by a very small increase is size that stops it. the inner tie rod does not actually come into contact with this or it doesn't look like it does. I would like to see if i can find one at an auto store or dealer if even possible.
Can someone describe this part for me? the old one is very worn out... It looks to me like a square shaped oring 19mm in size but is it made of a hard plastic or a pliable rubber? Also it looks like it slides on the actual rack that the inner tie rod screws into and is stopped by a very small increase is size that stops it. the inner tie rod does not actually come into contact with this or it doesn't look like it does. I would like to see if i can find one at an auto store or dealer if even possible.
thanks to all in advance.
The washer should sit flush on the inner tie rod..and the two inner tabs should go into the steering rack. once that is done..you tighten the inner tie rod into the rack and torque it down. once torqued you will need to use a hammer or mallet and a chisel or another tool to bend the washer section to where the tie rod indentation is. on the RL inner tie rod there should be two identations. if you need further help I can take pictures.
The washer should sit flush on the inner tie rod..and the two inner tabs should go into the steering rack. once that is done..you tighten the inner tie rod into the rack and torque it down. once torqued you will need to use a hammer or mallet and a chisel or another tool to bend the washer section to where the tie rod indentation is. on the RL inner tie rod there should be two identations. if you need further help I can take pictures.
Thanks but I was talking about the spacer, stopper part number 53535-SJA-A01. This washer you described comes with the inner tie rod and i have. I may not have asked my question the right way.
I have to say that by far this is the most detailed write up i've seen on this job... projektvertxKudos to you. I have looked at countless vids and tutorials from "Mechanics" on a series of car make and models and NONE have mentioned this part at all not even a recommendation to replace. Had i not found your write up i would not have replaced this part (53535-SJA-A01) (which is turning out to be the biggest problem with doing this job due to availability) but none the less who knows what damage could be caused by not replacing it. Thanks again and wish me luck getting it. I wold highly recommend anyone looking to do this job to get this part before starting.
Thanks but I was talking about the spacer, stopper part number 53535-SJA-A01. This washer you described comes with the inner tie rod and i have. I may not have asked my question the right way.
spacer goes go the steering rack..then the locking washer then the inner tie rod as shown below or picture OP posted before step 15.
^thank you. that worked!. well I finished the job. i screwed up one of the metal clamp that goes on the boot. i over tightened it and it broke..ended up using zip tie on the passenger side. overall, the job took me 4 hours, just because everything that could have gone wrong went wrong spent too much time trying to stake the inner tie rod washer before using the plier OP suggested. Not to mention, the inner tie rod removal kit rental from Autozone sucked lol.
Rather than use a rubber mallet to shock the outer tie rod..use a big hammer like an engineering or sledge hammer. 5 hits and it came off with ease.
Thank you to OP! Great write up and prompt response..saving me big time today. Anyhoo, my car still creaks in the driveway, so I am going to replace the sway bar bushings and rear motor mount next...need to get rid of this creaking noise.
 01-06-2017, 08:40 PM


 [img]
[img]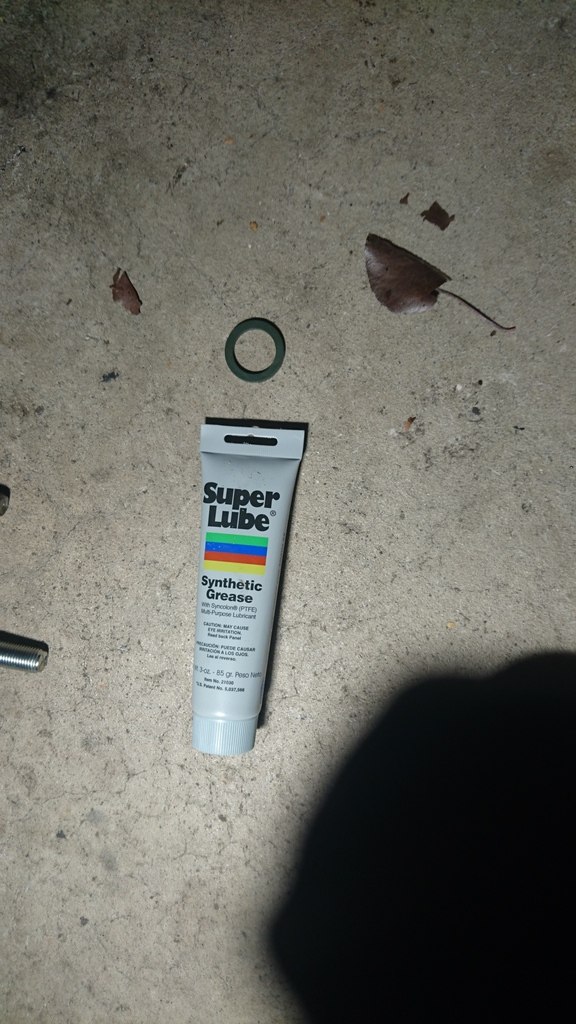


 [img]
[img]