
Driver's Seat Lowering?


Thread Starter
4th Gear
Joined: Oct 2008
Posts: 4
Likes: 0
From: Bay Area, California
Driver's Seat Lowering?
Hey Guys,
Being a tall guy (6'9") and finding a car that I fit in comfortably is rare... That's why I was so happy to find that I fit great in the '03 CL-S 6-speed. Obviously I have to drive with the seat all the way back, down, and reclined pretty far, but this works out well. The legroom is fine, but my one complaints is the headroom. I'm glad my car has a sunroof, as the less-than-one-inch boost in headroom it gives me makes all the difference. However, if my seat went only an inch or two lower, it would be a pretty perfect fit.
My question is: Is it possible to modify the driver's seat to make it go any lower than it already is? I don't want to buy a new seat, as the current seat is both comfortable and well bolstered. I also would like to avoid removing any of the seat padding.
I don't expect this answer to come soon, as it is rare I encounter anyone else who is as freakishly tall as me. Most of the tall guys I talk to drive either minivans or Buicks... I would rather origami myself into an uncomfortable car than drive a piece of s**t like that, and I definitely want to keep my Acura. If anyone has any suggestions or ideas, please let me know! The top of my head will thank you.
Cheers,
Alex

6th Gear
Joined: Jan 2013
Posts: 6
Likes: 0
From: Seattle, WA
This reply comes about four and a half years too late for the OP, but I'm going to put this reply here since I found this very thread via searching. I had a similar wish as the OP, for more headroom in my '01 CL-S via a lower seat, and was looking in vain for an easy solution just involving, say, a swap of seat rails.
Well, I got my wish granted, but only through my own exertions. Via shaving foam off the bottom seat cushion and thigh bolsters I freed up about an inch of extra headroom, and now have enough clearance above my noggin such that my hair no longer touches the headliner while driving.

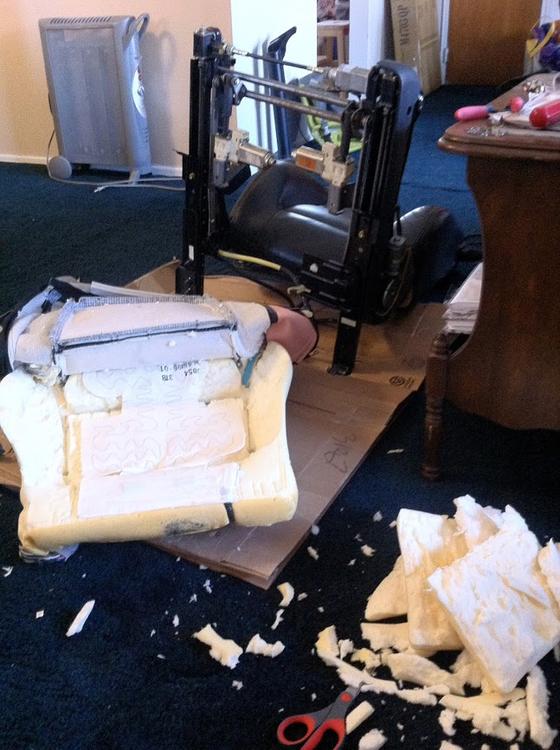
An overview of the scene in my living room today.
If you haven't pulled your seats from the car or the seat covers from the seat, and don't know a hog ring from a bull ring, then this walk-through will get you up to speed, as it did for me: http://joshsworld.com/cars/acura-tl-seat-heater-fix/ . It's for fixing heated seat elements on a TL, but the details are close enough, with the difference being that you go to town with a utility knife and sculpt the foam to your preference instead of re-soldering wires as he did.

A closer view of the foam that I shaved away, with the front of the car/seat to the right of the picture if you're all turned around backwards.
One piece of extra advice I'd offer is to disconnect the battery after undoing the bolts securing the seat frame to the car itself (so that you can motor it backwards and forwards with power) but before undoing the yellow side airbag connector (to avoid the SRS light coming on). Disconnecting the battery means inputing the radio and navi codes when hooking it back up together, but there's a good chance a prior tech put a sticker with said codes on the side of your glovebox, saving some hassle.
Another tip is to use zipties (good sized ones) in place of the hog rings when securing the seat cover back to the seat frame. I didn't have a hog ring plier and didn't really wish to go out and purchase one, and the zipties seem like they'll have plenty of strength for this application, which is to secure the hem of the seat cover fabric at various places to metal anchors that are themselves only maybe 2 mm thick.
A final thing I'd recommend--that I didn't do, much to my chagrin--is to take a few photos of the wires and connectors linking the seat base to the seat cushion assembly before you take it apart. While most of the connectors are unambiguous in their course and destination (by virtue of, say, having four pins whereas no other connectors nearby have that count) there were a few that were ambiguous and caused me a bit of consternation. I like puzzles, but not when they involve the possibility of the power seat functions not working.
Thankfully, I seem to have gotten everything back together fine, in that the power seat controls all do what they're supposed to and the memory function (while reset by the loss of battery power) works as well.
Well, I got my wish granted, but only through my own exertions. Via shaving foam off the bottom seat cushion and thigh bolsters I freed up about an inch of extra headroom, and now have enough clearance above my noggin such that my hair no longer touches the headliner while driving.
An overview of the scene in my living room today.
If you haven't pulled your seats from the car or the seat covers from the seat, and don't know a hog ring from a bull ring, then this walk-through will get you up to speed, as it did for me: http://joshsworld.com/cars/acura-tl-seat-heater-fix/ . It's for fixing heated seat elements on a TL, but the details are close enough, with the difference being that you go to town with a utility knife and sculpt the foam to your preference instead of re-soldering wires as he did.
A closer view of the foam that I shaved away, with the front of the car/seat to the right of the picture if you're all turned around backwards.
One piece of extra advice I'd offer is to disconnect the battery after undoing the bolts securing the seat frame to the car itself (so that you can motor it backwards and forwards with power) but before undoing the yellow side airbag connector (to avoid the SRS light coming on). Disconnecting the battery means inputing the radio and navi codes when hooking it back up together, but there's a good chance a prior tech put a sticker with said codes on the side of your glovebox, saving some hassle.
Another tip is to use zipties (good sized ones) in place of the hog rings when securing the seat cover back to the seat frame. I didn't have a hog ring plier and didn't really wish to go out and purchase one, and the zipties seem like they'll have plenty of strength for this application, which is to secure the hem of the seat cover fabric at various places to metal anchors that are themselves only maybe 2 mm thick.
A final thing I'd recommend--that I didn't do, much to my chagrin--is to take a few photos of the wires and connectors linking the seat base to the seat cushion assembly before you take it apart. While most of the connectors are unambiguous in their course and destination (by virtue of, say, having four pins whereas no other connectors nearby have that count) there were a few that were ambiguous and caused me a bit of consternation. I like puzzles, but not when they involve the possibility of the power seat functions not working.
Thankfully, I seem to have gotten everything back together fine, in that the power seat controls all do what they're supposed to and the memory function (while reset by the loss of battery power) works as well.
6th Gear
Joined: Jan 2013
Posts: 6
Likes: 0
From: Seattle, WA
If this all seems like a pain in the ass, you'd be correct. This took me about 4 hours start to finish, with a little dicking around looking up wiring diagrams, etc. when I got lost. The seats are also quite heavy to carry around thanks to all those motors in 'em. Oof.
Anyway, I think it was worth it, as I needed the headroom. I got a quote from a local upholstery shop to do the same work yesterday. The quote is what inspired me to try it myself, as it was for $380.
All this modification cost me was half a day of my time, a few zipties, and a quick round of vacuuming up the living room afterwards to appease the wife, as the foam ended up everywhere.

Thread
Thread Starter
Forum
Replies
Last Post
rockyboy
2G RDX (2013-2018)
171
Aug 4, 2024 10:35 AM
billmcd
ILX
9
Oct 17, 2016 03:33 PM