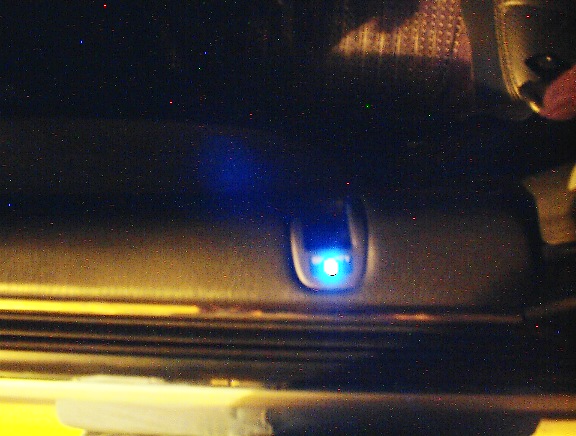
Replaced stock red LED on driver door with ...
 07-21-2001, 03:23 AM
#1
Retired. Not available.
Thread Starter

Replaced stock red LED on driver door with ...
super bright blue LED. Even though, it's not as bright as it would be if flushed mount but it's cooler the stock red LED. the process is simple and straight forward. remove the door panel, de-solder the stock LED from the small board and solder the blue LED on.
 07-21-2001, 03:26 AM
#2
Ambidextrous Masturbator

Join Date: Mar 2001
Location: Orange County, CA
Age: 48
Posts: 1,644
Likes: 0
Received 0 Likes
on
0 Posts
Originally posted by SilverKnight:
<STRONG>super bright blue LED. Even though, it's not as bright as it would be if flushed mount but it's cooler the stock red LED. the process is simple and straight forward. remove the door panel, de-solder the stock LED from the small board and solder the blue LED on.</STRONG>
<STRONG>super bright blue LED. Even though, it's not as bright as it would be if flushed mount but it's cooler the stock red LED. the process is simple and straight forward. remove the door panel, de-solder the stock LED from the small board and solder the blue LED on.</STRONG>
Pics?

 07-21-2001, 03:36 AM
#4
Retired. Not available.
Thread Starter
my digi went out of battery. besides, it was so hard to catch the blinks with digi.
Yup, I believed NovawhitetypeS was talking about it but he's waiting for me to put it on.
Yup, I believed NovawhitetypeS was talking about it but he's waiting for me to put it on.
07-21-2001, 03:38 AM
#5
Retired. Not available.
Thread Starter
Originally posted by SilverKnight:
<STRONG>my digi went out of battery. besides, it was so hard to catch the blinks with digi.
Yup, I believed NovawhitetypeS was talking about it but he's waiting for me to put it on. He was thinking about paying $15/each. I paid 2.95+tax.</STRONG>
<STRONG>my digi went out of battery. besides, it was so hard to catch the blinks with digi.
Yup, I believed NovawhitetypeS was talking about it but he's waiting for me to put it on. He was thinking about paying $15/each. I paid 2.95+tax.
</STRONG>

Trending Topics
 07-21-2001, 01:12 PM
#10
Racer

Join Date: Jul 2001
Location: Ohio
Posts: 362
Likes: 0
Received 0 Likes
on
0 Posts
Originally posted by Chris:
<STRONG>wow you make it seem so simple... but i'm sure many do not have a soldering iron</STRONG>
<STRONG>wow you make it seem so simple... but i'm sure many do not have a soldering iron
</STRONG>
Soldering irons run about $12 at Radio Shack.

 07-22-2001, 03:57 AM
#13
Retired. Not available.
Thread Starter
The instruction is really straight forward.
1. Remove door panel. There are 2 screws. One under the arm rest. The other at the door handle. Use a small screw driver to pop the little cover up and the screw is there. You need to remove the tweeter housing as well. Remove the housing by holding the upper right conner and pull it out.
|\ <===Pull out here.
| \
|____\
Pull out the door panel then lift it up from the door edge (bottom of the windows)
2. Disconnect all wiring harnesses.
3. Locate the little board that holds the LED. Unplug the wiring harness. Use a small screw driver to release the tab that locks the board in place. Be careful here, do not break the board. Pull the board out so you have room to work.
4. De-solder the stock LED. Solder the aftermarket LED in.
IMPORTANT: BE CAREFUL about the polarity of the LED. If you install it reversed, it wont work. Make sure you notice the stock LED's polarity before removing it. If you have a volt meter with diode checking capacity, you can always test for polarity. If the aftermarket LED doesnt work after you install it, remove, turn it 180 degree and solder it back in. Even I have de-soldering tool, it still tough for me to take it out (space limited) so try to get it right the first time. Good luck.

 i feel like a n00b now.
10-04-2004, 01:57 PM
i feel like a n00b now.
10-04-2004, 01:57 PM
#20
Not Asian
Originally Posted by Shawn S
WOW......This thread is older then DIRT.
 I guess that was my fault, he was looking for a thread on this topic over at a-tl, so I dug up this thread. Unfortunately, SilverKnight doesn't post here anymore to answer any questions.
10-04-2004, 01:59 PM
I guess that was my fault, he was looking for a thread on this topic over at a-tl, so I dug up this thread. Unfortunately, SilverKnight doesn't post here anymore to answer any questions.
10-04-2004, 01:59 PM
#21
Not Asian
Originally Posted by medicshane
what type of bulb and where can i get it
LOOKS GREAT!!!
LOOKS GREAT!!!
https://acurazine.com/forums/showthr...light=door+led

 12-15-2004, 11:53 AM
#24

hmm, ok is it is 3mm or 5mm? and whats the consumption, the whole thread doesnt talk about the main thing, the LED itself, lol...give me info guys please...thanx.

Thread
Thread Starter
Forum
Replies
Last Post
tman570
2G RL Audio, Bluetooth, Electronics & Navigation
11
06-11-2019 07:56 AM
handsom-hustla
Car Parts for Sale
70
11-13-2015 05:04 PM
wusty23jd
3G TL Audio, Bluetooth, Electronics & Navigation
4
09-24-2015 11:41 AM