How to Replace Spark Plugs


Thread Starter
Intermediate
Joined: Oct 2005
Posts: 30
Likes: 1
How to Replace Spark Plugs
Make sure engine is cold!!!!!!. or...you run risk of stripping threads during removal.
Didn't want to start a new thread but since I didn't find the info on here I wanted I thought I'd write it up. Reading this ahead of time will save you time doing it believe me.
Remove the 4 capbolts on the coilpack cover. Note that the 2 center bolts hold 2 coil packs underneath. When you remove these two there is a stud threaded at both ends. The whole thing may or may not come out of the block. In any event it doesn't matter. This could happen to the two others as well. Wrench size 10mm.

After removal the coil packs are visible. #2 and #4 coil packs have bolts holding the coilpacks in place-remove them. If the studs for the other 2 don't come out..remove them as well. Bottom line remove all 4 bolts holding coil packs. Next move the coilpacks counterclockwise and clockwise to the extent possible to break bottom of boot lose from the top of plug. This will allow you to pull the coilpack and boot out easier.
Push in the right side of the tab (see below and at the same timd pry off connector with a flat blade screwdriver. Twist it slightly in the space between the connector and the coilpack. This is the most difficult part of the job.

Move the connectors out of the way. Pull up on the coilpacks until they and the lower boot come out.


Next get a flashlight and look in all of the holes. If you see any water or oil in the bottom.-Stop. Put the stuff back together and take it to the dealer. You're done.
Use a 5/8" spark plug socket and a 10" extension. Note: tape the extension to the socket so with duct tape so they don't separate when removing..this can be a PITA. Make sure the socket is fully engaged on the plug!!! Break the plug free proceed slowly and even after the first turn go coockwise a turn..this will make removal easier. Like I said turn slowly so you don't strip threads. Take at least 1 to 2 minutes removing the plug. Inspect the thread on the plug and clean it off. Lubricate the old plug * Run it back into the hole and insure it runs in all the way by hand. Remove it.
Check gap of new plug. Should be about .047" +/ .002". Put dielectic jelly around top porcelain ribs. ** Put antisieze on plug thread *. Install plug gasket. Before putting in plug- check the sealing area of the top of the plug hole and if dirty use rag/extension and clean it up or use vacuum. Make rag slightly damp so that it picks up dirt.
Install plug. Make sure you use only the extension and your hand..no wrench. After it tightens by hand. loosen it a couple of turns and redo it (to make sure it stops at the same place. Torque to 10 ft lbs to make sure you are not overtorquing. Then torque to 13 ft lbs. note: max size click type wrench is 50 ft. lbs. Make very sure you see the "click"..its very slight with a 50 ft. ob wrench.
Put dielectic on bottom inside of boot and around the top where it engages into the valve cover housing. ** Install coil packs/boots and insure they bottom . Install the connectors by pushing it on coilpack til it clicks. Install the coilpack bolts just snug. Note you may have had to separate 2 of the bolts that double as coilpack cover.
Install cover you're done. Note.: I was very careful to clean everything up really good and was careful to cover the holes so nothing could get in the cylinders.
* Otional. Some recommend no lubricant.
** Also optional. I just do it.
Didn't want to start a new thread but since I didn't find the info on here I wanted I thought I'd write it up. Reading this ahead of time will save you time doing it believe me.
Remove the 4 capbolts on the coilpack cover. Note that the 2 center bolts hold 2 coil packs underneath. When you remove these two there is a stud threaded at both ends. The whole thing may or may not come out of the block. In any event it doesn't matter. This could happen to the two others as well. Wrench size 10mm.
After removal the coil packs are visible. #2 and #4 coil packs have bolts holding the coilpacks in place-remove them. If the studs for the other 2 don't come out..remove them as well. Bottom line remove all 4 bolts holding coil packs. Next move the coilpacks counterclockwise and clockwise to the extent possible to break bottom of boot lose from the top of plug. This will allow you to pull the coilpack and boot out easier.
Push in the right side of the tab (see below and at the same timd pry off connector with a flat blade screwdriver. Twist it slightly in the space between the connector and the coilpack. This is the most difficult part of the job.
Move the connectors out of the way. Pull up on the coilpacks until they and the lower boot come out.
Next get a flashlight and look in all of the holes. If you see any water or oil in the bottom.-Stop. Put the stuff back together and take it to the dealer. You're done.
Use a 5/8" spark plug socket and a 10" extension. Note: tape the extension to the socket so with duct tape so they don't separate when removing..this can be a PITA. Make sure the socket is fully engaged on the plug!!! Break the plug free proceed slowly and even after the first turn go coockwise a turn..this will make removal easier. Like I said turn slowly so you don't strip threads. Take at least 1 to 2 minutes removing the plug. Inspect the thread on the plug and clean it off. Lubricate the old plug * Run it back into the hole and insure it runs in all the way by hand. Remove it.
Check gap of new plug. Should be about .047" +/ .002". Put dielectic jelly around top porcelain ribs. ** Put antisieze on plug thread *. Install plug gasket. Before putting in plug- check the sealing area of the top of the plug hole and if dirty use rag/extension and clean it up or use vacuum. Make rag slightly damp so that it picks up dirt.
Install plug. Make sure you use only the extension and your hand..no wrench. After it tightens by hand. loosen it a couple of turns and redo it (to make sure it stops at the same place. Torque to 10 ft lbs to make sure you are not overtorquing. Then torque to 13 ft lbs. note: max size click type wrench is 50 ft. lbs. Make very sure you see the "click"..its very slight with a 50 ft. ob wrench.
Put dielectic on bottom inside of boot and around the top where it engages into the valve cover housing. ** Install coil packs/boots and insure they bottom . Install the connectors by pushing it on coilpack til it clicks. Install the coilpack bolts just snug. Note you may have had to separate 2 of the bolts that double as coilpack cover.
Install cover you're done. Note.: I was very careful to clean everything up really good and was careful to cover the holes so nothing could get in the cylinders.
* Otional. Some recommend no lubricant.
** Also optional. I just do it.
Thread Starter
Intermediate
Joined: Oct 2005
Posts: 30
Likes: 1
Manual Tranny Oil plugs.
Me again  .Book isn't very clear. Anyone have pictures of the Fill, check, and drain tranny plugs. Looks like the two top ones are accessible through the Wheel well and the bottom requires a mail 3/8" male square drive to remove.
Thanks.
.Book isn't very clear. Anyone have pictures of the Fill, check, and drain tranny plugs. Looks like the two top ones are accessible through the Wheel well and the bottom requires a mail 3/8" male square drive to remove.Thanks.
Drifting
Joined: Oct 2003
Posts: 2,068
Likes: 21
From: SoCal
Originally Posted by adc
Me again .Book isn't very clear. Anyone have pictures of the Fill, check, and drain tranny plugs. Looks like the two top ones are accessible through the Wheel well and the bottom requires a mail 3/8" male square drive to remove.
Thanks.
.Book isn't very clear. Anyone have pictures of the Fill, check, and drain tranny plugs. Looks like the two top ones are accessible through the Wheel well and the bottom requires a mail 3/8" male square drive to remove.Thanks.
https://acurazine.com/forums/showthr...mission+change
Trending Topics
Thread Starter
Intermediate
Joined: Oct 2005
Posts: 30
Likes: 1
Originally Posted by PACman
Pics are further down the thread on this link...
https://acurazine.com/forums/showthr...mission+change
https://acurazine.com/forums/showthr...mission+change
Thanks for the responses.

Make a hole, coming thru!
Joined: Aug 2007
Posts: 2,945
Likes: 15
From: Somewhere between 70 and 125 mph
Originally Posted by adc
Damn..pictures are too big. I'll work on that later. 
URL=[larger pic url] IMG [img url] /IMG /URL
Thread Starter
Intermediate
Joined: Oct 2005
Posts: 30
Likes: 1
Since I could no longer edit: This will make easier reading.
Originally Posted by adc
Make sure engine is cold!!!!!!. or...you run risk of stripping threads during removal.
Remove the 4 capbolts on the coilpack cover. Note that the 2 center bolts hold 2 coil packs underneath. When you remove these two there is a stud threaded at both ends. The whole thing may or may not come out of the block. In any event it doesn't matter. This could happen to the two others as well. Wrench size 10mm.

After removal the coil packs are visible. #2 and #4 coil packs have bolts holding the coilpacks in place-remove them. If the studs for the other 2 don't come out..remove them as well. Bottom line remove all 4 bolts holding coil packs. Next move the coilpacks counterclockwise and clockwise to the extent possible to break bottom of boot lose from the top of plug. This will allow you to pull the coilpack and boot out easier.
Push in the right side of the tab (see below and at the same timd pry off connector with a flat blade screwdriver. Twist it slightly in the space between the connector and the coilpack. This is the most difficult part of the job.

Move the connectors out of the way. Pull up on the coilpacks until they and the lower boot come out.


Next get a flashlight and look in all of the holes. If you see any water or oil in the bottom.-Stop. Put the stuff back together and take it to the dealer. You're done.
Use a 5/8" spark plug socket and a 10" extension. Note: tape the extension to the socket so with duct tape so they don't separate when removing..this can be a PITA. Make sure the socket is fully engaged on the plug!!! Break the plug free proceed slowly and even after the first turn go clockwise a turn..this will make removal easier. Like I said turn slowly so you don't strip threads. Take at least 1 to 2 minutes removing the plug. Inspect the thread on the plug and clean it off. Lubricate the old plug * Run it back into the hole and insure it runs in all the way by hand. Remove it.
Check gap of new plug. Should be about .047" +/ .002". Put dielectic jelly around top porcelain ribs. ** Put antisieze on plug thread *. Install plug gasket. Before putting in plug- check the sealing area of the top of the plug hole and if dirty use rag/extension and clean it up or use vacuum. Make rag slightly damp so that it picks up dirt.
Install plug. Make sure you use only the extension and your hand..no wrench. After it tightens by hand. loosen it a couple of turns and redo it (to make sure it stops at the same place. Torque to 10 ft lbs to make sure you are not over torquing. Then torque to 13 ft lbs. note: max size click type wrench is 50 ft. lbs. Make very sure you see the "click"..its very slight with a 50 ft. ob wrench.
Put dielectic on bottom inside of boot and around the top where it engages into the valve cover housing. ** Install coil packs/boots and insure they bottom . Install the connectors by pushing it on coilpack til it clicks. Install the coilpack bolts just snug. Note you may have had to separate 2 of the bolts that double as coilpack cover.
Install cover you're done. Note.: I was very careful to clean everything up really good and was careful to cover the holes so nothing could get in the cylinders.
* Optional. Some recommend no lubricant.
** Also optional. I just do it.
Remove the 4 capbolts on the coilpack cover. Note that the 2 center bolts hold 2 coil packs underneath. When you remove these two there is a stud threaded at both ends. The whole thing may or may not come out of the block. In any event it doesn't matter. This could happen to the two others as well. Wrench size 10mm.
After removal the coil packs are visible. #2 and #4 coil packs have bolts holding the coilpacks in place-remove them. If the studs for the other 2 don't come out..remove them as well. Bottom line remove all 4 bolts holding coil packs. Next move the coilpacks counterclockwise and clockwise to the extent possible to break bottom of boot lose from the top of plug. This will allow you to pull the coilpack and boot out easier.
Push in the right side of the tab (see below and at the same timd pry off connector with a flat blade screwdriver. Twist it slightly in the space between the connector and the coilpack. This is the most difficult part of the job.
Move the connectors out of the way. Pull up on the coilpacks until they and the lower boot come out.
Next get a flashlight and look in all of the holes. If you see any water or oil in the bottom.-Stop. Put the stuff back together and take it to the dealer. You're done.
Use a 5/8" spark plug socket and a 10" extension. Note: tape the extension to the socket so with duct tape so they don't separate when removing..this can be a PITA. Make sure the socket is fully engaged on the plug!!! Break the plug free proceed slowly and even after the first turn go clockwise a turn..this will make removal easier. Like I said turn slowly so you don't strip threads. Take at least 1 to 2 minutes removing the plug. Inspect the thread on the plug and clean it off. Lubricate the old plug * Run it back into the hole and insure it runs in all the way by hand. Remove it.
Check gap of new plug. Should be about .047" +/ .002". Put dielectic jelly around top porcelain ribs. ** Put antisieze on plug thread *. Install plug gasket. Before putting in plug- check the sealing area of the top of the plug hole and if dirty use rag/extension and clean it up or use vacuum. Make rag slightly damp so that it picks up dirt.
Install plug. Make sure you use only the extension and your hand..no wrench. After it tightens by hand. loosen it a couple of turns and redo it (to make sure it stops at the same place. Torque to 10 ft lbs to make sure you are not over torquing. Then torque to 13 ft lbs. note: max size click type wrench is 50 ft. lbs. Make very sure you see the "click"..its very slight with a 50 ft. ob wrench.
Put dielectic on bottom inside of boot and around the top where it engages into the valve cover housing. ** Install coil packs/boots and insure they bottom . Install the connectors by pushing it on coilpack til it clicks. Install the coilpack bolts just snug. Note you may have had to separate 2 of the bolts that double as coilpack cover.
Install cover you're done. Note.: I was very careful to clean everything up really good and was careful to cover the holes so nothing could get in the cylinders.
* Optional. Some recommend no lubricant.
** Also optional. I just do it.

Thread Starter
Intermediate
Joined: Oct 2005
Posts: 30
Likes: 1
Originally Posted by peterjedi
Denso Website saids gap should be 44. Did you get the 47 from the book?

Doesn't Rice His Car
Joined: Jul 2006
Posts: 1,053
Likes: 2
From: Kansas City Area
Hey thanks a lot! It helps me out for sure. I had no idea how to do this. IMO DIYs are always welcomed here whether someone has done it already or not. I've found from the DIY's here that I've read that some will have better pictures/descriptions than others. 
Driver/Detailer
Joined: Oct 2003
Posts: 2,474
Likes: 2
From: Sydney
Originally Posted by adc
Actually I got the number from the Haynes manual for the 2003 to 2005 Accord. They called for .047 to .051 I just checked the gaps on the new Autolites I put in. They were pregapped to around .046 or so. I won't regap a new plug unless its way off. They are gapped at the factory to perform as specified. You always run the risk of damaging the electrode/insulator or the prong. But that's just me. Not saying its the final word.


Photography Nerd
Joined: Sep 2003
Posts: 21,489
Likes: 11
From: Toronto
Bumping this thread because I'm overdue for a plug change...
Does everyone still recommend the OEM iridium plugs? Also, has it been confirmed that they are pre-gapped from the factory and shouldn't be changed?
Thanks!
Does everyone still recommend the OEM iridium plugs? Also, has it been confirmed that they are pre-gapped from the factory and shouldn't be changed?
Thanks!
Drifting
Joined: Oct 2003
Posts: 2,068
Likes: 21
From: SoCal
Yea, Denso or NGK Iridiums have been continually recommended by many members. When I replaced mine, the plug gap was spot on, so I didn't need to adjust it. But I'd still double check the gap just in case.
Drifting
Joined: Oct 2003
Posts: 2,068
Likes: 21
From: SoCal
Although our manual recommends plug replacement at 110K miles, I did mine at 100K. When I inspected the old plugs, the tips still look good with very mild carbon build up, so I guess I could of waited until 110K.
Photography Nerd
Joined: Sep 2003
Posts: 21,489
Likes: 11
From: Toronto
Thanks. I just hope that the plugs haven't seized in the head because I don't think they've ever been removed in the 5+ years I've owned this thing. I've always changed my plugs after a couple years in my previous cars.
Fingers crossed....
Fingers crossed....
Someone stole "My Garage"
Joined: May 2005
Posts: 3,537
Likes: 17
From: Ottawa, Ontario
Dan, and all others: ALWAYS check the gaps on plugs each time you handle them, even if they're fresh out of their packaging. My trustworthy parts counter guy I deal with has seen MANY plugs that look ok and were from boxes that look ok, be way out of spec. He thinks that too often, warehouse workers or transport companies will drop a package, and it doesn't take too much force to put the gap out by even a small amount.
It's quick and free insurance to check and adjust the gap as necessary, each time you handle the plugs.
It's quick and free insurance to check and adjust the gap as necessary, each time you handle the plugs.

Pro
Joined: Jan 2004
Posts: 629
Likes: 7
From: Pomona, CA
Dan, and all others: ALWAYS check the gaps on plugs each time you handle them, even if they're fresh out of their packaging. My trustworthy parts counter guy I deal with has seen MANY plugs that look ok and were from boxes that look ok, be way out of spec. He thinks that too often, warehouse workers or transport companies will drop a package, and it doesn't take too much force to put the gap out by even a small amount.
It's quick and free insurance to check and adjust the gap as necessary, each time you handle the plugs.
It's quick and free insurance to check and adjust the gap as necessary, each time you handle the plugs.
...and the Service manual specifically states to not adjust the electrode gap on iridium tipped plugs. If the gap is out of spec, you're supposed to replace with a new plug.
Someone stole "My Garage"
Joined: May 2005
Posts: 3,537
Likes: 17
From: Ottawa, Ontario
Which is why every NGK and Denso plug I've seen has a sleeve over the threaded end to protect the electrode in the package....
...and the Service manual specifically states to not adjust the electrode gap on iridium tipped plugs. If the gap is out of spec, you're supposed to replace with a new plug.
...and the Service manual specifically states to not adjust the electrode gap on iridium tipped plugs. If the gap is out of spec, you're supposed to replace with a new plug.
Pro
Joined: Jan 2004
Posts: 629
Likes: 7
From: Pomona, CA
Agreed that one should check the gap on any plug being installed.....but I'd be leery of "adjusting" the gap on the iridium plugs as I'd assume there must be some danger of fracturing the electrode if you try and bend it for more/less gap.

Pro
Joined: Apr 2006
Posts: 582
Likes: 19
Make sure engine is cold when changing spark plugs??
This is the first time that I hear this. That if you change plugs when it is warm, it may strip the threads.
But guys, what happens if you take your car to the shop and you wait while they do it? The engine will always be hot.
This is the first time that I hear this. That if you change plugs when it is warm, it may strip the threads.
But guys, what happens if you take your car to the shop and you wait while they do it? The engine will always be hot.
Racer
Joined: Jan 2005
Posts: 356
Likes: 1
Make sure engine is cold when changing spark plugs??
This is the first time that I hear this. That if you change plugs when it is warm, it may strip the threads.
But guys, what happens if you take your car to the shop and you wait while they do it? The engine will always be hot.
This is the first time that I hear this. That if you change plugs when it is warm, it may strip the threads.
But guys, what happens if you take your car to the shop and you wait while they do it? The engine will always be hot.
If you cross-thread, you're next best bet is to tap and re-thread with a helicoil.

1st Gear
Joined: May 2009
Posts: 1
Likes: 0
ADC is right on spark plug change
I would only add that to help getting the old plugs out more easily, blow out any debris that might be in spark plug hole, loosen plugs 1/4 turn only and then put a short burst of aerosol carb/choke cleaner down in the holes where the spark plugs are. Let sit for 5 minutes to dissolve the carbon rings that build up on the bottom of plug that can really make it a nightmare getting the plugs out and cause damage to threads. Changed mine on '05 TSX this afternoon and could tell there was a lot of resistance when beginning to take the plugs out. After doing the above they came right out by hand (via socket and extension) without the wrench attached. This is a technique recommended in some manuals and by two long time mechanics I work with. I have twisted off a spark plug in a car engine before and the first thing that happens is a cold sweat, the rest is no good either. I hope this saves at least one person a lot of headaches.

6th Gear
Joined: May 2009
Posts: 6
Likes: 0
good advice Kevdog...I'll be changing my spark plugs tonight...FYI my parts counter asked for my VIN to determine which spark plugs- NGK, or Denso. They sold me the Denso plugs. I didn't know why exactly it would matter, but I guess it does.
6th Gear
Joined: May 2009
Posts: 6
Likes: 0
Just changed my plugs after 75k. Plugs looked nasty on the ends, but it is probably just normal. Car didn't seem to run much different or anything, but maybe I'll get better gas mileage or something. If not, it is just a good measure anyhow. And I probably saved $200 over the dealer. Took me about an hour, getting out tools, to the end of the test drive. About as cost effective as putting in your own cabin filter (which by the way, my dealer charges 125 FREAKIN DOLLARS FOR!!!)
Anyway, I put some 3M copper anti-sieze on the threads. There has been a bit of discussion on various forums about this, about galvanic corrosion, and all sorts of mess. But between various recommendations and my own conclusions, I decided to use just a dab on the threads for safe measure.
http://solutions.3m.com/wps/portal/3...beGSGRCGLTDBgl
Apparently they did sell me the NGKs. That's fine with me, as that was what I would have bought anyhow. This was a great write up, and this whole site is awesome. I've officially become a shadetree mechanic due to the overwhelming competence displayed throughout this site!
Thread Starter
Intermediate
Joined: Oct 2005
Posts: 30
Likes: 1
Since I don't own an Acura..don't post on here much. Had to come back and read my own writeup bc I plan on changing the son's plugs again shortly. Vehicle now has 105K on it (about 35K on these plugs). I put the AutoLites on so I want to check them sooner. I need to decide on whether to go with the NGK's or not.
Thread Starter
Intermediate
Joined: Oct 2005
Posts: 30
Likes: 1
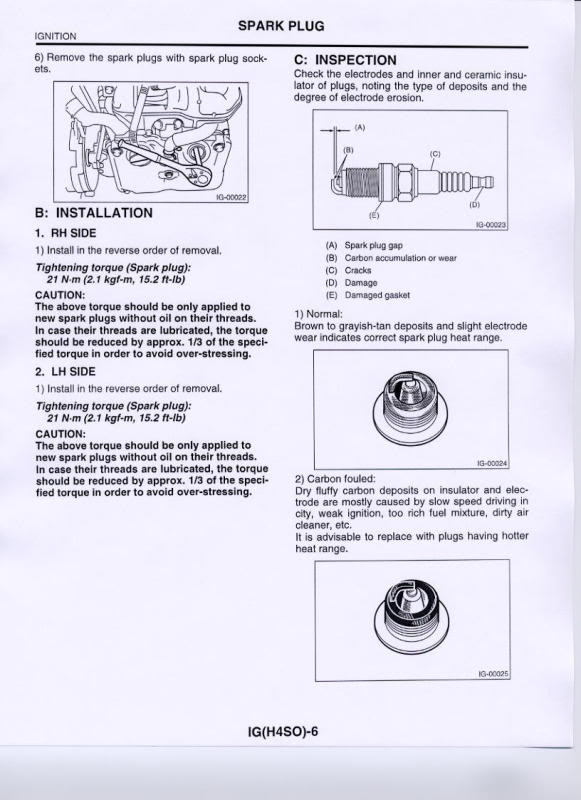
One additional. As per Subaru a reduced torque requirement (1/3 less) should be used if the threads are oiled. Anti-seize is a lubricant so it might be prudent to drop the torque value by a couple of pounds.