
Another curb rash rim repair DIY (56K beware)
 06-13-2009, 12:56 PM
#1
5th Gear
Thread Starter

Join Date: Sep 2005
Age: 45
Posts: 5
Likes: 0
Received 0 Likes
on
0 Posts
Another curb rash rim repair DIY (56K beware)
As a long-time lurker, I figured since I've learned so much from everyone, it was time to give back to the community, so I decided to finally try pcaulfie's curb rash repair. Plus, since I just ordered new Yokohama's, I didn't care about painting/scuffing up the tire, so now was a perfect time. Nothing here is ground-breaking --- all the credit goes to pcaulfie and NASAracer (audiworld) --- but I hit a few snags throughout the process and will try to highlight a few of the pitfalls and give a little more detail in the hope that it will be helpful for someone else.
References:
https://acurazine.com/forums/1g-tsx-problems-fixes-128/fixed-scratched-rim-56k-beware-657772/ (pcaulfie)
http://www.autopia-carcare.com/realwhda.html (NASAracer, Audiworld.com)
https://acurazine.com/forums/1g-tsx-tires-wheels-suspension-130/matching-oem-wheel-paint-673018/ (color matching)
Background:
I had two rims with curb damage: one with severe damage, occurring on two separate occasions: one by me, one by my wife. The second one only had damage in two places, but as you will see, it was fairly deep. I repaired the severe one first, so I'll start there and then describe how I applied my lessons learned for the first while repairing the second.
Here are the supplies I used:
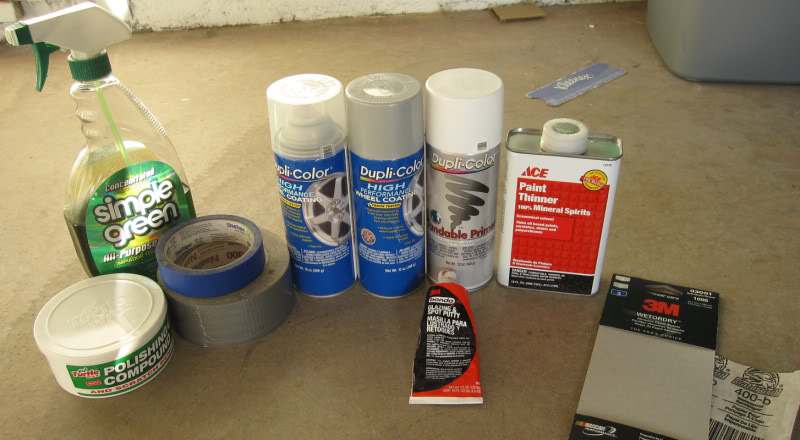
- dupli-color sandable primer (DAP 1689), silver wheel coating (WP101 Silver) and clear coat (HWP103) (Kragen's ~$5 each)
- Bondo glazing and spot putty (Kragen's ~$4)
- WetOrDry 1000 grit (Kragen's ~$3)
- Turtle Wax polishing compound - mild abrasive (Kragen's ~$3)
- Waterproof 400 grit (Ace HW - already had this, but could have easily got 400 at Kragen's)
- Paint thinner (Ace HW)
- Simple Green (anywhere ?)
- paint tape/duct tape
- 3-5 rags
Note: the dupli-color WP101 silver, as many here have noticed, is not an exact match (see color matching link above). However, it is close enough and if used properly, can be blended very well. More details below.
Wheel 1 repair
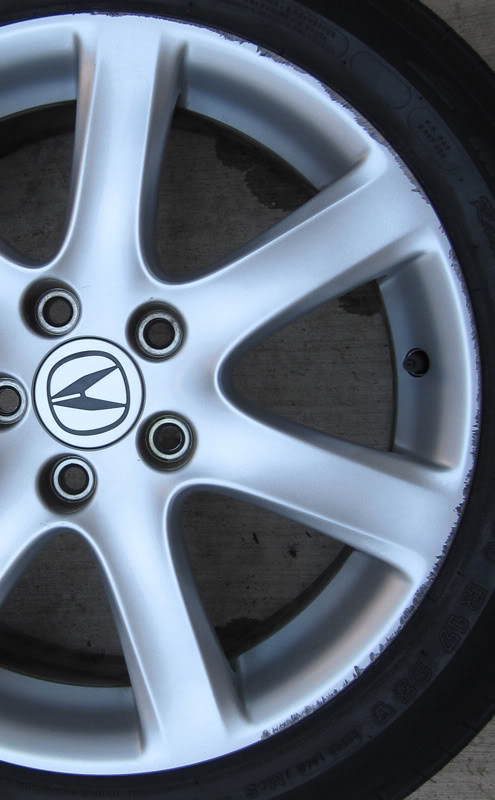
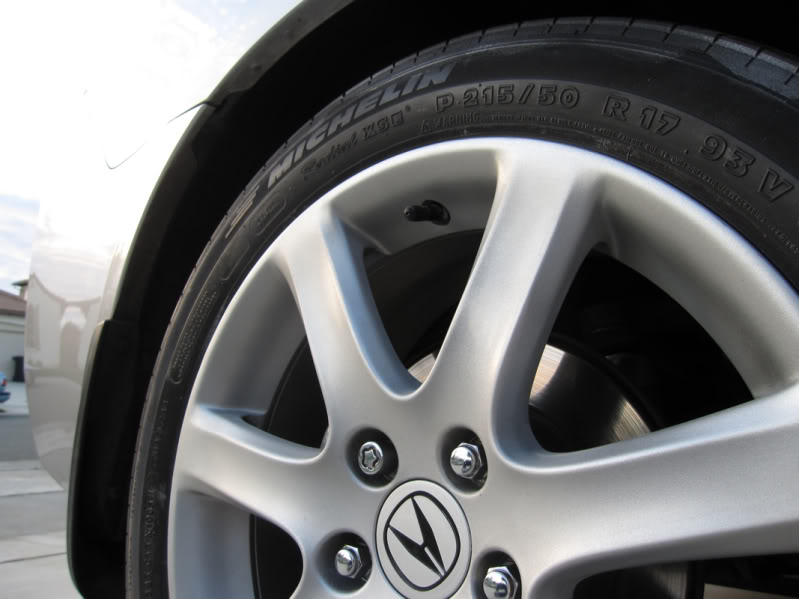
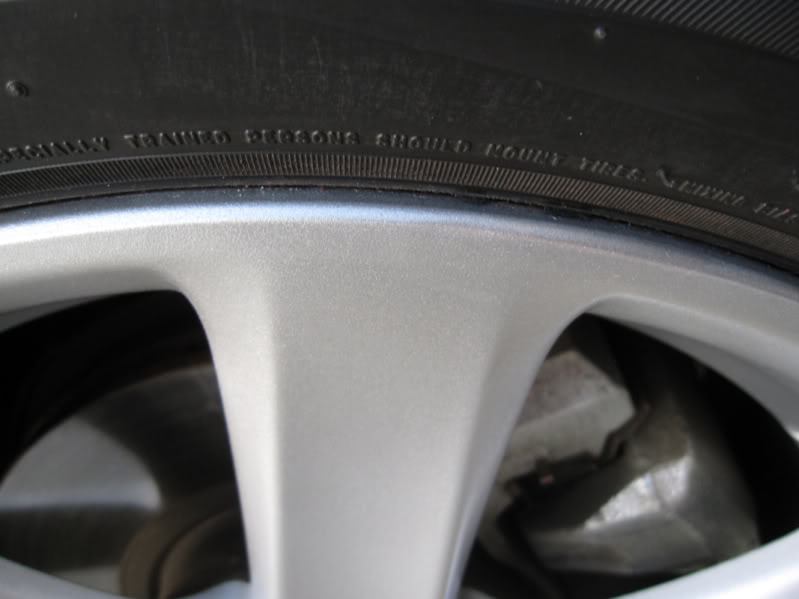
Okay, here is the before picture for wheel 1. As you can see, this damage is just about to half the rim:
1. Clean. It's very important the the rim be free of grease prior to proceeding. I scrubbed the entire rim with the simple green about 10x (or more). For good measure, I then wiped it with some paint thinner and made sure it was dry (especially in the damaged grooves). At this point, the rim was free of grease/dirt. Then, I taped the tire with duct tape and newspaper.
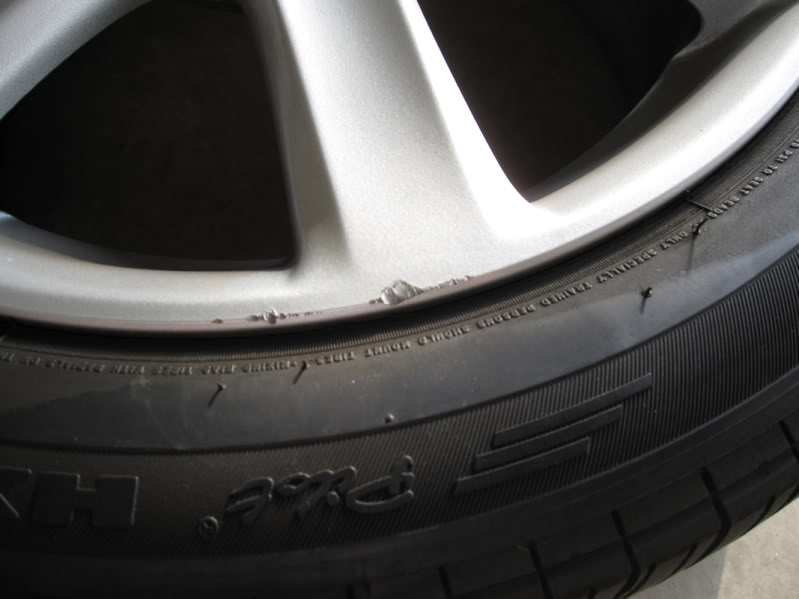
2. Sand and apply bondo. Next, I used the 400 grit sand paper to sand down the damage (and surrounding areas) and applied the bondo:
Then applied the bondo:
You want to apply bondo in thin layers so it will dry. Above is probably a bit heavy, but since it was warm outside (85 degrees F), it dried just fine.
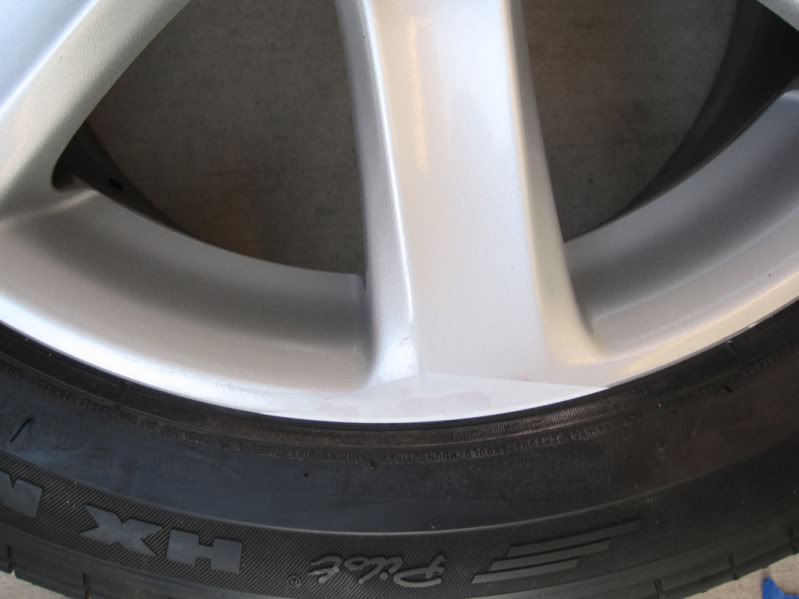
3. More sanding, more bondo. As I mentioned, you want to apply the bondo in somewhat thin layers, so I went through 2-3 rounds of sanding (400 grit) and re-applying the bondo, then sanding again. You'll want to make this as smooth as possible. Any minor bumps will show up later, do not rush this! Below is what it looked like after this process.
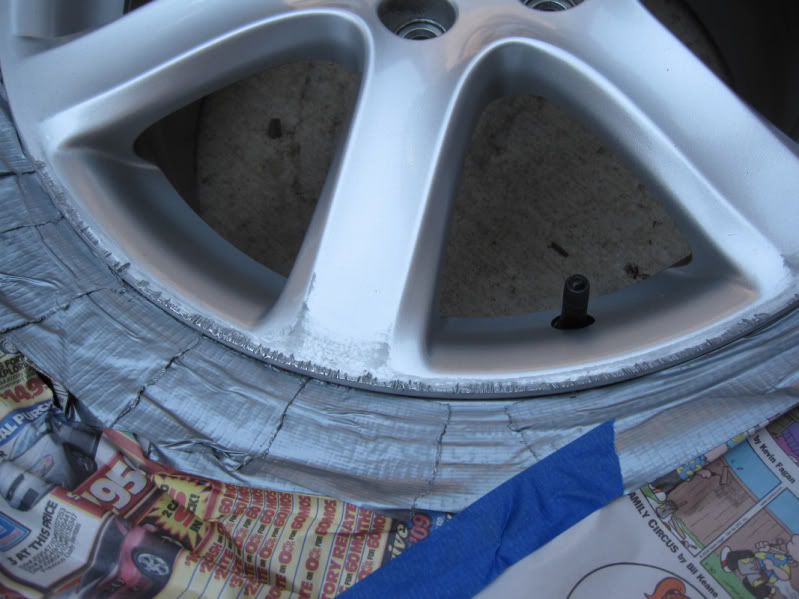
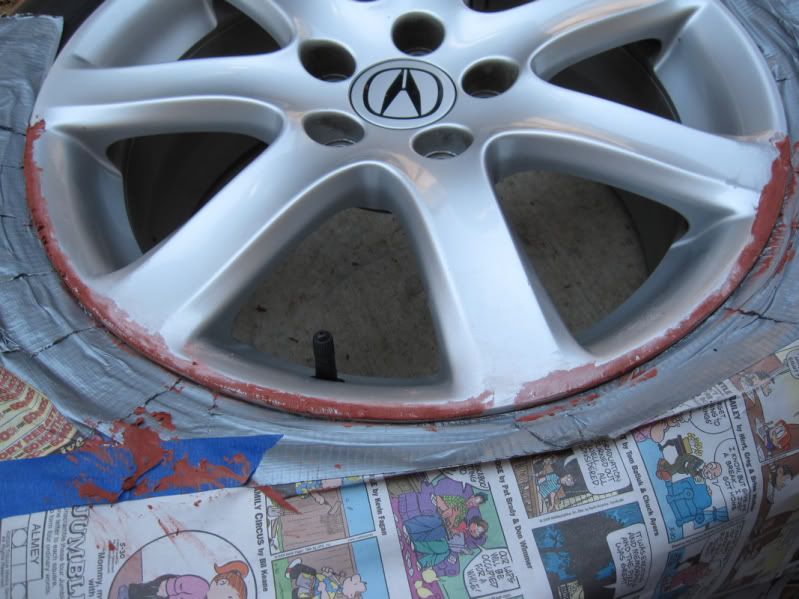
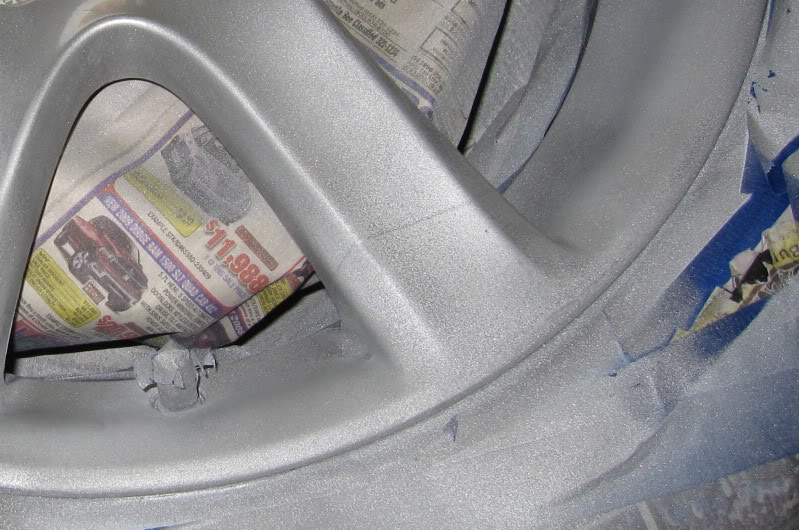
4. Re-tape. Next, I used the paint thinner to wipe any remnants of the bondo/bondo dust (from the sanding) and re-taped to expose only the damaged portion.
In retrospect, I would have exposed much less of the rim. The bondo is probably the only area that absolutely needs the primer. The rest of the factory painted wheel will hold the new dupli-color silver just fine (especially with the sanding that I did).
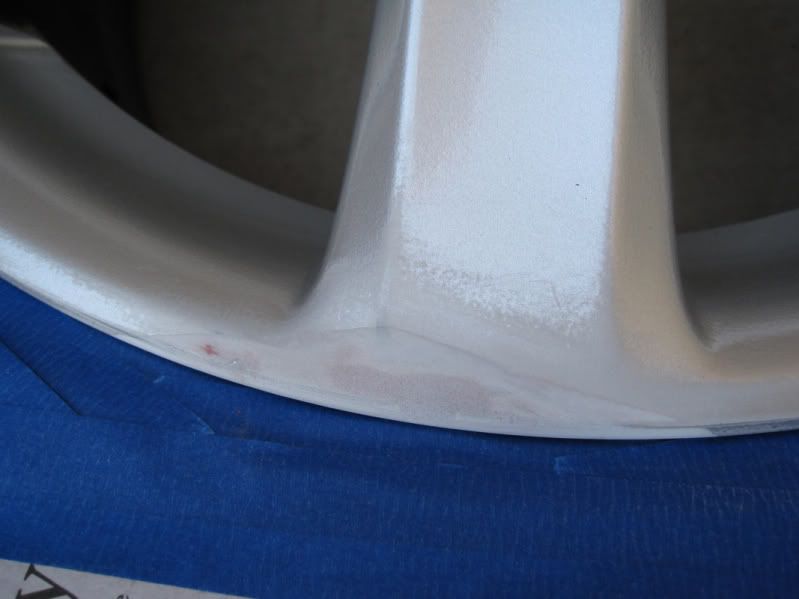
5. Primer. 3-4 *light* coats of the primer (10 minutes in between coats):
6. Sand after primer. After about 30 minutes after the final coat of primer, I sanded the primer with 1000 grit to make it nice and smooth (what I should have done was remove the tape and sanded the lines where the primer ended as well -- see below for more on my mistake).
7. Paint (original version). Originally, I left the tape on in the previous step and went straight to the sliver coat. However, this left a horrible line. My plan was to try to blend this using the Turtle Wax mild abrasive (trying to duplicate pcaulfie's work). However, I was unsuccessful --- pcaulfie seems to have a lot skill in this area --- and could not get rid of the line:
7. Paint (re-do). Since I royally messed up the previous step, I had to remove as much paint as possible using the paint thinner and a towel and some serious rubbing. Once this was done, I did *not* mask off the rest of the wheel, but instead simply sanded (1000 grit) the damaged areas and a little beyond (up the spokes 1-2"). The way I painted this time was to keep the tape off and spray in *very* light coats, spraying in a sweeping motion, releasing the nozzle and pulling up as I sprayed away from the damaged portion of the rim to fade the silver in. For all you barbers out there, this is like what you would do with your clippers as you fade up the side of a head! After doing this, take a rag dipped in paint thinner and wipe the overspray (spray that went beyond the fade) off. I must have sprayed 6-8 very light coats with 10 minutes and light sanding (1000 grit) in between. I cannot stress how important it is to keep the coats light. This is vital to blend in the colors. Also, the directions say that you need 10 minutes in between coats and to apply all the coats within 1 hour and if you don't, wait 7 days to apply additional coats. I simply could not do this. One hour *might* have been enough had I done everything right in the first place, but by the time I fixed my mess up and since I had to apply so many coats, this was not possible. Also, I wasn't waiting 7 days. That seemed excessive and everything turned out fine in the end. I guess only time will tell...
Note: if I hadn't taped so high (step 4) and I had removed the tape earlier (step 6), I could have avoided going so far up the spokes. And probably wouldn't need as many coats as I did.
As you can see, the texture is a little different where I sprayed. The next step cleans that up pretty well.
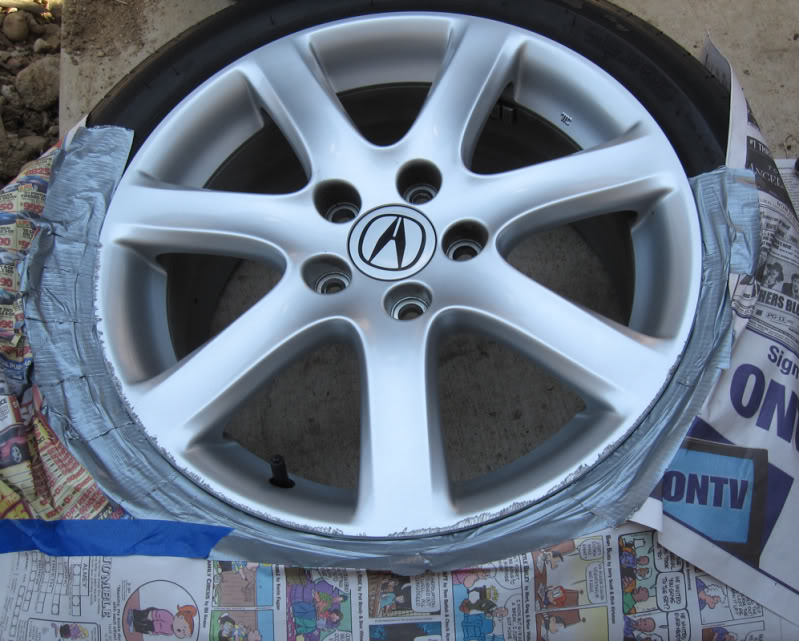
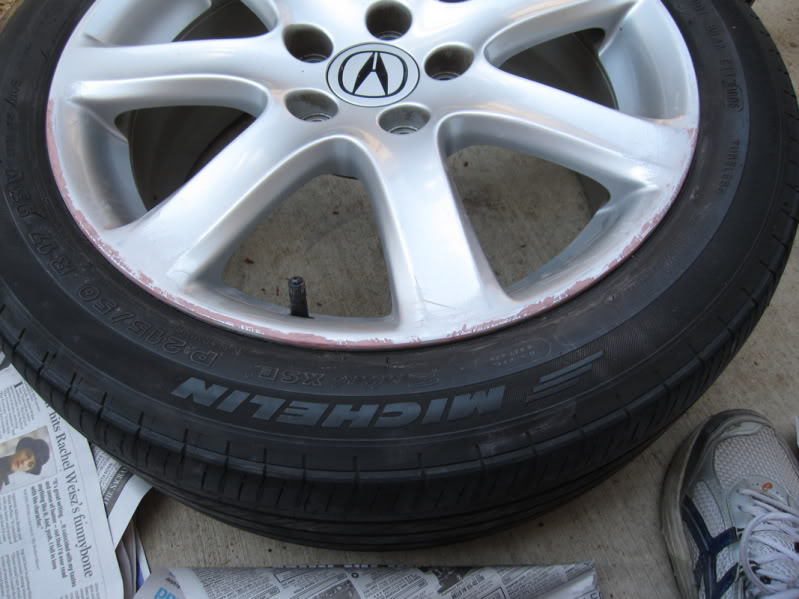
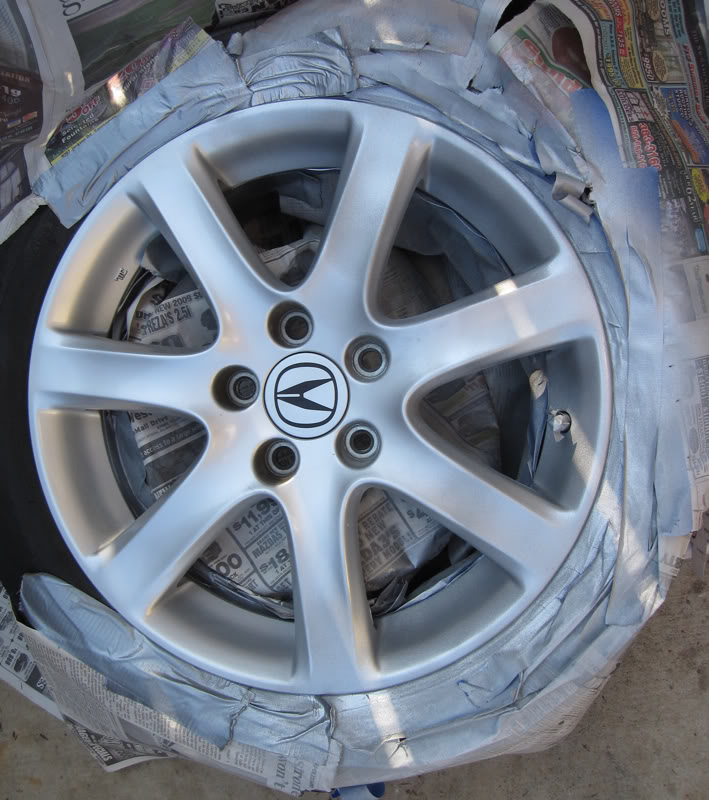
8. Clear coat and polishing. The directions on the clear coat are similar and say that I need to apply within 1 hour of the last color coat. Again, not possible for me. By the time I got to it, it was dark and I wanted to see what how the color coat came out in the daylight, so I let it sit overnight and picked it back up in the morning. I first *lightly* sanded (1000 grit) and then cleaned off the rim with a rag with paint thinner. Then I applied very light coats of the clear coat -- again, trying to fade it away from the damaged part and into the factory painted/clear coated portion. I gave the clear coat a couple of hours and then used the polishing compound to polish the entire rim to give it a uniform look.
Yeah, I know, somewhere in my fixing of the paint job I got lazy on taping the tire, but like I said, these will have brand new Yok's shortly, so no biggie.
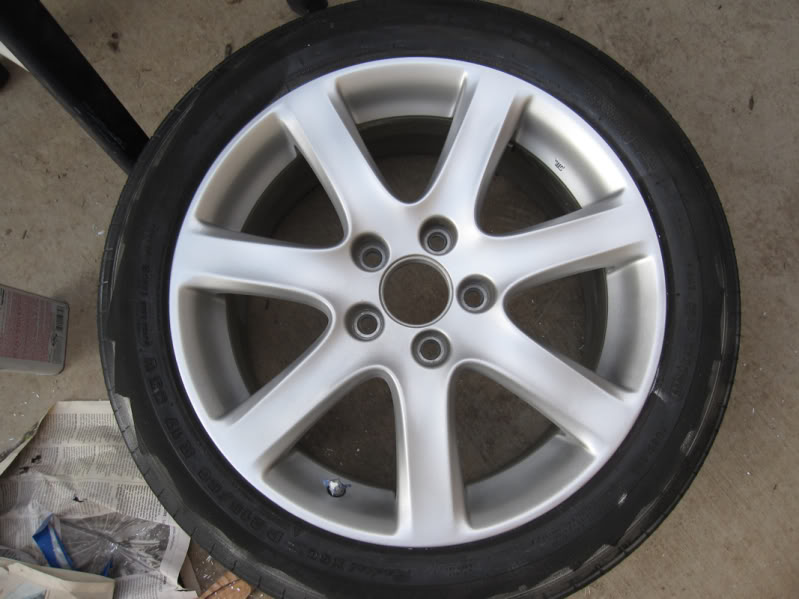
Another angle:
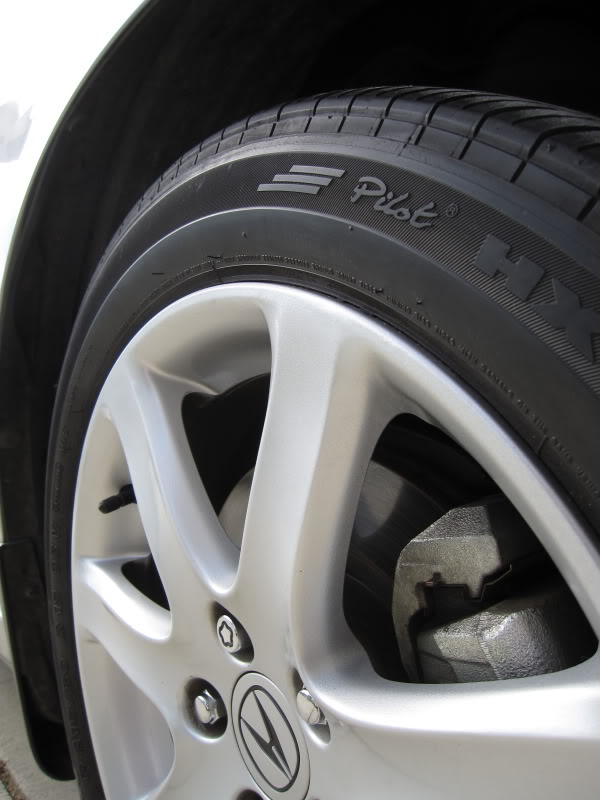
Back on the TSX:
On to the second rim. The second rim only had damage in one place:
Steps 1 - 3 were the same as for wheel 1: clean, sand, bondo, sand etc.
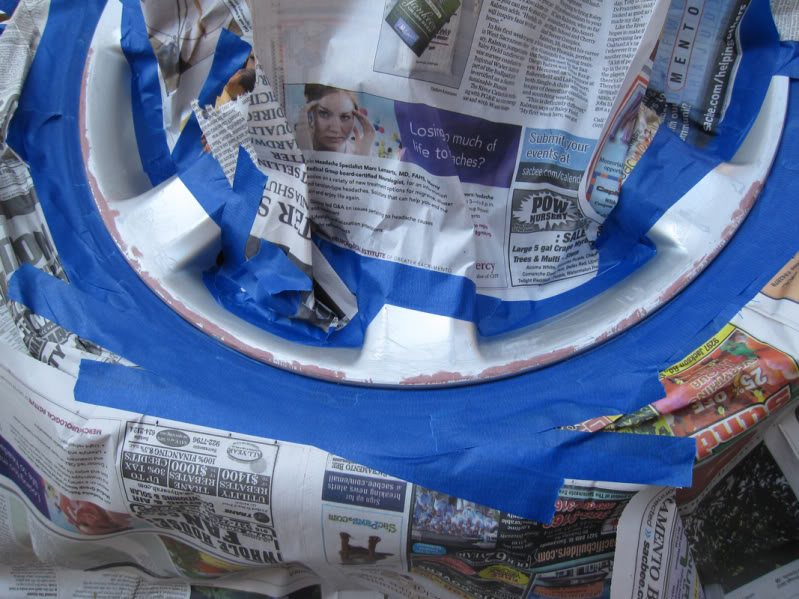
4., 5. This time, I taped and primed a much smaller spot:
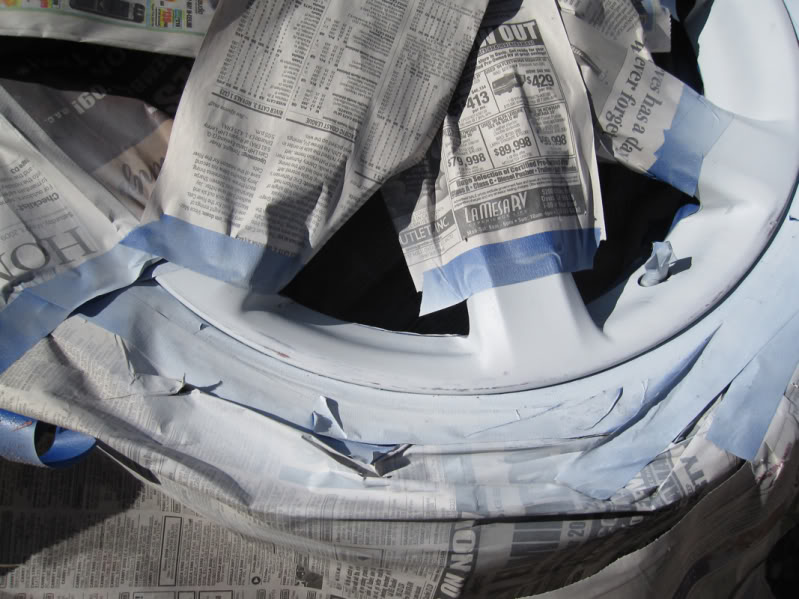
6. I now sanded the area (esp. where the tape was to blend the line) and masked off the tires:
7. Paint. After learning my lesson on wheel one, I left the tape off and faded the paint away from the problem area, one light coat at a time, wiping off the over-spray with a rag and paint thinner. Here's how it came out after about 4-5 *light* coats:

8. Clear coat and polishing.
Now on the TSX:
And that's it!
Thanks to pcaulfie, NASAracer for the great write-ups and everyone else who provided tips. Hopefully that fills in some of the questions/concerns some of you have for this repair. Let me know if there are any questions.
References:
https://acurazine.com/forums/1g-tsx-problems-fixes-128/fixed-scratched-rim-56k-beware-657772/ (pcaulfie)
http://www.autopia-carcare.com/realwhda.html (NASAracer, Audiworld.com)
https://acurazine.com/forums/1g-tsx-tires-wheels-suspension-130/matching-oem-wheel-paint-673018/ (color matching)
Background:
I had two rims with curb damage: one with severe damage, occurring on two separate occasions: one by me, one by my wife. The second one only had damage in two places, but as you will see, it was fairly deep. I repaired the severe one first, so I'll start there and then describe how I applied my lessons learned for the first while repairing the second.
Here are the supplies I used:
- dupli-color sandable primer (DAP 1689), silver wheel coating (WP101 Silver) and clear coat (HWP103) (Kragen's ~$5 each)
- Bondo glazing and spot putty (Kragen's ~$4)
- WetOrDry 1000 grit (Kragen's ~$3)
- Turtle Wax polishing compound - mild abrasive (Kragen's ~$3)
- Waterproof 400 grit (Ace HW - already had this, but could have easily got 400 at Kragen's)
- Paint thinner (Ace HW)
- Simple Green (anywhere ?)
- paint tape/duct tape
- 3-5 rags
Note: the dupli-color WP101 silver, as many here have noticed, is not an exact match (see color matching link above). However, it is close enough and if used properly, can be blended very well. More details below.
Wheel 1 repair
Okay, here is the before picture for wheel 1. As you can see, this damage is just about to half the rim:
1. Clean. It's very important the the rim be free of grease prior to proceeding. I scrubbed the entire rim with the simple green about 10x (or more). For good measure, I then wiped it with some paint thinner and made sure it was dry (especially in the damaged grooves). At this point, the rim was free of grease/dirt. Then, I taped the tire with duct tape and newspaper.
2. Sand and apply bondo. Next, I used the 400 grit sand paper to sand down the damage (and surrounding areas) and applied the bondo:
Then applied the bondo:
You want to apply bondo in thin layers so it will dry. Above is probably a bit heavy, but since it was warm outside (85 degrees F), it dried just fine.
3. More sanding, more bondo. As I mentioned, you want to apply the bondo in somewhat thin layers, so I went through 2-3 rounds of sanding (400 grit) and re-applying the bondo, then sanding again. You'll want to make this as smooth as possible. Any minor bumps will show up later, do not rush this! Below is what it looked like after this process.
4. Re-tape. Next, I used the paint thinner to wipe any remnants of the bondo/bondo dust (from the sanding) and re-taped to expose only the damaged portion.
In retrospect, I would have exposed much less of the rim. The bondo is probably the only area that absolutely needs the primer. The rest of the factory painted wheel will hold the new dupli-color silver just fine (especially with the sanding that I did).
5. Primer. 3-4 *light* coats of the primer (10 minutes in between coats):
6. Sand after primer. After about 30 minutes after the final coat of primer, I sanded the primer with 1000 grit to make it nice and smooth (what I should have done was remove the tape and sanded the lines where the primer ended as well -- see below for more on my mistake).
7. Paint (original version). Originally, I left the tape on in the previous step and went straight to the sliver coat. However, this left a horrible line. My plan was to try to blend this using the Turtle Wax mild abrasive (trying to duplicate pcaulfie's work). However, I was unsuccessful --- pcaulfie seems to have a lot skill in this area --- and could not get rid of the line:
7. Paint (re-do). Since I royally messed up the previous step, I had to remove as much paint as possible using the paint thinner and a towel and some serious rubbing. Once this was done, I did *not* mask off the rest of the wheel, but instead simply sanded (1000 grit) the damaged areas and a little beyond (up the spokes 1-2"). The way I painted this time was to keep the tape off and spray in *very* light coats, spraying in a sweeping motion, releasing the nozzle and pulling up as I sprayed away from the damaged portion of the rim to fade the silver in. For all you barbers out there, this is like what you would do with your clippers as you fade up the side of a head! After doing this, take a rag dipped in paint thinner and wipe the overspray (spray that went beyond the fade) off. I must have sprayed 6-8 very light coats with 10 minutes and light sanding (1000 grit) in between. I cannot stress how important it is to keep the coats light. This is vital to blend in the colors. Also, the directions say that you need 10 minutes in between coats and to apply all the coats within 1 hour and if you don't, wait 7 days to apply additional coats. I simply could not do this. One hour *might* have been enough had I done everything right in the first place, but by the time I fixed my mess up and since I had to apply so many coats, this was not possible. Also, I wasn't waiting 7 days. That seemed excessive and everything turned out fine in the end. I guess only time will tell...
Note: if I hadn't taped so high (step 4) and I had removed the tape earlier (step 6), I could have avoided going so far up the spokes. And probably wouldn't need as many coats as I did.
As you can see, the texture is a little different where I sprayed. The next step cleans that up pretty well.
8. Clear coat and polishing. The directions on the clear coat are similar and say that I need to apply within 1 hour of the last color coat. Again, not possible for me. By the time I got to it, it was dark and I wanted to see what how the color coat came out in the daylight, so I let it sit overnight and picked it back up in the morning. I first *lightly* sanded (1000 grit) and then cleaned off the rim with a rag with paint thinner. Then I applied very light coats of the clear coat -- again, trying to fade it away from the damaged part and into the factory painted/clear coated portion. I gave the clear coat a couple of hours and then used the polishing compound to polish the entire rim to give it a uniform look.
Yeah, I know, somewhere in my fixing of the paint job I got lazy on taping the tire, but like I said, these will have brand new Yok's shortly, so no biggie.
Another angle:
Back on the TSX:
On to the second rim. The second rim only had damage in one place:
Steps 1 - 3 were the same as for wheel 1: clean, sand, bondo, sand etc.
4., 5. This time, I taped and primed a much smaller spot:
6. I now sanded the area (esp. where the tape was to blend the line) and masked off the tires:
7. Paint. After learning my lesson on wheel one, I left the tape off and faded the paint away from the problem area, one light coat at a time, wiping off the over-spray with a rag and paint thinner. Here's how it came out after about 4-5 *light* coats:
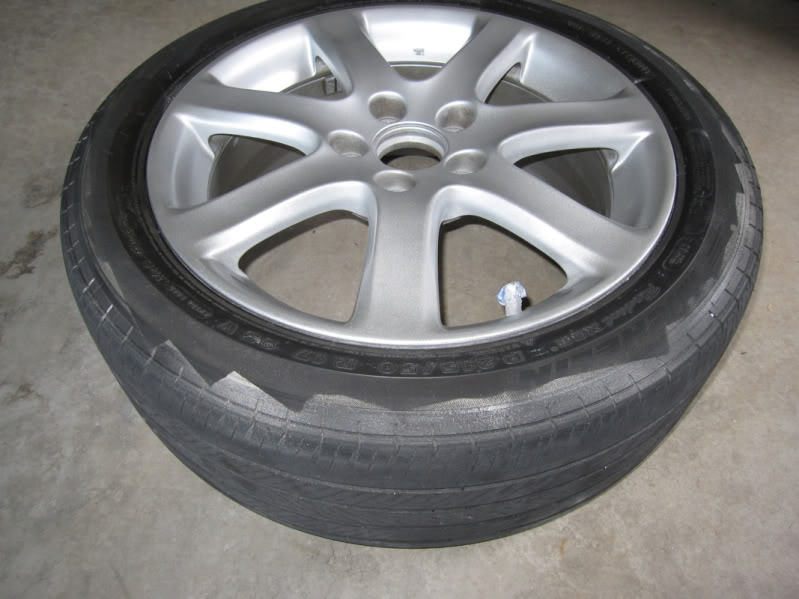
8. Clear coat and polishing.
Now on the TSX:
And that's it!
Thanks to pcaulfie, NASAracer for the great write-ups and everyone else who provided tips. Hopefully that fills in some of the questions/concerns some of you have for this repair. Let me know if there are any questions.
 06-13-2009, 02:53 PM
#2

That looks fantastic. You cant tell it ever had damage. Did you spray the whole wheel with that silver paint? If not, the new silver paint just blends in like that with the old silver paint so that it is seemless and not noticeable?
06-13-2009, 03:22 PM
#3
5th Gear
Thread Starter
Join Date: Sep 2005
Age: 45
Posts: 5
Likes: 0
Received 0 Likes
on
0 Posts
Thanks, Miamicarfan. No, I only sprayed the damaged part and immediate surrounding areas with a fading/feathering motion. If you spray light enough (and you don't mask off the area -- I did this for part II of the first wheel and for the second wheel), you can blend it. Sanding with the 1000 grit, cleaning it, applying the clear coat then using the polishing compound finishes the job.
 06-13-2009, 09:42 PM
#5
Someone stole "My Garage"
Very thorough write-up, and thanks for sharing your "lessons learned", or errors as they were. Very helpful to anyone including myself for not only wheel refinishing, but any spraycan painting in general!


Trending Topics
06-14-2009, 12:30 AM
#8
5th Gear
Thread Starter
Join Date: Sep 2005
Age: 45
Posts: 5
Likes: 0
Received 0 Likes
on
0 Posts
Since I messed up the first wheel, it took about 4 hours of one day, then about 2 the next day (a lot of that removing with sanding and paint thinner). Knowing what I know now, if I had to do it again, it would probably take about 3 hours total for the really bad one. Perhaps 2 hours total for the wheel with only minor damage.
06-26-2009, 09:47 PM
#9

Looks great. I did the same thing on my rim, leaving the tape on when painting, and got the same result. I had to go back and redo. It's not perfect, but it looks alot better than it did before. Plus I think I'm more critical because I know it's there; the casual observer would never know. I wish I could start fresh knowing what I now know. But yours looks great.
 06-30-2009, 03:19 PM
#11
5th Gear
Thread Starter
Join Date: Sep 2005
Age: 45
Posts: 5
Likes: 0
Received 0 Likes
on
0 Posts
Looks great. I did the same thing on my rim, leaving the tape on when painting, and got the same result. I had to go back and redo. It's not perfect, but it looks alot better than it did before. Plus I think I'm more critical because I know it's there; the casual observer would never know. I wish I could start fresh knowing what I now know. But yours looks great.


 07-03-2009, 06:39 PM
#15
5th Gear
Thread Starter
Join Date: Sep 2005
Age: 45
Posts: 5
Likes: 0
Received 0 Likes
on
0 Posts
09-19-2009, 12:26 AM
#17
Instructor
Join Date: Mar 2005
Location: Indianapolis
Age: 50
Posts: 168
Likes: 0
Received 0 Likes
on
0 Posts
I bought a used TL and the previous owner was kind enough to pre-curb a couple of the wheels for my convenience. Very considerate of them, but it has been bothering me quite a bit. I've called a couple places here and they all want around $150.00 to do what you described. I thought that seemed excessive considering the cost of new or even used wheels with no curb rash.
This gives me hope that there is a cure for my problem.
This gives me hope that there is a cure for my problem.


The following users liked this post:
miner (04-09-2013)
 04-09-2013, 05:01 AM
#31
10th Gear

Join Date: Mar 2013
Location: Tracy, CA 95376
Posts: 11
Likes: 0
Received 0 Likes
on
0 Posts
Awesome write up will definitely be trying this soon have been looking for this kind of write up for a while now and finally found it. It's people like you that make forums like this very useful for noobs like me thanx yoshpup.
08-09-2014, 03:44 AM
#32
2nd Gear

Join Date: Aug 2014
Location: Houston, Tx
Posts: 2
Likes: 0
Received 0 Likes
on
0 Posts
Thanks My precious wheel looks like new again! Havn't had the tire removed yet, hopefully the bondo holds. My only problem was matching color, I hope this can help someone - I have a silver 2014 RDX with double spoke style wheels. After 6 cans of silvers and lots of sanding, I finally got nice results with Dupli-Color. The can reads BCC0410 Bright Silver Met (PS2) Replaces DSCC410/T363 for Chryslers
My precious wheel looks like new again! Havn't had the tire removed yet, hopefully the bondo holds. My only problem was matching color, I hope this can help someone - I have a silver 2014 RDX with double spoke style wheels. After 6 cans of silvers and lots of sanding, I finally got nice results with Dupli-Color. The can reads BCC0410 Bright Silver Met (PS2) Replaces DSCC410/T363 for Chryslers
04-07-2016, 09:09 PM
#33

just wanted to know
To those of you who did this DIY, did the bondo hold up when the tire was removed? Also, what grit did you sand paper grit did you use on the parts that you sprayed(blended) but didn't bondo? So I want to probably paint my entire wheel so what grit should I sand the wheel down to so the paint will adhere? Thx for the info.


Thread
Thread Starter
Forum
Replies
Last Post
calrow
Car Parts for Sale
11
05-03-2017 10:21 PM
lanechanger
Member Cars for Sale
4
10-13-2015 10:56 AM