Installed: Cleared 2006 Headlights
 02-24-2007, 05:33 PM
#1
Instructor
Thread Starter
Join Date: Jun 2006
Age: 41
Posts: 102
Likes: 0
Received 0 Likes
on
0 Posts
After reading about these, I figured I would give it a shot, just removing the sidemarker diffusers.
Needless to say after looking at it after I got everything done, I am pretty impressed. Just waiting on my hyperwhite bulbs to come in now, and it will look even better. I like how the 06 lights have the chrome in there already, it looks better than ones I saw around that had been done without the chrome.
And while it isn't truly JDM authentic, it gives it a good look without spending 600+.
Tell me what you think.
 02-24-2007, 05:37 PM
#2
Not Driving, Just Posting
Join Date: Aug 2006
Location: Middleburg, FL
Age: 42
Posts: 792
Likes: 0
Received 0 Likes
on
0 Posts
they look good, but I think replacing the amber reflector with clear one would have looked pretty good too
and roxxor where are you located at??
and roxxor where are you located at??
02-24-2007, 05:47 PM
#3
in HKDM land!
Join Date: Jan 2006
Location: daaaa hyphY movement
Age: 38
Posts: 343
Likes: 0
Received 0 Likes
on
0 Posts
looks ehhhh. personally like da amber or if yu really want that clear look, go wid smoked corners. right now, it reminds me of altezzas.
A+ on the DIY tho.
A+ on the DIY tho.

Trending Topics
 I rather spend money to buy the JDM headlights, or not do it at all. Looks too ghetto, and the chrome just makes the car look cheap, like those ricer Civic taillights. Maybe tinting it will be better
02-25-2007, 01:50 AM
I rather spend money to buy the JDM headlights, or not do it at all. Looks too ghetto, and the chrome just makes the car look cheap, like those ricer Civic taillights. Maybe tinting it will be better
02-25-2007, 01:50 AM
#11
Instructor
Thread Starter
Join Date: Jun 2006
Age: 41
Posts: 102
Likes: 0
Received 0 Likes
on
0 Posts
I thought about the smoked, but I'm waiting to see what the new 168 bulbs look like.
I thought about getting rid of the amber turn signal as well, but decided to keep it so it wouldn't be totally chromed out, adds a little touch to it...
I thought about getting rid of the amber turn signal as well, but decided to keep it so it wouldn't be totally chromed out, adds a little touch to it...
 02-25-2007, 09:40 AM
#13
Senior Moderator
I for one think you did the right think by keeping the amber turn signal diffusers. Otherwise, you've introduced a huge air gap into the front of the housing, potentially allowing in moisture. It also prevents the bulb from being 'naked' in there which looks bad imo.
Nice diy!
Nice diy!
02-25-2007, 10:48 AM
#14
Team Owner
Join Date: Feb 2006
Location: District of Corruption
Age: 36
Posts: 23,588
Received 105 Likes
on
69 Posts
Originally Posted by fadinglionhart
i think it might look good with this:
blue film on the headlights.
not sure if it'll burn the film though.
blue film on the headlights.
not sure if it'll burn the film though.
That looks great.
 02-25-2007, 12:34 PM
#16
Instructor
Thread Starter
Join Date: Jun 2006
Age: 41
Posts: 102
Likes: 0
Received 0 Likes
on
0 Posts
It really isn't that hard to do by yourself, I think this was the easiest thing I've done outside of changing out my bulbs.
** I take no responsibility for anything that happens while attempting this. These are the steps I used and they worked. Perform this at your own risk**
- 1. Remove bumper. Details for the bumper can be found here:
http://www.handa-accessories.com/tsx/08V31.pdf
- 2. To remove the headlights, remove the two top bolts, the one side bolt, and one bolt underneath(the bottom one is the b**** to get to unless you have an extender in your socket set)
- 3. Remove the ballast, and all bulbs/rubber seals from the assembly. I didn't mess with taking out the metal clamps that hold the bulbs in place as they won't get messed up, just make sure the rubber seals and all parts of the low beam/hid and the high beam are removed.
- 4. Preheat your oven to 200F. Get an oven sheet, preferably a solid one, not a rack, and place a small towel just big enough for the sheet in the center.
- 5. Depending on oven size you may have to mess with this to get it to fit right, but: Place headlight on the sheet and put in the oven for about 20-22 minutes.
- 6. When time is up, quickly remove the headlight and put it on a solid surface to work on that won't get messed up by the heat. Using a flat head screwdriver/your fingers, pull up on all the retaining tabs so as not to break them. Then using the flat head screwdriver, begin to pry the headlight apart starting at the pointy end. The sealant should be warm enough that it will begin to pull apart, you will just have to deal with gooey sealant on your hands. FYI: I did not completely separate the two halves, if you are only removing the side reflector then you can get to the screws without taking it completely apart
- 7. Once you have it split enough, you will see the two screws that hold the side reflector and chrome housing in place. Remove the screws, and remove the chrome housing. Then slide the amber reflector out and over the tab that holds it in place in the corner of the light. Replace the chrome housing, and screw it back in place. Make sure you get the end of it over the tab in the corner of the assembly, or it will not stay in place.
- 8. Immediately begin to press the assembly back together, and start to push the retaining tabs back over the posts in order to hold the headlight together. Put the headlight back in the oven at 200F for about 8-10 minutes.
- 9. When time is up, take the headlight out and using a spring clamp set, find various points around the headlight to clamp together and put them on. I left these on for varying amounts of time since I was doing other things, but 10-15 minutes should be enough.
- 10. After the headlight assembly has sufficiently cooled down, reinstall all bulbs/rubber seals/ballast.
- 11. Reinstall headlight, then when done with both, reinstall bumper.
Done. Some other things to remember:
- Common sense, but remember not to touch any of the bulbs at any time. Grease/oil may collect on the light causing it to malfunction later on.
- If possible, the time you need to work the fastest it once you split open the assembly. The faster you work, the warmer the sealant will still be when you go to push the assembly back together. I know my first one was a little slow, but the second one I was able to knock out a lot quicker since I knew where it was the second time.
- Overall total time took me about 2-2 1/2 hours including bumper removal/reassembly.
- For those who might be paranoid like I was about putting a towel in the oven, it really didn't do anything. Of course I sat there the entire time watching to make sure nothing caught on fire, which I recommend unless you feel comfortable leaving a towel in a 200F oven without supervision...
02-25-2007, 12:40 PM
#17
Instructor
Thread Starter
Join Date: Jun 2006
Age: 41
Posts: 102
Likes: 0
Received 0 Likes
on
0 Posts
DIY Instructions
It really isn't that hard to do by yourself, I think this was the easiest thing I've done outside of changing out my bulbs.
** I take no responsibility for anything that happens while attempting this. These are the steps I used and they worked. Perform this at your own risk**
Tools I used:
- Flathead screwdriver(for bumper clips/prying apart the assembly)
- Fat Phillips head screwdriver(For removing the HID ballast and part of the internal assembly for the HID, and the amber reflectors)
- Oven sheet/Small towel
- 10mm Socket with extension(for the bumper bolts)
- 6 pc spring clamp set(Sears sells these for sure, other place do as well)
- Slotted Oven rack(Used to work on headlight outside of the oven. NOTE: DO NOT use this to put the headlight in the oven as you risk the towel falling through and catching on fire)
- 1. Remove bumper. Details for the bumper can be found here:
http://www.handa-accessories.com/tsx/08V31.pdf
- 2. To remove the headlights, remove the two top bolts, the one side bolt, and one bolt underneath(the bottom one is the b**** to get to unless you have an extender in your socket set)
- 3. Remove the ballast, and all bulbs/rubber seals from the assembly. I didn't mess with taking out the metal clamps that hold the bulbs in place as they won't get messed up, just make sure the rubber seals and all parts of the low beam/hid and the high beam are removed.
- 4. Preheat your oven to 200F. Get an oven sheet, preferably a solid one, not a rack, and place a small towel just big enough for the sheet in the center.
- 5. Depending on oven size you may have to mess with this to get it to fit right, but: Place headlight on the sheet and put in the oven for about 20-22 minutes.
- 6. When time is up, quickly remove the headlight and put it on a solid surface to work on that won't get messed up by the heat. Using a flat head screwdriver/your fingers, pull up on all the retaining tabs so as not to break them. Then using the flat head screwdriver, begin to pry the headlight apart starting at the pointy end. The sealant should be warm enough that it will begin to pull apart, you will just have to deal with gooey sealant on your hands. FYI: I did not completely separate the two halves, if you are only removing the side reflector then you can get to the screws without taking it completely apart
- 7. Once you have it split enough, you will see the two screws that hold the side reflector and chrome housing in place. Remove the screws, and remove the chrome housing. Then slide the amber reflector out and over the tab that holds it in place in the corner of the light. Replace the chrome housing, and screw it back in place. Make sure you get the end of it over the tab in the corner of the assembly, or it will not stay in place.
- 8. Immediately begin to press the assembly back together, and start to push the retaining tabs back over the posts in order to hold the headlight together. Put the headlight back in the oven at 200F for about 8-10 minutes.
- 9. When time is up, take the headlight out and using a spring clamp set, find various points around the headlight to clamp together and put them on. I left these on for varying amounts of time since I was doing other things, but 10-15 minutes should be enough.
- 10. After the headlight assembly has sufficiently cooled down, reinstall all bulbs/rubber seals/ballast.
- 11. Reinstall headlight, then when done with both, reinstall bumper.
Done. Some other things to remember:
- Common sense, but remember not to touch any of the bulbs at any time. Grease/oil may collect on the light causing it to malfunction later on.
- If possible, the time you need to work the fastest it once you split open the assembly. The faster you work, the warmer the sealant will still be when you go to push the assembly back together. I know my first one was a little slow, but the second one I was able to knock out a lot quicker since I knew where it was the second time.
- Overall total time took me about 2-2 1/2 hours including bumper removal/reassembly.
- For those who might be paranoid like I was about putting a towel in the oven, it really didn't do anything. Of course I sat there the entire time watching to make sure nothing caught on fire, which I recommend unless you feel comfortable leaving a towel in a 200F oven without supervision...
02-27-2007, 06:54 AM
#18
Senior Moderator
Nice write-up. Looking forward to seeing your lights in person. Like someone else mentioned earlier, it may look good with the light blue RB tint. Not to mention the protection of 17mil plastic. You will see them on my ride.
02-27-2007, 08:47 PM
#19
Instructor
Thread Starter
Join Date: Jun 2006
Age: 41
Posts: 102
Likes: 0
Received 0 Likes
on
0 Posts
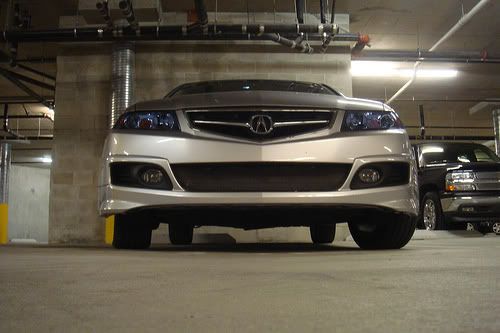
Got the new bulbs in today, here are the pics. Sidemarkers at night pics didn't come out as well as I wanted, I'll get some better ones another time. Also, got my new H11 MTEC fog bulbs as well.
And the spots you see are water spots, damn neighbors with their sprinkers that backspray onto anything in the driveway


And the spots you see are water spots, damn neighbors with their sprinkers that backspray onto anything in the driveway
02-27-2007, 10:07 PM
#20
Senior Moderator
Just a heads up about those MTEC bulbs... I had a pair too (in yellow, 3000k) and this is what 1 looked like after about 10 minutes:


Kaput. Dead. Crapola. Maybe I just got a bad set, but it could say something about their quality.
Kaput. Dead. Crapola. Maybe I just got a bad set, but it could say something about their quality.

 02-28-2007, 10:39 AM
#24
mmmmmm....
Originally Posted by roxxor
I thought about the smoked, but I'm waiting to see what the new 168 bulbs look like.
I thought about getting rid of the amber turn signal as well, but decided to keep it so it wouldn't be totally chromed out, adds a little touch to it...
I thought about getting rid of the amber turn signal as well, but decided to keep it so it wouldn't be totally chromed out, adds a little touch to it...
09-09-2009, 05:29 PM
#29
Instructor
The car looks really nice. Saves money by DIY. Anyone know where I can get the real JDM cleared headlights and not the knockoffs? I spent at least an hour looking for them. I dunno, maybe I'm just special and didn't see it.

Thread
Thread Starter
Forum
Replies
Last Post
rp_guy
Member Cars for Sale
9
07-16-2017 07:33 AM