Finally rewired the fogs!

 10-03-2007, 12:35 AM
#124
Originally Posted by clee109
well once it's fixed are you going to try again?
hekkk no.. i regret the whole thing.. and as a lesson.. i'm actually going to quit reading this forum.. once i receive my bushings from vilmar.. and get those installed..
i'm going to throw in the towel..
i've decided my next mod will be a supercharger... this way i can get my mind off working on this NEW already nice car. and back on school and saving up some money... i think i've lost a lot of myself in this car. granted it was well worth it.. but this was a bigger wake up call than my wreck on jul 09 07.. [1 yr anniversary].... lol. sorry to stray off topic. but this helps point out how majorly you can mess up with this mod.. [[[just be sure to unplug the negative.]] also dont bother testing the relay. just make sure u have the right wires.] GL to anyone who attempts this mod.
10-03-2007, 12:51 AM
#125
I can't find my garage
Thread Starter
Join Date: Mar 2006
Location: SoCal
Age: 35
Posts: 4,688
Likes: 0
Received 0 Likes
on
0 Posts
Originally Posted by vthree
ya.. i'm gonna have my dad bring in the car so i can get a rental.. sucks i have to buy ANOTHER fuse box. again.
10-03-2007, 06:35 AM
#126
Three Wheelin'
Join Date: Feb 2007
Location: Rockville, MD
Age: 39
Posts: 1,554
Likes: 0
Received 0 Likes
on
0 Posts
^^yeah I am usually pretty worried about things like that happening to me when I try to follow a DIY, but I am pretty confident since I have most of my questions answered before I am going to attempt this.
10-03-2007, 11:23 AM
#128
I Quit
today I'll be completing this mod with the DIY I posted earlier. I'll be sure to add extra pictures on how to run through the firewall, how to access the parking light, and just basics using tap splices, heat shrink, and electrical tape. So look for more detailed pics today!
10-03-2007, 01:00 PM
#131
I can't find my garage
Thread Starter
Join Date: Mar 2006
Location: SoCal
Age: 35
Posts: 4,688
Likes: 0
Received 0 Likes
on
0 Posts
Originally Posted by clee109
today I'll be completing this mod with the DIY I posted earlier. I'll be sure to add extra pictures on how to run through the firewall, how to access the parking light, and just basics using tap splices, heat shrink, and electrical tape. So look for more detailed pics today!
 10-03-2007, 01:01 PM
#132
I can't find my garage
Thread Starter
Join Date: Mar 2006
Location: SoCal
Age: 35
Posts: 4,688
Likes: 0
Received 0 Likes
on
0 Posts
Originally Posted by vthree
it better be the relay box that got blown (underhood fusebox)..
i purchased a new one and will ahve it by friday for sure.. i replaced all the relays, fuses, etc.. if anyone has any other thoughts tho please lmk!@
i purchased a new one and will ahve it by friday for sure.. i replaced all the relays, fuses, etc.. if anyone has any other thoughts tho please lmk!@
10-03-2007, 02:51 PM
#133
I Quit
ok, so I am half way done, my baby woke up so I have to wait till mommy gets home or till he takes his next nap. Here are some tips so far (yes it's taking a while because of all the pictures lol).
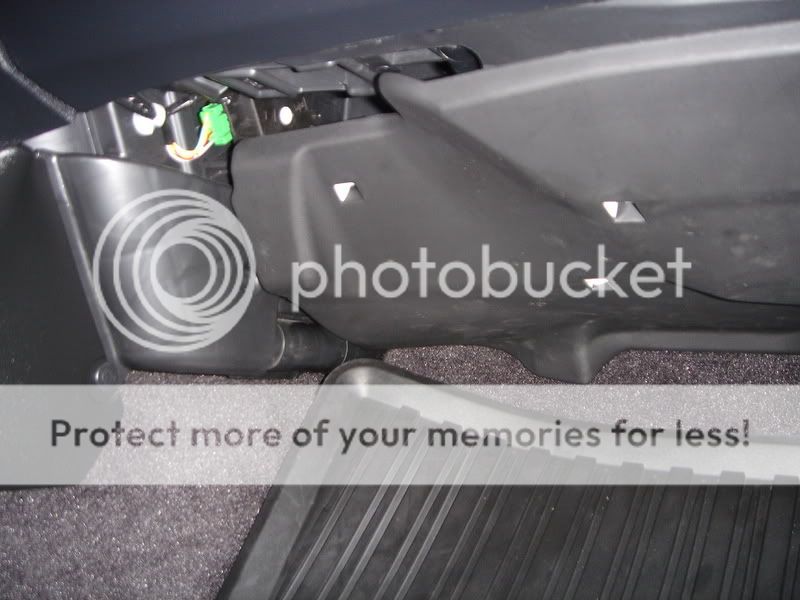
1. Getting through the firewall, there is a rubber boot directly behind the valve cover more towards the passenger side. Take needle nose pliers and pull on one of the tabs to push it back, then push a hanger from the top right towards the bottom left. Push about half of the hanger through and it'll pop out on the passenger side just to the left of the center console.
2. Remove the protective cover under the glove box for a little extra space, it's held in with clips, just pull at the back and make your way to the glove box.
3. Back under the hood DUCT tape your wire to the exposed hanger
4. go back to the passenger foot well and pull through.
5. Take the hanger and route it behind the center console right where the carpet meets metal you'll see a very small opening just enough for the hanger, fish the hanger through that and it'll end up on the driver side by the gas pedal.
Bam you made it through the firewall to the driver side.
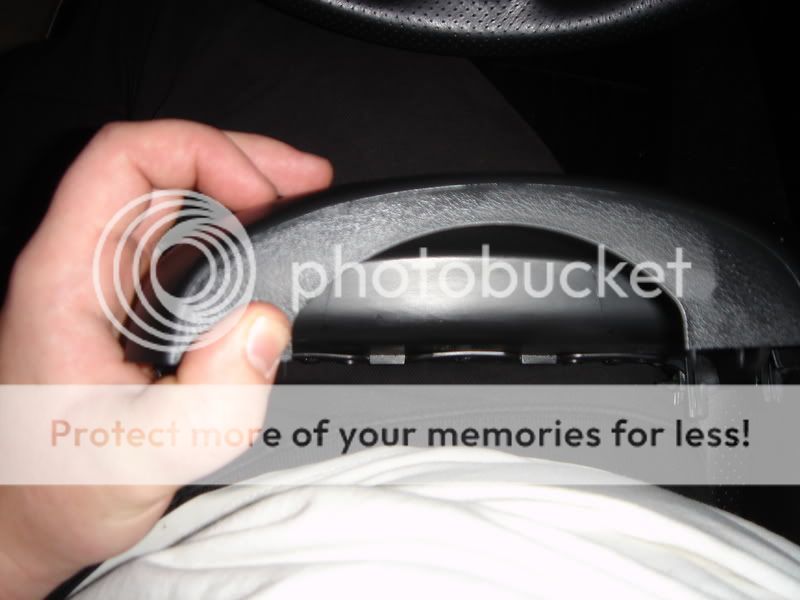
Tips on remover the wheel column.
1. Lower and extend the wheel fully, do not lock it in place
2. Remove three phillips head screws undernethe.
3. Push on the front sides of the top half of the cover with your thumbs and lift up.
4. That will unclip the front, the rest is just pushing in on the side of the top half and sliding your fingers along the bottom half.
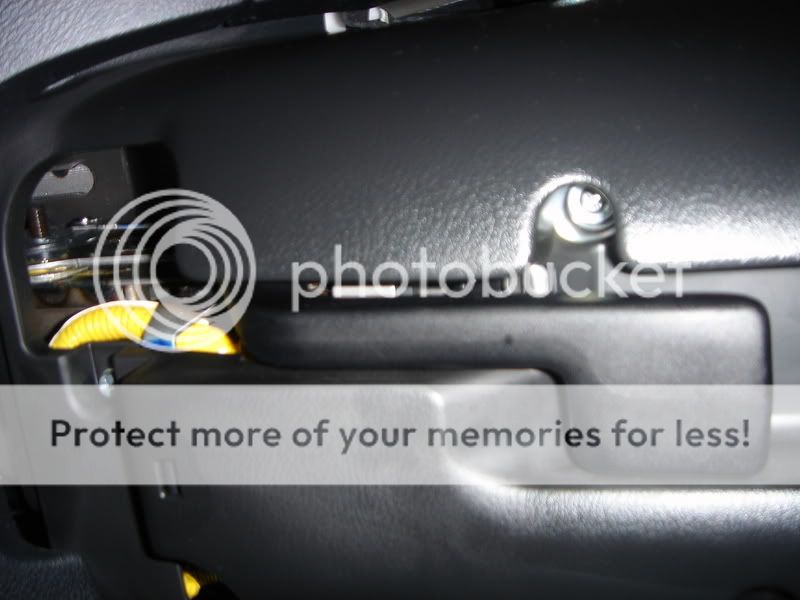
Tips to get the harness out:
This thing is a pain not much slack.
1. Remove the green clip under the light arm
2. Remove the white larger clip just above the steering wheel
3. Remove the black clip just to the right of the white one
4. Move all of that down and to the right.
5. The harness you are after is just behind the wiper arm and is black, the tab is on the inside left of the harness, push it in wiggle side to side and remove. DON'T PULL ON THE WIRES!!!!
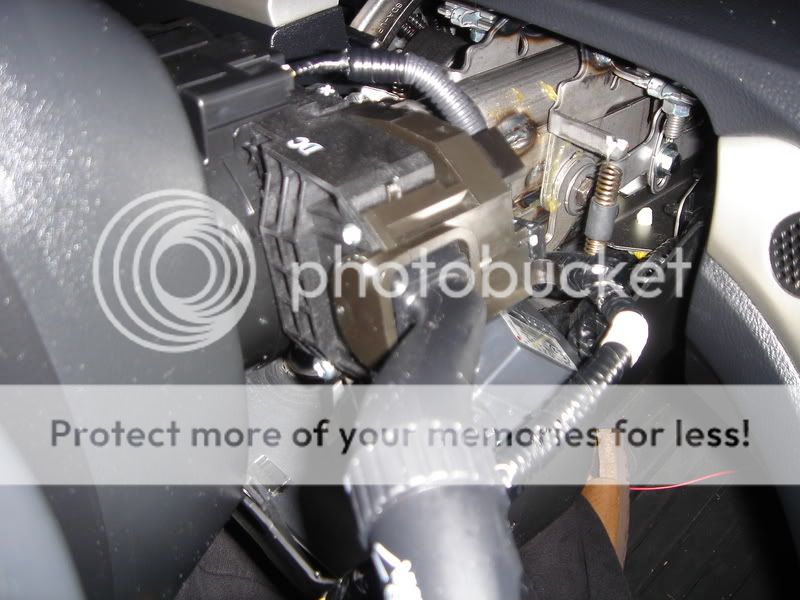
Tips to remover the Fog Relay:
1. You'll notice on the fuse box side of the relay an area for a flat head screw driver, insert the screwdriver and press towards the relay and pull up.
2. Now the relay is free of the fuse box, to open the halves you'll notice 4 or 5 clips just unclip them with the screwdriver and full the halves apart. Voila
Pics will come soon when I finish
1. Getting through the firewall, there is a rubber boot directly behind the valve cover more towards the passenger side. Take needle nose pliers and pull on one of the tabs to push it back, then push a hanger from the top right towards the bottom left. Push about half of the hanger through and it'll pop out on the passenger side just to the left of the center console.
2. Remove the protective cover under the glove box for a little extra space, it's held in with clips, just pull at the back and make your way to the glove box.
3. Back under the hood DUCT tape your wire to the exposed hanger
4. go back to the passenger foot well and pull through.
5. Take the hanger and route it behind the center console right where the carpet meets metal you'll see a very small opening just enough for the hanger, fish the hanger through that and it'll end up on the driver side by the gas pedal.
Bam you made it through the firewall to the driver side.
Tips on remover the wheel column.
1. Lower and extend the wheel fully, do not lock it in place
2. Remove three phillips head screws undernethe.
3. Push on the front sides of the top half of the cover with your thumbs and lift up.
4. That will unclip the front, the rest is just pushing in on the side of the top half and sliding your fingers along the bottom half.
Tips to get the harness out:
This thing is a pain not much slack.
1. Remove the green clip under the light arm
2. Remove the white larger clip just above the steering wheel
3. Remove the black clip just to the right of the white one
4. Move all of that down and to the right.
5. The harness you are after is just behind the wiper arm and is black, the tab is on the inside left of the harness, push it in wiggle side to side and remove. DON'T PULL ON THE WIRES!!!!
Tips to remover the Fog Relay:
1. You'll notice on the fuse box side of the relay an area for a flat head screw driver, insert the screwdriver and press towards the relay and pull up.
2. Now the relay is free of the fuse box, to open the halves you'll notice 4 or 5 clips just unclip them with the screwdriver and full the halves apart. Voila
Pics will come soon when I finish
10-03-2007, 07:46 PM
#135
I Quit
Full Detailed DIY Fog Lights Multi Part Layout Pt. 1
Fogs With Parking Lights 2006 TSX DIY
1. Disconnect battery
2. Locate boot just above and to the left of the valve cover.
3. Using needle nose pliers grab the top tab of the boot and pull back to expose the hole.
4. Run a hanger from the top right of the hole through the hole towards the bottom left. Leave half of the hanger exposed under the hood.
5. The hanger will pop out in the passenger foot well to the left of the console.
6. Attach your spool of wire to the hanger from the inside with duct tape.
7. Under the hood pull the hanger out with the wire attached, give yourself at least 4 - 5' of slack and cut wire at hanger.
8. Tie off the wire to the main harness with zipties to avoid moving parts and excessive heat.

9. Back under the passenger foot well pop the cover just beyond the glove box off by prying from the back forward. This gives you more space to work with.
10. Just above where the carpet meets the metal you will see a small gap, again attach the wire to the hanger and route it through the gap to the driver side.
11. The wire will pop out just behind the gas pedal on the driver side, pull the wire through and tight.
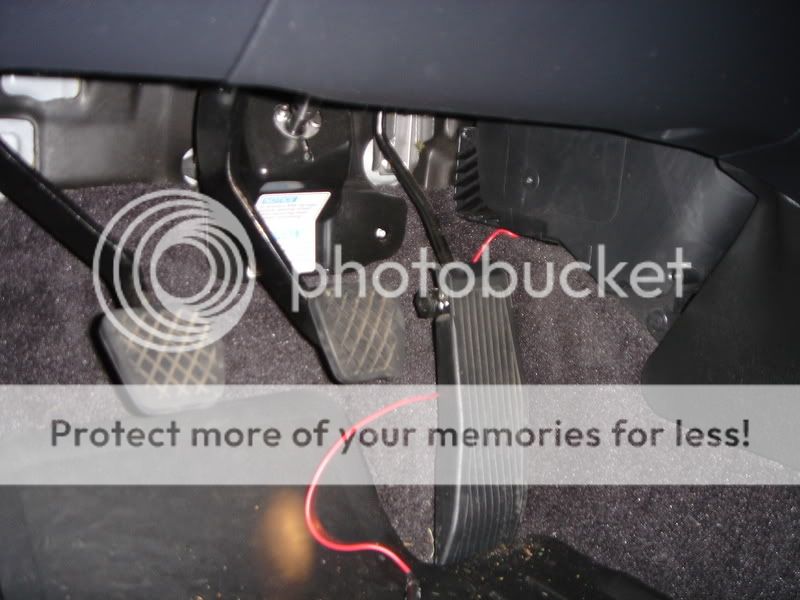
12. Tuck the wire out of site on the passenger side and put the cover back on.
1. Disconnect battery
2. Locate boot just above and to the left of the valve cover.
3. Using needle nose pliers grab the top tab of the boot and pull back to expose the hole.
4. Run a hanger from the top right of the hole through the hole towards the bottom left. Leave half of the hanger exposed under the hood.
5. The hanger will pop out in the passenger foot well to the left of the console.
6. Attach your spool of wire to the hanger from the inside with duct tape.
7. Under the hood pull the hanger out with the wire attached, give yourself at least 4 - 5' of slack and cut wire at hanger.
8. Tie off the wire to the main harness with zipties to avoid moving parts and excessive heat.
9. Back under the passenger foot well pop the cover just beyond the glove box off by prying from the back forward. This gives you more space to work with.
10. Just above where the carpet meets the metal you will see a small gap, again attach the wire to the hanger and route it through the gap to the driver side.
11. The wire will pop out just behind the gas pedal on the driver side, pull the wire through and tight.
12. Tuck the wire out of site on the passenger side and put the cover back on.
10-03-2007, 07:50 PM
#136
I Quit
Full Detailed DIY Fog Lights Multi Part Layout Pt. 2
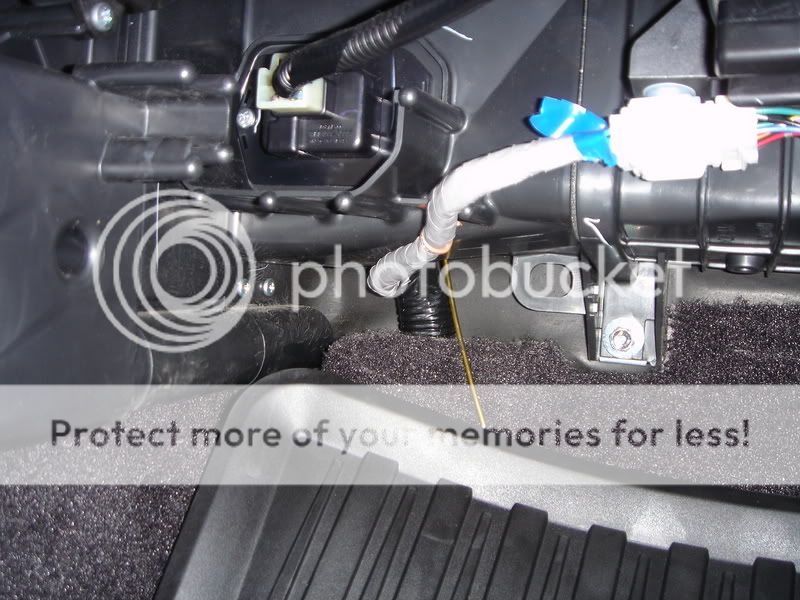
Stat disassembly of the steering wheel column.
1. Remove three phillips head screws from undernethe the bottom half of the colum covers. Lower and fully extend the wheel at this point, do not lock it into place.
2. Push on the front of the top half with your thumbs and push up to detach the front half of the steering column covers.
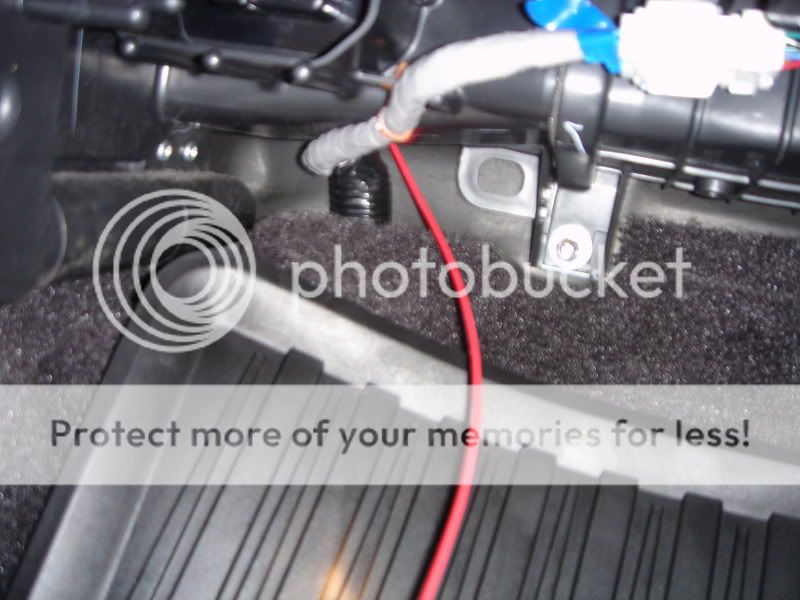
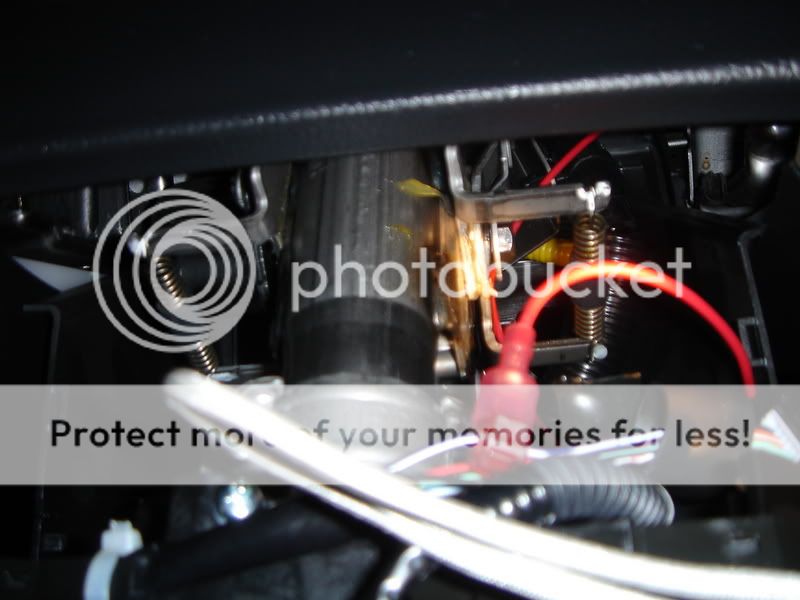
3. The fog light harness is on the right side behind the wiper stalk above the immobilizer. You wull need to remove the green clip under the light stalk, the white clip in the middle above the wheel, and the black clip just to the right of the white clip to access the fog light harness clip.
4. Detach the harness the same way as the others and position it upwards, then peel back the electrical tape and insulation to expose the wires.
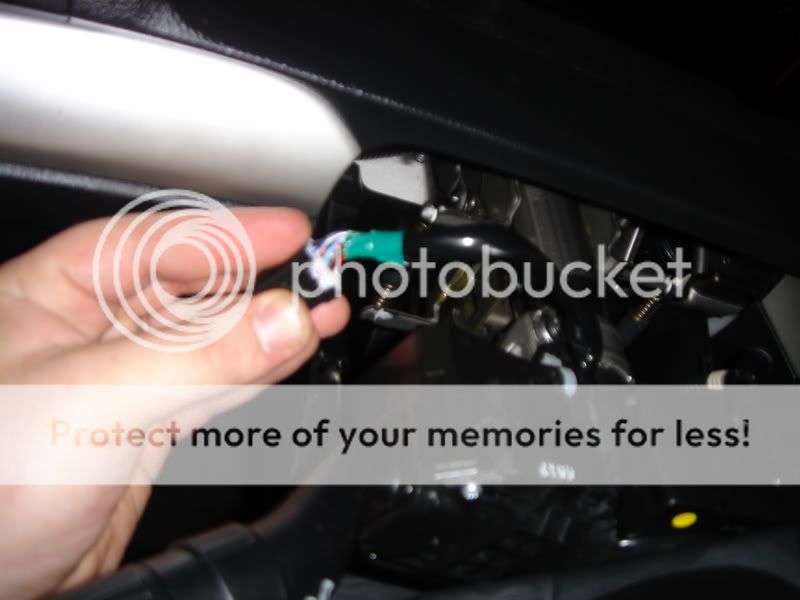
5. Identify the dark blue/white wire and isolate it.
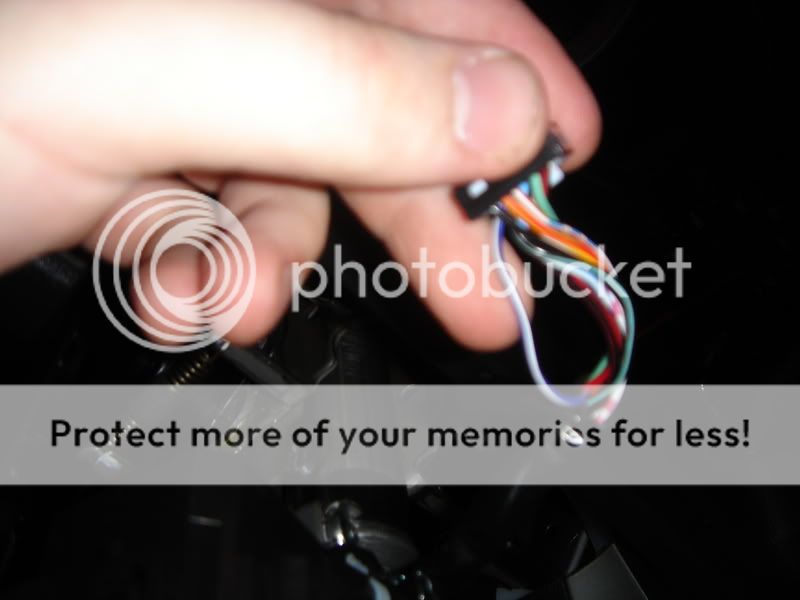
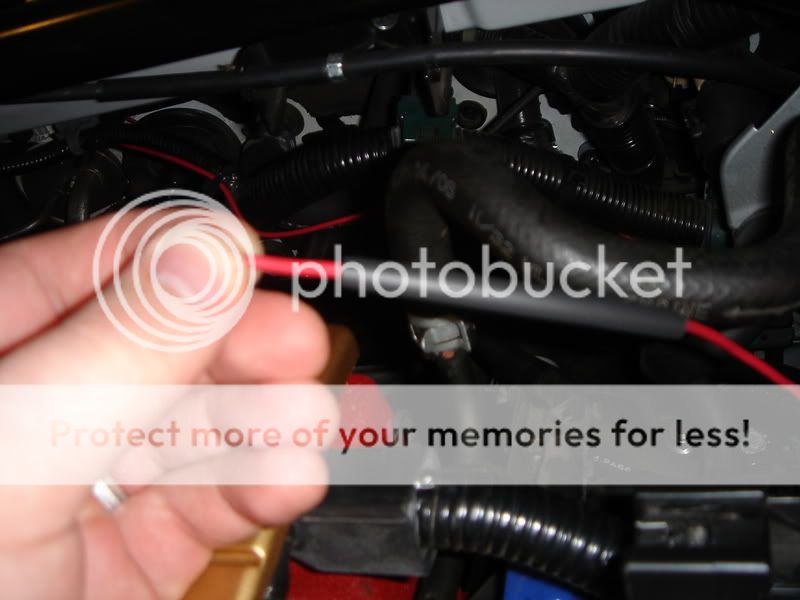
6. Take your splice and clip it onto the blue wire in the middle of it.
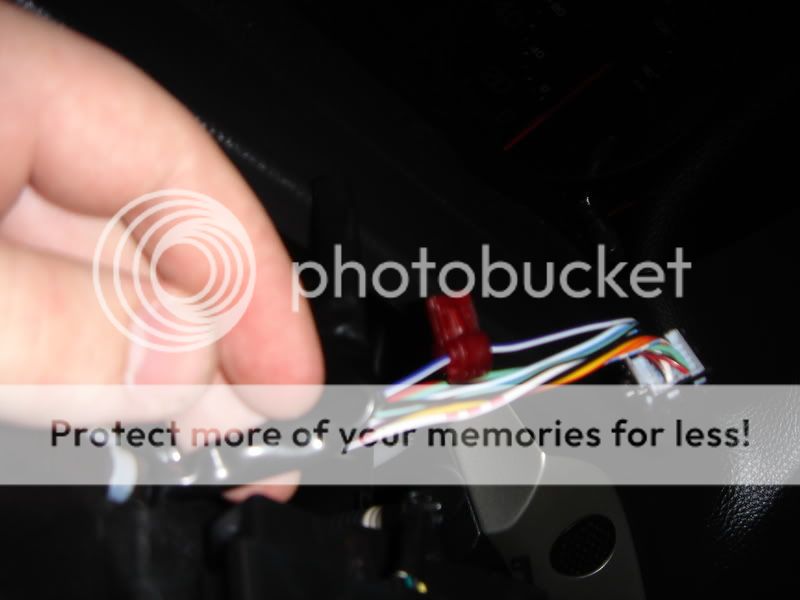
7. Now route the extension wire (red in my set up) along side the center console ziptieing it to the existing wire harness there.
8. Put on the other half of the splice and plug it into the blue/white wire.
1. Remove three phillips head screws from undernethe the bottom half of the colum covers. Lower and fully extend the wheel at this point, do not lock it into place.
2. Push on the front of the top half with your thumbs and push up to detach the front half of the steering column covers.
3. The fog light harness is on the right side behind the wiper stalk above the immobilizer. You wull need to remove the green clip under the light stalk, the white clip in the middle above the wheel, and the black clip just to the right of the white clip to access the fog light harness clip.
4. Detach the harness the same way as the others and position it upwards, then peel back the electrical tape and insulation to expose the wires.
5. Identify the dark blue/white wire and isolate it.
6. Take your splice and clip it onto the blue wire in the middle of it.
7. Now route the extension wire (red in my set up) along side the center console ziptieing it to the existing wire harness there.
8. Put on the other half of the splice and plug it into the blue/white wire.
10-03-2007, 07:53 PM
#137
I Quit
Full Detailed DIY Fog Lights Multi Part Layout Pt. 3
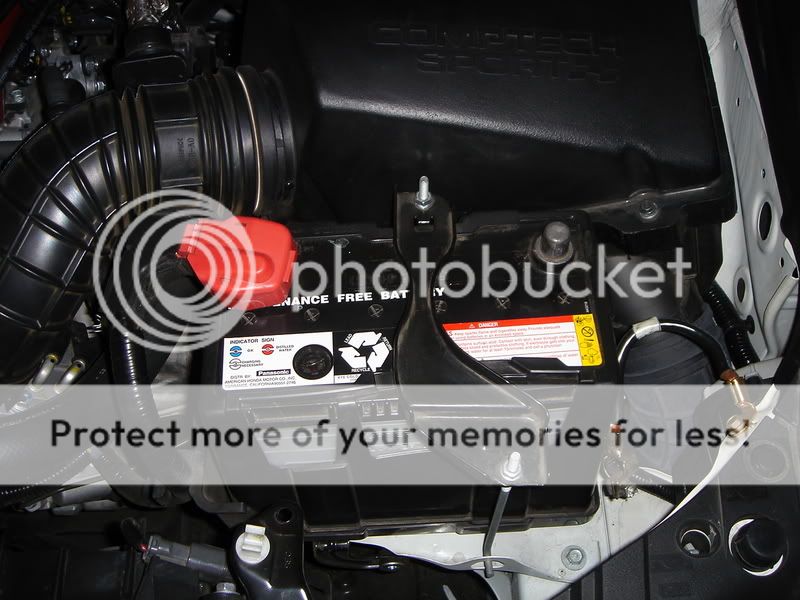
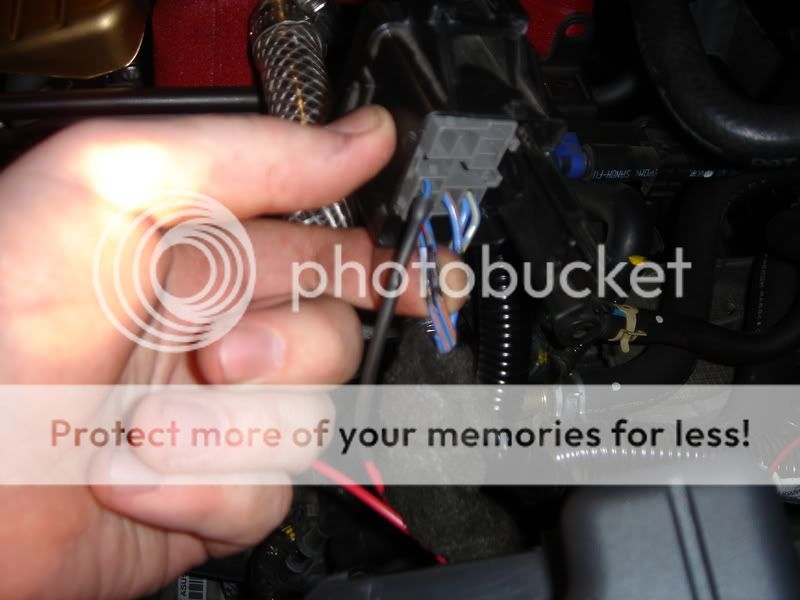
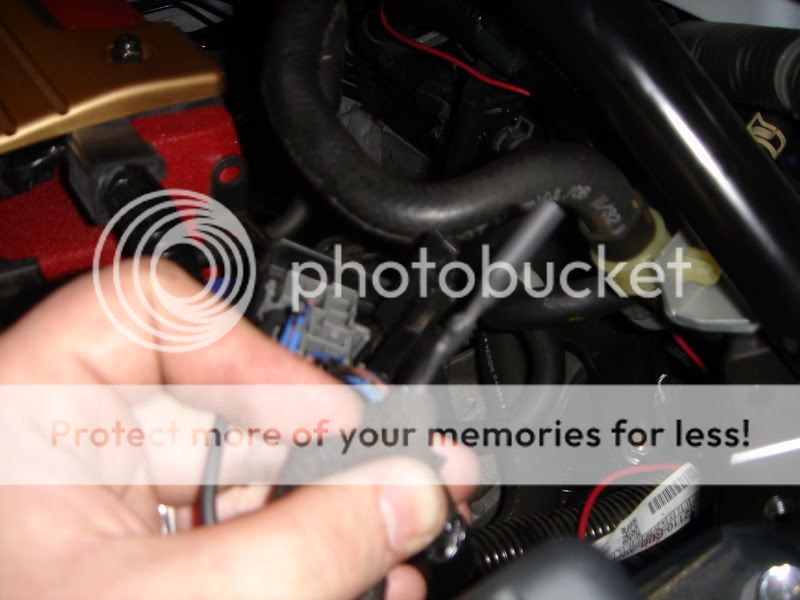
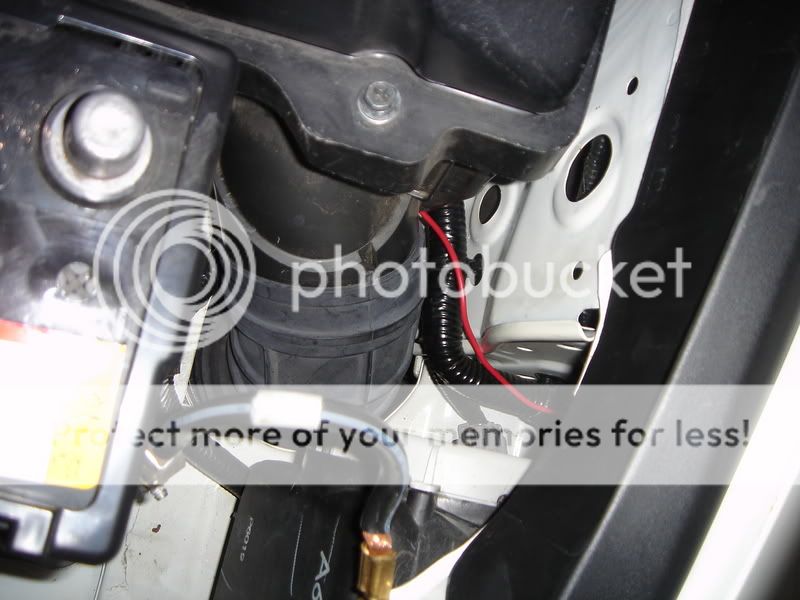
Fog Relay Modification (under hood)
1. Identify the fog relay, attached to the left of the fuse box. You will see an area for a flat head screw driver where it is connected to the fuse box. Push a flathead in and push out simultaneously pulling upward on the relay to free it from the fuse box.

2. Pop the cover off of the relay and seperate the two halves by popping the clips on the sides to see the wires.
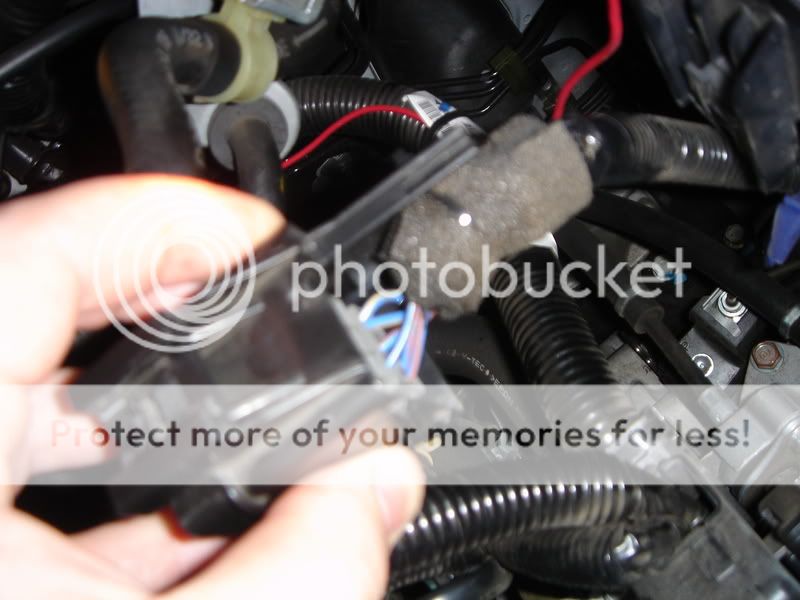
3. Cut the zip tie and remove the foam insulation for more working space.
4. Put heat shrink on you extension wire coming from inside the cabin but do not heat it yet.
5. Cut the dark blue/black wire on the harness the strip about an 1/8" of an inch off of the blue/black wire coming from the relay. Then strip a 1/4" of your extension wire and twist the two together, then slide the heat shrink over it and put a lighter to it to make it shrink.
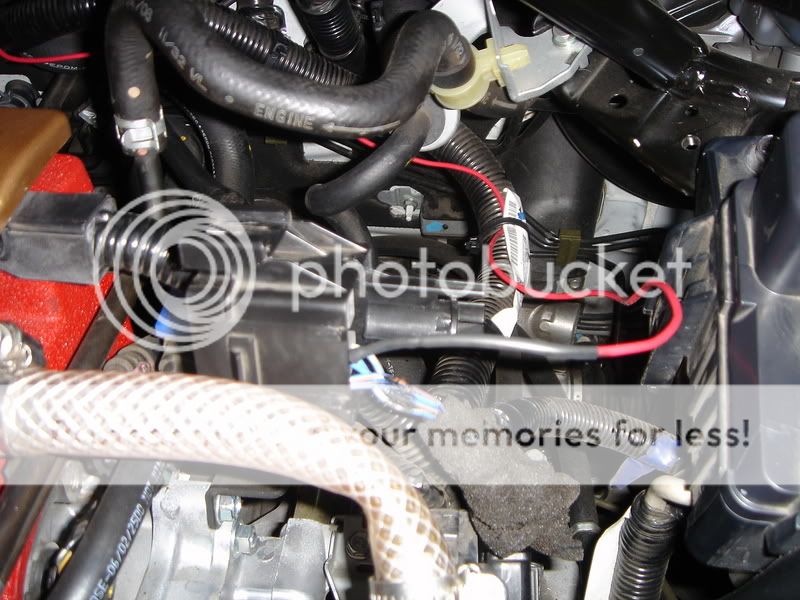
6. Now reconnect the battery for a quick test, your fogs will now work independently of ANY lights. If they do not light up review the above steps.

7. Disconnect the battery.
1. Identify the fog relay, attached to the left of the fuse box. You will see an area for a flat head screw driver where it is connected to the fuse box. Push a flathead in and push out simultaneously pulling upward on the relay to free it from the fuse box.
2. Pop the cover off of the relay and seperate the two halves by popping the clips on the sides to see the wires.
3. Cut the zip tie and remove the foam insulation for more working space.
4. Put heat shrink on you extension wire coming from inside the cabin but do not heat it yet.
5. Cut the dark blue/black wire on the harness the strip about an 1/8" of an inch off of the blue/black wire coming from the relay. Then strip a 1/4" of your extension wire and twist the two together, then slide the heat shrink over it and put a lighter to it to make it shrink.
6. Now reconnect the battery for a quick test, your fogs will now work independently of ANY lights. If they do not light up review the above steps.
7. Disconnect the battery.
10-03-2007, 07:57 PM
#138
I Quit
Full Detailed DIY Fog Lights Multi Part Layout Pt. 4
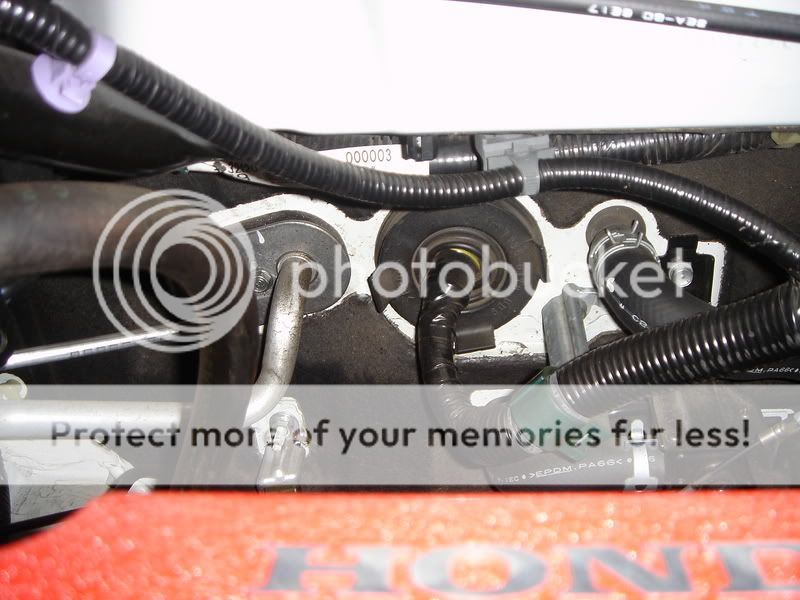
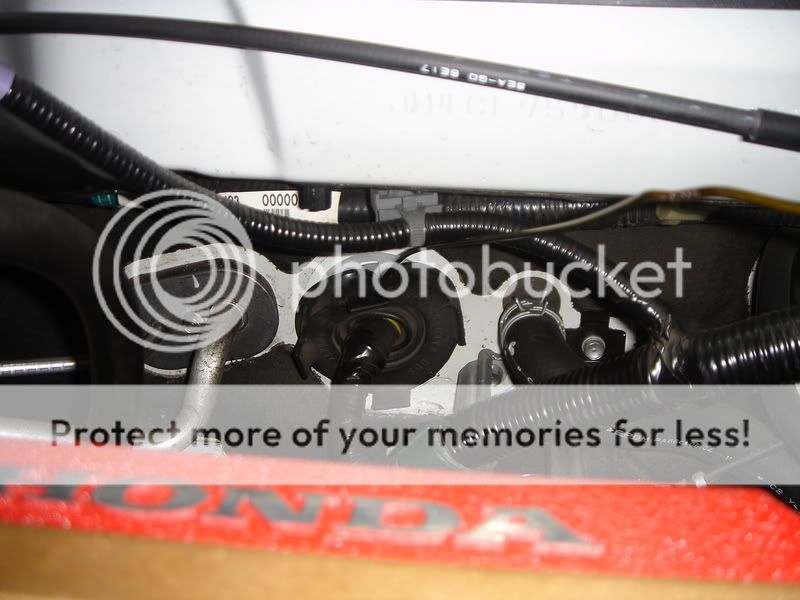
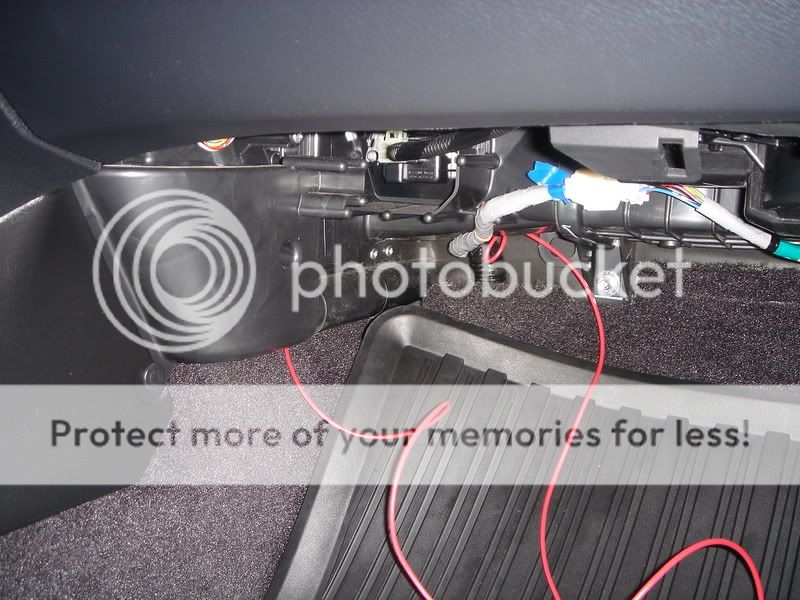
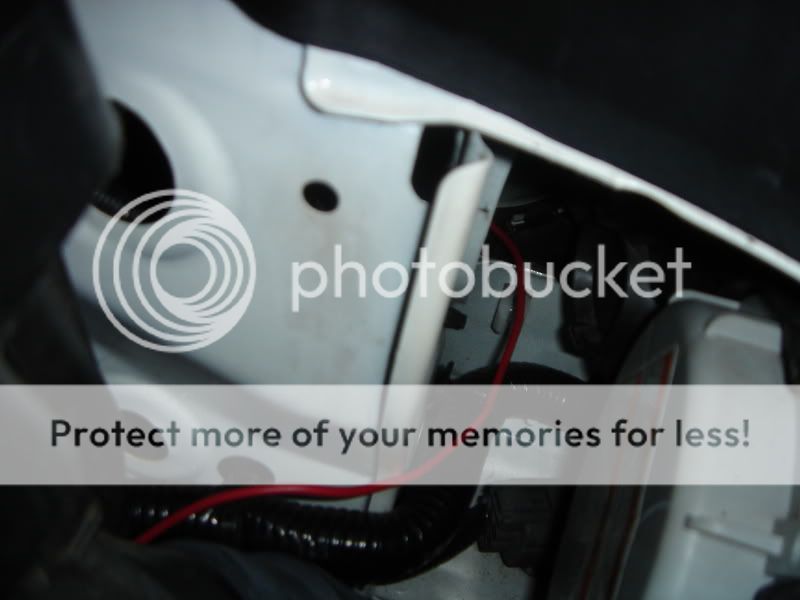
Accessing the Parking Light
1. Turn the wheel all the way to the right.
2. Locate the two plastic clips holding the fender liner in place and remove them, then pull back the liner.
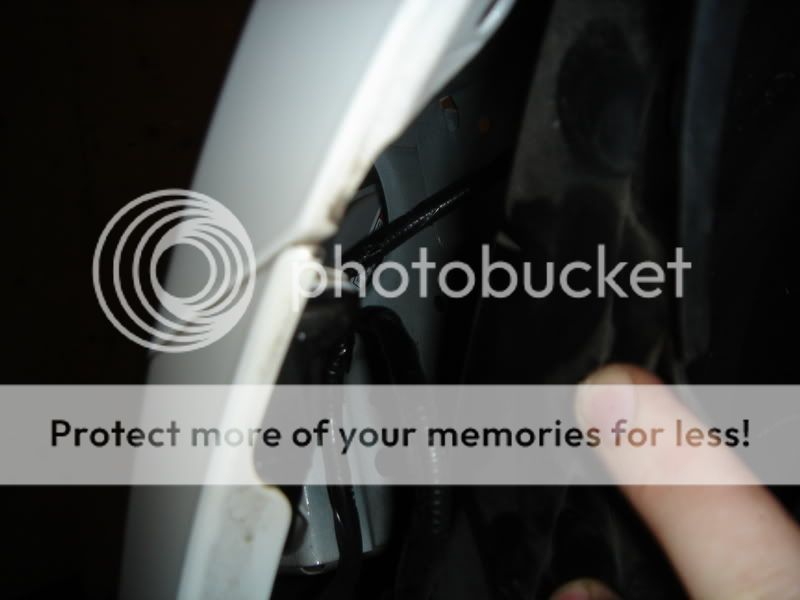
3. Pop the clip off of the back of the bulb and pull it out.
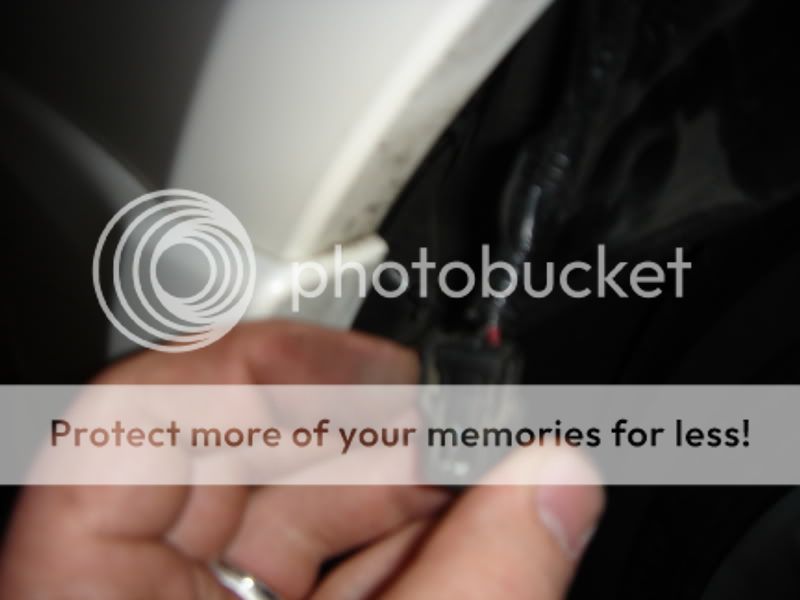
4. From inside the fender route a hanger through the hole under the hood and under the intake box and fuse box to the relay.
5. Attach your wire with duct tape to the end of the hanger in the fender well, then go under the hood and pull it through.
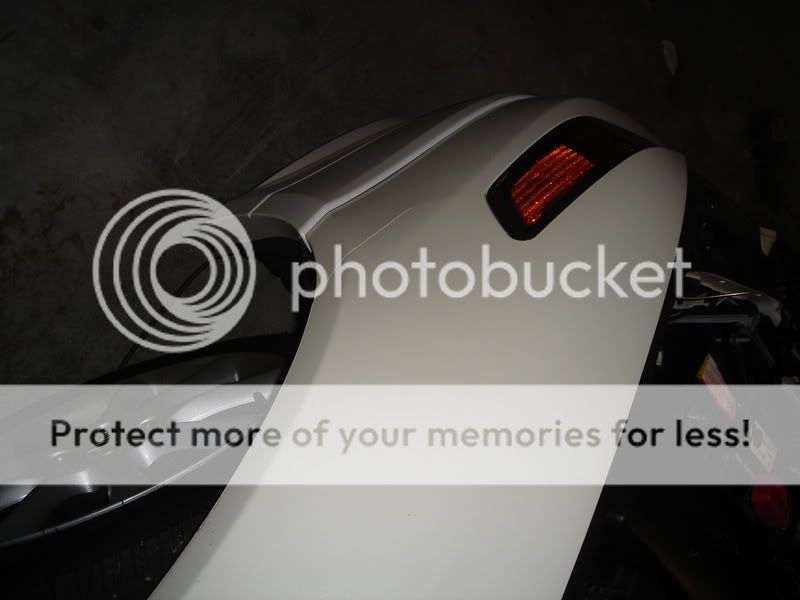
6. Leave wire dangling from fender area, then attach one half of the splice to it.

7. Peel back the electrical tape and insulation from the parking light wires and tap the RED positive wire with the other half of your splice.
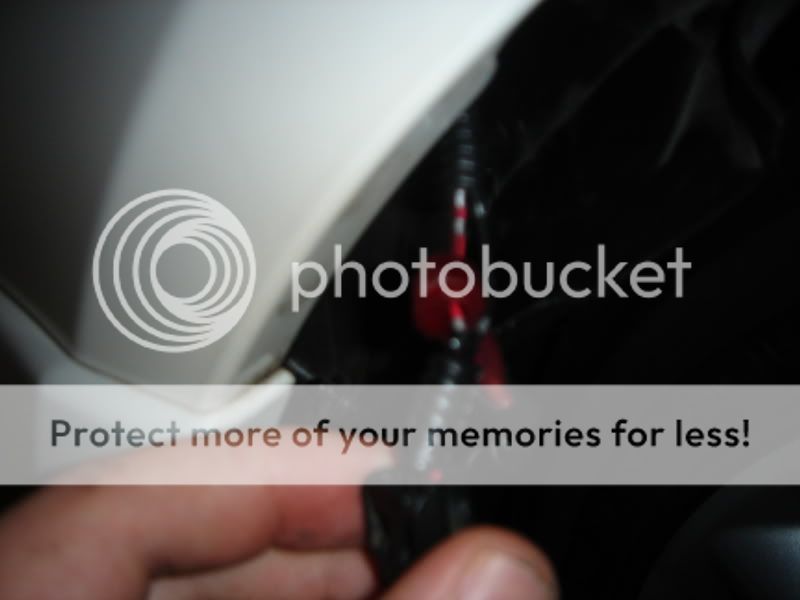
8. Connect the splice
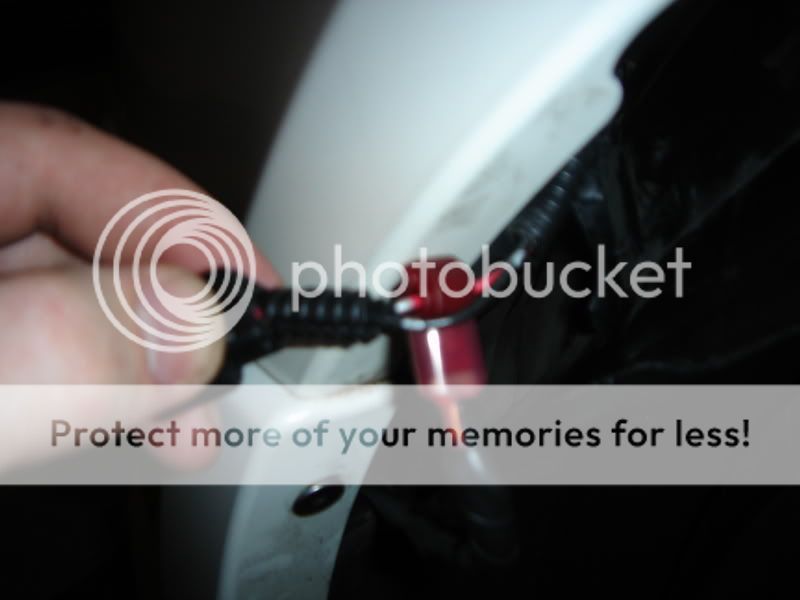
9. Recconect the parking light and tuck the liner away and clip it back into place.
1. Turn the wheel all the way to the right.
2. Locate the two plastic clips holding the fender liner in place and remove them, then pull back the liner.
3. Pop the clip off of the back of the bulb and pull it out.
4. From inside the fender route a hanger through the hole under the hood and under the intake box and fuse box to the relay.
5. Attach your wire with duct tape to the end of the hanger in the fender well, then go under the hood and pull it through.
6. Leave wire dangling from fender area, then attach one half of the splice to it.
7. Peel back the electrical tape and insulation from the parking light wires and tap the RED positive wire with the other half of your splice.
8. Connect the splice
9. Recconect the parking light and tuck the liner away and clip it back into place.
10-03-2007, 08:00 PM
#139
I Quit
Full Detailed DIY Fog Lights Multi Part Layout Pt. 5
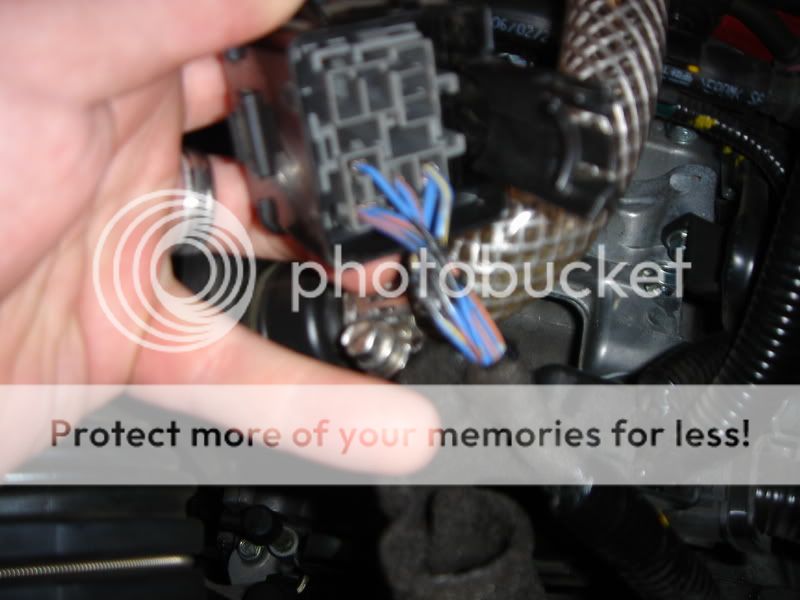
Back to the relay
1. Cut the two orange/blue wires just below the blue/black wire you connected earlier.
2. Strip about 1/8" of wire off of the two orange/blue lines running out of the harness and twist them together.

3. Put some heat shrink over them and use a lighter to shrink it.
4. Now strip about 1/8" away from the other ends of the blue/orange wires on the relay, twist them together, then strip 1/4" from your wire running from the parking light.
*put heat shrink over the parking light extension wire now*
Now twist your extension around the blue/orange wires and slide the heat shrink over it and use a lighter to make it shrink.
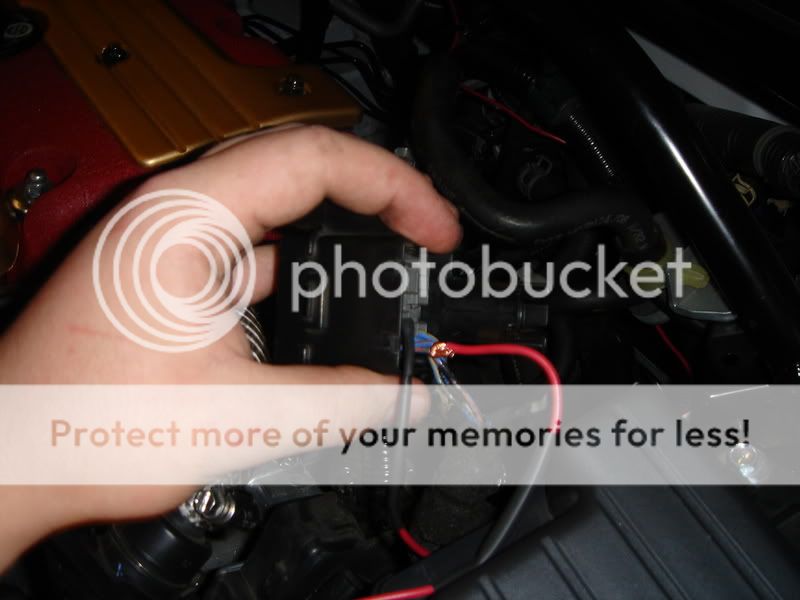
5. TEST!!!!! The fog lights will now turn on/off with the parking lights, and stay on with the head lights.
1. Cut the two orange/blue wires just below the blue/black wire you connected earlier.
2. Strip about 1/8" of wire off of the two orange/blue lines running out of the harness and twist them together.
3. Put some heat shrink over them and use a lighter to shrink it.
4. Now strip about 1/8" away from the other ends of the blue/orange wires on the relay, twist them together, then strip 1/4" from your wire running from the parking light.
*put heat shrink over the parking light extension wire now*
Now twist your extension around the blue/orange wires and slide the heat shrink over it and use a lighter to make it shrink.
5. TEST!!!!! The fog lights will now turn on/off with the parking lights, and stay on with the head lights.
10-03-2007, 08:03 PM
#140
I Quit
Full Detailed DIY Fog Lights Multi Part Layout Pt. 6
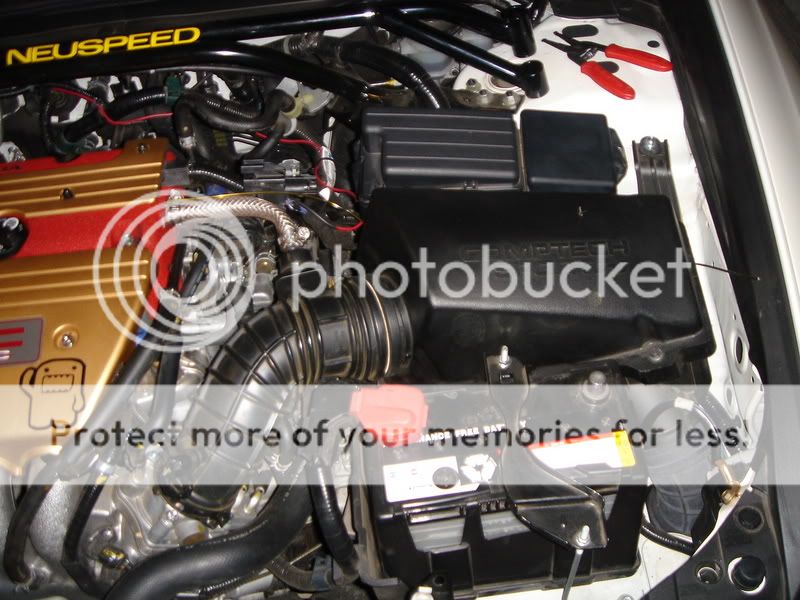
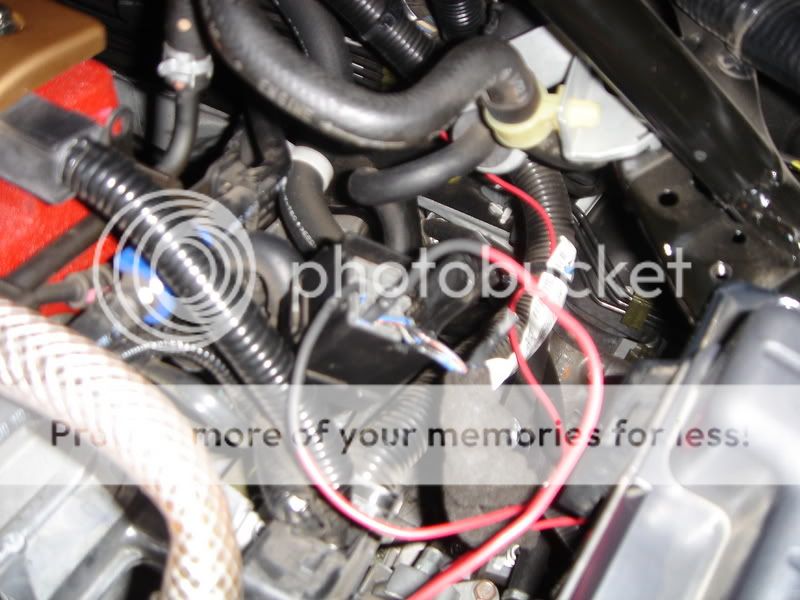
Clean up
1. Wrap the foam insulation you removed back around the wires, then put the bottom half of the relay back together and replace
the ziptie you cut earlier.
2. Now clip the two halves of the realy together and affix it back to the fuse box.
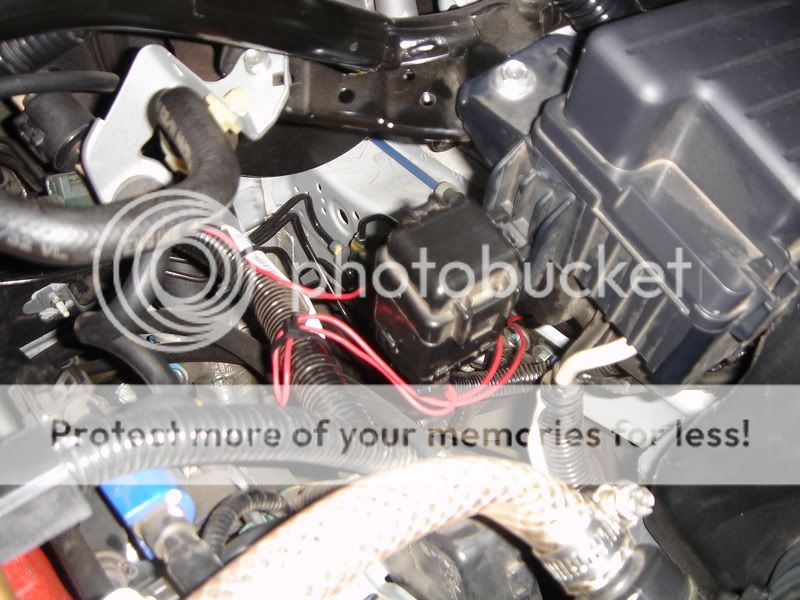
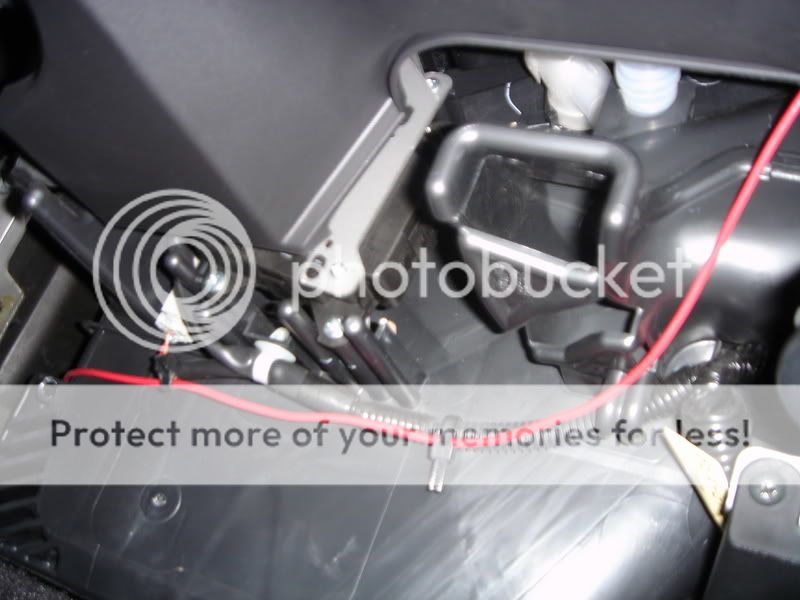
3. If you tucked the parking light extension wire under the intake box and fuse box it should look like this now:
4. Push the boot back on where you ran your wire through the firewall, it will wrap around the wire just fine with some finess.
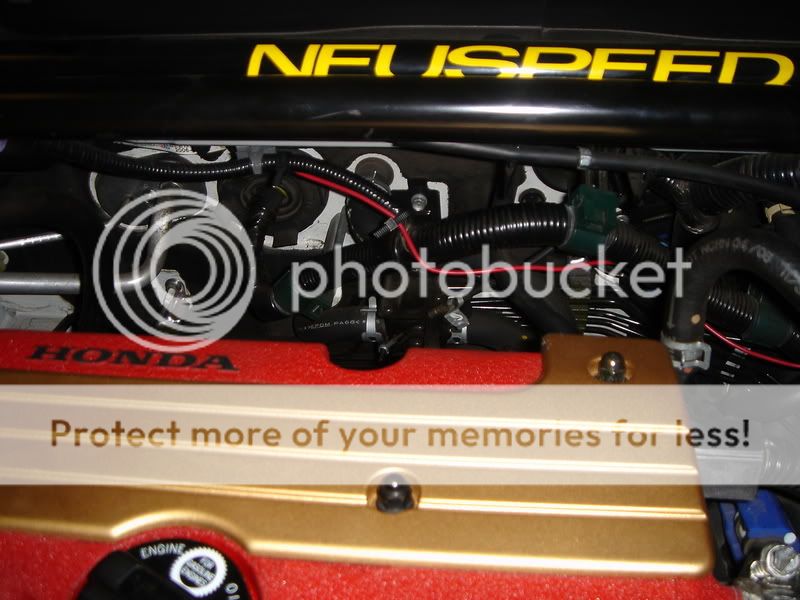
Finished:

Hope that helps everyone, this write up was exhausting!!!!!! Please DO NOT attempt this is anything does not make sense, ask your question and we will do our best to help!
Thanks to: mltk, tookie, peregrine, vthree
1. Wrap the foam insulation you removed back around the wires, then put the bottom half of the relay back together and replace
the ziptie you cut earlier.
2. Now clip the two halves of the realy together and affix it back to the fuse box.
3. If you tucked the parking light extension wire under the intake box and fuse box it should look like this now:
4. Push the boot back on where you ran your wire through the firewall, it will wrap around the wire just fine with some finess.
Finished:
Hope that helps everyone, this write up was exhausting!!!!!! Please DO NOT attempt this is anything does not make sense, ask your question and we will do our best to help!
Thanks to: mltk, tookie, peregrine, vthree
10-03-2007, 08:24 PM
#141
excellent write up!!
makes me wanna retry.. but iono. i know for sure ordering the new fuse box will cure the headlights. and hopefully the turn signals.. but we'll see tom/thursday when it arrives..
my service advisor. advised me to wait for the new fuse box. since all the tests i've done would be exactly what the technician would have done. for $102.50/hr .....
10-03-2007, 11:02 PM
#142
I can't find my garage
Thread Starter
Join Date: Mar 2006
Location: SoCal
Age: 35
Posts: 4,688
Likes: 0
Received 0 Likes
on
0 Posts
damm, clee109 took this diy to a next level. great write up no offense though, but dam, that red wire really stands out! lol also id like to add, like ive mentioned before, i found a tiny a firewall-like hole for this one wire and i wired mine through there, its alot closer to the steering wheel and easy to hook up
no offense though, but dam, that red wire really stands out! lol also id like to add, like ive mentioned before, i found a tiny a firewall-like hole for this one wire and i wired mine through there, its alot closer to the steering wheel and easy to hook up
10-03-2007, 11:57 PM
#143
I Quit
Originally Posted by mltk53
damm, clee109 took this diy to a next level. great write up no offense though, but dam, that red wire really stands out! lol also id like to add, like ive mentioned before, i found a tiny a firewall-like hole for this one wire and i wired mine through there, its alot closer to the steering wheel and easy to hook up
no offense though, but dam, that red wire really stands out! lol also id like to add, like ive mentioned before, i found a tiny a firewall-like hole for this one wire and i wired mine through there, its alot closer to the steering wheel and easy to hook up
10-04-2007, 12:50 AM
#145
I Quit
^^^tookie - without your pictures it would not have made sense to me lol. So you get kudos for guinea pigging and giving the initial and clear feedback. Now all we can hope for is that vthree gets his box fixed and maybe now would be more confident to try again! Plus props to vthree for posting pics of the initial mistake to make the whole blue/white wire issue clear.
10-04-2007, 06:59 AM
#146
Three Wheelin'
Join Date: Feb 2007
Location: Rockville, MD
Age: 39
Posts: 1,554
Likes: 0
Received 0 Likes
on
0 Posts
Originally Posted by mltk53
damm, clee109 took this diy to a next level. great write up no offense though, but dam, that red wire really stands out! lol also id like to add, like ive mentioned before, i found a tiny a firewall-like hole for this one wire and i wired mine through there, its alot closer to the steering wheel and easy to hook up
no offense though, but dam, that red wire really stands out! lol also id like to add, like ive mentioned before, i found a tiny a firewall-like hole for this one wire and i wired mine through there, its alot closer to the steering wheel and easy to hook up
10-05-2007, 08:52 PM
#149
I Quit
hmmm, vthree post pics of your fog relay you modded, all of the wires, pic of the parking light wire, pic of your blue/white wire set up under the steering column. There is something going on there, you may have nicked or cut a wire somewhere you didn't intend to and haven't noticed it. Being that those wires are so small it would be easy to nick one and not know it. That could be causing a problem. Or maybe you melted something when you touched the wrong wire.....
10-05-2007, 10:07 PM
#150
my fog relay has been unmodded and restored. minus the two blue orange (black/ground) wires.. cant seem to find those any more at ALL.. i've looked everywhere.. regardless of that. with that setup only my fogs didnt work.. it shouldn't have any affect on my headlights nor brights or turn signals... =(
i did try jumping my wires today.. odd..
when i add power to the lowbeam fuse.. both HIDS turn on now. .with the new box.. not just one...
can anyone on here help me at all??????????
i did try jumping my wires today.. odd..
when i add power to the lowbeam fuse.. both HIDS turn on now. .with the new box.. not just one...
can anyone on here help me at all??????????
10-15-2007, 12:43 PM
#152
ok guys...
it was the switch.. which was only $75... [being sarcastic bout the only].. on a lighter note. if u mess up. you can get the 05 tsx switch which does not have the fogs on it. for $25 shipped.
be careful in attempting this mod.. sadly im a prime example of what NOT to do. lol.
it was the switch.. which was only $75... [being sarcastic bout the only].. on a lighter note. if u mess up. you can get the 05 tsx switch which does not have the fogs on it. for $25 shipped.
be careful in attempting this mod.. sadly im a prime example of what NOT to do. lol.
10-15-2007, 03:12 PM
#153
I can't find my garage
Thread Starter
Join Date: Mar 2006
Location: SoCal
Age: 35
Posts: 4,688
Likes: 0
Received 0 Likes
on
0 Posts
Originally Posted by tookie
got your car back yet MLTK? then hurry up and take a pic of your secret passage way! 
10-15-2007, 03:14 PM
#154
I can't find my garage
Thread Starter
Join Date: Mar 2006
Location: SoCal
Age: 35
Posts: 4,688
Likes: 0
Received 0 Likes
on
0 Posts
hey vthree. u kno, your story is amazing. not in a good way..lol but yea~such struggles. i feel ya man. so is everything fixed? where did those two blue/oranges ever go? ever find 'em? how much $$ did you spend with all this wreck?
10-15-2007, 07:15 PM
#156
Advanced
Join Date: Aug 2007
Location: Seattle
Age: 43
Posts: 52
Likes: 0
Received 0 Likes
on
0 Posts
Originally Posted by vthree
the blue oranges all go together. i found my etm.. they're supposed to. lol.
i spend a total of 475 + shipping.
fuse box w/ relay control module was 400
switch was 75...
if you get an 05 one its only $20....
good luck everyone.
i spend a total of 475 + shipping.
fuse box w/ relay control module was 400
switch was 75...
if you get an 05 one its only $20....
good luck everyone.
so is everything fixed and you got your fogs rewired to turn on by themselves now? yah i know.. so much money AND time spent on this supposedly simple mod. but in the end i'm glad you got it fixed. so what's the next mod you're planning...????
 10-15-2007, 11:19 PM
#157
haha no i ended up leaving it back at stock.. lol. 6000k hids are bright enough. =)
next mod = supercharger. or hondata..
im leaning more towards hondata now. because i dont want to waste 4k + time and effort with the sc. esp since i dont plan to race out my tsx..
its going to be my family car. combined with my spirited driver. granted when the time comes and i do have a family. i'll prolly get a new car the... still. just incase..
so looks like hondata now.
 10-16-2007, 11:50 AM
#159
I can't find my garage
Thread Starter
Join Date: Mar 2006
Location: SoCal
Age: 35
Posts: 4,688
Likes: 0
Received 0 Likes
on
0 Posts
Originally Posted by 1slicktL
you prolly drop ur blue and orange wire somewhere on is one with the harnes the other is just a loop both side went to the relay
