
JDM Puddle Light DIY

The Short-Bus Pirate
Joined: Sep 2006
Posts: 10
Likes: 0
From: Utah
Originally Posted by evo_to_tsx
yep for $40 they are definitely worth it 
mine just came in today.. i'll be drilling in my brand new euro R skirts this weekend
wish me luck!
mine just came in today.. i'll be drilling in my brand new euro R skirts this weekend
wish me luck!
The Short-Bus Pirate
Joined: Sep 2006
Posts: 10
Likes: 0
From: Utah
As I mentioned, I do like the way the lights look. $40 was an incredible price for the 10 lights. Still, I don't really think there is much of a comparison to the lights that Xizor installed. For the amount of time involved and the difficulty of the installation, I really do think the 5 LED lights are the better choice.
I probably would have chosen the other lights, but I got temporarily stupid and thought that I was getting the 5 LED lights for more than half off. My bad.
I probably would have chosen the other lights, but I got temporarily stupid and thought that I was getting the 5 LED lights for more than half off. My bad.
CarbonGreyPearlEbony
Joined: Feb 2006
Posts: 2,189
Likes: 3
Originally Posted by msmching
xizor.. . . . .
How much did u pay for that led lights?!?!?
Its niceeeeeeeee..........
How much did u pay for that led lights?!?!?
Its niceeeeeeeee..........
Instructor
Joined: Jun 2006
Posts: 102
Likes: 0
FYI for those that try this: After spending about an hour looking for the damn wire to connect the ground for the dimming effect, I came up with a much simpler solution.
I unbolted the part where the interior lights are, tapped that and ran it down the pillar. So simple, and time saving.

After using a flathead screwdriver to get the light covers off(carefully), undo the two bolts circled with a phillips head screwdriver. Then pull down on the assembly.

Now unplug both connectors. The one you will be tapping is the one on the right

The wire is the dark green/red wire shown here. Tap that, then run the wire back through and down the pillar.
I unbolted the part where the interior lights are, tapped that and ran it down the pillar. So simple, and time saving.
After using a flathead screwdriver to get the light covers off(carefully), undo the two bolts circled with a phillips head screwdriver. Then pull down on the assembly.
Now unplug both connectors. The one you will be tapping is the one on the right
The wire is the dark green/red wire shown here. Tap that, then run the wire back through and down the pillar.


Ex-King of Pasadena
Joined: Feb 2007
Posts: 1,033
Likes: 0
From: CA, 91107
roxxor ............
The interior light thingy u show above...
Cuz i wanted to connect it to the... footwell led light... how do i run the wire down to the footwell!?!?
Isn't it going to... "press" the line if i put the covers back on!??!
thanks mann...
The interior light thingy u show above...
Cuz i wanted to connect it to the... footwell led light... how do i run the wire down to the footwell!?!?
Isn't it going to... "press" the line if i put the covers back on!??!
thanks mann...
Instructor
Joined: Jun 2006
Posts: 102
Likes: 0
Nope. The only other tricky part is getting the wire down to the side. Pull the rubber part off and you will see a track along the pillar that you can run the wire in, straight down to the fue box area. Then, just run it from there as necessary. If needed, I can get pics of this, just let me know
Thread Starter
Bye TSX, hello domestic?
Joined: Jan 2004
Posts: 8,552
Likes: 0
From: NOVA
Originally Posted by msmching
roxxor ............
The interior light thingy u show above...
Cuz i wanted to connect it to the... footwell led light... how do i run the wire down to the footwell!?!?
Isn't it going to... "press" the line if i put the covers back on!??!
thanks mann...
The interior light thingy u show above...
Cuz i wanted to connect it to the... footwell led light... how do i run the wire down to the footwell!?!?
Isn't it going to... "press" the line if i put the covers back on!??!
thanks mann...
Ex-King of Pasadena
Joined: Feb 2007
Posts: 1,033
Likes: 0
From: CA, 91107
hmMm... cooL cooLL... i'll try it this weekend.. =) . . . . .
thnx thnxx!!!!
and btw... u guys heard of something call.. ELECTRIC SUPERCHARGE?!?!?! ...... ELECTRIC?!?!?! @@
Saw someone selling that for like 80 bucks...
thnx thnxx!!!!
and btw... u guys heard of something call.. ELECTRIC SUPERCHARGE?!?!?! ...... ELECTRIC?!?!?! @@
Saw someone selling that for like 80 bucks...


Instructor
Joined: Mar 2006
Posts: 192
Likes: 0
I tried tapping this dome light wire today for a different project. Was not able to find it. I removed all the molding in the area and had the whole fuse-box exposed. There are a lot of green plugs, but none that look like the one pictured. Can any one provide a better location or have a better picture? Is it literally on the back of the panel? I tried feeling around but didnt notice any plugs on the actual back of it. Any help would be appreciated, thanks.
Instructor
Joined: Mar 2006
Posts: 192
Likes: 0
^^^ Scratch that, I found it. Gave it another go today and I found the wires. For anyone who can't find it, just grab a flashlight stick your head under the dash and look up towards the A-pillar. There is only 1 harness coming from that area and you can see the 4 wires that go into the green plug. I was actually able to tap it without unplugging it.
looks like i am going to attempt this mod.. esp since i found these. http://cgi.ebay.com/ebaymotors/8X-Ci...#ht_2499wt_974
i'm just curious how good their output will really be.
i'm just curious how good their output will really be.

10th Gear
Joined: Jun 2010
Posts: 11
Likes: 0
ok so today I decided that instead of puddle lights under the the side skirts, I would put led strips under the side mirrors. It looks pretty nice providing light at night time, however, I am confused on how to get the led's to come on when I unlock the door and turn off when I lock it. Basically, I just want them to come on when the interior lights come on because I dont want them to be constantly on. Both led strips have ground and positive wires, I grounded them and hooked the positives together then to the interior light fuse, but they continue to stay on even when the car is locked. Help???
Instructor
Joined: Mar 2009
Posts: 142
Likes: 2
From: Maine
I'm assuming you grounded to the frame.
The interior light fuse (#6 I assume) does not control the interior lights. It is a constant + only. The grounding from the green/red wire is what controls the on/off.
So you'll have to splice the LEDs' ground wires into the green/red wire instead of where you have it now, and leave the + wires tapped into the interior light fuse.
Its a good idea to always confirm with a DMM that the power sources you plan to tap do what you originally expect them to do.
How to find the green/red ground wire is here (post#147):
https://acurazine.com/forums/showthr...ambient&page=4
Good luck with your modding...

Instructor
Joined: Mar 2009
Posts: 142
Likes: 2
From: Maine
up: always on
down: works with courtesy lighting
^^Is this how you're trying to do it? I'm assuming this is what you're doing, and I'm assuming the blue part is the SPDT switch.
How to run the LED to the middle of the switch and the fuse: the + wire of the LED goes to the fuse slot, and the ground wire of the LED goes to the switch's middle.
The bottom line coming out of the switch connects to the frame (where it says ground).
Last edited by aCUREa; Jul 5, 2010 at 05:16 AM.
Instructor
Joined: Mar 2009
Posts: 142
Likes: 2
From: Maine
You just attach the ground wire so that it contacts the metal frame of the car (the chassis). The battery's (-) post is connected to the frame, so connecting a wire to the frame is the same as if you connected it directly to the battery (-)
The best way is to attach an o-ring to the wire terminal, loosen a bolt, and screw the bolt back on over the o-ring.
Another way is to find a ground wire (for some stock application) that attaches to the frame itself and just splice into it. The cubby/glovebox light ground wires (black) do this. The ACC socket ground wire (black) does this too. There are many ground wires you could also tap instead of connecting directly to the frame.
If you use a bolt, the key is to make sure the bolt you choose is a conductor. I noticed some of them have coating on them or aren't made out of the right metal (or something) such that they aren't conductors. The best way is to find a grounding post.
I'll post a picture of how I did it.
But let me ask... aren't you supposed to splice into the green/red wire? If you need the puddle lights to work like the dome/courtesy lights, then you can't ground to the frame. You'll have to tap the green/red for ground.
Instructor
Joined: Mar 2009
Posts: 142
Likes: 2
From: Maine
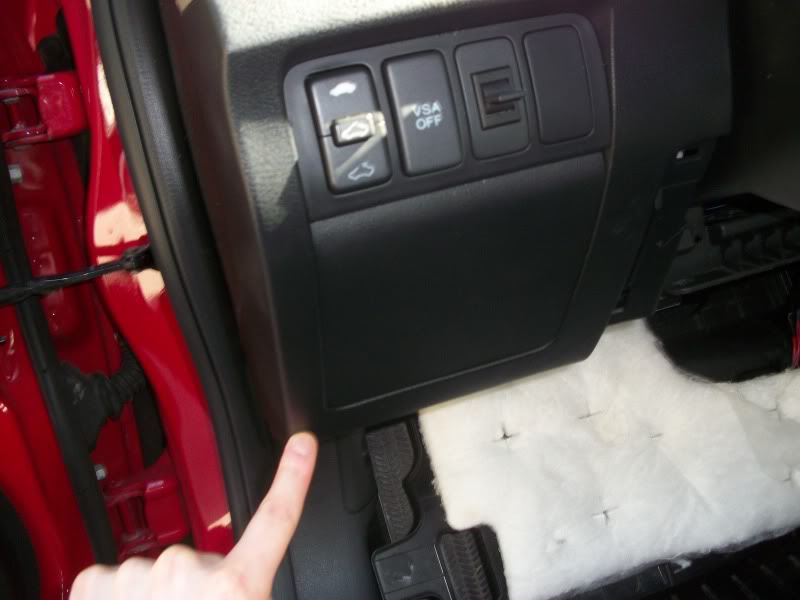
okay, sorry for the triple-post now, but I said I'd post some pics. A real easy-to-reach screw for grounding close to the switch panel is here in these pics. You can see the ground wire I ran with an o-ring too (a little blurry)
The screw I used is right behind here right where my finger points

The screw I used is right behind here right where my finger points
Last edited by aCUREa; Jul 10, 2010 at 05:20 PM.
Moderator
Joined: Oct 2007
Posts: 3,578
Likes: 322
From: Orange County, CA
