
How to remove center console
 02-17-2009 | 11:13 PM
#1

Thread Starter
Advanced
Joined: Nov 2008
Posts: 68
Likes: 0
How to remove center console
Hey guys,
My heated seat lights are out and I want to take my center console apart.
I did do my homework and searched all over the forum, and the best I could come up with was for AT and I have a 6MT.
How do I take it apart and if there are pictures along with explanation, that'd be awesome!
Thanks
My heated seat lights are out and I want to take my center console apart.
I did do my homework and searched all over the forum, and the best I could come up with was for AT and I have a 6MT.
How do I take it apart and if there are pictures along with explanation, that'd be awesome!
Thanks
02-18-2009 | 09:51 AM
#3

Drifting
Joined: Aug 2007
Posts: 2,548
Likes: 5
From: Pittsburgh, PA
It's exactly the same as the AT. If you want to get the plastic piece all the way off you'll have to take off the shift knob and the locking nut from the shifter shaft. The boot then just slides right off.
02-18-2009 | 10:09 AM
#4
Mike D from Ohio
Joined: Nov 2007
Posts: 435
Likes: 0
From: Ohio
Hopefully this helps you out:
http://rides.webshots.com/album/482100858sQavkT
http://rides.webshots.com/album/482100858sQavkT
 02-18-2009 | 11:50 AM
#6
Drifting
Joined: Oct 2003
Posts: 2,069
Likes: 21
From: SoCal
Very true. My first time, I was yanking the console while on my knees on the passenger seat.
02-18-2009 | 12:05 PM
#7
Thread Starter
Advanced
Joined: Nov 2008
Posts: 68
Likes: 0
I will try that then...
so... do you start from the front or from the e-brake?
Trending Topics
02-18-2009 | 12:17 PM
#8
Drifting
Joined: Oct 2003
Posts: 2,069
Likes: 21
From: SoCal
I did e-brake location first. Use the rubber side (handle) of what ever tool you have so as not to scratch the plastic, to pop the back clip up. I could not get any grip doing the front part (not an ashtray) first.
02-18-2009 | 01:01 PM
#9
Drifting
Joined: Aug 2007
Posts: 2,548
Likes: 5
From: Pittsburgh, PA
Pro tip: Put a thin layer of grease on the metal clips before you put it back together. Half the reason it's so hard to get out is because clips get a bunch of surface corrosion and then don't want to slide through the plastic retainer thingys. The part will still clip on just as firmly but when you need to take it off again it just takes some firm pressure and it pops right out far less violently.
02-18-2009 | 03:13 PM
#10
CL9 ABP
iTrader: (1)
Joined: Feb 2005
Posts: 4,528
Likes: 245
From: Commack, Long Island -> Queens NY
I have a short youtube of me prying the car apart.
Center console vsa and hazard button http://www.youtube.com/watch?v=b0M0V...e=channel_page
Center console vsa and hazard button http://www.youtube.com/watch?v=b0M0V...e=channel_page
The following users liked this post:
Blindeye_03 (02-14-2014)
02-18-2009 | 07:30 PM
#11
Thread Starter
Advanced
Joined: Nov 2008
Posts: 68
Likes: 0
Finally! i managed to pull it off. Thought I broke all the clips, but all still attached! And pacman, I did need to knee on the seat to pull it out... And I did it on campus parking lot, attracted a lot of attention... especially with my tinted window... not a good idea at all.
02-18-2009 | 10:45 PM
#13
CL9 ABP
iTrader: (1)
Joined: Feb 2005
Posts: 4,528
Likes: 245
From: Commack, Long Island -> Queens NY
Finally! i managed to pull it off. Thought I broke all the clips, but all still attached! And pacman, I did need to knee on the seat to pull it out... And I did it on campus parking lot, attracted a lot of attention... especially with my tinted window... not a good idea at all.
no just fixing a fog light or something.
02-24-2009 | 08:09 PM
#14
Intermediate
Joined: Feb 2009
Posts: 27
Likes: 0
From: Boston, MA
lcrazyaznl....Great video on removing the console and cd pocket....i removed the cd pocket on my car because the bulb burnt out, but i cant seem to find the bulb at any auto parts store...does anyone know the part number?
Thanks in advance.
Thanks in advance.
Last edited by kvelez07; 02-24-2009 at 08:10 PM. Reason: spelling
 02-25-2009 | 01:27 PM
#17
Mike D from Ohio
Joined: Nov 2007
Posts: 435
Likes: 0
From: Ohio
 03-02-2009 | 08:04 AM
#18
-Mike
Joined: Feb 2006
Posts: 183
Likes: 0
From: Jersey
hi all,
does anyone know if the plastic trim around the shift boot is replaceable??
I was taking out my center console and that trim broke off! =(
http://www.acuraautomotiveparts.org/...s=&view=normal
#5 is the entire center console panel, I just need that little semi rectangular trim that goes around the boot.
thanks
03-19-2009 | 03:57 PM
#19
Mike D from Ohio
Joined: Nov 2007
Posts: 435
Likes: 0
From: Ohio
^^nobody seems to be answering you
I would imagine you have to buy the entire piece #5. Sometimes its hard to find a sub-piece without having to buy the whole piece.
On that link, #5 was $36 (if I remember). That doesn't sound too too expensive to fix a cracked interior piece. I could imagine the dealership would make you buy the whole piece too.
04-15-2009 | 12:16 PM
#20

Pro
Joined: Apr 2006
Posts: 702
Likes: 12
For some reason, I can't for the life of me get those last two clips (by the seat heater switches) out. I've pulled as hard as I can underneath the shifter trim part and from the "not an ashtray" bin, and those two clips are super solid in there. It's so frustrating as I've removed all the other clips around the center console. What am I doing wrong? I'm going to get a f***ing eye hemorrhage if I pull any harder. Those two metal clips aren't going anywhere! Any tips?
04-15-2009 | 03:46 PM
#21
CL9 ABP
iTrader: (1)
Joined: Feb 2005
Posts: 4,528
Likes: 245
From: Commack, Long Island -> Queens NY
just take a flat head near the front to clips and slowly pry up towards it. Chances out their just stuck. I mean mine pops out so easy since i've done it so many times. The first time I did it was a slow pry between each set of clips.
04-15-2009 | 03:52 PM
#22
Pro
Joined: Apr 2006
Posts: 702
Likes: 12
I've tried a flat head under the shifter area. Do you mean pry with a flathead on the side that is attached to the "not an ashtray" pocket?
04-16-2009 | 12:58 PM
#26
Instructor
Joined: Mar 2009
Posts: 142
Likes: 2
From: Maine
I got mine off yesterday for the first time too. I didn't scratch it, but one of the metal clips became mutilated. It still fits on sturdily though, as if it didn't happen. If you stick something underneath the panel to pry, be careful you don't hit the clips when you stick the prying tool in. that's how I mutilated mine. I'm lucky it still fits.
There are actually 8 clips that need removed: 2 front, 2 back, 2 on each side. Its best to start from the front and pry each clip one by one.
Edit: it took me a while to get it and was VERY frustrating.
There are actually 8 clips that need removed: 2 front, 2 back, 2 on each side. Its best to start from the front and pry each clip one by one.
Edit: it took me a while to get it and was VERY frustrating.
Last edited by aCUREa; 04-16-2009 at 01:02 PM.
04-16-2009 | 10:07 PM
#27
Pro
Joined: Apr 2006
Posts: 702
Likes: 12
^^nobody seems to be answering you
I would imagine you have to buy the entire piece #5. Sometimes its hard to find a sub-piece without having to buy the whole piece.
On that link, #5 was $36 (if I remember). That doesn't sound too too expensive to fix a cracked interior piece. I could imagine the dealership would make you buy the whole piece too.
I would imagine you have to buy the entire piece #5. Sometimes its hard to find a sub-piece without having to buy the whole piece.
On that link, #5 was $36 (if I remember). That doesn't sound too too expensive to fix a cracked interior piece. I could imagine the dealership would make you buy the whole piece too.
04-16-2009 | 10:11 PM
#28
Pro
Joined: Apr 2006
Posts: 702
Likes: 12
I got mine off yesterday for the first time too. I didn't scratch it, but one of the metal clips became mutilated. It still fits on sturdily though, as if it didn't happen. If you stick something underneath the panel to pry, be careful you don't hit the clips when you stick the prying tool in. that's how I mutilated mine. I'm lucky it still fits.
There are actually 8 clips that need removed: 2 front, 2 back, 2 on each side. Its best to start from the front and pry each clip one by one.
Edit: it took me a while to get it and was VERY frustrating.
There are actually 8 clips that need removed: 2 front, 2 back, 2 on each side. Its best to start from the front and pry each clip one by one.
Edit: it took me a while to get it and was VERY frustrating.
 04-21-2009 | 07:36 PM
#30
Instructor
Joined: Mar 2009
Posts: 142
Likes: 2
From: Maine
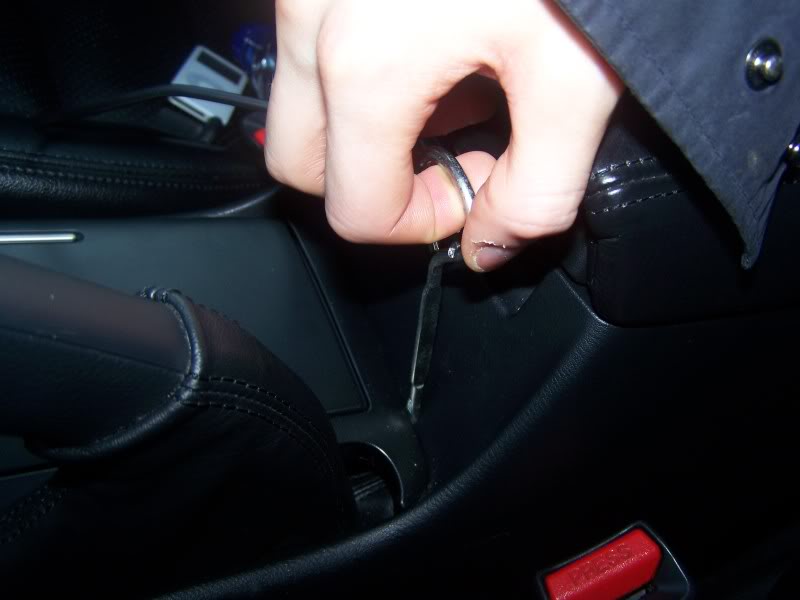
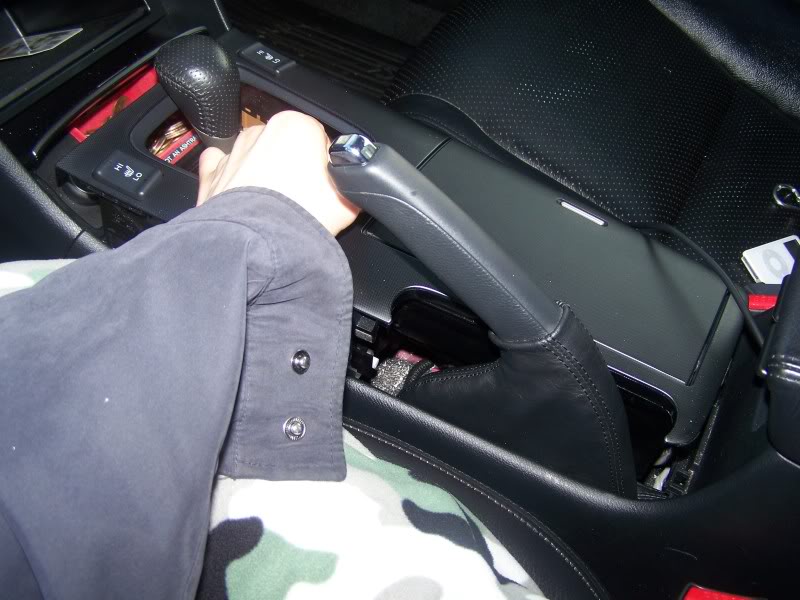
Removing the cubby cd holder is cake. I pulled it out 70000 times. Sitting in the driver seat, grab the floor of the cd holder with your right hand, and grab the cd holder door with your left. Then pull it straight out. You'll need to exert more of the force on the bottom of the cd holder (right hand). Only exert a little bit of force on the door with your left hand so you don't break the door.
I'll post pics of how to grab it. The problem was that I couldn't take a pic of both of my hands on it at once since I needed to hold the camera. So I took a pic of each hand separately so you can see how I gripped it. But use both hands when you pull obviously:
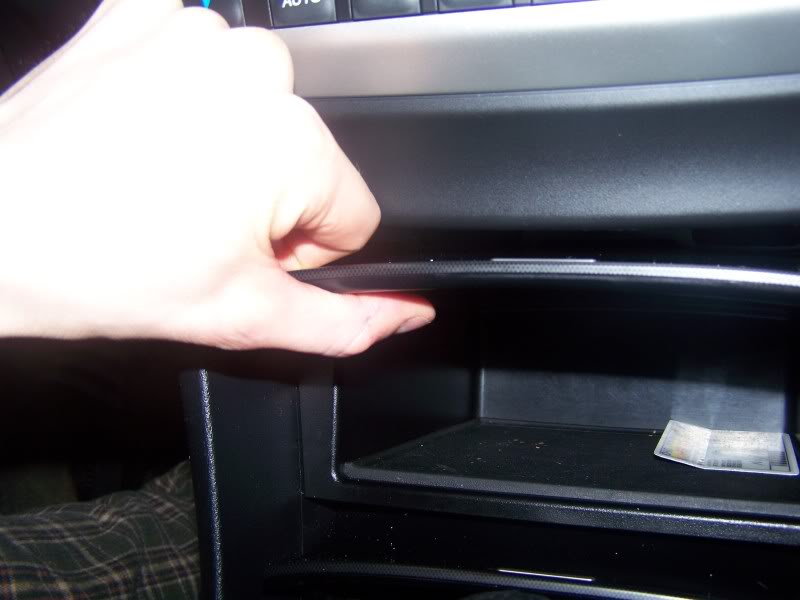
right hand: stick finger under
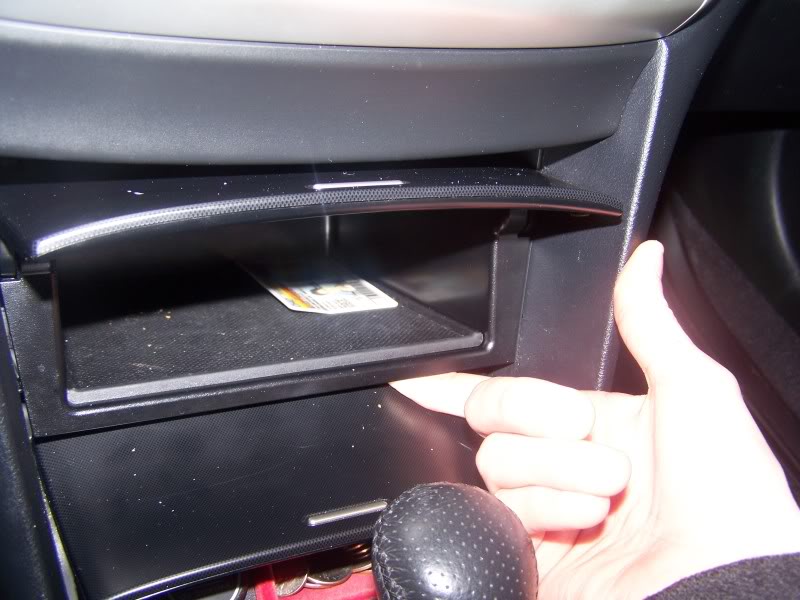
...then grab it
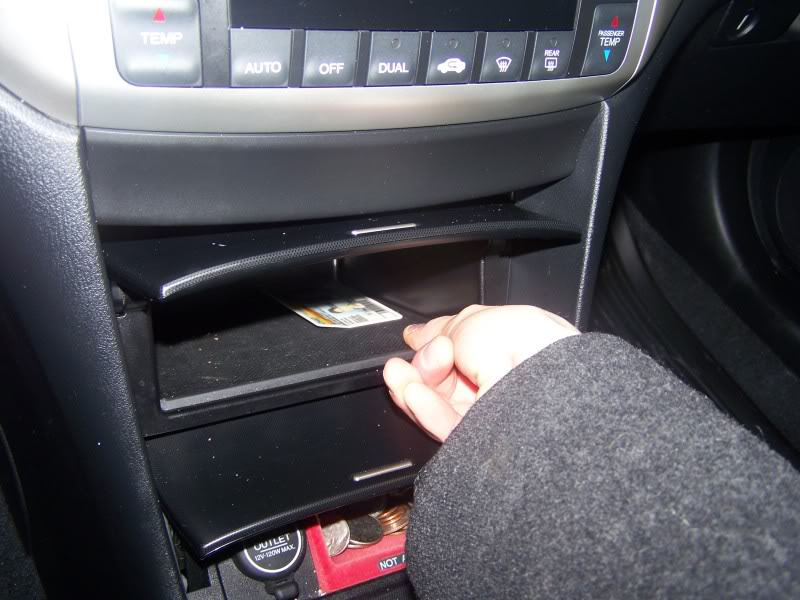
left hand: grab door like this
Here it is... theres still a wire attaching it so don't pull too hard after its out:

edit: I'm not responsible if you break it... be careful
I'll post pics of how to grab it. The problem was that I couldn't take a pic of both of my hands on it at once since I needed to hold the camera. So I took a pic of each hand separately so you can see how I gripped it. But use both hands when you pull obviously:
right hand: stick finger under
...then grab it
left hand: grab door like this
Here it is... theres still a wire attaching it so don't pull too hard after its out:
edit: I'm not responsible if you break it... be careful
Last edited by aCUREa; 04-21-2009 at 07:39 PM.
04-22-2009 | 06:56 PM
#32
Instructor
Joined: Mar 2009
Posts: 142
Likes: 2
From: Maine
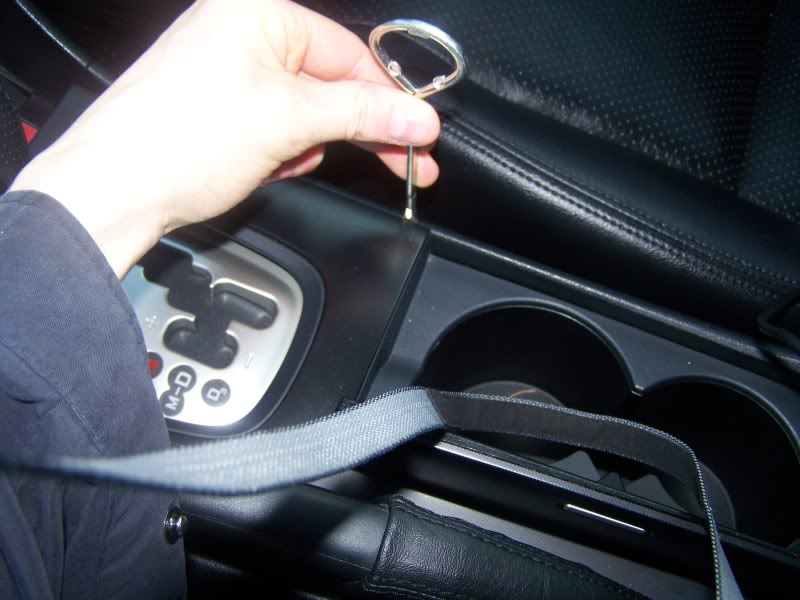
I was bored today and thought that since many people have trouble, I’d take pictures of how I got the center panel up in case anyone still needs help (the piece with the seat heater switches). Some people can just pull the whole thing off in one motion because it is loose from prior removal. But most people haven’t taken it off yet, so its not loose, so you can’t just pull. You’ll need to pry each clip up one by one.
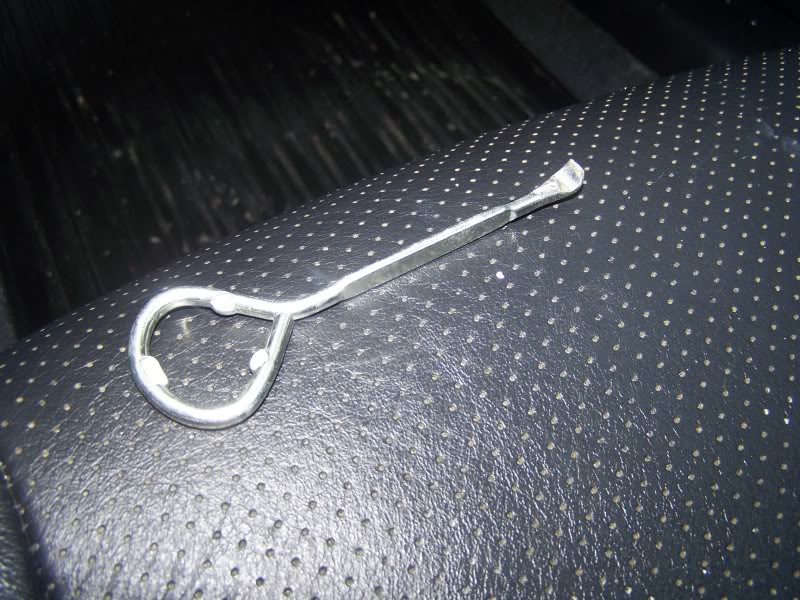
Since it is so hard to get off, I used a metal prying tool, which is frowned upon because of risk of scratching, but I never scratched mine yet with this tool. If you’re careful, the tool might only scratch underneath where you can’t see, but that’s it. BUT you have to be careful. If you’re worried, place a cloth between the tool and the points of contact.
Disclaimer: I’m not responsible for damage/injury. If you don’t like the metal prying tool, pursue a different method.
Here is the tool:
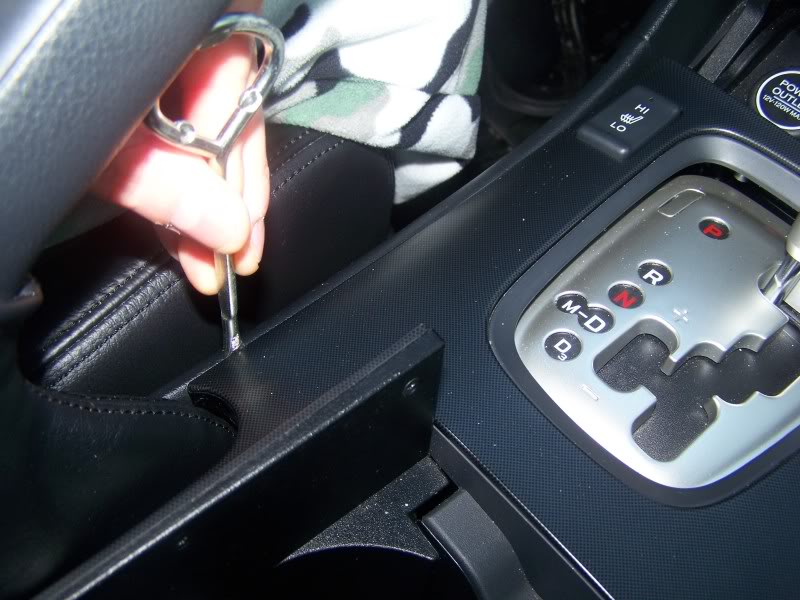
Start here and get the two clips up in the front by the ashtray:
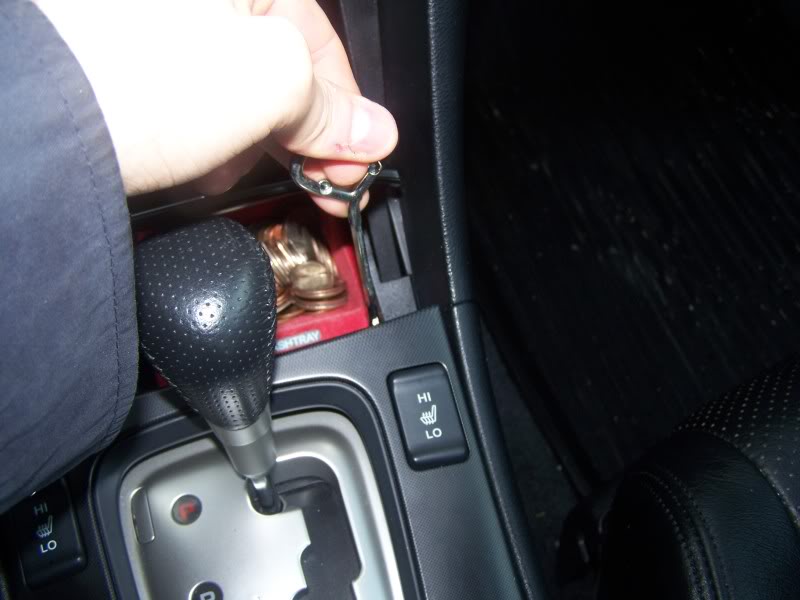
^^getting the tool underneath is not straight-forward. You’ll have to use a separate plastic tool to help pull the panel up a little so you can fit the prying tool under. I didn’t show that here, but you can figure it out. ALSO, be careful that the prying tool, when stuck under, doesn’t damage something underneath. So you should stick the tool as close as the clip as possible. If anything obstructs the tool from getting under, don’t force it, but rather move the tool over to a spot where there is no obstruction.
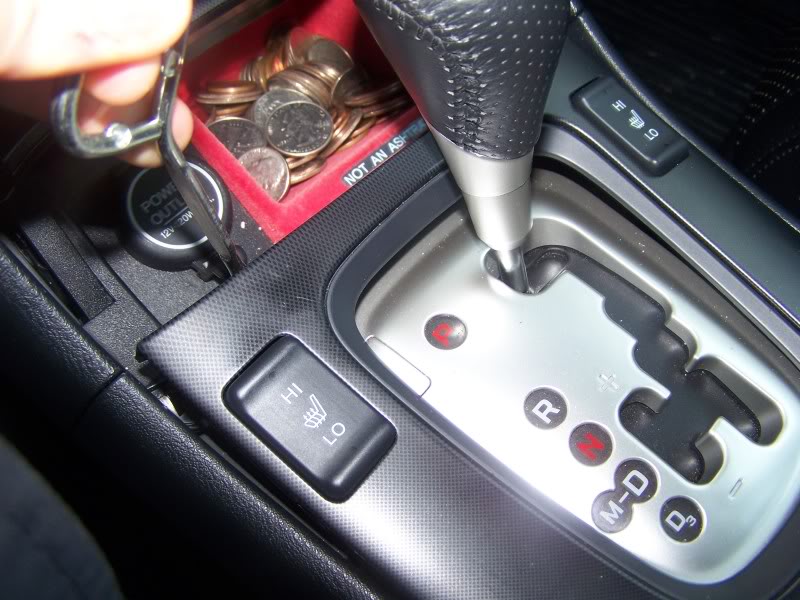
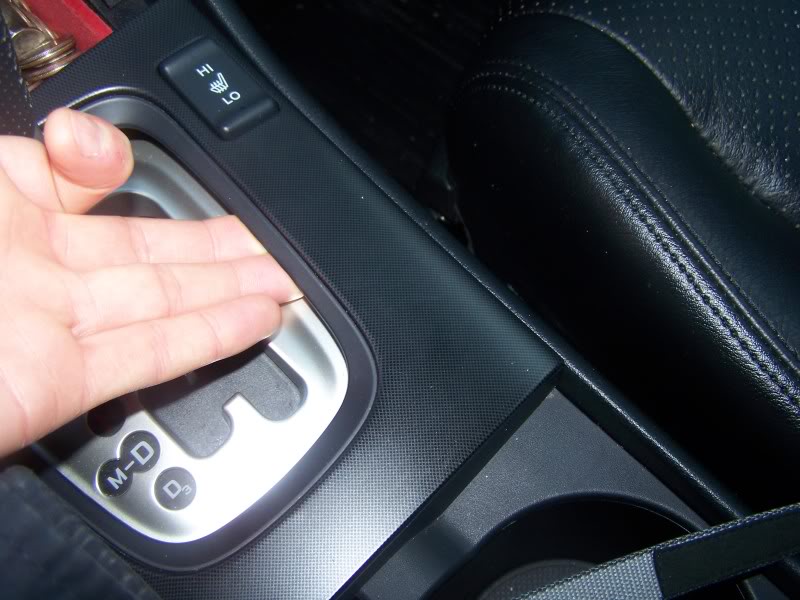
Next, pry up the clips on the sides (4 total, so 4 separate pryings):
^^Again, there are some points along the side where plastic blocks you from inserting the tool, so pull the panel up a little and look to see where. You’ll most likely have to also stick your hand underneath and push up while prying the sides, like this:
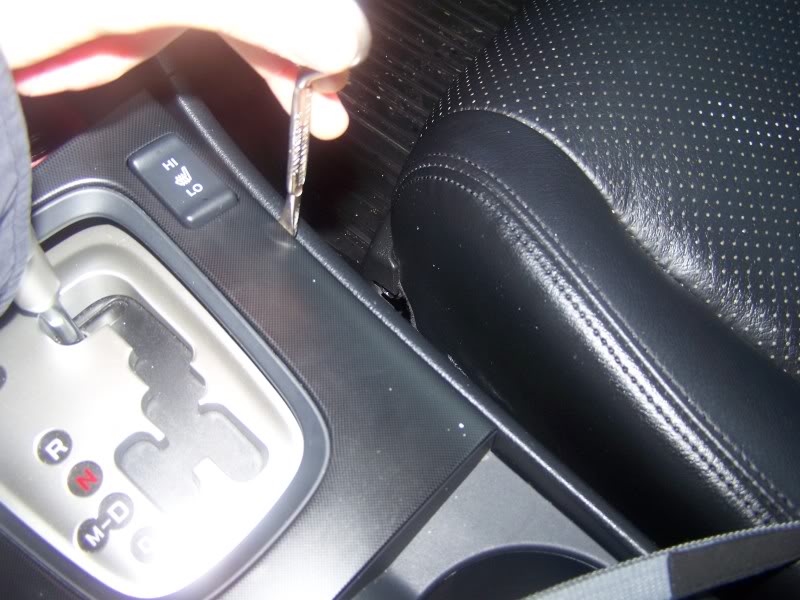
Next (and last), get the two back clips up by the e-brake:
Stick the tool in like this first:

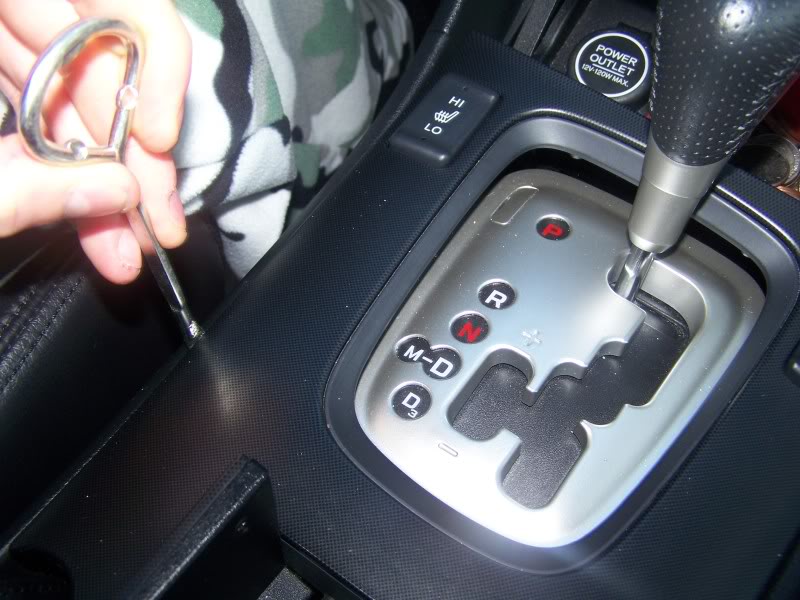
...then tilt it upward to get the prying tip under and pull:
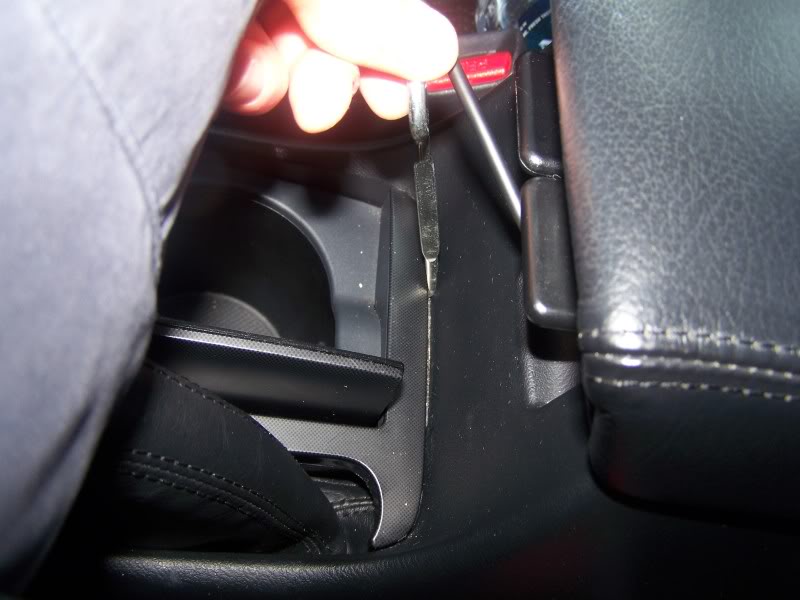
...do the same exact thing to the other back clip here:
Below is it disconnected. You still have to unplug the heater switches, so don’t pull too hard until you do:
I also post 2 pics below of the back of the panel after disconnection. Notice where the 8 clips are:
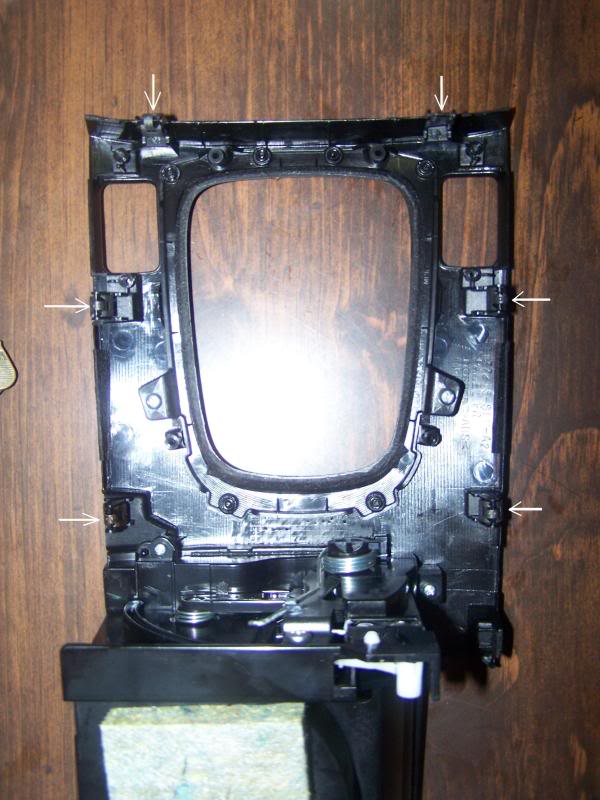

Note: I didn't show any pics of me pulling. I just showed me placing the tool underneath. You'll have to pull pretty hard with the prying tool, but be careful, and if you sense something might break, then stop pulling and reposition the tool.
Since it is so hard to get off, I used a metal prying tool, which is frowned upon because of risk of scratching, but I never scratched mine yet with this tool. If you’re careful, the tool might only scratch underneath where you can’t see, but that’s it. BUT you have to be careful. If you’re worried, place a cloth between the tool and the points of contact.
Disclaimer: I’m not responsible for damage/injury. If you don’t like the metal prying tool, pursue a different method.
Here is the tool:
Start here and get the two clips up in the front by the ashtray:
^^getting the tool underneath is not straight-forward. You’ll have to use a separate plastic tool to help pull the panel up a little so you can fit the prying tool under. I didn’t show that here, but you can figure it out. ALSO, be careful that the prying tool, when stuck under, doesn’t damage something underneath. So you should stick the tool as close as the clip as possible. If anything obstructs the tool from getting under, don’t force it, but rather move the tool over to a spot where there is no obstruction.
Next, pry up the clips on the sides (4 total, so 4 separate pryings):
^^Again, there are some points along the side where plastic blocks you from inserting the tool, so pull the panel up a little and look to see where. You’ll most likely have to also stick your hand underneath and push up while prying the sides, like this:
Next (and last), get the two back clips up by the e-brake:
Stick the tool in like this first:
...then tilt it upward to get the prying tip under and pull:
...do the same exact thing to the other back clip here:
Below is it disconnected. You still have to unplug the heater switches, so don’t pull too hard until you do:
I also post 2 pics below of the back of the panel after disconnection. Notice where the 8 clips are:
Note: I didn't show any pics of me pulling. I just showed me placing the tool underneath. You'll have to pull pretty hard with the prying tool, but be careful, and if you sense something might break, then stop pulling and reposition the tool.
Last edited by aCUREa; 04-22-2009 at 07:00 PM. Reason: needed to add final note on bottom
05-18-2009 | 05:26 PM
#34

3rd Gear
Joined: May 2006
Posts: 3
Likes: 0
 01-15-2010 | 07:28 PM
#36

1st Gear
Joined: Aug 2007
Posts: 1
Likes: 0
Sorry for bumping this old thread but I wanted to jump in and just thank everyone for their pictures and advice that helped me fix a problem I've had since March 09. I was rearended at 50 mph while waiting at a red light and after $10,000 in repairs, I noticed that the my center console CD holder didn't shut anymore. I weakly remembered that right after the accident I had tried to shut it while filling out the police report but in all the excitement forgot about it. I figured the accident was violent enough that something had broken inside the console that causes it to lock shut. I took it to an Acura dealer to find out about a replacement but didn't have the money and just decided to live with it. Everytime I would look at it, constantly hanging open, contents spilling out whenever I'd accelerate I would become annoyed all over again. Here at work I had some free time to kill and was browsing different iPod intigration kits and someone mentioned taking out the center console and I was reinvested. I would go home and get my toolkit and I would fix the damn thing myself! Just needed a guide to start me out and this was the first thread that popped up in my search. I immediately ran out into the parking lot of my work to see if the solution really was that easy. Boy, do I feel dumb that I've lived with it this long! And after about a minute of looking at how the little mechanism works, got it back in the proper position, replaced the console and am so stupidly excited about it that I came running right back here to thank you guys! Sorry about this content-less, stream of consciousness gushing but this has made me so happy. Thanks again, and drive safe everyone!
06-16-2010 | 11:12 PM
#37
Pro
Joined: Apr 2006
Posts: 702
Likes: 12
Anyone know if it's possible to remove the black storage box inside the center console? I'm talking about removing the box that holds the mp3 jack and the aux power in the 06+ models. I have the helms manual, but it doesn't show how to remove the box inside the center console. I've tried to do it myself, but I don't see a way to do it. Maybe I have to take the entire console out of the car first. Any advice?
06-17-2010 | 04:30 PM
#39
Pro
Joined: Apr 2006
Posts: 702
Likes: 12
I took out all the screws that hold the entire console to the car, and I removed all the screws in the console box, but the box seems to be almost pressure fit in there with no way to remove it. short of cutting open the console.


Thread
Thread Starter
Forum
Replies
Last Post
SidhuSaaB
3G TL Problems & Fixes
18
05-30-2020 12:40 AM
detailersdomain
Wash & Wax
3
10-09-2015 10:13 PM
ExcelerateRep
Sponsored Sales & Group Buys
0
09-22-2015 10:39 AM