DIY: TSX Fog Bulb Replacement (Step by step w/ pics)
 09-16-2006, 12:25 PM
#1
Doesn't Rice His Car
Thread Starter
Join Date: Jul 2006
Location: Kansas City Area
Age: 42
Posts: 1,053
Likes: 0
Received 2 Likes
on
1 Post
DIY: TSX Fog Bulb Replacement (Step by step w/ pics)
Accessing the bulbs were a piece of cake. I had a hell of a time removing one of the bulbs though because the harness would not come off (I was not pressing down on the right place). Anyhow, even though it's a pretty easy, I took pictures along the way to help modification noobs (such as myself). Hopefully you'll have better luck than I did, and it will only take 10 minutes or so.  This was performed on an 06' TSX
Tools needed:
Flash light/work light
Small flat head screwdriver
10mm wrench/socket
gloves/cloth to handle bulbs (optional)
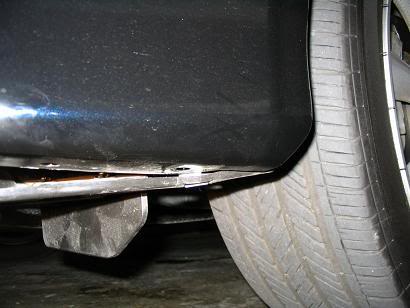
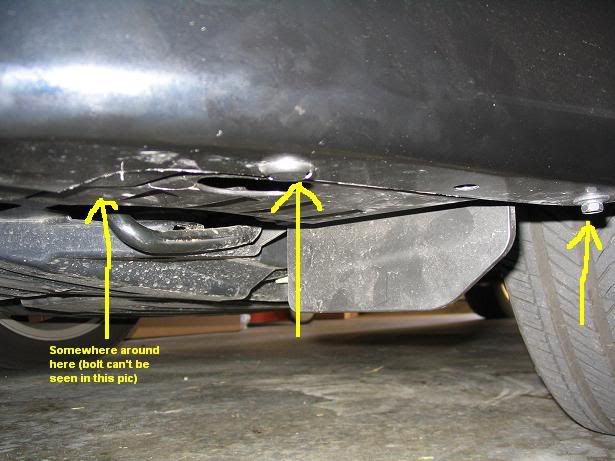
1) Remove 2 bolts and 1 "clip" (w/ a flat head screwdriver) located below.
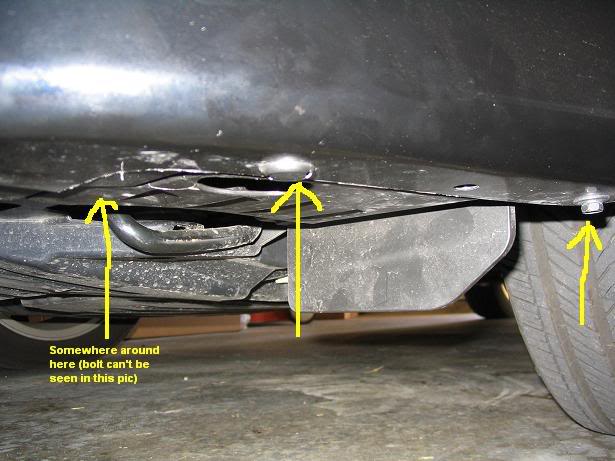
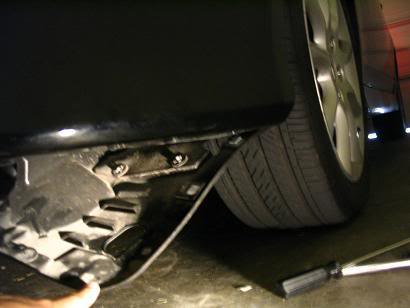
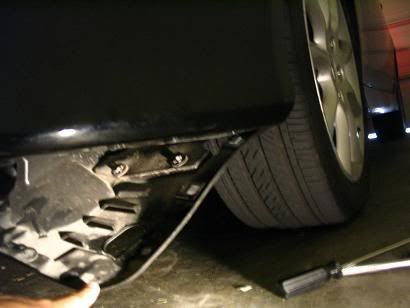
2) Begin to untuck the plastic cover from under the car. It's very flexible, but may require a little bit of persuation to come out.
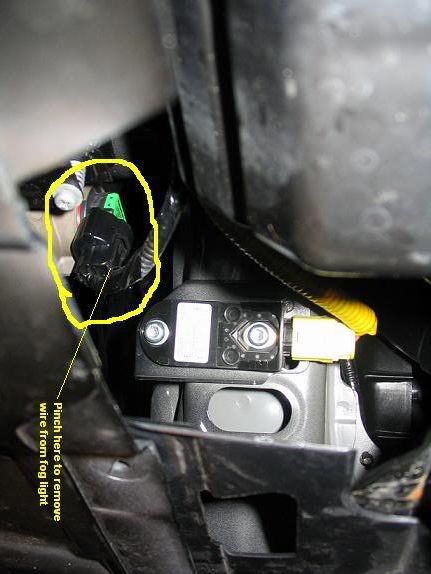
3a) Slide under the car and peak up and find where the fog light is located (circled in picture below).
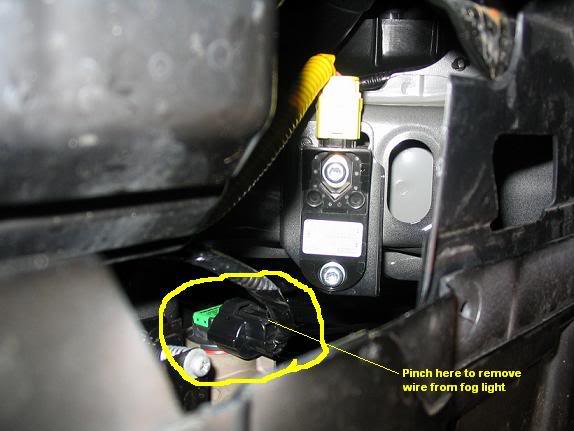
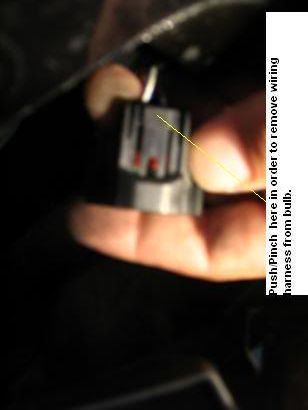
3b) Pinch exactly where it is shown in the picture and pull down gently to remove the wiring harness from the bulb. **NOTE: Bulb can NOT be removed until you disconnect the wiring harness from the bulb.
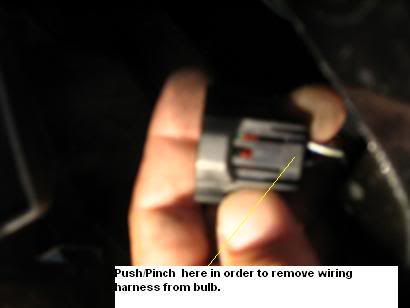
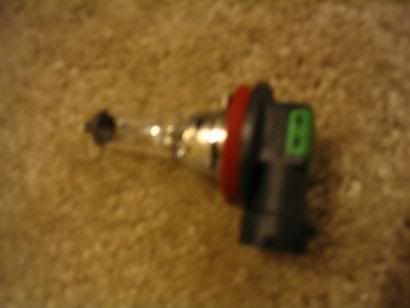
4) After you have removed the wiring harness from the bulb, twist the bulb counterclockwise to remove it from the fog housing. **Note: You must twist the bulb in order to get the bulb out of the housing. Do not touch the bulb part of the foglight with your bare hands

5) Put new bulb of choice back into the fog light housing by twisting clockwise. This step requires a bit of feeling around. Be sure not to bang your bulb around when you're trying to put it back in.
6) Attach wiring harness back into the bulb by simply "snapping" it back in.
7)Tuck plastic cover back up under the car and replace the bolts and clip.
8) Repeat steps for the other bulb.
This was performed on an 06' TSXTools needed:
Flash light/work light
Small flat head screwdriver
10mm wrench/socket
gloves/cloth to handle bulbs (optional)
1) Remove 2 bolts and 1 "clip" (w/ a flat head screwdriver) located below.
2) Begin to untuck the plastic cover from under the car. It's very flexible, but may require a little bit of persuation to come out.
3a) Slide under the car and peak up and find where the fog light is located (circled in picture below).
3b) Pinch exactly where it is shown in the picture and pull down gently to remove the wiring harness from the bulb. **NOTE: Bulb can NOT be removed until you disconnect the wiring harness from the bulb.
4) After you have removed the wiring harness from the bulb, twist the bulb counterclockwise to remove it from the fog housing. **Note: You must twist the bulb in order to get the bulb out of the housing. Do not touch the bulb part of the foglight with your bare hands
5) Put new bulb of choice back into the fog light housing by twisting clockwise. This step requires a bit of feeling around. Be sure not to bang your bulb around when you're trying to put it back in.
6) Attach wiring harness back into the bulb by simply "snapping" it back in.
7)Tuck plastic cover back up under the car and replace the bolts and clip.
8) Repeat steps for the other bulb.

The following 2 users liked this post by studville:
C00TS (03-19-2016),
DemonPoofball (03-31-2014)
01-20-2007, 02:21 PM
#3
Burning Brakes
Join Date: May 2006
Location: Portland, OR
Age: 41
Posts: 752
Likes: 0
Received 0 Likes
on
0 Posts
great DIY writeup! it helped me a lot in installing my new bulbs.
however, i found that i only had to remove one bolt on each side (it was black, and it held two underbody plastic pieces together) to do the swaps. if you remove the one bolt, you can push your hand up through between the two pieces (as it says in the manual) and do it without having to pull down the under cover
however, i found that i only had to remove one bolt on each side (it was black, and it held two underbody plastic pieces together) to do the swaps. if you remove the one bolt, you can push your hand up through between the two pieces (as it says in the manual) and do it without having to pull down the under cover
01-20-2007, 02:32 PM
#4
Team Owner
Join Date: Feb 2006
Location: District of Corruption
Age: 36
Posts: 23,588
Received 105 Likes
on
69 Posts
Originally Posted by ruffellprefley
great DIY writeup! it helped me a lot in installing my new bulbs.
however, i found that i only had to remove one bolt on each side (it was black, and it held two underbody plastic pieces together) to do the swaps. if you remove the one bolt, you can push your hand up through between the two pieces (as it says in the manual) and do it without having to pull down the under cover
however, i found that i only had to remove one bolt on each side (it was black, and it held two underbody plastic pieces together) to do the swaps. if you remove the one bolt, you can push your hand up through between the two pieces (as it says in the manual) and do it without having to pull down the under cover
However, please oh PLEASE remember to secure the two underbody pieces together. My bolt was NOT fastened and fell out while I was driving over the months, and I had water go up into that area and blow out one of my bulbs. Avoid and please check your bolts.
08-24-2007, 08:49 PM
#6
Racer
Join Date: Aug 2006
Location: CA
Posts: 486
Likes: 0
Received 0 Likes
on
0 Posts
Thanks for the write-up, it really helped when I installed my "2500k" Nokya's today! I Know I could have done it by just removing that one bolt, but it was easier at first to remove all three because I didn't know where everything was.
Thanks again!
Thanks again!

Trending Topics
08-28-2007, 04:37 PM
#10
Three Wheelin'
Join Date: Feb 2007
Location: Rockville, MD
Age: 39
Posts: 1,554
Likes: 0
Received 0 Likes
on
0 Posts
Originally Posted by xjohnkdoex
hoen xenonmatch H11's seem to get some pretty good feedback. i've been looking into possibly getting those bulbs.
 . The Hoens have surpassed the Nokyas already.
08-29-2007, 12:14 AM
. The Hoens have surpassed the Nokyas already.
08-29-2007, 12:14 AM
#11
Racer
Join Date: Aug 2006
Location: CA
Posts: 486
Likes: 0
Received 0 Likes
on
0 Posts
Originally Posted by CGTSX07
I have the Hoens and they do look good. I had the yellow Nokyas before that and loved them, but they blew out early . The Hoens have surpassed the Nokyas already.
. The Hoens have surpassed the Nokyas already.
08-29-2007, 01:54 PM
#14
Old Man Yelling at Clouds
Nice writeup! I'm about to do just that with some new bulbs...
08-29-2007, 03:58 PM
#15
Burning Brakes
I have had my Hoens for about 15 months and they are still alive and kicking. I use them everynight I drive and they haven't blown yet. These are wayyyy better than any Piaa bulb or Nokya's hands down.

 08-17-2008, 10:01 PM
#19
gets all the crazy chicks
Join Date: May 2007
Location: Dirty Jersey
Age: 44
Posts: 300
Likes: 0
Received 0 Likes
on
0 Posts
With Hoen Endurance fogs (I'll post more tomorrow):


Honestly, for $50 I can't say I'm too impressed. I was expecting it to be a bit more..yellow. I guess I'll have to Lamin-X it.

Honestly, for $50 I can't say I'm too impressed. I was expecting it to be a bit more..yellow. I guess I'll have to Lamin-X it.
03-24-2010, 12:45 AM
#20
AcuraZine
Join Date: Aug 2007
Location: Virginia
Posts: 66
Likes: 0
Received 0 Likes
on
0 Posts
Has any one tried to do this with the A-spec bumper? I spent an hour trying to figure it out and failed, must have missed something while under the car. So if some one can do a small write up or use a photo that would be helpful. Thanks
03-24-2010, 01:35 PM
#21
Site Lurker, Rare poster
This is actually a more involved DIY. All you really have to do is remove one bolt under the car. The kit itself won't get in the way so whether you have a lip kit or not won't matter.
Remove this one bolt and the flap actually pushes in. Plenty of clearance for your hand to get in there and swap out the bulbs. I don't have a pic of it but even if you look in the owner's manual it will show you what you need to do. I was able to remove the bulb with it attached as well, I have an 08 so not sure if the wires were maybe longer or not. Took me about 5-10 mins first time I did it to find the right bolt lol.
Remove this one bolt and the flap actually pushes in. Plenty of clearance for your hand to get in there and swap out the bulbs. I don't have a pic of it but even if you look in the owner's manual it will show you what you need to do. I was able to remove the bulb with it attached as well, I have an 08 so not sure if the wires were maybe longer or not. Took me about 5-10 mins first time I did it to find the right bolt lol.
03-24-2010, 09:25 PM
#22
AcuraZine
Join Date: Aug 2007
Location: Virginia
Posts: 66
Likes: 0
Received 0 Likes
on
0 Posts
This is actually a more involved DIY. All you really have to do is remove one bolt under the car. The kit itself won't get in the way so whether you have a lip kit or not won't matter.
Remove this one bolt and the flap actually pushes in. Plenty of clearance for your hand to get in there and swap out the bulbs. I don't have a pic of it but even if you look in the owner's manual it will show you what you need to do. I was able to remove the bulb with it attached as well, I have an 08 so not sure if the wires were maybe longer or not. Took me about 5-10 mins first time I did it to find the right bolt lol.
Remove this one bolt and the flap actually pushes in. Plenty of clearance for your hand to get in there and swap out the bulbs. I don't have a pic of it but even if you look in the owner's manual it will show you what you need to do. I was able to remove the bulb with it attached as well, I have an 08 so not sure if the wires were maybe longer or not. Took me about 5-10 mins first time I did it to find the right bolt lol.
03-25-2010, 09:21 AM
#23
Site Lurker, Rare poster
Unfortunately I don't have a picture of it. When you go under the car, you'll see the bolts going into the bumper itself. Then on the black flaps (like pictured above in the first pic) you'll see a black bolt iirc. You undo this one bolt and you'll push the flap in and not pull it down and out as shown above. If you or someone can take a picture of the bottom front I might be able to see it there and tell you which one specifically. It will be on the black under trim and not on the actual bumper itself. I'll see if I can find a copy of it in the manual online and link it.
03-26-2010, 12:00 PM
#24
Site Lurker, Rare poster
http://techinfo.honda.com/rjanisis/p...8/EA0808OM.pdf
That's a link that should work to the manual for the 08. Page 309 of the manual itself is the steps for the quick fog light change I used. If you go the quick search on the top of the PDF page it'll be page 312. Under "Lights". Just follow that and you'll be good to go.
That's a link that should work to the manual for the 08. Page 309 of the manual itself is the steps for the quick fog light change I used. If you go the quick search on the top of the PDF page it'll be page 312. Under "Lights". Just follow that and you'll be good to go.
02-09-2014, 12:01 PM
#25
Cruisin'
Another option: http://www.carcarekiosk.com/video/20...lights/foglamp
 01-07-2016, 09:36 AM
#27
3rd Gear

Join Date: Jan 2016
Age: 35
Posts: 3
Likes: 0
Received 0 Likes
on
0 Posts
This is actually a more involved DIY. All you really have to do is remove one bolt under the car. The kit itself won't get in the way so whether you have a lip kit or not won't matter.
Remove this one bolt and the flap actually pushes in. Plenty of clearance for your hand to get in there and swap out the bulbs. I don't have a pic of it but even if you look in the owner's manual it will show you what you need to do. I was able to remove the bulb with it attached as well, I have an 08 so not sure if the wires were maybe longer or not. Took me about 5-10 mins first time I did it to find the right bolt lol.
Remove this one bolt and the flap actually pushes in. Plenty of clearance for your hand to get in there and swap out the bulbs. I don't have a pic of it but even if you look in the owner's manual it will show you what you need to do. I was able to remove the bulb with it attached as well, I have an 08 so not sure if the wires were maybe longer or not. Took me about 5-10 mins first time I did it to find the right bolt lol.
Most tsx models have a removable bezel on the fog light housing. No tools required. 5 second replacement.
01-07-2016, 11:42 AM
#28
3rd Gear
Join Date: Jan 2016
Age: 35
Posts: 3
Likes: 0
Received 0 Likes
on
0 Posts
Accessing the bulbs were a piece of cake. I had a hell of a time removing one of the bulbs though because the harness would not come off (I was not pressing down on the right place). Anyhow, even though it's a pretty easy, I took pictures along the way to help modification noobs (such as myself). Hopefully you'll have better luck than I did, and it will only take 10 minutes or so. This was performed on an 06' TSX
Tools needed:
Flash light/work light
Small flat head screwdriver
10mm wrench/socket
gloves/cloth to handle bulbs (optional)
1) Remove 2 bolts and 1 "clip" (w/ a flat head screwdriver) located below.
2) Begin to untuck the plastic cover from under the car. It's very flexible, but may require a little bit of persuation to come out.

3a) Slide under the car and peak up and find where the fog light is located (circled in picture below).
3b) Pinch exactly where it is shown in the picture and pull down gently to remove the wiring harness from the bulb. **NOTE: Bulb can NOT be removed until you disconnect the wiring harness from the bulb.
4) After you have removed the wiring harness from the bulb, twist the bulb counterclockwise to remove it from the fog housing. **Note: You must twist the bulb in order to get the bulb out of the housing. Do not touch the bulb part of the foglight with your bare hands
5) Put new bulb of choice back into the fog light housing by twisting clockwise. This step requires a bit of feeling around. Be sure not to bang your bulb around when you're trying to put it back in.
6) Attach wiring harness back into the bulb by simply "snapping" it back in.
7)Tuck plastic cover back up under the car and replace the bolts and clip.
8) Repeat steps for the other bulb.
This was performed on an 06' TSXTools needed:
Flash light/work light
Small flat head screwdriver
10mm wrench/socket
gloves/cloth to handle bulbs (optional)
1) Remove 2 bolts and 1 "clip" (w/ a flat head screwdriver) located below.
2) Begin to untuck the plastic cover from under the car. It's very flexible, but may require a little bit of persuation to come out.
3a) Slide under the car and peak up and find where the fog light is located (circled in picture below).
3b) Pinch exactly where it is shown in the picture and pull down gently to remove the wiring harness from the bulb. **NOTE: Bulb can NOT be removed until you disconnect the wiring harness from the bulb.
4) After you have removed the wiring harness from the bulb, twist the bulb counterclockwise to remove it from the fog housing. **Note: You must twist the bulb in order to get the bulb out of the housing. Do not touch the bulb part of the foglight with your bare hands
5) Put new bulb of choice back into the fog light housing by twisting clockwise. This step requires a bit of feeling around. Be sure not to bang your bulb around when you're trying to put it back in.
6) Attach wiring harness back into the bulb by simply "snapping" it back in.
7)Tuck plastic cover back up under the car and replace the bolts and clip.
8) Repeat steps for the other bulb.

Thread
Thread Starter
Forum
Replies
Last Post
prox
5G TLX Problems & Fixes
6
09-01-2015 02:03 AM