
DIY Guide - TL Switchblade key - 60+ Photos
 01-30-2007, 09:48 PM
#1
DIY Guide - TL Switchblade key - 60+ Photos
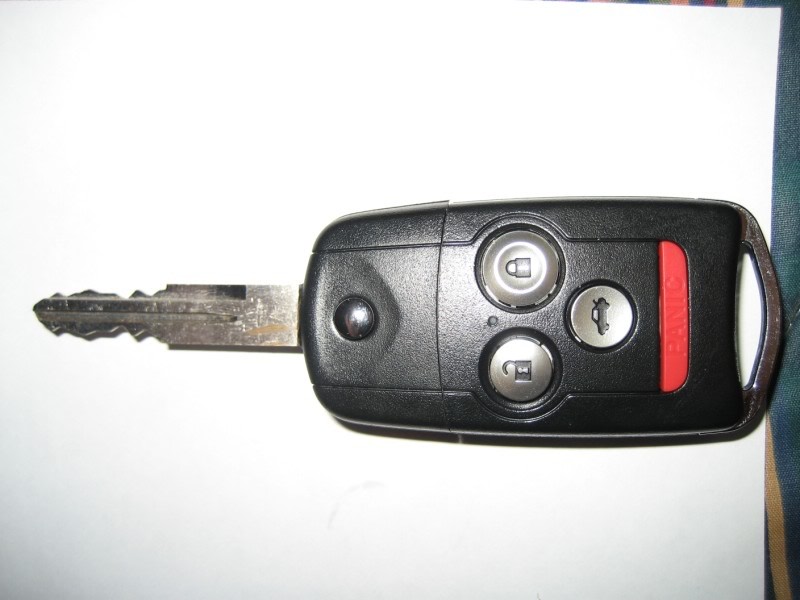
Okay, so this is my first DIY Guide. I think I went overboard but I guess I’ll let you guys be the judge. If you decide to try this mod, I think this guide would definitely be useful but I don’t think it’s a perfect guide by any means. I figured I’d post it up because I took the pictures, might as well try to make them useful. Its more like a “don’t do what I did, be more careful” guide :-P Ok, one other quick story then into the guide. The reason I decided to try this mod is because I felt paying up to $150 for this mod was a bit steep (mill, key cut, program, fob, yada yada). I spent $42 on the key fob from the dealer and I had to buy some JB Weld $4.50, so basically my total cost was $46.50...plus time spent of course. Lastly, props to JKAutoSports on the RSX board for an awesome thread, Bngu1 here on Acurazine for helping me as well and lastly my good friend Budweiser. I plan on making a short video of it functioning as well but for now just pics and text. OK, so here we go!
First of all, I didn’t take any pics of me taking the key apart believe it or not. So I took pics of me re-assembling it so they should be good enough.
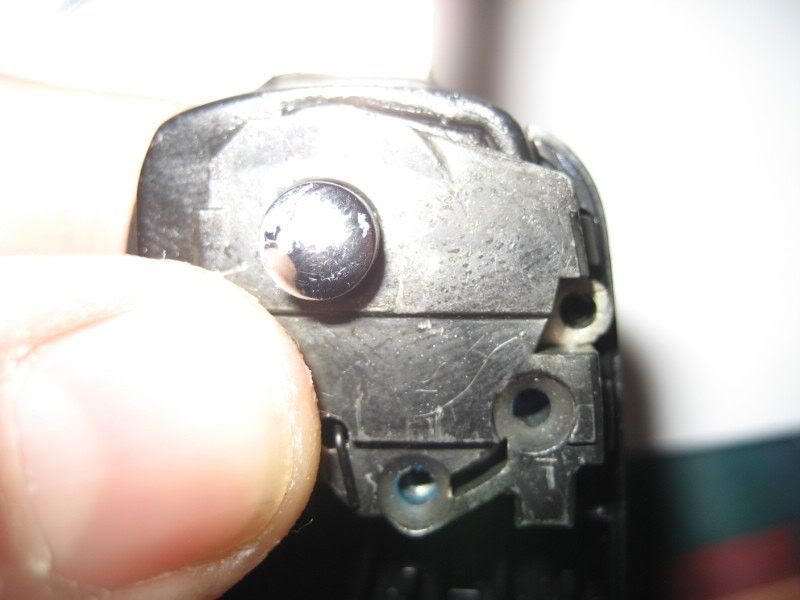
First, I removed the tiny screw on the back. NOTE: It’s easiest to take apart with the key in the “open” position IMO.

Then lifted the button piece up and out.
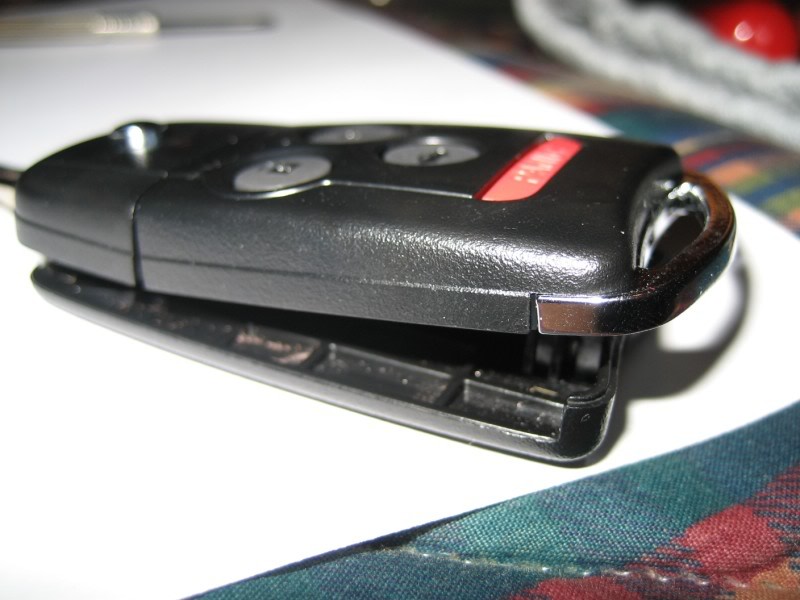
Now to remove the top cover.
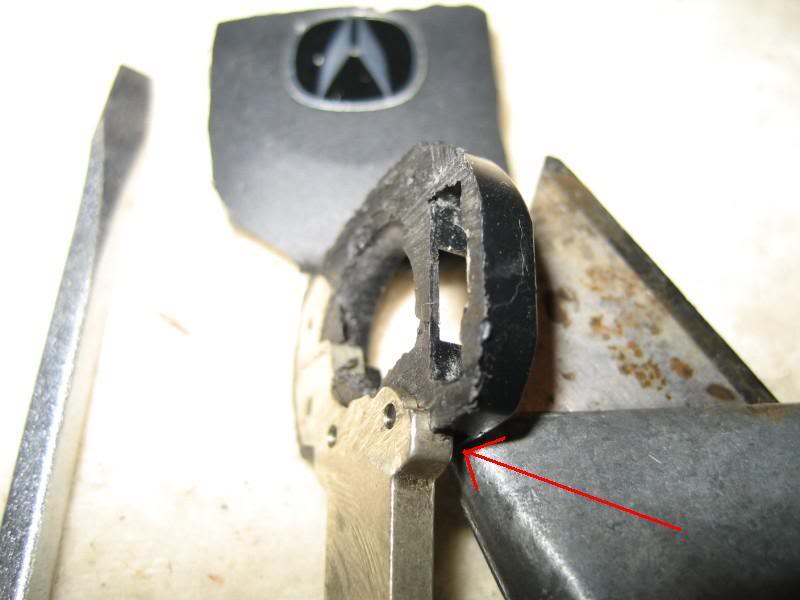
If you look in up there on the left hand side, you will see one clip easily but there is another one farther back as well. Plus there is double-sided tape holding it on. I heated it with a hair dryer to loosen up the tape and carefully pried it off but in the process you can see I bent the second clip I was talking about.


With the metal cover exposed, I removed 3 the screws. They are a pain because they are locktited.
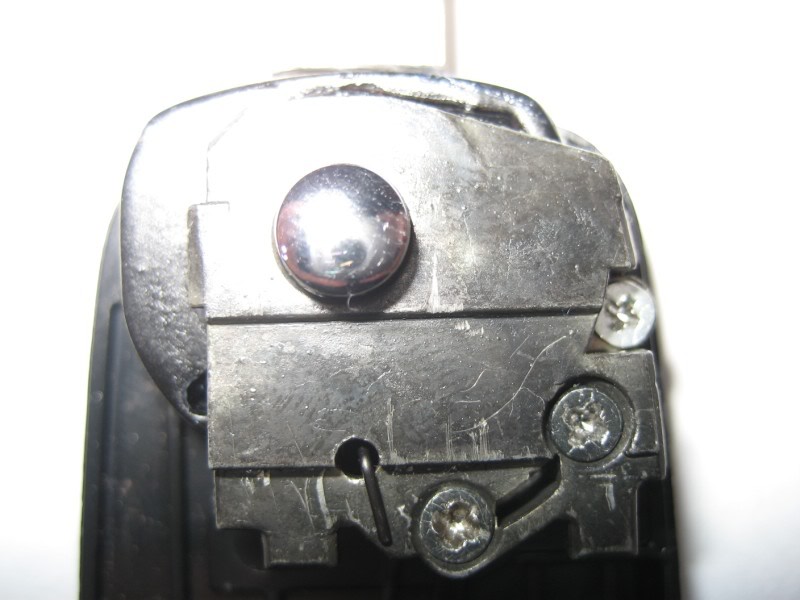
Once the screws are out, the spring will force the metal cover to twist counter-clockwise then the cover slides off. You just have to make sure you don’t bend the part of the spring that sticks out above the metal cover. Its next to the bottom screw.
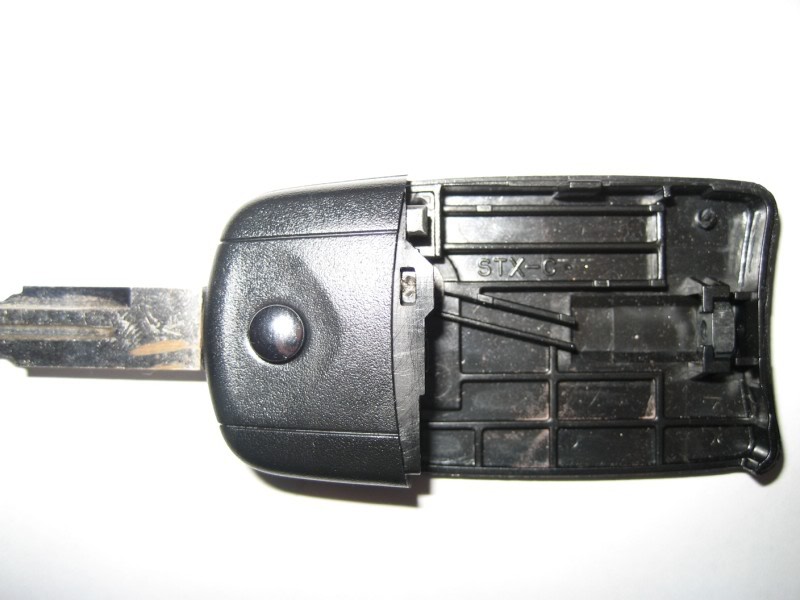
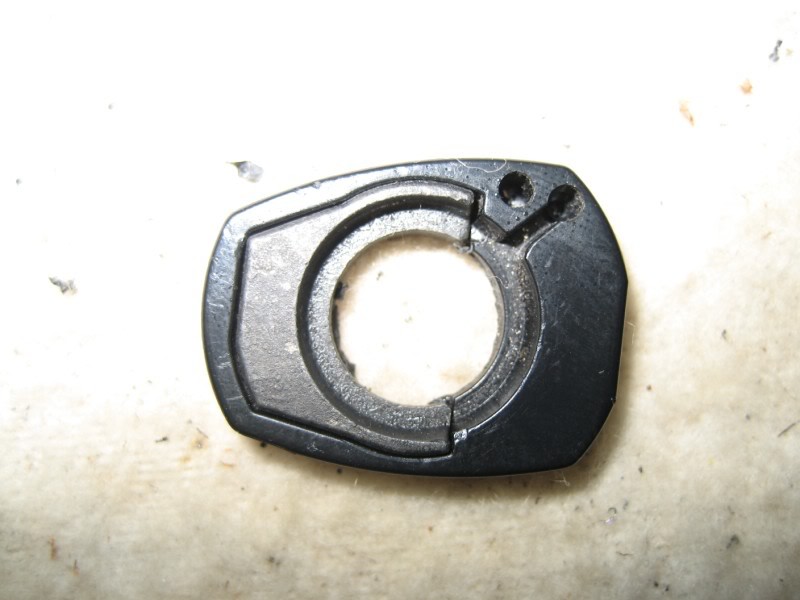
Now with the metal cover off and the spring out the key should slide right out.
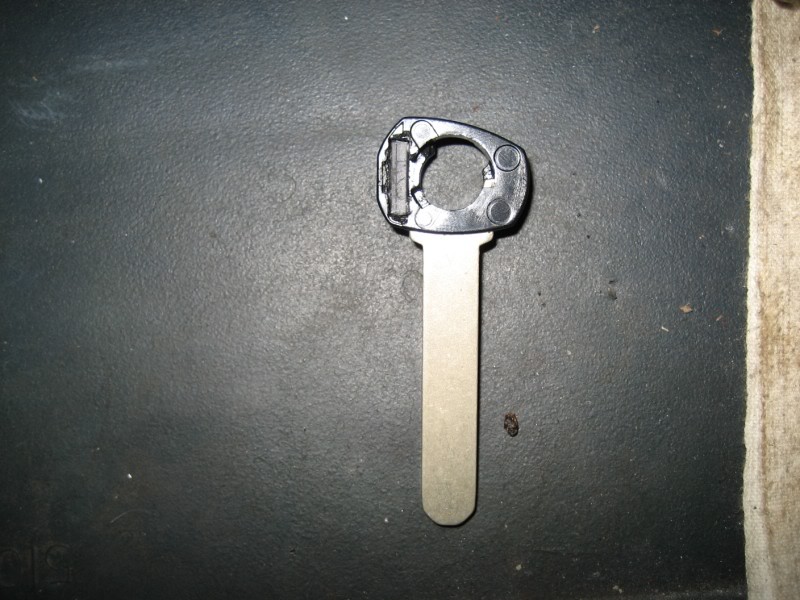
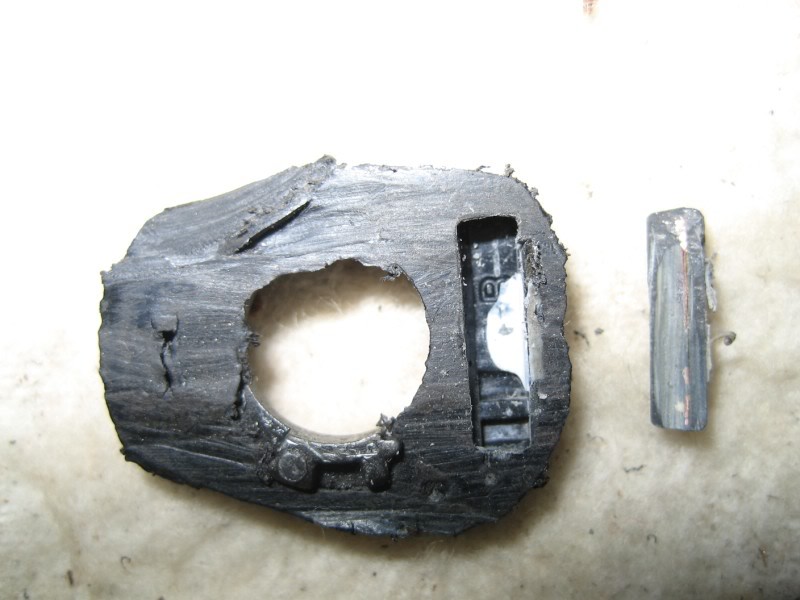
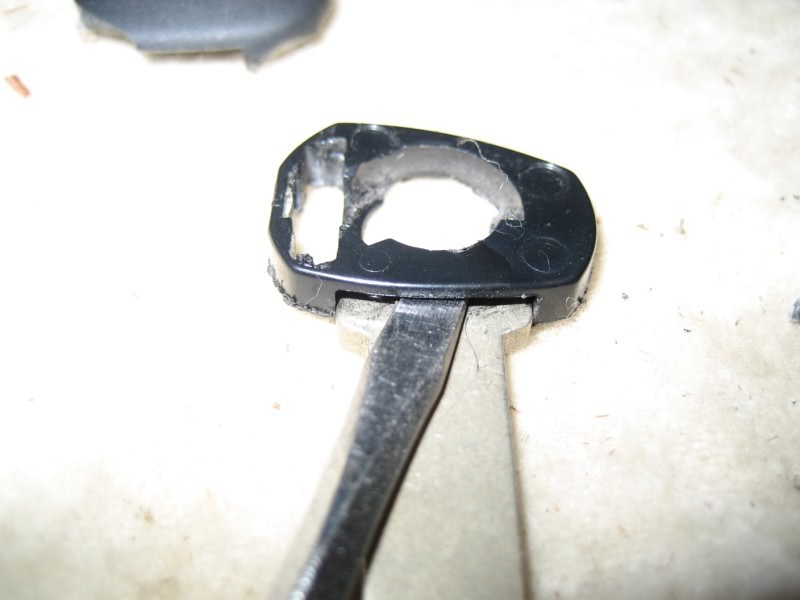
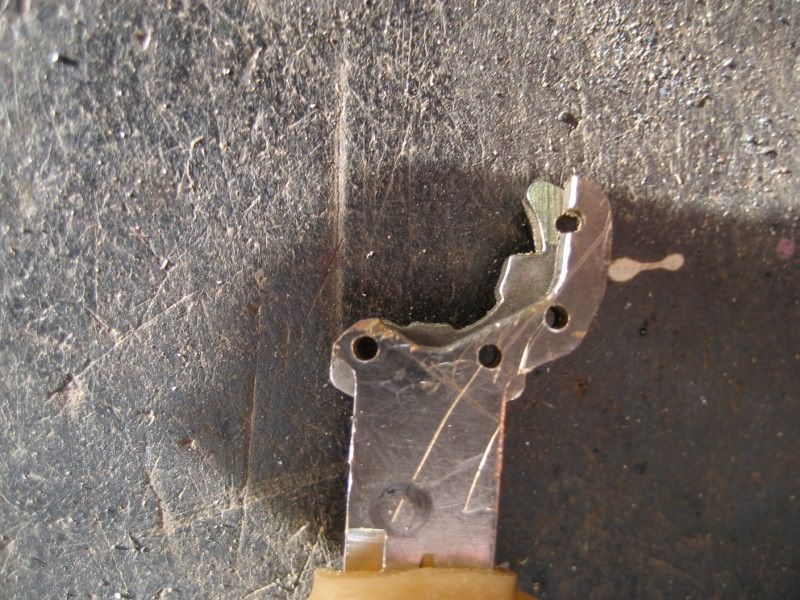
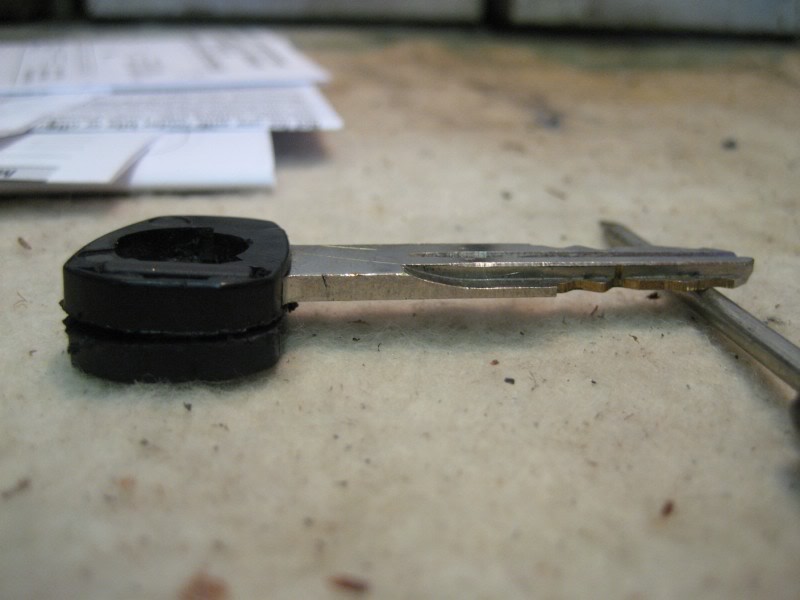
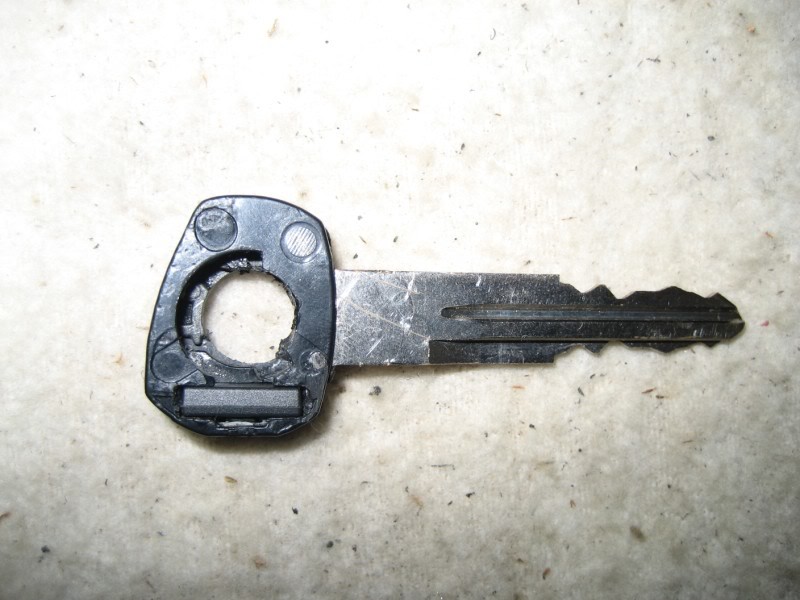
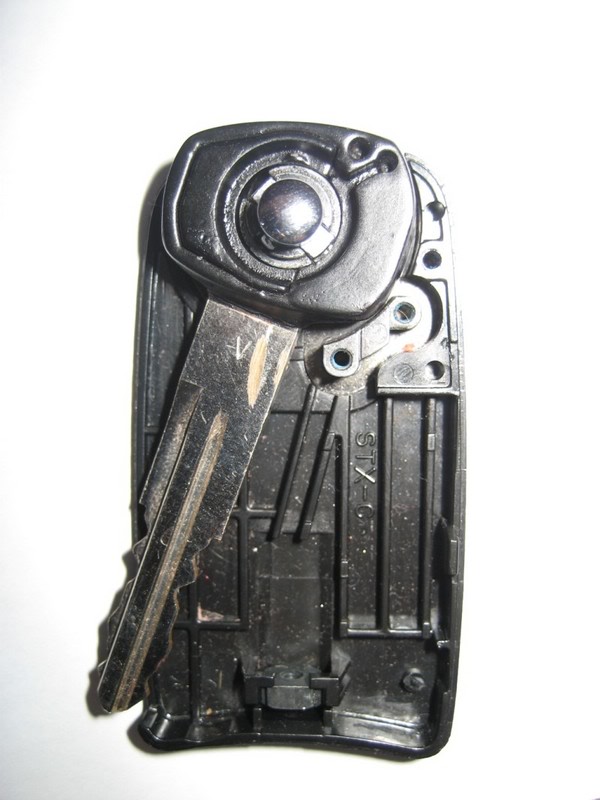
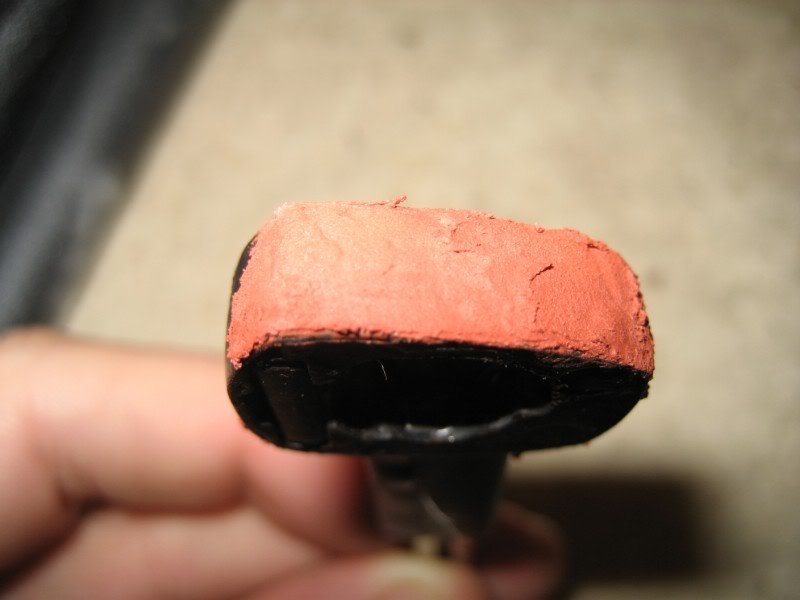
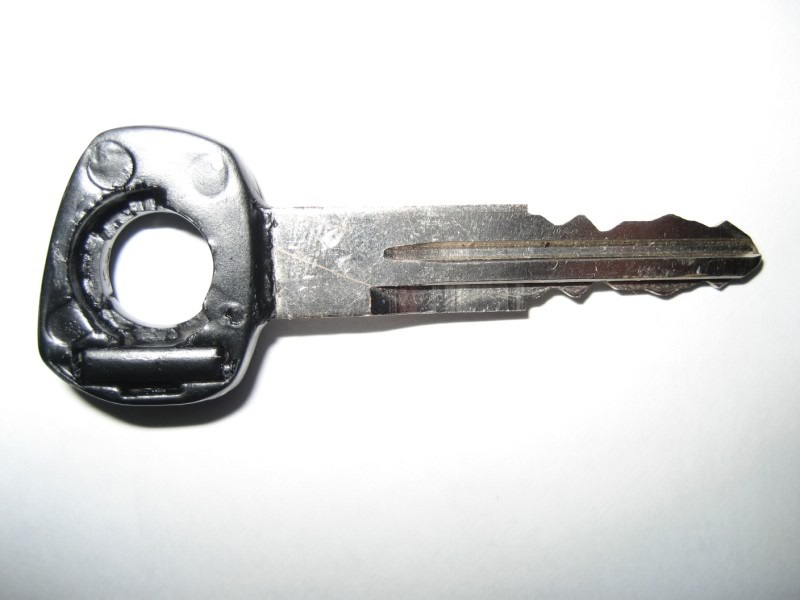
Here is the key. You can see the immobilizer in the little slot on the left. It’s buried in there nice and tight. There was a little flap/door hiding the chip but when I was prying it up it broke off. No worries, you don’t really need it anyway, JB weld and/or superglue will hold the new chip in.
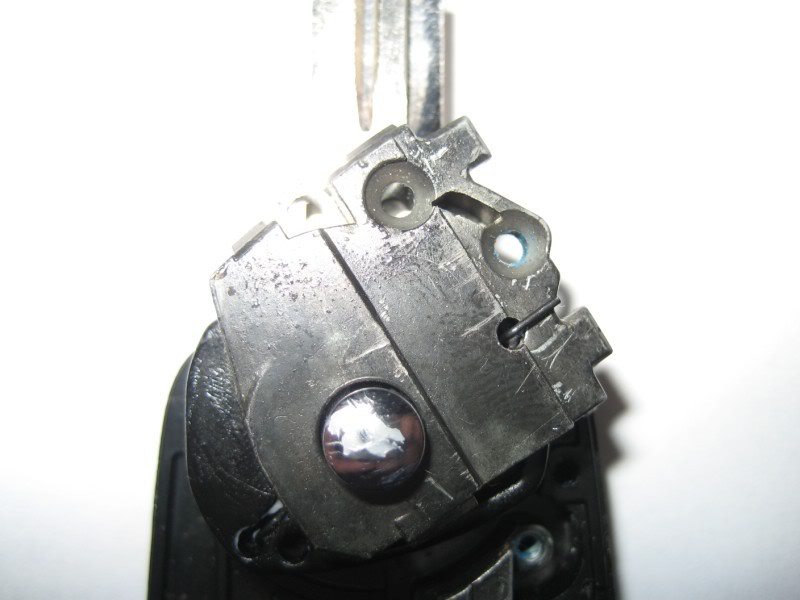
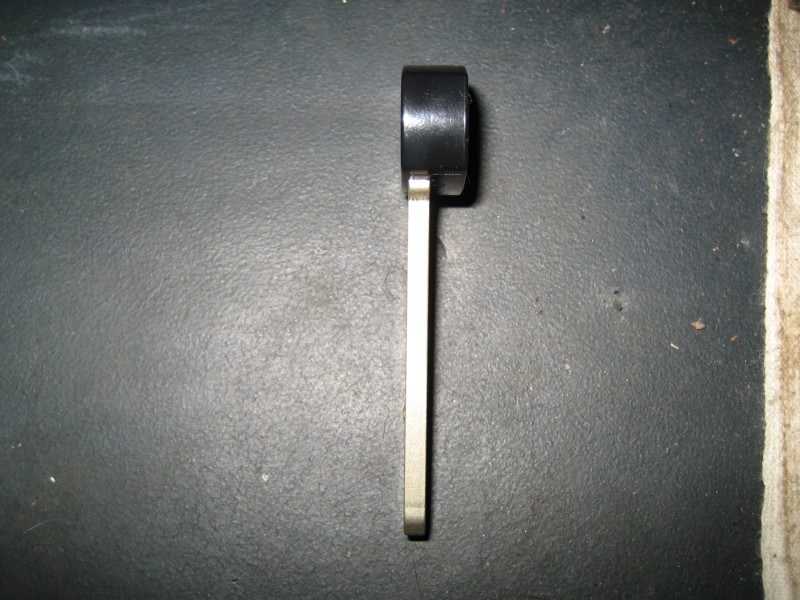
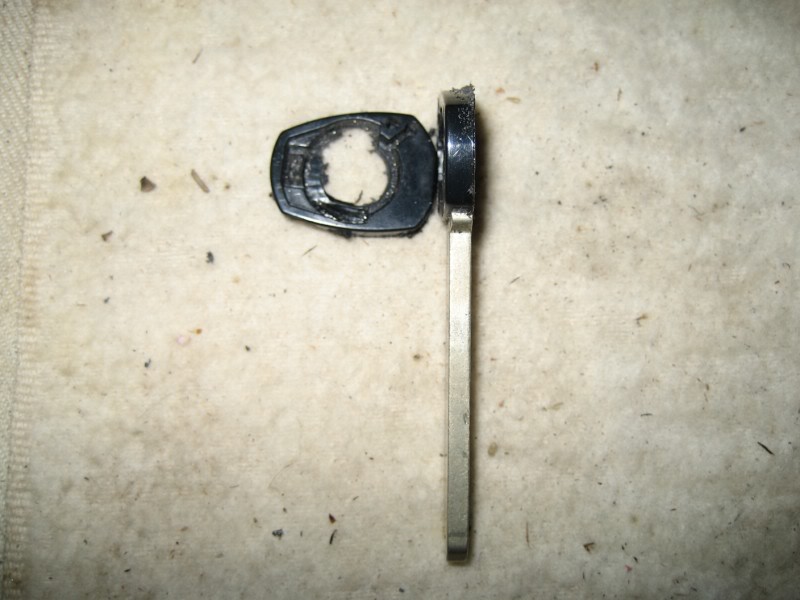
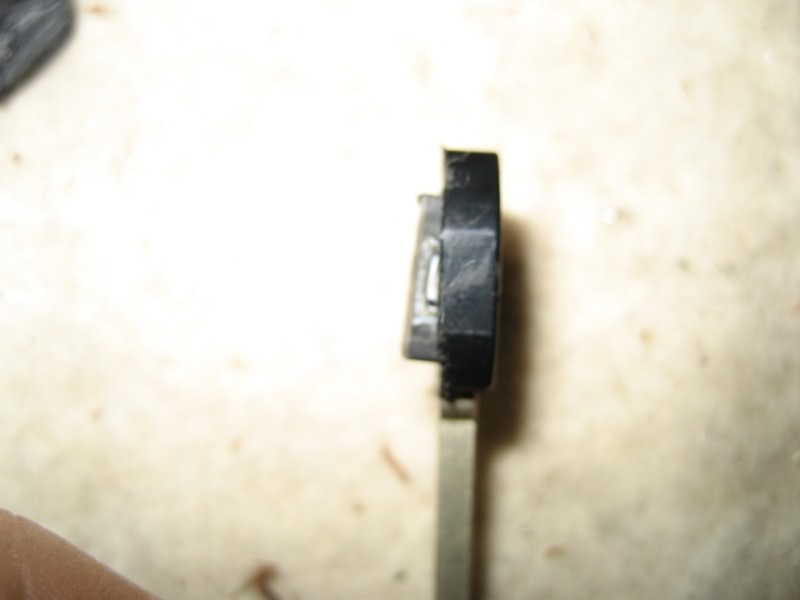
Next photo is a profile of the key. You can see its not dead center and that’s a good thing for the way I’m cutting the key apart.
Here is the backside of the key. As you notice on both sides there are molded grooves in the plastic and I tried to keep them intact as much as possible.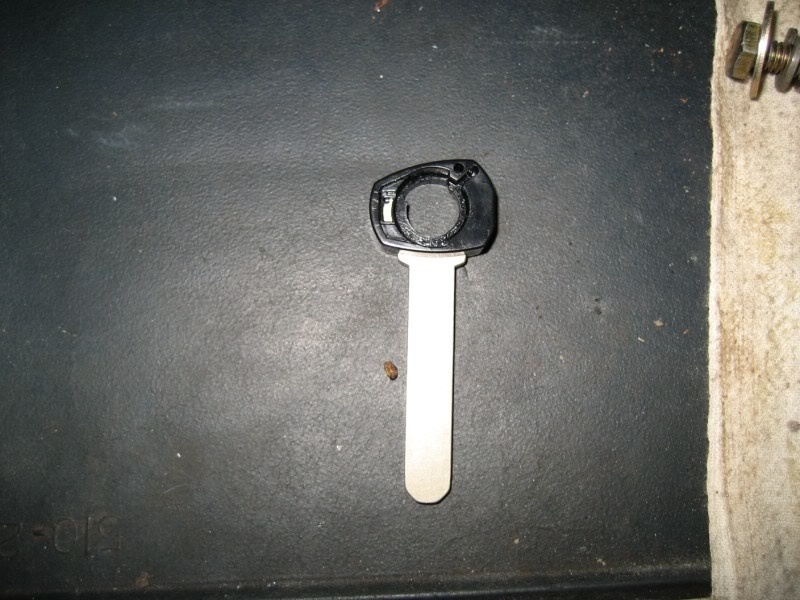
Macro shot of the immobilizer chip.

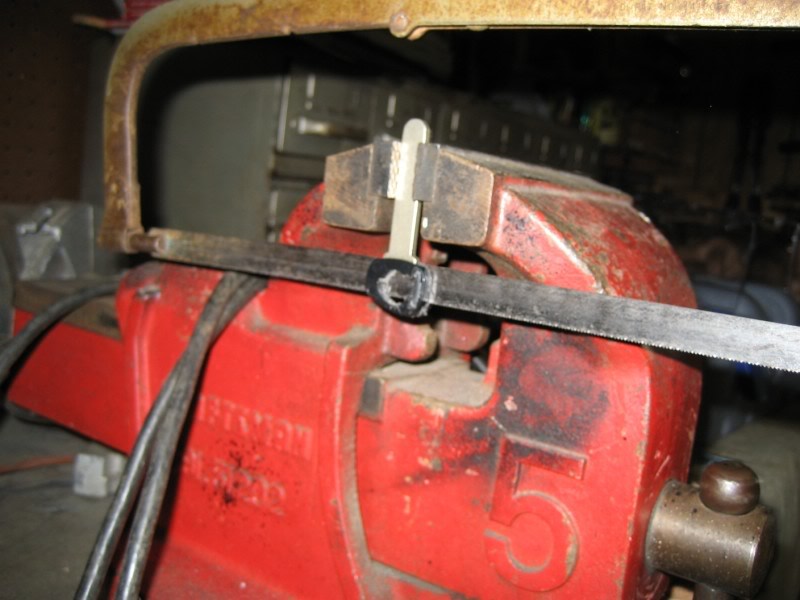
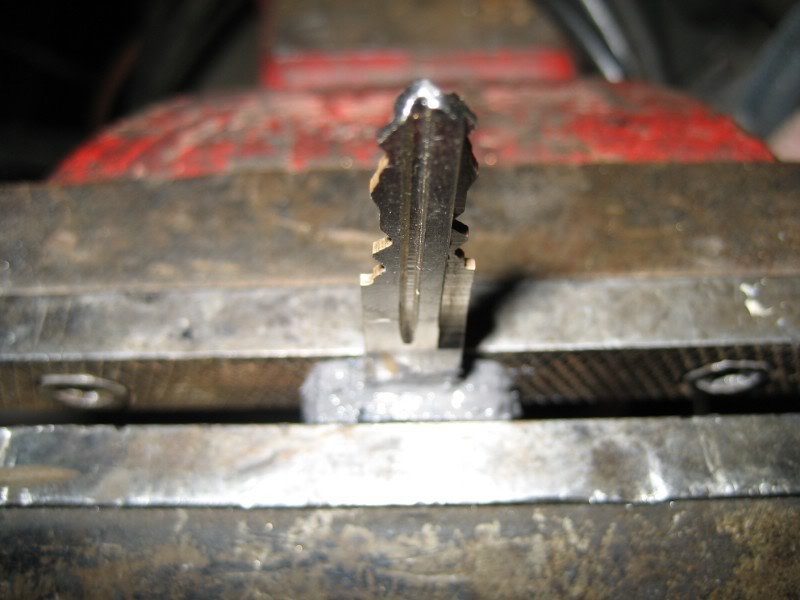
The plan was to cut the key in half with a hacksaw so I mounted the key in a vice.
I placed the hacksaw blade flush with the blank key and tried to cut straight down through the plastic.
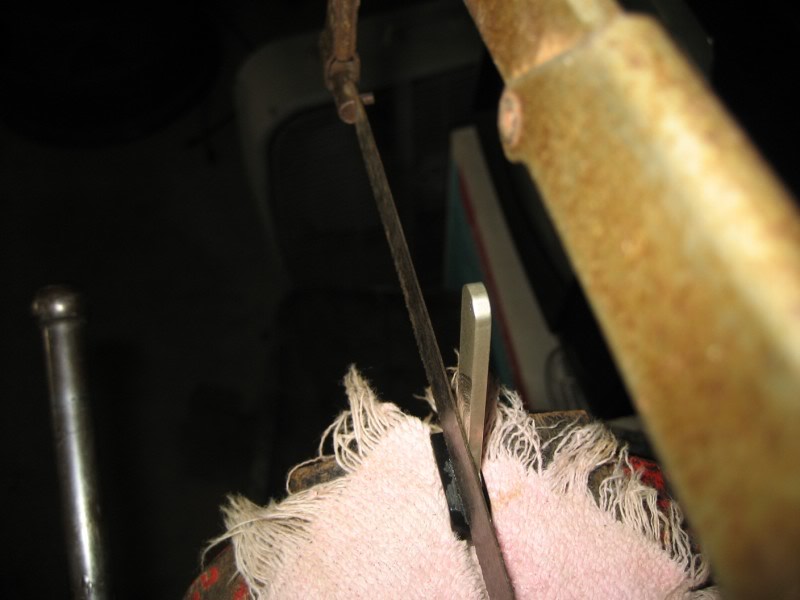
Shot of cut line started here. Take your time! The plastic isn’t super strong.
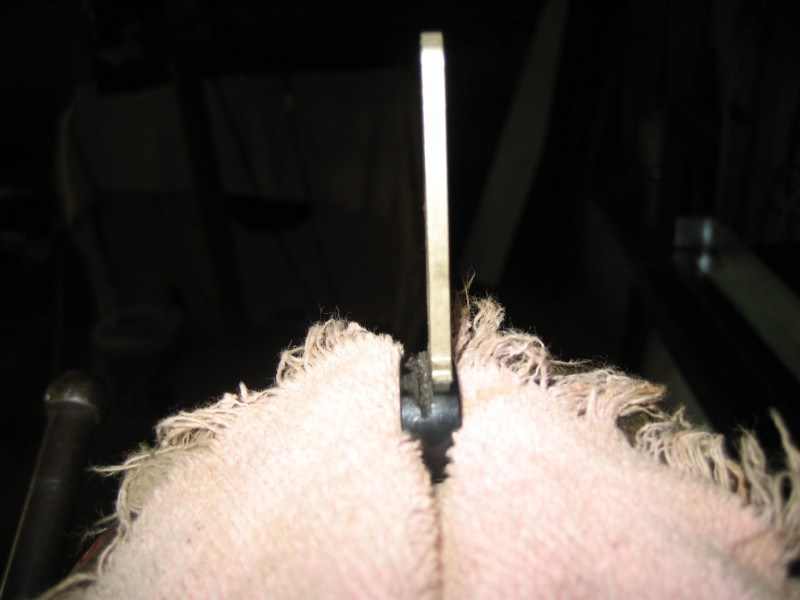
After going about half way through, the vice started naturally closing the gap I cut so I had to remount the key in the vice like this and finish cutting the key in half. Did I mention take your time? Three quarters of the way through I could see the already cut upper part moving back and forth as I tried to cut. I thought it was going to snap off but patience and a nice smooth sawing motion got it done.
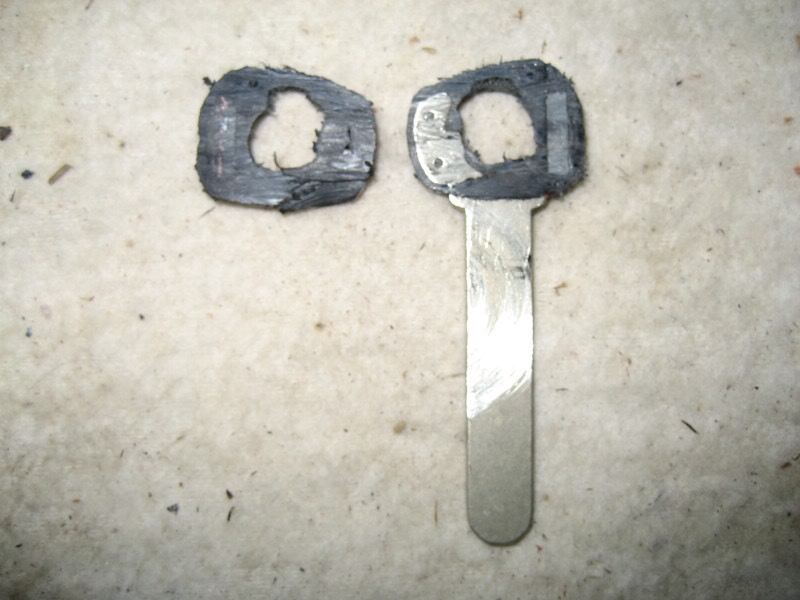
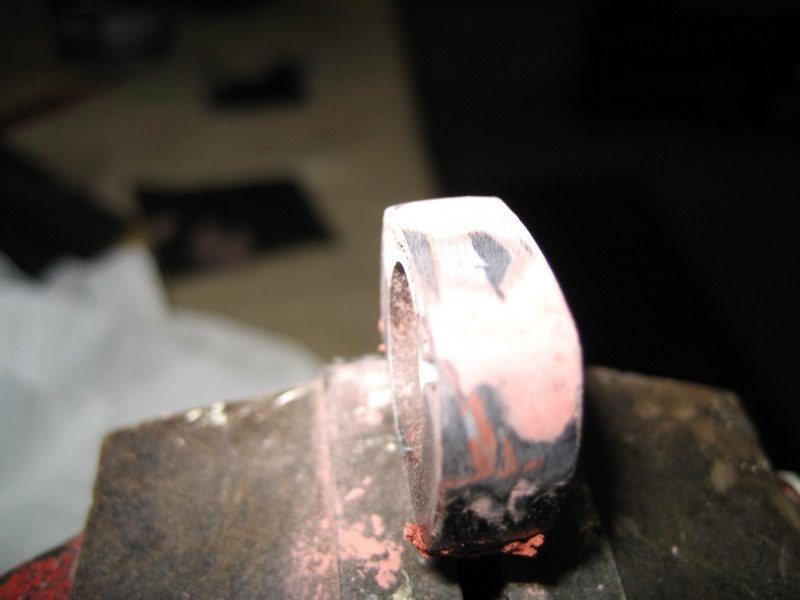
Here it is. Cut in half.
I was pleased I cut it so straight!
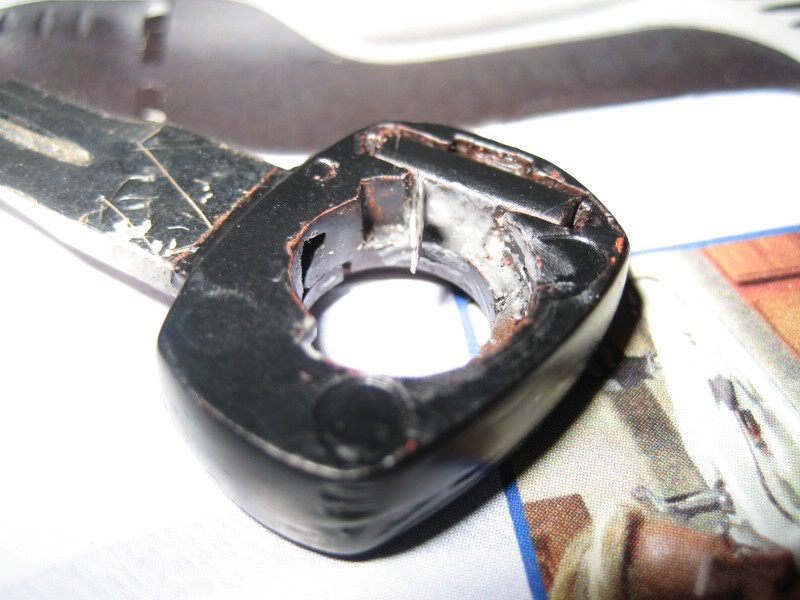
Here is the cut side of the two pieces. You can see partial shape of the blank and also see both halves of the immobilizer chip, which was destroyed.
Ok, this is a piece of the key that fits into the molding. I test fit it back into the plastic after cutting the key in half.
Macro photo of the molding, it stayed intact for the most part. Slight bulge near the top.
Test fit of the piece fitting into the molding. The plastic had pushed out a lil bit like I said. I put the two pieces in the vice and carefully pressed them back together.
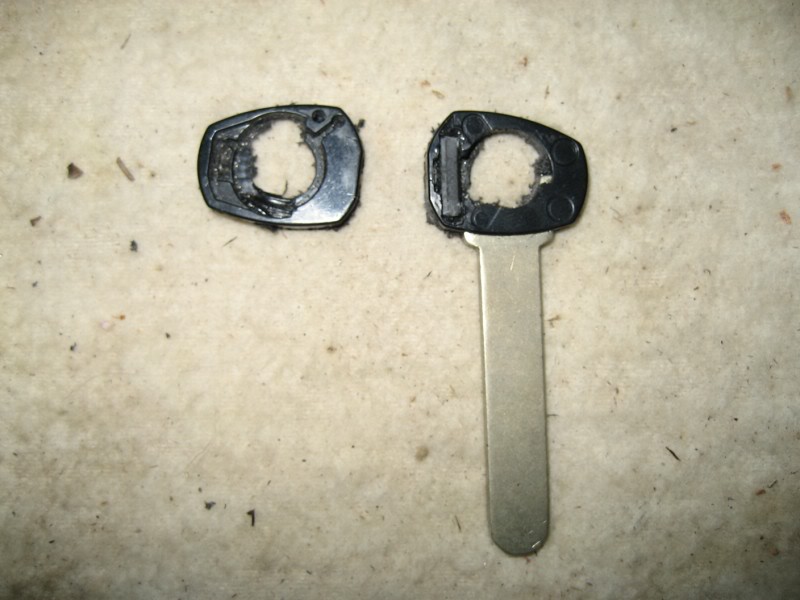
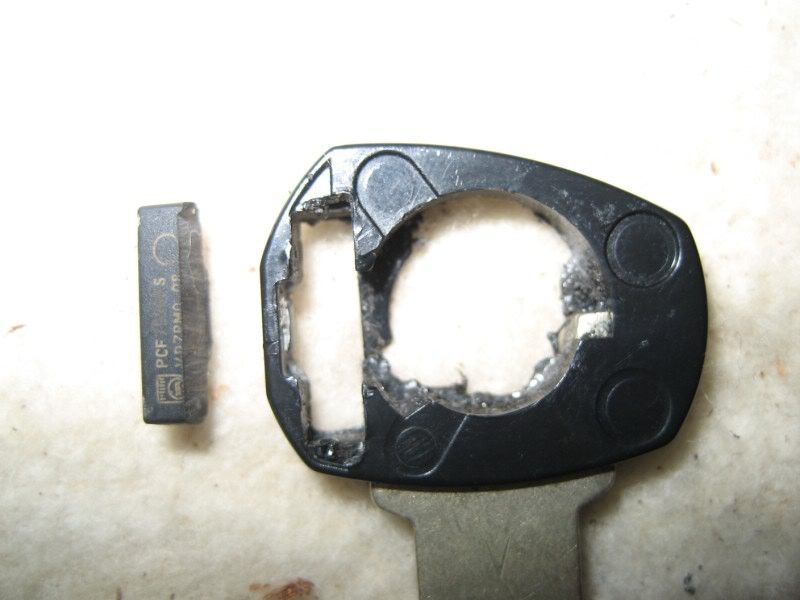
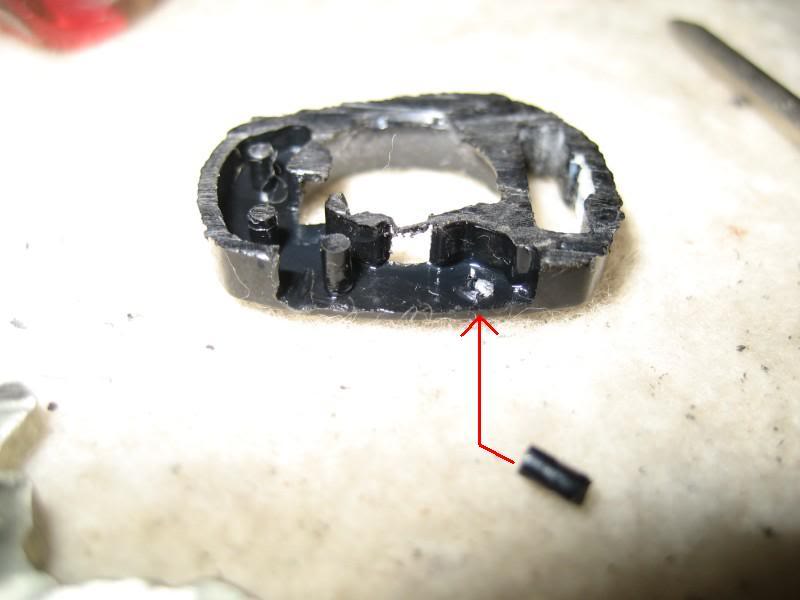
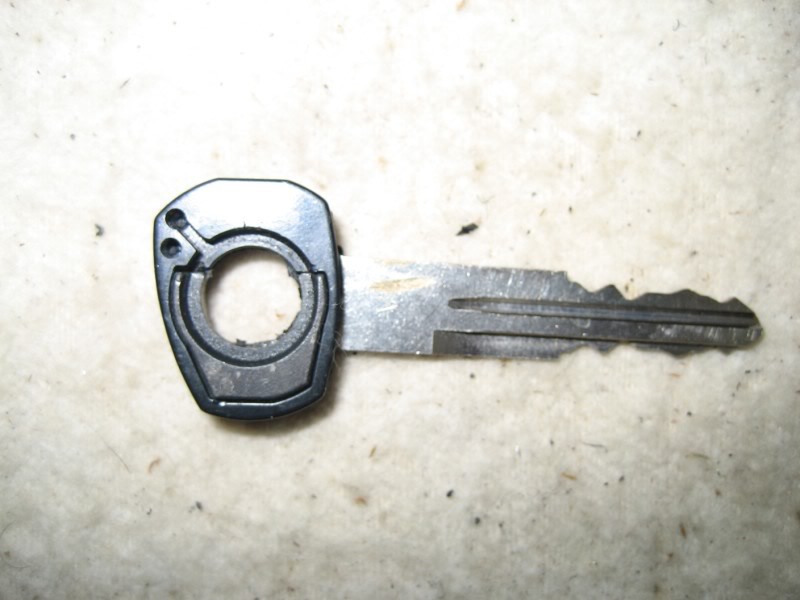
Ok next I removed the destroyed immobilizer chip. It comes out pretty easy. I just took a flathead and push it out. You can see it about to fall out.
Here it is removed from the key.
Test fitting my immobilizer from my hacked up Acura key. As you can see it’s sticking out of the top. I thought maybe I would be able to get by without removing the other half of the destroyed immobilizer but no dice.
You can see the other half of the immobilizer here. I took a box cutter and pushed down along the outline of the chip and pried it out. Came out fair easily.

Chip removed.
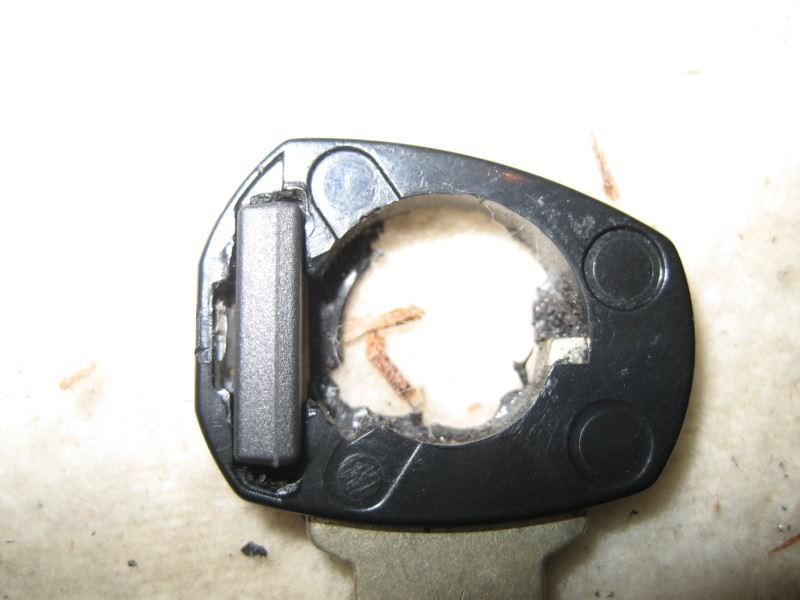
With the old chip removed, I’m test fitting the immobilizer. Perfect fit.
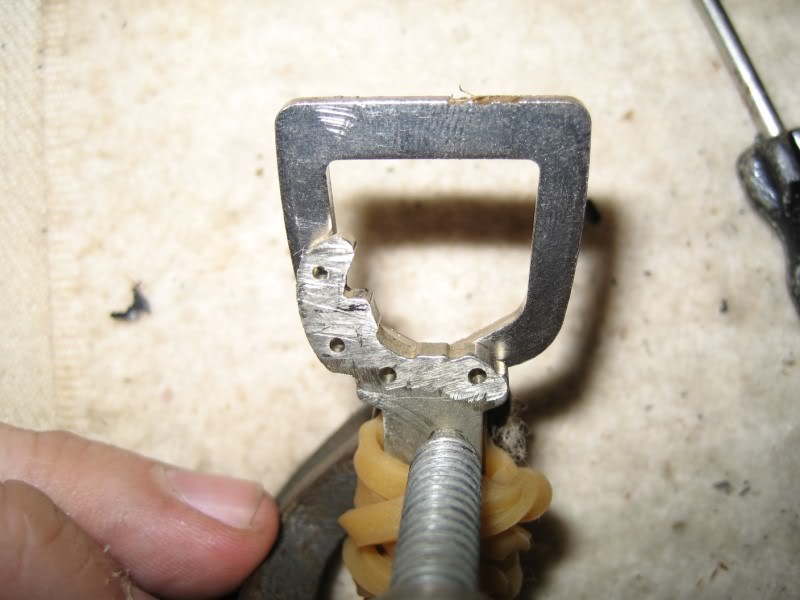
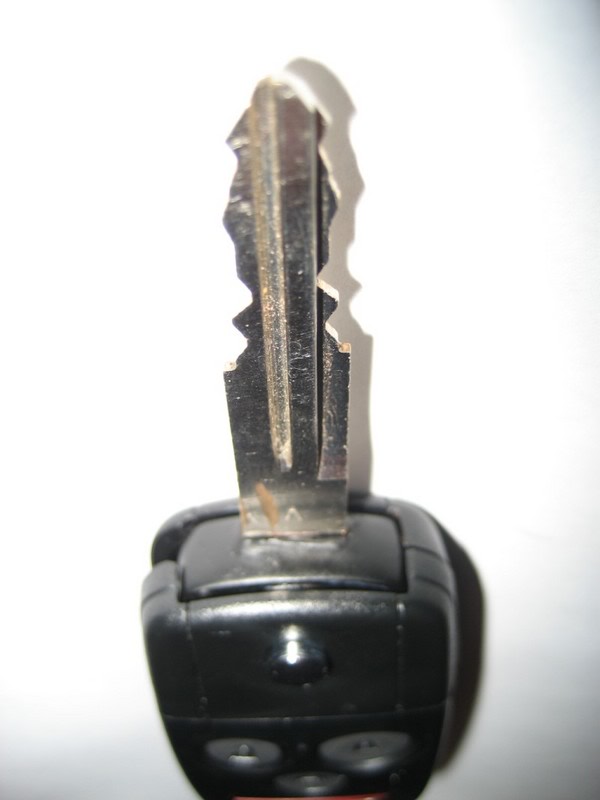
Next, I used a Dremel to expose of full shape of the blank key. It’s long on one side and very short on the other. Be careful not to take away too much plastic, just enough to expose the key.
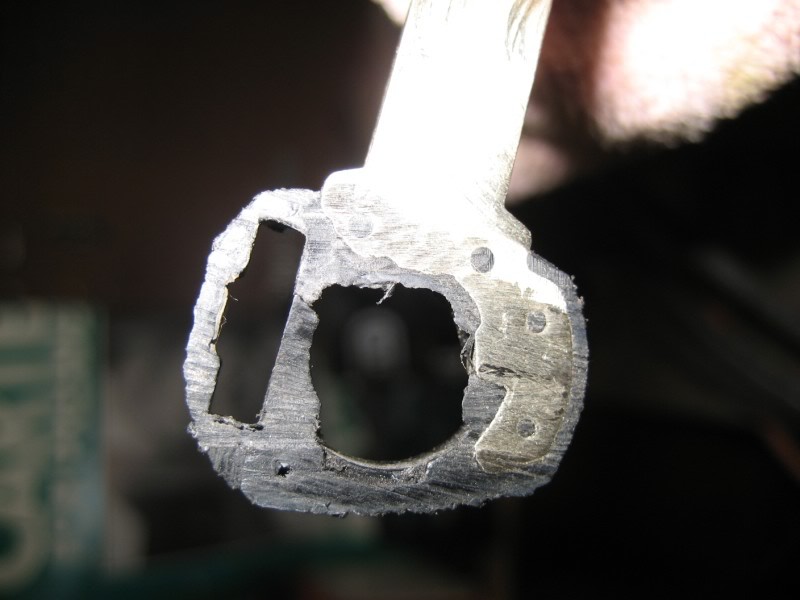
Now, I had to remove the blank key from the plastic. With the full blank exposed, it broke loose fairly easily. I just held the plastic part between my thumb and index finger and used my other hand to carefully twist the key counter clockwise until the short side popped loose.
Right side popped loose.
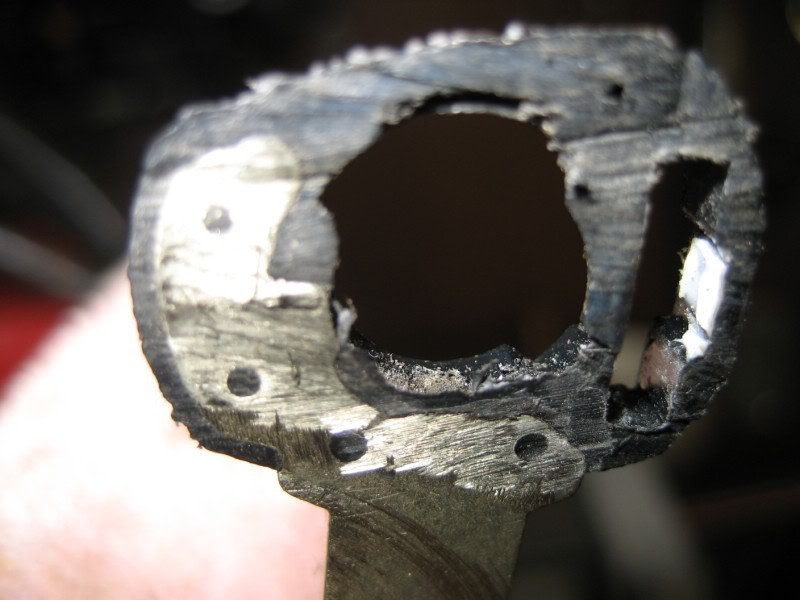
Once I got the right edge loose, I flipped the key over and took a small flathead to finish prying the blank out of the plastic. Be careful again. There are 4 small studs that the blank key uses to hold it in place.
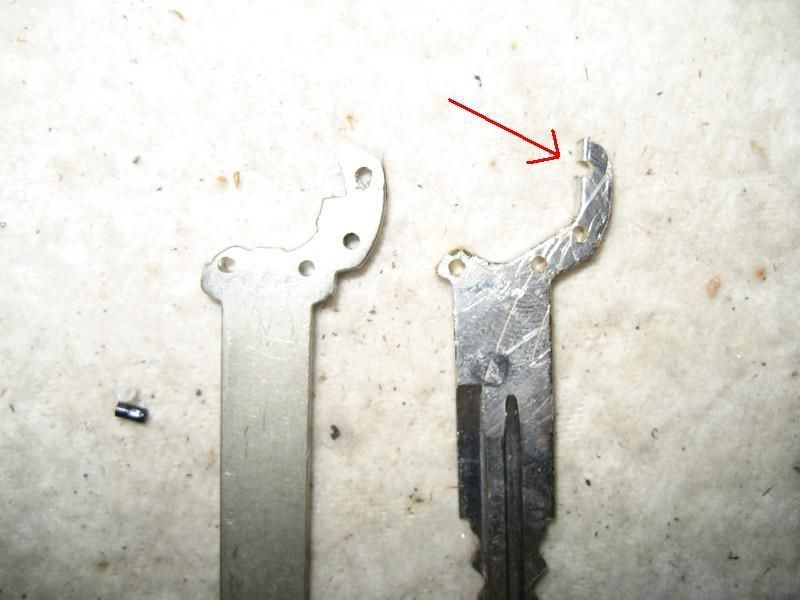
Here’s the blank out of the plastic. I broke one of the small studs by accident but no matter, I will show you how I fixed that later.
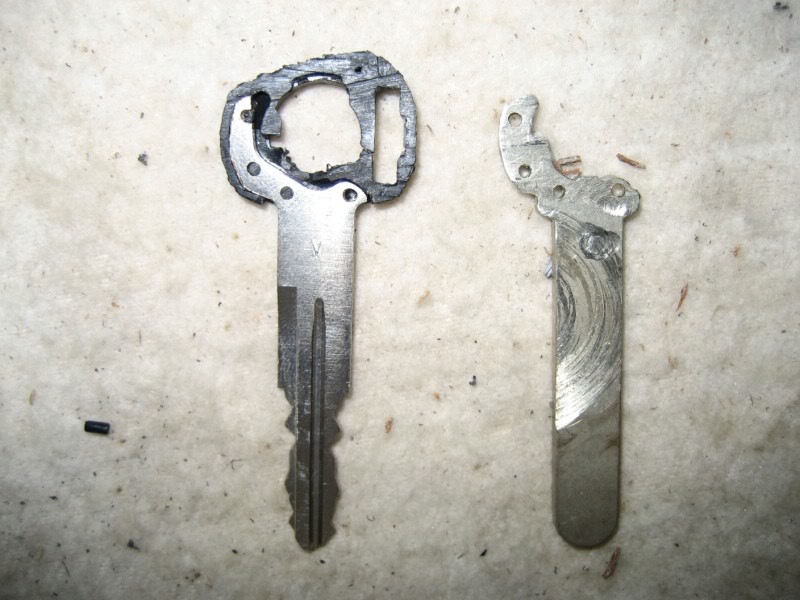
To help with strength, I decided it would be a good idea to try and use the plastic studs as the blank did. So I took the hacked up TSX key and lined it up with the blank key. NOTE: I’m not explaining how to hack up your own TSX key, you can read that under Moda_way’s DIY on the accord key found here. https://acurazine.com/forums/showthread.php?t=24807
I lined up the bottoms first. I used rubber bands to get started then used a small C-clamp once I got it all aligned. Something I noticed here that is interesting too. The TSX key is in fact wider than the blank TL key. You can see the edge of the TSX key on both sides of the blank key if you get everything perfectly aligned.
I thought maybe all four holes would line up with the TSX key but only three do. The four, very top hole on the long side will only have half a hole.
Once I got the key lined up and clamped down, I put the C-clamp in the vice and drilled the four holes in the TSX key using the blank key holes as guides.
Pic of all four holes drilled.
Now it was time to make the TSX key shaped like the blank key. I broke out the Dremel again and cut/grinded it down. Fairly simple. Although, it took me a few times test fitting before I got it just right. I could get the key about half way in but couldn’t get it all the way. So I used the vise to finish pushing the key onto the studs. You can also see the top hole that only makes a partial hole as mentioned.

First of all, I didn’t take any pics of me taking the key apart believe it or not. So I took pics of me re-assembling it so they should be good enough.
First, I removed the tiny screw on the back. NOTE: It’s easiest to take apart with the key in the “open” position IMO.
Then lifted the button piece up and out.
Now to remove the top cover.
If you look in up there on the left hand side, you will see one clip easily but there is another one farther back as well. Plus there is double-sided tape holding it on. I heated it with a hair dryer to loosen up the tape and carefully pried it off but in the process you can see I bent the second clip I was talking about.
With the metal cover exposed, I removed 3 the screws. They are a pain because they are locktited.
Once the screws are out, the spring will force the metal cover to twist counter-clockwise then the cover slides off. You just have to make sure you don’t bend the part of the spring that sticks out above the metal cover. Its next to the bottom screw.
Now with the metal cover off and the spring out the key should slide right out.
Here is the key. You can see the immobilizer in the little slot on the left. It’s buried in there nice and tight. There was a little flap/door hiding the chip but when I was prying it up it broke off. No worries, you don’t really need it anyway, JB weld and/or superglue will hold the new chip in.
Next photo is a profile of the key. You can see its not dead center and that’s a good thing for the way I’m cutting the key apart.
Here is the backside of the key. As you notice on both sides there are molded grooves in the plastic and I tried to keep them intact as much as possible.
Macro shot of the immobilizer chip.
The plan was to cut the key in half with a hacksaw so I mounted the key in a vice.
I placed the hacksaw blade flush with the blank key and tried to cut straight down through the plastic.
Shot of cut line started here. Take your time! The plastic isn’t super strong.
After going about half way through, the vice started naturally closing the gap I cut so I had to remount the key in the vice like this and finish cutting the key in half. Did I mention take your time? Three quarters of the way through I could see the already cut upper part moving back and forth as I tried to cut. I thought it was going to snap off but patience and a nice smooth sawing motion got it done.
Here it is. Cut in half.
I was pleased I cut it so straight!
Here is the cut side of the two pieces. You can see partial shape of the blank and also see both halves of the immobilizer chip, which was destroyed.
Ok, this is a piece of the key that fits into the molding. I test fit it back into the plastic after cutting the key in half.
Macro photo of the molding, it stayed intact for the most part. Slight bulge near the top.
Test fit of the piece fitting into the molding. The plastic had pushed out a lil bit like I said. I put the two pieces in the vice and carefully pressed them back together.
Ok next I removed the destroyed immobilizer chip. It comes out pretty easy. I just took a flathead and push it out. You can see it about to fall out.
Here it is removed from the key.
Test fitting my immobilizer from my hacked up Acura key. As you can see it’s sticking out of the top. I thought maybe I would be able to get by without removing the other half of the destroyed immobilizer but no dice.
You can see the other half of the immobilizer here. I took a box cutter and pushed down along the outline of the chip and pried it out. Came out fair easily.
Chip removed.
With the old chip removed, I’m test fitting the immobilizer. Perfect fit.
Next, I used a Dremel to expose of full shape of the blank key. It’s long on one side and very short on the other. Be careful not to take away too much plastic, just enough to expose the key.
Now, I had to remove the blank key from the plastic. With the full blank exposed, it broke loose fairly easily. I just held the plastic part between my thumb and index finger and used my other hand to carefully twist the key counter clockwise until the short side popped loose.
Right side popped loose.
Once I got the right edge loose, I flipped the key over and took a small flathead to finish prying the blank out of the plastic. Be careful again. There are 4 small studs that the blank key uses to hold it in place.
Here’s the blank out of the plastic. I broke one of the small studs by accident but no matter, I will show you how I fixed that later.
To help with strength, I decided it would be a good idea to try and use the plastic studs as the blank did. So I took the hacked up TSX key and lined it up with the blank key. NOTE: I’m not explaining how to hack up your own TSX key, you can read that under Moda_way’s DIY on the accord key found here. https://acurazine.com/forums/showthread.php?t=24807
I lined up the bottoms first. I used rubber bands to get started then used a small C-clamp once I got it all aligned. Something I noticed here that is interesting too. The TSX key is in fact wider than the blank TL key. You can see the edge of the TSX key on both sides of the blank key if you get everything perfectly aligned.
I thought maybe all four holes would line up with the TSX key but only three do. The four, very top hole on the long side will only have half a hole.
Once I got the key lined up and clamped down, I put the C-clamp in the vice and drilled the four holes in the TSX key using the blank key holes as guides.
Pic of all four holes drilled.
Now it was time to make the TSX key shaped like the blank key. I broke out the Dremel again and cut/grinded it down. Fairly simple. Although, it took me a few times test fitting before I got it just right. I could get the key about half way in but couldn’t get it all the way. So I used the vise to finish pushing the key onto the studs. You can also see the top hole that only makes a partial hole as mentioned.
 01-30-2007, 09:49 PM
#2
Part 2
It fits! The top stud is half way around the key, the two middle ones are perfect and I broke the one on the far right as stated before. It’s sturdier than I thought once I got it in. No play/movement at all.
Testing fitting the whole thing back together.
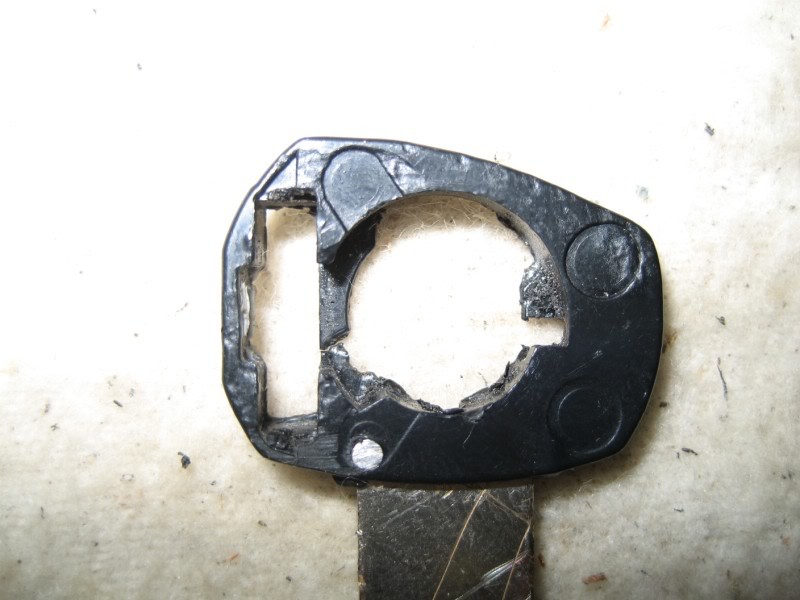
It fit pretty well but I was slightly concerned about this big chunk missing. That’s what I did with the Dremel before I used the hacksaw for the initial try at cutting the key in half
Here it is just pushed together. The immobilizer chip is snug enough that it holds the two halves together while I took the pic.
I wanted to check how straight the new TSX key fit into the plastic. So far so good.
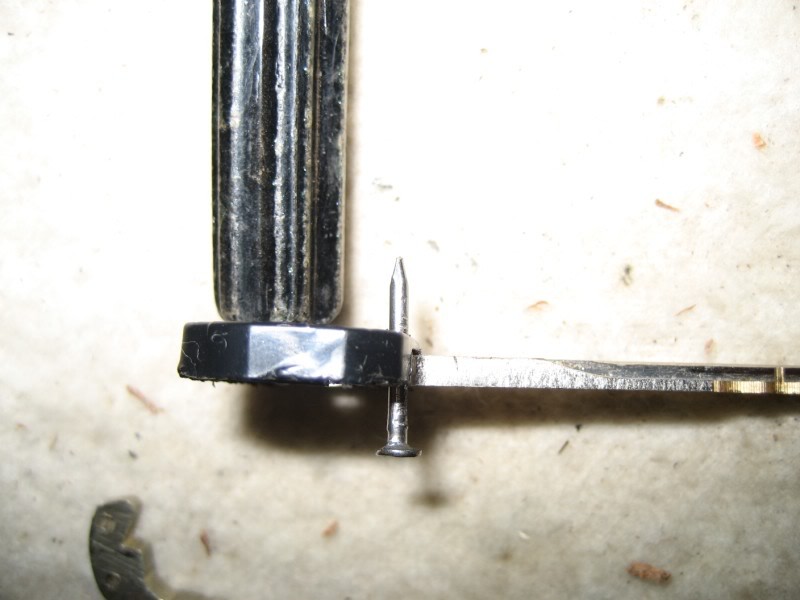
Ok, to fix the broken stud. With the TSX key in the plastic, I drilled the hole straight through.
I was able to find a small nail that was a perfect fit for the hole. Then took the Dremel and cut both ends of the nail off. Done deal, now I have all four studs back.
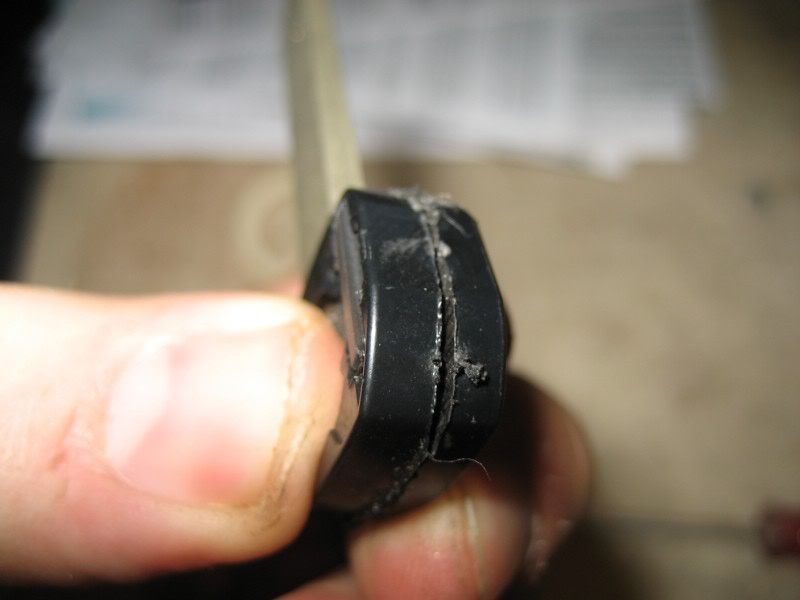
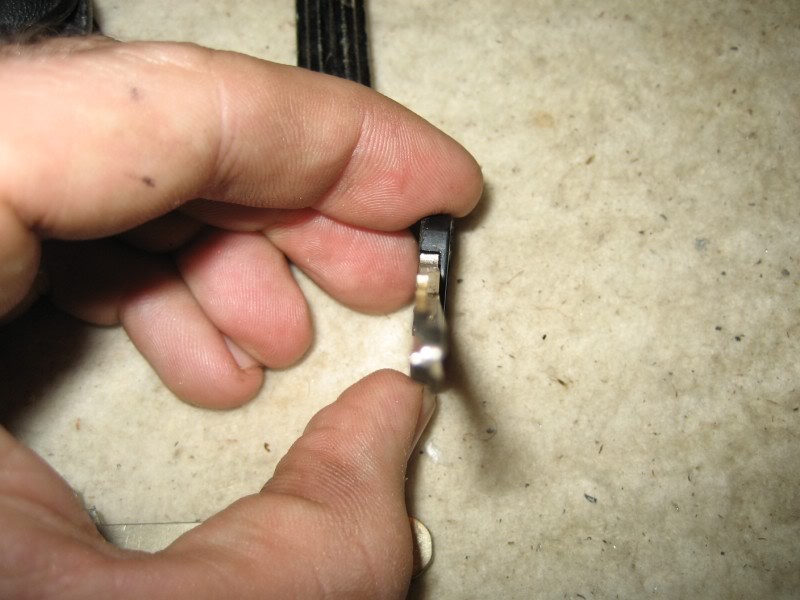
These are the last two photos before JB Weld. Looks cleaner than I thought it would at this point. All the excess plastic around the outside of the two halves which was a result of the hacksaw cut, I was able to scrape off with my finger nail or you could use a knife.
I thought about putting JB Weld under the key before it went down onto the studs but I figured the two pieces being pushed back together with weld in between would be good enough. NOTE: I’ve never used JB Weld in my life before this mod. This was my first time. I really didn’t know how much to use but I knew I didn’t want to use too much. At any rate it did get a little messy. I figured I’d just sand it down later though.
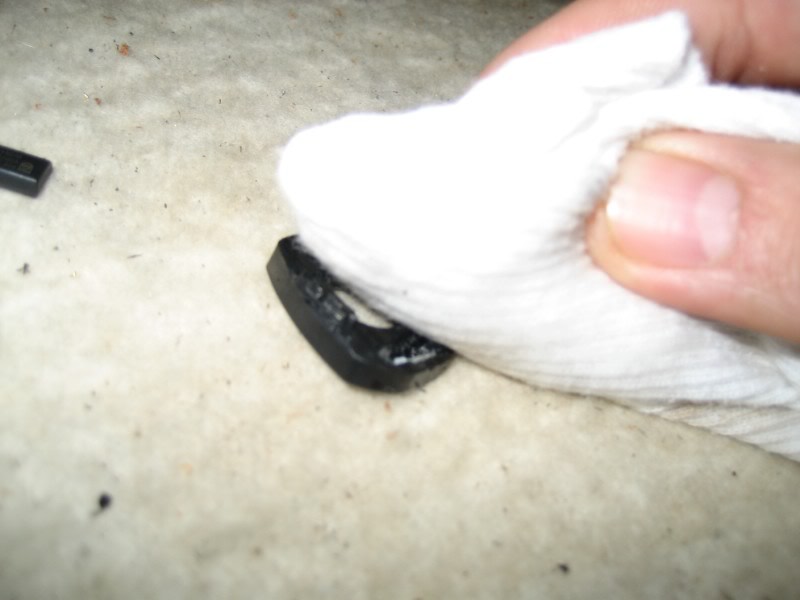
Before applying the JB weld, I cleaned both sides of the plastic with paint thinner and an all cotton cloth. DO NOT SAND THE HALVES. The fact that they are slightly jagged from the hacksaw is a good thing for JB weld from what I read.
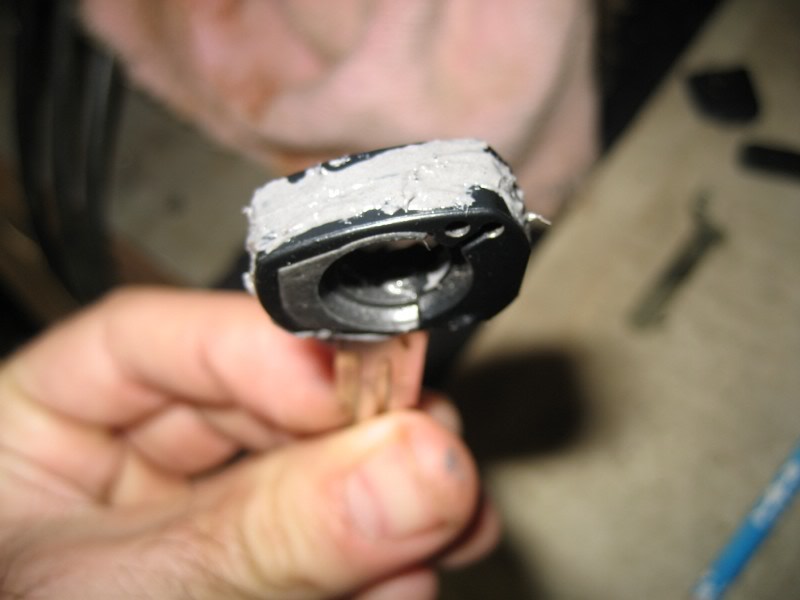
I put a layer of JB weld on both halves. Then I mashed the key together with hand pressure only. The immobilizer is in as well. You can see the JB weld oozing from both sides.

Next, I took the JB weld that had oozed and spread it out along the seam on the outside.
The JB weld is a thick substance, almost gummy. Although the JB weld had only been on for less than a minute it’s thick enough to hold the key together without having to apply constant pressure.
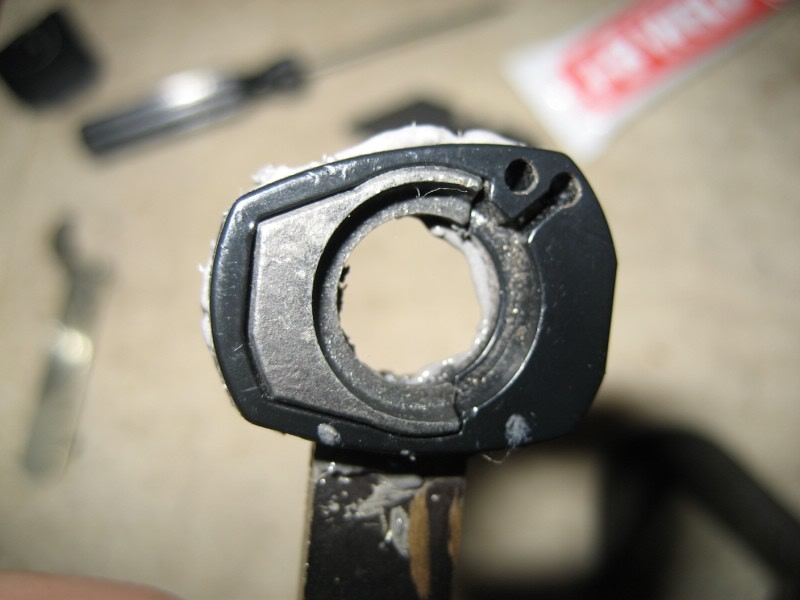
Next I transferred the key into a vice and carefully tightened until it was snug. Watch the key carefully and make sure the two halves don’t shift out of alignment. Once it was snug, I took it back out of the vice for a minute and cleaned up some of the JB Weld on the inside circle. This step was mainly to clean the inside hole to maintain a perfect circle and not have to worry about sanding down JB weld inside the key after its dry. Also, if you can clean out these two slots, do so. These are the two slots in which the key uses to hold it in the closed position and the other to hold the key in the open position. I didn’t realize it until my JB Weld was dry so I had to chip the JB weld out of the slots with a knife after the fact.
After you clean up the hole and slots the best you can, put the key back in the vice, carefully tightening then wait 24 hours for the JB weld to dry.
After 24 hours, I sanded down the outside of the key along the seem to make it mostly smooth again. I started out with 220 grit and finished with 800 grit.
Then I did a test fit. To do a basic test fit; you need the key, the bottom housing and the flip button. The key should slide down over the flip button in the “closed” position as I call it. I had to sand the outside a tiny bit more because there’s not much room for the key once it’s down on the post.
You may also need to sand inside the hole. I had to sand it a little bit before the key would slide down on the post. I started with 220 grit sand paper then finished with 800 grit. I used a pencil and rapped the sandpaper around it to help keep a perfect circle.
With the key in this position, apply pressure around the plastic on the key against the bottom housing with one hand and try to move the key clockwise with your other hand. It should NOT be able to rotate clockwise out of the housing without pushing the flip button. It can have a little play but not so much that it can rotate out of the housing to expose the edge of the key. The reason for this is because once the spring is back in place it applies constant pressure in the clockwise direction meaning if there was enough play to expose the key, then in the “closed” position, your key would be hanging out slightly when it’s supposed to be hidden inside the fob.
You can see here I had this problem. The key was slightly off so I had to fix that as well which I will explain.
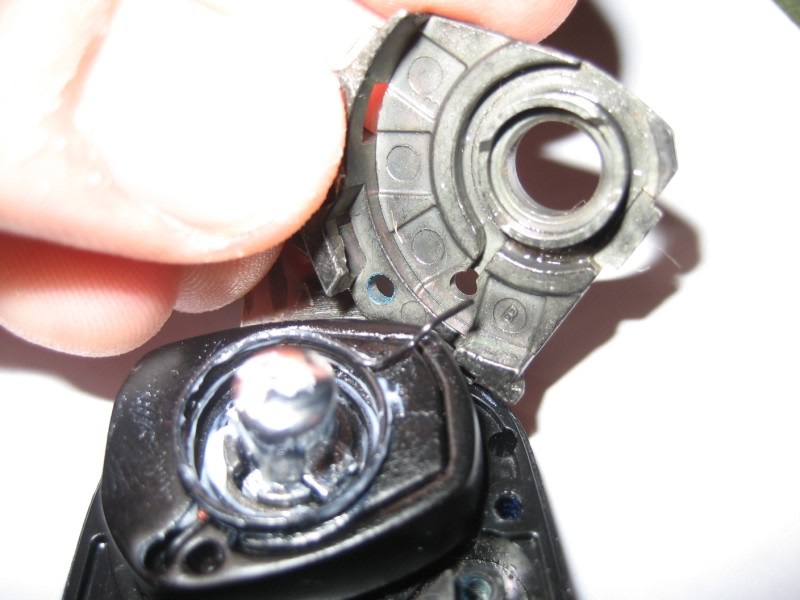
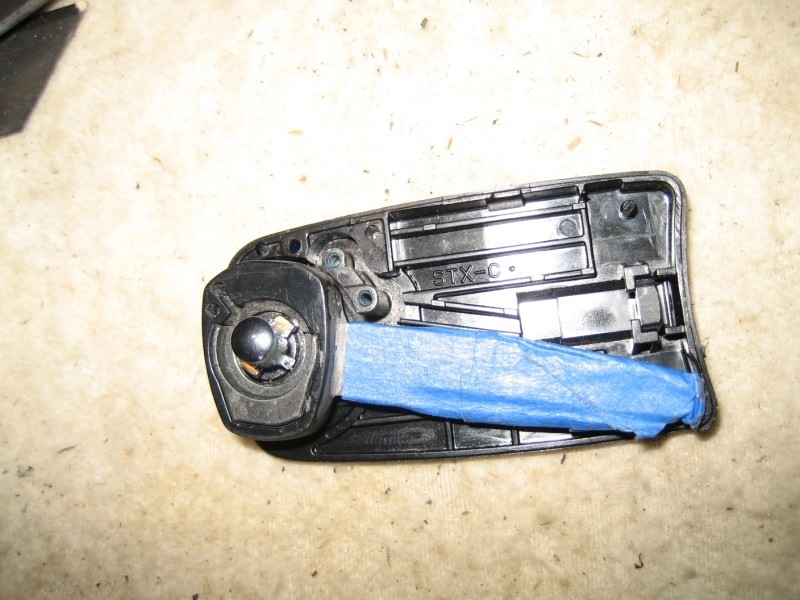
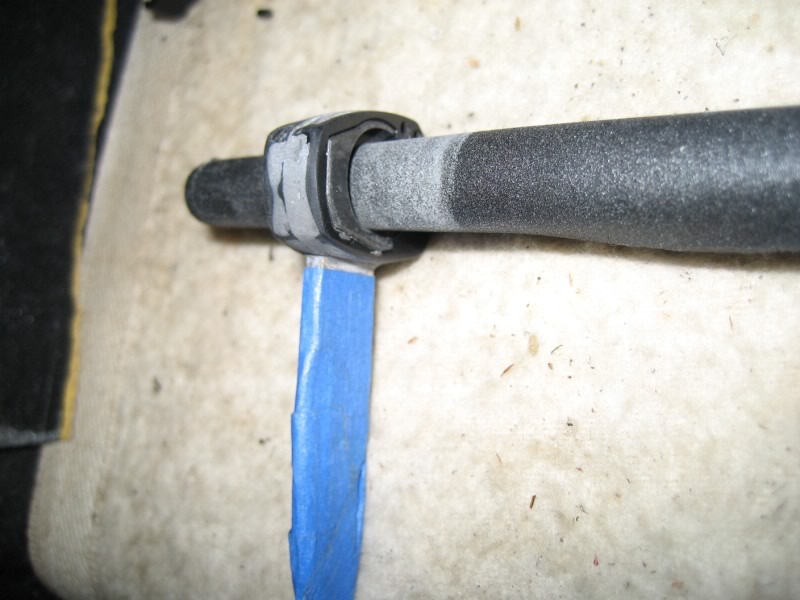
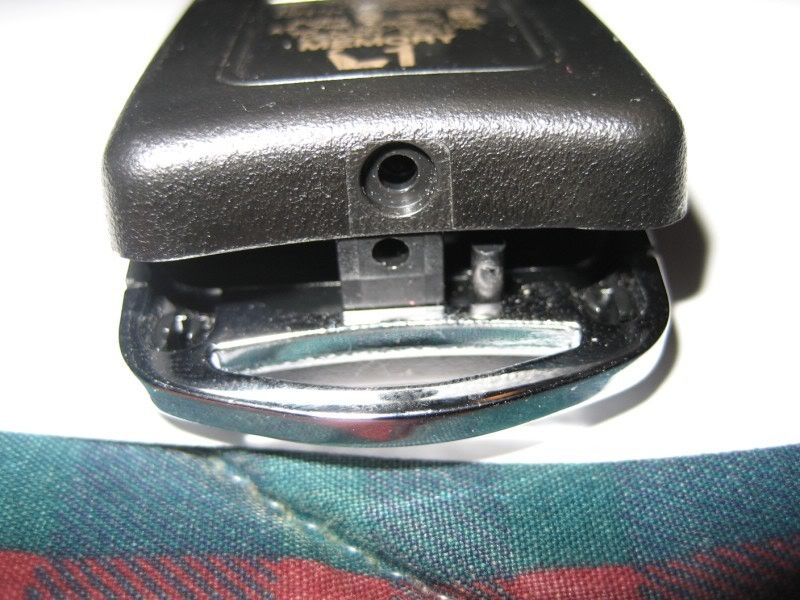
Another important test fit requires the components listed above plus the spring and the metal cover which holds the key down. The key needs to be in the open position to re-assemble the cover and spring. First put the key in the open position like so and place the spring back on.
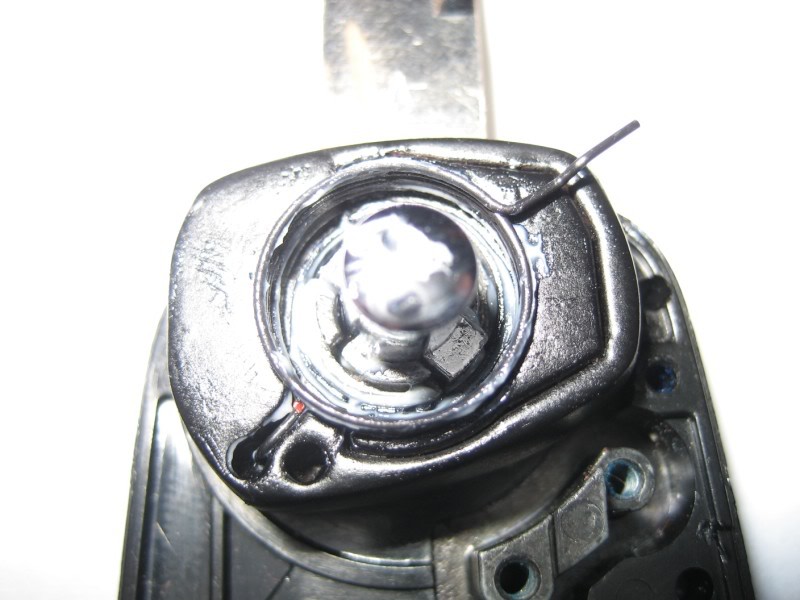
Then place the metal cover back on like so.


After placing the spring into the key and sliding on the cover, twist the metal cover clockwise to line the screw holes up.
You don’t have to put the screws back in necessarily. I was able to hold the cover down with two finger pressure. Once it’s together, close the key. Now push the button to flip the key open and see if it works. You are testing to see if the key a) flips open b) spins freely c) if it locks in the open position.
Ok, after my test fits I clearly had two problems.
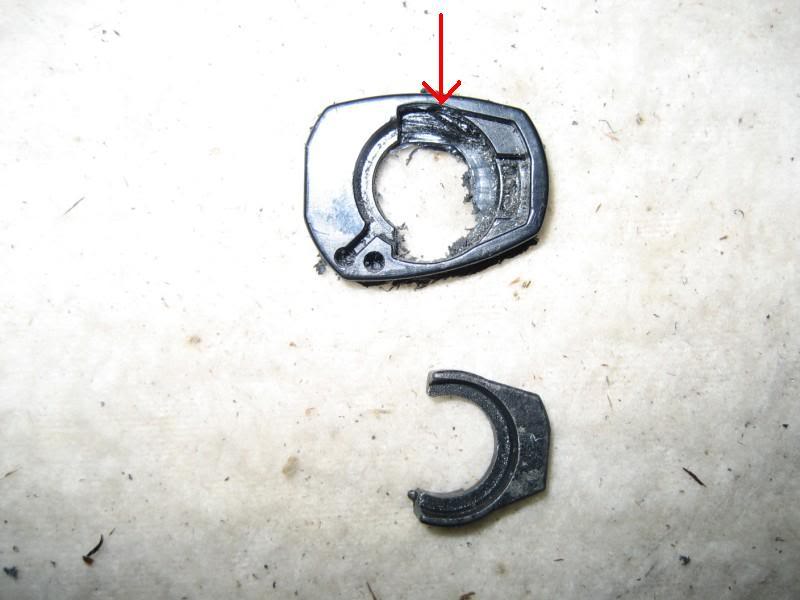
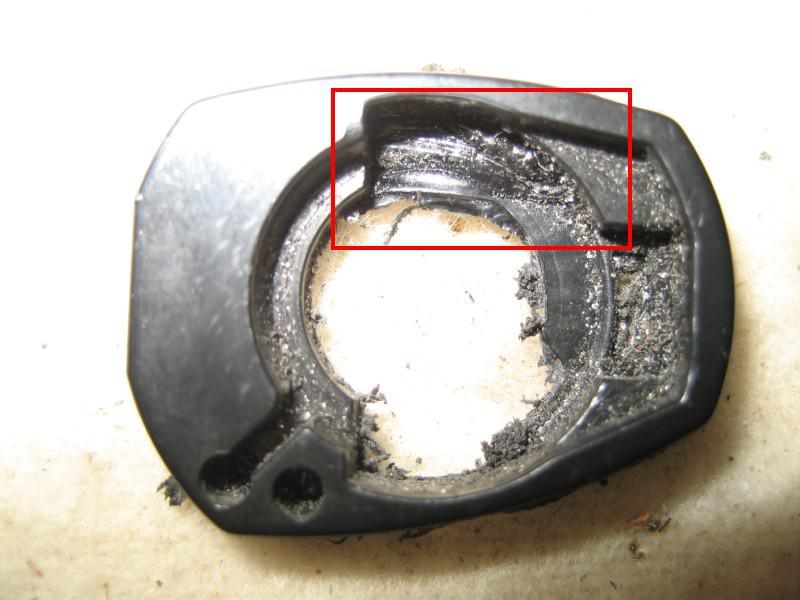
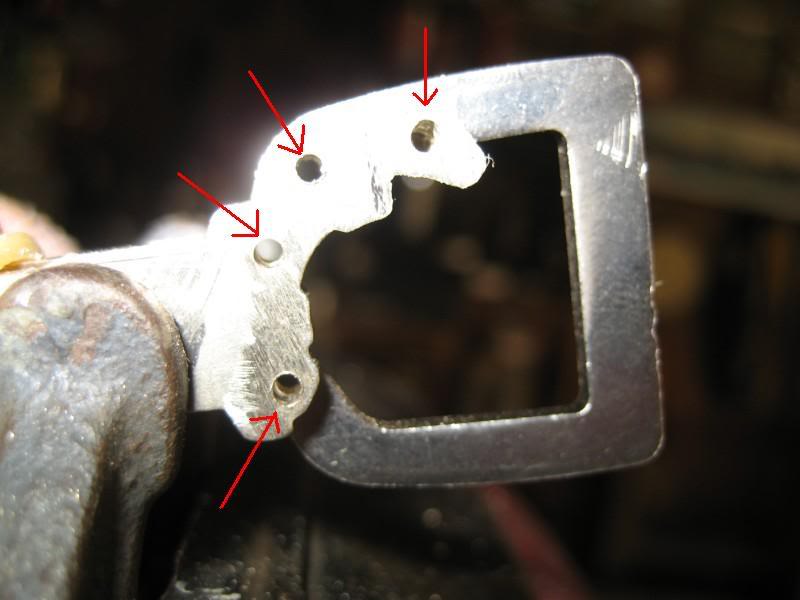
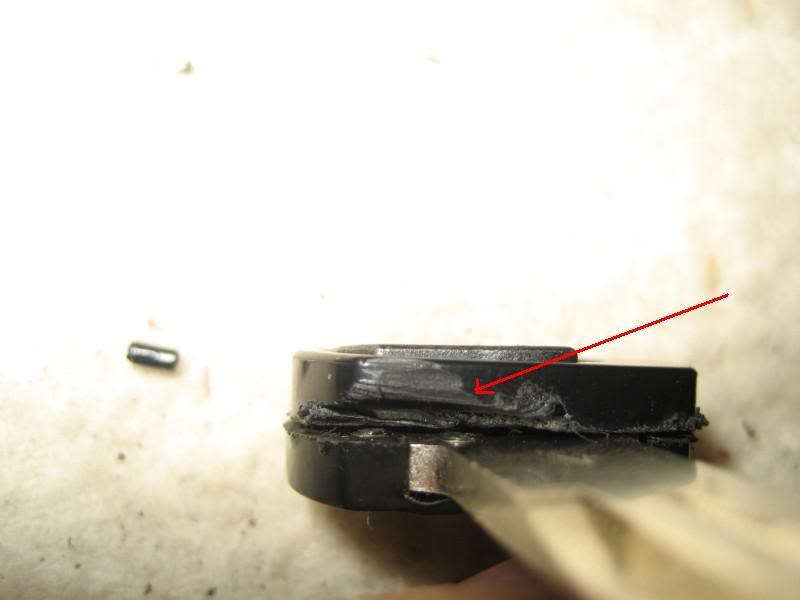
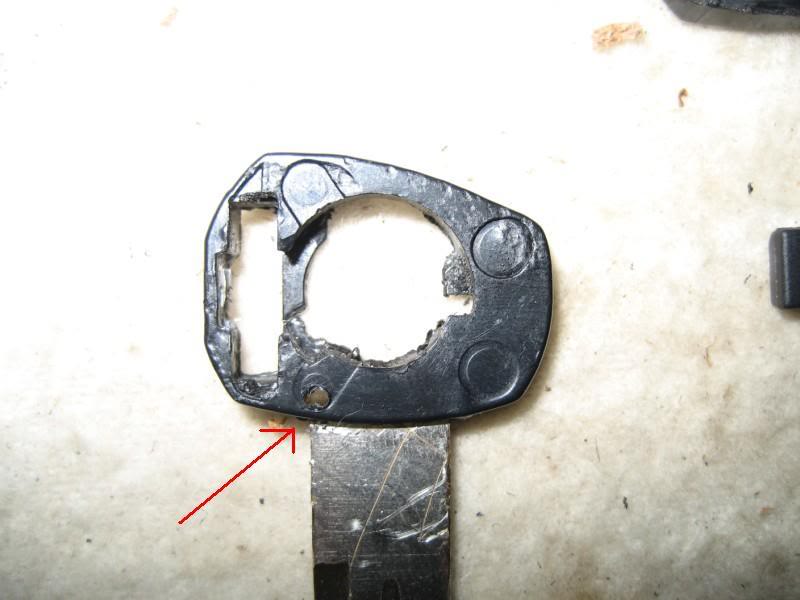
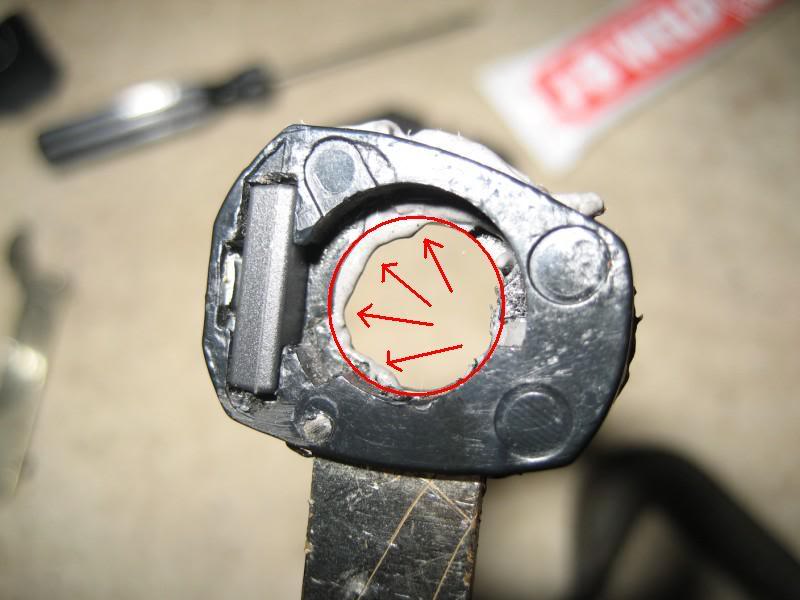
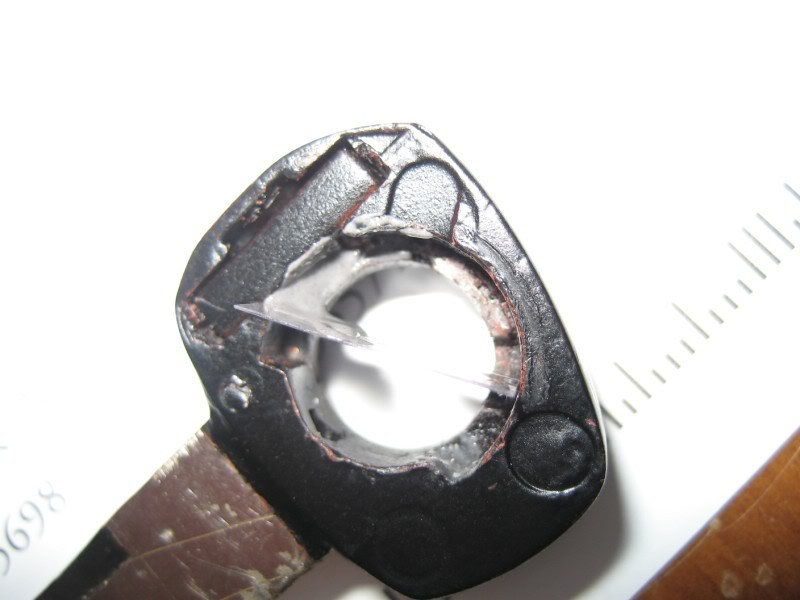
Notice the two sections circled in the photo. The one on the left is used to hold it in the closed position and the other to stop the key in the open position. See the before and after.
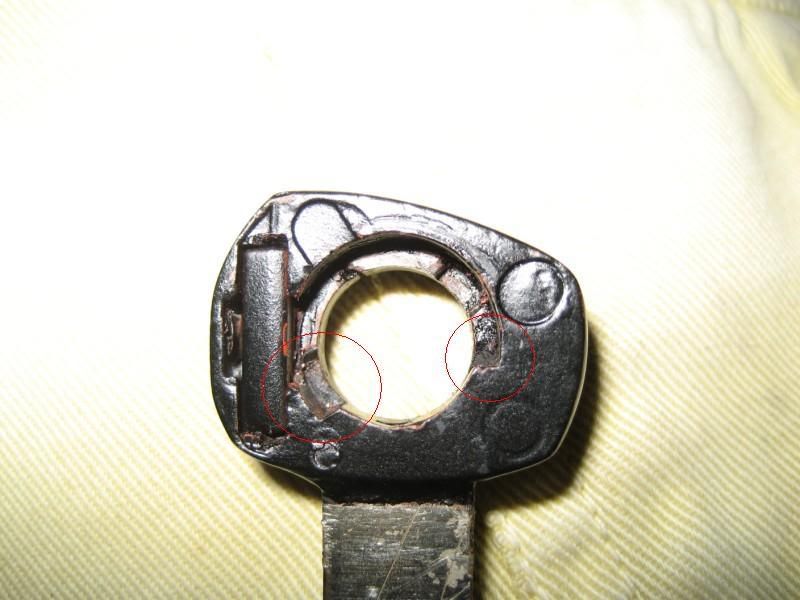
After JB welding the two halves back together, my alignment was slightly off I’m guessing or the chipping away JB Weld caused a problem making the “closed” position slot too large. In other words, in the closed position the key was hanging out the edge of the fob as I described it should NOT be.
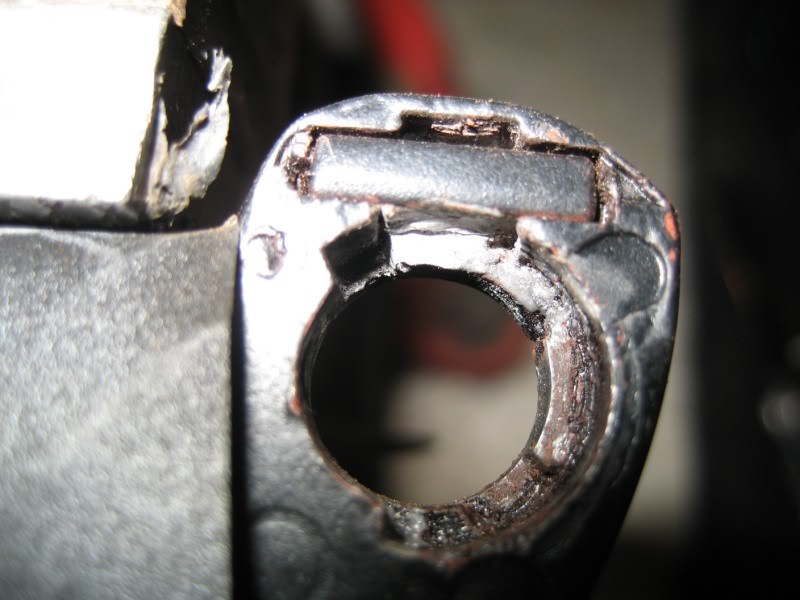
The second issue is when I pushed the button to flip the key out, it was rolling passed the open position slot, leaving the key crooked. The reason for this is because of the tiny metal showing in the picture of the original key. It stops the key from going past straight.
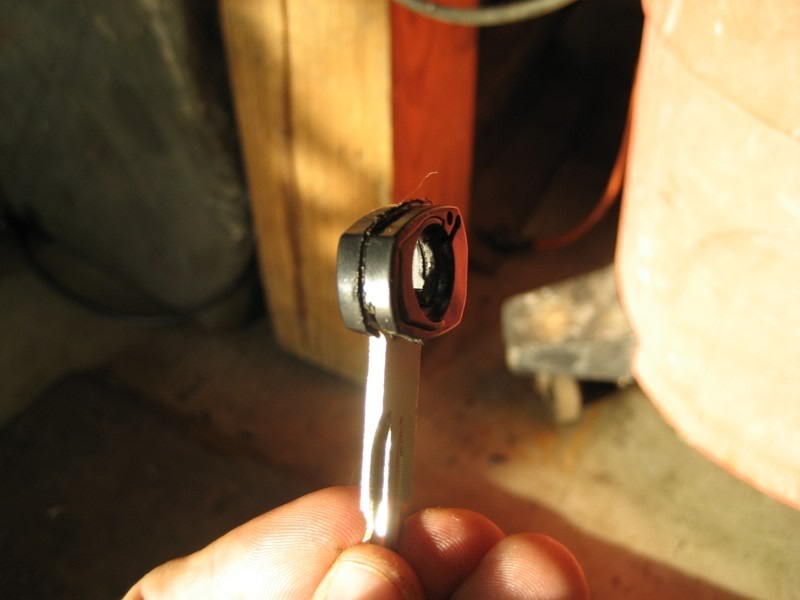
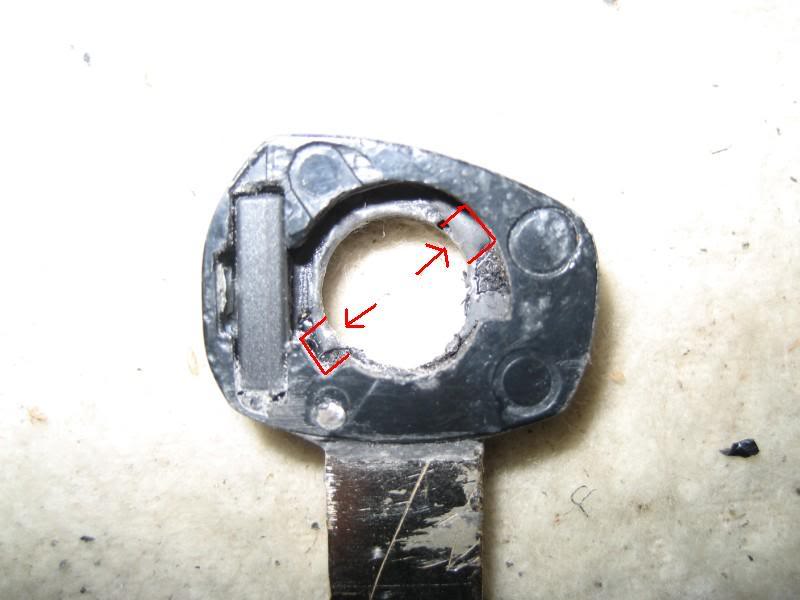
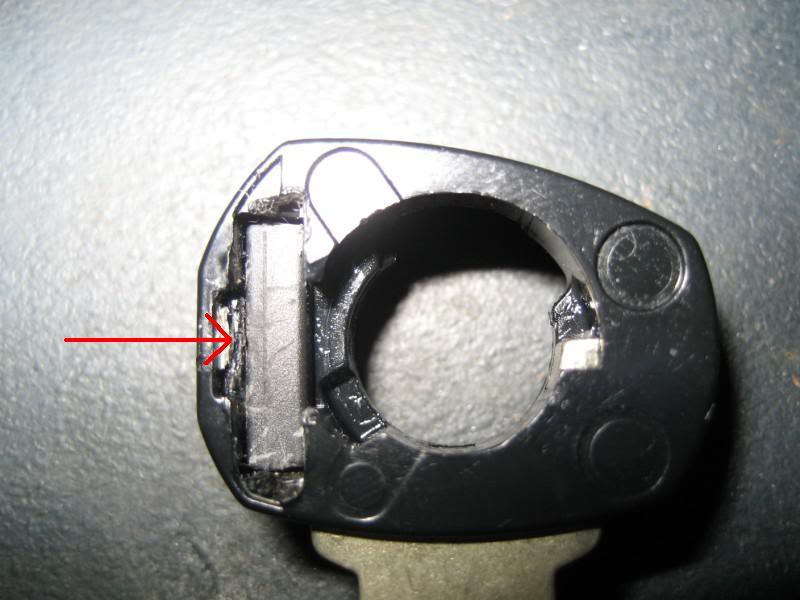
So, to fix the problem, I came up with the idea to build up the closed position wall again using more JB Weld. First, I cut a small piece of plastic off of the JB weld packaging. Then I wedged that piece into the key as shown to make a temporary “wall”. Next, I mixed up some more JB weld and put a little gob against the “wall”. I put more than I needed because it’s obviously easier to take away than add back.

After 24 hours of drying, I was able to peel the plastic “wall” from the JB weld since the tiny piece of plastic I used was so smooth and obviously it wasn’t going to stick to the JB Weld. This left the gob of JB weld with a nice straight edge.
Then I busted out the Dremel to start trimming down the JB weld. I did the best I could with that then to get a more detailed shape; I used a pocket knife to carve it.
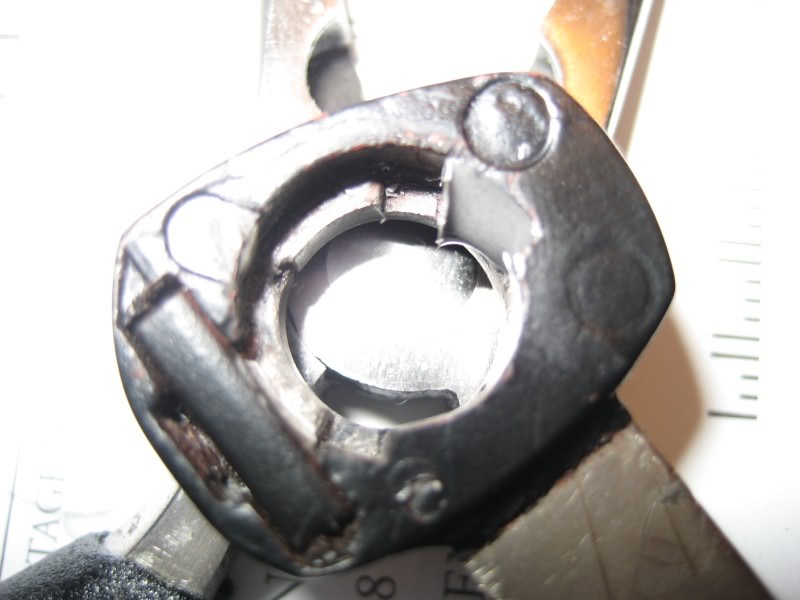
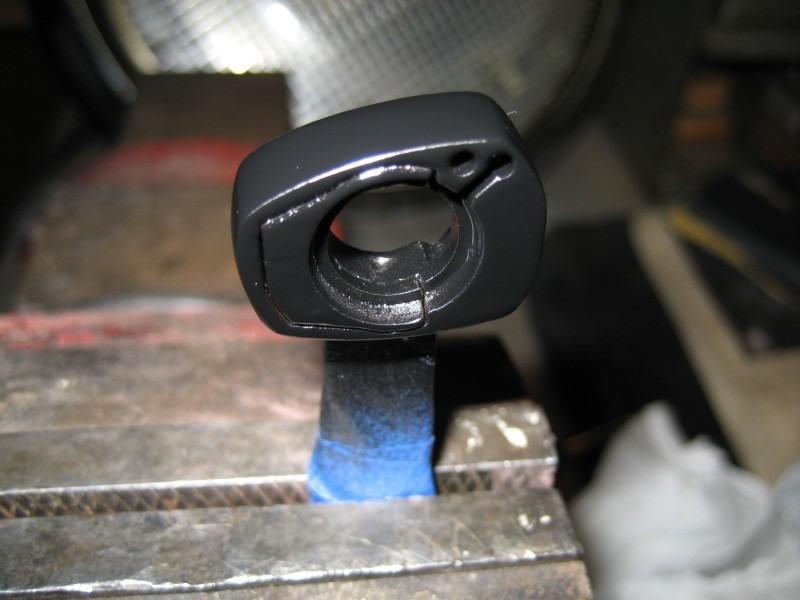
Here is the finished product. The closed slot is now smaller.
Now I tested fitted again. I put it back in the housing and it fit pretty well. The key sits inside the housing like it’s supposed to when closed and had very little play.
Ok, on to fixing the “open” position problem. I used the same technique I used to fix the “closed” position problem. Here’s where I made a slight mistake as well. I put the JB Weld too high as you can see in the pic so the key would NOT open all the way. So back to the Dremel and pocket knife for carving til I got it just right. See before and after.

After this, I put the spring and metal cover back on and tested the flip, worked like a charm. I was starting to see some daylight. SO ON TO PAINT!
I taped my key up with painters tape. Next, I cleaned the complete outside of the key with paint thinner then applied some spot bondo to the top and bottom of the key. I didn’t worry about the sides of the key because you won’t ever see them. You see the top when the key is closed and the bottom when the key is open. I could have probably sanded the top and bottom down until they were completely smooth but I didn’t want to.

After letting the bondo dry overnight, I sanded it smooth.
Once that was done, I cleaned the entire key with paint thinner and sprayed on two coats of black paint. Each coat a few mins apart and let it dry for 3 days while I was on a vacation trip.
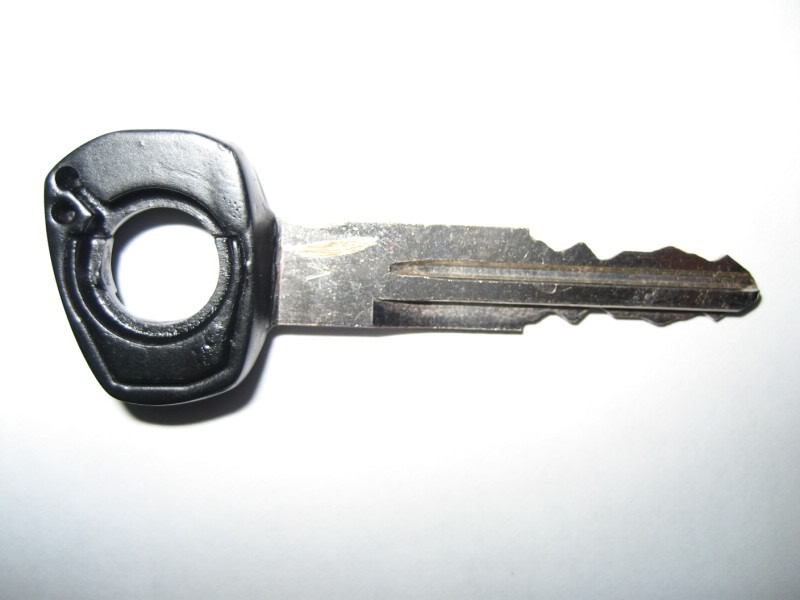
Finished product.
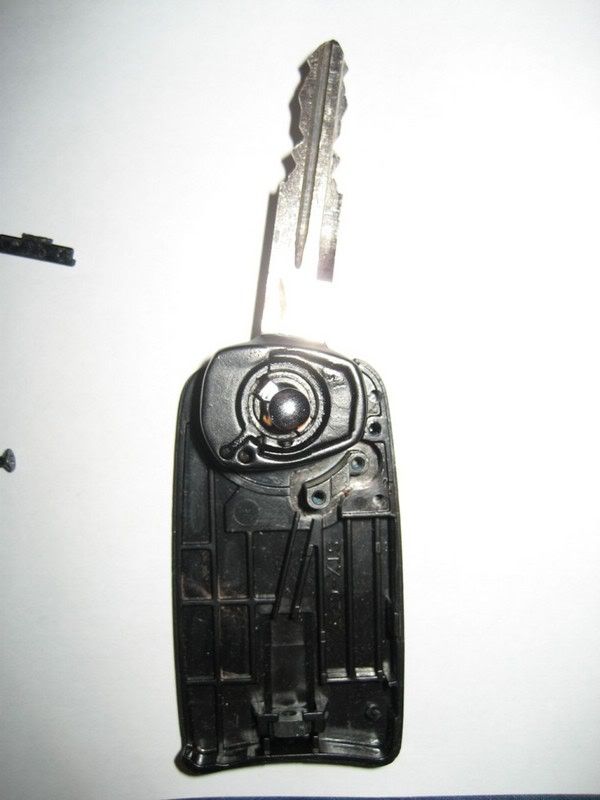
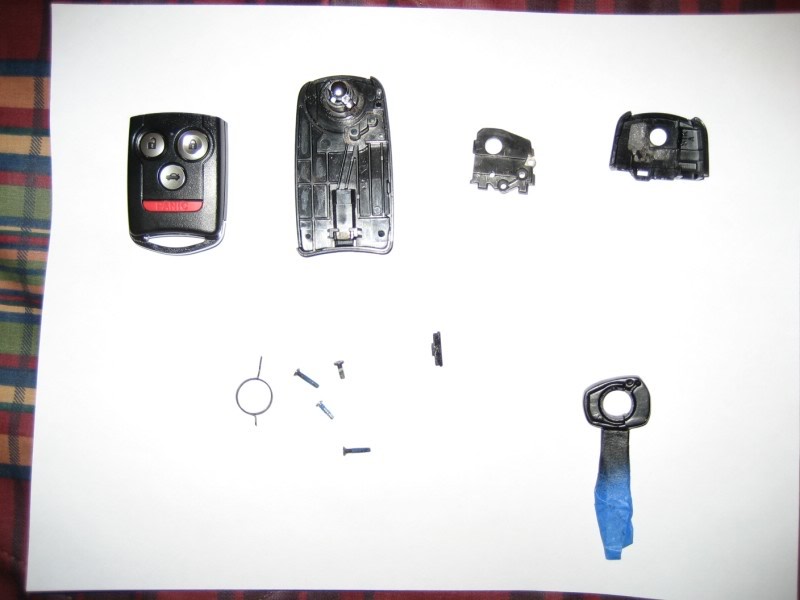
FINALLY, it was time to try and re-assemble the key. Here are all the parts minus the tiny black piece near the middle. It was the flap that covered the original immobilizer and was not need.
I test fit the key back into the housing and it was a little snug. I had to sand the inner circle a little bit more to get it rotating smoothly. I used some lithium grease to lubricate the key when I put it all back together.
Just follow the instructions from the beginning of this guide in reverse order to re-assemble your key. To program the key I used the instructions found here at post #90:
http://forums.clubrsx.com/showthread...=428964&page=4
Here is the finished product!! The only small issue I have is the “closed” position is a little too far back inside the fob so I can’t push it back far enough in the fob for the flip button to pop back up but its fairly easy to make it pop out by gently pushing on the top left portion of the key with my finger. I’ll show this on my video. I figure I’d rather have this issue than the issue of it hanging out too far.
Testing fitting the whole thing back together.
It fit pretty well but I was slightly concerned about this big chunk missing. That’s what I did with the Dremel before I used the hacksaw for the initial try at cutting the key in half
Here it is just pushed together. The immobilizer chip is snug enough that it holds the two halves together while I took the pic.
I wanted to check how straight the new TSX key fit into the plastic. So far so good.
Ok, to fix the broken stud. With the TSX key in the plastic, I drilled the hole straight through.
I was able to find a small nail that was a perfect fit for the hole. Then took the Dremel and cut both ends of the nail off. Done deal, now I have all four studs back.
These are the last two photos before JB Weld. Looks cleaner than I thought it would at this point. All the excess plastic around the outside of the two halves which was a result of the hacksaw cut, I was able to scrape off with my finger nail or you could use a knife.
I thought about putting JB Weld under the key before it went down onto the studs but I figured the two pieces being pushed back together with weld in between would be good enough. NOTE: I’ve never used JB Weld in my life before this mod. This was my first time. I really didn’t know how much to use but I knew I didn’t want to use too much. At any rate it did get a little messy. I figured I’d just sand it down later though.
Before applying the JB weld, I cleaned both sides of the plastic with paint thinner and an all cotton cloth. DO NOT SAND THE HALVES. The fact that they are slightly jagged from the hacksaw is a good thing for JB weld from what I read.
I put a layer of JB weld on both halves. Then I mashed the key together with hand pressure only. The immobilizer is in as well. You can see the JB weld oozing from both sides.
Next, I took the JB weld that had oozed and spread it out along the seam on the outside.
The JB weld is a thick substance, almost gummy. Although the JB weld had only been on for less than a minute it’s thick enough to hold the key together without having to apply constant pressure.
Next I transferred the key into a vice and carefully tightened until it was snug. Watch the key carefully and make sure the two halves don’t shift out of alignment. Once it was snug, I took it back out of the vice for a minute and cleaned up some of the JB Weld on the inside circle. This step was mainly to clean the inside hole to maintain a perfect circle and not have to worry about sanding down JB weld inside the key after its dry. Also, if you can clean out these two slots, do so. These are the two slots in which the key uses to hold it in the closed position and the other to hold the key in the open position. I didn’t realize it until my JB Weld was dry so I had to chip the JB weld out of the slots with a knife after the fact.
After you clean up the hole and slots the best you can, put the key back in the vice, carefully tightening then wait 24 hours for the JB weld to dry.
After 24 hours, I sanded down the outside of the key along the seem to make it mostly smooth again. I started out with 220 grit and finished with 800 grit.
Then I did a test fit. To do a basic test fit; you need the key, the bottom housing and the flip button. The key should slide down over the flip button in the “closed” position as I call it. I had to sand the outside a tiny bit more because there’s not much room for the key once it’s down on the post.
You may also need to sand inside the hole. I had to sand it a little bit before the key would slide down on the post. I started with 220 grit sand paper then finished with 800 grit. I used a pencil and rapped the sandpaper around it to help keep a perfect circle.
With the key in this position, apply pressure around the plastic on the key against the bottom housing with one hand and try to move the key clockwise with your other hand. It should NOT be able to rotate clockwise out of the housing without pushing the flip button. It can have a little play but not so much that it can rotate out of the housing to expose the edge of the key. The reason for this is because once the spring is back in place it applies constant pressure in the clockwise direction meaning if there was enough play to expose the key, then in the “closed” position, your key would be hanging out slightly when it’s supposed to be hidden inside the fob.
You can see here I had this problem. The key was slightly off so I had to fix that as well which I will explain.
Another important test fit requires the components listed above plus the spring and the metal cover which holds the key down. The key needs to be in the open position to re-assemble the cover and spring. First put the key in the open position like so and place the spring back on.
Then place the metal cover back on like so.
After placing the spring into the key and sliding on the cover, twist the metal cover clockwise to line the screw holes up.
You don’t have to put the screws back in necessarily. I was able to hold the cover down with two finger pressure. Once it’s together, close the key. Now push the button to flip the key open and see if it works. You are testing to see if the key a) flips open b) spins freely c) if it locks in the open position.
Ok, after my test fits I clearly had two problems.
Notice the two sections circled in the photo. The one on the left is used to hold it in the closed position and the other to stop the key in the open position. See the before and after.
After JB welding the two halves back together, my alignment was slightly off I’m guessing or the chipping away JB Weld caused a problem making the “closed” position slot too large. In other words, in the closed position the key was hanging out the edge of the fob as I described it should NOT be.
The second issue is when I pushed the button to flip the key out, it was rolling passed the open position slot, leaving the key crooked. The reason for this is because of the tiny metal showing in the picture of the original key. It stops the key from going past straight.
So, to fix the problem, I came up with the idea to build up the closed position wall again using more JB Weld. First, I cut a small piece of plastic off of the JB weld packaging. Then I wedged that piece into the key as shown to make a temporary “wall”. Next, I mixed up some more JB weld and put a little gob against the “wall”. I put more than I needed because it’s obviously easier to take away than add back.
After 24 hours of drying, I was able to peel the plastic “wall” from the JB weld since the tiny piece of plastic I used was so smooth and obviously it wasn’t going to stick to the JB Weld. This left the gob of JB weld with a nice straight edge.
Then I busted out the Dremel to start trimming down the JB weld. I did the best I could with that then to get a more detailed shape; I used a pocket knife to carve it.
Here is the finished product. The closed slot is now smaller.
Now I tested fitted again. I put it back in the housing and it fit pretty well. The key sits inside the housing like it’s supposed to when closed and had very little play.
Ok, on to fixing the “open” position problem. I used the same technique I used to fix the “closed” position problem. Here’s where I made a slight mistake as well. I put the JB Weld too high as you can see in the pic so the key would NOT open all the way. So back to the Dremel and pocket knife for carving til I got it just right. See before and after.
After this, I put the spring and metal cover back on and tested the flip, worked like a charm. I was starting to see some daylight. SO ON TO PAINT!
I taped my key up with painters tape. Next, I cleaned the complete outside of the key with paint thinner then applied some spot bondo to the top and bottom of the key. I didn’t worry about the sides of the key because you won’t ever see them. You see the top when the key is closed and the bottom when the key is open. I could have probably sanded the top and bottom down until they were completely smooth but I didn’t want to.
After letting the bondo dry overnight, I sanded it smooth.
Once that was done, I cleaned the entire key with paint thinner and sprayed on two coats of black paint. Each coat a few mins apart and let it dry for 3 days while I was on a vacation trip.
Finished product.
FINALLY, it was time to try and re-assemble the key. Here are all the parts minus the tiny black piece near the middle. It was the flap that covered the original immobilizer and was not need.
I test fit the key back into the housing and it was a little snug. I had to sand the inner circle a little bit more to get it rotating smoothly. I used some lithium grease to lubricate the key when I put it all back together.
Just follow the instructions from the beginning of this guide in reverse order to re-assemble your key. To program the key I used the instructions found here at post #90:
http://forums.clubrsx.com/showthread...=428964&page=4
Here is the finished product!! The only small issue I have is the “closed” position is a little too far back inside the fob so I can’t push it back far enough in the fob for the flip button to pop back up but its fairly easy to make it pop out by gently pushing on the top left portion of the key with my finger. I’ll show this on my video. I figure I’d rather have this issue than the issue of it hanging out too far.
01-30-2007, 09:57 PM
#3
Instructor

Join Date: May 2006
Location: Denver, CO
Age: 38
Posts: 206
Likes: 0
Received 0 Likes
on
0 Posts
Lol I think the number of pictures is scaring everyone away from doing this!!! Well done though, and I can clearly see that you pay close attention to detail. ;-)

Trending Topics

 Very nice writeup and Pics man!
 01-31-2007, 07:46 AM
#12
Burning Brakes
 with everyone...nice work
Still, I'll be honest and say that I'm glad I paid the extra few bucks for my Switchblade key from FLbusa. I prefer the idea of not having to disect and rebuild my key, especially one with a flip mechanism.
01-31-2007, 10:42 AM
#13
Instructor
Join Date: May 2003
Location: South Florida
Age: 64
Posts: 219
Likes: 0
Received 0 Likes
on
0 Posts
Very nice work.
My hat's off to you. I don't think I would have put that much work into the mod personally but the end result is very nice and impressive.
I'll send you some of my overflow customers.
Pete
My hat's off to you. I don't think I would have put that much work into the mod personally but the end result is very nice and impressive.
I'll send you some of my overflow customers.
Pete

 02-01-2007, 10:22 AM
#20
Thanks guys. There was a great sense of accomplishment when I finished this mod.  I did get a little picture happy but I had to test out my new canon I got for Christmas. I made these two videos with the camera as well ;-)
First video: I lock and unlock the doors and also show the windows going down AND back up thanks to the KP technology windows module I installed a while back(you can't really see the windows go up and down but you can here it). I do the trunk pop and also I show you the small issue I THOUGHT I had with the key not locking in the closed position without pressing on the top left edge. But to my surprise I don't have to after all. See video two.
http://www.youtube.com/watch?v=_DXPQj54IUI
Second video: I found if I slide my finger ALL the way down to the tip of the key and push, it works fine to close the key. Also I'm starting the car with the newly modded key.
http://www.youtube.com/watch?v=tXUCrrBu6WA
I did get a little picture happy but I had to test out my new canon I got for Christmas. I made these two videos with the camera as well ;-)First video: I lock and unlock the doors and also show the windows going down AND back up thanks to the KP technology windows module I installed a while back(you can't really see the windows go up and down but you can here it). I do the trunk pop and also I show you the small issue I THOUGHT I had with the key not locking in the closed position without pressing on the top left edge. But to my surprise I don't have to after all. See video two.
http://www.youtube.com/watch?v=_DXPQj54IUI
Second video: I found if I slide my finger ALL the way down to the tip of the key and push, it works fine to close the key. Also I'm starting the car with the newly modded key.
http://www.youtube.com/watch?v=tXUCrrBu6WA
 02-01-2007, 01:16 PM
#22
Hailing from the 3-0-5
Join Date: Oct 2006
Location: Miami, FL
Age: 40
Posts: 173
Likes: 0
Received 0 Likes
on
0 Posts
Toy!!
Dude ... I love how in the videos you "switch-out" and "switch-in" so many times! It is addictive, isn't it? Got mine from FLBusa and open and close it constantly for "kicks" . Gotta love the Germans for inventing the "switchblade key" . Awesome write-up and pics!
. Gotta love the Germans for inventing the "switchblade key" . Awesome write-up and pics!
02-04-2007, 08:26 AM
#24
Pro
Join Date: Nov 2005
Location: CT
Age: 52
Posts: 614
Likes: 0
Received 0 Likes
on
0 Posts
Originally Posted by rza49311
Thanks guys. There was a great sense of accomplishment when I finished this mod. I did get a little picture happy but I had to test out my new canon I got for Christmas. I made these two videos with the camera as well ;-)
First video: I lock and unlock the doors and also show the windows going down AND back up thanks to the KP technology windows module I installed a while back(you can't really see the windows go up and down but you can here it). I do the trunk pop and also I show you the small issue I THOUGHT I had with the key not locking in the closed position without pressing on the top left edge. But to my surprise I don't have to after all. See video two.
http://www.youtube.com/watch?v=_DXPQj54IUI
Second video: I found if I slide my finger ALL the way down to the tip of the key and push, it works fine to close the key. Also I'm starting the car with the newly modded key.
http://www.youtube.com/watch?v=tXUCrrBu6WA
I did get a little picture happy but I had to test out my new canon I got for Christmas. I made these two videos with the camera as well ;-)First video: I lock and unlock the doors and also show the windows going down AND back up thanks to the KP technology windows module I installed a while back(you can't really see the windows go up and down but you can here it). I do the trunk pop and also I show you the small issue I THOUGHT I had with the key not locking in the closed position without pressing on the top left edge. But to my surprise I don't have to after all. See video two.
http://www.youtube.com/watch?v=_DXPQj54IUI
Second video: I found if I slide my finger ALL the way down to the tip of the key and push, it works fine to close the key. Also I'm starting the car with the newly modded key.
http://www.youtube.com/watch?v=tXUCrrBu6WA
I noticed that you were able to roll up with the remote. Did you install a module??
02-04-2007, 08:29 AM
#25
She said: it's GINORMOUS!
great work!!
the key looks good!
yes, you need module.
the key looks good!
Originally Posted by DLTSX6MT
I noticed that you were able to roll up with the remote. Did you install a module??
02-04-2007, 03:18 PM
#28
Originally Posted by gtg710w
is it possible to just simply pop out the immobilizer chip? without doing any cutting?
 02-13-2007, 08:54 AM
#31
Suzuka Master
Join Date: Jul 2003
Location: Cincinnati, OH
Age: 49
Posts: 7,594
Likes: 0
Received 4 Likes
on
3 Posts
Originally Posted by rza49311
looks like a dealer has jumped on the band wagon
http://cgi.ebay.com/ebaymotors/ws/eB...m=280080145631
http://cgi.ebay.com/ebaymotors/ws/eB...m=280080145631
 02-13-2007, 02:46 PM
#32
mmmmmm....
Originally Posted by rza49311
looks like a dealer has jumped on the band wagon
http://cgi.ebay.com/ebaymotors/ws/eB...m=280080145631
http://cgi.ebay.com/ebaymotors/ws/eB...m=280080145631
 02-14-2007, 02:40 PM
#34
Drifting
Join Date: May 2006
Location: Mississauga, Canada
Age: 41
Posts: 2,355
Likes: 0
Received 1 Like
on
1 Post
Originally Posted by rza49311
looks like a dealer has jumped on the band wagon
http://cgi.ebay.com/ebaymotors/ws/eB...m=280080145631
http://cgi.ebay.com/ebaymotors/ws/eB...m=280080145631
i'll let you guys know how this one works.... FBUsa has been swamped (understandably so) and never got back on me to shipping charges to Canada... this is a few bucks cheaper, so after shipping it works out to be about the same for you guys ordering in the states....
can't wait!!
 02-14-2007, 10:00 PM
#36
Instructor

Join Date: Sep 2003
Location: Ottawa, Canada
Posts: 121
Likes: 0
Received 0 Likes
on
0 Posts
Originally Posted by rza49311
looks like a dealer has jumped on the band wagon
http://cgi.ebay.com/ebaymotors/ws/eB...m=280080145631
http://cgi.ebay.com/ebaymotors/ws/eB...m=280080145631
02-20-2007, 10:24 PM
#37
7th Gear

Join Date: Feb 2007
Location: NY
Posts: 7
Likes: 0
Received 0 Likes
on
0 Posts
Originally Posted by rza49311
Okay, so this is my first DIY Guide. I think I went overboard but I guess I’ll let you guys be the judge. If you decide to try this mod, I think this guide would definitely be useful but I don’t think it’s a perfect guide by any means. I figured I’d post it up because I took the pictures, might as well try to make them useful. Its more like a “don’t do what I did, be more careful” guide :-P Ok, one other quick story then into the guide. The reason I decided to try this mod is because I felt paying up to $150 for this mod was a bit steep (mill, key cut, program, fob, yada yada). I spent $42 on the key fob from the dealer and I had to buy some JB Weld $4.50, so basically my total cost was $46.50...plus time spent of course. Lastly, props to JKAutoSports on the RSX board for an awesome thread, Bngu1 here on Acurazine for helping me as well and lastly my good friend Budweiser. I plan on making a short video of it functioning as well but for now just pics and text. OK, so here we go!
First of all, I didn’t take any pics of me taking the key apart believe it or not. So I took pics of me re-assembling it so they should be good enough.
First, I removed the tiny screw on the back. NOTE: It’s easiest to take apart with the key in the “open” position IMO.
First of all, I didn’t take any pics of me taking the key apart believe it or not. So I took pics of me re-assembling it so they should be good enough.
First, I removed the tiny screw on the back. NOTE: It’s easiest to take apart with the key in the “open” position IMO.
02-21-2007, 06:01 AM
#38
Originally Posted by 2002AcuraRL
Hello everyone, I'm new to this form and just wanted to say I think what you did is amazing. I was wondering if anyone knows if its possible to mod that key to work with an 02 RL. Thanks
https://acurazine.com/forums/showthr...6&page=1&pp=25
there is some info in the very post # 1and in post # 138