06 fog light mesh "grille" DIY
 01-27-2007, 04:37 PM
#1
Burning Brakes
Thread Starter
Join Date: May 2006
Location: Portland, OR
Age: 41
Posts: 752
Likes: 0
Received 0 Likes
on
0 Posts
06 fog light mesh "grille" DIY
my passenger side fog got cracked by a rock within a month of me owning my car, so i wish i had done this sooner. i wanted to do this partially to protect what's left of my fogs and partially to hide the damage that's already there. so here's what i did (unfortunately i didn't take pictures AS i was doing it, so i'm going to borrow some pictures already here on the thread. i'm sorry if i don't fully attribute whose picture is whose):
supplies needed:
flat head screwdriver
10mm socket wrench
short handled phillips head screwdriver
aluminum "gutter guard" from home depot (or other place)
rust-oleum exterior metal spray paint (i used satin black)
first i made a cardboard pattern of the approximate size of the fog lens:

i left about a half inch on all sides so that it would get pinched between the bumper and the glass lens
then, i traced the pattern onto the aluminum mesh and cut it out (sorry, i don't have pictures of these)
i gave the two aluminum mesh cutouts three light coats of paint (and ample curing time)
now on to the install:
remove the 5 plastic clips, 4 black bolts, and the two outermost silver bolts holding the underbody cover onto the bumper. this photo is from studville's foglight replacement DIY:
after removing all the bolts and clips, i was able to push UP the underbody cover (studville pulled it down) enough to see what i was doing.
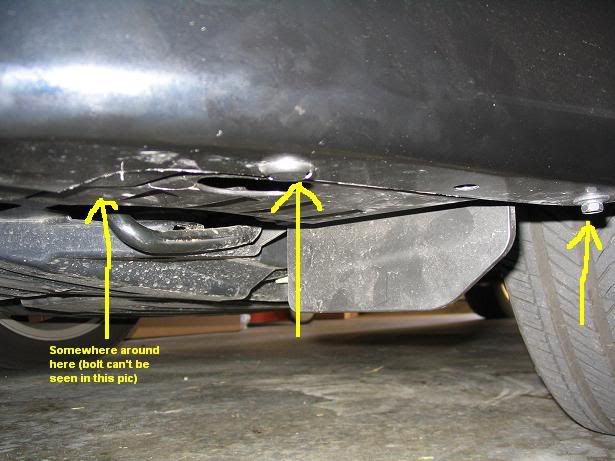
next, with the short-handled phillips screwdriver, loosen the brass screw (no pics here, but i will estimate the location from the outside with a picture. approimate locations circled in red)

after loosening the one screw (on each fog) it is possible to pull back the fog housing enough to slide the mesh grille between the glass and the bumper. do this on each side and make sure you've got full coverage of the lens.
the next step(s) are just to put everything back the way you found them... and then you're done!
this is what mine look like after completion:
passenger side

driver side

full shot

supplies needed:
flat head screwdriver
10mm socket wrench
short handled phillips head screwdriver
aluminum "gutter guard" from home depot (or other place)
rust-oleum exterior metal spray paint (i used satin black)
first i made a cardboard pattern of the approximate size of the fog lens:
i left about a half inch on all sides so that it would get pinched between the bumper and the glass lens
then, i traced the pattern onto the aluminum mesh and cut it out (sorry, i don't have pictures of these)
i gave the two aluminum mesh cutouts three light coats of paint (and ample curing time)
now on to the install:
remove the 5 plastic clips, 4 black bolts, and the two outermost silver bolts holding the underbody cover onto the bumper. this photo is from studville's foglight replacement DIY:
after removing all the bolts and clips, i was able to push UP the underbody cover (studville pulled it down) enough to see what i was doing.
next, with the short-handled phillips screwdriver, loosen the brass screw (no pics here, but i will estimate the location from the outside with a picture. approimate locations circled in red)
after loosening the one screw (on each fog) it is possible to pull back the fog housing enough to slide the mesh grille between the glass and the bumper. do this on each side and make sure you've got full coverage of the lens.
the next step(s) are just to put everything back the way you found them... and then you're done!
this is what mine look like after completion:
passenger side
driver side
full shot

 01-27-2007, 06:15 PM
#5
Advanced

Join Date: Dec 2005
Age: 38
Posts: 53
Likes: 0
Received 0 Likes
on
0 Posts
Might want to consider meshing out the "Vents to the sides of the foglights too... personally Id consider doing that as well as dremeling the Drivers side one (opening up the Fake vents) to get better Airflow to the Cold Air
01-27-2007, 07:35 PM
#6
Burning Brakes
Thread Starter
Join Date: May 2006
Location: Portland, OR
Age: 41
Posts: 752
Likes: 0
Received 0 Likes
on
0 Posts
Originally Posted by Firefightr86
Might want to consider meshing out the "Vents to the sides of the foglights too... personally Id consider doing that as well as dremeling the Drivers side one (opening up the Fake vents) to get better Airflow to the Cold Air


Trending Topics
01-28-2007, 05:07 PM
#11
Slippy maybe...
Join Date: Mar 2005
Location: Hamilton, Ontario
Age: 47
Posts: 221
Likes: 0
Received 1 Like
on
1 Post
I'm thinking this might be a good solution for me too. I've been using the Rockblocker film on my foglights but after only half a year of only using the foglights when the car is in motion, the plastic film has bubbled and turned completely brown rendering my foglights useless. I'm taking the film off once the weather turns better and looking into something like the solution offered here.
01-28-2007, 08:51 PM
#12
OEM plus!
Join Date: Apr 2006
Location: Chicago area
Age: 44
Posts: 509
Likes: 0
Received 0 Likes
on
0 Posts
Looks pretty good actually. As soon as you said gutter guard, I was on the defensive because I thought it was going to be a ricer mod. But I am impressed, it looks clean.
01-28-2007, 09:37 PM
#13
Burning Brakes
Thread Starter
Join Date: May 2006
Location: Portland, OR
Age: 41
Posts: 752
Likes: 0
Received 0 Likes
on
0 Posts
unfortunately, i have noticed a reduction in light output (obviously because the grille is blocking it), so if you use your fogs for your vision more than how it looks cool and for others to see you, then this mod is probably not going to be a good solution for you.
03-13-2007, 08:53 PM
#15
Racer

Join Date: Jul 2006
Location: Denver, CO
Age: 41
Posts: 256
Likes: 0
Received 0 Likes
on
0 Posts
Since both my fogs cracked within a month of purchasing the TSX, I recently decided I'd better apply this mod before the housings were completely destroyed. I liked this foglight mod, but I was a little worried about the loss of light output. Using the same idea, I bought some 1/16" Lexan sheet and cut it into rectangles (pics below).
I was able to pull the undercarriage plastic down enough to get under there and see what was going on; but I actually found that my arm was skinny enough to insert through the venting behind the license plate. I found the "brass" screws (mine weren't brass), which, to clarify from the above images, are inserted along the length of the car, not from the sides. In the same way as ruffell I was able to slide the Lexan sheets between the bulb housing and bumper, although I had to use a pair of scissors to round the edges of the sheets first.
I did a little research before buying the Lexan--it supposedly can handle temperatures up to 240F, which in my estimation should work. Does anybody know how hot the bulbs actually get? Hot enough to boil water? Also, the plastic doesn't touch the surface of the bulb as much as a Rockblocker film does, so hopefully these won't get burned up. If so, I can always replace very easily ($10 of Lexan will get you about 10 bulb covers), and now that I know where everything is, I could probably do it without removing the undercarriage covers.
Sorry the pics are kinda crummy...basically you can't tell the Lexan is even there (the lines are my cracked bulbs underneath the Lexan). I'll post an update if the plastic starts to burn up.
Thanks to ruffell for the idea/instructions!
03-14-2007, 12:03 AM
#16
Burning Brakes
Thread Starter
Join Date: May 2006
Location: Portland, OR
Age: 41
Posts: 752
Likes: 0
Received 0 Likes
on
0 Posts
Originally Posted by jswim99
Since both my fogs cracked within a month of purchasing the TSX, I recently decided I'd better apply this mod before the housings were completely destroyed. I liked this foglight mod, but I was a little worried about the loss of light output. Using the same idea, I bought some 1/16" Lexan sheet and cut it into rectangles (pics below).
I was able to pull the undercarriage plastic down enough to get under there and see what was going on; but I actually found that my arm was skinny enough to insert through the venting behind the license plate. I found the "brass" screws (mine weren't brass), which, to clarify from the above images, are inserted along the length of the car, not from the sides. In the same way as ruffell I was able to slide the Lexan sheets between the bulb housing and bumper, although I had to use a pair of scissors to round the edges of the sheets first.
I did a little research before buying the Lexan--it supposedly can handle temperatures up to 240F, which in my estimation should work. Does anybody know how hot the bulbs actually get? Hot enough to boil water? Also, the plastic doesn't touch the surface of the bulb as much as a Rockblocker film does, so hopefully these won't get burned up. If so, I can always replace very easily ($10 of Lexan will get you about 10 bulb covers), and now that I know where everything is, I could probably do it without removing the undercarriage covers.
Sorry the pics are kinda crummy...basically you can't tell the Lexan is even there (the lines are my cracked bulbs underneath the Lexan). I'll post an update if the plastic starts to burn up.
Thanks to ruffell for the idea/instructions!
03-14-2007, 01:12 PM
#17
Racer
Join Date: Jul 2006
Location: Denver, CO
Age: 41
Posts: 256
Likes: 0
Received 0 Likes
on
0 Posts
I bought two 1'x1' sheets from McMaster-Carr for about $12 plus shipping (www.mcmaster.com). I only did that because going to a local plastics shop wasn't worth the convenience of having it shipped.
 03-14-2007, 08:32 PM
#21
Racer
Join Date: Jul 2006
Location: Denver, CO
Age: 41
Posts: 256
Likes: 0
Received 0 Likes
on
0 Posts
Originally Posted by LoveMyTSX
Hmmmm I wonder if Lexan comes in yellow??
03-14-2007, 09:31 PM
#22
Burning Brakes
Thread Starter
Join Date: May 2006
Location: Portland, OR
Age: 41
Posts: 752
Likes: 0
Received 0 Likes
on
0 Posts
Originally Posted by LoveMyTSX
Hmmmm I wonder if Lexan comes in yellow??
i was wondering the same thing myself, only i don't know if yellow lenses and foggies would look all that good on CGP. seems much more a PWP thing to have.
04-11-2007, 06:45 AM
#23
Racer
Join Date: Jul 2006
Location: Denver, CO
Age: 41
Posts: 256
Likes: 0
Received 0 Likes
on
0 Posts
Ok, I've had this mod installed for a month or so now, and I've had a chance to use the lights quite a bit. No burning/discoloration of the Lexan whatsoever. I highly recommend this to anybody who thinks they have any chance of getting a cracked foglight. I wish I would've done it immediately when I bought my car!
05-03-2007, 12:11 PM
#25
Three Wheelin'
Join Date: Jul 2003
Location: St. Louis
Posts: 1,545
Likes: 0
Received 0 Likes
on
0 Posts
Originally Posted by jswim99
I bought two 1'x1' sheets from McMaster-Carr for about $12 plus shipping (www.mcmaster.com).
05-04-2007, 06:23 AM
#26
Racer
Join Date: Jul 2006
Location: Denver, CO
Age: 41
Posts: 256
Likes: 0
Received 0 Likes
on
0 Posts
Originally Posted by STL
What was the part number on the stuff you bought? Was it 8574K24? I ask because I'm seeing two 12"x12"x1/16" sheets of that only costing $7.40 plus S&H -- so I'm wondering if I'm looking at the same thing you bought.
05-04-2007, 10:43 AM
#27
Three Wheelin'
Join Date: Jul 2003
Location: St. Louis
Posts: 1,545
Likes: 0
Received 0 Likes
on
0 Posts
Originally Posted by jswim99
I'm sure that stuff will work. I don't remember exactly the part number that I bought, but prices change all the time so go for it!
05-04-2007, 01:39 PM
#28
Racer
Join Date: Jul 2006
Location: Denver, CO
Age: 41
Posts: 256
Likes: 0
Received 0 Likes
on
0 Posts
Originally Posted by STL
Have you had your fog lights on with the car not moving (like sitting at a long light or just stopping to chat with someone)? I ask because I am curious if this stuff might only be "working" because you only have the fogs on while moving (and the airflow is keeping the material cool enough to not yellow or melt). Thanks...
05-04-2007, 06:56 PM
#29
Burning Brakes
Thread Starter
Join Date: May 2006
Location: Portland, OR
Age: 41
Posts: 752
Likes: 0
Received 0 Likes
on
0 Posts
has anyone had any luck finding flat sheets of colored lexan? yellow would be awesome, as i think, would be a light blue (for cgp, blue might look better than yellow?)
05-04-2007, 11:54 PM
#30
I Quit
Originally Posted by ruffellprefley
has anyone had any luck finding flat sheets of colored lexan? yellow would be awesome, as i think, would be a light blue (for cgp, blue might look better than yellow?)
05-05-2007, 01:06 AM
#31
Burning Brakes
Thread Starter
Join Date: May 2006
Location: Portland, OR
Age: 41
Posts: 752
Likes: 0
Received 0 Likes
on
0 Posts
Originally Posted by clee109
that stuff's going to discolor though, right? and not really be a lot of protection from rocks, like lexan would be... from what jswim99 is saying, he hasn't had discoloring with his lexan and it's hard stuff too
05-05-2007, 10:05 AM
#32
I Quit
When I had my MDX I had the smoked film on my front signals and taillights and it never discolored, lasted as long as I had the SUV, didn't peel, or anything. Problem is that your fogs will melt it if you use them alot. But you can always upgrade to HID's in your fogs and no melting issue.
05-05-2007, 01:08 PM
#33
Burning Brakes
Thread Starter
Join Date: May 2006
Location: Portland, OR
Age: 41
Posts: 752
Likes: 0
Received 0 Likes
on
0 Posts
Originally Posted by clee109
Problem is that your fogs will melt it if you use them alot. .
 , being that it doesn't seem to melt or discolor
  06-08-2007, 08:45 PM
#35
Burning Brakes
Thread Starter
Join Date: May 2006
Location: Portland, OR
Age: 41
Posts: 752
Likes: 0
Received 0 Likes
on
0 Posts
i just switched out my custom "gutter-guard" grilles in favor of some 1/16" clear lexan. it doesn't look as cool, but the light output is WAY better, especially with my nokya hyper yellow h9 bulbs. pictures this evening perhaps. if not, then tomorrow.
still looking for yellow lexan sheets, as opposed to using yellow tint.
still looking for yellow lexan sheets, as opposed to using yellow tint.
06-15-2007, 07:50 PM
#40
Burning Brakes
Thread Starter
Join Date: May 2006
Location: Portland, OR
Age: 41
Posts: 752
Likes: 0
Received 0 Likes
on
0 Posts
Originally Posted by STL
For those of you that have done this, do you think 3/32" lexan would work too -- or is that too thick? That's all I can seem to find locally.
might not be easily bendable enough...