
faster windows

Thread Starter
Moderator


Joined: Oct 2004
Posts: 64,159
Likes: 3,404
From: Not Las Vegas (SF Bay Area)
well me and my friend Sam got around to WDing my windows to make them go up faster. They do go up faster but nothing insane. I have videos comparing the before with the after, but i dont have a server to post them onto. Anyways onto the guide.
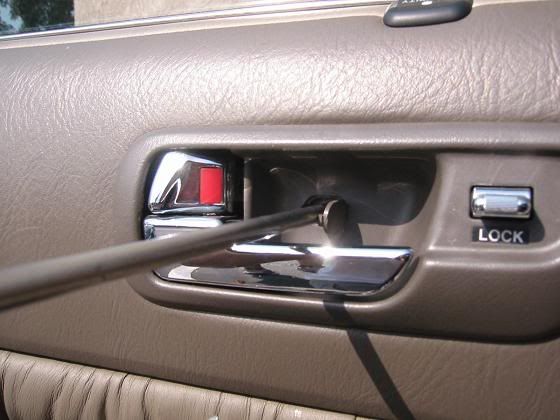
1. First you need to get a small screw driver and open up screw cover for the door handle
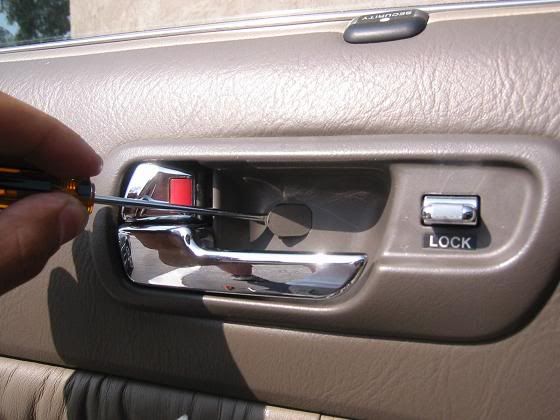
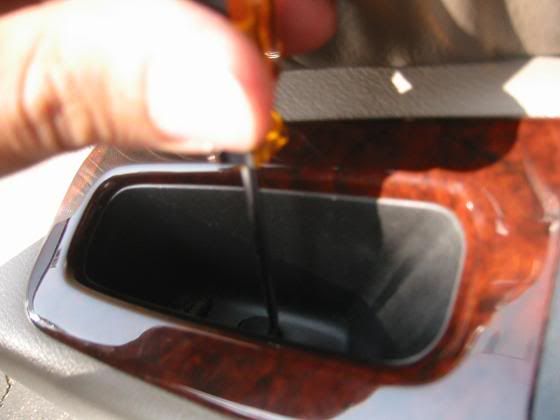
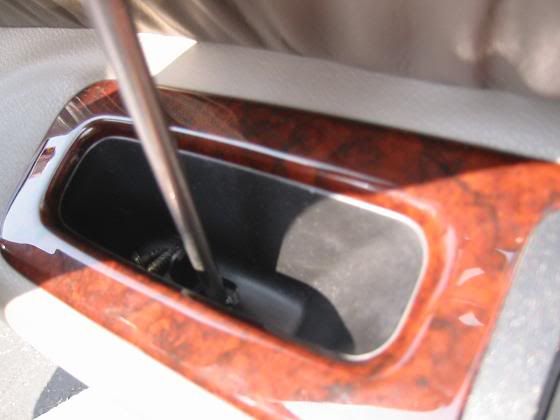
2. Next you unscrew the screw behind it, place this screw in a place you wont lose it. I suggest the cup holder.
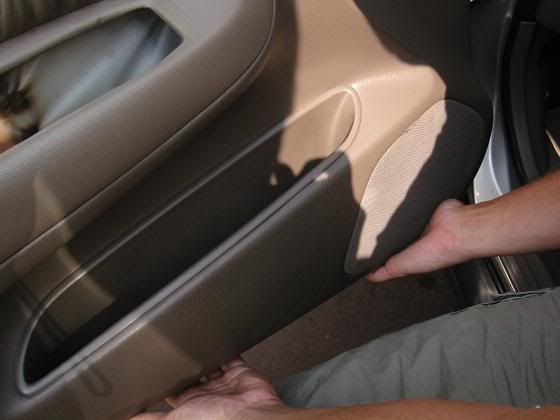
3. Using the same process you did to take off the screw cover for the door handle repeat the same thing for the door grab/handle.
4. Then uncsrew the screw behind the cover and place that in a safe spot.
5. Carefully pry out the window controls from the door.
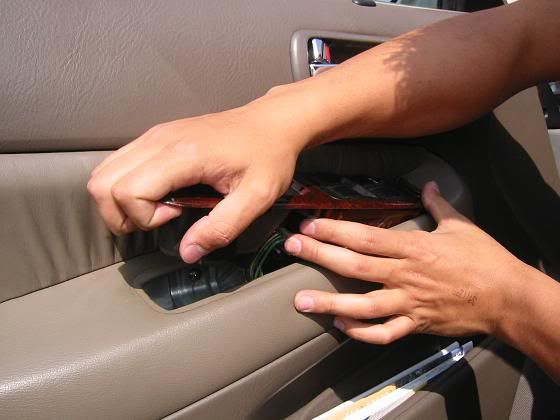
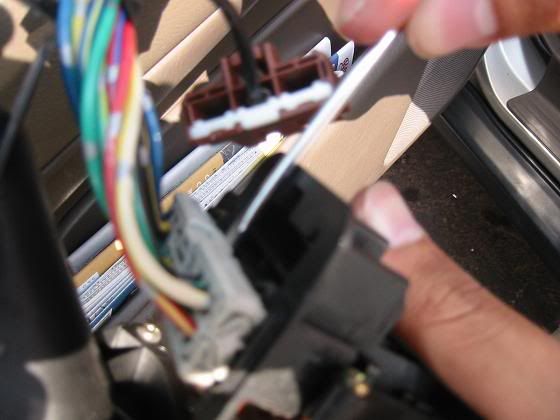
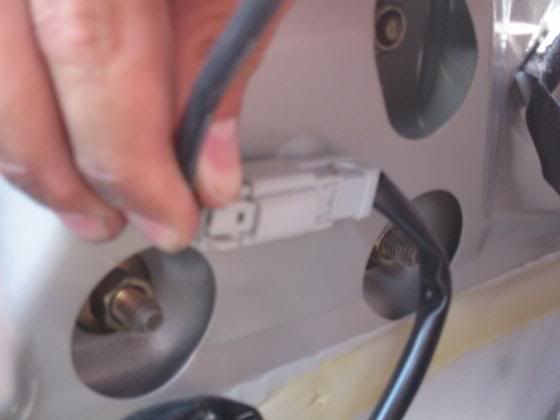
6. Next disconnect the cables behind the window controller. If its hard to take out the larger grey plug you can use a small screw driver and shimmy it out of the socket.

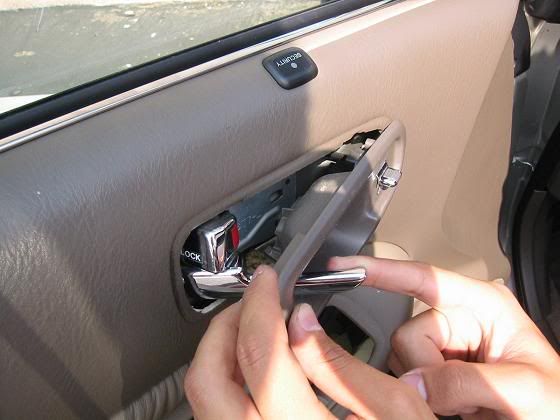
7. Next you want to take out the door lock plastic piece. To do this you have to open the door handle and then pry out the door lock piece.
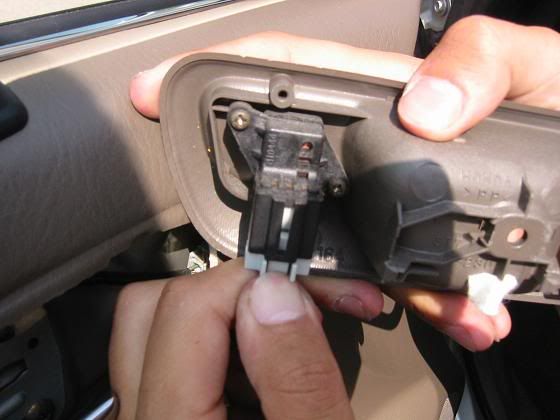
8. Disconnect the cable behind the door lock piece.
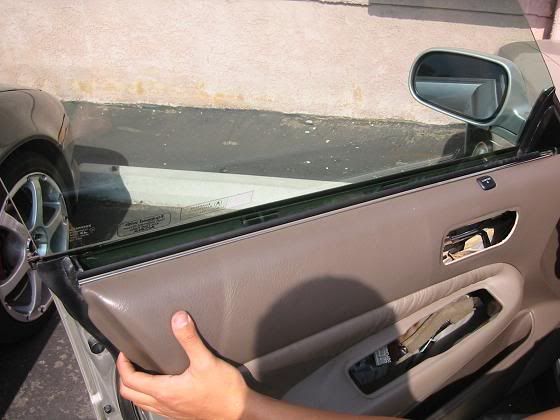
9. Now you can remove the door panel. Grab the door panel from the bottom and give it a tug outwards to losen up all the clips holding it in place. Fyi there are clips holding the panel all around except for the top. You will have to use quite a bit of force but be carefull not to use too much force your you might break something.
10. After all the clips are disconnected you can lift the door panel out of the grove thats holding it in.
11. Next disconnect the security light cable from behind the door panel.
12. Disconnect the courtesy light cable from behind the door panel.

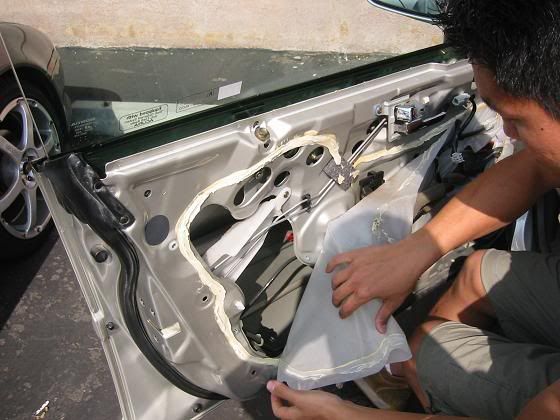
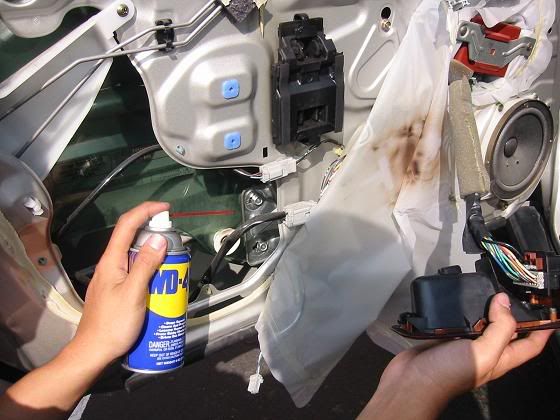
13. For me it was easier to remove this plastic tarp to get access to good lubing spots. But i didnt want to cut into it, so i carefully peeled it off.
14. You can if you want to make it easier to lube up the tracks by removing the door grab/handle support from the door. You do this by unscrewing the 2 screws. fyi you dont need to do this on the passenger side door, i only did it for the driver side door cause it made it a bit easier.
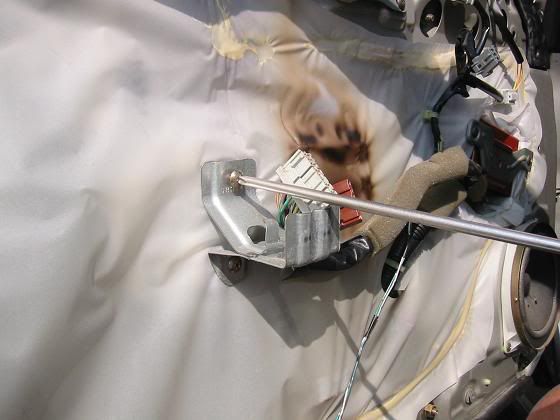
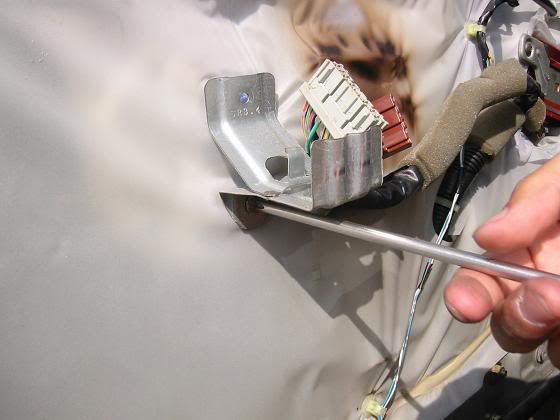
15. Now you can finally start lubing up the tracks. You should plug in the window control switch while you do this so you can work the lube into the tracks after spraying. these are the spots where i applied lube to.
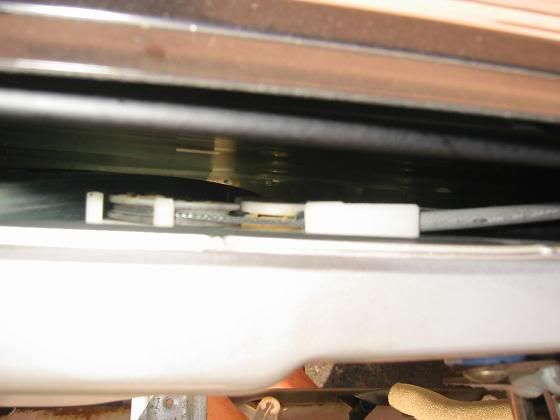
a. First i lubed up the middle track and roller while the window was rolled down.
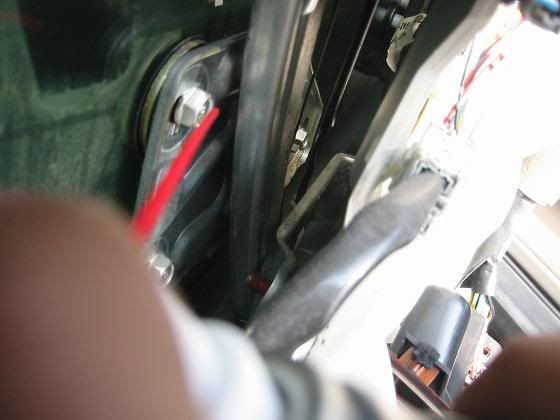
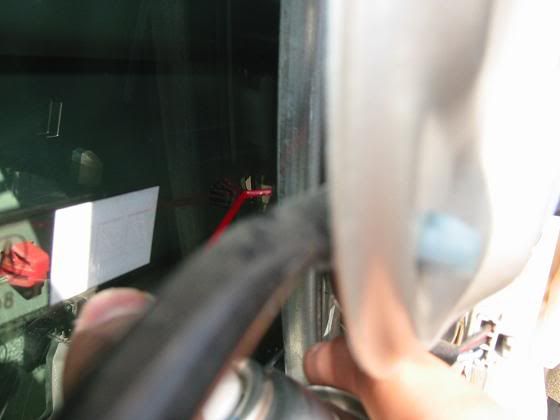
b. Then with the window rolled up i applied lube to the track and rollers on the front of the door. I also sprayed lube onto the tracks when the window was down as well. This picture is looking down into the door from the top of it.
c. Looking in from the top of the door i sprayed lube onto the track when the windows was rolled down.

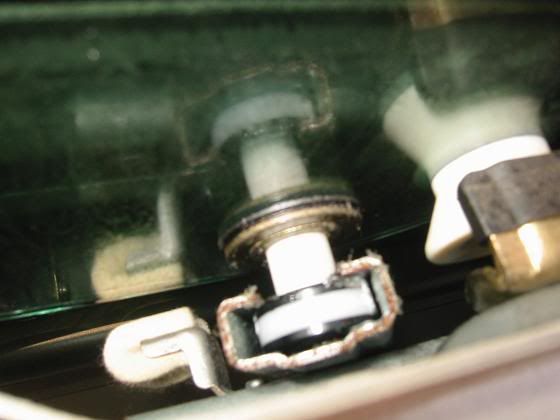
d. The final thing i lubed up was the cable and a small roller that pulls up the window into the close position. This is located between the track in the front of the door and in the middle of the door.
16. After you're done lubing up the door, you can now reassemble the door. Clean up any lube that might dripped to the inside of the door. Disconnect the window controller. Then double check to see if any of the clips are still stuck in the door and remove them and place them back into the door panel. To put it back together reattach the door grab/handle brace onto the door and then reattach the plastic tarp to the glue (i just rubbed it to warm it up so the glue would get sticky again, make sure you reseal this tarp good otherwise water might get in and start rusting up stuff and messing with the electrical components. ) connect the security light and the courtesy light and place the door lock cable and the window cables thru their respective holes and then put the door panel into the groove on top of the door first and bang on the door all around to make the clips pop back into their holes. Aftewards you reconnect the window cables to the window controller and seat that back into the door grab/handle and then screw it back into place, and then slide the cover back over the screw. Finally you reattach the plastic door lock piece by first opening the door latch and then sliding it thru and then reseating it and screwing it back into place and putting the cover on it.
17. Repeat for the passenger door. fyi there is no security cable to disconnect and the window controller has only 1 cable instead of 2 attached to it.
For me i had the hardest time controlling the spray of the WD40 so i said screw it and got it all over the windows. Some windex will easily clean this up. And make sure after you clean up the windows to wipe the felt while the window is rolled down otherwise you'll get more grease onto the windows. If you could find the motor you might want to spray that as well so the motor runs easier. But after you're done you can enjoy your faster windows.
If you have anymore questions feel free to post. If you guys find this usefull hopefully a mod will sticky this
1. First you need to get a small screw driver and open up screw cover for the door handle
2. Next you unscrew the screw behind it, place this screw in a place you wont lose it. I suggest the cup holder.
3. Using the same process you did to take off the screw cover for the door handle repeat the same thing for the door grab/handle.
4. Then uncsrew the screw behind the cover and place that in a safe spot.
5. Carefully pry out the window controls from the door.
6. Next disconnect the cables behind the window controller. If its hard to take out the larger grey plug you can use a small screw driver and shimmy it out of the socket.
7. Next you want to take out the door lock plastic piece. To do this you have to open the door handle and then pry out the door lock piece.
8. Disconnect the cable behind the door lock piece.
9. Now you can remove the door panel. Grab the door panel from the bottom and give it a tug outwards to losen up all the clips holding it in place. Fyi there are clips holding the panel all around except for the top. You will have to use quite a bit of force but be carefull not to use too much force your you might break something.
10. After all the clips are disconnected you can lift the door panel out of the grove thats holding it in.
11. Next disconnect the security light cable from behind the door panel.
12. Disconnect the courtesy light cable from behind the door panel.
13. For me it was easier to remove this plastic tarp to get access to good lubing spots. But i didnt want to cut into it, so i carefully peeled it off.
14. You can if you want to make it easier to lube up the tracks by removing the door grab/handle support from the door. You do this by unscrewing the 2 screws. fyi you dont need to do this on the passenger side door, i only did it for the driver side door cause it made it a bit easier.
15. Now you can finally start lubing up the tracks. You should plug in the window control switch while you do this so you can work the lube into the tracks after spraying. these are the spots where i applied lube to.
a. First i lubed up the middle track and roller while the window was rolled down.
b. Then with the window rolled up i applied lube to the track and rollers on the front of the door. I also sprayed lube onto the tracks when the window was down as well. This picture is looking down into the door from the top of it.
c. Looking in from the top of the door i sprayed lube onto the track when the windows was rolled down.
d. The final thing i lubed up was the cable and a small roller that pulls up the window into the close position. This is located between the track in the front of the door and in the middle of the door.
16. After you're done lubing up the door, you can now reassemble the door. Clean up any lube that might dripped to the inside of the door. Disconnect the window controller. Then double check to see if any of the clips are still stuck in the door and remove them and place them back into the door panel. To put it back together reattach the door grab/handle brace onto the door and then reattach the plastic tarp to the glue (i just rubbed it to warm it up so the glue would get sticky again, make sure you reseal this tarp good otherwise water might get in and start rusting up stuff and messing with the electrical components. ) connect the security light and the courtesy light and place the door lock cable and the window cables thru their respective holes and then put the door panel into the groove on top of the door first and bang on the door all around to make the clips pop back into their holes. Aftewards you reconnect the window cables to the window controller and seat that back into the door grab/handle and then screw it back into place, and then slide the cover back over the screw. Finally you reattach the plastic door lock piece by first opening the door latch and then sliding it thru and then reseating it and screwing it back into place and putting the cover on it.
17. Repeat for the passenger door. fyi there is no security cable to disconnect and the window controller has only 1 cable instead of 2 attached to it.
For me i had the hardest time controlling the spray of the WD40 so i said screw it and got it all over the windows. Some windex will easily clean this up. And make sure after you clean up the windows to wipe the felt while the window is rolled down otherwise you'll get more grease onto the windows. If you could find the motor you might want to spray that as well so the motor runs easier. But after you're done you can enjoy your faster windows.
If you have anymore questions feel free to post. If you guys find this usefull hopefully a mod will sticky this


 in other words...THANX
Registered Driver
Joined: Aug 2004
Posts: 2,493
Likes: 3
From: Bristol, Rhode Island
Very nice, I actually did this (again) the other day and took some pictures along the way but they all came out pretty blurry so I ditched the idea for another few months. Now I don't have to do it :p
Trending Topics
Registered Driver
Joined: Aug 2004
Posts: 2,493
Likes: 3
From: Bristol, Rhode Island
That's what we are all here for  I'm trying to document as much as I can because sometimes it can be intimidating to do but a lot of description and pictures get people to start working on their cars which helps keep this place going.
I'm trying to document as much as I can because sometimes it can be intimidating to do but a lot of description and pictures get people to start working on their cars which helps keep this place going.

Advanced
Joined: Dec 2003
Posts: 70
Likes: 0
From: Omaha, Nebraska
thank you very much sir, that was a nice write up. i went out and did it to just the driver's side. it's effing hot and humid here, so i think im gonna wait until tonight to do the passenger's side. the only slight inconvience i had was gettin the panel out, but once i figured out how to do it, it was smooth sailing from there.


Burning Brakes
Joined: Jul 2005
Posts: 996
Likes: 4
too bad WD-40 works like ass as a lubricant.. when it dries up and REMOVES the lubrication your windows will be slower than before...Lith grease, or chain lubricant would have been a better choice... I did this on a jeep one time... windows were slower after a couple weeks... got p/o.... did some research, and a lot of professionals state that WD-40 is more of a penetrant and a crappy lubricant... Made the mistake once, did it right on my sunroof and doors... they are soooo fast. faster than factory

1996 ACURA 3.2 ON RL 16'S
Joined: Jan 2006
Posts: 64
Likes: 1
From: Houston/Clear Lake
I Agree With Ljmushock I Work At A Dealership I Am A Service Advisor And Wd-40 Is Now A Mild Penetrant Compared To Other Stuff Out There And It Evaporates And Will Not Lubricate For Long Normally For Metallic Applications Lithium Grease Is Recommended As Is A Graphite Based Lubetry Graphite For Your Key Locks And Ignitions And Lithium Grease For Door Hinges And Any Metal To Metal Or Metal To Glass Applications. Make Sure You Clean Up Any Area That Get's Overspray, Like On Glass To Prevent Chronic Streaking When You Got Your Door Panel All Open.
1996 ACURA 3.2 ON RL 16'S
Joined: Jan 2006
Posts: 64
Likes: 1
From: Houston/Clear Lake
Silicone Spray Is For Rubber Parts To Keep Them From Cracking And Drying Like The Weatherstriping On The Doors And Trunk But Not For Metal Applications. Take A Rag Spray Some Silicone On It And Wipe Your Rubber Pieces With It All Ove Your Car !!!!! Also If You Can Find Some High Temp Silicone Spray Use It On Engine Rubber Hoses And Vaccuum Tubes Or Any Thing......... Let Me Know How Y'all Like It!

oh boo..i just did this today but didnt read ur guys replies about the lith grease...did the wd40..no more squeaking and faster windows..but it makes sense what u guys say..well the process is so easy i think i wont even need the diy next time.
Senior Moderator
Joined: May 2003
Posts: 45,641
Likes: 2,335
From: Better Neighborhood, Arizona
Well I did this today.. it was very easy (especially since directions were given)
Added some acoustic foam, dynomat, fixed the windows, tightened some screws and tightened up the lock mechanisms. The doors sound and feel much better. Less road noise too.
Added some acoustic foam, dynomat, fixed the windows, tightened some screws and tightened up the lock mechanisms. The doors sound and feel much better. Less road noise too.
大日本帝国
Joined: Apr 2006
Posts: 5,321
Likes: 36
From: Double Standard Land
My driver's side is slower than my passenger side...  A helluva lot noisier, too. Haven't actually gotten around to doing this, though, and hopefully afterwards my ears will be spared, hehe.
~Cheers~
A helluva lot noisier, too. Haven't actually gotten around to doing this, though, and hopefully afterwards my ears will be spared, hehe.~Cheers~
Thread Starter
Moderator
Joined: Oct 2004
Posts: 64,159
Likes: 3,404
From: Not Las Vegas (SF Bay Area)
yea i definately need to redo my windows they are slower than they were before this, so yea dont use WD-40, im gonna redo my windows with lithium grease or soemthing better


3rd Gear
Joined: May 2006
Posts: 3
Likes: 0
I also did this recently, but still found it difficult getting to the rail closest to the door hinge and thought shooting spray down the railing from the top was messy. I ended up removing the door speaker, which provided direct access to the rail, which you can lubricate by hand with some lithium grease. Actually, you might want to try this first before tearing off the vapor barrier and lubricating all the other points, which in my case, were already fine.
Acura Vet
Joined: Oct 2003
Posts: 830
Likes: 0
From: Snellville, GA
I am going to go back and do this again, but I had to take my driver's door apart because the rubber top portion of the Chrome/Weather stripping trim was coming apart. I bought a new piece with all of the clips and the felt pieces were attached to it. I lubed up the window after installation and it sounds & looks great. I also got rid of the pesky window rattle that had started to plague me. This DIY was very helpful even almost two years later. I am going to go back in and do it again with the Gear lubricant (because all I had at the time was WD40) and do the rest of the windows too. I may replace the weather stripping on the other three windows while I am at it. The felt on the piece that I replaced was extremely nasty. I can see why the windows were so scratched up.
Advanced
Joined: Feb 2007
Posts: 74
Likes: 0
Originally Posted by Mizouse
well me and my friend Sam got around to WDing my windows to make them go up faster. They do go up faster but nothing insane. I have videos comparing the before with the after, but i dont have a server to post them onto. Anyways onto the guide.
1. First you need to get a small screw driver and open up screw cover for the door handle
2. Next you unscrew the screw behind it, place this screw in a place you wont lose it. I suggest the cup holder.
3. Using the same process you did to take off the screw cover for the door handle repeat the same thing for the door grab/handle.
4. Then uncsrew the screw behind the cover and place that in a safe spot.
5. Carefully pry out the window controls from the door.
6. Next disconnect the cables behind the window controller. If its hard to take out the larger grey plug you can use a small screw driver and shimmy it out of the socket.
7. Next you want to take out the door lock plastic piece. To do this you have to open the door handle and then pry out the door lock piece.
8. Disconnect the cable behind the door lock piece.
9. Now you can remove the door panel. Grab the door panel from the bottom and give it a tug outwards to losen up all the clips holding it in place. Fyi there are clips holding the panel all around except for the top. You will have to use quite a bit of force but be carefull not to use too much force your you might break something.
10. After all the clips are disconnected you can lift the door panel out of the grove thats holding it in.
11. Next disconnect the security light cable from behind the door panel.
12. Disconnect the courtesy light cable from behind the door panel.
13. For me it was easier to remove this plastic tarp to get access to good lubing spots. But i didnt want to cut into it, so i carefully peeled it off.
14. You can if you want to make it easier to lube up the tracks by removing the door grab/handle support from the door. You do this by unscrewing the 2 screws. fyi you dont need to do this on the passenger side door, i only did it for the driver side door cause it made it a bit easier.
15. Now you can finally start lubing up the tracks. You should plug in the window control switch while you do this so you can work the lube into the tracks after spraying. these are the spots where i applied lube to.
a. First i lubed up the middle track and roller while the window was rolled down.
b. Then with the window rolled up i applied lube to the track and rollers on the front of the door. I also sprayed lube onto the tracks when the window was down as well. This picture is looking down into the door from the top of it.
c. Looking in from the top of the door i sprayed lube onto the track when the windows was rolled down.
d. The final thing i lubed up was the cable and a small roller that pulls up the window into the close position. This is located between the track in the front of the door and in the middle of the door.
16. After you're done lubing up the door, you can now reassemble the door. Clean up any lube that might dripped to the inside of the door. Disconnect the window controller. Then double check to see if any of the clips are still stuck in the door and remove them and place them back into the door panel. To put it back together reattach the door grab/handle brace onto the door and then reattach the plastic tarp to the glue (i just rubbed it to warm it up so the glue would get sticky again, make sure you reseal this tarp good otherwise water might get in and start rusting up stuff and messing with the electrical components. ) connect the security light and the courtesy light and place the door lock cable and the window cables thru their respective holes and then put the door panel into the groove on top of the door first and bang on the door all around to make the clips pop back into their holes. Aftewards you reconnect the window cables to the window controller and seat that back into the door grab/handle and then screw it back into place, and then slide the cover back over the screw. Finally you reattach the plastic door lock piece by first opening the door latch and then sliding it thru and then reseating it and screwing it back into place and putting the cover on it.
17. Repeat for the passenger door. fyi there is no security cable to disconnect and the window controller has only 1 cable instead of 2 attached to it.
For me i had the hardest time controlling the spray of the WD40 so i said screw it and got it all over the windows. Some windex will easily clean this up. And make sure after you clean up the windows to wipe the felt while the window is rolled down otherwise you'll get more grease onto the windows. If you could find the motor you might want to spray that as well so the motor runs easier. But after you're done you can enjoy your faster windows.
If you have anymore questions feel free to post. If you guys find this usefull hopefully a mod will sticky this
I just got a TL and noticed the windows are WAY slow! Do people on here get new motors? is it worth a motor price or the WD help it ALOT?
Acura Vet
Joined: Oct 2003
Posts: 830
Likes: 0
From: Snellville, GA
Actually I was given silicone as a better alternative to the WD. The WD will actually make it worse once it gets wet. I have done mine with WD just because I had to take the door panel off (and that was all that I had handy) to replace the Chrome weather stripping on the door which also holds the Felt pieces that hold up against the window. I would recommend replacing those too if you see yours is all nasty.( I bought a new piece for the driver's front window for $100.00, I don't know if you can just buy the felt clips or not) This will cut down on the scratches on the window and help to make it quieter as well. I wouldn't replace the motor because that was how these cars were made. EVERYONE'S windows are slow. I have had the motor in mine replaced (when it was still under warranty many moons ago) and I can tell you that there was no difference. As long as the window works the motor should be fine.
Advanced
Joined: Feb 2007
Posts: 74
Likes: 0
Originally Posted by alphason'sac
Actually I was given silicone as a better alternative to the WD. The WD will actually make it worse once it gets wet. I have done mine with WD just because I had to take the door panel off (and that was all that I had handy) to replace the Chrome weather stripping on the door which also holds the Felt pieces that hold up against the window. I would recommend replacing those too if you see yours is all nasty.( I bought a new piece for the driver's front window for $100.00, I don't know if you can just buy the felt clips or not) This will cut down on the scratches on the window and help to make it quieter as well. I wouldn't replace the motor because that was how these cars were made. EVERYONE'S windows are slow. I have had the motor in mine replaced (when it was still under warranty many moons ago) and I can tell you that there was no difference. As long as the window works the motor should be fine.
Advanced
Joined: Mar 2007
Posts: 73
Likes: 0
Thanks for the information regarding SLOW WINDOWS. My PASSENGER side window is "iffy" to say the least. It goes DOWN OK, but 50/50 of the time when it goes UP sometimes its SLOW, sometimes its "NORMAL".
Anybody got any 411 on this? Is it the motor? regulator? Or just plain bad, where I can try this MOD to fix it?
If the ignition is OFF, the window will halt to a standstill about halfway up. Im actually scared that one day-- my window wont go up all the way. In other words, I need the engine to be running for the passenger side window to go up at normal to slow speed.
Advanced
Joined: Mar 2007
Posts: 73
Likes: 0
Mizouse,
Many thanks for this MOD. It wasnt that hard as I thought it would be. The only difference is I used SILICONE SPRAY, not WD-40. And yeah, I got it all over my window too-- but that was only because I have a itchy/heavy trigger finger out of months of frustration of the slow passenger window. Now it moves faster, not faster than the speed of light, but NO MORE SQUEAKY NOISES, and NO MORE SLOW DOWN/STOPPAGE, engine ON or OFF.
You are the man Mizouse!!!


Intermediate
Joined: Jan 2007
Posts: 33
Likes: 0
Finally did it.
Finally did it. Used silicone lub. I got the track closer to the hinges but had to take the door panel off to get the other track. Your tutorial made it easy as pie. Two screws and a little tug and its out and just as easy to put back too. Windows are noticeably faster. I wish I had done it sooner but was worried about taking off the panels. Thanks for the tutorial and great pics.
Fear and Loathing
Fear and Loathing
