
DIY: Custom colored cluster needles
 01-20-2014, 08:38 AM
#1
Racer
Thread Starter
DIY: Custom colored cluster needles
Ok before we begin you should understand this is a mod you have to be careful with. You can easily break your cluster if your not careful (I did once before and its not fun). This mod only covers changing the cluster needle color but I recommend upgrading to LED back lighting while your cluster is open. I will not be responsible for any mistakes you make so do this at your own risk. If you are still interested lets begin!
Things you will need:
Soldering Iron
Model Paint
4 3mm LEDs
q-tips
Optional:
10 of these for backlight: Link
(Credit to El-Baz ^^^)
Keep in mind what ever color you paint your needle is the color LED you should use. Ex. Blue needle = blue led. Blue and white LEDs both share the same forward voltage (see below). Keep this in mind when picking an LED.
Forward Voltages:
IR 1.5
red 2.0
orange 2.0
yellow 2.1
green 2.2
true green 3.3
blue 3.3
white 3.3
UV 3.3
blue (430 nm) 4.6
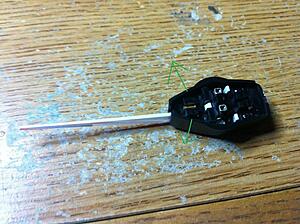
1. Have your cluster removed already, there are plenty of guides on the forum out there to follow.
2. Pop each tap holding the tinted shield in and remove the shield.
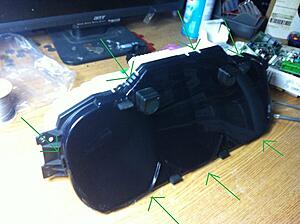
3. Remove the 10 screws behind the Gas / Temp gauge and keep them in a safe spot. You can't lose a single one.
4. Pop the top three tabs holding the black trim. If you rest the cluster on its back and lift the trim up gently it will release the bottom three without you having to pop them.
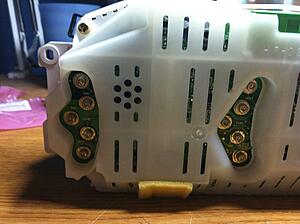
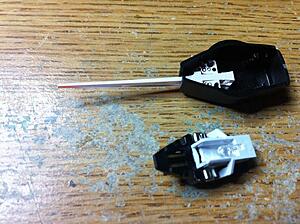
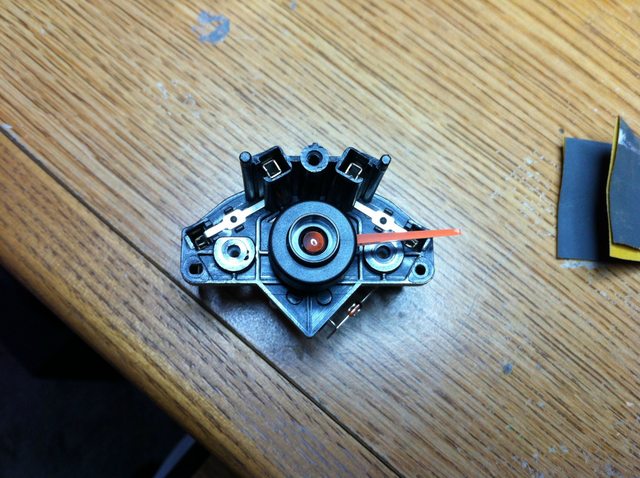
5. Remove the 6 screws in the circles. Lift up the small covers that are held in place by the center screws. You will see a board under each one. Gently lift up that board and place it aside. Once all 6 screws are removed gently lift up both motors and separate them from the faceplate.
If you did 5 right you should have the motors like so:

Pro-tip: The gas needle is the one that holds it place and the temp needle is the one that slides back down to the bottom.
6. Over on the speedometer, and tachometer your going to have to pull the needles off. Get a firm grip on both sides of the black part and slowly apply more and more pressure pulling them. Eventually you'll feel them give and start to slide up.
7. Once the needles are off you'll need to pull the black plastic to be able to lift the guts out of the needle. (Don't pull the needle too hard and the guts will come out separately)
Take Note: There is a small metal weight on the inside of the tach / speed. The bigger weight goes to the smaller needle (tach). Do not mix this up.
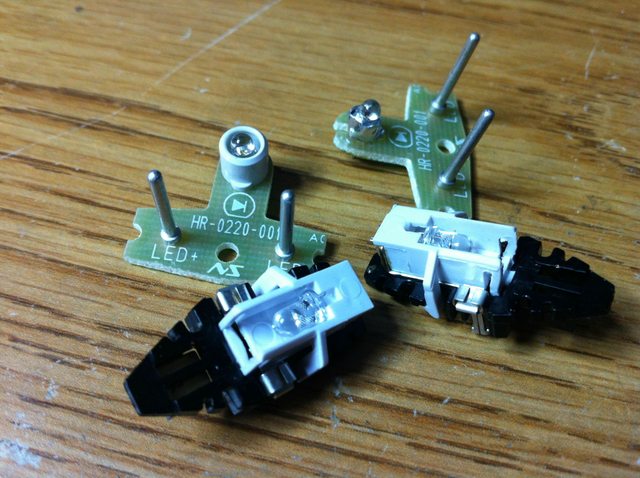
8. Note these should be the polarities of the led. It could vary by year so check yours to be positive.

9. It's time to do some soldering!
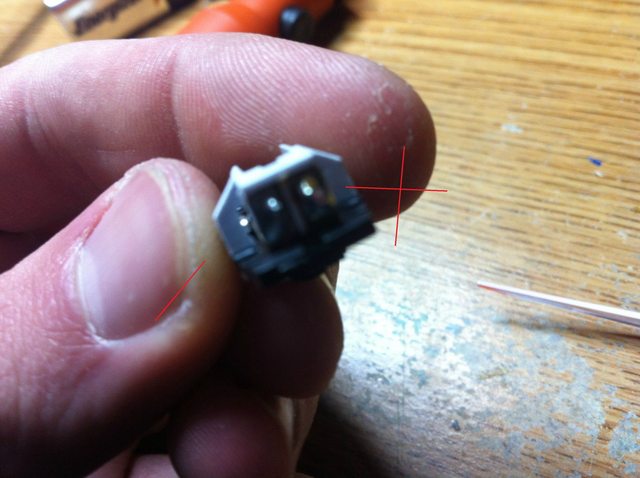
Removing the leds from the boards is easy. Just be sure not to melt any plastic. (If you lose one of the plastics you can cover the led with tape like I did).

Pro-Tip: Get some tiny tweezers and put them like so:
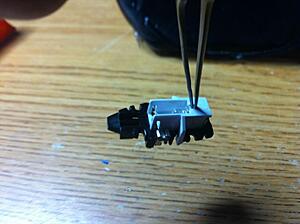
As soon as you heat the solder it will shoot the led right out.
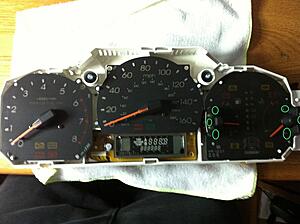
10. Now grab your 1500 grit sandpaper and carefully sand the bottom of each needle.

Some orange left behind on the back of the needle is ok. You wont be able to get the gas / temp needles fully sanded so just do your best.
11. Once all the sanding is done take your model paint and repaint the back of each needle. I found using a q-tip works best. (You may need to do a few coats)

12. Re-install everything back in reverse order. Be careful not to over tighten the 10 screws behind the gas / temp gauges if you overtighten them you could break a gauge. If you moved your gas gauge it will need to be re calibrated (Best bet is to have a full tank so you can just move the needle to the top.) If you want your mileage to shine a bit better remove the red shield. Someone mentioned this a long time ago (I'm sorry I forgot who). But it makes the mileage shine brighter and greener.
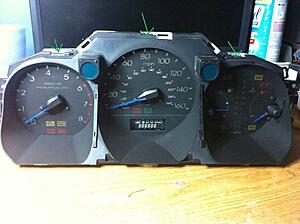
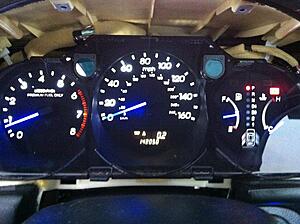
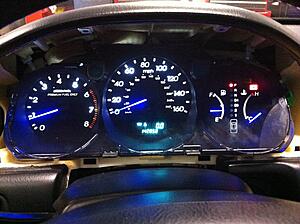
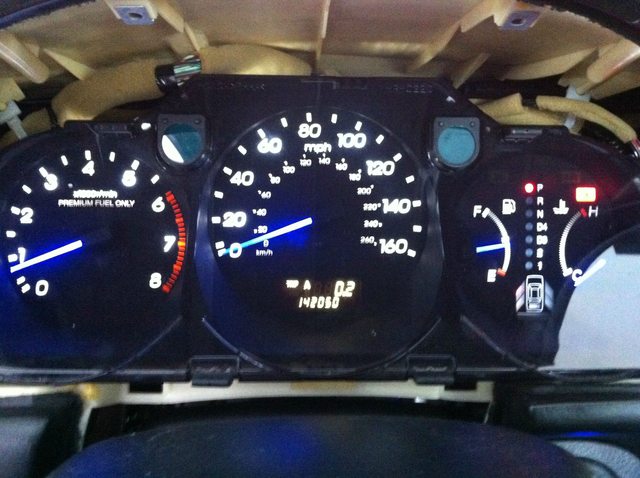
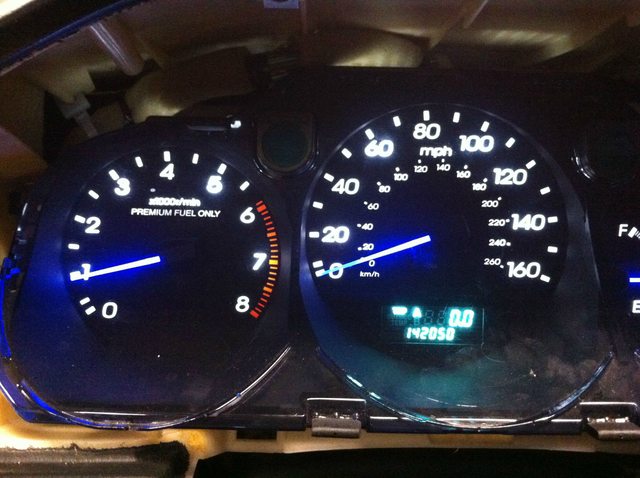
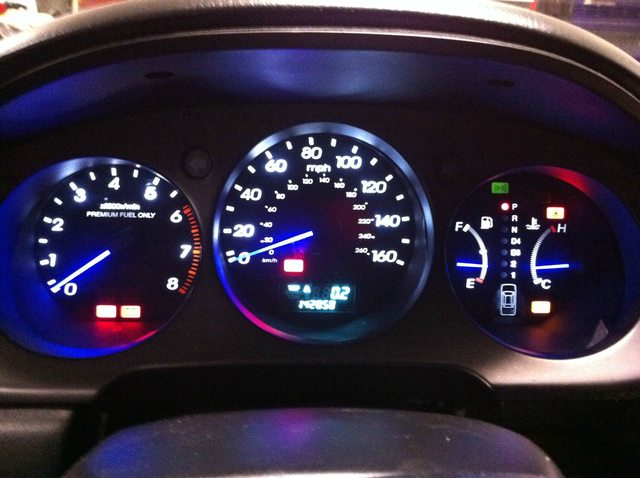
13. Enjoy! Here's some photos of blue needles I did:

Things you will need:
Soldering Iron
Model Paint
4 3mm LEDs
q-tips
Optional:
10 of these for backlight: Link
(Credit to El-Baz ^^^)
Keep in mind what ever color you paint your needle is the color LED you should use. Ex. Blue needle = blue led. Blue and white LEDs both share the same forward voltage (see below). Keep this in mind when picking an LED.
Forward Voltages:
IR 1.5
red 2.0
orange 2.0
yellow 2.1
green 2.2
true green 3.3
blue 3.3
white 3.3
UV 3.3
blue (430 nm) 4.6
1. Have your cluster removed already, there are plenty of guides on the forum out there to follow.
2. Pop each tap holding the tinted shield in and remove the shield.

3. Remove the 10 screws behind the Gas / Temp gauge and keep them in a safe spot. You can't lose a single one.

4. Pop the top three tabs holding the black trim. If you rest the cluster on its back and lift the trim up gently it will release the bottom three without you having to pop them.
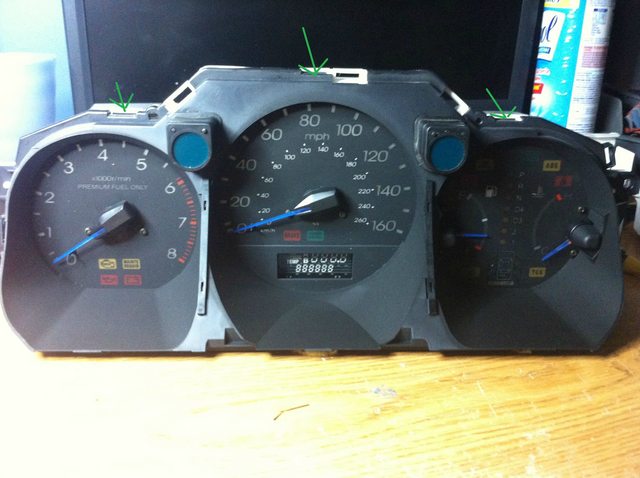
5. Remove the 6 screws in the circles. Lift up the small covers that are held in place by the center screws. You will see a board under each one. Gently lift up that board and place it aside. Once all 6 screws are removed gently lift up both motors and separate them from the faceplate.

If you did 5 right you should have the motors like so:
Pro-tip: The gas needle is the one that holds it place and the temp needle is the one that slides back down to the bottom.
6. Over on the speedometer, and tachometer your going to have to pull the needles off. Get a firm grip on both sides of the black part and slowly apply more and more pressure pulling them. Eventually you'll feel them give and start to slide up.
7. Once the needles are off you'll need to pull the black plastic to be able to lift the guts out of the needle. (Don't pull the needle too hard and the guts will come out separately)


Take Note: There is a small metal weight on the inside of the tach / speed. The bigger weight goes to the smaller needle (tach). Do not mix this up.
8. Note these should be the polarities of the led. It could vary by year so check yours to be positive.
9. It's time to do some soldering!
Removing the leds from the boards is easy. Just be sure not to melt any plastic. (If you lose one of the plastics you can cover the led with tape like I did).
Pro-Tip: Get some tiny tweezers and put them like so:

As soon as you heat the solder it will shoot the led right out.
10. Now grab your 1500 grit sandpaper and carefully sand the bottom of each needle.

Some orange left behind on the back of the needle is ok. You wont be able to get the gas / temp needles fully sanded so just do your best.

11. Once all the sanding is done take your model paint and repaint the back of each needle. I found using a q-tip works best. (You may need to do a few coats)
12. Re-install everything back in reverse order. Be careful not to over tighten the 10 screws behind the gas / temp gauges if you overtighten them you could break a gauge. If you moved your gas gauge it will need to be re calibrated (Best bet is to have a full tank so you can just move the needle to the top.) If you want your mileage to shine a bit better remove the red shield. Someone mentioned this a long time ago (I'm sorry I forgot who). But it makes the mileage shine brighter and greener.
13. Enjoy! Here's some photos of blue needles I did:


 01-20-2014, 02:10 PM
#4

Very Nice diy. Looks real nice!
Iv done something similar in my integra in the past (with colored sharpie...RED/Blue) came out just as clean.
For anyone looking for a variation to this, id recommend clear needles with tips colored about 1/4-1/2 inch.
Iv done something similar in my integra in the past (with colored sharpie...RED/Blue) came out just as clean.
For anyone looking for a variation to this, id recommend clear needles with tips colored about 1/4-1/2 inch.
01-20-2014, 04:47 PM
#5
Racer
Thread Starter
Thanks for the compliment guys. Earl the brightness of the needles isn't much more than the stock lighting. The camera seems to make them look bright but I lower them to 75% brightness then snap a photo they look the same as real life.
I haven't forgotten about the LED AC unit. I just haven't spent the time to swap the bulbs yet.
And 1sik that sounds pretty sweet do you have a photo of how they looked?
I haven't forgotten about the LED AC unit. I just haven't spent the time to swap the bulbs yet.
And 1sik that sounds pretty sweet do you have a photo of how they looked?
01-21-2014, 11:35 AM
#6
Racer
Thread Starter
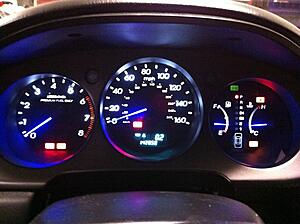
Hey Earl here's a really good photo of how it looks in real life.
Blue blinker indicators can be done using T5 Leds I have a set installed and they shine through the green with no issue. Next step is the AC unit, then I'll look into the radio.

Blue blinker indicators can be done using T5 Leds I have a set installed and they shine through the green with no issue. Next step is the AC unit, then I'll look into the radio.
01-21-2014, 12:10 PM
#7
I really like this idea, and I especially like the idea of modding, not necessarily because of the result, but because of the process it took to get it. Everyone knows that that is half the fun!
I'm back at my university in Arizona, so I won't have the time or resources to do any more projects until summer. I went to Acura recently and got to play in the RLX (about the 3rd time I've done so, I have to be careful not to drool all over the leather) and noticed that the cluster had white needles. Did you take any pictures of what the needles looked like without any color behind it?
I'm back at my university in Arizona, so I won't have the time or resources to do any more projects until summer. I went to Acura recently and got to play in the RLX (about the 3rd time I've done so, I have to be careful not to drool all over the leather) and noticed that the cluster had white needles. Did you take any pictures of what the needles looked like without any color behind it?
Trending Topics
01-21-2014, 03:29 PM
#9

Here's a picture of the cluster. It seems like the color of the needle mimics the color of the lights behind the numbers. I wouldn't know if I would describe it as clear or foggy, but if you would take a picture of the needle after sanding and before you put color or whatever to it, I'd appreciate it! Thanks for doing the extra work.
I really like how the blue looks, particular in the fuel gauge spot. I'm seriously having such trouble deciding what color to go with or to stick with red. Like I said earlier, I still feel like the white would be trying to mimic the super new cluster of the RLX. Haha, I need to get into my car once I get out of class and take a good look at the red and think about it. :p
Well I have about 4 months to think about it! I'm kind of hesitant to go back into the cluster again, though. I was fortunate enough to have extra components for it laying around when I was doing my RL-RL interior swap, but I don't have it anymore. So anything that goes wrong will be a costly mistake.
01-21-2014, 03:35 PM
#10
Sorry to double post here. Here is a picture of a 2004 cluster.

I really like the blue/white contrast, and I feel that blue needles here would have been a really good design. But since my cluster lacks the blue and white numbers, I'm not sure how well it would match.
I really like the blue/white contrast, and I feel that blue needles here would have been a really good design. But since my cluster lacks the blue and white numbers, I'm not sure how well it would match.
01-21-2014, 04:21 PM
#11
Racer
Thread Starter
This is after sanding with 1500 grit. They look pretty decent but I think they need some kind of paint behind them or else an LED will make it look like crap. If you painted them white and used a nice white led with them I'd bet they look really good.
I don't blame you on not wanting to go into the cluster. My temperature gauge isn't fully working now because the contact stripped. You can tap the lens near it and it will rise haha.
01-21-2014, 04:43 PM
#12

This is after sanding with 1500 grit. They look pretty decent but I think they need some kind of paint behind them or else an LED will make it look like crap. If you painted them white and used a nice white led with them I'd bet they look really good.
I don't blame you on not wanting to go into the cluster. My temperature gauge isn't fully working now because the contact stripped. You can tap the lens near it and it will rise haha.
But seriously, props to you for taking the plunge!
01-21-2014, 07:57 PM
#13
Racer
Thread Starter
It is pretty damn easy to screw up the tach / speedometer. During my research I read through all of the LED backlight mods and there's quite a few saying they have a broken gauge after opening it up. On the bright side though with this mod you don't have to remove the screws behind the speedometer or tachometer so there's less chance of screwing up the motors. But a good amount of force is needed to pull the needles off though so it is nerve wracking until they finally come free.
I think my next DIY will be a total LED conversion (with main focus on cluster, radio, nav, and ac unit).
I think my next DIY will be a total LED conversion (with main focus on cluster, radio, nav, and ac unit).
04-04-2014, 12:35 AM
#15
Instructor

Bringing the thread back from the dead!!
Hey does anyone know if the silver rings on the outside bezel of the 04 RL are removable? I want to put that on my CL as the cluster looks similar in size
Hey does anyone know if the silver rings on the outside bezel of the 04 RL are removable? I want to put that on my CL as the cluster looks similar in size
04-04-2014, 01:56 PM
#16

instrument panel bulbs ???
Hi guys. i like that gauges like crazy. I would like to replace OEM bulbs on my instrumental panel and also AC buttons and around gear shifter. But i have no idea what kind of bulbs are those and i would like to have all new bulbs ready when i open a panel.( don't wanna do it twice) and wonder if anyone could tell me an exactly symbols of those bulbs also how many of them... that would be nice .
04-04-2014, 06:50 PM
#17
Hi guys. i like that gauges like crazy. I would like to replace OEM bulbs on my instrumental panel and also AC buttons and around gear shifter. But i have no idea what kind of bulbs are those and i would like to have all new bulbs ready when i open a panel.( don't wanna do it twice) and wonder if anyone could tell me an exactly symbols of those bulbs also how many of them... that would be nice .
04-04-2014, 09:48 PM
#18
Racer
Thread Starter
Earl's right if you take the time to do a bit of digging you'll find some good info. The cluster takes 10 leds for the backlight. Each needle requires one 3mm led. For the AC unit you need 3x NEO 3mm for the LCD backlight, to light hte AC buttons you want side emitting led strips and it will take some cutting (look in my build thread).
The shift light is really easy it's just one top emitting led strip in place of the standard bulb.
The shift light is really easy it's just one top emitting led strip in place of the standard bulb.

Thread
Thread Starter
Forum
Replies
Last Post
rp_guy
Member Cars for Sale
9
07-16-2017 07:33 AM
ExcelerateRep
4G TL Performance Parts & Modifications
8
10-14-2015 08:20 AM