When you click on links to various merchants on this site and make a purchase, this can result in this site earning a commission. Affiliate programs and affiliations include, but are not limited to, the eBay Partner Network.
I'm investigating a P2263 error on my 2011 RDX SHAWD. The wastegate valve eyelet has been adjusted so there is no slack, but still the P2263 appears - but only after a few hours of driving.
I looked at the freeze frame data at the time of error, and Baro=97kpa and TCBoost = 1.45kpa. The code set at a time that I was not (I think) calling for turbo. I'm not sure how to diagnose this...any help appreciated.
Can you see if there's any wear with the eyelet and pin? A gap between the eyelet and pin? The actuator has a strong internal spring that pulls up on the eyelet, which moves the boost control flap and when the flap is "bottomed out" the actuator spring is still pulling up strongly even when the flap is at its movement limit, if there's any wear in the eyelet, pin area it will show up as gap in the upper eyelet as shown in the photo. It should take a decent amount of downward pressure using a screwdriver to move the boost control linkage arm downward since you're overcoming the internal return spring of the actuator. You also shouldn't see any movement in the linkage arm when pulling up on just the linkage arm. I'm not sure what it means to adjust the slack out of the eyelet, it's either worn or not and if you're trying to adjust out a gap between the eyelet and pin because of wear this isn't fixing the problem. Wear in the eyelet and pin area is the most probable cause of the P2263 code but it certainly isn't the only potential problem that can cause this code. From what I've read the P2263 code is caused by the turbo boost pressure not responding quickly enough to an expected boost level so a lot of different parts of the system are involved, all the plumbing, sensors, actuators, solenoid valves and the turbo itself.
.
I can see from a 4 year old invoice that the previous owner replaced the eyelet, and 2 years ago adjusted. I actually turned the union nut (connecting actuator arm with eyelet) as much as possible to pickup all potential slack (bringing the eyelet up). I wonder if I over tightened the linkage and am now preloading the spring...not sure if that matters?
The strange this is it took 3 hours of driving to trigger the P2263. I have no clue what to check since I suspect something is just a bit out of tolerance. I was the data stream / freeze frame would point to something specific.
Do you see any gap between the pin and eyelet opening, like the photo shows? It's not only the eyelet opening that gets worn, the pin also gets worn. The photo is from my car when I was getting the P2263 code, there was about 2mm of wear with the eyelet hole and 2mm of wear on the pin so ~4mm of gap between the two.
Being a big guy I find it a bit tough to get in there, but I expect the pin which the eyelet connects to is worn as well. From everything I read online those are not replaceable as they are welded/pressed into the arm. How did you get yours out? (I'm guessing you removed the entire turbocharger and pressed it out or drilled it out?)
As an aside, assuming there is some play in the current (replaced 4 yr ago) eyelet, should tightening the union bolt to remove slack solve the code?
I will take a closer look on the next warm day (nice cold Canadian winter day here)
I was able to replace the pin with the turbo in the car but it's not an easy job, it's tough to get the pin off the linkage arm. The pin is rivetted onto the arm and I was able to grind off the rivet head quickly and cleanly but it's still difficult to get the pin out of the linkage arm. The good news though is there is a pin replacement part available now, see pdf. I've attached my notes from the job and what I would do differently if I did this fix again. Even though it was not an easy fix I didn't have to remove and install the turbo, which is also not a trivial job. My car has been running fine with no code for over 7K miles now so the fix was successful.
If there's play from the parts being worn you can't really adjust it to fix the problem.
I'm investigating a P2263 error on my 2011 RDX SHAWD. The wastegate valve eyelet has been adjusted so there is no slack, but still the P2263 appears - but only after a few hours of driving.
I looked at the freeze frame data at the time of error, and Baro=97kpa and TCBoost = 1.45kpa. The code set at a time that I was not (I think) calling for turbo. I'm not sure how to diagnose this...any help appreciated.
I'm glad you found the fix I used Flashpro that has an option to turn it off. After my upgrades it would P2263 every time I got on the freeway, so I turned it off.
I wish I could edit posts....sorry for the part 2...
I found the software here , Is it free? (Not sure if this is trial version of freeware). Is it fairly straight forward to disable this alert?
Yes, it has a box to check and it maintains SH-AWD while staying out of limp mode. As Tomtwtwtw said. It is a tuning module that comes with some tunes for stock and some performance enhancement upgrades. You can also get a tune for it, live or internet. With the stock tune I gained 5 MPG combined and much better power.
Originally Posted by Tomtwtwtw
You will need the FlashPro module as well to interface with your car - that will run you about 800 bucks off the site.
I have access to a dealer type CANBUS based device (aftermarket), than can flash, actuate devices, etc. Is the settings available that way? Is this a setting in the PCM? Or something different
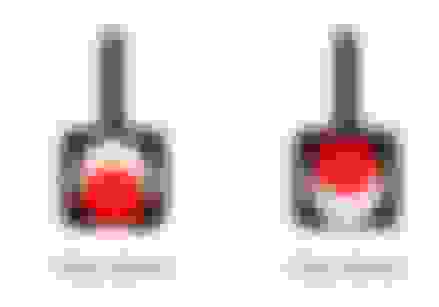
I removed the intercooler today and had a very good look at the eyelet. I was surprised that there was still a gap with some play up and down. So I decided to adjust the union nut as suggested in the posts, to get rid of the gap. So I tightened the union nut to pull up the eyelet, and now when in resting position the gap is ABOVE the pin (as shown in left picture).
After I reassembled everything it occurred to me that I might have done the opposite of what was needed. Should I have adjusted the eyelet so that (when vehicle is off) the gap is ABOVE or BELOW the pin when in resting position.
Nice illustrations of the pin and eyebolt and what a worn eyebolt and pin looks like. If you look at how the eyebolt and pin wear you'll see all the wear is on the bottom area of the pin and bottom area of the eyebolt. The correct adjustment for the actuator is, with the engine off, to have the actuator internal spring-loaded rod pulling up on the linkage arm and holding the variable boost control flap in the closed position with considerable preload force. With pin/eyebolt wear there will be a gap above as shown with the left drawing, the linkage arm should be fully up and spring-loaded force holding the flap closed. Any wear in the pin or eyebolt will show up as a gab above the pin.
As the pin and eyebolt wear the spring-loaded force from the actuator will be less because the wear allows the actuator rod to move upward some from the wear so the preload will be reduced but there should still be enough preload to keep the linkage arm full up and the flap closed although with less preload. From what I've observed the adjustment coupler for the variable boost control actuator is threaded down close to the top of eyebolt edge so spring preload is basically as much as it can be with the adjustment coupler limit down. As the eyebolt and pin wear there is some loss in spring preload but I don't know by how much. With the pin eyebolt wear, to restore the original spring preload you would have to adjust the coupler to shorten the rod length to bring back more spring preload but typically I don't see any adjustment remaining from the original adjustment position, you just can't shorten the rod length anymore and you don't want to go the other way when the pin/eyebolt wear.
When the pin/eyebolt wear you can't adjust your way out the problem, it's the play or slop in the pin/eyebolt pivot point that reduces the control of the variable boost control flap and exhaust flow over the turbine wheel, which will set the P2263 code.
When I was working on my car to get rid of the P2263 code I ended up replacing the pin and eyebolt but replacing the pin was a real pain and since then I had an idea to get rid of the pin wear slop in the linkage without replacing the pin but it's only an idea, I haven't tried it out but will share what I was thinking of doing if I had to do this over again. See the attached pdf if interested and if anybody is willing to try this out I have parts to send out if requested.
Interesting idea - I *think* you are moving the force (and friction) on the pin to the washer? I may have to noodle this for a while.
Given the effort required to work back there I don't think I'm up for experimenting with it.
On the downstroke the force is on the washer and the pin flange, the eyebolt is not in contact with the original eyebolt to pin contact area, during the upstroke the eyebolt is in contact with the pin as before. I'd try an experiment using this idea if I still had the original worn pin on the linkage arm.

 01-21-2024, 09:51 PM