
Spring/shock install
 07-06-2005 | 06:07 PM
#1
Thread Starter
Senior Moderator
Joined: Jul 2002
Posts: 12,005
Likes: 9
From: Bay Area, CA
Spring/shock install
Disclaimer: by using these guides, you are removing me from any liability that is related to any injury that might occur. I would suggest having a friend help you on these installs, if you are unsure about your abilities for any of these projects, get a professional to do it.
Credit goes to 1stgencl for the original write up and pictures
Estimated time: ~3 hours
Tools:
2 good jacks
Assorted sockets and open ended wrenches (air tools if avail)
Flashlight
Spring Compressor
Penetrating Oil
Allen wrench that is included with tools in trunk
Hammer
I would highly recommend getting a friend to help you do this project.
1. Spray all bolts with penetrating oil the day before if possible
2. Unbolt the upper strut bar under the hood (2 screws in each side and two in the middle - 12MM socket)
3. Jack up both front sides of the car (makes it easier to free strut from lower mounting piece)
4. Remove wheel on one side
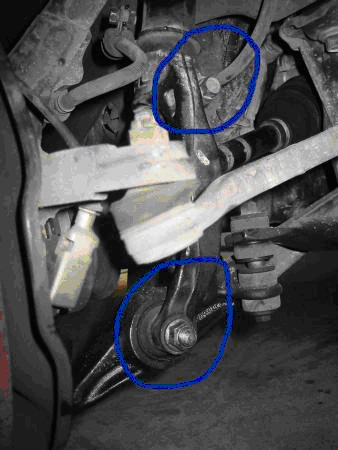
5. Remove the lower mounting bolt (17MM maybe) (lower circle in picture)
6. Remove the mounting bolt that holds the strut to the bracket (upper circle)
7. Remove the three nuts under the hood that hold the strut in (14MM)
8. The strut and spring should now drop out, if they don't keep wiggling it until the bottom of the strut is free from the mounting piece.
9. Now you will need to compress the top spring with your compressors. You will need to compress the fronts a lot more than the backs.
11. Take an 14MM open ended wrench and remove the nut holding the top mount to the spring and shock.
12. The spring should now be free from the strut and you can slide your new spring over the strut.
13. Compress the spring and put the top mount back on.
14. Using the Allen wrench again, tighten the top nut.
15. Slide the assembly back in place and hand tighten the top three mounting nuts.
16. Put the bottom of the strut in the mounting bracket and tighten the bolt.
17. Replace the bottom mounting bolt and tighten.
18. Tighten the top nuts
19. Put the wheel back on
20. Do the same on the other side and lower the front
21. Jack up both sides of the back of the car.
22. Remove one tire
23. Remove the lower mounting bolt (17MM, might be bigger)
23. Remove the two nuts on the top of the shock in the trunk (14MM)
24. Drop the assembly down, and once it clears the top hole put it all they way up to the top of the wheel well and bring the bottom out first. This took me a while to get out.
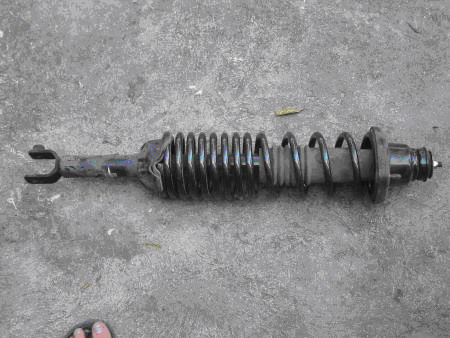
25. Compress the back spring, as you can see it doesn't need too much compressing
27. Slide the spring off (looking at how the bottom mount and top mounts are lined up) and put the new spring on. I didn't need to compress the back spring, as you can see they are pretty much even in length.
28. When you go to put the top mount back on the shock and spring, make sure the top screw is inline with the very end of the spring on the bottom of the assembly. It is kind of hard to explain but if you look in the picture you will see the top mounting screw is inline with the very end of the coil. This is VERY important when remounting the assembly and cause me to remove it and start over
29. This part is a pain in the neck. Figure out a way to get the assembly back in the wheel well and lined up. Leave your self a lot of time for this one and I recommend putting the top in first.
30. After you get the spring in place hand tighten the top nuts.
31. Than line up the bottom and put the bolt back in place.
32. Tighten the top mounting nuts.
33. Replace the wheel and move on to the other side.
EDIT: Added for rear suspension clarification
Credit goes to 1stgencl for the original write up and pictures
Estimated time: ~3 hours
Tools:
2 good jacks
Assorted sockets and open ended wrenches (air tools if avail)
Flashlight
Spring Compressor
Penetrating Oil
Allen wrench that is included with tools in trunk
Hammer
I would highly recommend getting a friend to help you do this project.
1. Spray all bolts with penetrating oil the day before if possible
2. Unbolt the upper strut bar under the hood (2 screws in each side and two in the middle - 12MM socket)
3. Jack up both front sides of the car (makes it easier to free strut from lower mounting piece)
4. Remove wheel on one side
5. Remove the lower mounting bolt (17MM maybe) (lower circle in picture)
6. Remove the mounting bolt that holds the strut to the bracket (upper circle)
7. Remove the three nuts under the hood that hold the strut in (14MM)
8. The strut and spring should now drop out, if they don't keep wiggling it until the bottom of the strut is free from the mounting piece.
9. Now you will need to compress the top spring with your compressors. You will need to compress the fronts a lot more than the backs.
11. Take an 14MM open ended wrench and remove the nut holding the top mount to the spring and shock.
12. The spring should now be free from the strut and you can slide your new spring over the strut.
13. Compress the spring and put the top mount back on.
14. Using the Allen wrench again, tighten the top nut.
15. Slide the assembly back in place and hand tighten the top three mounting nuts.
16. Put the bottom of the strut in the mounting bracket and tighten the bolt.
17. Replace the bottom mounting bolt and tighten.
18. Tighten the top nuts
19. Put the wheel back on
20. Do the same on the other side and lower the front
21. Jack up both sides of the back of the car.
22. Remove one tire
23. Remove the lower mounting bolt (17MM, might be bigger)
23. Remove the two nuts on the top of the shock in the trunk (14MM)
24. Drop the assembly down, and once it clears the top hole put it all they way up to the top of the wheel well and bring the bottom out first. This took me a while to get out.
25. Compress the back spring, as you can see it doesn't need too much compressing
27. Slide the spring off (looking at how the bottom mount and top mounts are lined up) and put the new spring on. I didn't need to compress the back spring, as you can see they are pretty much even in length.
28. When you go to put the top mount back on the shock and spring, make sure the top screw is inline with the very end of the spring on the bottom of the assembly. It is kind of hard to explain but if you look in the picture you will see the top mounting screw is inline with the very end of the coil. This is VERY important when remounting the assembly and cause me to remove it and start over
29. This part is a pain in the neck. Figure out a way to get the assembly back in the wheel well and lined up. Leave your self a lot of time for this one and I recommend putting the top in first.
30. After you get the spring in place hand tighten the top nuts.
31. Than line up the bottom and put the bolt back in place.
32. Tighten the top mounting nuts.
33. Replace the wheel and move on to the other side.
EDIT: Added for rear suspension clarification
It's really easy. When you have your car up on jackstands, take your jack below your rotor. Now raise that end only SLIGHTLY, enough to take tension off the bolt. The bolt will slide right out. You do the same when installing the bolt so that you don't strip it.
There are only 3 bolts you will have to deal with. 2 up top, and 1 at the bottom. Once you have that lower bolt off, you'll notice that it slides in at an angle. That's why there's always tension being applied.
There are only 3 bolts you will have to deal with. 2 up top, and 1 at the bottom. Once you have that lower bolt off, you'll notice that it slides in at an angle. That's why there's always tension being applied.
03-29-2007 | 08:06 PM
#2
Mmmm...
Joined: Feb 2007
Posts: 1,329
Likes: 0
From: Raleigh, NC
I'm trying to figure ot my options on this... I plan on buying some neuspeeds from Sleep_DEPRIVED_Sleeper... but I'm not sure if i have the capabilities... First of all the tools... 2 good jacks... could that just be two flat tire jacks? I'm really  so forgive me... also the spring compressor... wth is that and since im sure i do not own one... where could i pick one up at?
next... since I'm not sure if I could do this myself/with friend/father how much would it cost to get it done professionally... I really want to DIY but I dont have the proper tools...
so forgive me... also the spring compressor... wth is that and since im sure i do not own one... where could i pick one up at?next... since I'm not sure if I could do this myself/with friend/father how much would it cost to get it done professionally... I really want to DIY but I dont have the proper tools...
03-29-2007 | 08:53 PM
#3
Senior Moderator
Regional Coordinator
(Mid-Atlantic)
Regional Coordinator
(Mid-Atlantic)
iTrader: (6)
Joined: Jan 2005
Posts: 92,262
Likes: 4,489
From: ShitsBurgh
Originally Posted by CLpwner
I'm trying to figure ot my options on this... I plan on buying some neuspeeds from Sleep_DEPRIVED_Sleeper... but I'm not sure if i have the capabilities... First of all the tools... 2 good jacks... could that just be two flat tire jacks? I'm really so forgive me... also the spring compressor... wth is that and since im sure i do not own one... where could i pick one up at?
next... since I'm not sure if I could do this myself/with friend/father how much would it cost to get it done professionally... I really want to DIY but I dont have the proper tools...
so forgive me... also the spring compressor... wth is that and since im sure i do not own one... where could i pick one up at?next... since I'm not sure if I could do this myself/with friend/father how much would it cost to get it done professionally... I really want to DIY but I dont have the proper tools...
you can get away with one jack, I had 2 floor jacks, but only did one 1/4 of the car at a time. The flat tire jack would work, you may wanna go to walmart or advanced auto or somewhere and just buy a jack kit. I got a 2 ton floor jack, 2 jack stands and a creeper for $50 from advanced auto.
The spring compressors, you can rent from a car parts store, I rented a set of spring compressors for $50 and they gave it back to me when I returned them. If you have more specific questions, pm me
03-29-2007 | 09:03 PM
#4
Mmmm...
Joined: Feb 2007
Posts: 1,329
Likes: 0
From: Raleigh, NC
oh thanks... you could have just posted in the quick reply haha... do u think it would be necessary to have 2 jacks... what do u mean by you had 2 but only did 1/4 at a time... you mean you had it up on two but you did a tire at a time? cuz thats probably what i would do also... and how much harder if any would it be with only the flat tire jack?
03-29-2007 | 10:57 PM
#6
Turtle Charged, Biotcch!!
Joined: May 2006
Posts: 1,168
Likes: 0
From: Irvine, SoCal
I suggest you get a set of Jack and jack stands (2), it'll be such a good investment if you plan to work on your car. I just bit a bullet and bought jack/stands/creeper and some other tools from sears. quality parts coupled with a great warranty can't be beat.
Changing springs/struts is fairly easy. It takes a while to do the first wheel but once you're done with that, it's smooth sailing.
Changing springs/struts is fairly easy. It takes a while to do the first wheel but once you're done with that, it's smooth sailing.
03-30-2007 | 12:23 AM
#7
i like acura
Joined: Jan 2006
Posts: 2,431
Likes: 15
From: Bothell,WA
if u really dont know anything, i dont know about tryin to do it yourself. Any local members near you? im sure someone would be willing to help you so u can learn and get some hands on experience.
And invest in some jack stands and a jack, wheni had my wheels powdercoated i sat on jack stands for a week, and i was mad then about havin to buy them, but now im so glad that i did
And invest in some jack stands and a jack, wheni had my wheels powdercoated i sat on jack stands for a week, and i was mad then about havin to buy them, but now im so glad that i did
Trending Topics
04-07-2007 | 04:46 PM
#9
Senior Moderator
Regional Coordinator
(Mid-Atlantic)
Regional Coordinator
(Mid-Atlantic)
iTrader: (6)
Joined: Jan 2005
Posts: 92,262
Likes: 4,489
From: ShitsBurgh
Originally Posted by suprachica79
I gotta say this is possibly the worst DIY I've ever read, I appreciate the effort, but so many important pieces were left out. I had to leave my car half finished..
If you have additions to it, send them to me and I'll add them
04-12-2007 | 10:23 AM
#10
Amish Country Acura
Joined: Sep 2005
Posts: 42
Likes: 0
From: Pennsylvania
When I replaced the suspension on my car about a year ago, it ended up taking me two days. In an ideal world, it wouldn't be too bad of a job at all. However, on the passenger's rear side, I had a bolt that had pretty much welded itself to the inside of the bushing. I ended up having to cut the bolt to get the strut out, press the old bushing and bolt out, press a new bushing in, buy a new bolt, and then reassemble everything. It was a major pain in the butt, cause I ended up having to drive about two hours to find a bushing in stock at NAPA, and then I had to drop another $50 deposit to get a press to remove and reinstall the new bushing. All-in-all, I'd really suggest having something like this professionally done unless you have the time and tools needed to improvise and account for issues like I had.
04-12-2007 | 11:44 AM
#11
Land of Pleasant Living
Joined: Sep 2005
Posts: 2,619
Likes: 0
To do my springs, I took my car to the Naval Academy and used their hobby shop.. rented a lift for like $4 an hour ($2 without a lift i think) and got to use any tool i needed, including air tools for free.
They usually have plenty of people there who are willing to lend a hand or some knowledge.
This is a great way to go if you have a base around you and any type of connections.. they never even asked for ID, so you could probably go and use it even if you didnt have connections with the military
Also (I feel this is rather relevant)
MacPherson (quality) Spring compressors are yours for only $10!
They normally sell for around $50, and these were only used once.
https://acurazine.com/forums/car-parts-sale-361/fs-1st-gen-cl-parts-361662/
04-18-2008 | 07:35 PM
#12
Mmmm...
Joined: Feb 2007
Posts: 1,329
Likes: 0
From: Raleigh, NC
Alright guys... Its getting close to that time when I'm really trying to do it myself with these K-sports...
Can anyone give me some more detailed pictures/instructions...
I'd appreciate it immensely
Can anyone give me some more detailed pictures/instructions...
I'd appreciate it immensely
04-21-2008 | 03:26 PM
#14
Senior Moderator
Regional Coordinator
(Mid-Atlantic)
Regional Coordinator
(Mid-Atlantic)
iTrader: (6)
Joined: Jan 2005
Posts: 92,262
Likes: 4,489
From: ShitsBurgh
It's pretty straight forward, the only main problem i had was getting the rears to line up and into the holes took some work. I just followed these steps and they helped
07-27-2008 | 10:00 PM
#16
For Life
Joined: Jun 2008
Posts: 724
Likes: 0
From: Tampa Bay
ok i cannot figure out how to get the stock shock/strut out of the wheel well. i got all the bolts off the strut, but i cant pull it out and its kind of stuck. anyone with any experience removing the stock shock??
07-28-2008 | 12:47 AM
#17
For Life
Joined: Jun 2008
Posts: 724
Likes: 0
From: Tampa Bay
haha im an idiot, i just kept unbolting more things till it fell apart. on the stock shocks there is a bolt that is behind the shock. undo that and the shock can come apart as 2 pieces right above the fork. now i just have 1 more bolt to get off and i can swap everything out.
10-13-2008 | 01:51 PM
#18
Bagel Bomber
Joined: Sep 2003
Posts: 1,737
Likes: 4
From: Fairfax VA
haha im an idiot, i just kept unbolting more things till it fell apart. on the stock shocks there is a bolt that is behind the shock. undo that and the shock can come apart as 2 pieces right above the fork. now i just have 1 more bolt to get off and i can swap everything out.
10-13-2008 | 03:14 PM
#20
Bagel Bomber
Joined: Sep 2003
Posts: 1,737
Likes: 4
From: Fairfax VA
Thanks - I just applied penetrating oil to the large screw in the back, and the two up front. I have a messed up lug on the front, so I am going to merchants to have the tires mounted and while its there, i'm going to ask if they will break those bolts with their air tools.
Was undoing the sways hard?
Was undoing the sways hard?
 10-27-2008 | 01:40 AM
#23
Drifting
Joined: Jul 2008
Posts: 2,386
Likes: 42
From: PK NY
I went to Honda and they actually told me that I was screwed and had to change out the whole spindle because the bushing couldn't be removed. BS! KYB sells them. The rears required an angle grinder(to remove the nuts), dremel tool(to cut the bushing ring out), torch(to melt the rubber on the bushings), 3lb hammer(to pound the new bushings in) and borrowing my neighbors carpenter for his hammering skills. Freakin unbelievably frustrating, but still worth the effort.
10-28-2008 | 11:11 AM
#24
Bagel Bomber
Joined: Sep 2003
Posts: 1,737
Likes: 4
From: Fairfax VA
yeah, I had this problem too, it really sucked. I ended up having to change the lower mount bushings. Hardest part of the job. Actual time this took ~4hrs for the fronts and ~5days for the rears(including shipping of the new bushings).
I went to Honda and they actually told me that I was screwed and had to change out the whole spindle because the bushing couldn't be removed. BS! KYB sells them. The rears required an angle grinder(to remove the nuts), dremel tool(to cut the bushing ring out), torch(to melt the rubber on the bushings), 3lb hammer(to pound the new bushings in) and borrowing my neighbors carpenter for his hammering skills. Freakin unbelievably frustrating, but still worth the effort.
I went to Honda and they actually told me that I was screwed and had to change out the whole spindle because the bushing couldn't be removed. BS! KYB sells them. The rears required an angle grinder(to remove the nuts), dremel tool(to cut the bushing ring out), torch(to melt the rubber on the bushings), 3lb hammer(to pound the new bushings in) and borrowing my neighbors carpenter for his hammering skills. Freakin unbelievably frustrating, but still worth the effort.
 11-03-2008 | 12:22 PM
#25
Drifting
Joined: Jul 2008
Posts: 2,386
Likes: 42
From: PK NY
^^ This sounds right, had to cut mine off, melt the rubber out and cut out the old bushing sleeve. Luckly there is a honda dealer close by so walking was easy. New bolts and bushings ran 80 bucks for the two back. I wouldn't do this again, I cant say it was worth it either
yeah, I mean I guess it depends on how much you had wanted to lower your car. My KYB bushings ran $27 incl shipping and the bolts were $6 from my local tractor supply store.
 oh yeah tractors! (I'm being extremely sarcastic about where I need to buy bolts.)
11-03-2008 | 07:17 PM
oh yeah tractors! (I'm being extremely sarcastic about where I need to buy bolts.)
11-03-2008 | 07:17 PM
#27
Bagel Bomber
Joined: Sep 2003
Posts: 1,737
Likes: 4
From: Fairfax VA
^^^ Not lowered, and just looking for stock ride back, which I think I got, not sure. I still think the new michelins made more of a difference, but I definately like my car again. Good idea about hitting up the tractor shop, they were 12 bucks a bolt from honda, and the bushings were 26 each from honda.
Never the less, good write up.
Never the less, good write up.
11-24-2008 | 06:02 PM
#29
Bagel Bomber
Joined: Sep 2003
Posts: 1,737
Likes: 4
From: Fairfax VA
12-14-2008 | 03:05 PM
#30
Bagel Bomber
Joined: Sep 2003
Posts: 1,737
Likes: 4
From: Fairfax VA
Anyone have some advice for tightening the top nut. I installed GR-2's but with the cold weather, it appears, i never tightened the top nut enough. It doesnt have a allen key hole, it is just a metal tab. It appears i need to get some vice grips to hold that while i tighten, but its pretty hard to move the nut. Anyone kow what i'm talking about?
12-19-2008 | 03:56 PM
#31
Bagel Bomber
Joined: Sep 2003
Posts: 1,737
Likes: 4
From: Fairfax VA
28. When you go to put the top mount back on the shock and spring, make sure the top screw is inline with the very end of the spring on the bottom of the assembly. It is kind of hard to explain but if you look in the picture you will see the top mounting screw is inline with the very end of the coil. This is VERY important when remounting the assembly and cause me to remove it and start over
could this be why I have a clunking sound comming from the rear passenger side? Or would it be impossible to install if this wasn't correct and the clunking is comming from something else. Its only on that side.
could this be why I have a clunking sound comming from the rear passenger side? Or would it be impossible to install if this wasn't correct and the clunking is comming from something else. Its only on that side.
07-25-2009 | 03:22 PM
#35
Instructor
Joined: Jul 2007
Posts: 153
Likes: 0
From: Albany, NY
Got my shocks yesterday, decided to put the rear ones in today because i dont have my camber kit for the front yet. Anyway, the entire project ended in failure 
I thought i would put up some more pictures, especially what bolt to look out for.


This bolt is such a pain in the ass, had to give up. Going to the shop monday.


I thought i would put up some more pictures, especially what bolt to look out for.
This bolt is such a pain in the ass, had to give up. Going to the shop monday.
Last edited by Master Bill Flex; 07-25-2009 at 03:25 PM.
