
DIY: 2 Piston Caliper w/ 11.1" Rotors
 07-10-2010, 03:47 PM
#1
Three Wheelin'
Thread Starter
DIY: 2 Piston Caliper w/ 11.1" Rotors
Disclaimer:
Myself nor AcuraZine are liable for any injury or damage that might occur. You should be able to perform this brake swap on your own. Having a second set of hands would be ideal for step #7.
This DIY is written for the '97 (hub over rotor) design. The '98/'99 CL does not require you to separate the hub to change rotors and those steps are to be skipped.
Time needed to complete: approximately 1 hour and 30 mins w/ air tools. If air tools are not available, give yourself another hour.
Tools Needed:
• A set of metric sockets
• Ratchet
• A set of metric wrenches
• 36mm socket for axle nut
• Slide hammer (Preferably 5 lbs, rent this from a local auto parts store)
• 2x4 block of wood
• 3lb sledge
* If you don't have air tools, you'll need a large ratchet and a breaker bar
Parts List:
• Front calipers from the Legend GS Coupe/LS Sedan or NSX
• 25T caliper bracket from the 5th gen Accord V6, Accord Wagon, 4th gen Prelude VTEC, 3.0CL or Integra Type R
• Rotors from a 5th gen Accord V6, Accord Wagon, 4th gen Prelude VTEC or 3.0CL (ITR rotors would need to be drilled to 4x114.3)
• 2 separate brake caliper hardware kits. 1 for the Legend/NSX calipers and 1 for the 25T brackets.
• 2 sets of brake pads.
The "25" in the 25T caliper bracket is the width of the rotor in millimeters. The 2.2/2.3CL have 23T brackets. If you buy a loaded Legend/NSX caliper, you'll receive 28T brackets. The 28T will work if you shim the bracket. If you have a 3.0 CL, your brackets and rotors do not need changed.
Best place to buy the brackets is from rockauto.com. Advance Autoparts or other chains will charge you about $80. At Rock Auto it came to $40 with shipping.
*Important Note*
Acura Legend Calipers:
If you choose to go with the Legend calipers, you will need to do 1 of 2 things.
1. Flip the calipers over to keep the smaller piston at the leading edge. This will put the bleeder screw at the bottom of the caliper so you will need to remove the calipers to bleed them or use a vacuum.
2. Swap the calipers to the opposite sides of the vehicle. This will put the bleeder screw at the top, but the larger piston will be at the leading edge and not how Honda designed it.
Acura NSX Calipers:
The NSX caliper placement is the similar to the CL's, so flipping the calipers or swapping sides is not required.
ANY year NSX front calipers will work, however there were a couple changes throughout the years. The 91-96 had 40 mm and 36 mm pistons adding more front bias for the 11.1" rotors. The 97-05 had 40 mm and 34 mm pistons and used different brackets due to the 12" rotors.

Step 1:
Place vehicle safely on jack stands and remove wheels.


Step 2:
Remove the banjo bolt for the brake line on the back side of the caliper. Brake fluid will leak out and it is a good idea to zip tie the brake line vertically onto the control arm so that it is out of the way.
*Put a bucket or some towels down before performing this step to keep brake fluid off the floor.*

Step 3:
Remove the 2 bolts that hold the caliper to the bracket. They are located on the back side of the assembly.


Step 4:
Remove the 2 bolts that hold the caliper bracket to the knuckles.
*Note: You can't actually see the bolts in this photo, so arrows are included to help show the location.

Step 5:
Loosen the 4 bolts that are located on the front of the hub. It's easier to do this now, before the hub and rotor are removed from the car. Do not completely remove them or the rotor will fall during step 7.
Step 6:
Remove the 36mm axle nut.

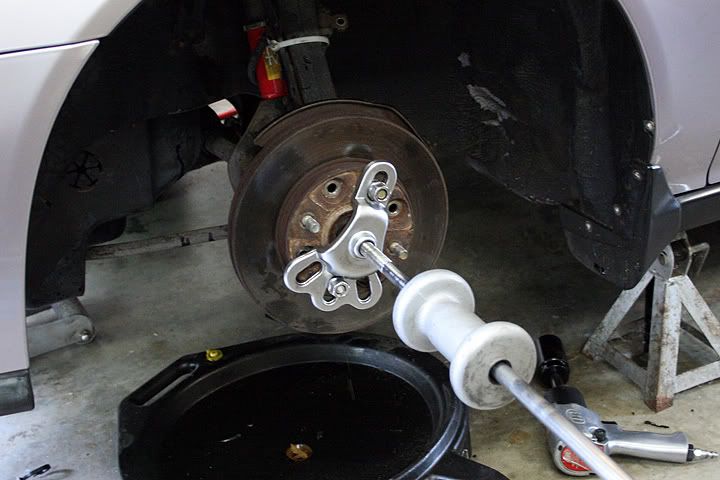
Step 7:
Attach the slide hammer using your lug nuts. 4 or 5 smacks and the hub should separate from the wheel bearings.

You will be able to see the bearings at this point and it is a good idea to add some bearing grease.

Step 8:
Completely remove the 4 bolts you had loosened in step 5 and then swap out the old rotor with the new 11.1" rotor. Tighten the 4 bolts enough so that the rotor and hub are firmly held together. You can torque these down later when the rotor and hub are back on the car.

Step 9:
Getting the hub back into the bearings is the tricky part. I don't have any good photos of this since it requires two hands and I had no one to hold the camera.
What you need to do is place the rotor/hub assembly back onto the car while lining up the splines in the axle. Grab the axle from behind the suspension and pull it out towards you as far as it will go. Then take the 36mm socket and place it over the center of the hub. Take a 2x4 and put it behind the socket and hit it with a 3lb. sledge. All you want to do it press the rotor/hub far enough into the wheel bearings, so that the axle sticks out though the entire assembly. Take your axle nut and start to thread it on a few turns.

Once the axle nut starts to thread, grab your impact with the 36mm socket and begin threading the axle completely on. There's no need for a press, the axle nut will pull everything together. The inner hub race has a lip. It will stop when the 2 pieces of the hub are touching. This leaves the proper tolerance for the bearings without having to know the clearance spec.
Finally for this step, notch the axle nut.
If you don't feel comfortable performing the above step, you will need to remove the entire knuckle and have a shop press the hub back together.

Step 10:
Tighten the 4 bolts that hold the rotor to the outer hub.

Step 11:
Now all you have to do is reassemble the caliper and bracket in the reverse order.
Bolt up the brackets, place brake pads, bolt up the caliper and finally bolt up the brake line.


Bleed the brakes and you are finished.

Myself nor AcuraZine are liable for any injury or damage that might occur. You should be able to perform this brake swap on your own. Having a second set of hands would be ideal for step #7.
This DIY is written for the '97 (hub over rotor) design. The '98/'99 CL does not require you to separate the hub to change rotors and those steps are to be skipped.
Time needed to complete: approximately 1 hour and 30 mins w/ air tools. If air tools are not available, give yourself another hour.
Tools Needed:
• A set of metric sockets
• Ratchet
• A set of metric wrenches
• 36mm socket for axle nut
• Slide hammer (Preferably 5 lbs, rent this from a local auto parts store)
• 2x4 block of wood
• 3lb sledge
* If you don't have air tools, you'll need a large ratchet and a breaker bar
Parts List:
• Front calipers from the Legend GS Coupe/LS Sedan or NSX
• 25T caliper bracket from the 5th gen Accord V6, Accord Wagon, 4th gen Prelude VTEC, 3.0CL or Integra Type R
• Rotors from a 5th gen Accord V6, Accord Wagon, 4th gen Prelude VTEC or 3.0CL (ITR rotors would need to be drilled to 4x114.3)
• 2 separate brake caliper hardware kits. 1 for the Legend/NSX calipers and 1 for the 25T brackets.
• 2 sets of brake pads.
The "25" in the 25T caliper bracket is the width of the rotor in millimeters. The 2.2/2.3CL have 23T brackets. If you buy a loaded Legend/NSX caliper, you'll receive 28T brackets. The 28T will work if you shim the bracket. If you have a 3.0 CL, your brackets and rotors do not need changed.
Best place to buy the brackets is from rockauto.com. Advance Autoparts or other chains will charge you about $80. At Rock Auto it came to $40 with shipping.
*Important Note*
Acura Legend Calipers:
If you choose to go with the Legend calipers, you will need to do 1 of 2 things.
1. Flip the calipers over to keep the smaller piston at the leading edge. This will put the bleeder screw at the bottom of the caliper so you will need to remove the calipers to bleed them or use a vacuum.
2. Swap the calipers to the opposite sides of the vehicle. This will put the bleeder screw at the top, but the larger piston will be at the leading edge and not how Honda designed it.
Acura NSX Calipers:
The NSX caliper placement is the similar to the CL's, so flipping the calipers or swapping sides is not required.
ANY year NSX front calipers will work, however there were a couple changes throughout the years. The 91-96 had 40 mm and 36 mm pistons adding more front bias for the 11.1" rotors. The 97-05 had 40 mm and 34 mm pistons and used different brackets due to the 12" rotors.
Step 1:
Place vehicle safely on jack stands and remove wheels.
Step 2:
Remove the banjo bolt for the brake line on the back side of the caliper. Brake fluid will leak out and it is a good idea to zip tie the brake line vertically onto the control arm so that it is out of the way.
*Put a bucket or some towels down before performing this step to keep brake fluid off the floor.*
Step 3:
Remove the 2 bolts that hold the caliper to the bracket. They are located on the back side of the assembly.
Step 4:
Remove the 2 bolts that hold the caliper bracket to the knuckles.
*Note: You can't actually see the bolts in this photo, so arrows are included to help show the location.
Step 5:
Loosen the 4 bolts that are located on the front of the hub. It's easier to do this now, before the hub and rotor are removed from the car. Do not completely remove them or the rotor will fall during step 7.
Step 6:
Remove the 36mm axle nut.
Step 7:
Attach the slide hammer using your lug nuts. 4 or 5 smacks and the hub should separate from the wheel bearings.
You will be able to see the bearings at this point and it is a good idea to add some bearing grease.
Step 8:
Completely remove the 4 bolts you had loosened in step 5 and then swap out the old rotor with the new 11.1" rotor. Tighten the 4 bolts enough so that the rotor and hub are firmly held together. You can torque these down later when the rotor and hub are back on the car.
Step 9:
Getting the hub back into the bearings is the tricky part. I don't have any good photos of this since it requires two hands and I had no one to hold the camera.
What you need to do is place the rotor/hub assembly back onto the car while lining up the splines in the axle. Grab the axle from behind the suspension and pull it out towards you as far as it will go. Then take the 36mm socket and place it over the center of the hub. Take a 2x4 and put it behind the socket and hit it with a 3lb. sledge. All you want to do it press the rotor/hub far enough into the wheel bearings, so that the axle sticks out though the entire assembly. Take your axle nut and start to thread it on a few turns.
Once the axle nut starts to thread, grab your impact with the 36mm socket and begin threading the axle completely on. There's no need for a press, the axle nut will pull everything together. The inner hub race has a lip. It will stop when the 2 pieces of the hub are touching. This leaves the proper tolerance for the bearings without having to know the clearance spec.
Finally for this step, notch the axle nut.
If you don't feel comfortable performing the above step, you will need to remove the entire knuckle and have a shop press the hub back together.
Step 10:
Tighten the 4 bolts that hold the rotor to the outer hub.
Step 11:
Now all you have to do is reassemble the caliper and bracket in the reverse order.
Bolt up the brackets, place brake pads, bolt up the caliper and finally bolt up the brake line.
Bleed the brakes and you are finished.
Last edited by 97BlackAckCL; 07-12-2010 at 10:55 PM.
 07-10-2010, 03:53 PM
#2
Three Wheelin'
Thread Starter
If you feel that any of these steps are vague or need further explained, please let me know via PM and I will try to revise with the help of a moderator.
07-10-2010, 06:50 PM
#4
Three Wheelin'
Thread Starter
Thanks, I hope I made sense of it. Some of the steps might be easier to understand when you actually go through the process.
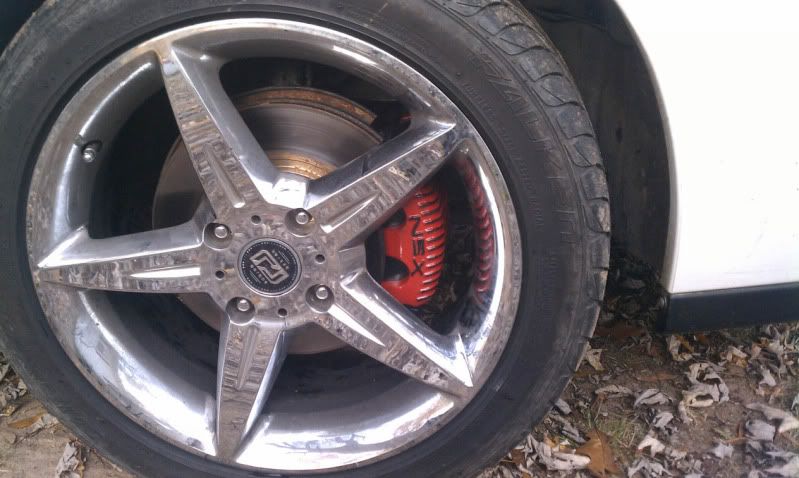
As for the wheel clearance, there's actually about 5 mm of space between the caliper and the spokes. Also, the 91-96 NSX had 16" wheels so this brake set up should work with our stock wheels as well.
As for the wheel clearance, there's actually about 5 mm of space between the caliper and the spokes. Also, the 91-96 NSX had 16" wheels so this brake set up should work with our stock wheels as well.
07-10-2010, 10:44 PM
#5
Senior Moderator
So basically if you have a 98 or 99 you just take the caliper, bracket, and brake rotor off and replace them with the new ones? The brake line will just bolt into the bracket, correct?
Last edited by DaInFaMMuS1; 07-11-2010 at 12:25 PM.
07-11-2010, 12:19 AM
#6
Senior Moderator
Regional Coordinator
(Mid-Atlantic)
Regional Coordinator
(Mid-Atlantic)
iTrader: (6)
Great write up, I will be using this thanks 
Trending Topics
07-11-2010, 01:18 PM
#8
Three Wheelin'
Thread Starter
Correct, but the brake line isn't connected to the bracket. All you need to do is unbolt it from the old caliper and then screw it into the new one. You'll probably want to use new crush washers to make sure the line seals completely.
07-11-2010, 03:38 PM
#9
Three Wheelin'
Thread Starter
One thing I forgot to mention is that the 12" NSX brakes might be another option for those that want to go even bigger. It's not a well documented brake set up, but the 2 piston calipers and 97-05 NSX brackets will work with our cars. Finding a 12" rotor would require some research.
The NSX rotor might work if it were redrilled, and I've read that the 04-07 Accord Euro R had 12" rotors which would need drilled to 4x114.3 as well.
The NSX rotor might work if it were redrilled, and I've read that the 04-07 Accord Euro R had 12" rotors which would need drilled to 4x114.3 as well.

 05-09-2011, 08:42 AM
#12
Pro
since the resurrection already has taken place i got a question about this. i ordered the "loaded pair" of calipers from the 94 Legend GS. these come with the 28T brackets. the rotors i will b using are 25mm from a 3.0CL. in the description at the top it says you can use the 28T brackets if you "shim" them. has anyone done it this way? id prefer not to buy diff brackets if i don't have to. sounds like i need to account for 3 mm somewhere, but where should i "shim" them and what should i use? anyone who has done this please help. thank you
 05-24-2011, 01:58 PM
#14
Senior Moderator
Regional Coordinator
(Mid-Atlantic)
Regional Coordinator
(Mid-Atlantic)
iTrader: (6)
10-22-2011, 05:58 PM
#15
do you have the pictures of how you attached the slide hammer top the lug nuts? did you have t6o make a plate or how did you connect it to the lug nuts, the pictures are not showing up. I will not be upgrading calibers or anything I am just thinking about replacing the rotors to 98-99 rotors because mine is getting really thin
Last edited by P0401; 10-22-2011 at 06:01 PM.
 10-24-2011, 09:48 AM
#18
Three Wheelin'
Thread Starter
It is true that the bearings can be damaged with the use of a slide hammer. I didn't replace mine and have no issues, but that's not to say it isn't worth doing. It's only a $30 part.
10-24-2011, 02:45 PM
#19
Pro
from what i understand its like a 50 50 shot u could damage somthing...ive always used the method where u take the whole knnuckle off and pound out the bearing/hub assembly from the back....worked like a charm for me and ive had to do it twice now.
Last edited by 97'CL2.2; 10-24-2011 at 02:47 PM.
11-01-2011, 01:36 PM
#21
My bearings came apart so now I have to find a way to get the race out of it so I can change the hub. Does anyone know of a easy way to get it out without having to take it all apart and press it out. Also Rockauto had a sale on fully loaded Auto Specialty/Kelsey Hayes NSX calipers for $34.00 a piece shipped with no core charge so I got the Right and Left front calipers to put on there also (looks like they are sold out of the front now) would there be any advantages with the NSX rear calipers?
11-01-2011, 08:36 PM
#22
Three Wheelin'
Thread Starter
Rear NSX brakes will result in too much rear bias according to those who have done it. The rotors are larger at 11.1", and the calipers are larger too. Running 11.8" '97+ NSX front rotors can help lessen the problem, but there is no 11.8" rotor that is a direct swap.
One thing you'll notice about the 2 piston front brakes is that the brake pedal has to travel a longer distance before they grab. The NSX probably has a larger master cylinder. I found that installing stainless brakes lines makes a difference. It still doesn't feel like the stock brakes, though. It takes some getting used to.
One thing you'll notice about the 2 piston front brakes is that the brake pedal has to travel a longer distance before they grab. The NSX probably has a larger master cylinder. I found that installing stainless brakes lines makes a difference. It still doesn't feel like the stock brakes, though. It takes some getting used to.
11-03-2011, 09:27 AM
#24
I re-read your tutorial and since there are no more pictures it seems like your bearings came out of the race also and you didn't even remove the 4 bolts on the back that holds the hub in. Is this correct? I can see the bearings and stuff on mine but I thought that messed everything up because I would think the whole hub should have came out instead of the bearing coming apart like it sounds like happened with yours (and mine)
11-03-2011, 02:53 PM
#25
Three Wheelin'
Thread Starter
It looks like the NSX also has a 1" MC, but has 4 ports instead of 2 (probably not the reason for the soft pedal). That, and the 28mm rotor are the differences I've come up with so far.
I re-read your tutorial and since there are no more pictures it seems like your bearings came out of the race also and you didn't even remove the 4 bolts on the back that holds the hub in. Is this correct? I can see the bearings and stuff on mine but I thought that messed everything up because I would think the whole hub should have came out instead of the bearing coming apart like it sounds like happened with yours (and mine)
When putting it back together I used the axle nut and air tools to drive the inner race back onto the hub. It's much better to have a shop press it in, but of course that requires removing the knuckle. If you have the time, I recommend using a press.
11-04-2011, 08:31 AM
#26
Senior Moderator
Regional Coordinator
(Mid-Atlantic)
Regional Coordinator
(Mid-Atlantic)
iTrader: (6)
The main difference people switch to the NSX or Legend is for the dual piston, because it's supposed to supply more even breaking across the rotor. The NSX is more just for bling like blazin said
11-04-2011, 06:27 PM
#27
I looked up the information on the acura cl 3.0 master cylinder and the NSX master cylinder and the parts numbers are different and the NSX has LF and LR information where the CL has RR and RF port information.
The NSX information says:
Bore 1"
LF Port 10x1mm INV
LR Port 12x1mm INV
Push Rod Depth 2.41"
and the CL Information says:
Bore Size 1"
RF Port 10x1mm INV
RR Port 12x1mm INV
Push Rod Depth 2.41"
Not sure if that has anything to do with it or not but both look like they bolt up the same way
The NSX information says:
Bore 1"
LF Port 10x1mm INV
LR Port 12x1mm INV
Push Rod Depth 2.41"
and the CL Information says:
Bore Size 1"
RF Port 10x1mm INV
RR Port 12x1mm INV
Push Rod Depth 2.41"
Not sure if that has anything to do with it or not but both look like they bolt up the same way
11-05-2011, 01:26 PM
#28
Three Wheelin'
Thread Starter
You might not even have a soft pedal since it's a 3.0 that already has bigger brakes... or maybe the 3.0 has a softer pedal than the 4 cylinder. It's been over a year and now I hardly notice it.
 11-16-2011, 06:22 AM
#30
Three Wheelin'
Thread Starter
Looks good, did you paint them yourself?
This winter I plan to disassemble the calipers and powder coat them myself. If you want your rear calipers done, let me know. I have glossy red and a bunch of other colors.
This winter I plan to disassemble the calipers and powder coat them myself. If you want your rear calipers done, let me know. I have glossy red and a bunch of other colors.

Thread
Thread Starter
Forum
Replies
Last Post
rp_guy
Member Cars for Sale
9
07-16-2017 07:33 AM
08_UA7_Gr33k
Member Cars for Sale
13
02-11-2016 02:17 PM
08_UA7_Gr33k
Member Cars for Sale
1
09-27-2015 01:56 PM