1st Gen CL Steering Wheel DIY w/pics
 03-07-2007, 10:07 AM
#1
Suzuka Master
Thread Starter
1st Gen CL Steering Wheel DIY w/pics
I recently changed my steering wheel, and was dissapointed to find out there's no DIY that is EXACTLY for the CL, it's for other vehicles.
So, I did one myself, with pics included.
DISCLAIMER:
This is a Do-It-Yourself job, and hence I take no responsibility for any malfunctions or injuries that occur when performing this job.
Tools needed:-Torque wrench (28lb ft torque value)
-T30 star bit
-Large socket wrench
-Small socket wrench
-14mm socket
-Small Phillips screwdriver
-Medium Phillips screwdriver
-Socket wrench extension (6 inch will work)
-Patience (yes, I said it, don't force anything)
Step 1.
Park the car as straight as possible, making sure the wheel is straight. If not, your wheel will be off center.
Disconnect the battery. The last thing you want is the Airbag going off in your face Make sure you have your radio anti-theft code!
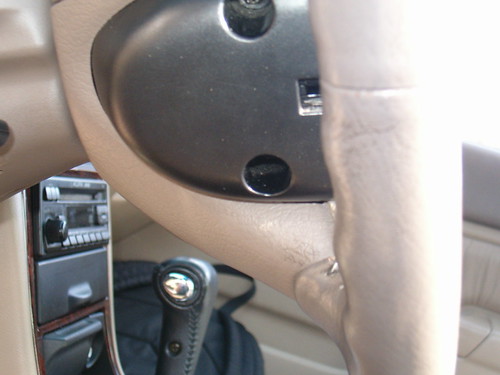
Step 2.
Remove the side access panels on the side (near the volume and cruise controls)
and the bottom access panel on the steering wheel. You'll see them.
Step 3.
Remove the cruise control and volume control pieces from the steering wheel with the small Phillips screwdriver. Unplug each one and set aside.
Step 4.
Remove the T30 star bolt on each side. This holds the airbag in place.
Step 5.
Pull the airbag unit out and disconnect the airbag connectors. Also make sure all the other connectors are disconnected. Put it aside.
Step 6.
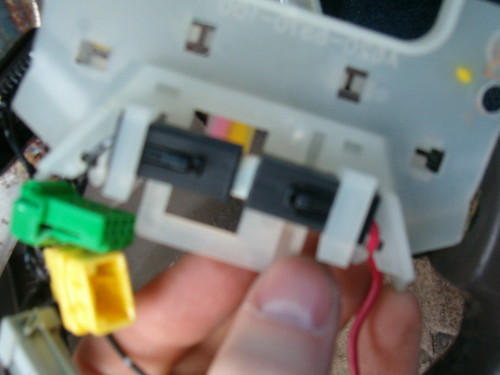
Remove the 2 Phillips screws that hold in the clear plastic piece. When thats removed, flip it around and push out the two black connectors, and disconnect those from each other. Put the plastic piece aside.

Step 7.
Remove the 14mm bolt in the center of the wheel. Hold the wheel straight, and push hard. It'll feel like you're about to break something, but it'll pop and loosen. Remove the bolt.
Step 8.
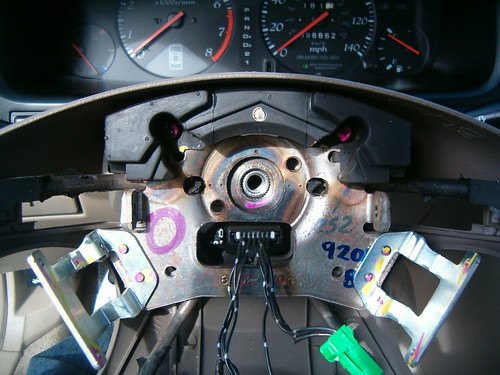
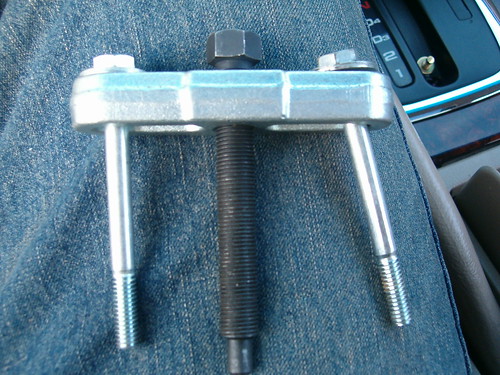
Use the wheel puller to remove the wheel itself. In this case, I rented a universal one from Advance Auto. I used the two smaller bolts and screwed them into the two offset wheel holes, making sure to tighten them down until there is a few threads left. DO NOT GO DOWN TO NO THREAD VISIBLE on those 2 bolts, that's too far, and will poke your cable ribbon reel behind the wheel! Leave a little thread visible. Then center the black center bolt in the wheel hole were the 14mm bolt was. Then tighten down the BLACK bolt until the wheel pops off. It should come off easily. DO NOT REMOVE THE WHEEL YET! Hold it in place to keep the ribbon reel from popping out and unwrapping.
Step 9.
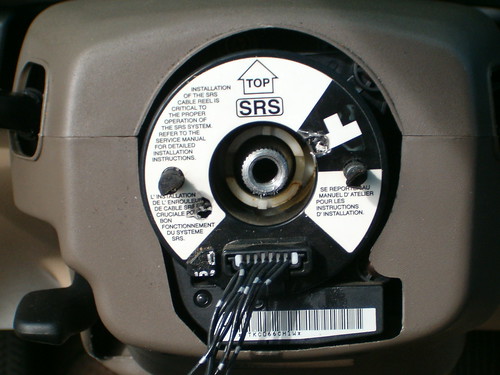
CAREFULLY AND SLOWLY remove the wheel using one hand, and use the other to make sure the black ribbon reel DOES NOT pop out. If it does you'll have to re-center it, and that's just a pain.
Step 10.
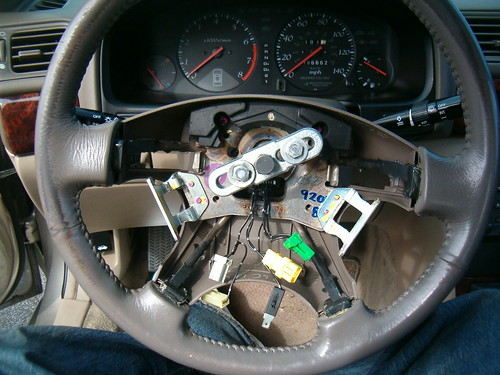
Take the cruise and volume control brackets off. The screws are on the backside of the wheel. Put those on the new wheel.
Take off the black upper cushion (2 screws) and put aside for a minute.
Take off the 2 screws behind the cushion off. This removes the back wheel trim piece. Transfer that and the cushion onto the new wheel.
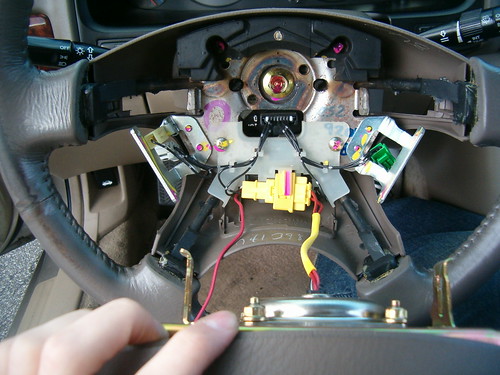
Step 11.
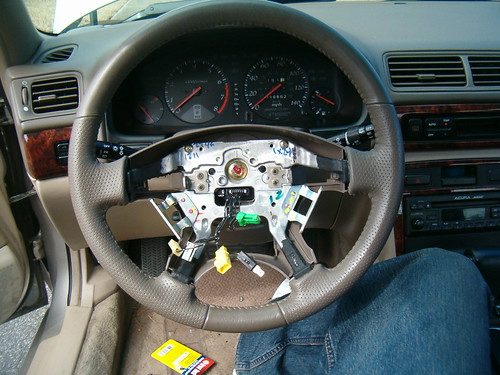
Now it's time to install the new steering wheel!
Put the new wheel in position and run the wires for controls/airbags through the slot under the 14mm bolt hole. Make sure it lines up straight and is in the same position as the old wheel. Once this is done, install the 14mm bolt and tighten to 28lb ft torque.
Step 12.
Get the clear plastic piece and install it, making sure to connect the two backside black connectors together (airbag to steering column) and then screw in place. BE CAREFUL! Those 2 screws also hold the bottom portion of the back trim piece in place. Then route the appropriate wires in their locations. Look back on the previous photos if you are unsure. Proper routing is an absolute must!
Step 13.
Once the airbag is connected fully, place it on the steering wheel. Pay attention to the red wire. It should run outside the metal on the airbag, you don't want to pinch it as it is your horn button wire. Put back in the 2 T30 bolts that secure the airbag. Secure the airbag.
Note- you might have to play with the airbag to get it to sit correctly. Take your time.
Step 14.
Put back the cruise and volume controls, the 2 side trim piece covers, and the bottom trim cover.
Step 15.
Enjoy the view!
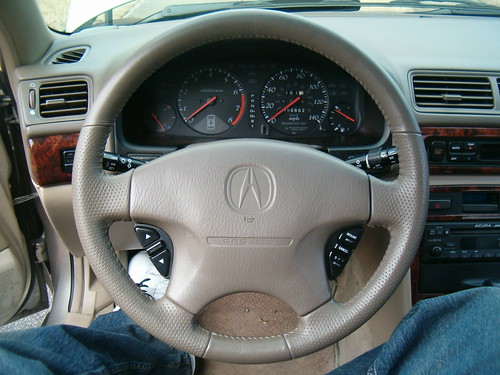
Reconnect the battery, enter radio code (if applicable) and look for SRS light. If so, look for the SRS light reset thread that I did.
So, I did one myself, with pics included.
DISCLAIMER:
This is a Do-It-Yourself job, and hence I take no responsibility for any malfunctions or injuries that occur when performing this job.
Tools needed:-Torque wrench (28lb ft torque value)
-T30 star bit
-Large socket wrench
-Small socket wrench
-14mm socket
-Small Phillips screwdriver
-Medium Phillips screwdriver
-Socket wrench extension (6 inch will work)
-Patience (yes, I said it, don't force anything)
Step 1.
Park the car as straight as possible, making sure the wheel is straight. If not, your wheel will be off center.
Disconnect the battery. The last thing you want is the Airbag going off in your face
Make sure you have your radio anti-theft code!Step 2.
Remove the side access panels on the side (near the volume and cruise controls)
and the bottom access panel on the steering wheel. You'll see them.
Step 3.
Remove the cruise control and volume control pieces from the steering wheel with the small Phillips screwdriver. Unplug each one and set aside.
Step 4.
Remove the T30 star bolt on each side. This holds the airbag in place.
Step 5.
Pull the airbag unit out and disconnect the airbag connectors. Also make sure all the other connectors are disconnected. Put it aside.
Step 6.
Remove the 2 Phillips screws that hold in the clear plastic piece. When thats removed, flip it around and push out the two black connectors, and disconnect those from each other. Put the plastic piece aside.
Step 7.
Remove the 14mm bolt in the center of the wheel. Hold the wheel straight, and push hard. It'll feel like you're about to break something, but it'll pop and loosen. Remove the bolt.
Step 8.
Use the wheel puller to remove the wheel itself. In this case, I rented a universal one from Advance Auto. I used the two smaller bolts and screwed them into the two offset wheel holes, making sure to tighten them down until there is a few threads left. DO NOT GO DOWN TO NO THREAD VISIBLE on those 2 bolts, that's too far, and will poke your cable ribbon reel behind the wheel! Leave a little thread visible. Then center the black center bolt in the wheel hole were the 14mm bolt was. Then tighten down the BLACK bolt until the wheel pops off. It should come off easily. DO NOT REMOVE THE WHEEL YET! Hold it in place to keep the ribbon reel from popping out and unwrapping.
Step 9.
CAREFULLY AND SLOWLY remove the wheel using one hand, and use the other to make sure the black ribbon reel DOES NOT pop out. If it does you'll have to re-center it, and that's just a pain.
Step 10.
Take the cruise and volume control brackets off. The screws are on the backside of the wheel. Put those on the new wheel.
Take off the black upper cushion (2 screws) and put aside for a minute.
Take off the 2 screws behind the cushion off. This removes the back wheel trim piece. Transfer that and the cushion onto the new wheel.
Step 11.
Now it's time to install the new steering wheel!
Put the new wheel in position and run the wires for controls/airbags through the slot under the 14mm bolt hole. Make sure it lines up straight and is in the same position as the old wheel. Once this is done, install the 14mm bolt and tighten to 28lb ft torque.
Step 12.
Get the clear plastic piece and install it, making sure to connect the two backside black connectors together (airbag to steering column) and then screw in place. BE CAREFUL! Those 2 screws also hold the bottom portion of the back trim piece in place. Then route the appropriate wires in their locations. Look back on the previous photos if you are unsure. Proper routing is an absolute must!
Step 13.
Once the airbag is connected fully, place it on the steering wheel. Pay attention to the red wire. It should run outside the metal on the airbag, you don't want to pinch it as it is your horn button wire. Put back in the 2 T30 bolts that secure the airbag. Secure the airbag.
Note- you might have to play with the airbag to get it to sit correctly. Take your time.
Step 14.
Put back the cruise and volume controls, the 2 side trim piece covers, and the bottom trim cover.
Step 15.
Enjoy the view!
Reconnect the battery, enter radio code (if applicable) and look for SRS light. If so, look for the SRS light reset thread that I did.
 03-26-2007, 08:14 PM
#4
Senior Moderator
Regional Coordinator
(Mid-Atlantic)
Regional Coordinator
(Mid-Atlantic)
iTrader: (6)
Nice ducky, 2nd gen CL/TL and MDX all fit the air bag, I have been trying to find a 98-up black air bag for months.
03-26-2007, 09:38 PM
#6
Senior Moderator
Regional Coordinator
(Mid-Atlantic)
Regional Coordinator
(Mid-Atlantic)
iTrader: (6)
Originally Posted by CLpwner
black airbag? why would you care about the color of your airbag or does this mean something else?
03-27-2007, 01:49 PM
#7
Land of Pleasant Living
Join Date: Sep 2005
Posts: 2,619
Likes: 0
Received 0 Likes
on
0 Posts
Originally Posted by CLpwner
black airbag? why would you care about the color of your airbag or does this mean something else?
he means the center piece of the steering wheel... not the actual bag that deploys
Trending Topics
 03-27-2007, 04:54 PM
#10
chips and smokes, lets go
Originally Posted by CLpwner
black airbag? why would you care about the color of your airbag or does this mean something else?
 03-27-2007, 06:25 PM
#12
Suzuka Master
Thread Starter
Thanks guys, I wish I had taken the pics with my new cam, but i didn't have it yet.
Still came out alright though
yup, all 2nd gen CL and TL steering wheels fit, along with the MDX steering wheels.
The only difference is that the 97 CL's have completely different wheels from the 98 and 99 CL. So if you're gonna change the 97 to a 98 or higher vehicle, you need the airbag from a 98 or higher vehicle.
Still came out alright though
Originally Posted by 97BlackAckCL
Nice ducky, 2nd gen CL/TL and MDX all fit the air bag, I have been trying to find a 98-up black air bag for months.
The only difference is that the 97 CL's have completely different wheels from the 98 and 99 CL. So if you're gonna change the 97 to a 98 or higher vehicle, you need the airbag from a 98 or higher vehicle.
03-27-2007, 08:15 PM
#13
Senior Moderator
Regional Coordinator
(Mid-Atlantic)
Regional Coordinator
(Mid-Atlantic)
iTrader: (6)
Originally Posted by herbalist
its got to match the interior
 03-27-2007, 08:37 PM
#14
Mmmm...
Join Date: Feb 2007
Location: Raleigh, NC
Posts: 1,329
Likes: 0
Received 0 Likes
on
0 Posts
Originally Posted by hornedfrog2000
He wants to die in style.
03-27-2007, 10:25 PM
#15
Burning Brakes

Join Date: Mar 2007
Location: Southlake, TX
Age: 37
Posts: 1,244
Likes: 0
Received 2 Likes
on
2 Posts
I can say this: the airbags that 'used' to be in my CL were a light ish baby blue... and i'll assume it was liekthat for all cars in that year bracket atleast
03-28-2007, 06:14 PM
#16
Turtle Charged, Biotcch!!
Join Date: May 2006
Location: Irvine, SoCal
Age: 36
Posts: 1,168
Likes: 0
Received 0 Likes
on
0 Posts
If i can add a bit to the DIY, i did this a while ago:
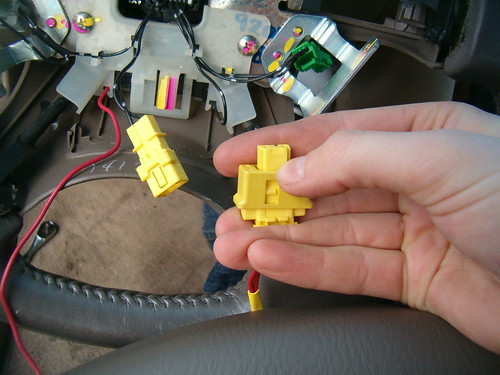
-You should deactivate the orange SRS connectors from both the driver's side and the passenger's before removing the airbag.
What i mean is to disconnect the orange/yellow connectors before going to Step 3. In step 2 you remove the access panels, you'll see the SRS connector under the steering wheel. You can just pull it out and disconnect.
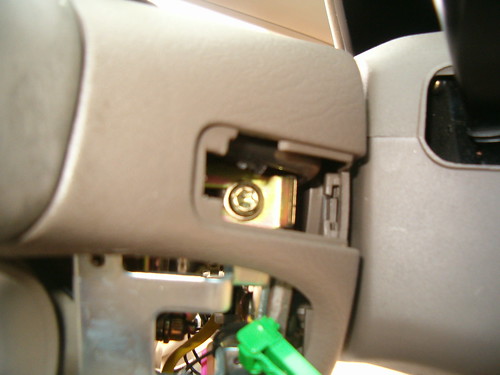
The SRS connector for the passenger's airbag is behind the glove box. when you open the glove box, look to the upper left of the glove box and you'll see yellow wires. That's the SRS connector.
-You should deactivate the orange SRS connectors from both the driver's side and the passenger's before removing the airbag.
What i mean is to disconnect the orange/yellow connectors before going to Step 3. In step 2 you remove the access panels, you'll see the SRS connector under the steering wheel. You can just pull it out and disconnect.
The SRS connector for the passenger's airbag is behind the glove box. when you open the glove box, look to the upper left of the glove box and you'll see yellow wires. That's the SRS connector.
03-28-2007, 06:42 PM
#17
Suzuka Master
Thread Starter
I didn't see a need, as in the 1st step is to disconnect the battery. But good input, I'll see if I can slide out to the CL tomorrow and take pics, maybe I'll edit it in.

03-29-2007, 08:34 AM
#18
Instructor

Join Date: Oct 2006
Age: 44
Posts: 102
Likes: 0
Received 0 Likes
on
0 Posts
Thats a nice DIY. I got a 97 CL with the SRS light on and on the stearing wheel it looks like it got hit and has a few dings and a small gash it it. When you press on it feels like there's nothing underneath. It goes in about 1 to 1 1/2 inches when you press it. In the corners where it meets the stearing its not flush, its about a half inch inward. I got airbags from a used CL, both passenger and driver with the modul (for $350 shipped). I had my stearing wheel checked by a mechanic and he said it feels like there's no airbag there.
I would like to install it myself but I will never chance something like that. Will be taking it to a shop, (acura dealership might not do it)
I would like to install it myself but I will never chance something like that. Will be taking it to a shop, (acura dealership might not do it)
04-12-2007, 09:47 PM
#25
Senior Moderator
Regional Coordinator
(Mid-Atlantic)
Regional Coordinator
(Mid-Atlantic)
iTrader: (6)
Originally Posted by hornedfrog2000
Would an RSX wheel fit our car? 97 that is.

 04-30-2007, 09:51 PM
#28
B A N N E D
Join Date: Oct 2006
Location: Cedar Rapids, IA
Age: 39
Posts: 821
Likes: 0
Received 0 Likes
on
0 Posts
I had a question. Does anyone know if I bought a 96 accord wheel would it fit on my 97 cl? It look like it would, but I'm not sure. My wheel has a pretty bad wear spot on it, and I read here I would have to change my airbag, and wheel to get a newer cl/tl wheel. This would cost me 300$ I can get the accord one for like 30$ and at least it will make my wheel look way cleaner. I will find the auction so you guys can see it.
04-30-2007, 09:55 PM
#29
B A N N E D
Join Date: Oct 2006
Location: Cedar Rapids, IA
Age: 39
Posts: 821
Likes: 0
Received 0 Likes
on
0 Posts
04-30-2007, 10:38 PM
#30
Senior Moderator
Regional Coordinator
(Mid-Atlantic)
Regional Coordinator
(Mid-Atlantic)
iTrader: (6)
Yup, that should work, it's the same wheel
05-21-2007, 09:02 PM
#31
10th Gear

Join Date: Sep 2004
Location: virginia
Age: 42
Posts: 10
Likes: 0
Received 0 Likes
on
0 Posts
Will This one fit a 99 3.0 CL? seems there is a slight difference in the metal part?
http://cgi.ebay.com/ebaymotors/ACURA...ayphotohosting
http://cgi.ebay.com/ebaymotors/ACURA...ayphotohosting
05-21-2007, 10:28 PM
#34
Senior Moderator
Regional Coordinator
(Mid-Atlantic)
Regional Coordinator
(Mid-Atlantic)
iTrader: (6)
Originally Posted by pearlxman
Will This one fit a 99 3.0 CL? seems there is a slight difference in the metal part?
http://cgi.ebay.com/ebaymotors/ACURA...ayphotohosting
http://cgi.ebay.com/ebaymotors/ACURA...ayphotohosting
 but I sold a bunch to 2nd gen owners, the bags should be the same
06-18-2007, 05:14 PM
but I sold a bunch to 2nd gen owners, the bags should be the same
06-18-2007, 05:14 PM
#35
1st Gear

Join Date: Jun 2007
Age: 33
Posts: 1
Likes: 0
Received 0 Likes
on
0 Posts
http://cgi.ebay.com/ebaymotors/HONDA...spagenameZWDVW
So, blackack, did you ever find a suitable 98 or 99 airbag to swap? how did it work? I don't like how my steering wheel doesn't match the black/black theme of my 97 CL, and wanted to put the MDX woodgrain on there, but not sure how costly/easy to find the centerpiece would be.
So, blackack, did you ever find a suitable 98 or 99 airbag to swap? how did it work? I don't like how my steering wheel doesn't match the black/black theme of my 97 CL, and wanted to put the MDX woodgrain on there, but not sure how costly/easy to find the centerpiece would be.
06-18-2007, 05:56 PM
#36
Suzuka Master
Thread Starter
The airbags are usually around 300 bucks. You just have to take the old wheel off, and install the new wheel by following the pics I posted
06-19-2007, 08:43 AM
#37
Senior Moderator
Regional Coordinator
(Mid-Atlantic)
Regional Coordinator
(Mid-Atlantic)
iTrader: (6)
Yup, finally found one for a decent price  Just waiting for it to get here, then I have to figure out where to get a steering wheel puller from. And don't buy that wheel that is WAY too expensive for a steering wheel
  I got mine for way cheaper
Just waiting for it to get here, then I have to figure out where to get a steering wheel puller from. And don't buy that wheel that is WAY too expensive for a steering wheel I got mine for way cheaper
06-24-2007, 04:54 PM
#39
10th Gear
Join Date: Sep 2004
Location: virginia
Age: 42
Posts: 10
Likes: 0
Received 0 Likes
on
0 Posts
finally got around to replacing mine. Took about an hour. I'll try and post some pics soon. Thanks for the write up. Only difference I found in the two steering wheels was the black cushion part used smaller screws, but i had some lying around that worked great.
05-20-2008, 10:02 AM
#40
5th Gear

Join Date: May 2008
Posts: 5
Likes: 0
Received 0 Likes
on
0 Posts
Does anyone know if this MDX steering wheel would fit into a 1998 CL? I'm also wondering whether it is the same shade of beige as the CL.
http://cgi.ebay.com/ebaymotors/ACURA...spagenameZWDVW
http://cgi.ebay.com/ebaymotors/ACURA...spagenameZWDVW