
DIY: Adjusting Valves in Acura MDX

Thread Starter
Moderator
Joined: Jan 2009
Posts: 6,509
Likes: 1,021
From: Baja, M�xico.
DIY: Adjusting Valves in Acura MDX
Hello folks!
This is probably the most lengthy and in depth DIY I have ever done, I will try to explain to the best of my capabilities how to adjust the valves on your MDX this DIY works for all the 2G MDX (2007 to 2013) bear in mind the 2010-2013 has a different head valve train setup the steps are virtually the same just some visual differences.
The J-Series engine is almost universal in this procedure so you can apply this guide (With some modifications) to almost any Honda & Acura product with a V6 J-Series. 1st Gen MDX and Even the 3rd gen MDX should not be too far off the bat of this guide.
First off..
When you should adjust the valves?
Honda & Acura say "Adjust when Noisy" but this is a very bad approach. Since the only valves that will get noisier with time are the Intake Valves, The Exhaust Valves will wear out its valve seats and valve stems which will lead to become Tighter... Tighter Valves are far too dangerous as they can destroy your Engine Head. So its a good advice to adjust your valves with the 105K Service, Do not wait until "They are noisy".How difficult it is?
Its not really too difficult more than it is very time consuming. Don�t take me wrong, You can mess this thing up to the point of damaging your engine.. So as in most DIYs I take absolutely no responsibility if you mess up your engine while making a mistake using this Guide. If you follow this guide correctly you should have no issues at all.
What do I need?
The tools you will need are already probably in your tool box.. There is only 1 special tool you can get but its not required and that is the "Valve Adjustment Tool" that is basically a Flat Screwdriver and 10mm Wrench Combo in 1.. If you have both of these in your tool box you don�t need the special tool at all.These are the tools I used and Info:
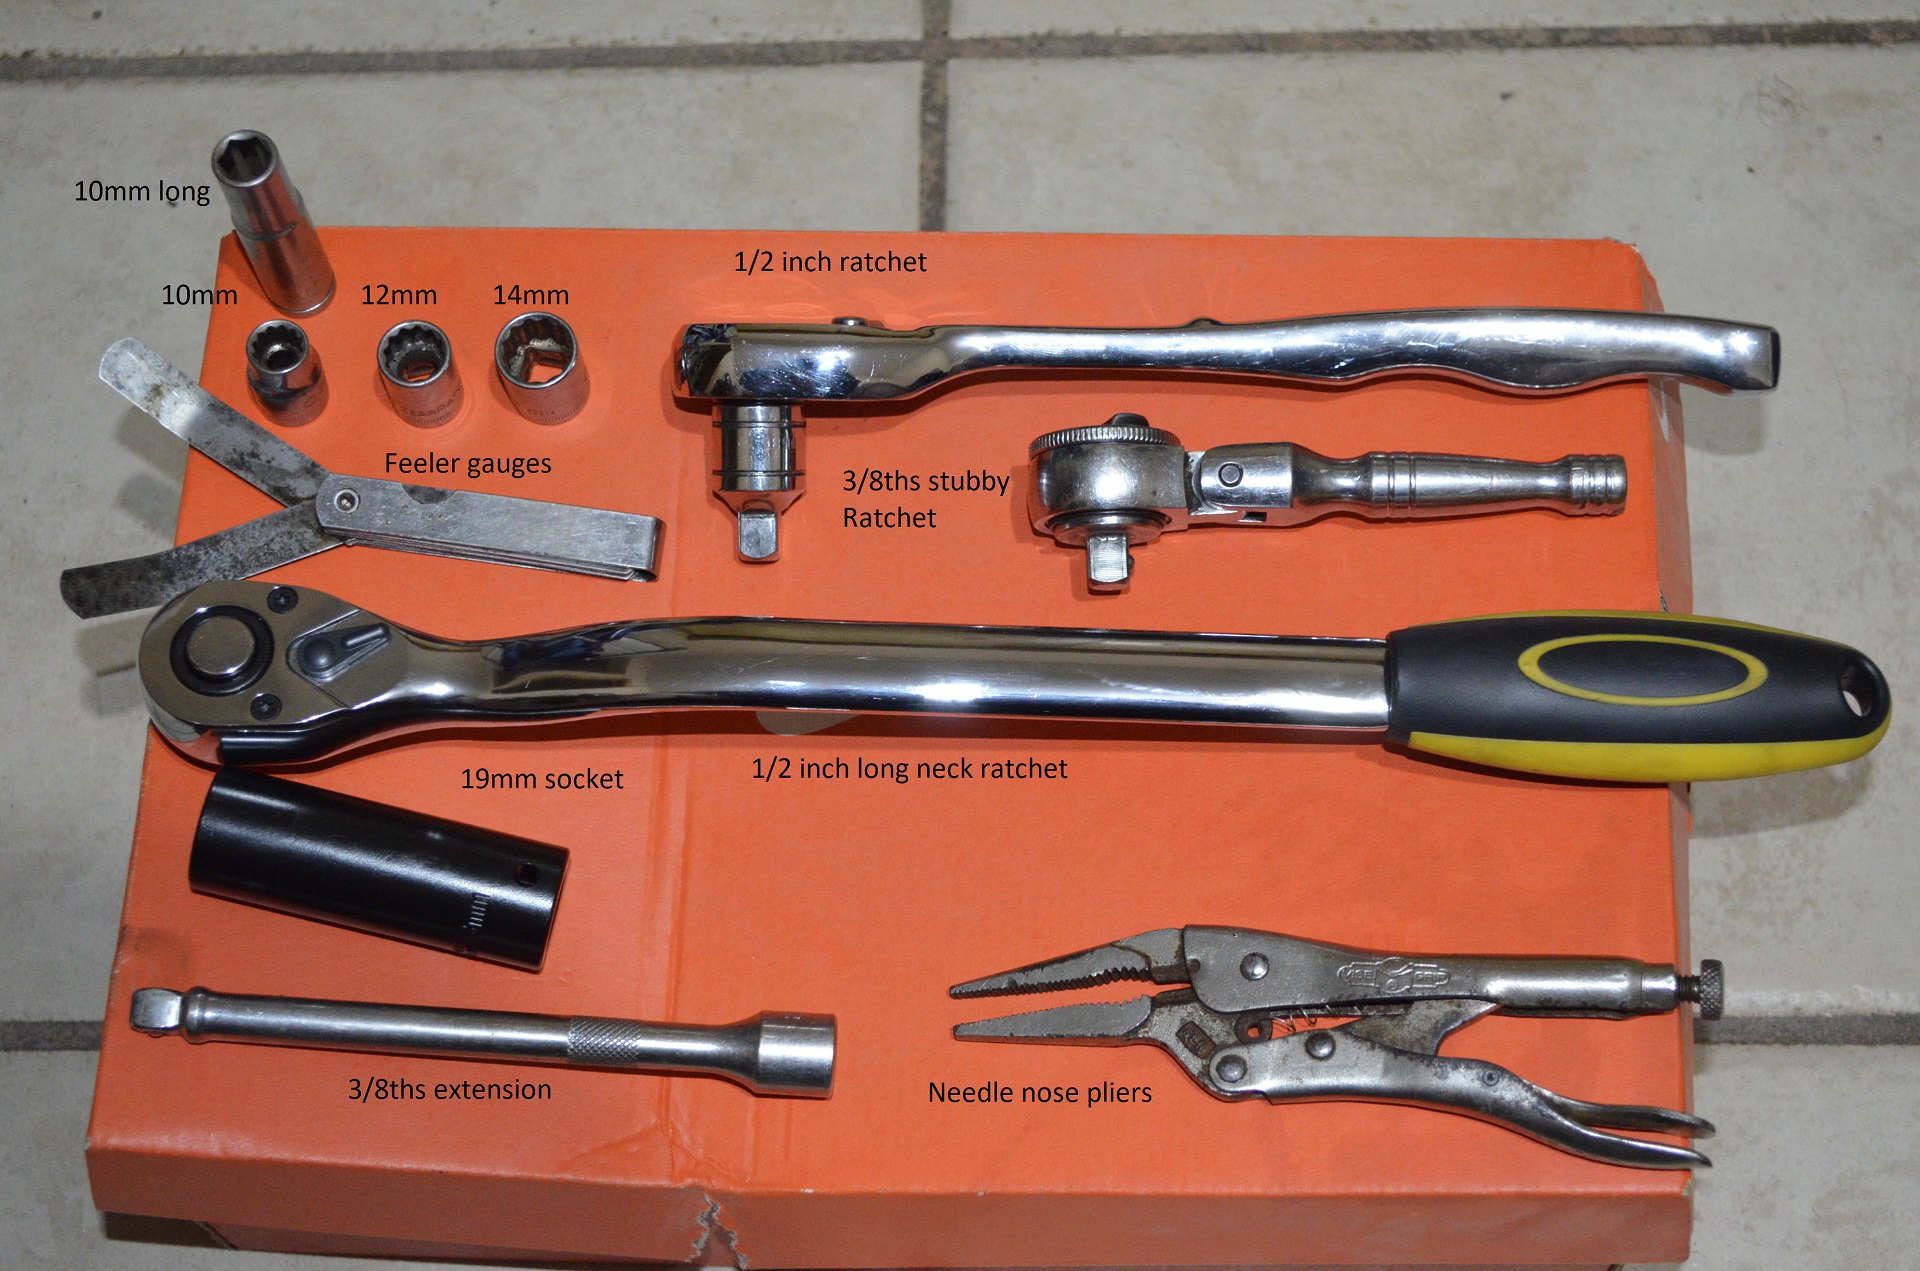
(NOT PICTURED HERE: 10mm closed end wrench and small flat screwdriver, They are pictured below. Torque meter for the Manifold Cover, Intake Manifold bolts and Throttle Body).
Both feeler gauges are: 0.22mm and 0.30mm in thickness.
Torque Specs:
Manifold Cover Bolts 8lb-ft
Intake Manifold Bolts 16lb-ft
Throttle Body Nuts and Bolts 16lb-ft
Most of the bolts and nuts are 10mm and 12mm, You can remove the front wire loom bracket to makes some room and it has a bigger 14mm bolt. Otherwise you can do all of this job with 10 and 12mm sockets.
Now the STEPS:
First off you have to remove your engine plastic cover, If you do not know how to do this its probably for the best to STOP and let a professional mechanic do this job.. If you know how to remove it then proceed ahead.
1.- Unplug the MAF and MAP Sensors:

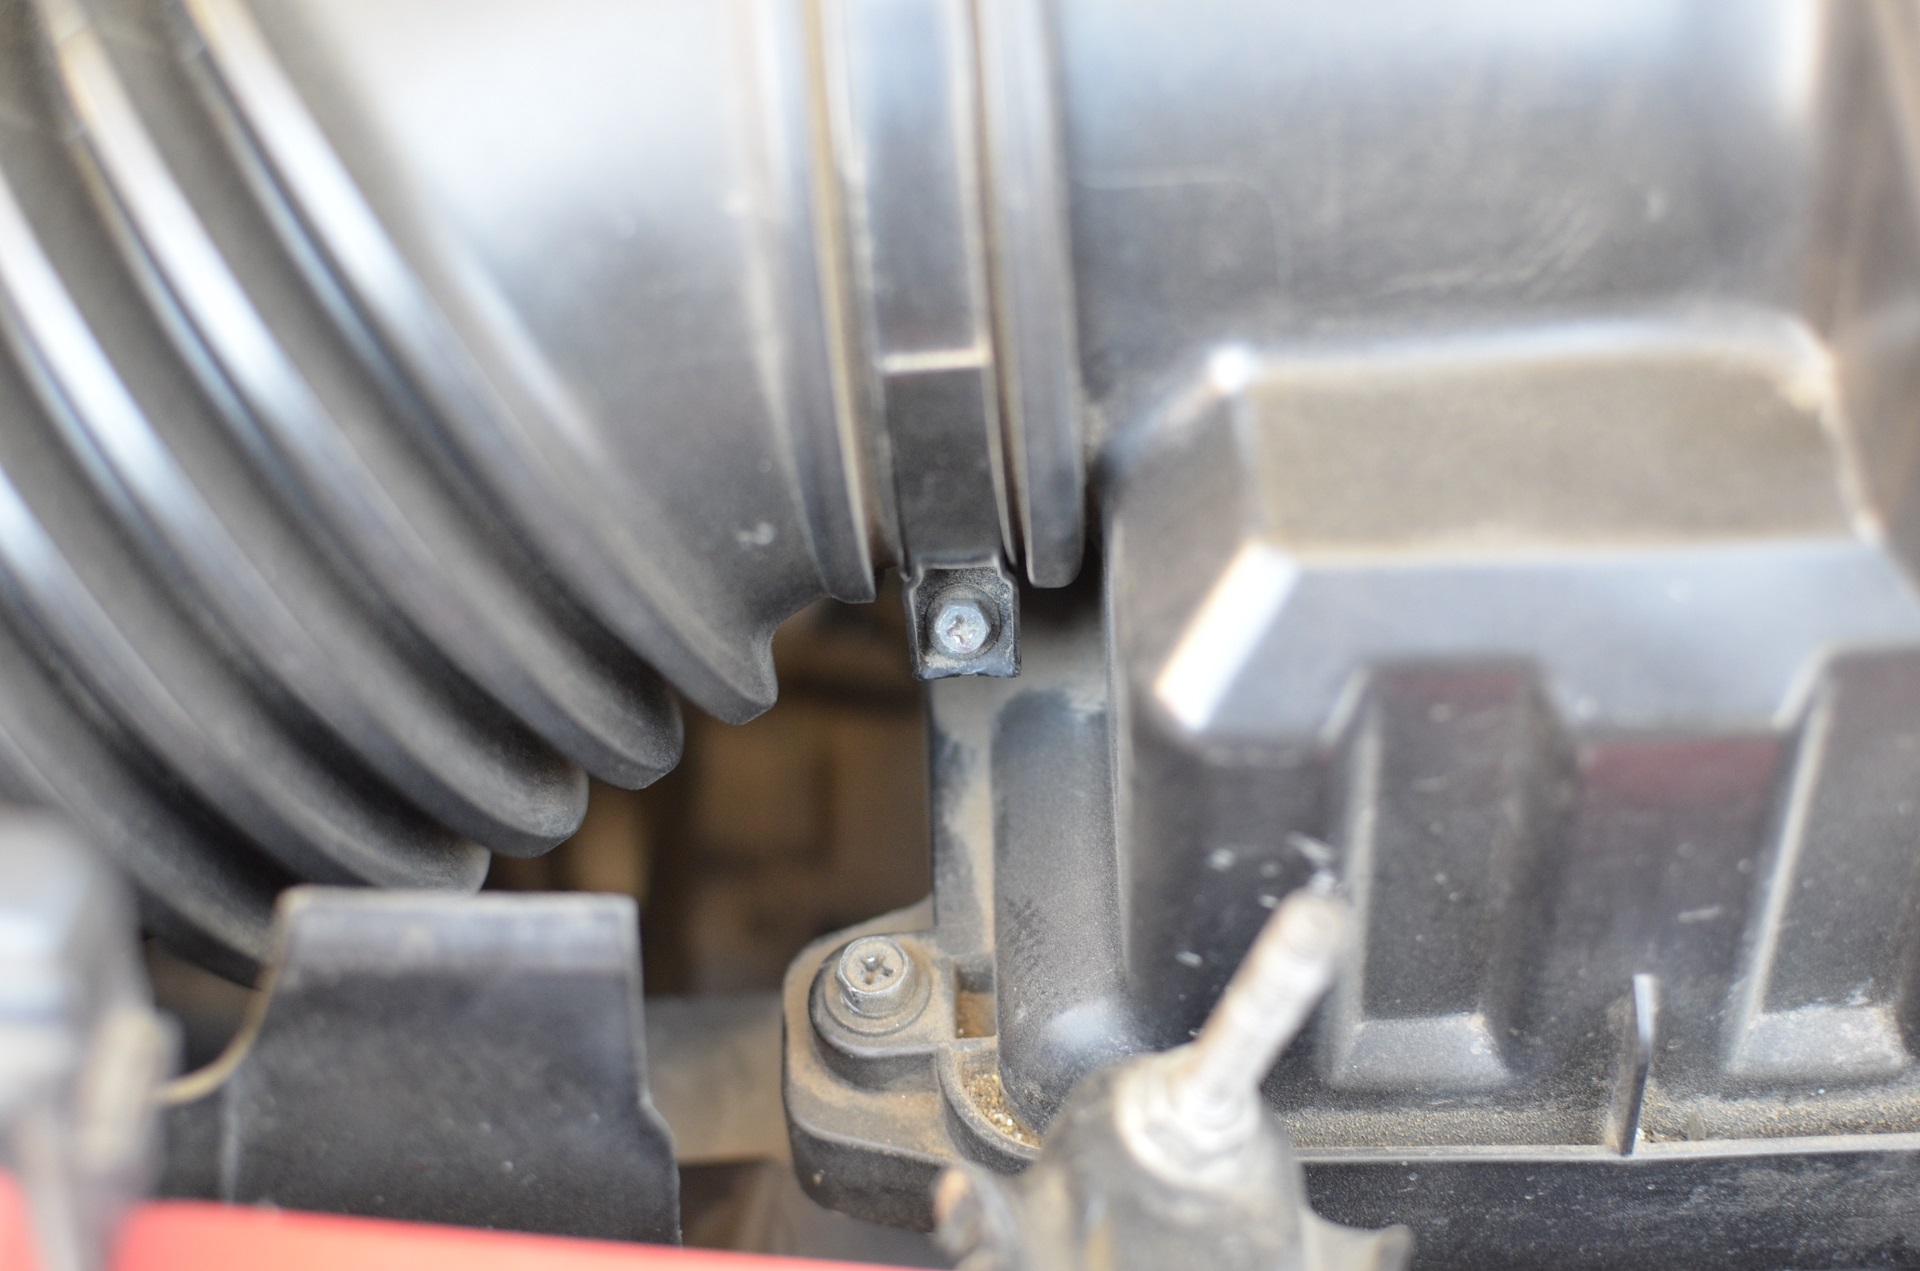
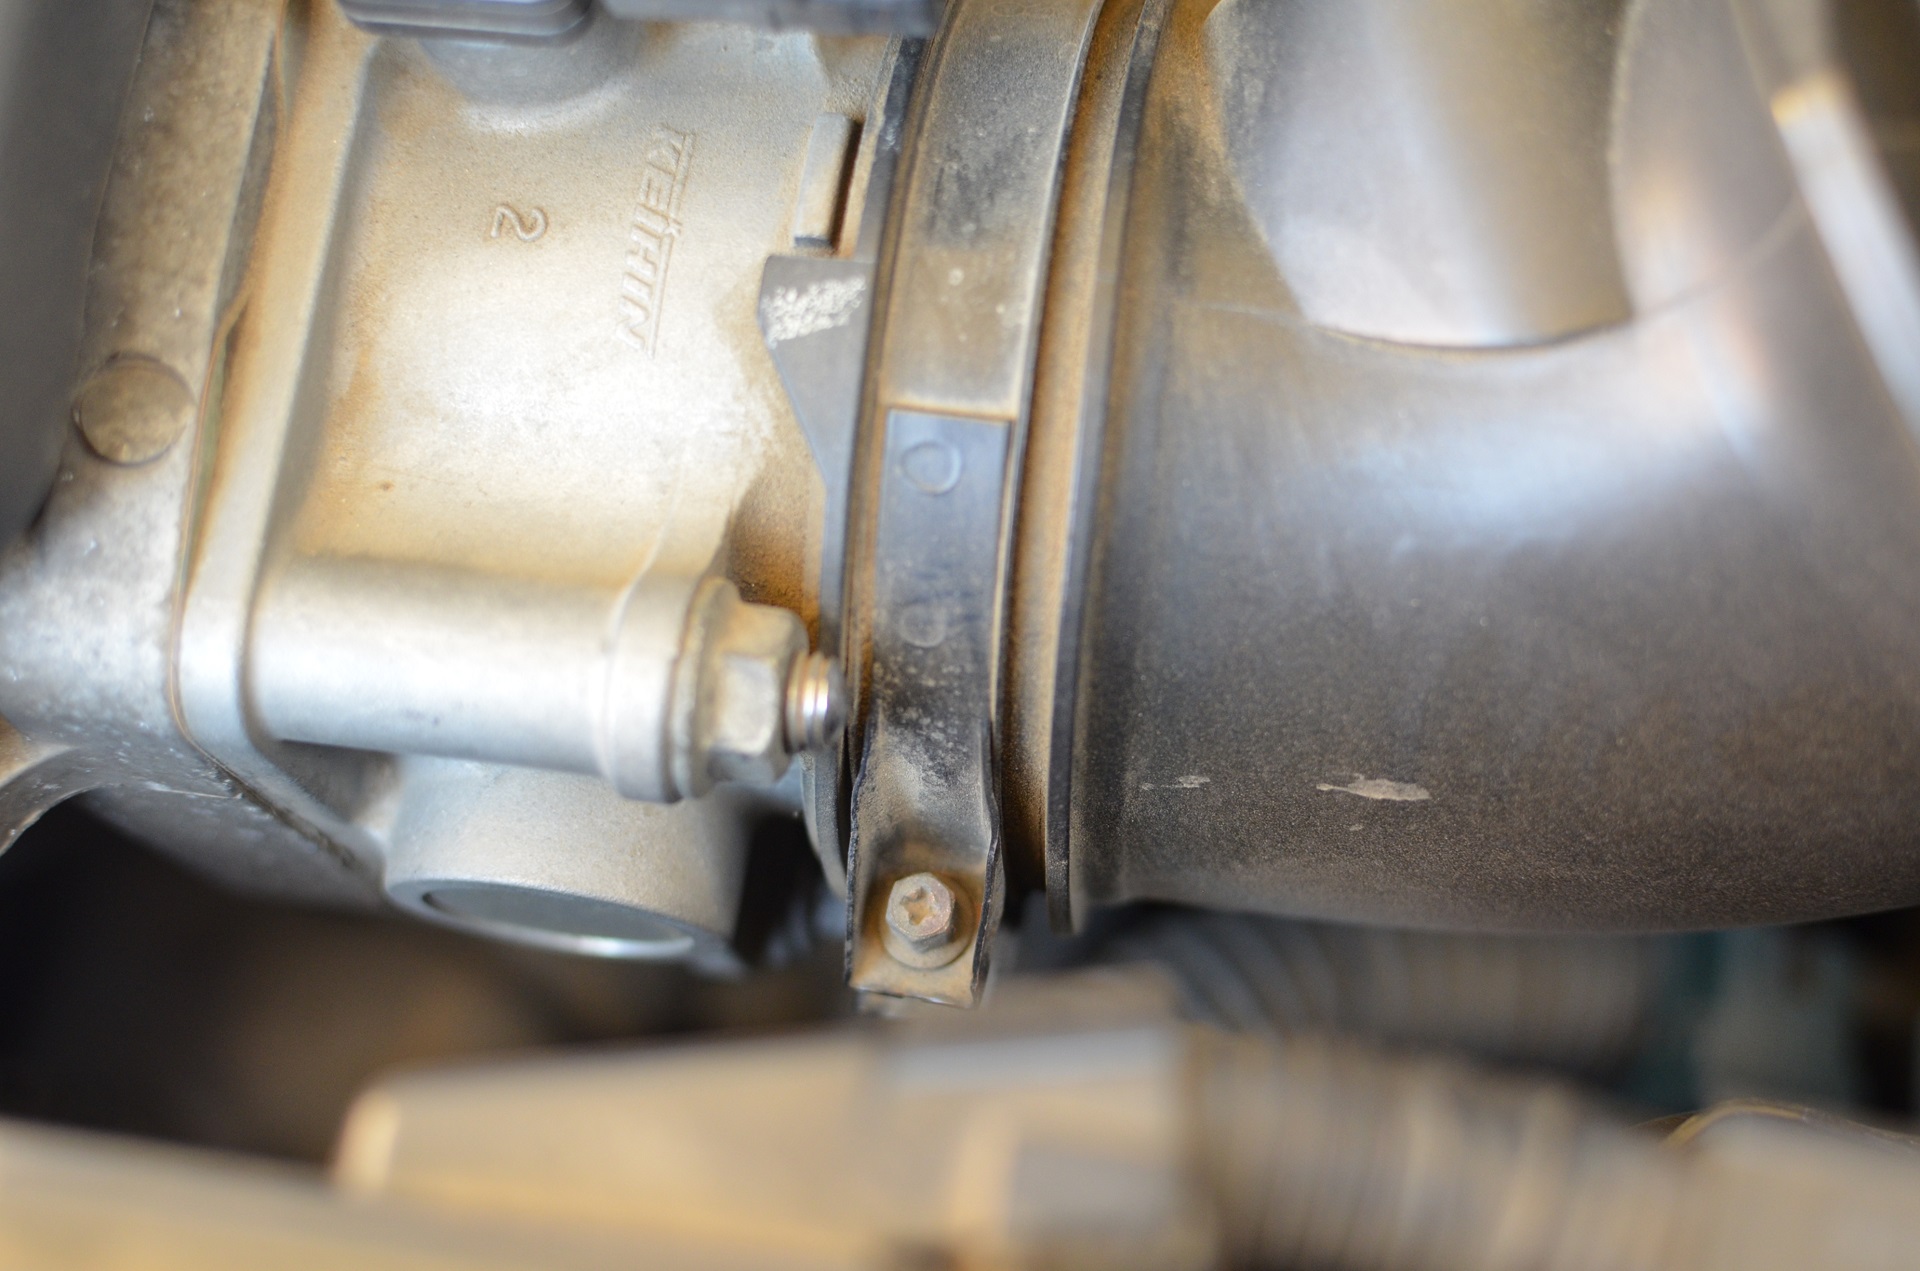
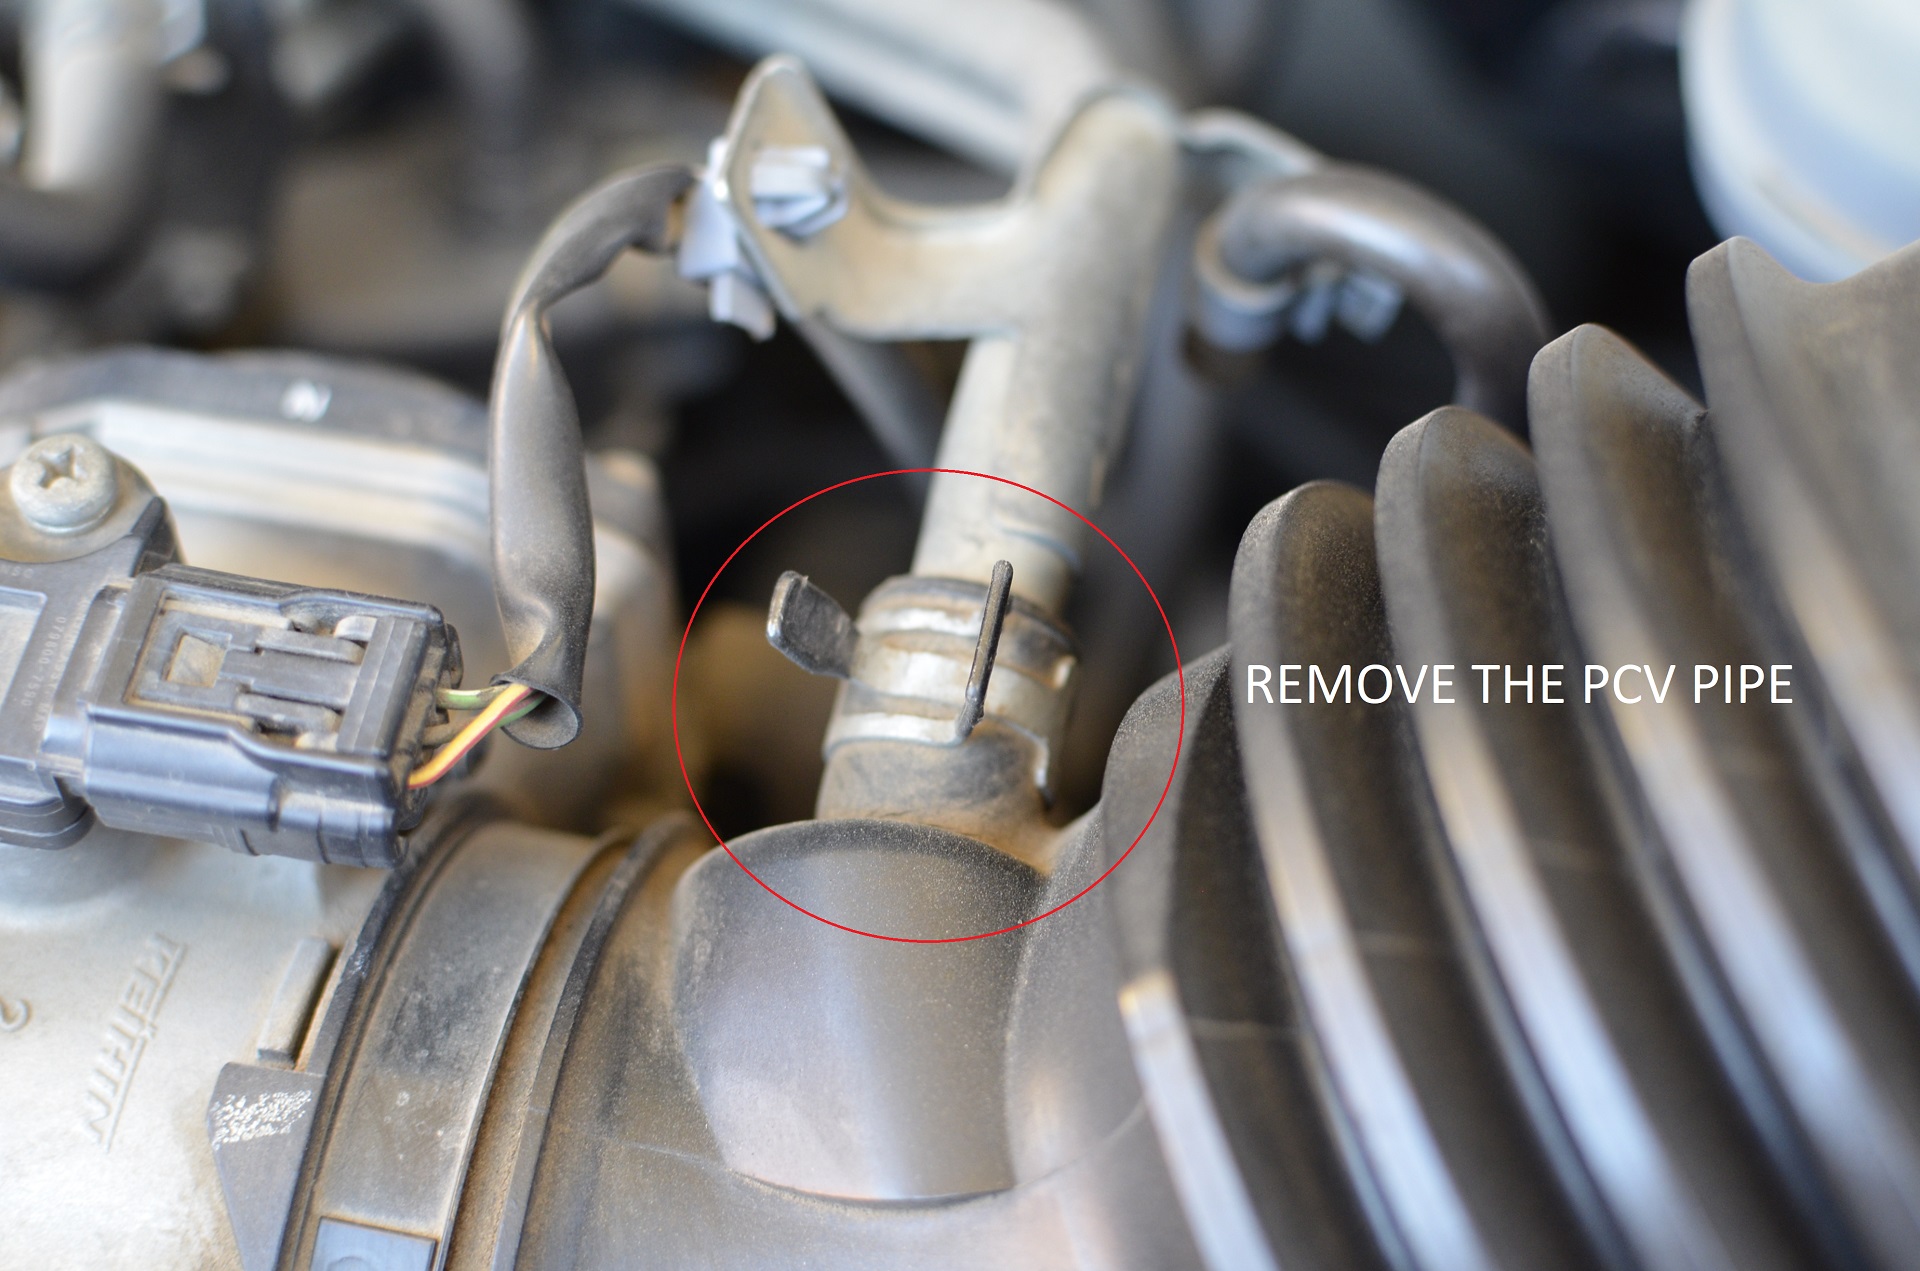
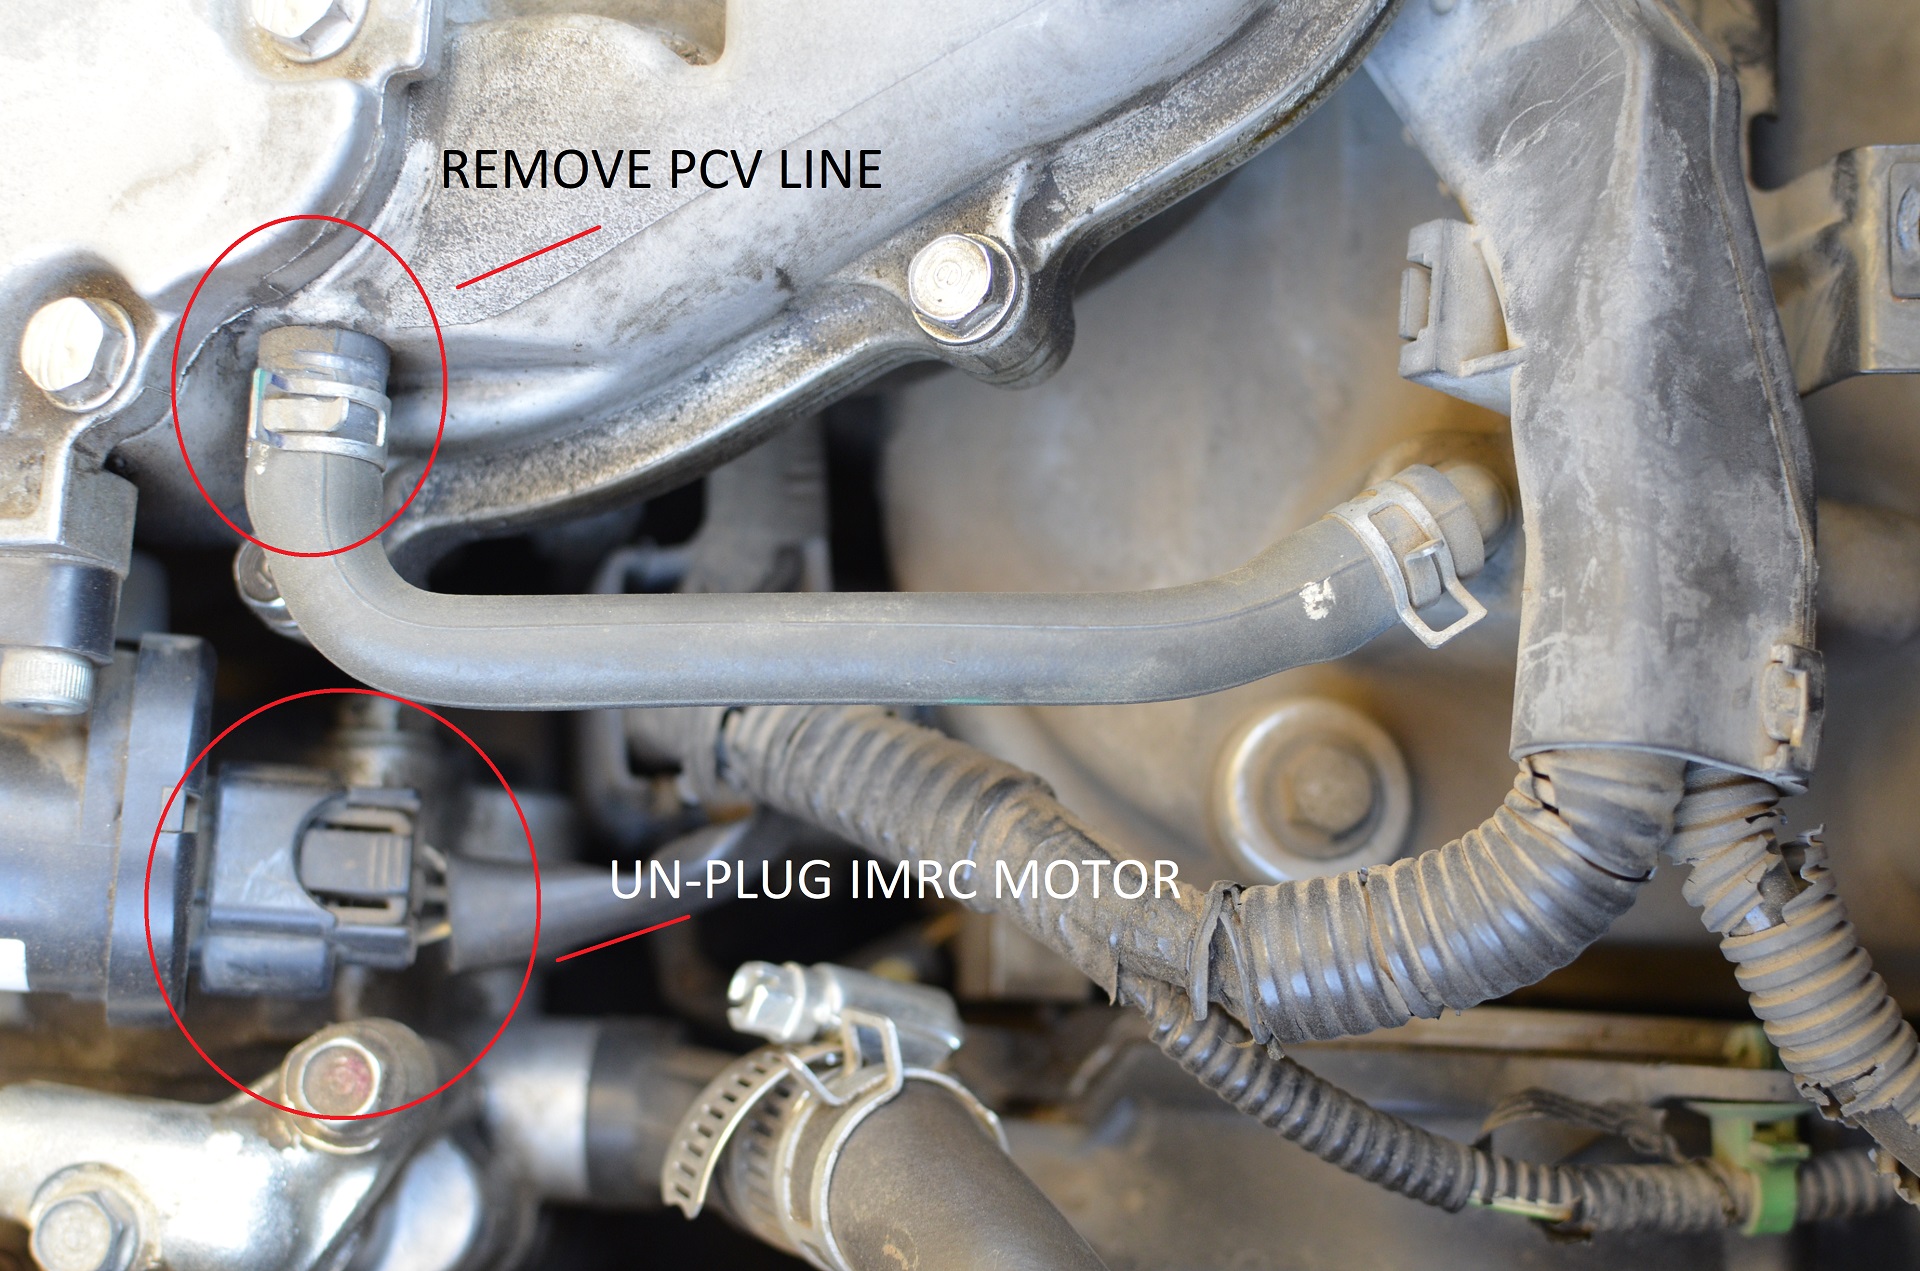
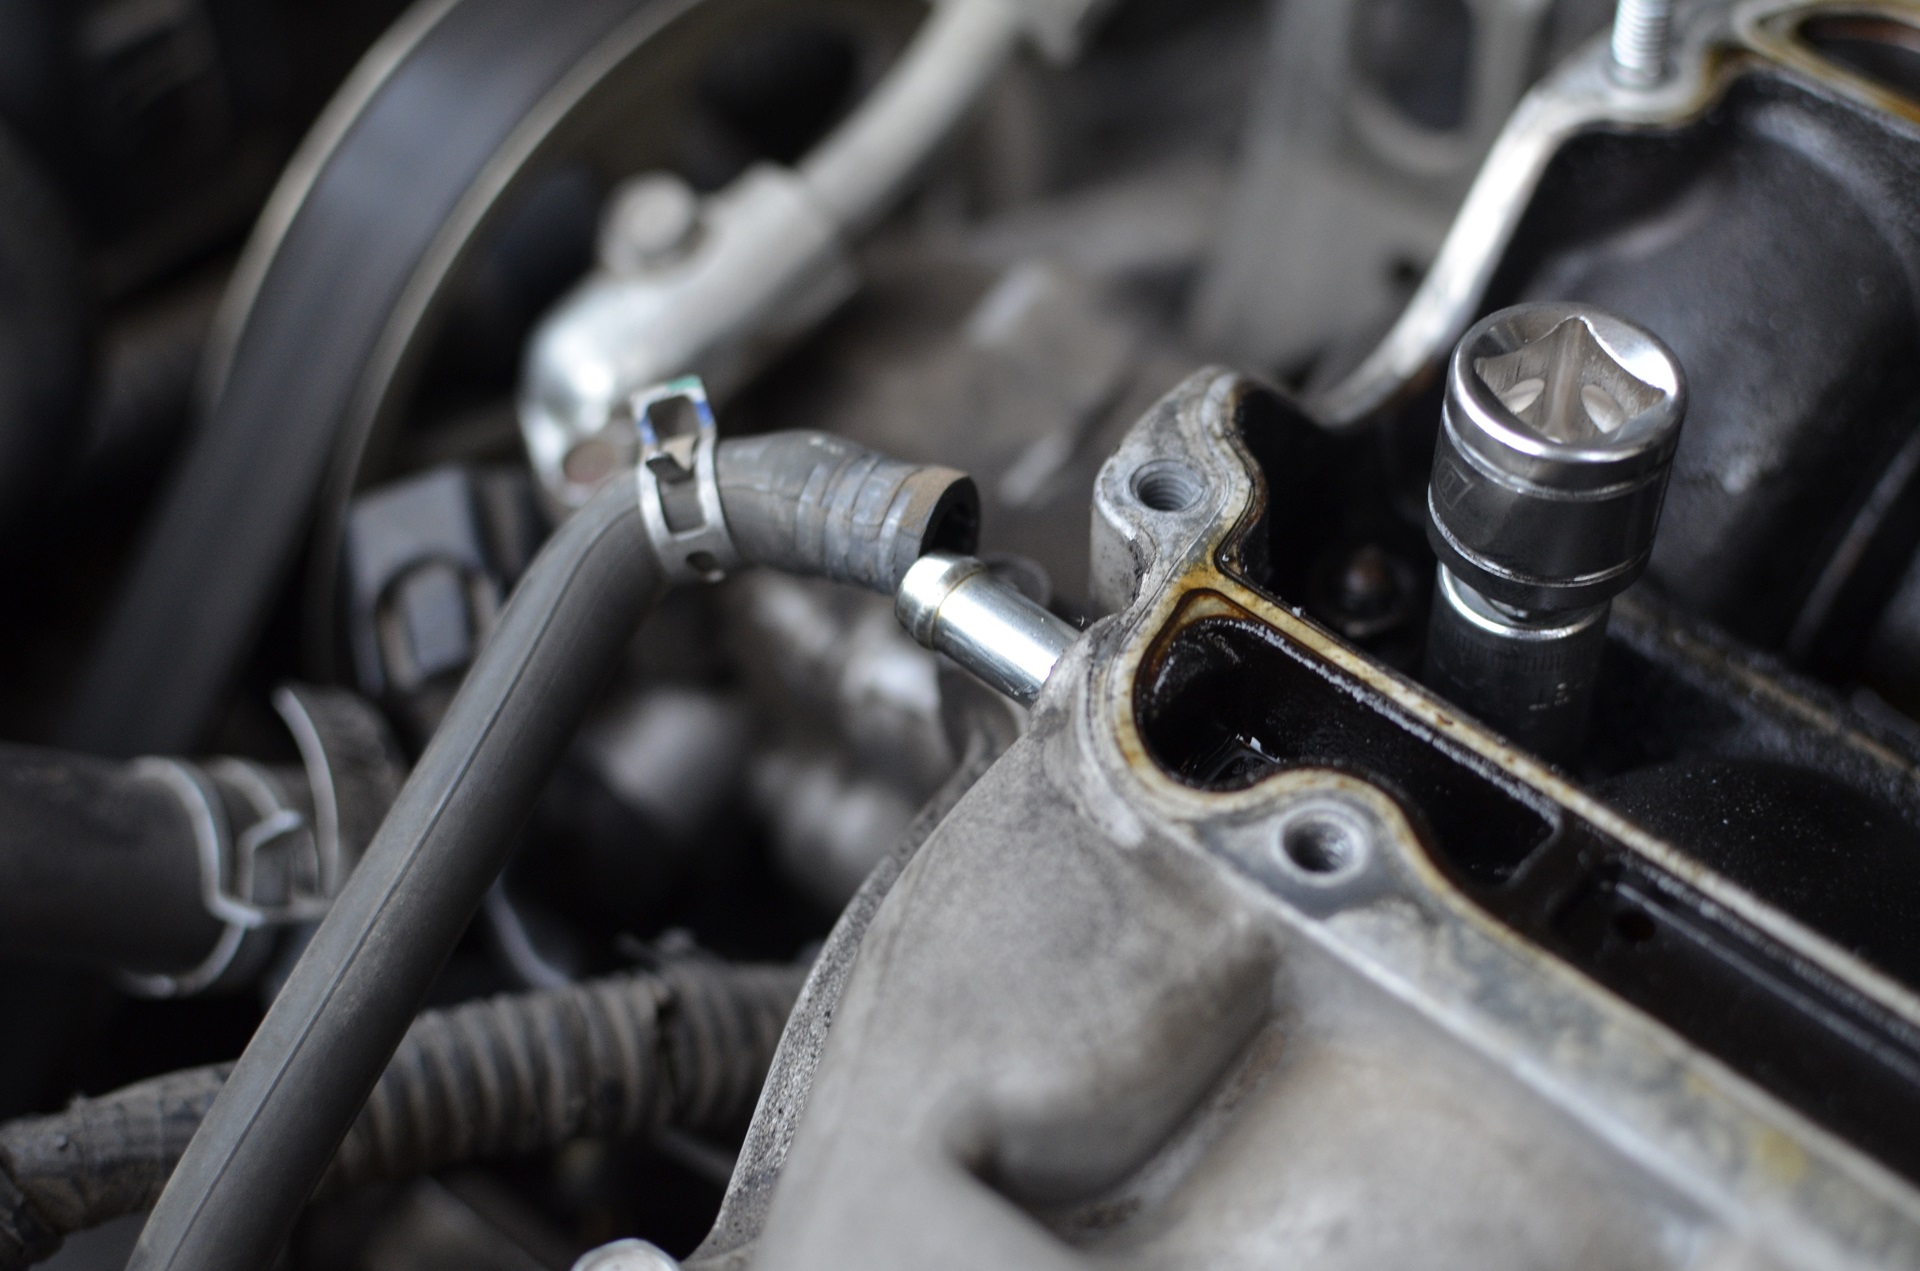
2.- (Not Pictured Remove the Air Filter Cover) Remove the Air Intake tube by removing the 2 Philips screw straps and remove the PCV Line:
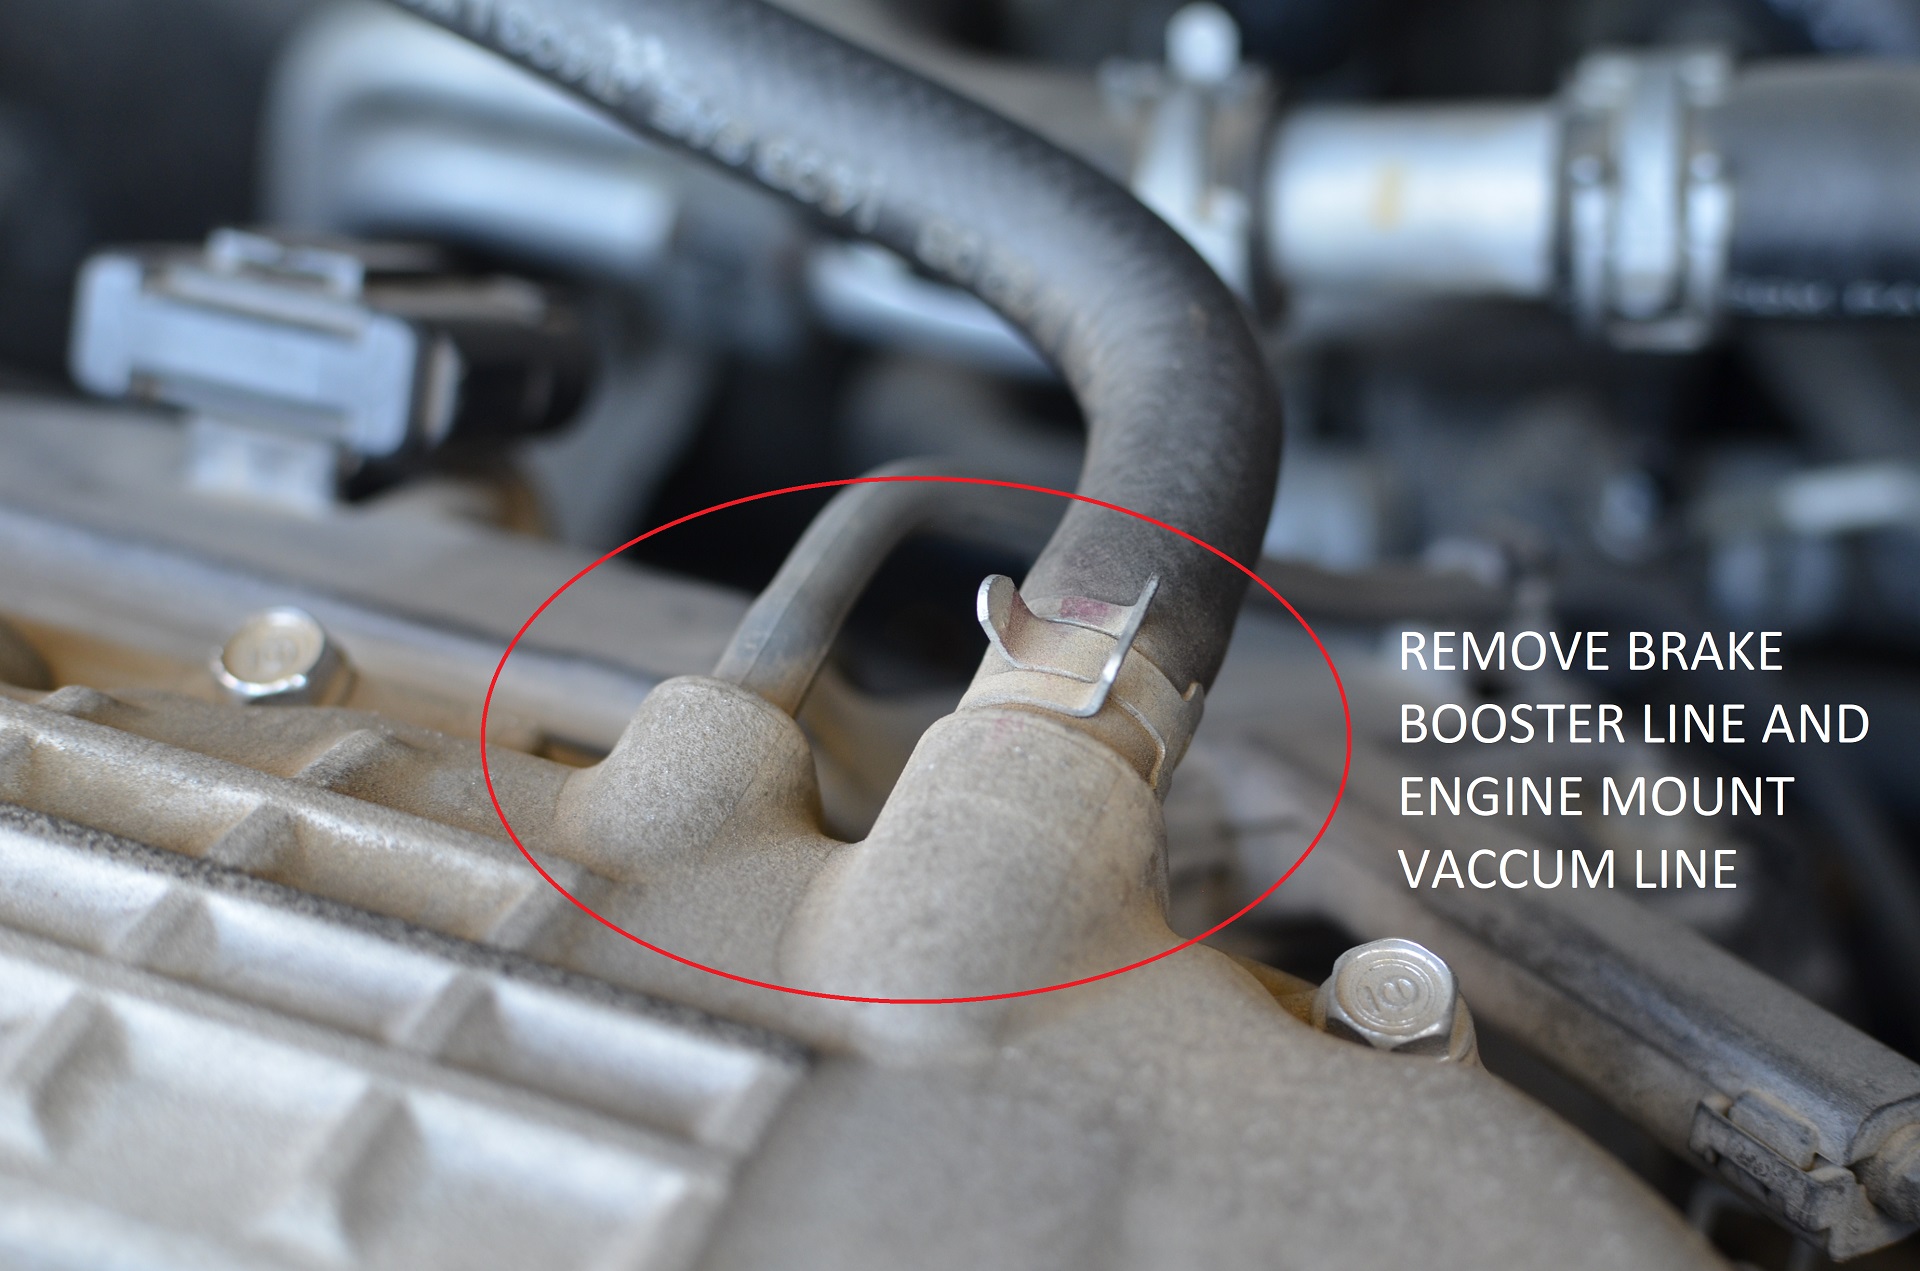
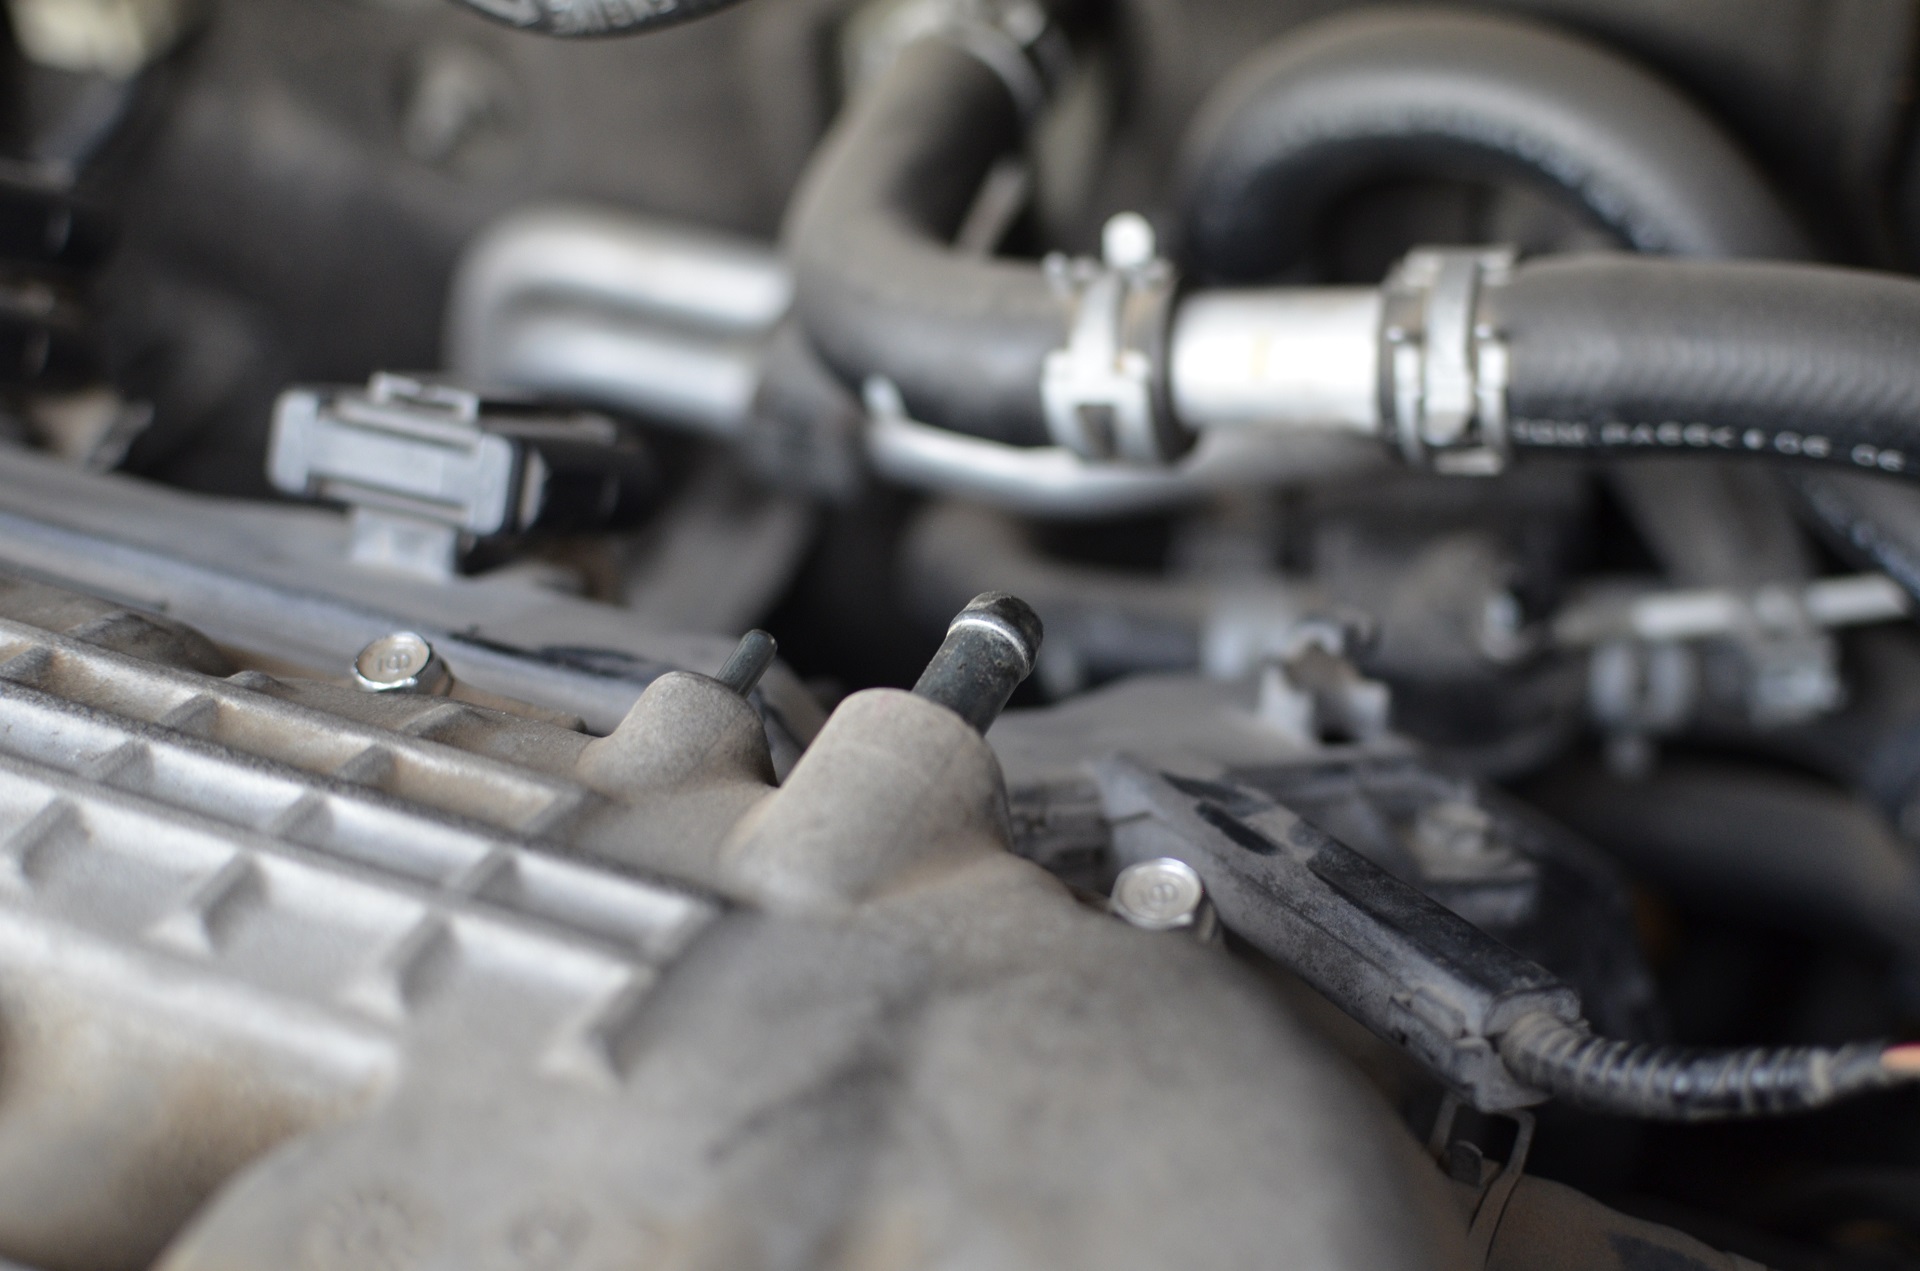
3.- Disconnect IMRC Motor and all Manifold PCV Lines (Brake Booster, Engine Mounts, Front PCV Line):
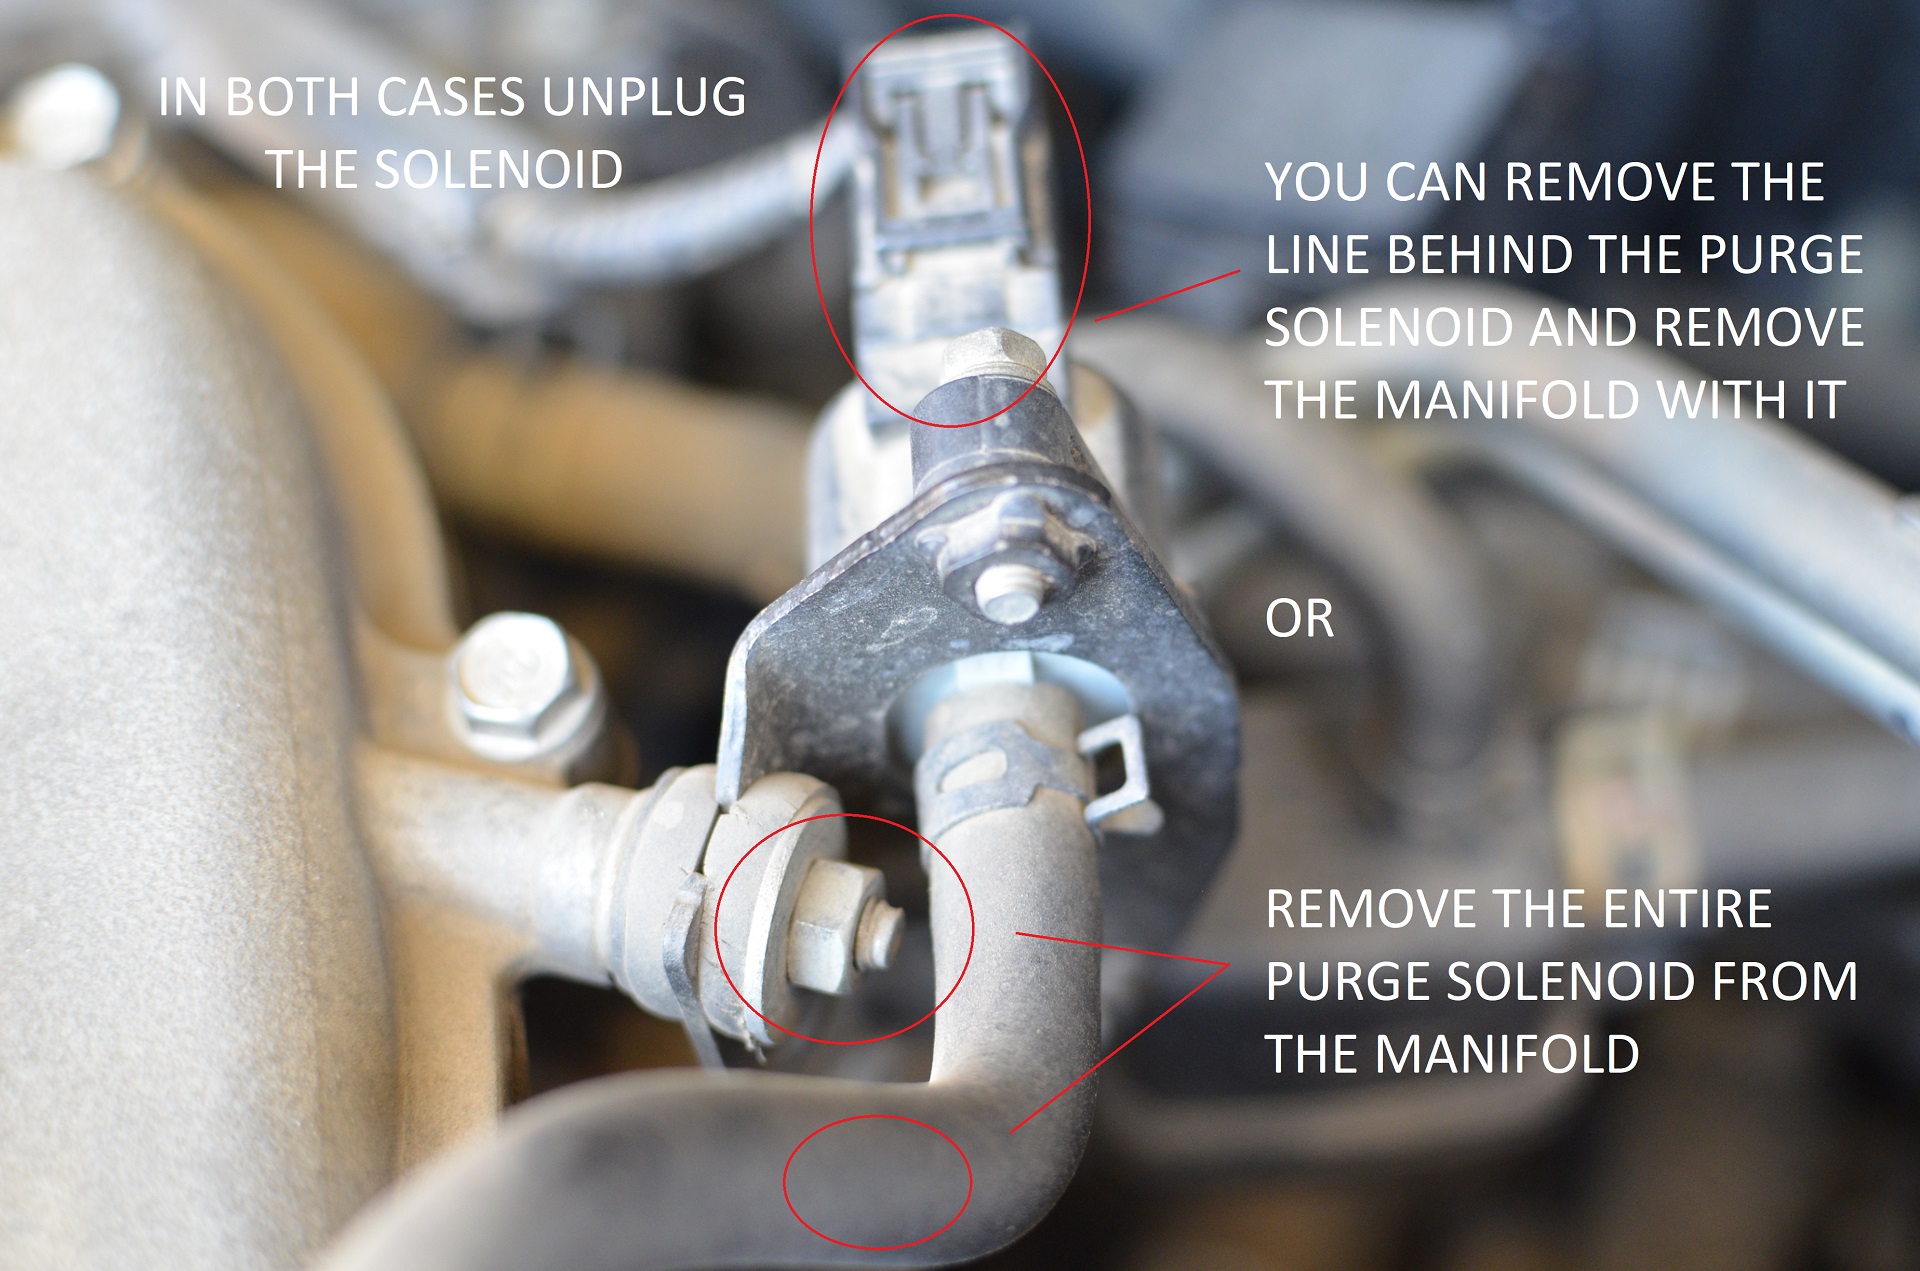
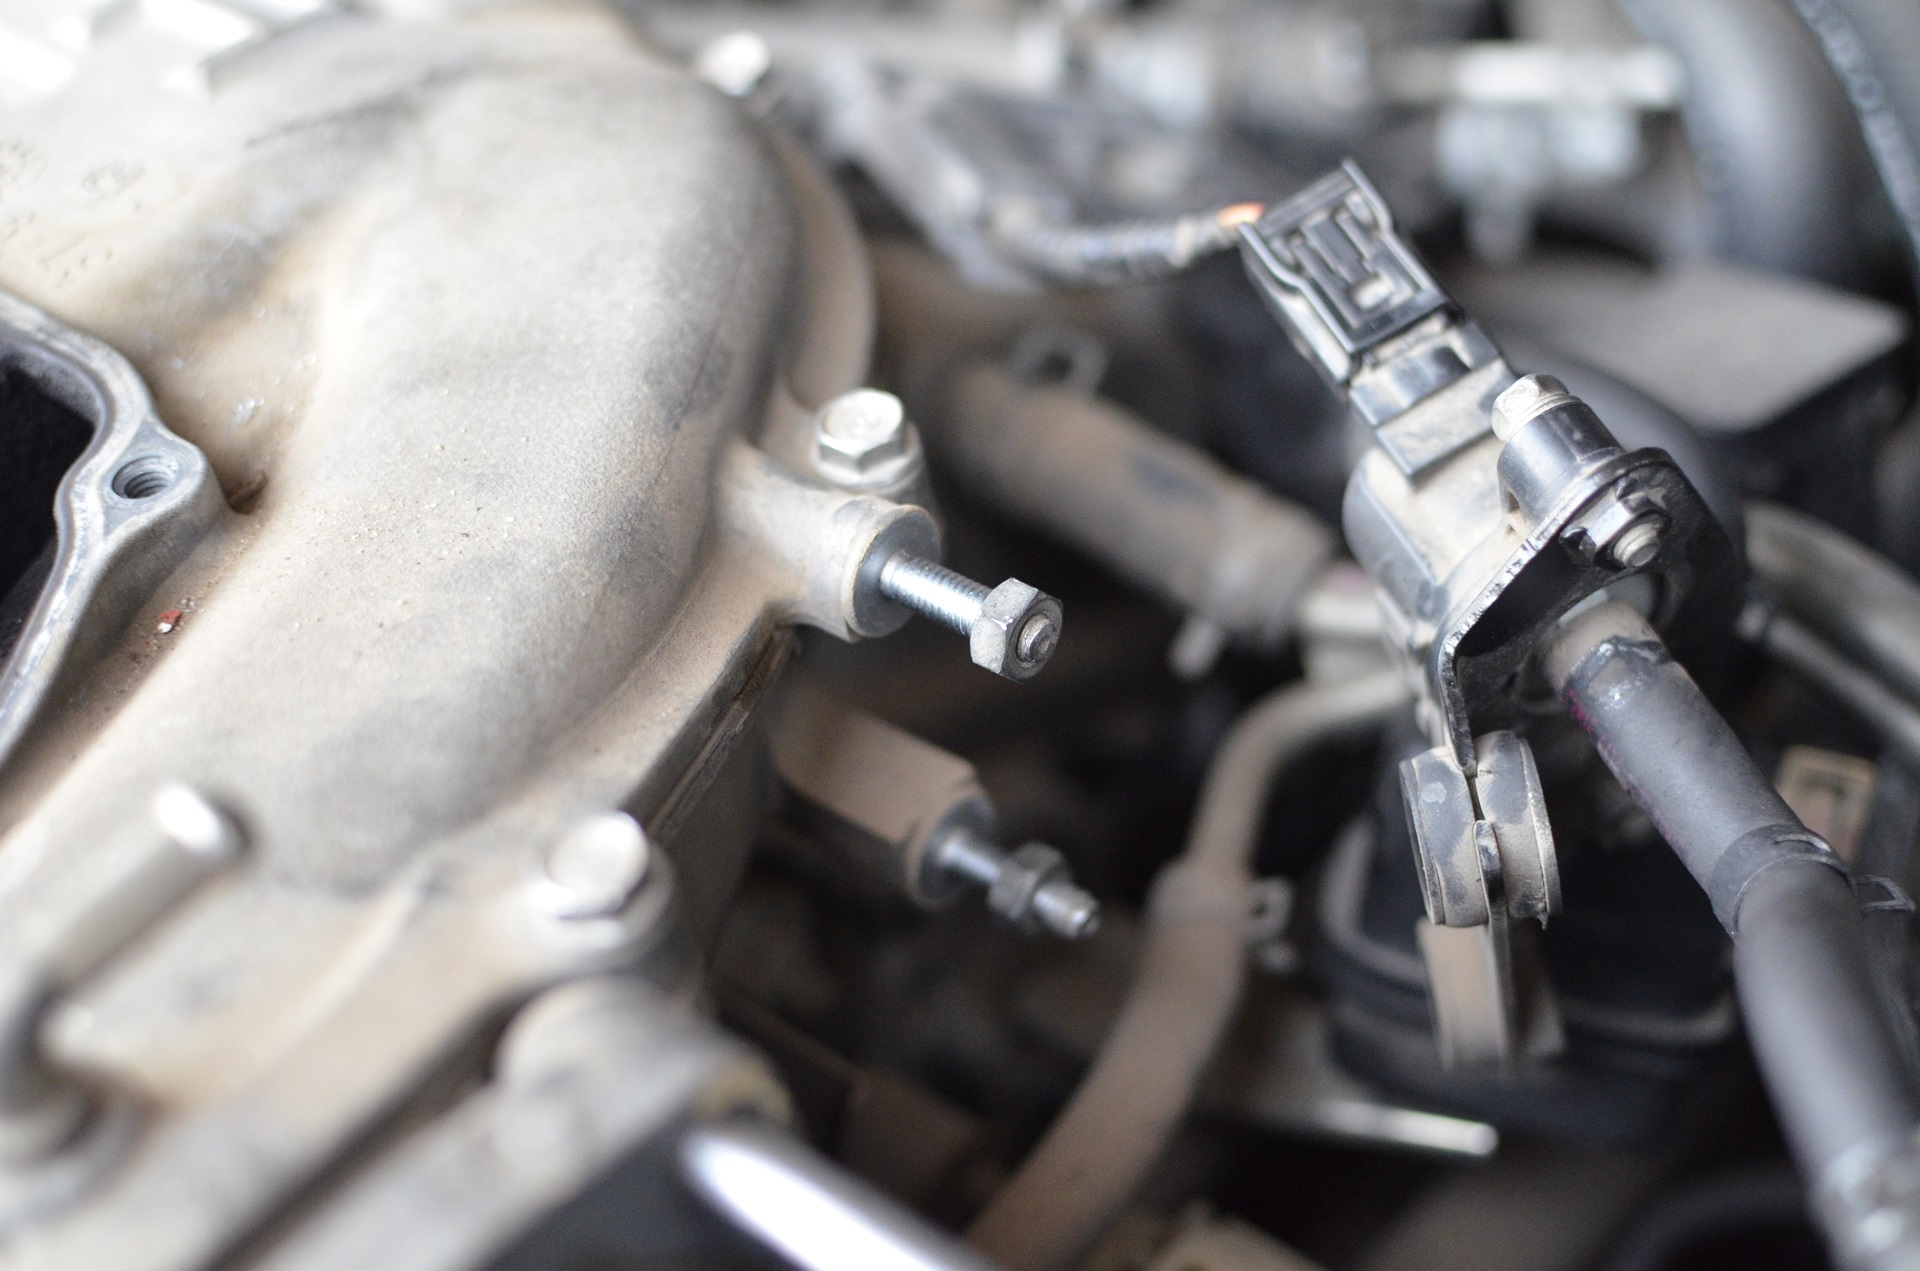
4.-Remove the Purge Valve Solenoid:
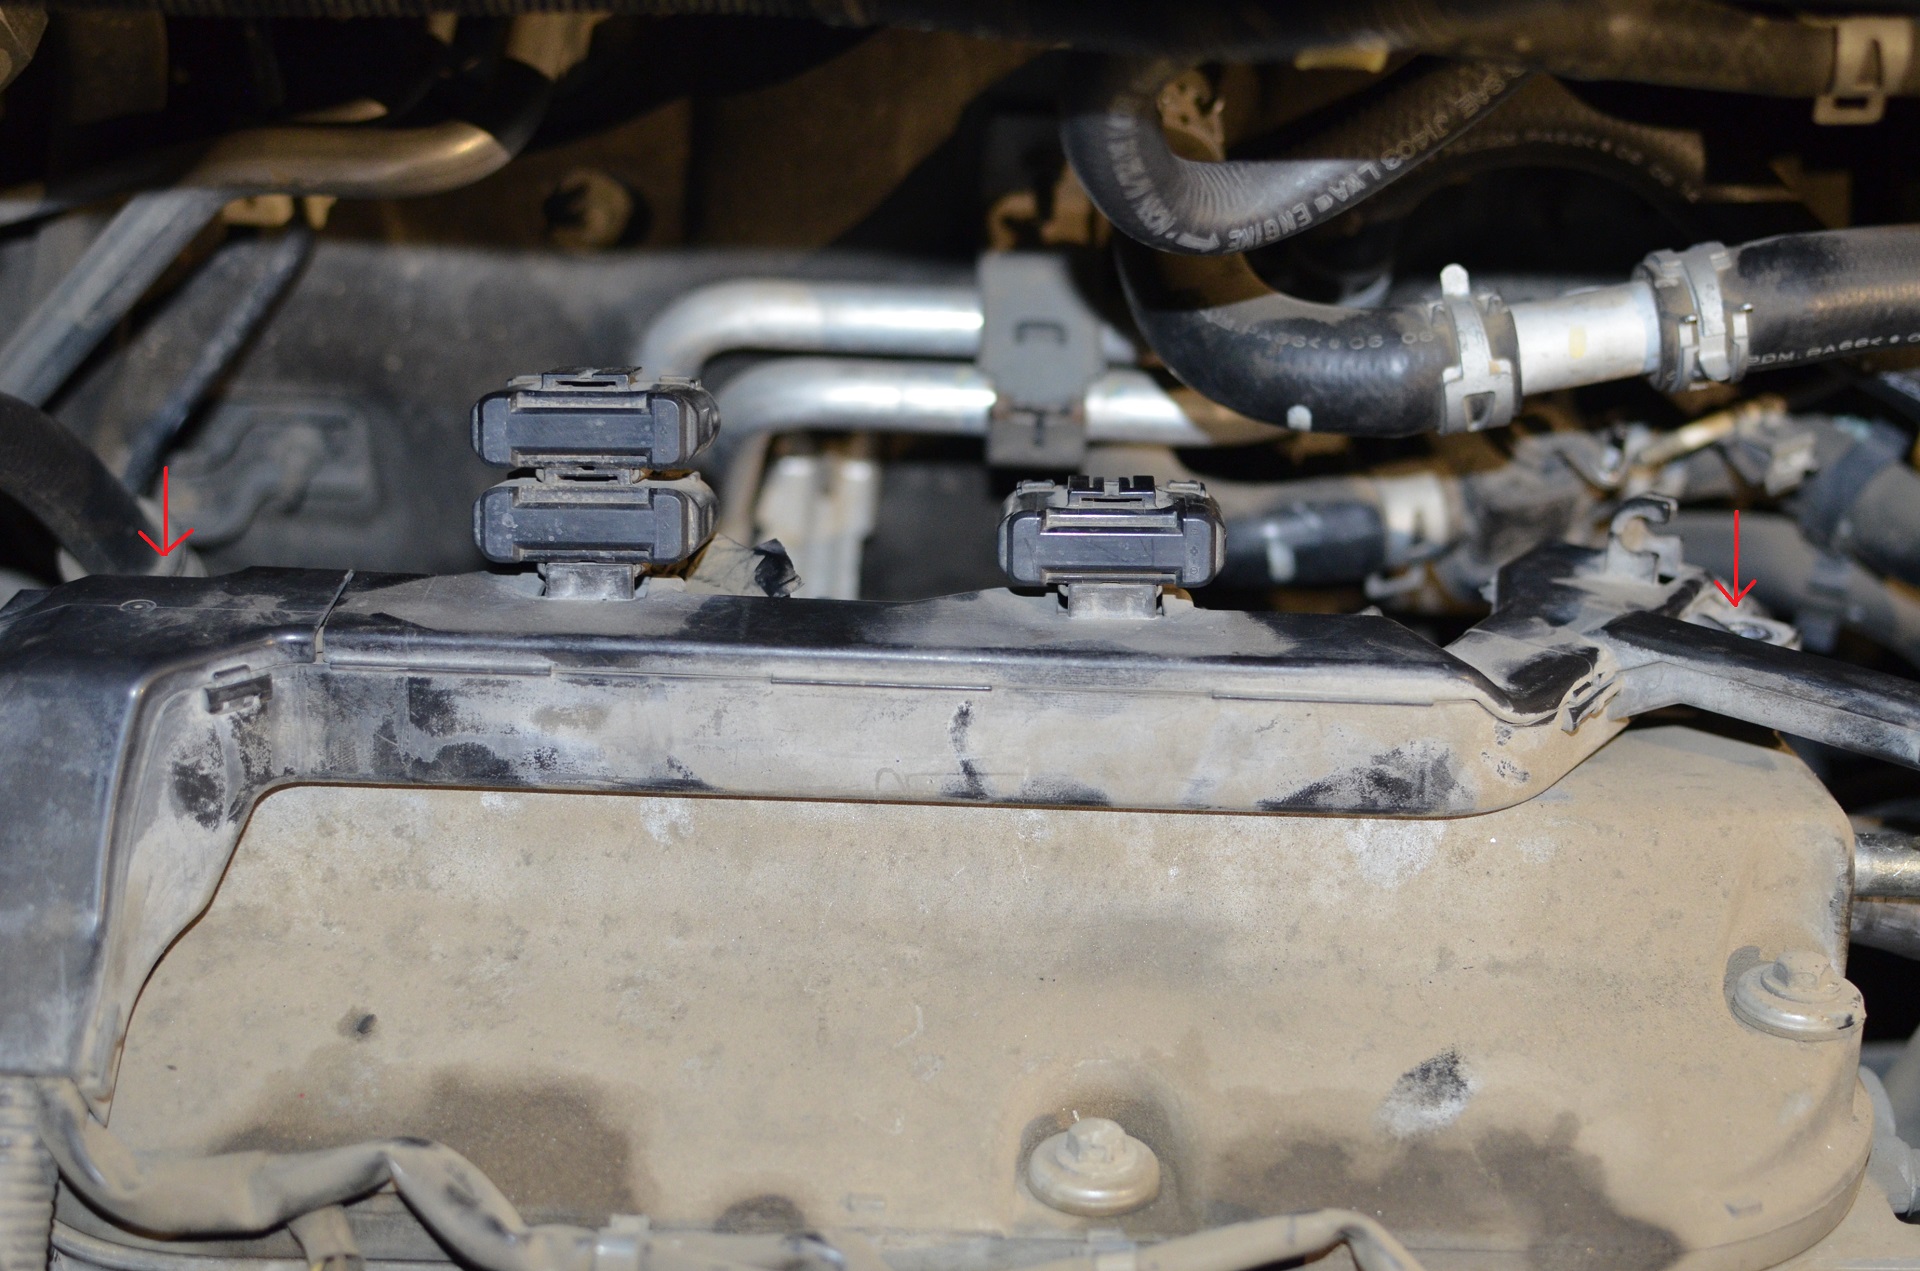
5.-Remove both valve cover wire looms, They all use 10mm bolts, Disconnect the coils and remove them:
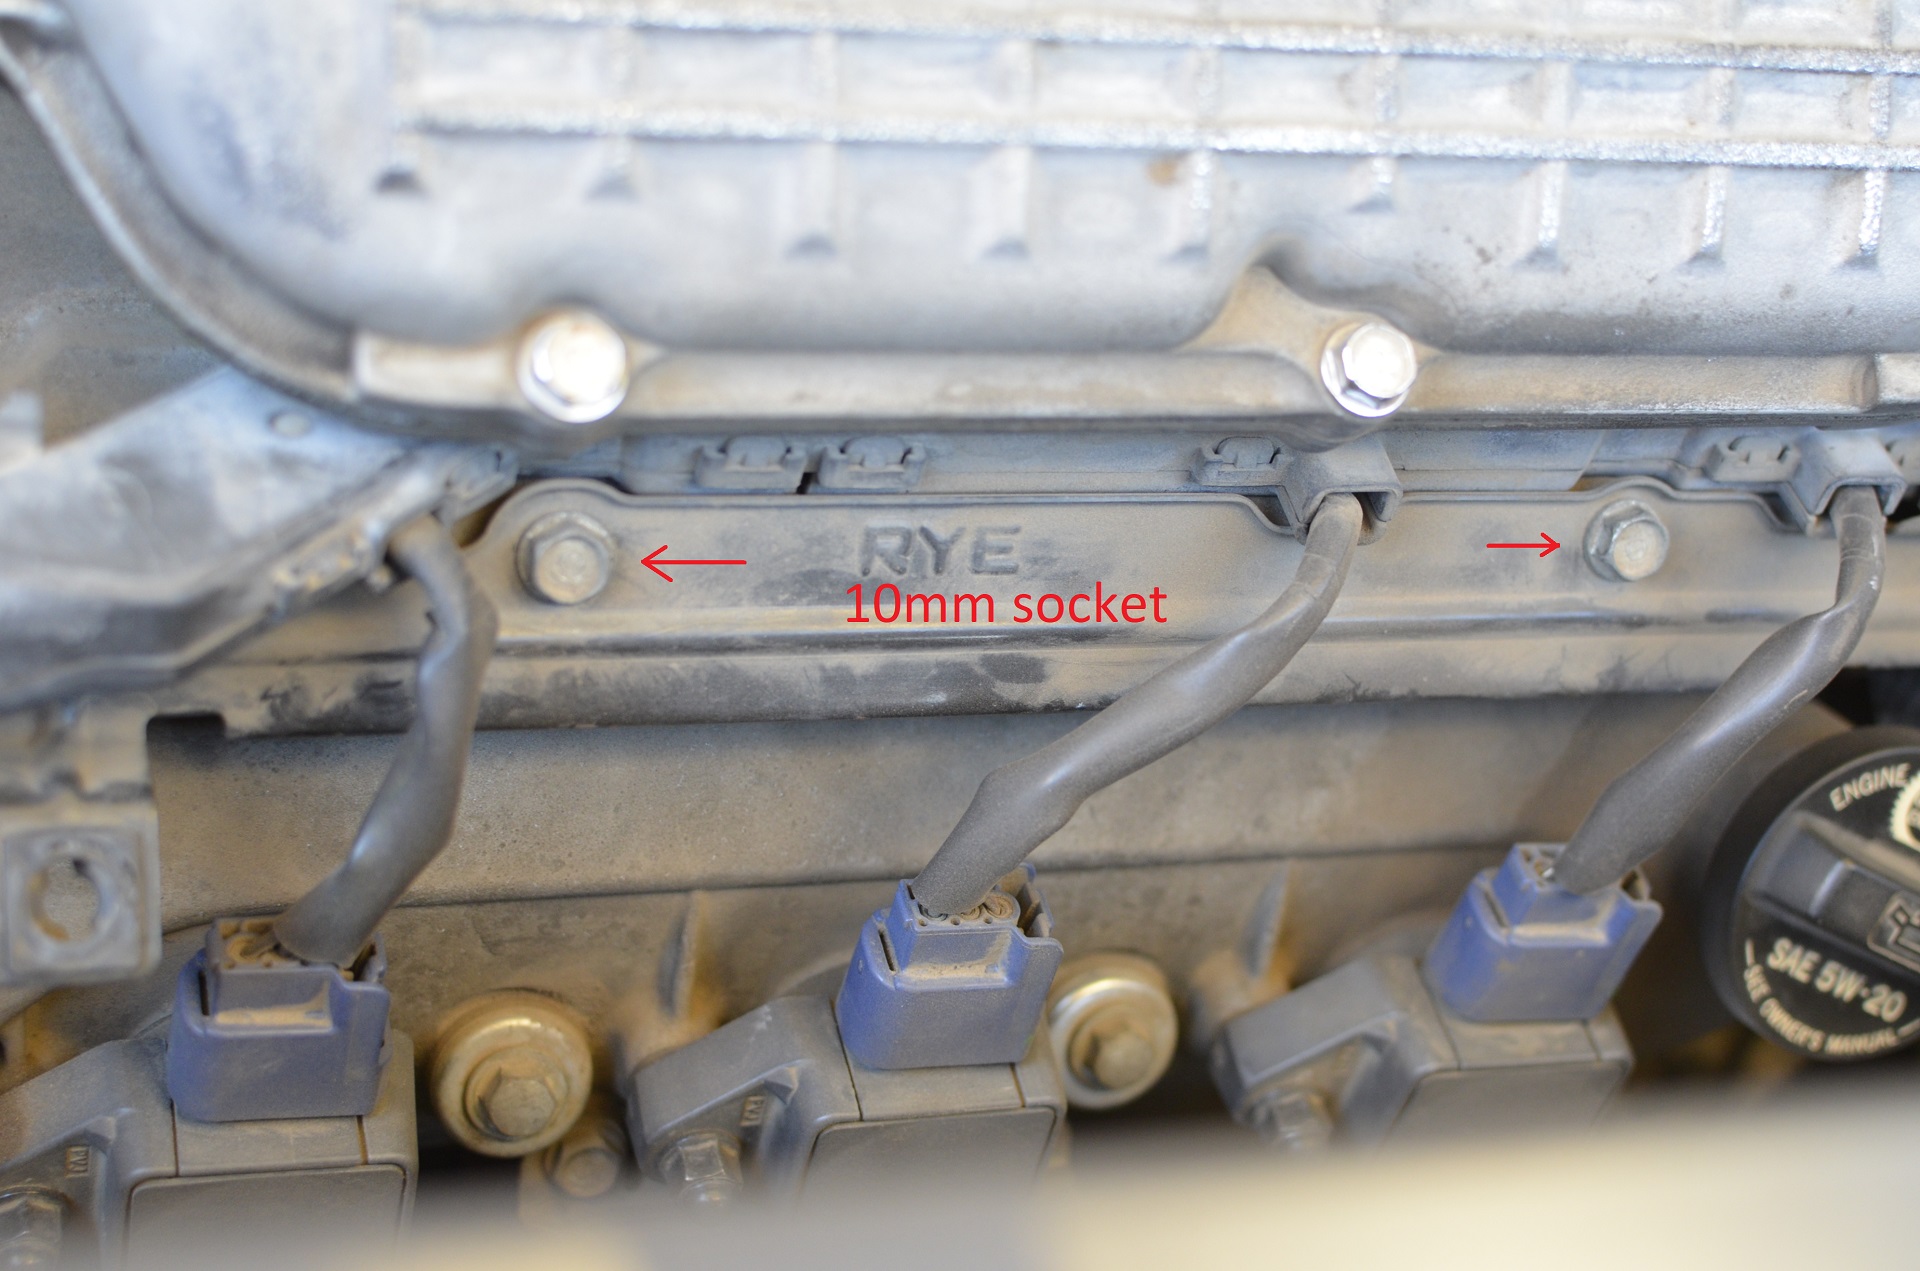
Rear, Uses 3x 10mm bolts the ones on the arrows and 1 (Not Pictured) PS bracket holder bolt that is holding the PS Line to the rear valve cover:
I
nformation:
Reason why its a PITA to remove the TB completely is because of the coolant lines it has to warm itself up. If you plan to remove the Manifold with the TB in place you will have to purge the radiator afterwards and replace coolant:
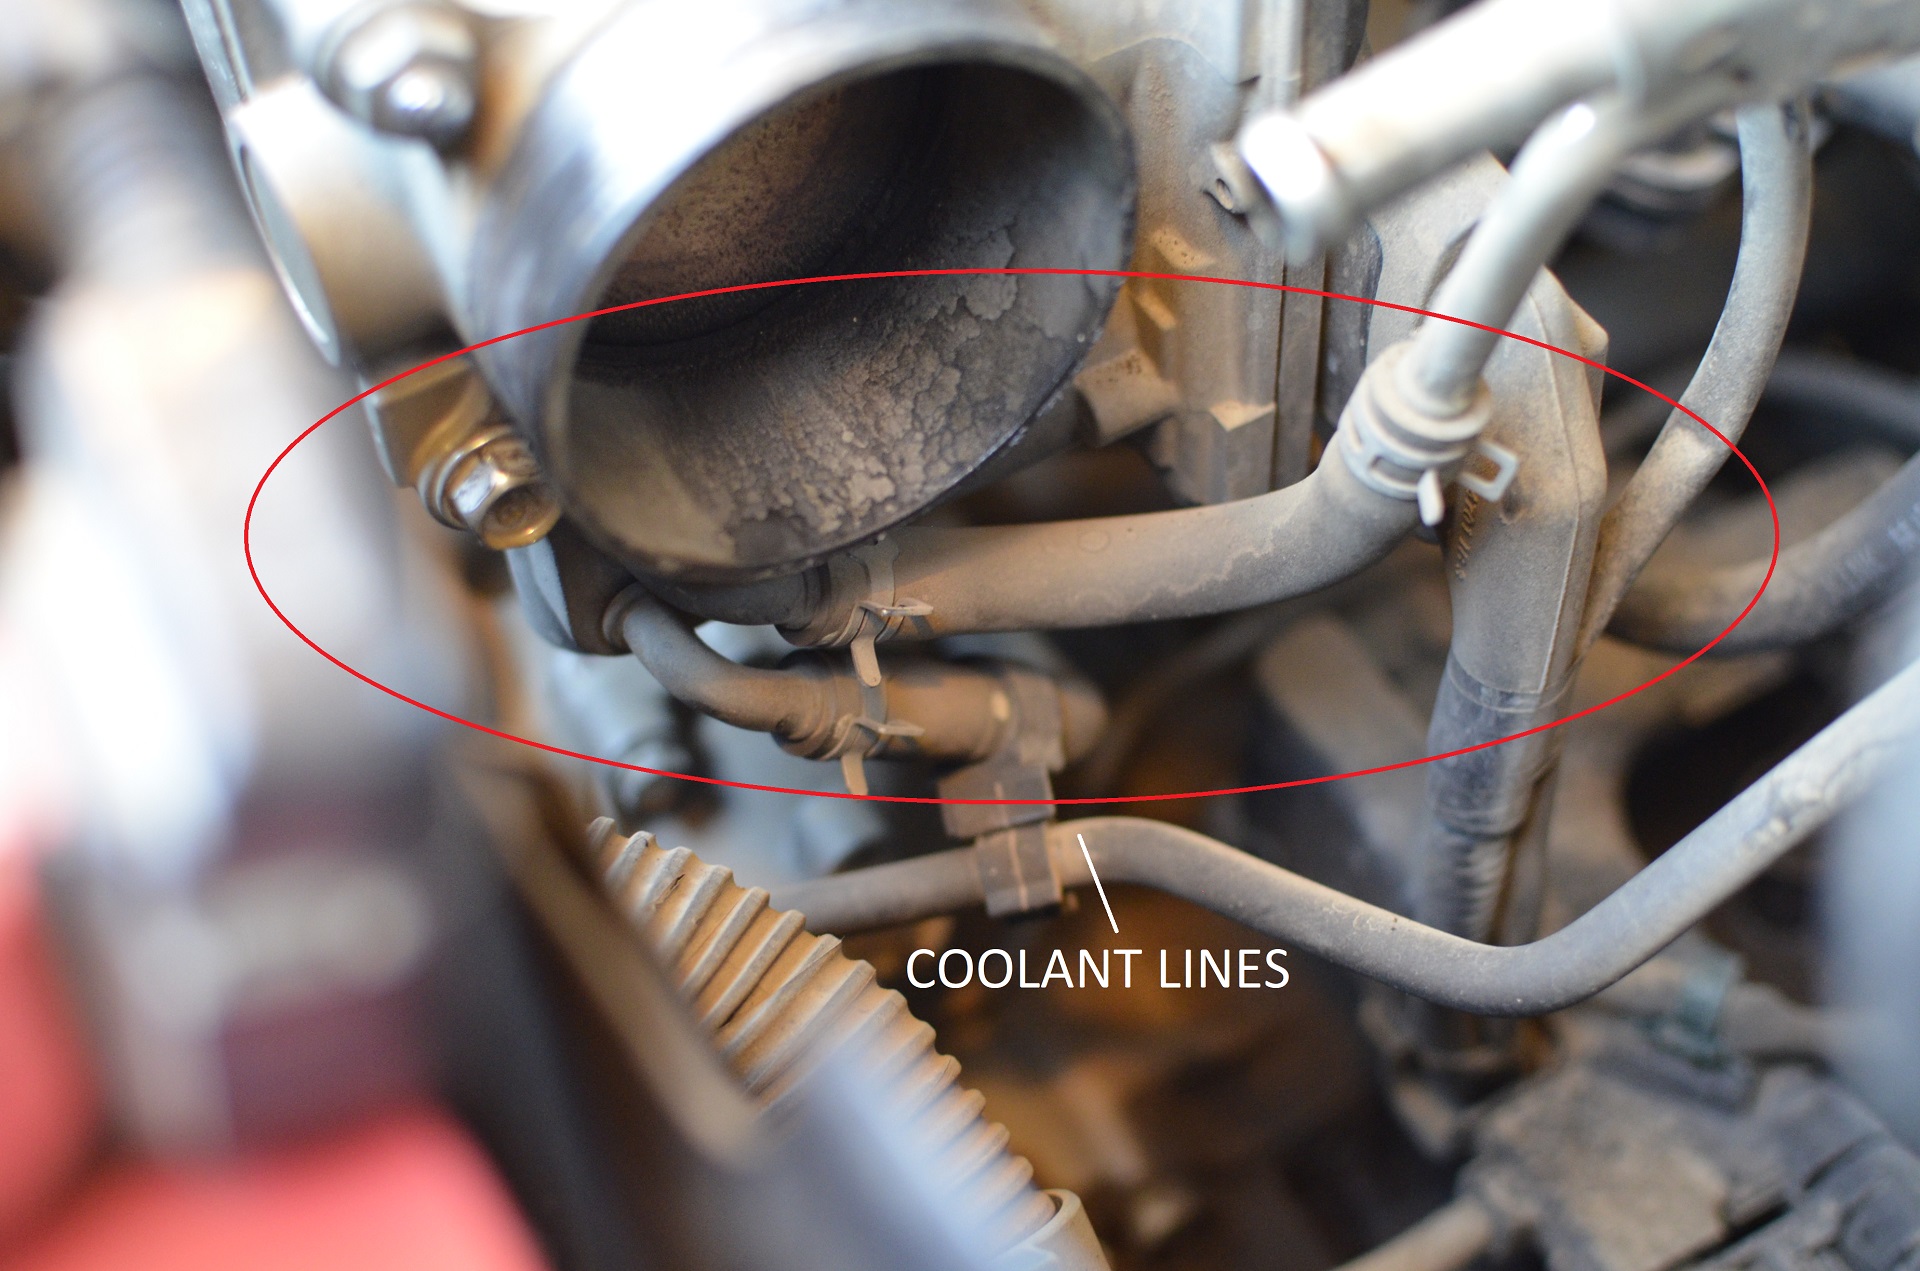
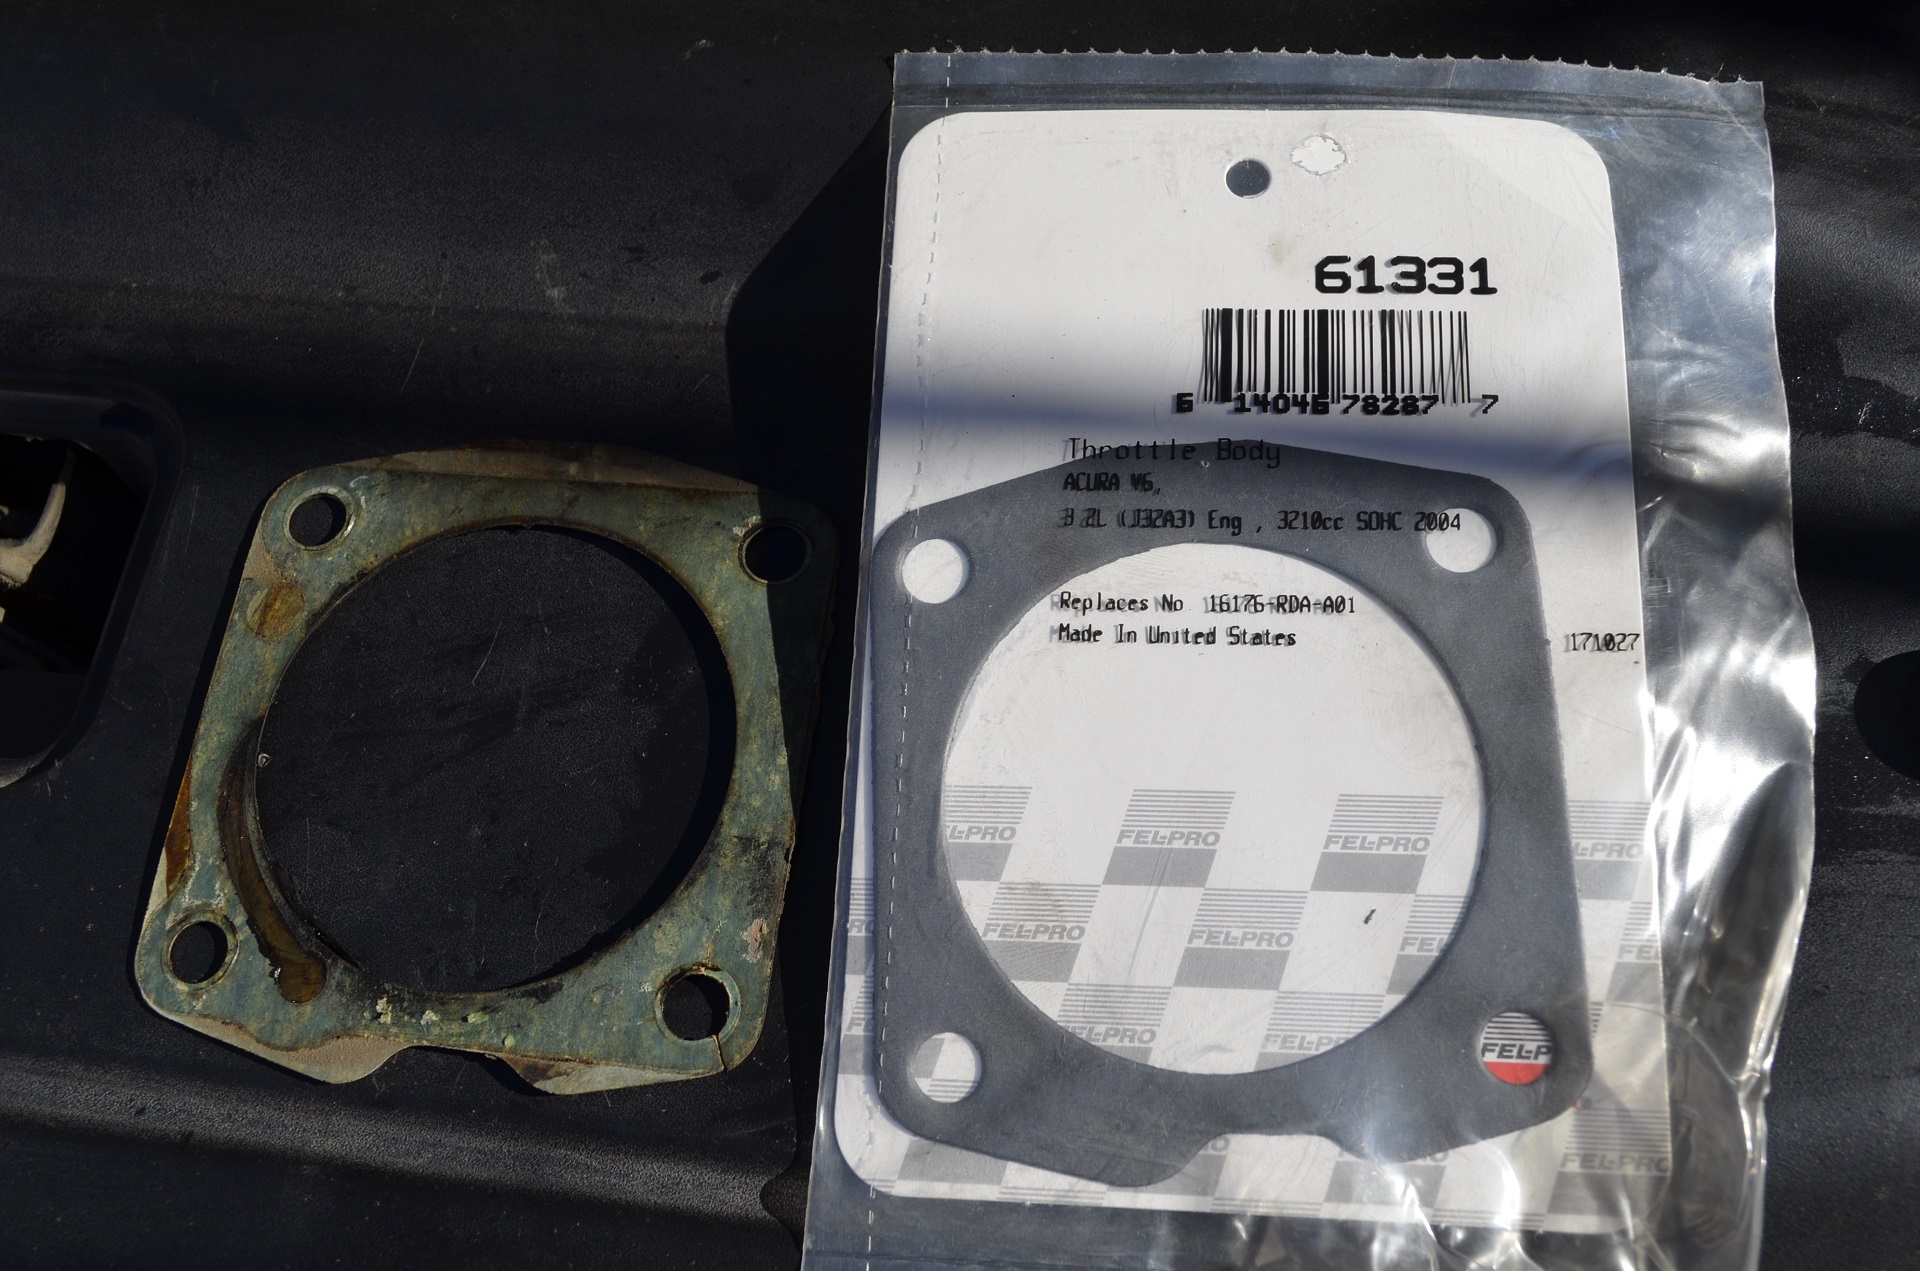
So in order to avoid this you will buy only the TB Gasket because it can get damaged when removing it.. So buy the TB Gasket!:
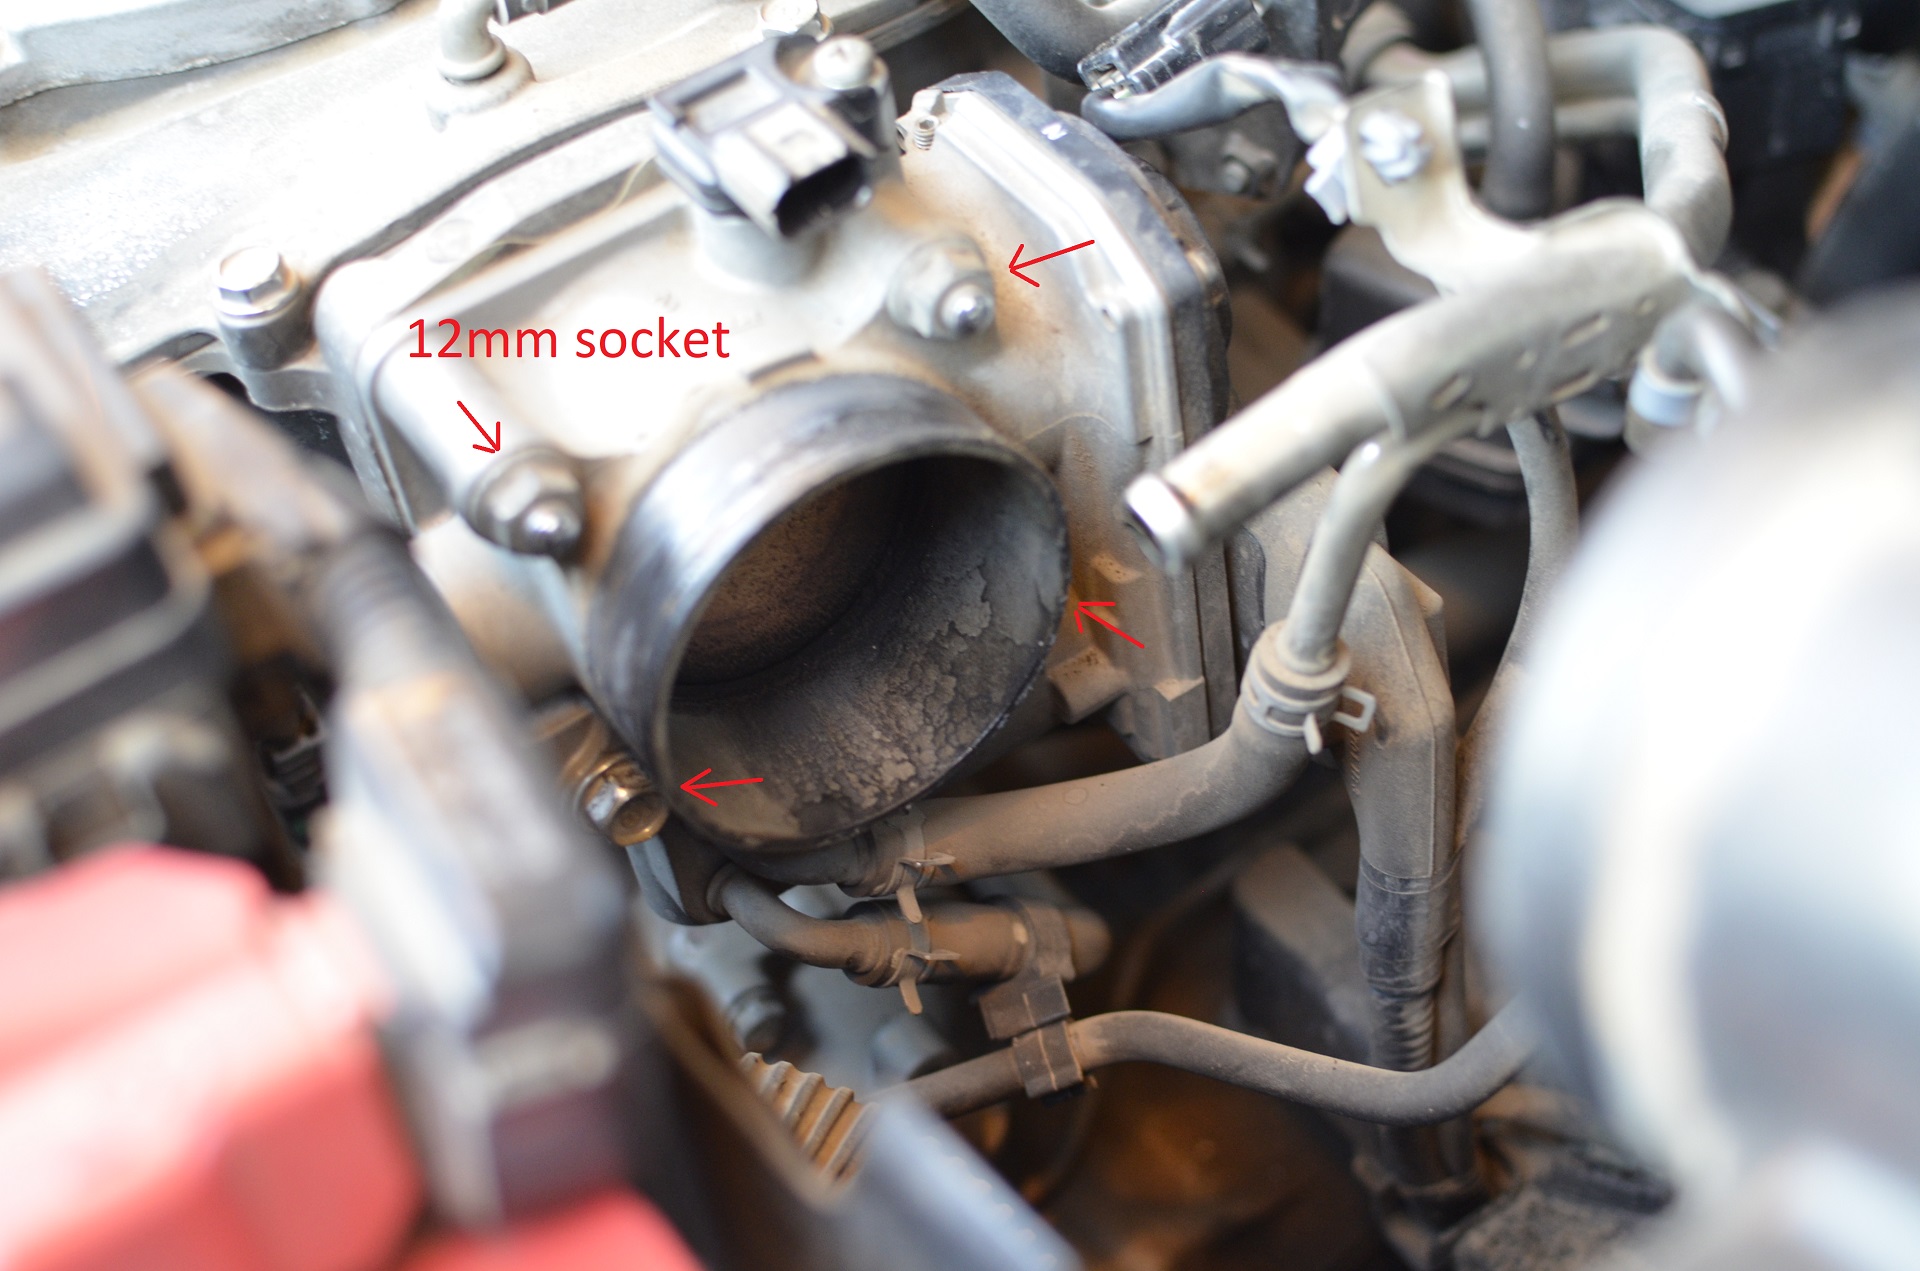
6.- Remove the Throttle Body:
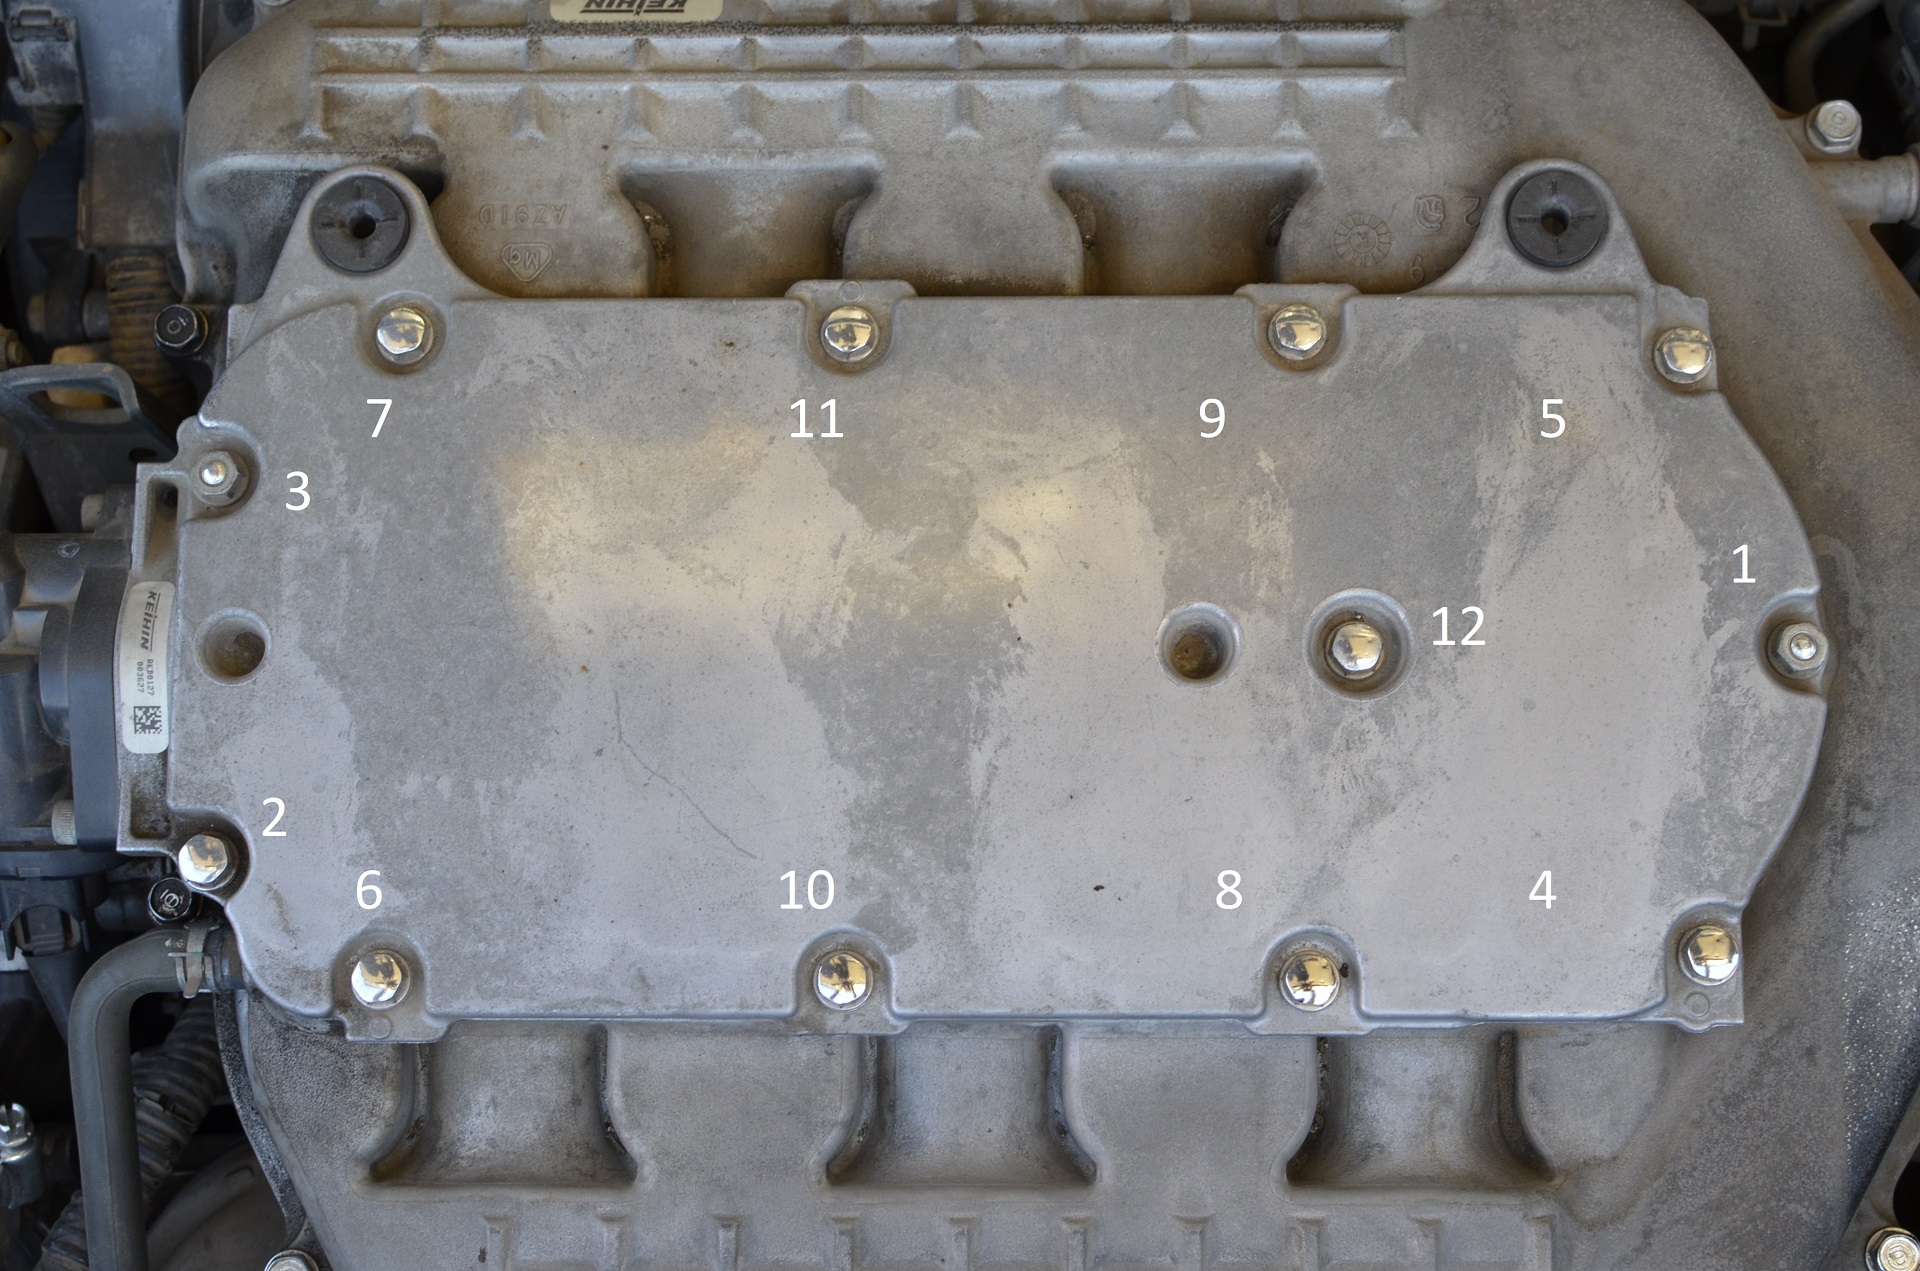
7.- Now its time to remove the Intake Manifold! First we have to remove the Manifold Cover, Use this sequence to undo it:
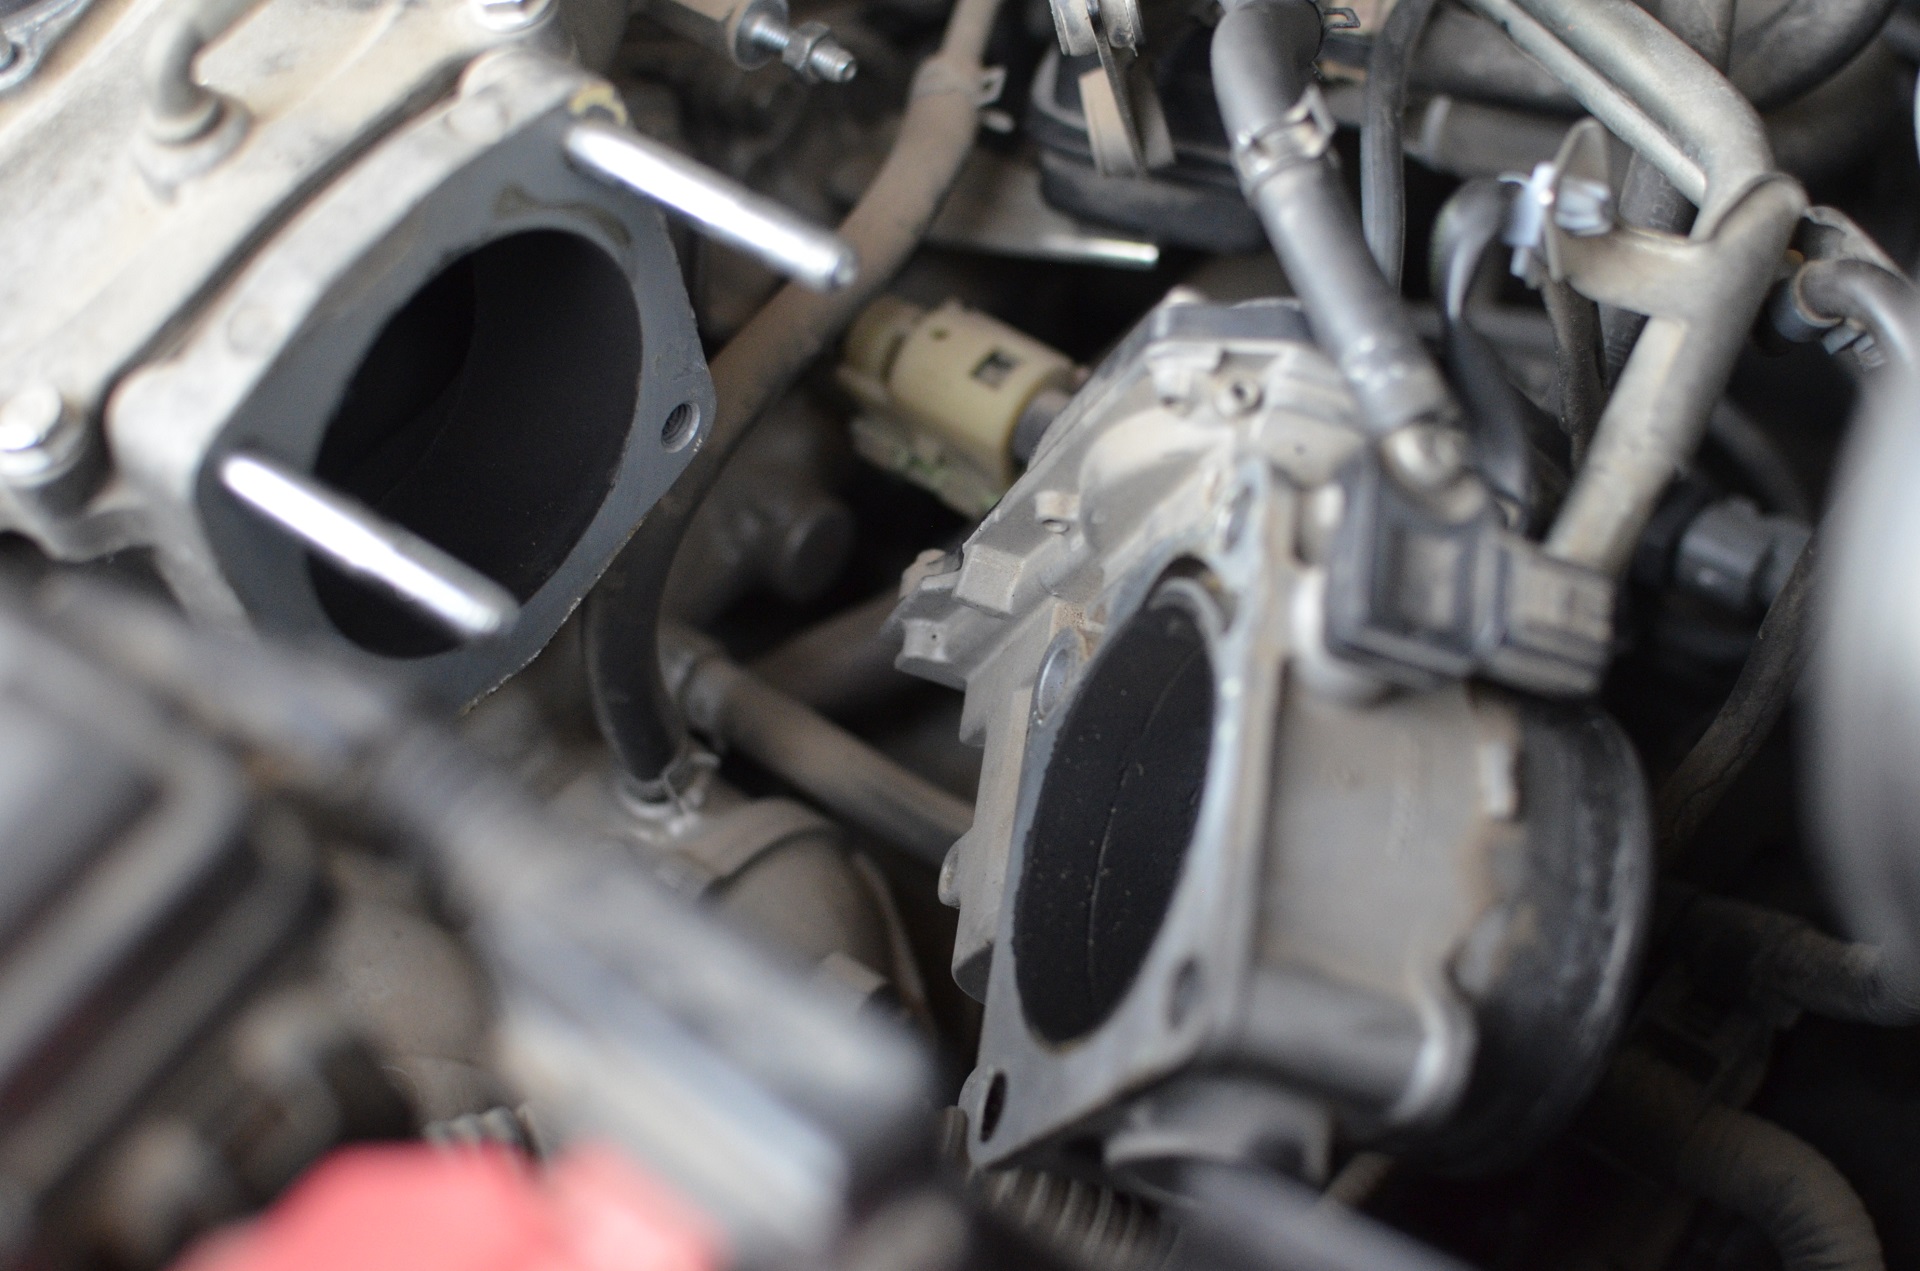
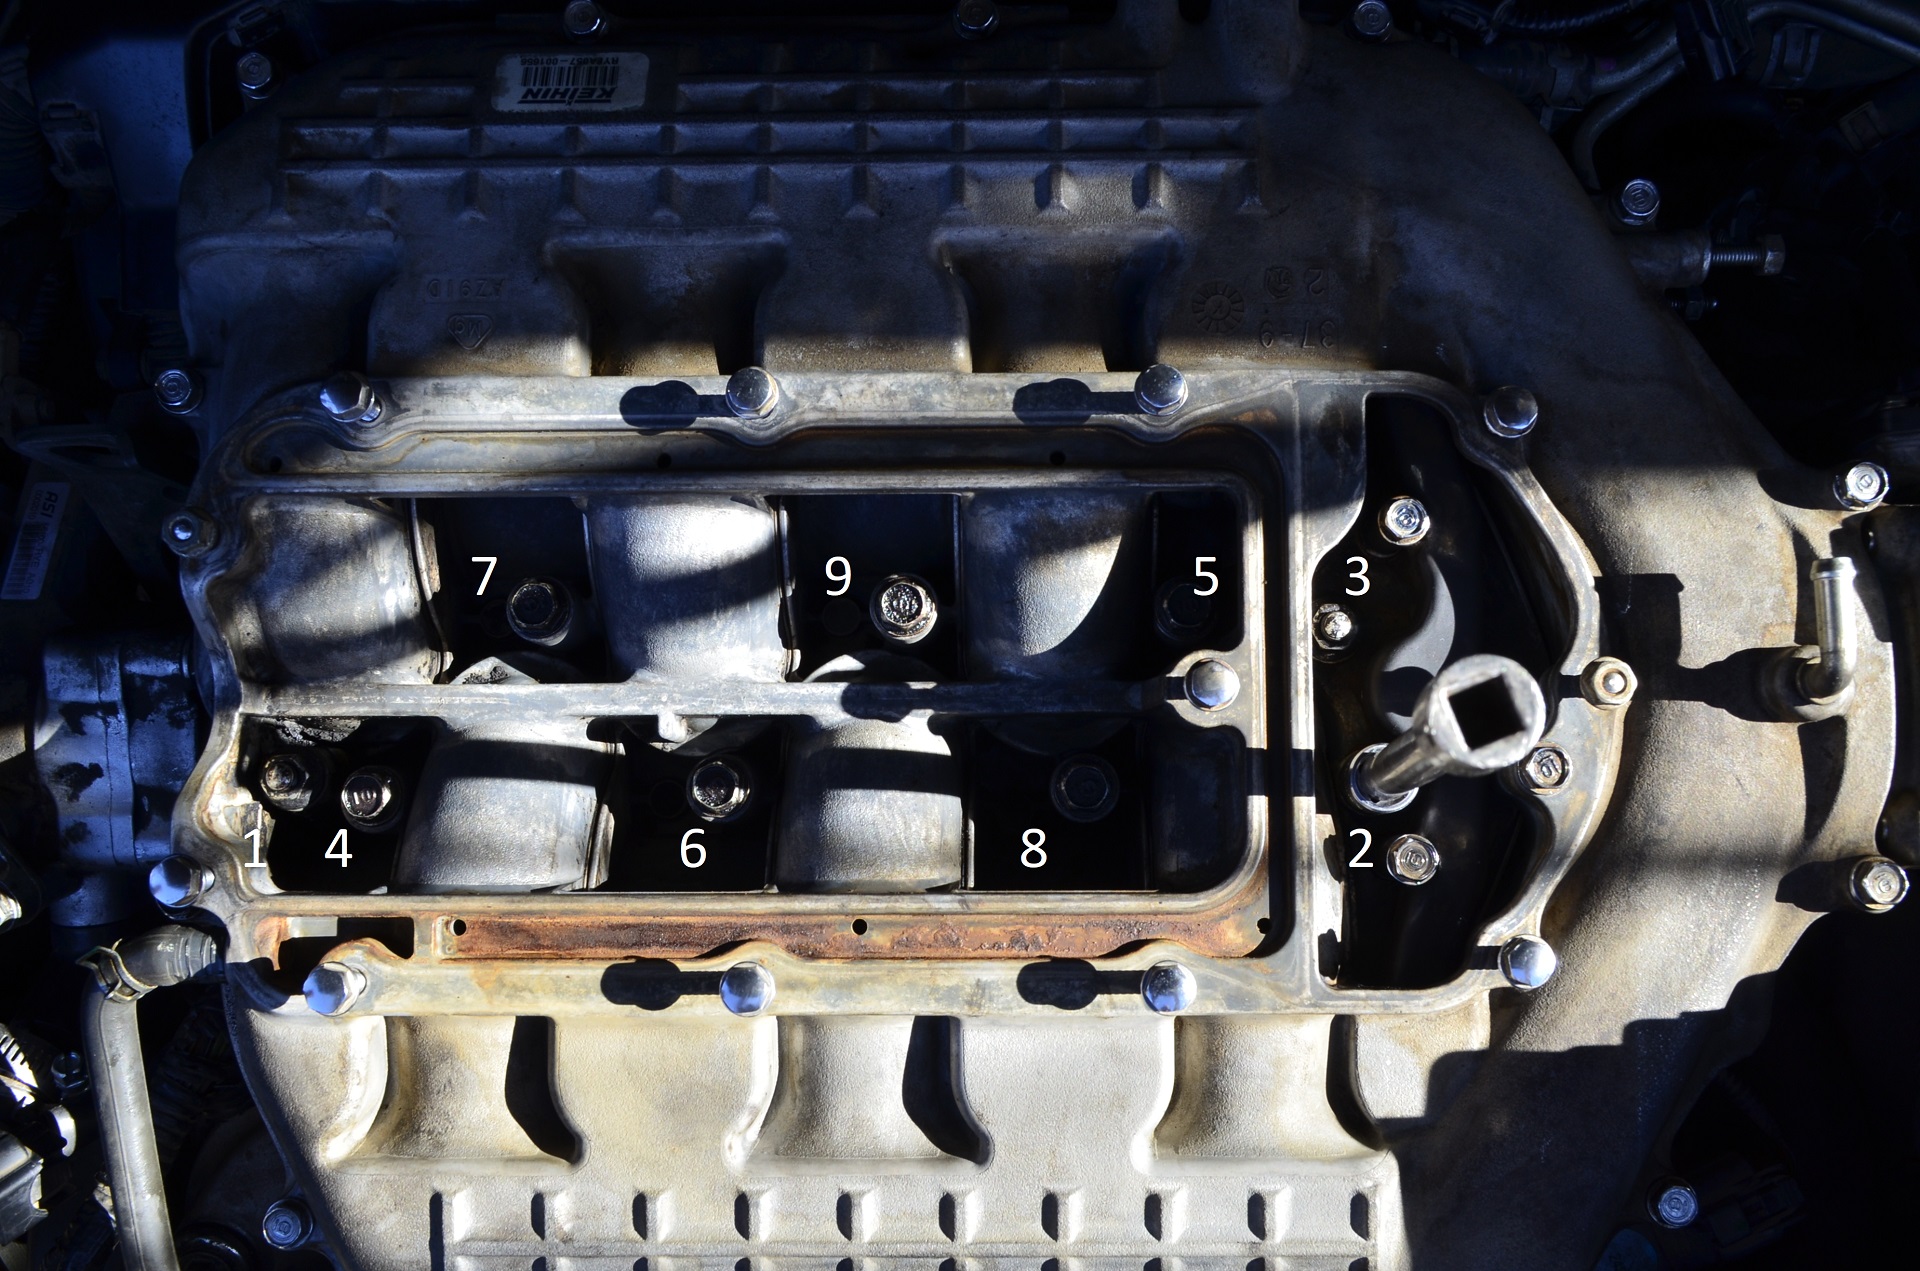
8.- Remove the Intake Manifold, Use this sequence to undo it:
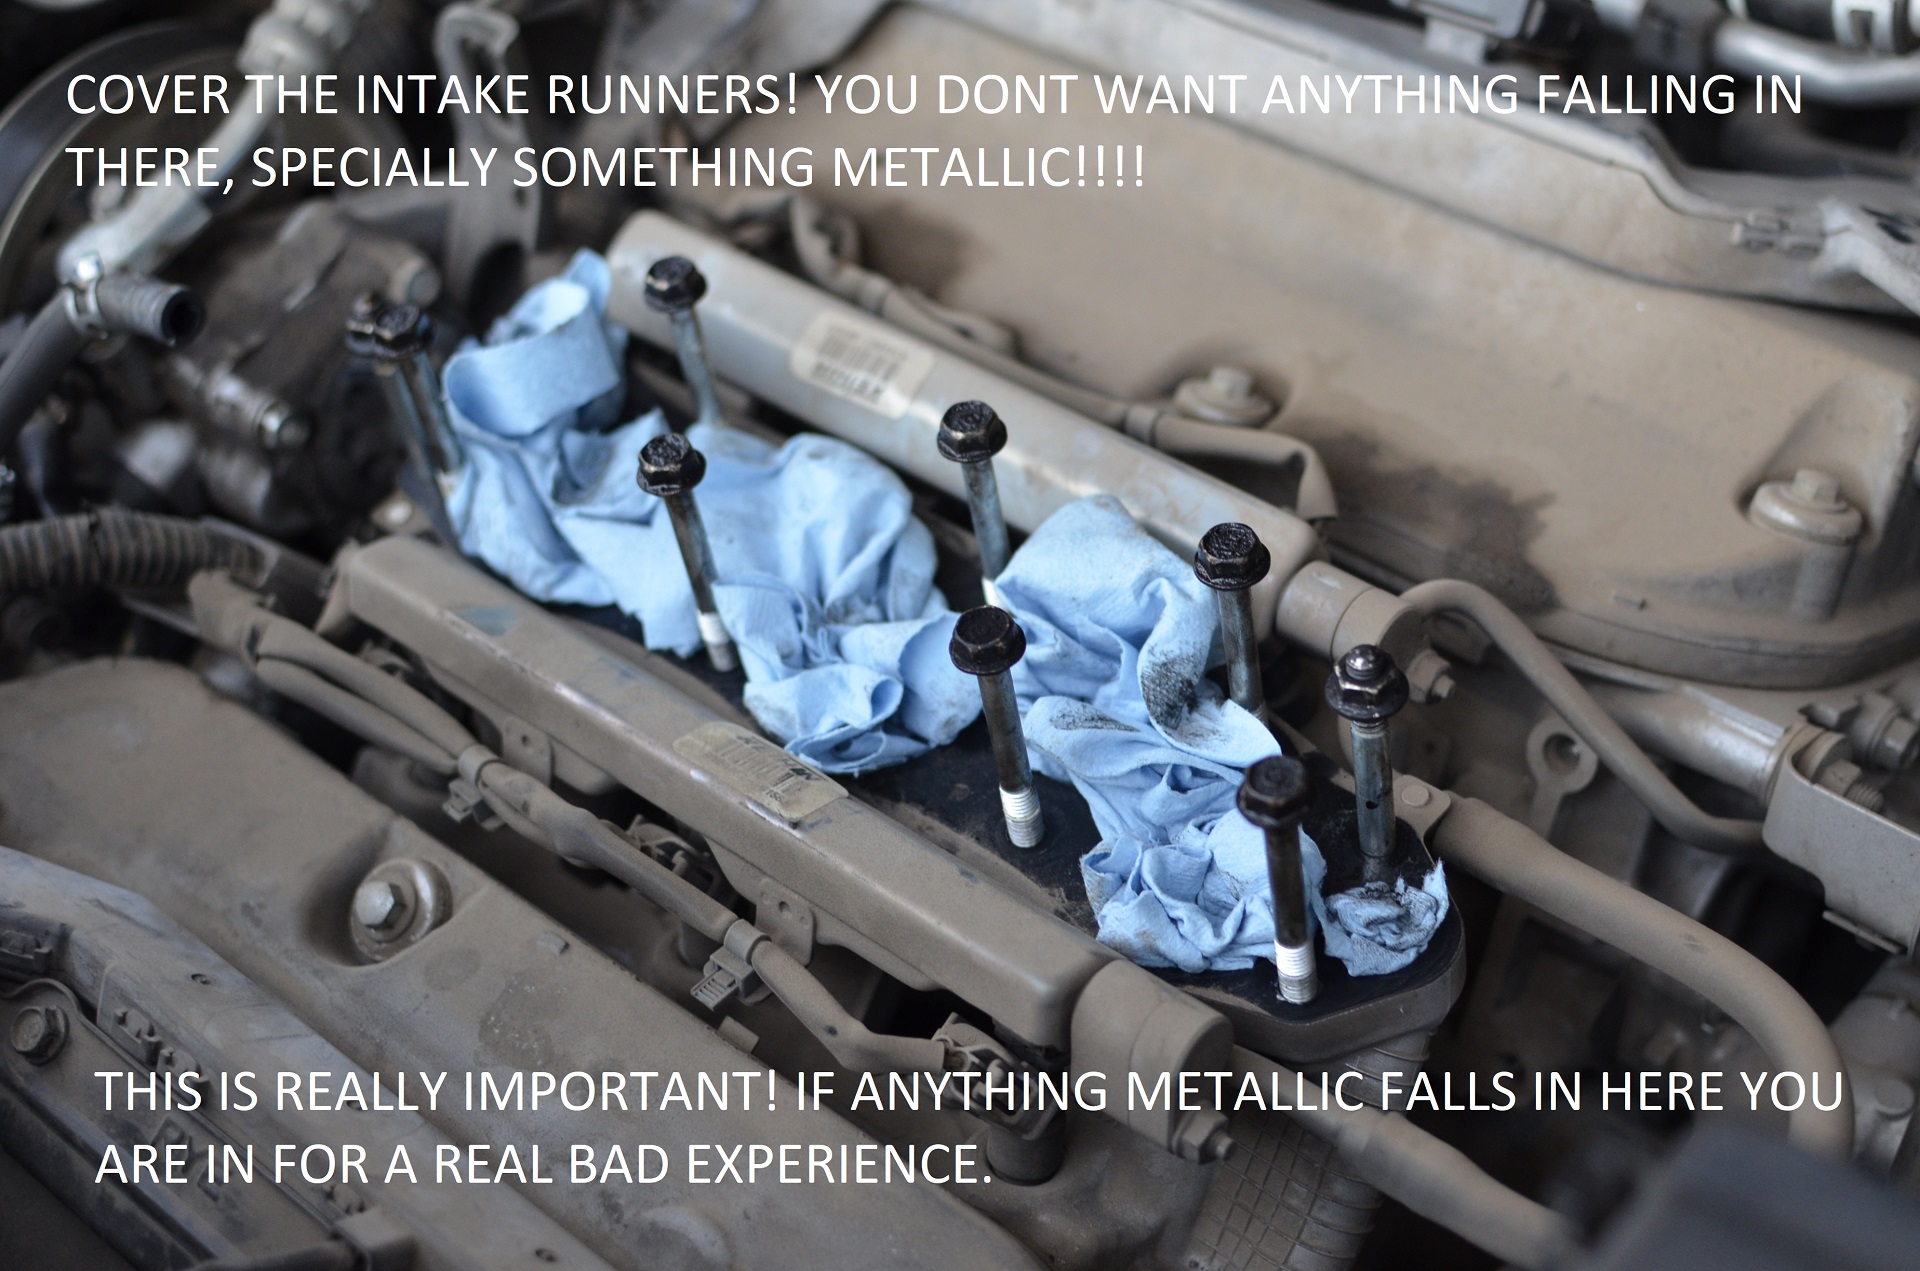
Important Information! After Removing the Intake Manifold:
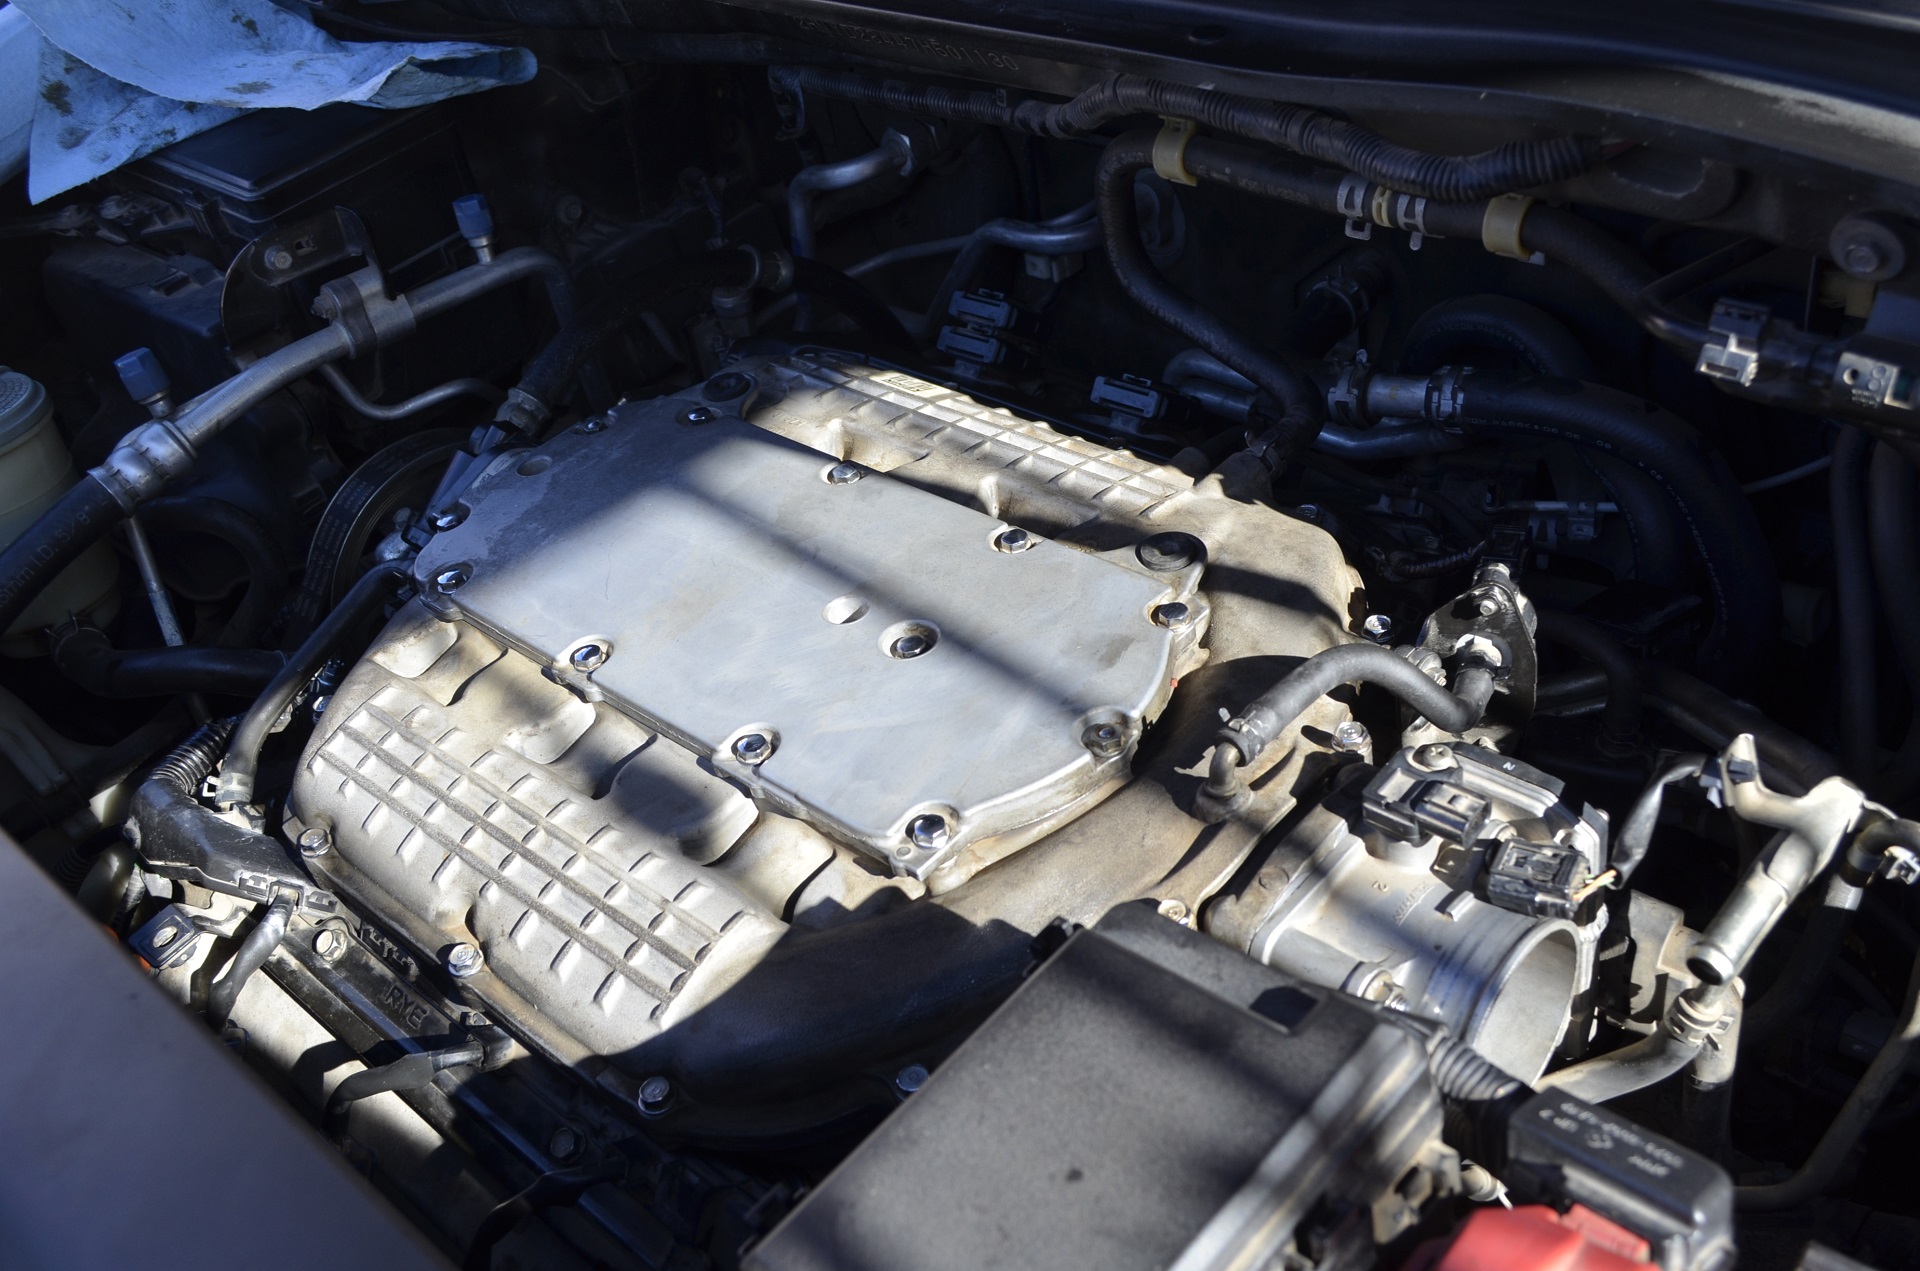
9.- Remove the Valve Covers...
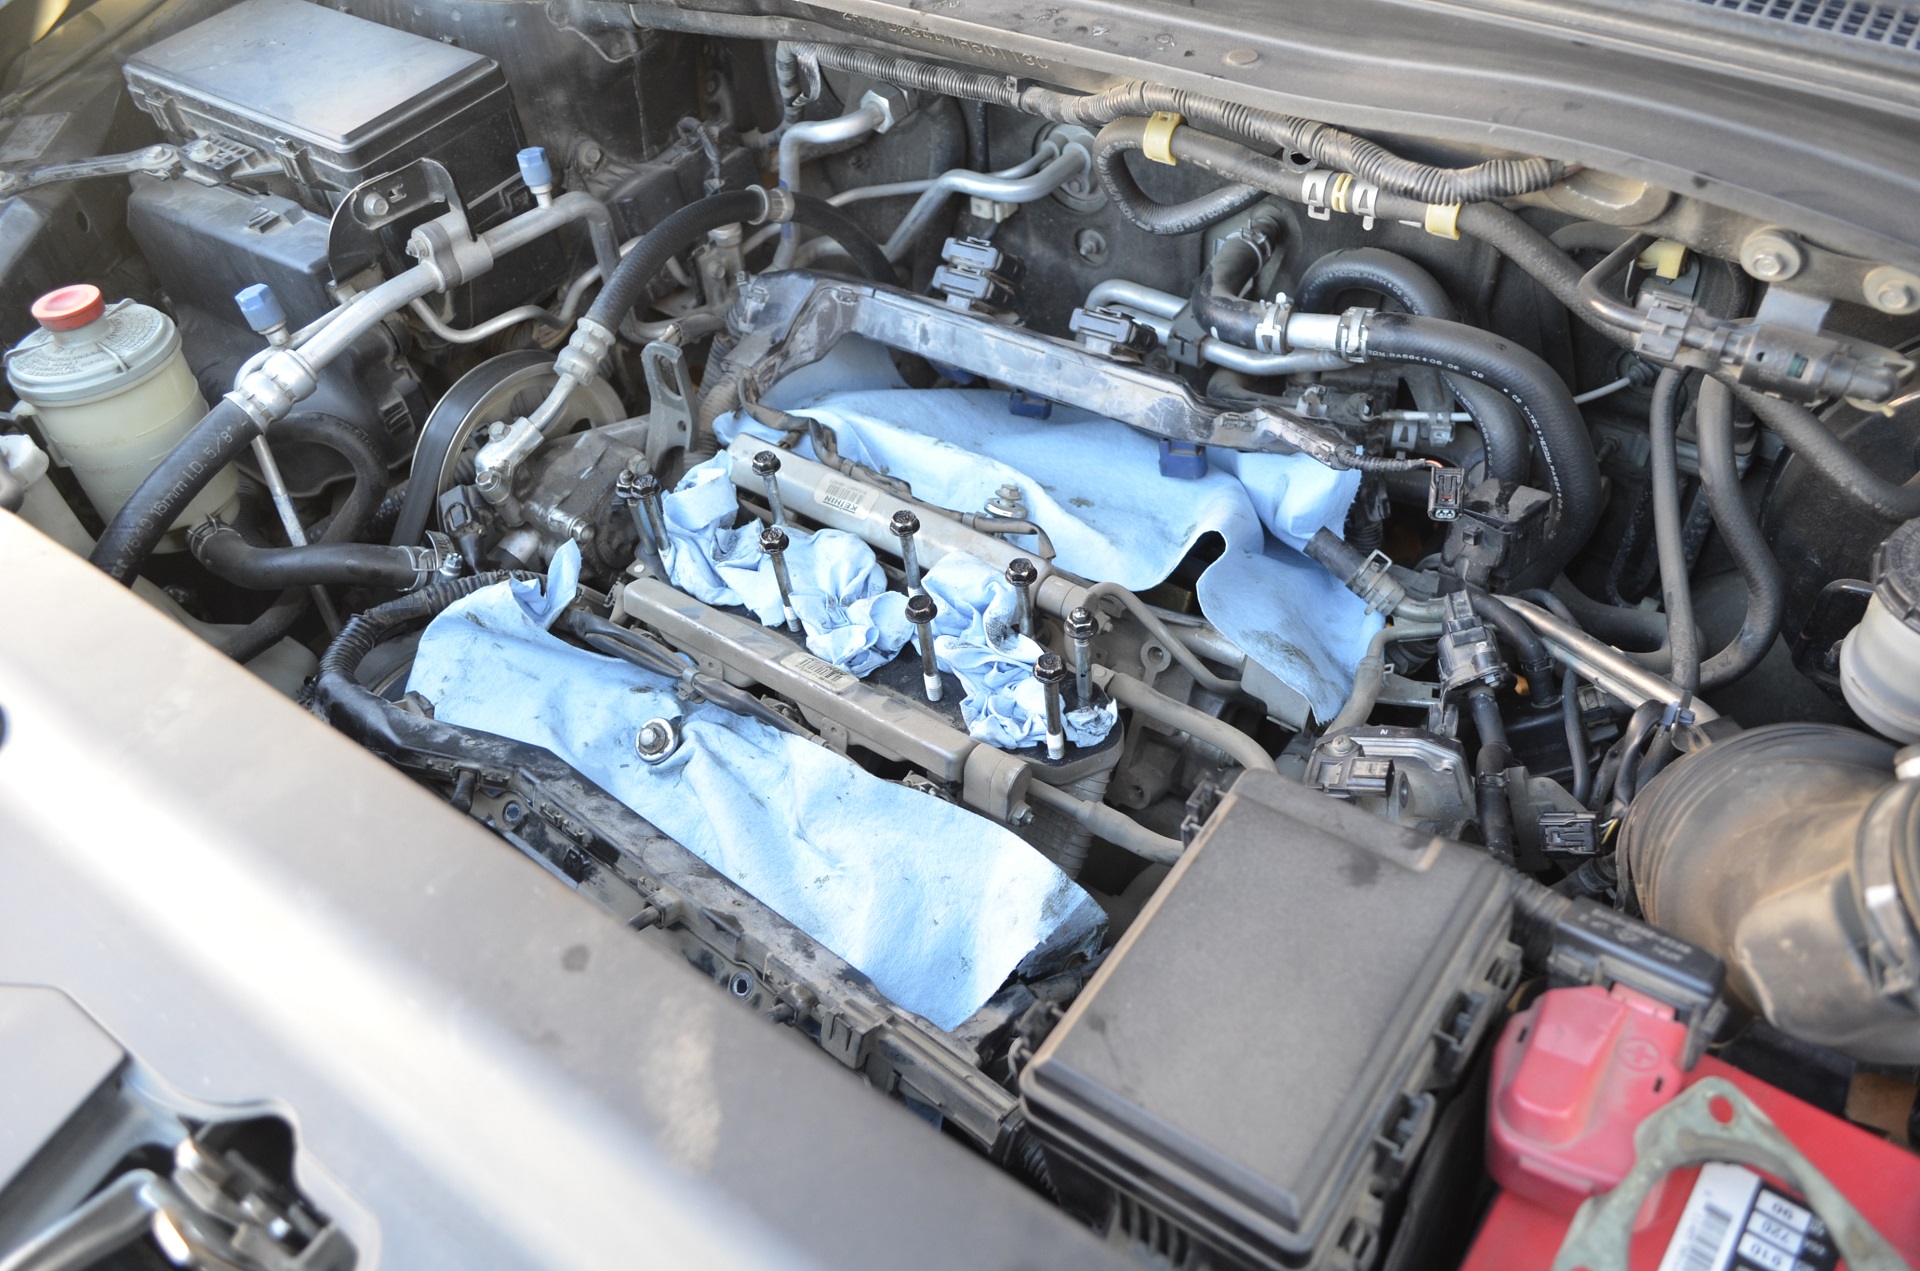
Now this isn�t very easy at ALL its probably the hardest part of the procedure as there is little to no room to wiggle the wire looms out of the way. Do your best to remove the covers, There is a PCV Line on the Rear Cover (NOT PICTURED) that is the one that connects to the Intake Tube PCV Line, Remove that. To pop the covers use a flat screwdriver and push the covers Up away from the head.. Make extreme CAUTION not to damage the valve cover gaskets! You can re-use them but if you damage them do not re-use them.The gasket will try to stick to the head before pulling the cover away make sure the gasket has un-sticked from the head with your hand. Then remove it by wiggling it between the head and the wire loom (Painful and stressful step). Make sure the gasket do not get stuck in one of the spark plug tubes! if you feel any resistance STOP and re-check that the gasket is not stuck. Valve covers removed: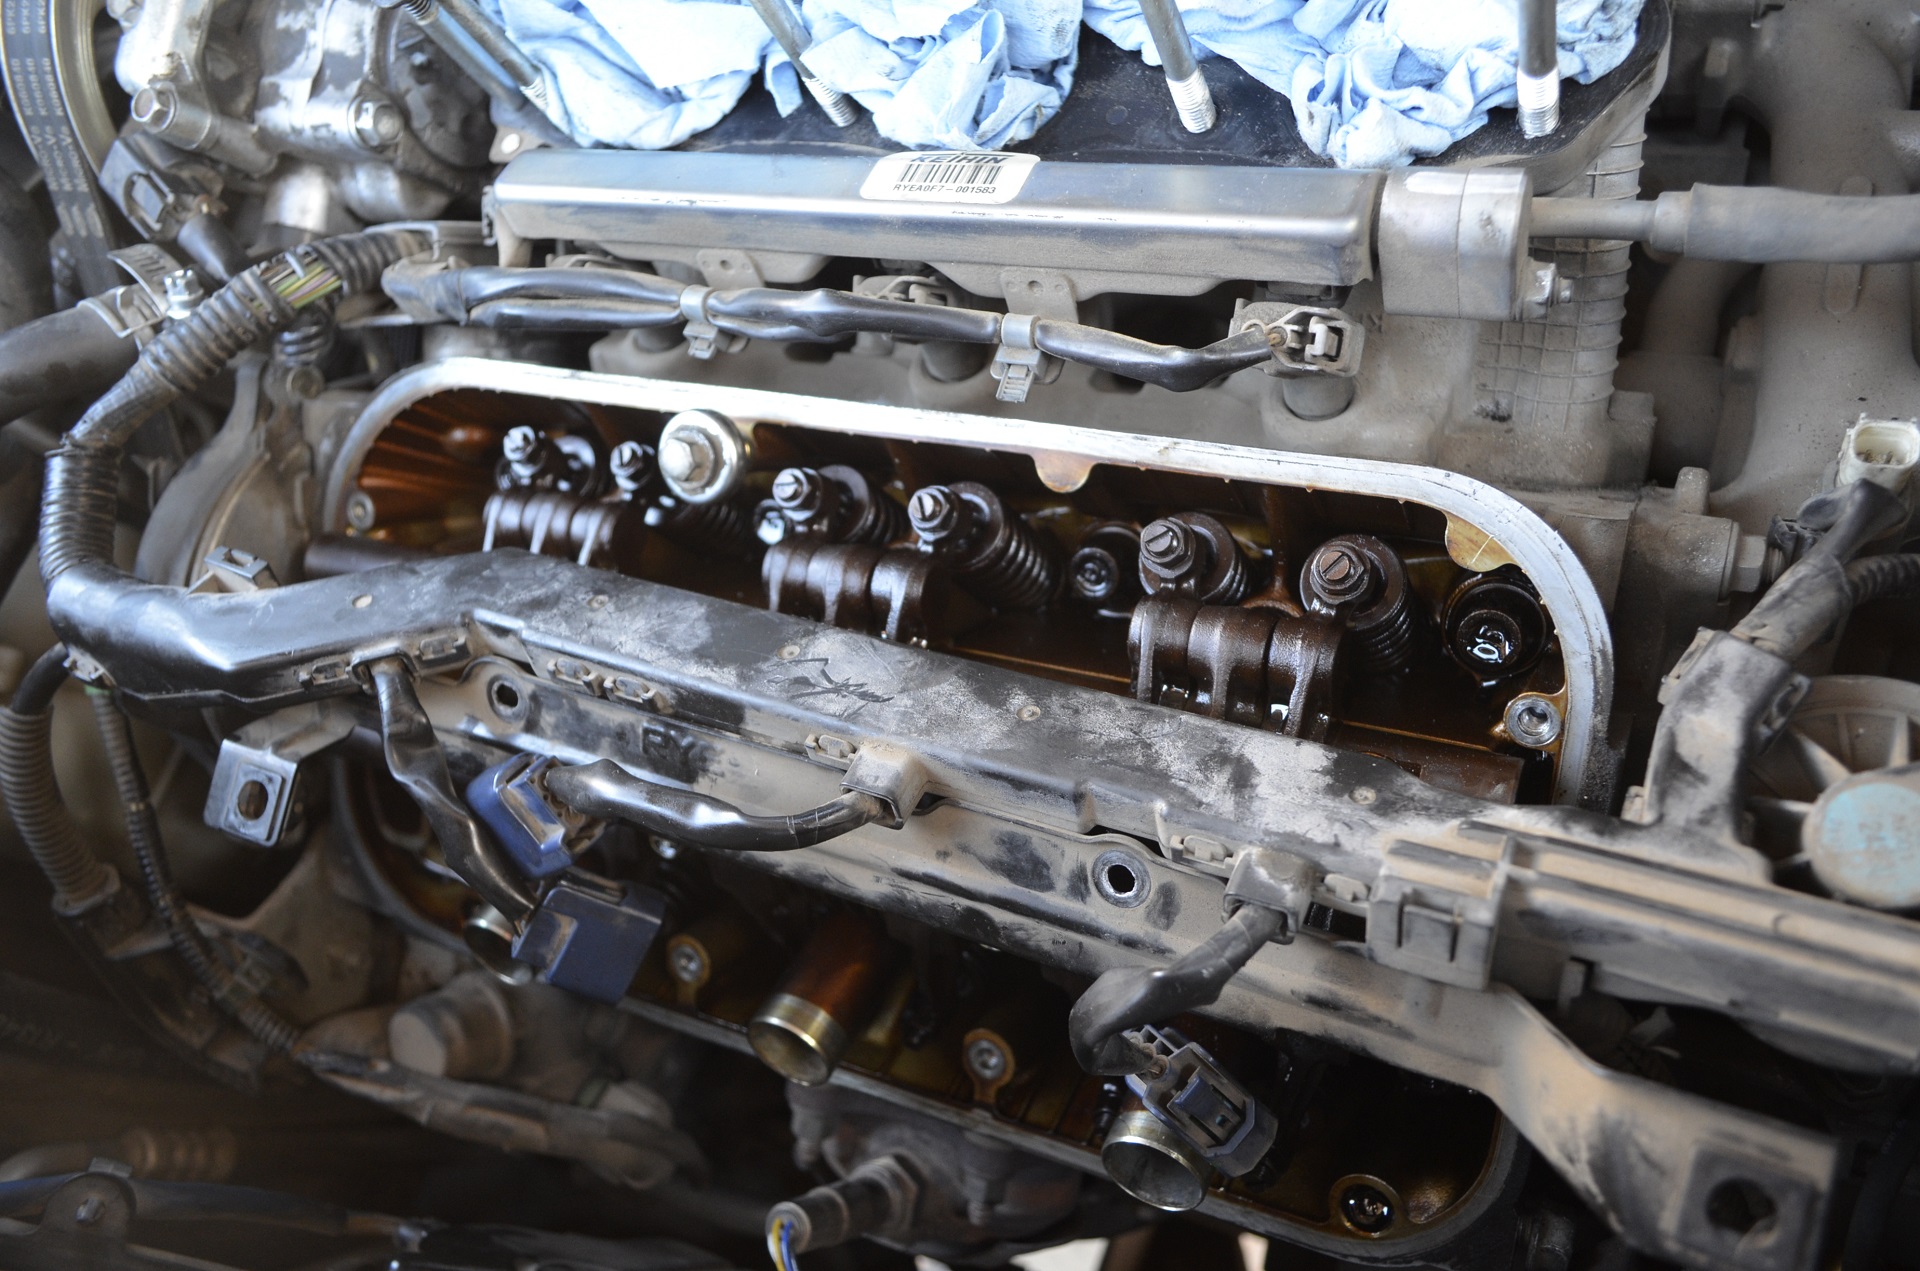
10.- You can now cover everything up to let it sit until its cold (If you started cold then proceed to step 11). DO NOT ADJUST THE VALVES EVEN IF THEY ARE WARM! COLD ONLY!!!!
11.- Now with the engine Completely COLD we can adjust the valves but before that its time to set the TDC timings.
For this you will need a LONG breaker bar and a 19mm socket as we will be turning the crankshaft by hand (NOT PICTURED).
Open the Timing Belt cover peep hole and use a mirror to align the TDC Markings to each individual cylinder:
Turn the crankshaft CLOCKWISE and find cylinder 1:
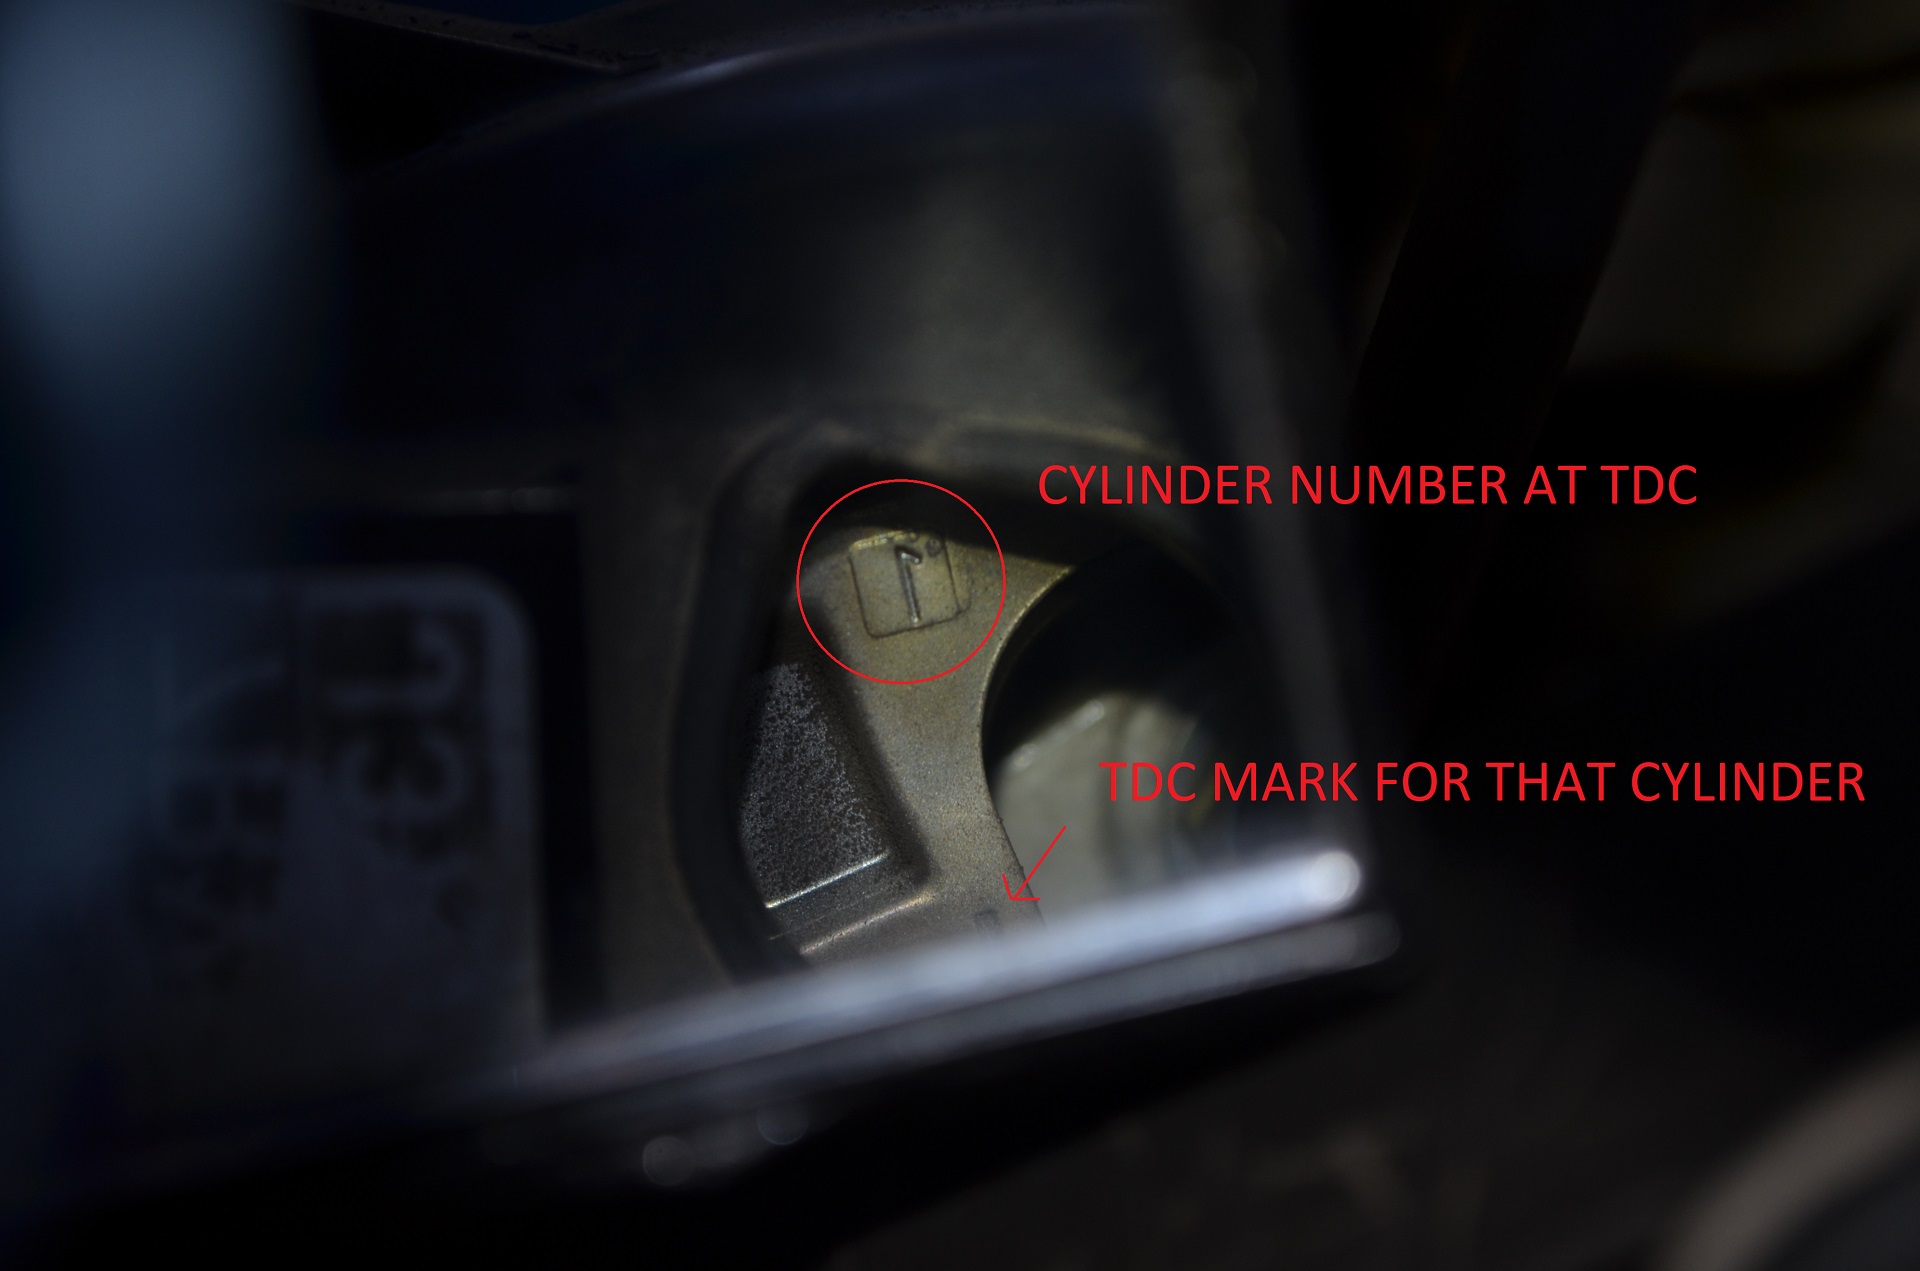
Then align the TDC marks for that cylinder:

You can now adjust all valves in cylinder 1!
The adjustment sequence follows the firing order so:
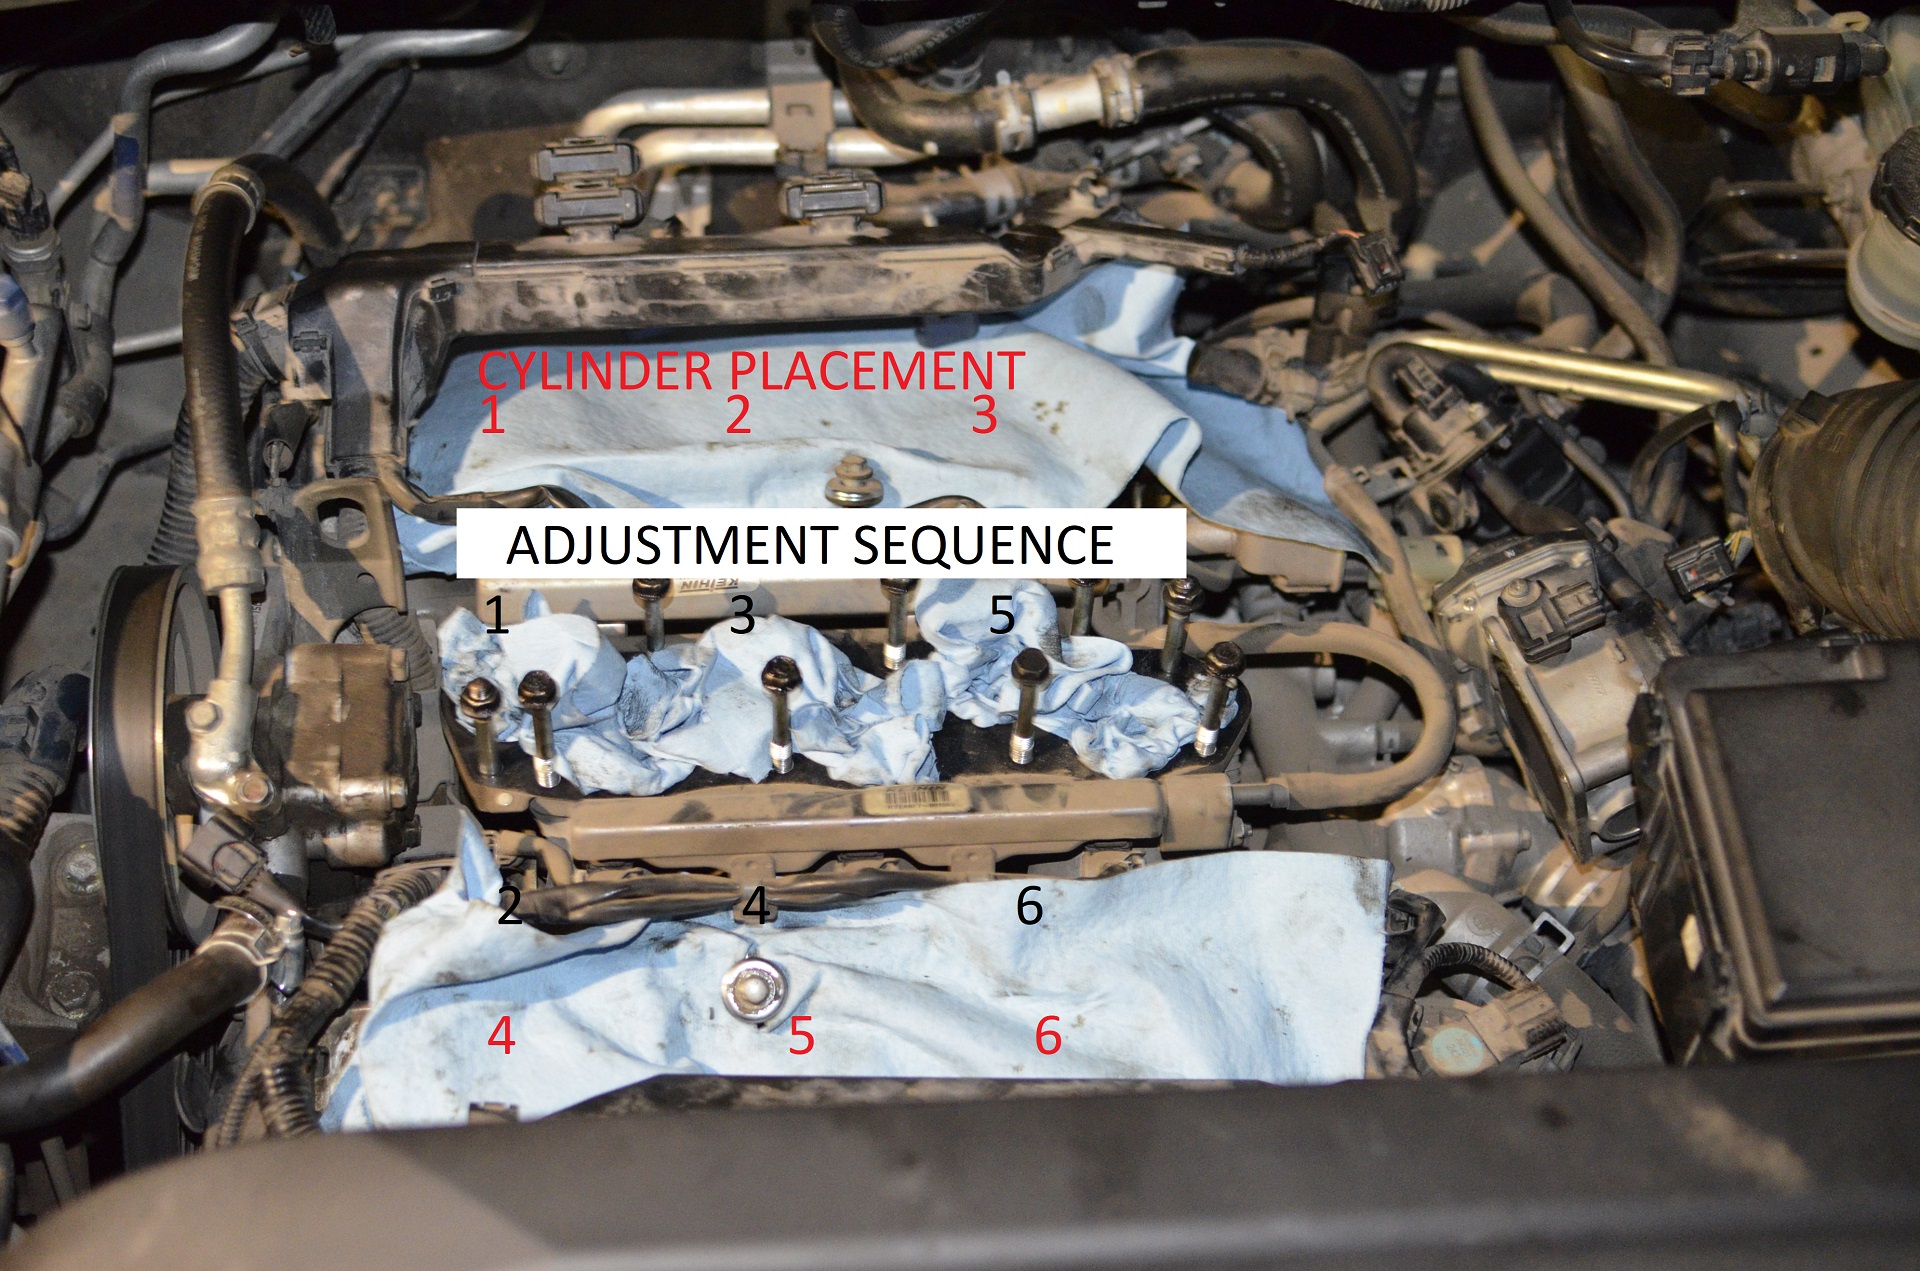
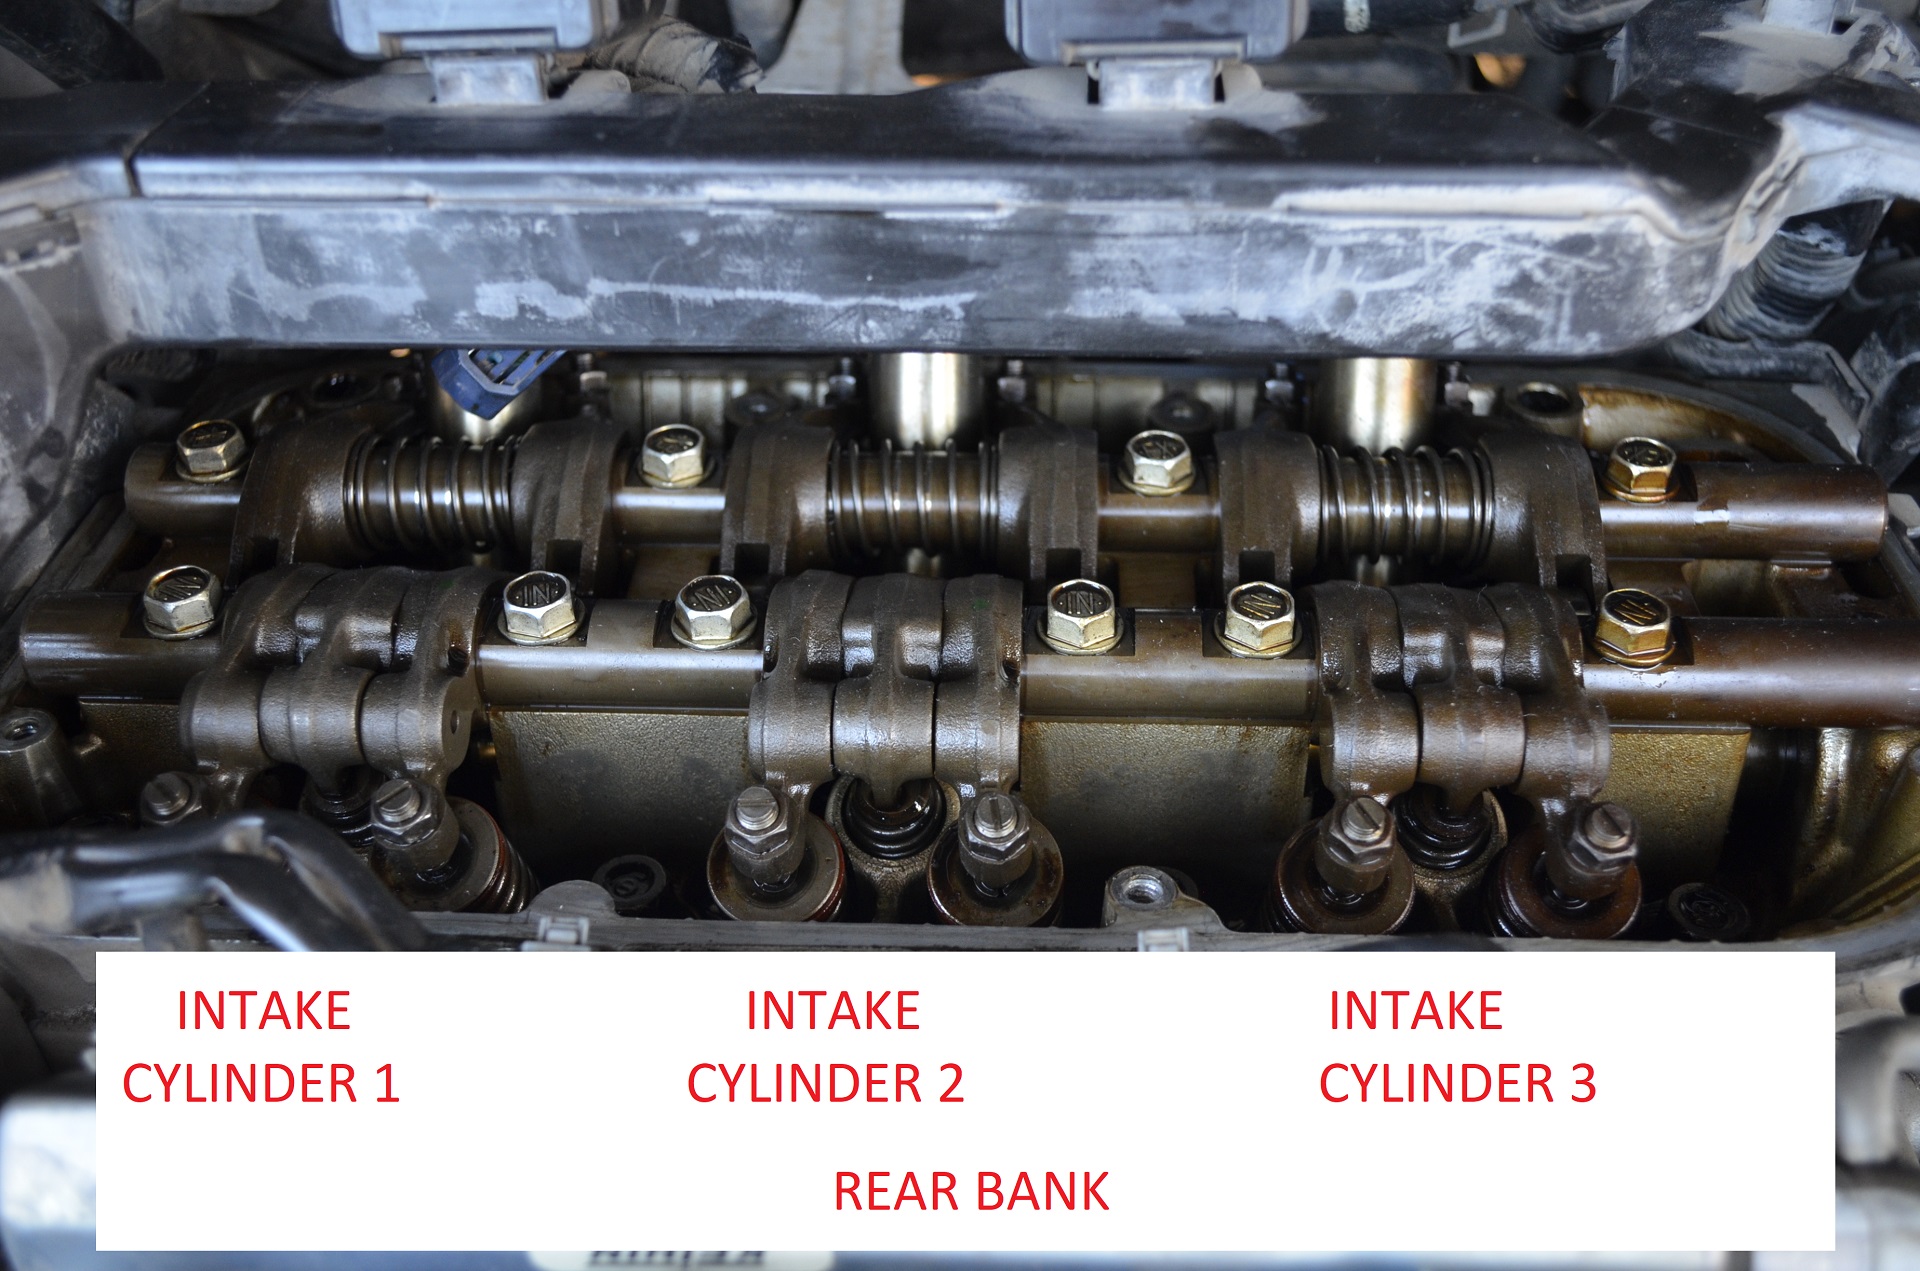
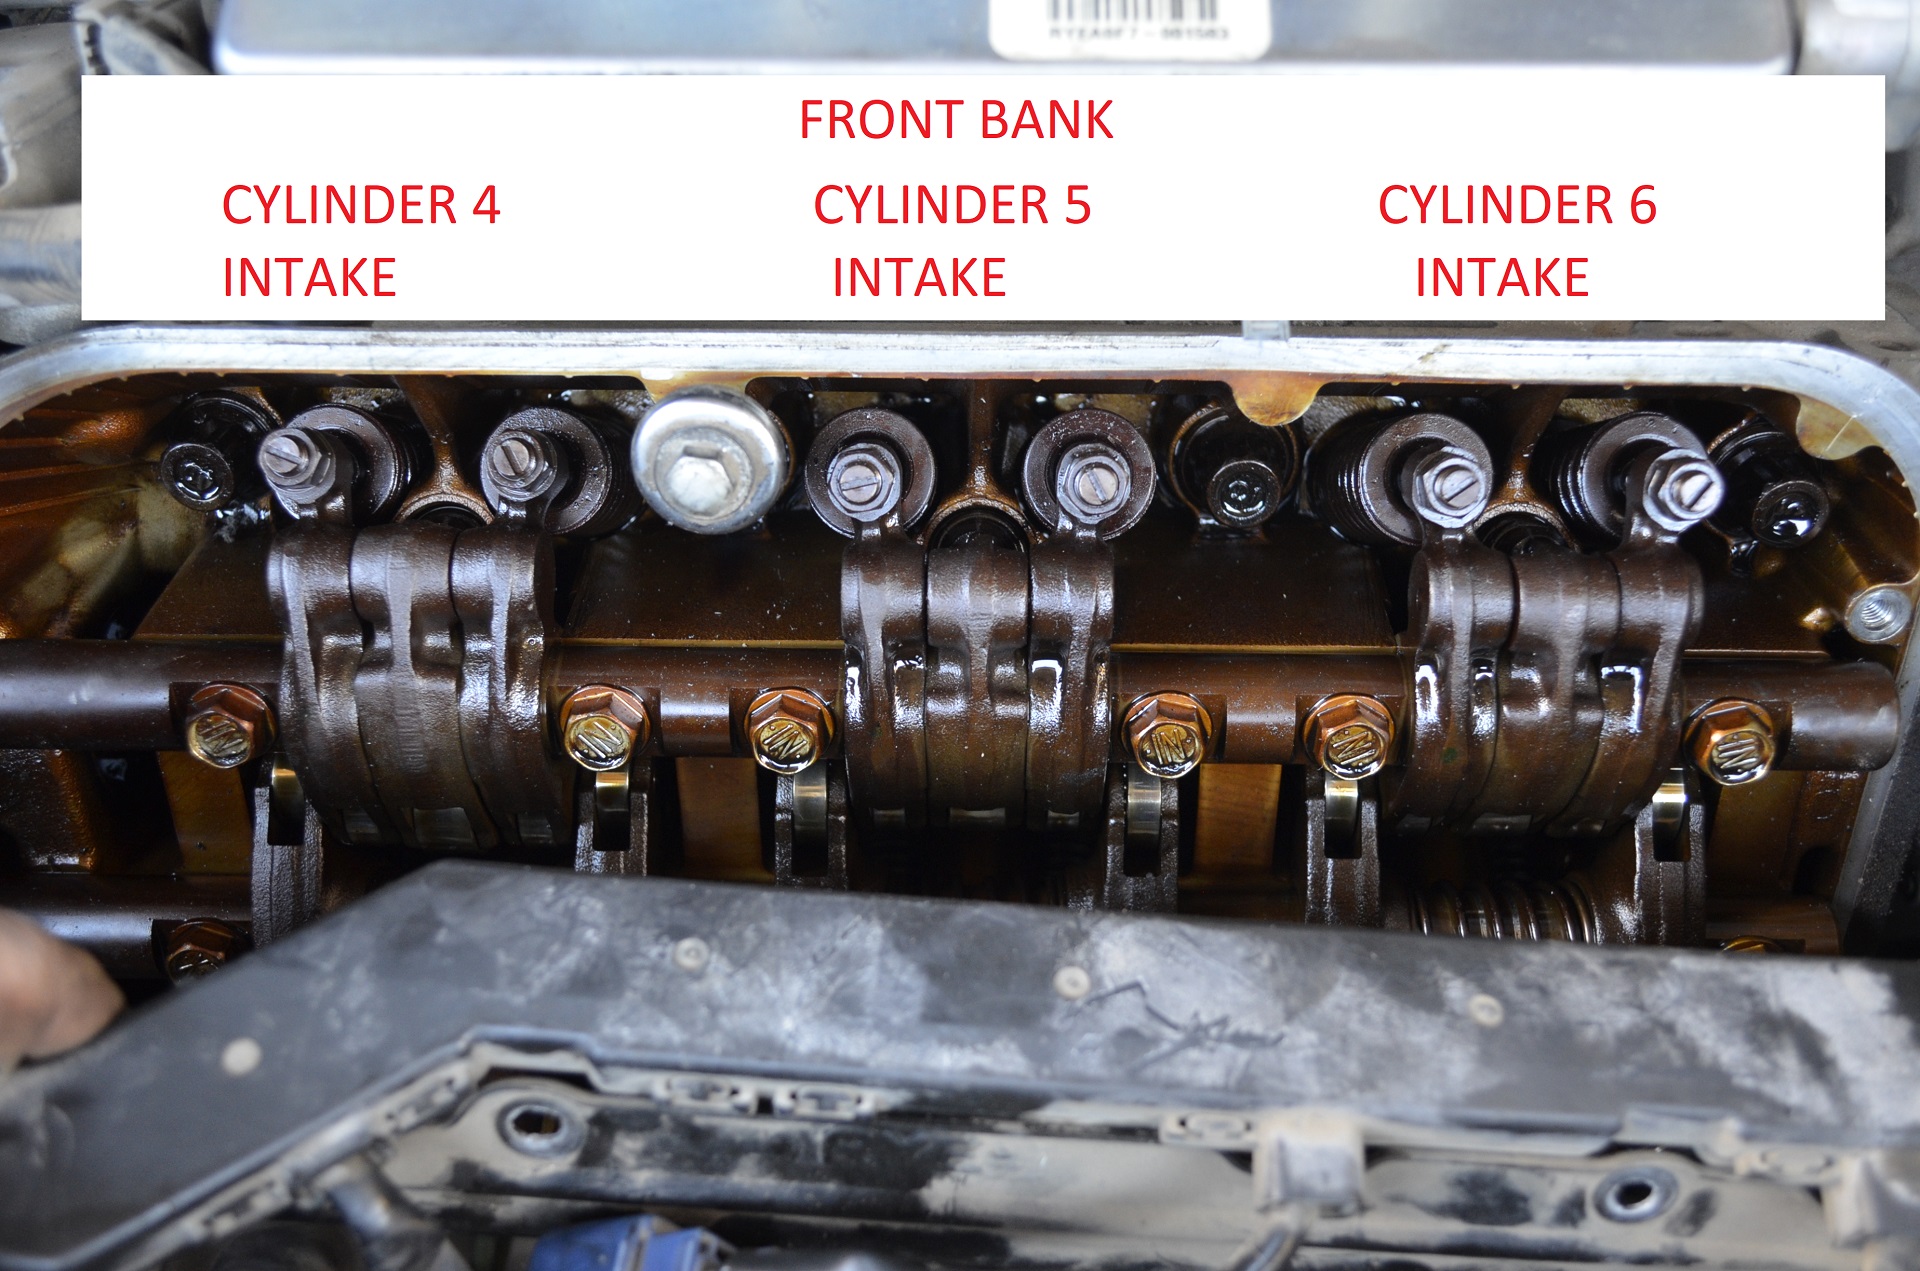
The engine rear bank has cylinders 1,2,3 while the front bank has 4,5,6.
The firing order (Or adjustment sequence when you turn the crankshaft) will be: 1.4.2,5,3,6
Do not try to adjust the valves that are not in TDC! always adjust the valves on the specific TDC sequence.
12.- Adjusting the valves is not really difficult.. You will need 2 feeler gauges:
0.22mm for the Intake Valves.
0.30mm for the Exhaust Valves.Use a closed end 10mm wrench and a flat screwdriver:

You can also buy the tool specific for adjusting valves but its really not needed.Insert your feeler gauge between the valve tip and the rocker arm hammer pin (Adjusting Pin w/e):

If the feeler gauge cannot be inserted you will have to undo the hammer pin (Adjusting Pin):
 Adjust until there is little drag on the feeler gauges, They should be able to fit in snug but not too tightly if they drag they are too tight!
When you are over tighten the locking nut HAND TIGHT! there is a specific torque value for this but good luck trying to set the torque meter while holding the adjustment pin with the flat screwdriver. Tighten as much as you needed to undo them.. Its not too hard, just "Hand Tight". The nut is small so dont go ape **** on it! Being a locking nut setup they will not undo themselves unless you leave it super loose. Finish all valves in all cylinders then proceed to final assembly.
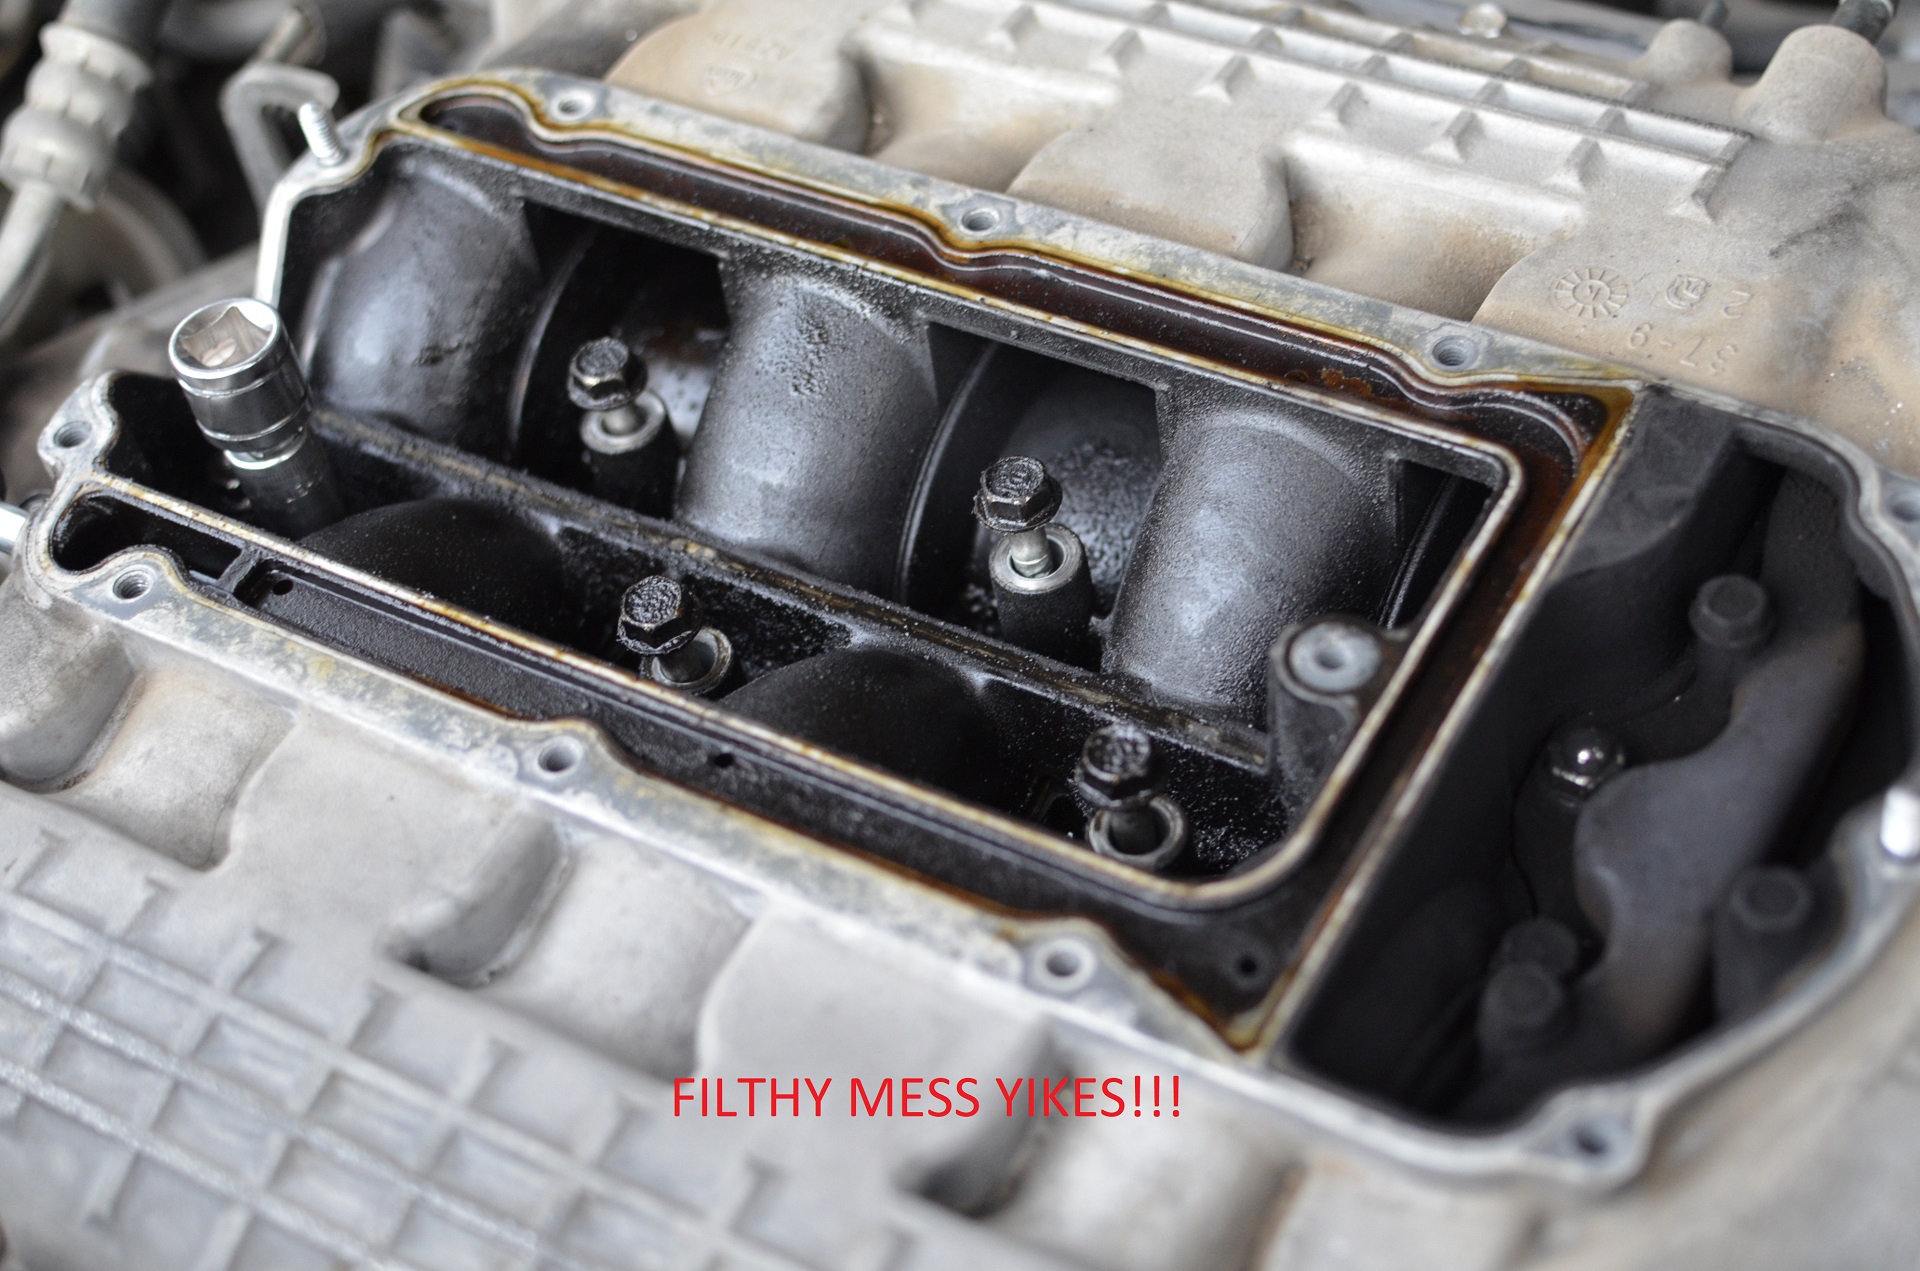
OPTIONAL!!.- You can clean your Manifold, EGR Passages and Throttle Body, If you don�t want to mess with resetting the TPS in the Throttle Body DO NOT CLEAN IT! If you clean your TB you will Could need a TPS reset which can only be done with a good OBDII Scanner or at the Dealership. Not resetting the TPS value will create a high idle situation.My valve covers were DIRTY AS HELL:

Now they are clean!

Perfect time to clean the EGR Passages and Holes:

The EGR Splitter bolts are only to be tighten to 8lb-ft max! do not overtight! Look at that clean manifold...

13.- Now its time to get everything back together which is obviously reverse procedure.!
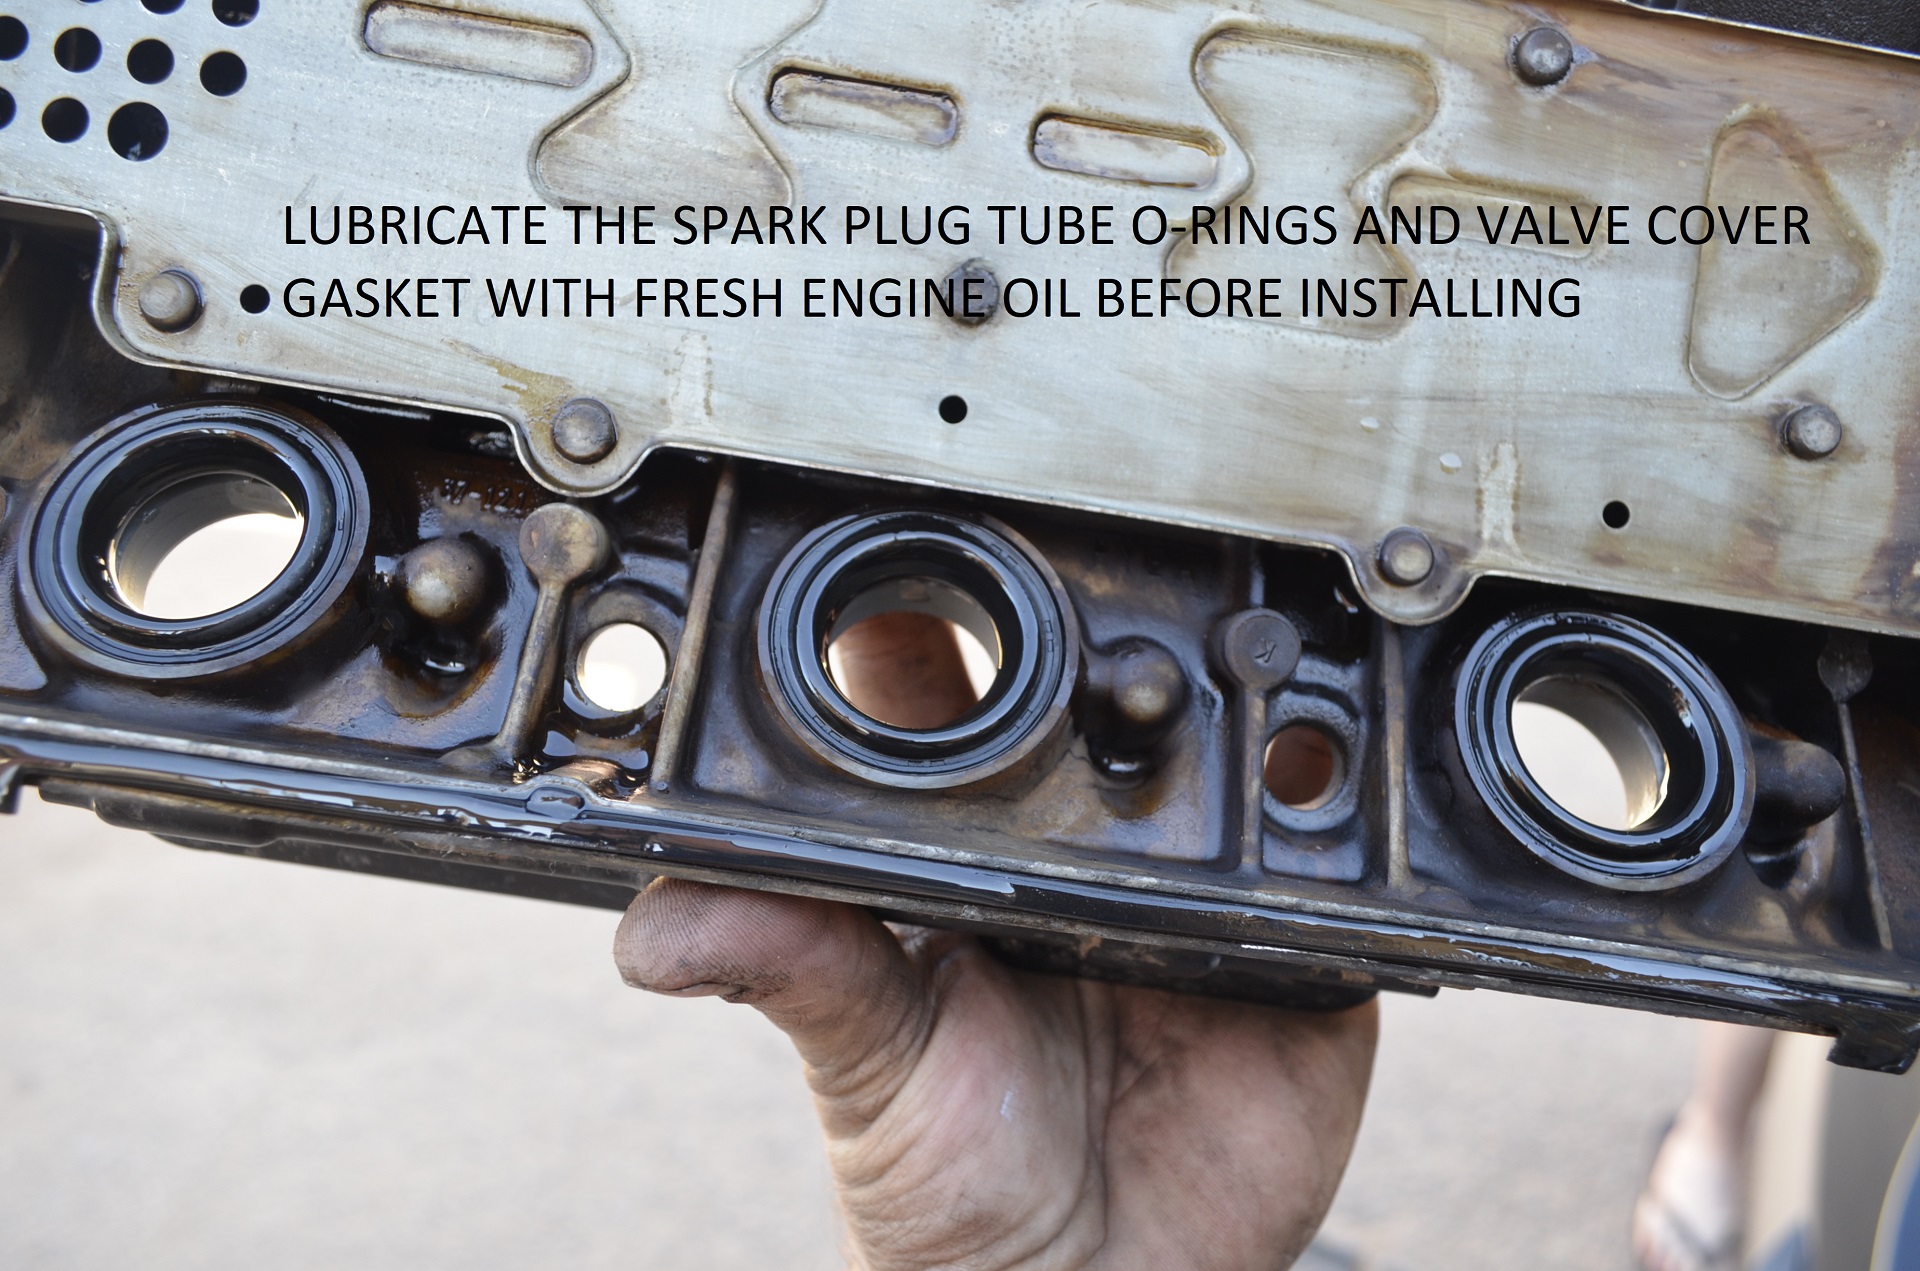
Proceed to lubricate the Spark Plug tube O-Rings and Valve Cover Gasket with fresh engine oil, Then re-install the valve covers! GOOD LUCK!
Tighten the valve cover bolts to no more than "Hand Tight". DO NOT OVERTIGHT! THEY CAN SNAP!!!!Re-install the rear valve cover PCV Line, Wire loom bolts and PS Steering line bracket, Do the front wire loom for the coils and Re-install the coils and plug them!
14.- Re-install the Manifold:


15.- Tighten the Manifold bolts using this sequence to max 16lb-ft:

16.- Tighten the Manifold Cover bolts using this sequence to max 8lb-ft:

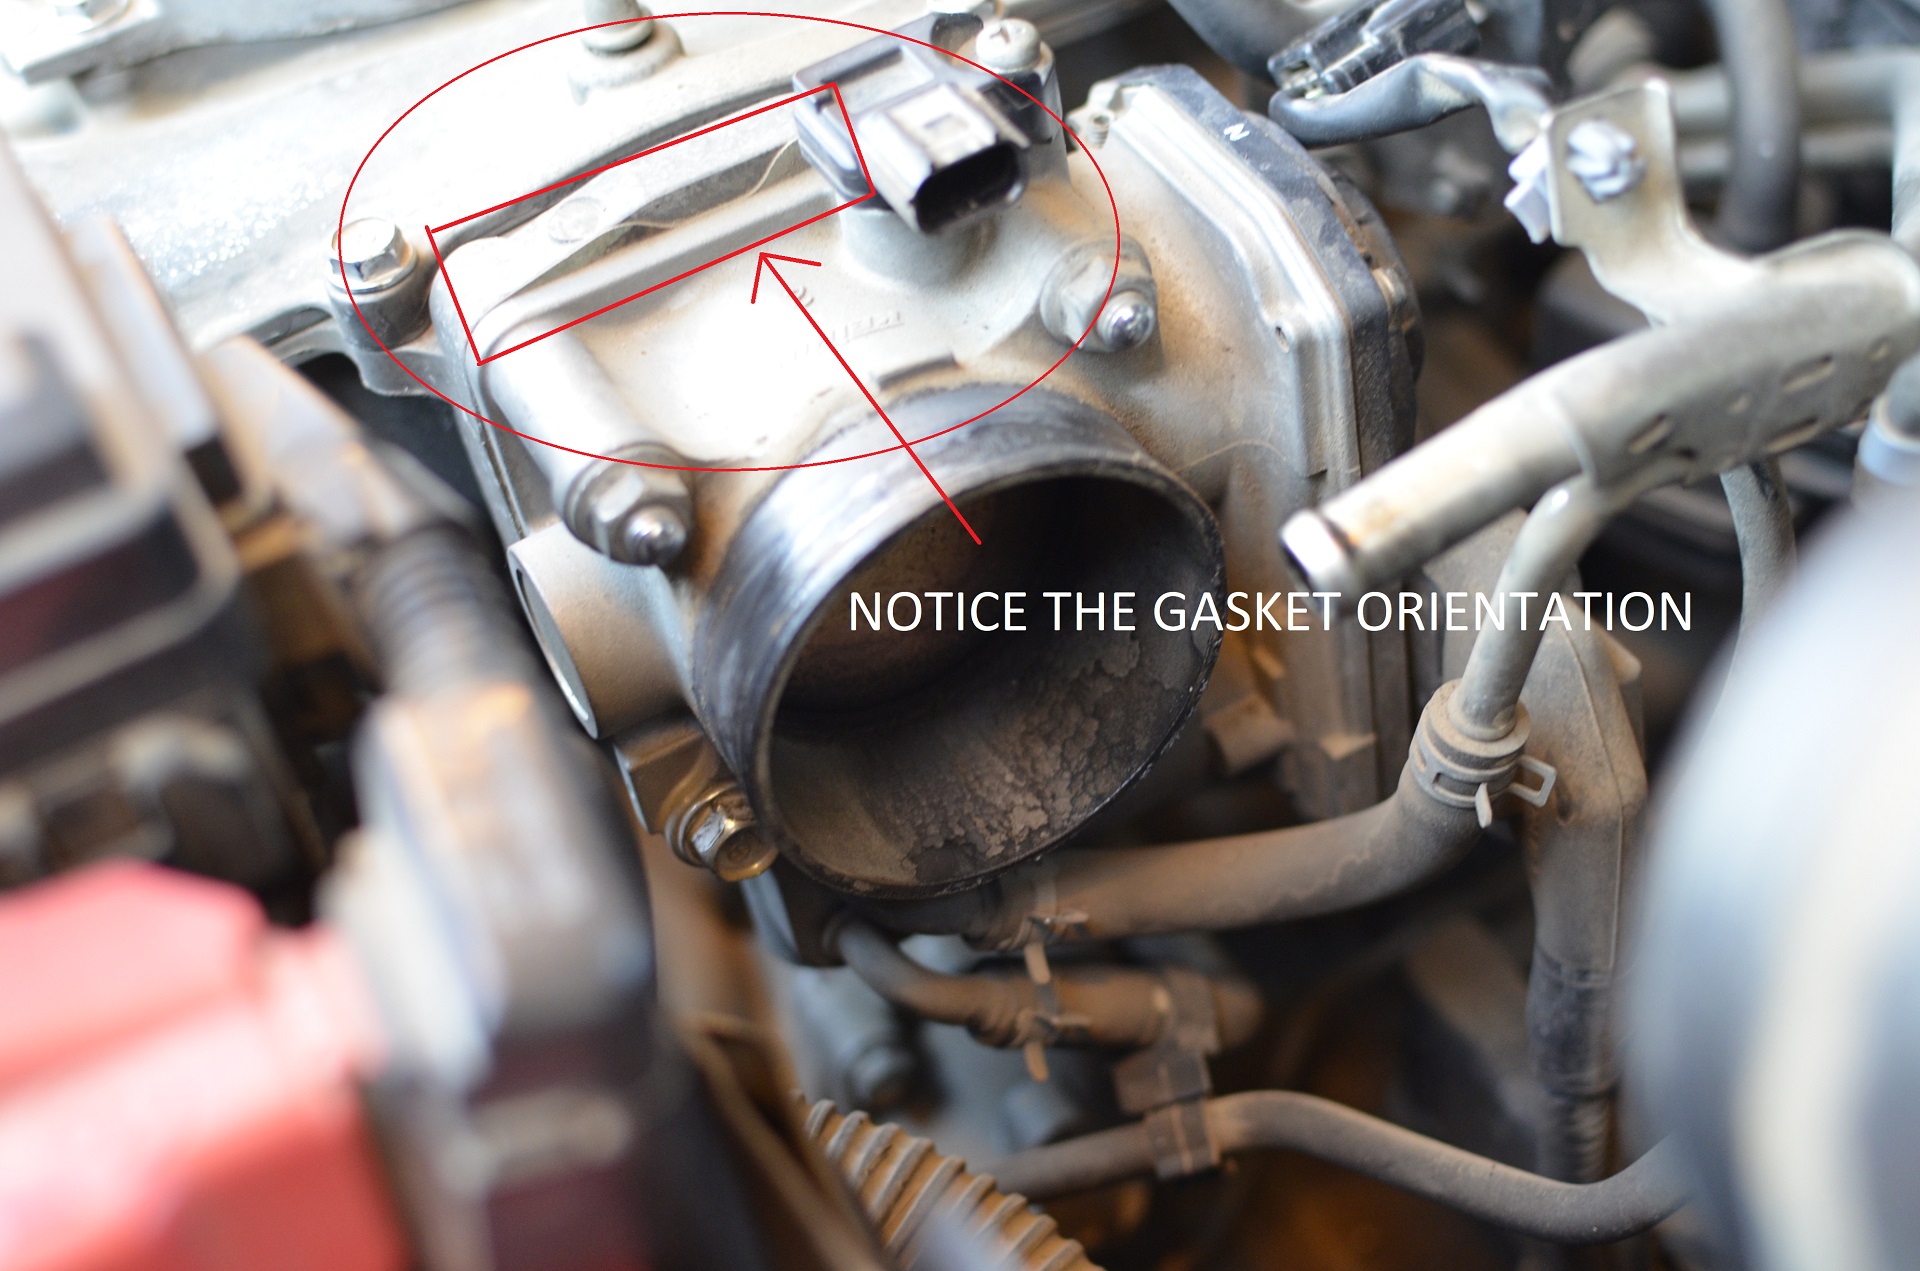
17.- Reinstall the TB making sure the Gasket has the correct orientation, Tighten the bolts and nuts in a cross pattern to 16lb-ft:
18- Re-install the PCV Line on the front Manifold, Re-connect the IMRC Motor, Connect the Brake Booster Line and Engine Mount vacuum, Install the Purge Valve solenoid, Intake Tube, Intake Tube PCV Line, Re-install the air filter cover and plug the MAF and MAP Sensors... Re-check every PCV line, Bracket, tube, etc.. And fire it up!
Now you successfully adjusted your valves!
Troubleshooting:
1.- If you start the car and notice the idle is surging? Odds are you have a vacuum leak, Check every PCV Line (Front Valve Cover, Engine Mount Vacuum, Brake Booster, Purge Valve Solenoid). If everything checks then you have a leak in a gasket either be Manifold Gasket, Manifold Cover Gasket or Throttle Body.
2.- Idle TOO HIGH! If you notice your idle is too high and you opened the Throttle Body plate to clean it? Odds are you need your TPS Reset which can only be done via ECU. Check this Thread: P0507 and SH-AWD:77 after Cleaning Throttle Body - Acura MDX Forum : Acura MDX SUV Forums
Now if everything is alright congratulations! Now you really successfully adjusted your valves!
If you have any questions feel free to ask!!
This is probably the most lengthy and in depth DIY I have ever done, I will try to explain to the best of my capabilities how to adjust the valves on your MDX this DIY works for all the 2G MDX (2007 to 2013) bear in mind the 2010-2013 has a different head valve train setup the steps are virtually the same just some visual differences.
The J-Series engine is almost universal in this procedure so you can apply this guide (With some modifications) to almost any Honda & Acura product with a V6 J-Series. 1st Gen MDX and Even the 3rd gen MDX should not be too far off the bat of this guide.
First off..
When you should adjust the valves?
Honda & Acura say "Adjust when Noisy" but this is a very bad approach. Since the only valves that will get noisier with time are the Intake Valves, The Exhaust Valves will wear out its valve seats and valve stems which will lead to become Tighter... Tighter Valves are far too dangerous as they can destroy your Engine Head. So its a good advice to adjust your valves with the 105K Service, Do not wait until "They are noisy".How difficult it is?
Its not really too difficult more than it is very time consuming. Don�t take me wrong, You can mess this thing up to the point of damaging your engine.. So as in most DIYs I take absolutely no responsibility if you mess up your engine while making a mistake using this Guide. If you follow this guide correctly you should have no issues at all.
What do I need?
The tools you will need are already probably in your tool box.. There is only 1 special tool you can get but its not required and that is the "Valve Adjustment Tool" that is basically a Flat Screwdriver and 10mm Wrench Combo in 1.. If you have both of these in your tool box you don�t need the special tool at all.These are the tools I used and Info:
(NOT PICTURED HERE: 10mm closed end wrench and small flat screwdriver, They are pictured below. Torque meter for the Manifold Cover, Intake Manifold bolts and Throttle Body).
Both feeler gauges are: 0.22mm and 0.30mm in thickness.
Torque Specs:
Manifold Cover Bolts 8lb-ft
Intake Manifold Bolts 16lb-ft
Throttle Body Nuts and Bolts 16lb-ft
Most of the bolts and nuts are 10mm and 12mm, You can remove the front wire loom bracket to makes some room and it has a bigger 14mm bolt. Otherwise you can do all of this job with 10 and 12mm sockets.
Now the STEPS:
First off you have to remove your engine plastic cover, If you do not know how to do this its probably for the best to STOP and let a professional mechanic do this job.. If you know how to remove it then proceed ahead.
1.- Unplug the MAF and MAP Sensors:
2.- (Not Pictured Remove the Air Filter Cover) Remove the Air Intake tube by removing the 2 Philips screw straps and remove the PCV Line:
3.- Disconnect IMRC Motor and all Manifold PCV Lines (Brake Booster, Engine Mounts, Front PCV Line):
4.-Remove the Purge Valve Solenoid:
5.-Remove both valve cover wire looms, They all use 10mm bolts, Disconnect the coils and remove them:
Rear, Uses 3x 10mm bolts the ones on the arrows and 1 (Not Pictured) PS bracket holder bolt that is holding the PS Line to the rear valve cover:
I
nformation:
Reason why its a PITA to remove the TB completely is because of the coolant lines it has to warm itself up. If you plan to remove the Manifold with the TB in place you will have to purge the radiator afterwards and replace coolant:
So in order to avoid this you will buy only the TB Gasket because it can get damaged when removing it.. So buy the TB Gasket!:
6.- Remove the Throttle Body:
7.- Now its time to remove the Intake Manifold! First we have to remove the Manifold Cover, Use this sequence to undo it:
8.- Remove the Intake Manifold, Use this sequence to undo it:
Important Information! After Removing the Intake Manifold:
9.- Remove the Valve Covers...
Now this isn�t very easy at ALL its probably the hardest part of the procedure as there is little to no room to wiggle the wire looms out of the way. Do your best to remove the covers, There is a PCV Line on the Rear Cover (NOT PICTURED) that is the one that connects to the Intake Tube PCV Line, Remove that. To pop the covers use a flat screwdriver and push the covers Up away from the head.. Make extreme CAUTION not to damage the valve cover gaskets! You can re-use them but if you damage them do not re-use them.The gasket will try to stick to the head before pulling the cover away make sure the gasket has un-sticked from the head with your hand. Then remove it by wiggling it between the head and the wire loom (Painful and stressful step). Make sure the gasket do not get stuck in one of the spark plug tubes! if you feel any resistance STOP and re-check that the gasket is not stuck. Valve covers removed:
10.- You can now cover everything up to let it sit until its cold (If you started cold then proceed to step 11). DO NOT ADJUST THE VALVES EVEN IF THEY ARE WARM! COLD ONLY!!!!
11.- Now with the engine Completely COLD we can adjust the valves but before that its time to set the TDC timings.
For this you will need a LONG breaker bar and a 19mm socket as we will be turning the crankshaft by hand (NOT PICTURED).
Open the Timing Belt cover peep hole and use a mirror to align the TDC Markings to each individual cylinder:
Turn the crankshaft CLOCKWISE and find cylinder 1:
Then align the TDC marks for that cylinder:
You can now adjust all valves in cylinder 1!
The adjustment sequence follows the firing order so:
The engine rear bank has cylinders 1,2,3 while the front bank has 4,5,6.
The firing order (Or adjustment sequence when you turn the crankshaft) will be: 1.4.2,5,3,6
Do not try to adjust the valves that are not in TDC! always adjust the valves on the specific TDC sequence.
12.- Adjusting the valves is not really difficult.. You will need 2 feeler gauges:
0.22mm for the Intake Valves.
0.30mm for the Exhaust Valves.Use a closed end 10mm wrench and a flat screwdriver:
You can also buy the tool specific for adjusting valves but its really not needed.Insert your feeler gauge between the valve tip and the rocker arm hammer pin (Adjusting Pin w/e):
If the feeler gauge cannot be inserted you will have to undo the hammer pin (Adjusting Pin):
Adjust until there is little drag on the feeler gauges, They should be able to fit in snug but not too tightly if they drag they are too tight!When you are over tighten the locking nut HAND TIGHT! there is a specific torque value for this but good luck trying to set the torque meter while holding the adjustment pin with the flat screwdriver. Tighten as much as you needed to undo them.. Its not too hard, just "Hand Tight". The nut is small so dont go ape **** on it! Being a locking nut setup they will not undo themselves unless you leave it super loose. Finish all valves in all cylinders then proceed to final assembly.
OPTIONAL!!.- You can clean your Manifold, EGR Passages and Throttle Body, If you don�t want to mess with resetting the TPS in the Throttle Body DO NOT CLEAN IT! If you clean your TB you will Could need a TPS reset which can only be done with a good OBDII Scanner or at the Dealership. Not resetting the TPS value will create a high idle situation.My valve covers were DIRTY AS HELL:
Now they are clean!
Perfect time to clean the EGR Passages and Holes:
The EGR Splitter bolts are only to be tighten to 8lb-ft max! do not overtight! Look at that clean manifold...
13.- Now its time to get everything back together which is obviously reverse procedure.!
Proceed to lubricate the Spark Plug tube O-Rings and Valve Cover Gasket with fresh engine oil, Then re-install the valve covers! GOOD LUCK!
Tighten the valve cover bolts to no more than "Hand Tight". DO NOT OVERTIGHT! THEY CAN SNAP!!!!Re-install the rear valve cover PCV Line, Wire loom bolts and PS Steering line bracket, Do the front wire loom for the coils and Re-install the coils and plug them!
14.- Re-install the Manifold:
15.- Tighten the Manifold bolts using this sequence to max 16lb-ft:
16.- Tighten the Manifold Cover bolts using this sequence to max 8lb-ft:
17.- Reinstall the TB making sure the Gasket has the correct orientation, Tighten the bolts and nuts in a cross pattern to 16lb-ft:
18- Re-install the PCV Line on the front Manifold, Re-connect the IMRC Motor, Connect the Brake Booster Line and Engine Mount vacuum, Install the Purge Valve solenoid, Intake Tube, Intake Tube PCV Line, Re-install the air filter cover and plug the MAF and MAP Sensors... Re-check every PCV line, Bracket, tube, etc.. And fire it up!
Now you successfully adjusted your valves!
Troubleshooting:
1.- If you start the car and notice the idle is surging? Odds are you have a vacuum leak, Check every PCV Line (Front Valve Cover, Engine Mount Vacuum, Brake Booster, Purge Valve Solenoid). If everything checks then you have a leak in a gasket either be Manifold Gasket, Manifold Cover Gasket or Throttle Body.
2.- Idle TOO HIGH! If you notice your idle is too high and you opened the Throttle Body plate to clean it? Odds are you need your TPS Reset which can only be done via ECU. Check this Thread: P0507 and SH-AWD:77 after Cleaning Throttle Body - Acura MDX Forum : Acura MDX SUV Forums
Now if everything is alright congratulations! Now you really successfully adjusted your valves!
If you have any questions feel free to ask!!

Instructor
Joined: Dec 2011
Posts: 114
Likes: 9
Thx for excellent description. What was your mileage? Why would you want to reuse VC gaskets and sparkplug tube seals - relatively small cost for new gaskets compared to work required to remove VC’s later to repair leak? Did all valves need adjusting? How far off were they? Did you reuse manifold gasket?
Thread Starter
Moderator
Joined: Jan 2009
Posts: 6,509
Likes: 1,021
From: Baja, M�xico.
Thx for excellent description. What was your mileage? Why would you want to reuse VC gaskets and sparkplug tube seals - relatively small cost for new gaskets compared to work required to remove VC�s later to repair leak? Did all valves need adjusting? How far off were they? Did you reuse manifold gasket?
My MDX is currently sitting at 102K.
I re-used the other gaskets because they are rubber (Manifold Cover and Valve Cover Gasket) and metal (Manifold Gasket) no point in spending for something that will work alright again (Of course YMMV which is why I didn�t recommend on skipping these, Just my personal preference). The TB Gasket though is paper and can get ripped apart when removed which I have dealt with before, Mine didn�t tear anyway so that was a waste of a perfectly good paper gasket.
OBVIOUSLY Honda says to replace them all, God forbids they lose any money on gaskets.. I�ve done my fair share of these and I haven�t had an issue re-using them. But again Your Mileage May Vary!
Intake side only 1 cylinder was off but not by much I just wanted them to be on par with all others so I adjusted them.
Exhaust side, 2 cylinders were a little bit tight so I just make them on par with all others.
All in all they were fine, Nothing to worry about but at least now I know I can do another 100K on them.

6th Gear
Joined: Jan 2018
Posts: 6
Likes: 0
Great DIY and excellent pics.
I've done valves on covics, CR-Vs, accords, pilots and the Honda engines in the Saturn Vues my neighbor has. I finally bought the valve adjustment tool. Mine is an Alltrade 648827 from amazon, but they're sold under a lot of names.
I've done valves on covics, CR-Vs, accords, pilots and the Honda engines in the Saturn Vues my neighbor has. I finally bought the valve adjustment tool. Mine is an Alltrade 648827 from amazon, but they're sold under a lot of names.
Thread Starter
Moderator
Joined: Jan 2009
Posts: 6,509
Likes: 1,021
From: Baja, M�xico.
Thanks!
The valve adjustment job is one of the easiest on the MDX but the engine height is what makes is cumbersome to reach.. I had to use a wheel ramp so I could reach the rear valves comfortably.
The valve adjustment job is one of the easiest on the MDX but the engine height is what makes is cumbersome to reach.. I had to use a wheel ramp so I could reach the rear valves comfortably.
6th Gear
Joined: Jan 2018
Posts: 6
Likes: 0
Got to Do my CR-V soon too but that ones right out in the open.

Thread
Thread Starter
Forum
Replies
Last Post