DIY Camber Adjustments - Stop paying for Alignments
 11-21-2011, 09:52 PM
#1

Hey everybody,
At the request of few fellow AZ members I've put together a quick camber adjustments DIY. This should come in handy for those that change suspension heights and wheel setups often enough that their camber settings get out of wack from factory spec. And with alignments fetching around 80 bucks a pop for a decent one, why not invest in some tools and never pay for an alignment again? I adjust my camber to fit my tire temps at the track but I've catered this to street TL's that just need to stop tire wear and keep them in factory spec. It's something that just about anyone can do with simple hand tools and some specialty tools for camber measurement. This is setup for the type of front/rear camber kit I have on my car but the premise is the same for the other types of kits out there.
Here's a list and pictures of the tools you'll need to accomplish camber changes.
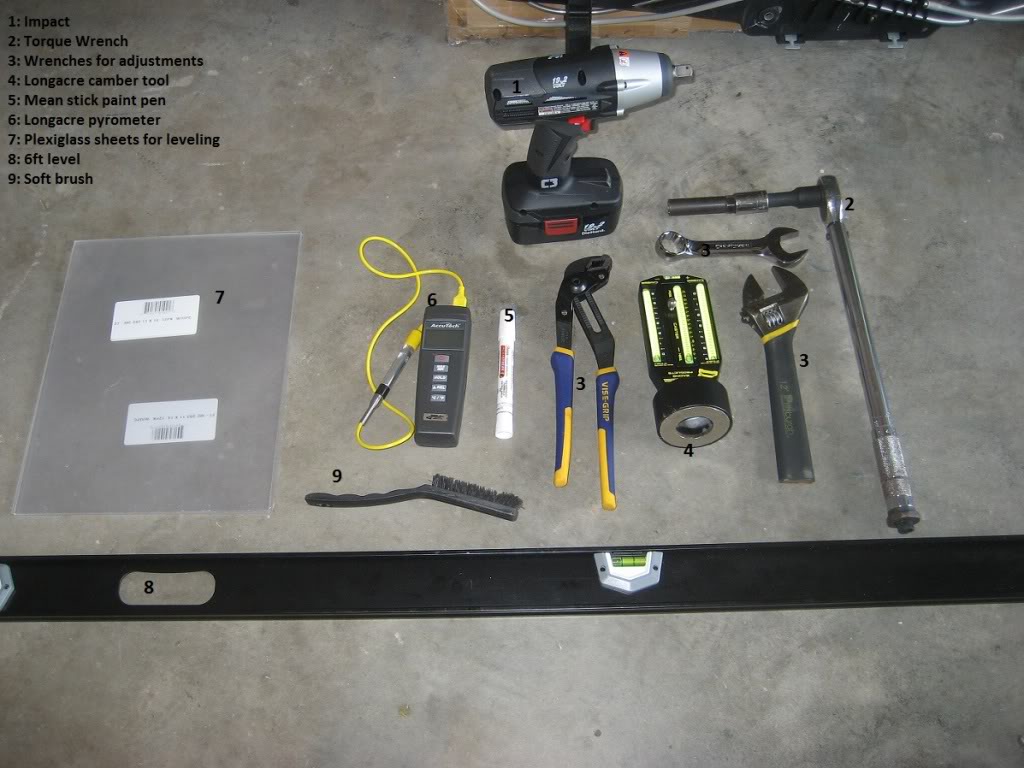
And obviously you'll need a jack to get the car in the air and a notebook to keep alignment records in.
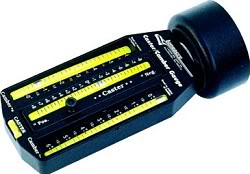
OK, lets talk about the camber tool. There are many out there and they all pretty much will give you the same information, it's just a matter of how much you want to spend and small things like if you want a digital display over a tradition "bubble" type one. I'm quite partial to Longacre Racing products. Been using them at the track for years and they are strong, accurate and dependable. The first one is the type that I have, but for more money you can have the style shown after it. I used one on my STI race team and its awesome but pretty expensive and not really that necessary for the avg DD'er, but if you think it'll impress your friends, go for it if it'll make you feel better.
Next, before we get into the process one must take to get accurate camber changes I have a picture of the factory specs for the TL's alignment. Because this a DIY for camber specifically, I drew a red box around the applicable number on the diagram.
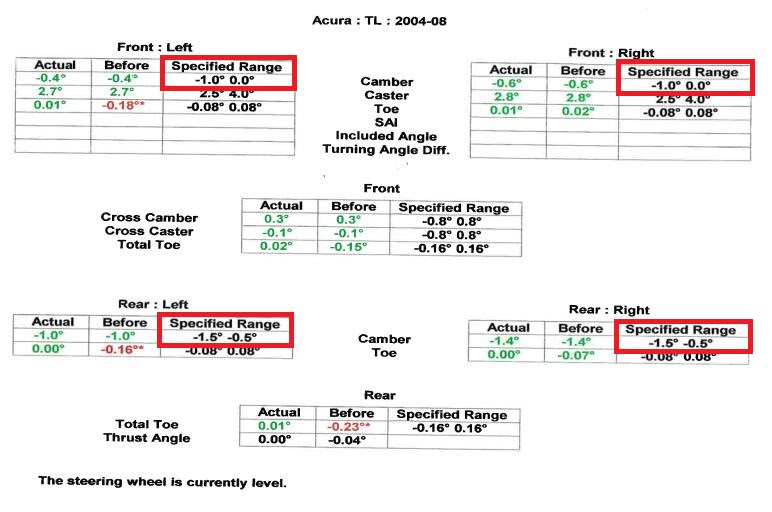
My examples are not going to be to this spec due to it being setup for track duty and really these numbers are really just serving as examples for the process. But the spec numbers will work for you or at least show you how to adjust your camber to stop excessive tire wear or tuck your wheels if necessary.
Ok, now that we know what we need to accomplish a camber adjustment and what numbers we're looking for, lets get cracking on actually measuring and adjusting your front and rear camber to suit your needs. Please note that the process is the exact same for the front and the rear and you might need to interpret the process for your specific camber kit.
Adjusting Camber Process
1: Start with the car on a clear and flat as possible surface (ie garage)
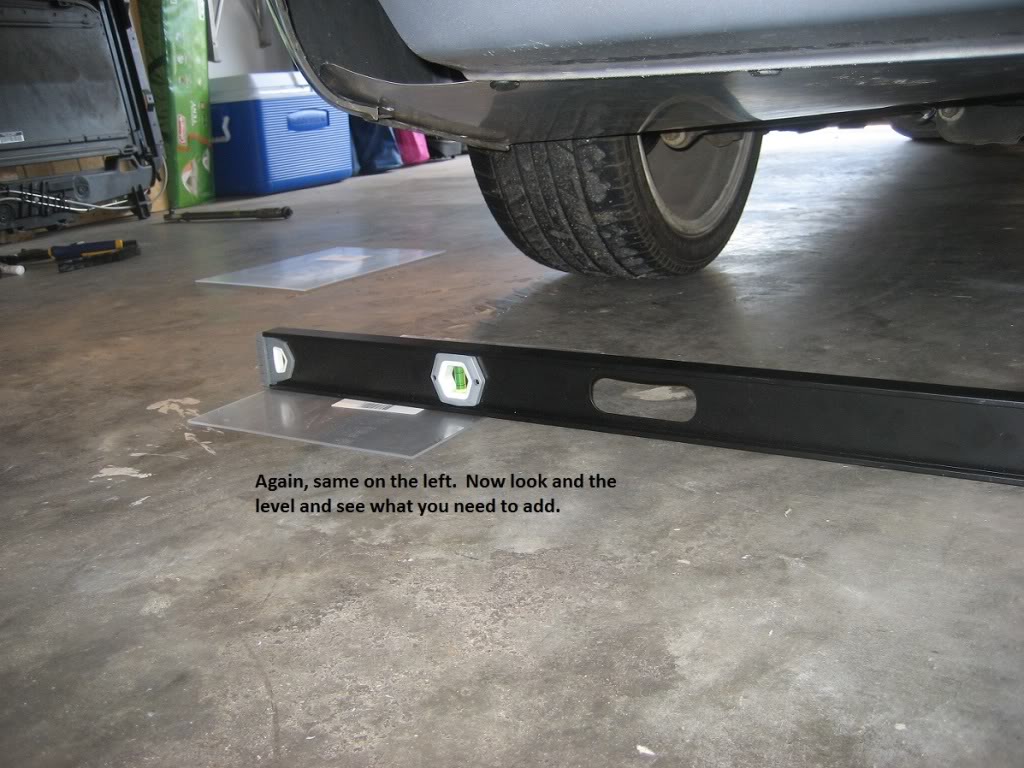
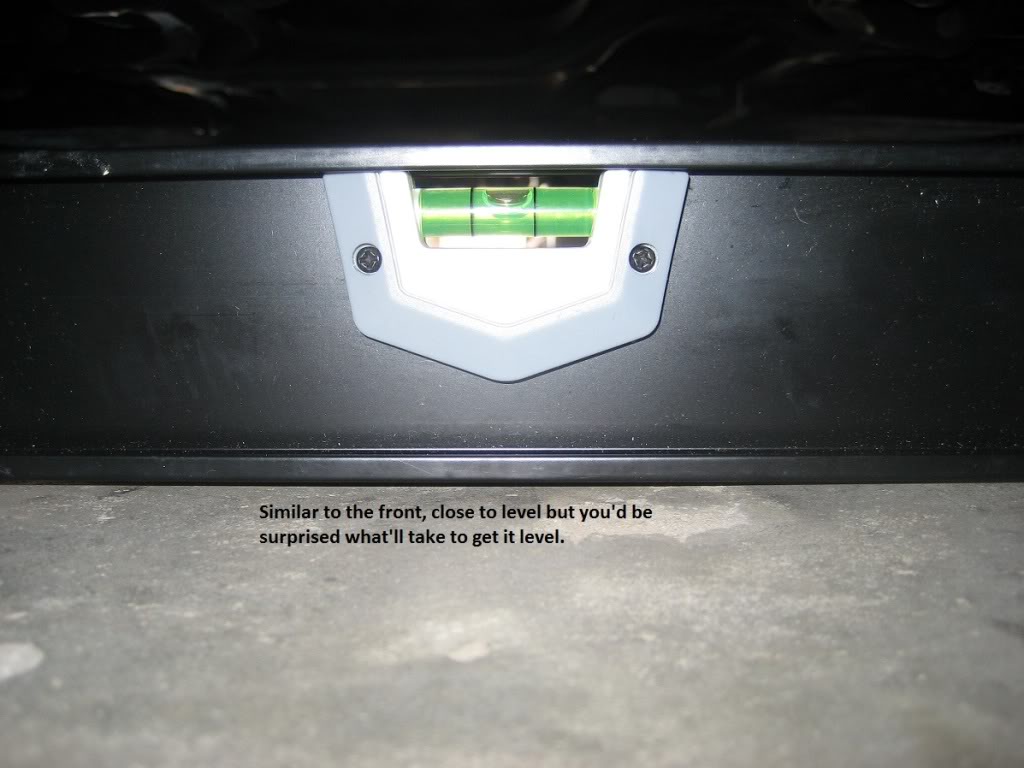
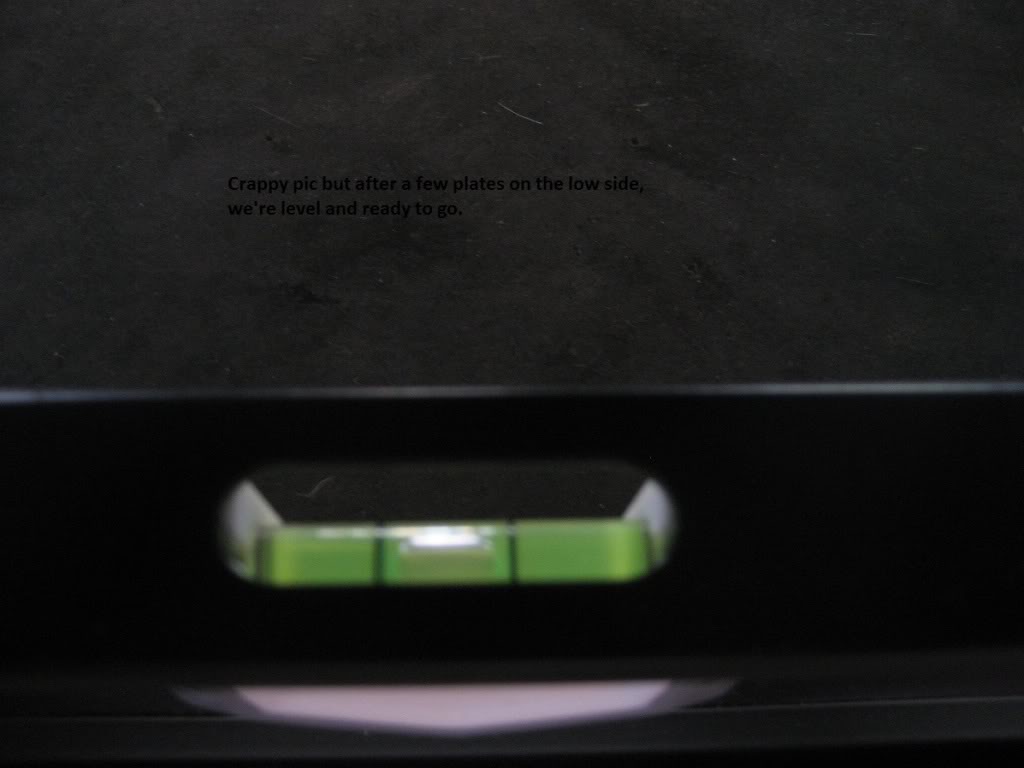
2: Use your 6ft level and leveling plates and make a level surface for both fronts or both rears to sit on while taking measurements. MUST BE LEVEL or don't bother starting.
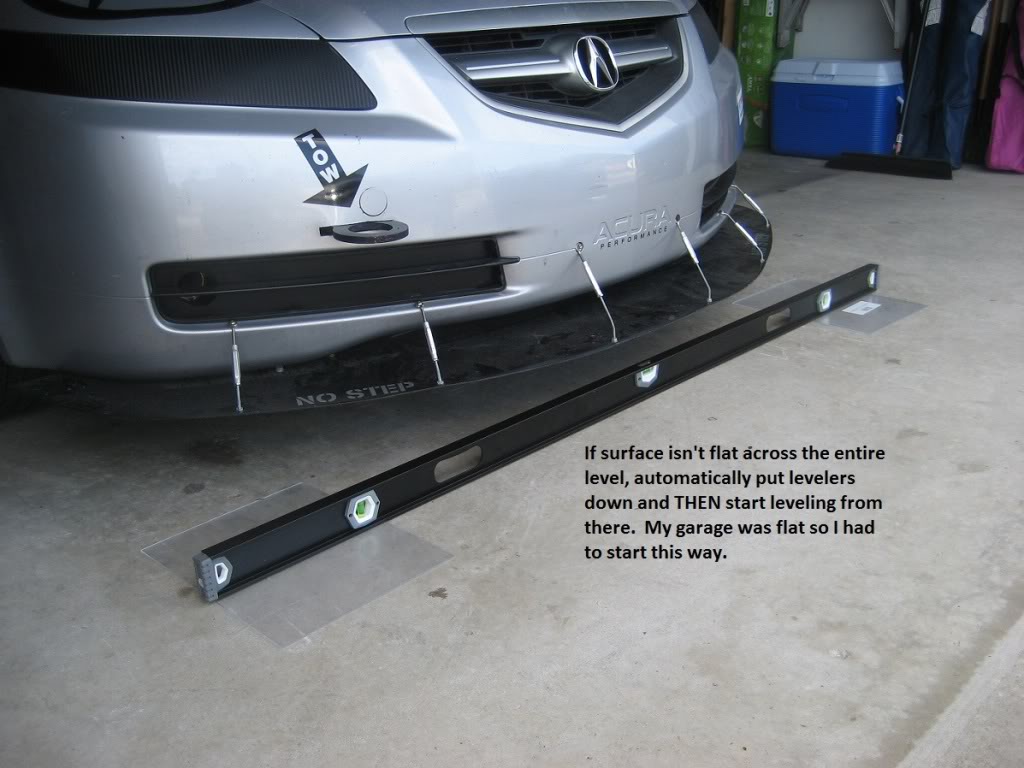
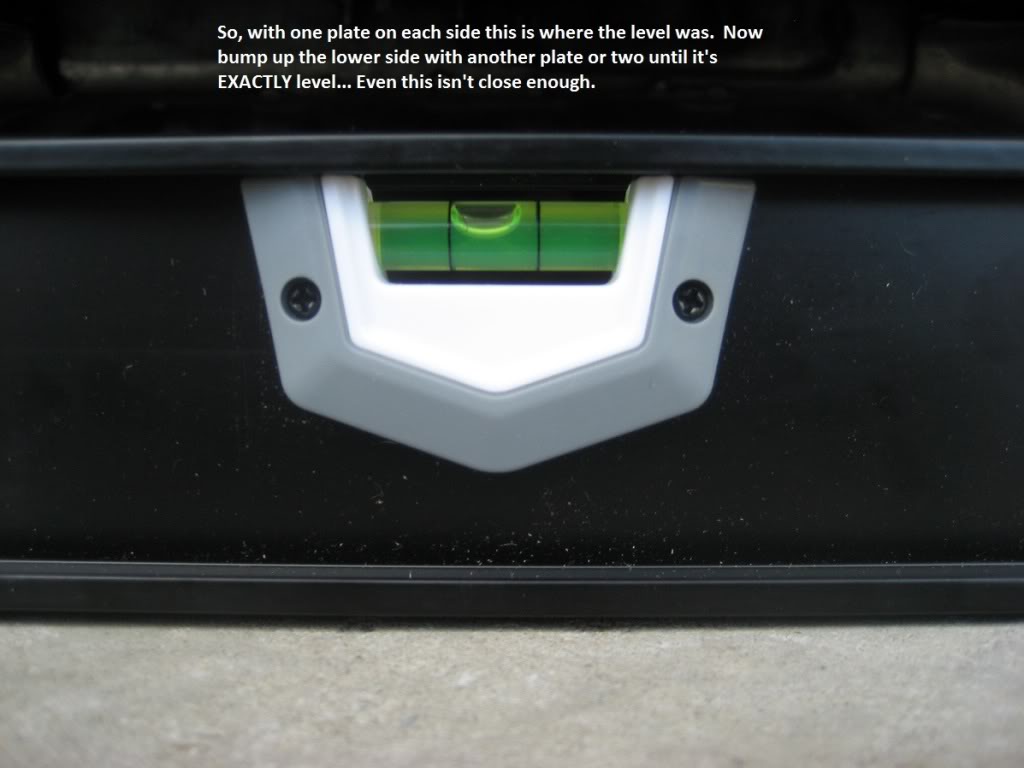
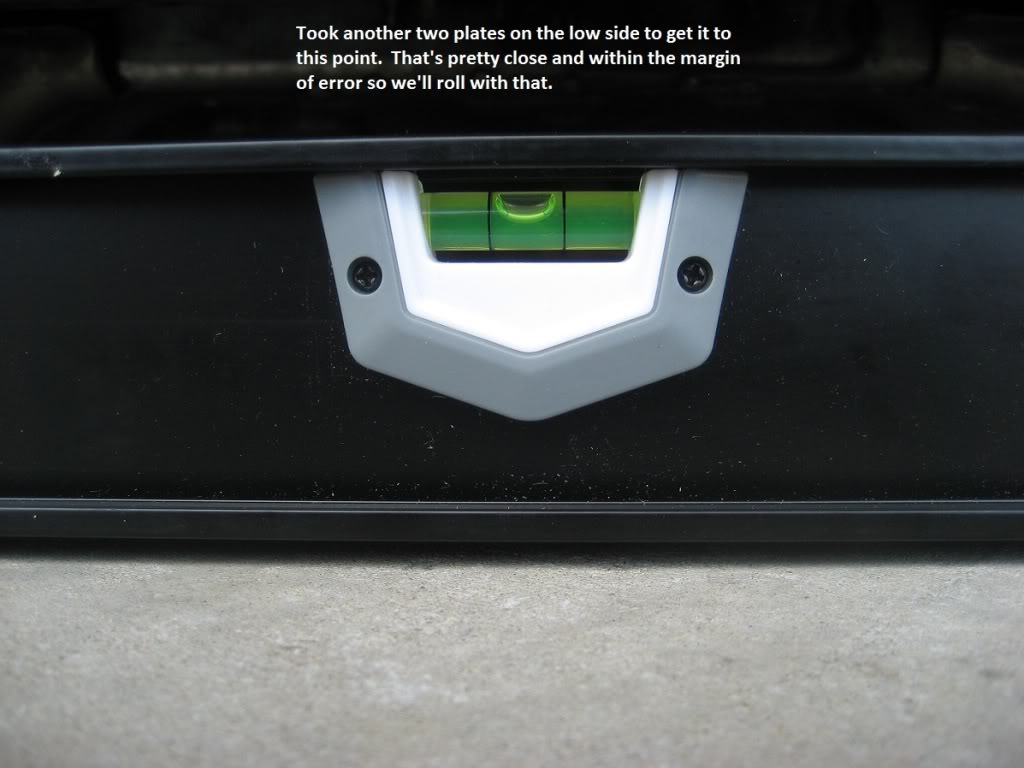
3: Roll the car forwards/backwards onto the leveled surface.
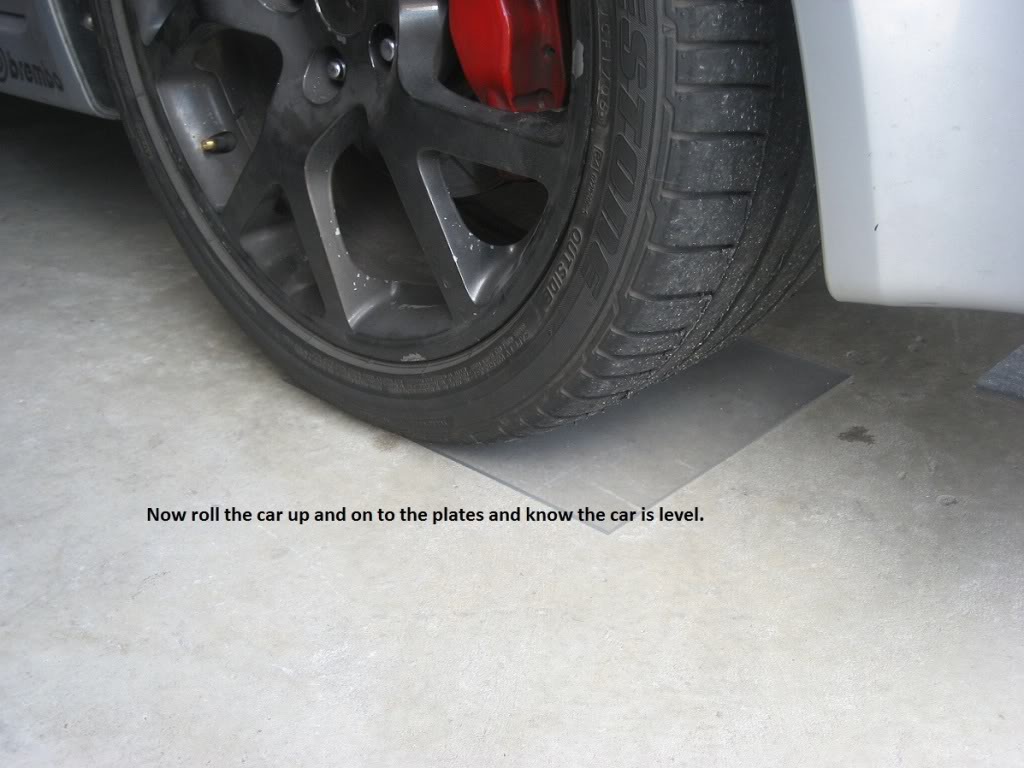
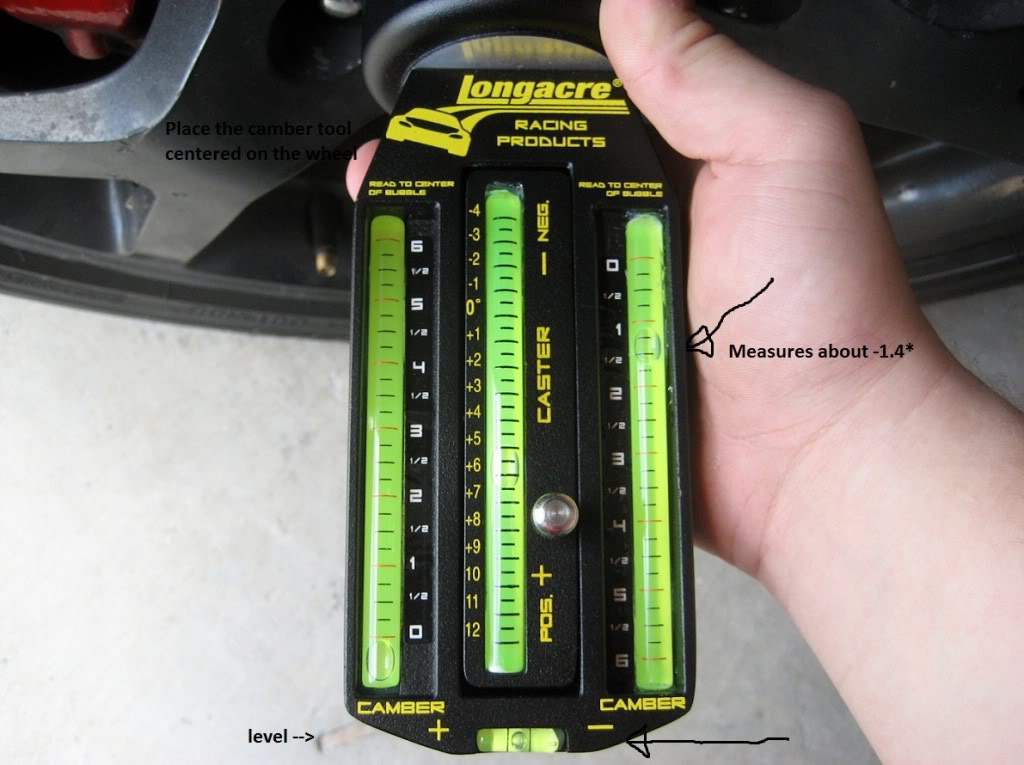
4: Use your Camber measuring tool and take a measurement from the centermost spot on the wheel. Mine covers the entire center cap and then I center it inbetween the lugs. Write what you measure down under respective FL FR RL RR category.
5: If the camber is out of spec, jack the car up and remove the wheel.
Instructions for the front camber adjustments
1: To adjust the camber with "ball joint" style front camber kit you have to loosen the lock nut on the top and rotate the ball joint to get the desired camber settings. With my car, I've found that the max negative camber I can acheive is about -1.5*. and with the ball joint 180 opposite that point, I can get back to about 0* camber. Using that, one can say that half between the two would net about -.7* of camber and that should help you make quick changes that are accurate. Even finer than that, you can use the Hex pattern on the bottom side of the ball joint to get an effective change by rotating the ball joint one point either direction to make a small (about .3* pos or neg) change.

2: Once the ball joint has been adjusted to give the wanted camber setting, simply tighten everything down and put the wheel back on.
3: It is important that you roll the car about 6 feet or so forwards or backwards and then put the car back on the leveling plate to help the new adjustments settle in quick before re-measuring.
4: Re-measure and record the data.
5: If it's in spec and matches the other side, move on. If not, repeat the process to make sure both sides measure out to the same setting and hopefully get them back to stock specs.
Instructions for the rear camber instructions
1: Again start on a clean/flat(ish) surface. and start leveling.

2: Once level and rolled up on the leveling plates, take your initial camber measurement.
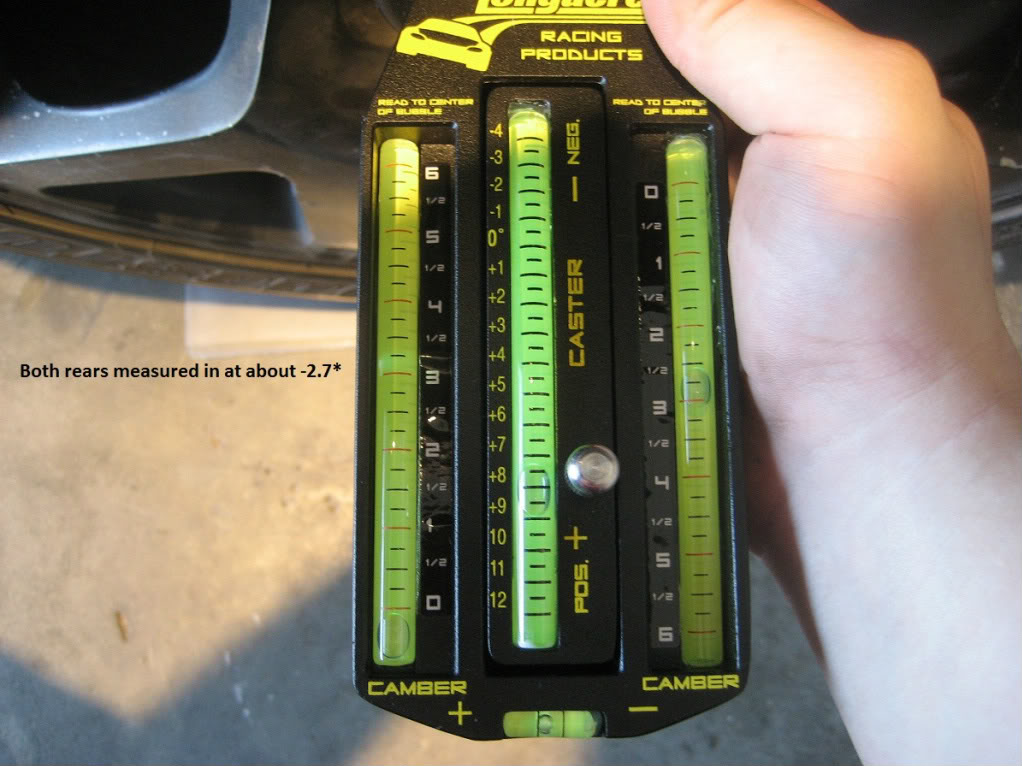
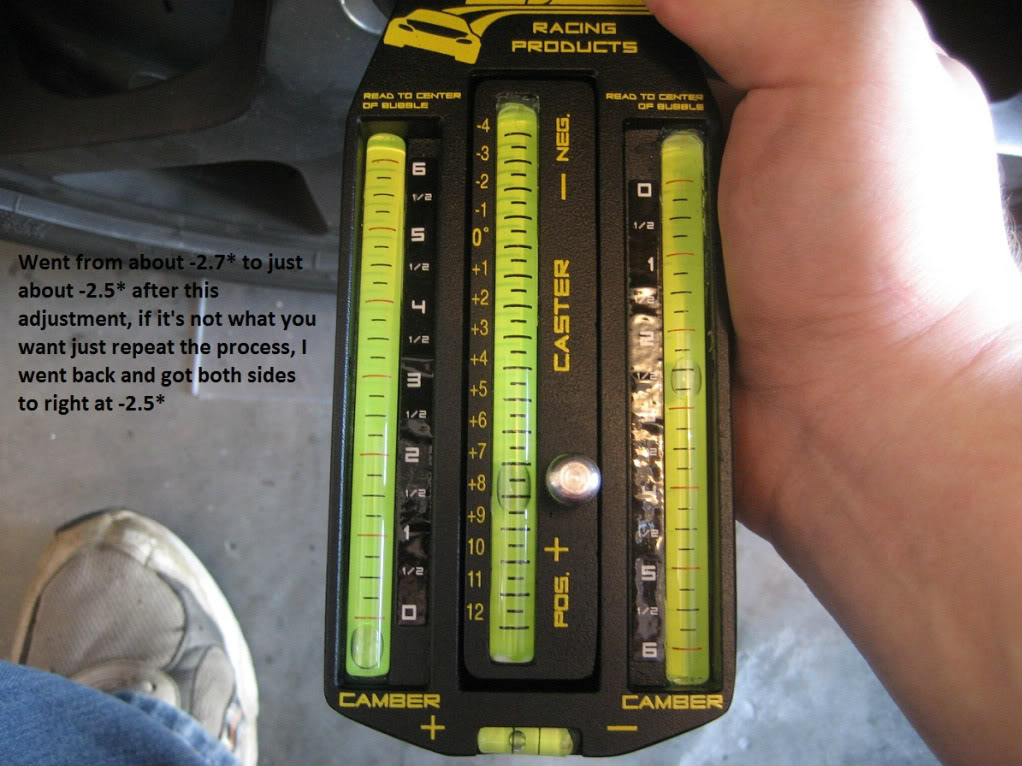
3: Both my rears measured in at about -2.7*. I'm not sure where I want them yet being I don't have track data to go off of so I'm gonna set them at -2.5* and see what the tire temps say at the track next time.
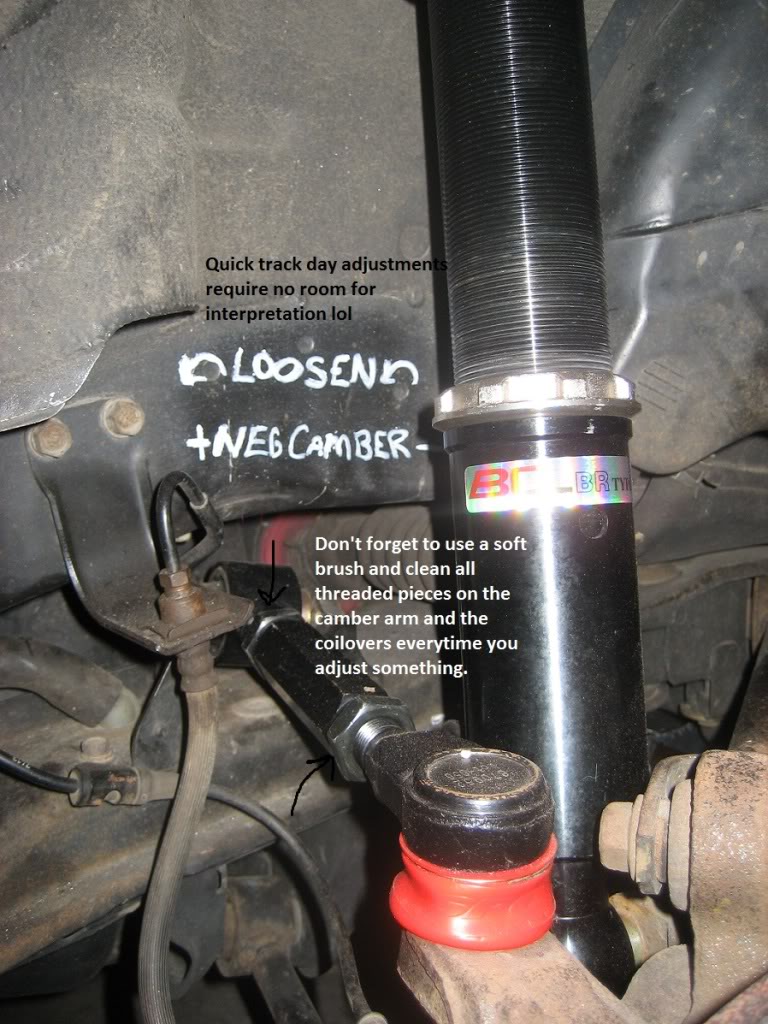
4: Remove the wheels and get setup for the adjustment. First things first, use a soft brush and clean out the threads on the camber kit. I do this every single time I adjust something and it will guarantee you don't ruin them with dirt someday.
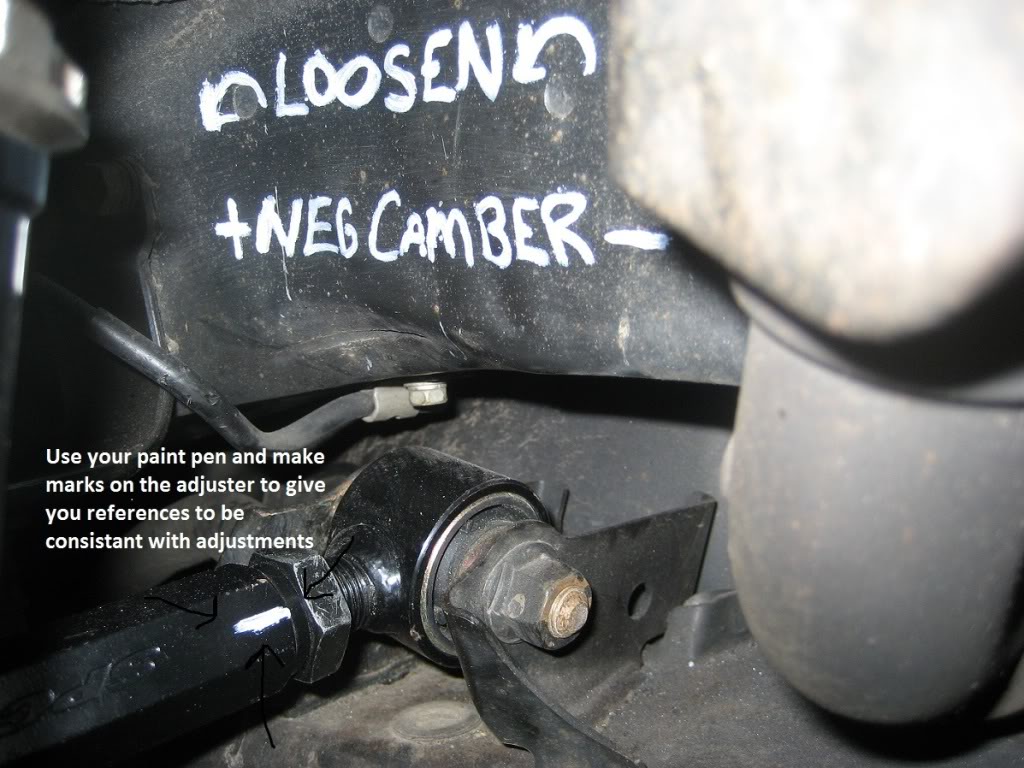
5: After cleaning the threads, loosen both lock nuts on the camber arm. Yes, I like my paint pen in the wheel well, makes sure no one eff's anything up at the track if I have a buddy help me dial in the car in the pits.
6: Note the tick marks I have on the adjuster arms, makes it easy to not lose track of how much you've turned it and gives you a reference for how much a complete turn changes the camber. Mine is about .7* for every complete turn.
7: Adjust the camber to what you want and again, re-essemble everything, roll the car forwards and back on to the plates and re-measure.
That should just about do it for camber adjustments. If I missed something I'll be happy to have it edited. If you have any questions about adjusting your camber or about track stuff, feel free to PM me and I'll try to get back to you quickly.
At the request of few fellow AZ members I've put together a quick camber adjustments DIY. This should come in handy for those that change suspension heights and wheel setups often enough that their camber settings get out of wack from factory spec. And with alignments fetching around 80 bucks a pop for a decent one, why not invest in some tools and never pay for an alignment again? I adjust my camber to fit my tire temps at the track but I've catered this to street TL's that just need to stop tire wear and keep them in factory spec. It's something that just about anyone can do with simple hand tools and some specialty tools for camber measurement. This is setup for the type of front/rear camber kit I have on my car but the premise is the same for the other types of kits out there.
Here's a list and pictures of the tools you'll need to accomplish camber changes.
And obviously you'll need a jack to get the car in the air and a notebook to keep alignment records in.
OK, lets talk about the camber tool. There are many out there and they all pretty much will give you the same information, it's just a matter of how much you want to spend and small things like if you want a digital display over a tradition "bubble" type one. I'm quite partial to Longacre Racing products. Been using them at the track for years and they are strong, accurate and dependable. The first one is the type that I have, but for more money you can have the style shown after it. I used one on my STI race team and its awesome but pretty expensive and not really that necessary for the avg DD'er, but if you think it'll impress your friends, go for it if it'll make you feel better.
Next, before we get into the process one must take to get accurate camber changes I have a picture of the factory specs for the TL's alignment. Because this a DIY for camber specifically, I drew a red box around the applicable number on the diagram.
My examples are not going to be to this spec due to it being setup for track duty and really these numbers are really just serving as examples for the process. But the spec numbers will work for you or at least show you how to adjust your camber to stop excessive tire wear or tuck your wheels if necessary.
Ok, now that we know what we need to accomplish a camber adjustment and what numbers we're looking for, lets get cracking on actually measuring and adjusting your front and rear camber to suit your needs. Please note that the process is the exact same for the front and the rear and you might need to interpret the process for your specific camber kit.
Adjusting Camber Process
1: Start with the car on a clear and flat as possible surface (ie garage)
2: Use your 6ft level and leveling plates and make a level surface for both fronts or both rears to sit on while taking measurements. MUST BE LEVEL or don't bother starting.
3: Roll the car forwards/backwards onto the leveled surface.
4: Use your Camber measuring tool and take a measurement from the centermost spot on the wheel. Mine covers the entire center cap and then I center it inbetween the lugs. Write what you measure down under respective FL FR RL RR category.
5: If the camber is out of spec, jack the car up and remove the wheel.
Instructions for the front camber adjustments
1: To adjust the camber with "ball joint" style front camber kit you have to loosen the lock nut on the top and rotate the ball joint to get the desired camber settings. With my car, I've found that the max negative camber I can acheive is about -1.5*. and with the ball joint 180 opposite that point, I can get back to about 0* camber. Using that, one can say that half between the two would net about -.7* of camber and that should help you make quick changes that are accurate. Even finer than that, you can use the Hex pattern on the bottom side of the ball joint to get an effective change by rotating the ball joint one point either direction to make a small (about .3* pos or neg) change.
2: Once the ball joint has been adjusted to give the wanted camber setting, simply tighten everything down and put the wheel back on.
3: It is important that you roll the car about 6 feet or so forwards or backwards and then put the car back on the leveling plate to help the new adjustments settle in quick before re-measuring.
4: Re-measure and record the data.
5: If it's in spec and matches the other side, move on. If not, repeat the process to make sure both sides measure out to the same setting and hopefully get them back to stock specs.
Instructions for the rear camber instructions
1: Again start on a clean/flat(ish) surface. and start leveling.
2: Once level and rolled up on the leveling plates, take your initial camber measurement.
3: Both my rears measured in at about -2.7*. I'm not sure where I want them yet being I don't have track data to go off of so I'm gonna set them at -2.5* and see what the tire temps say at the track next time.
4: Remove the wheels and get setup for the adjustment. First things first, use a soft brush and clean out the threads on the camber kit. I do this every single time I adjust something and it will guarantee you don't ruin them with dirt someday.
5: After cleaning the threads, loosen both lock nuts on the camber arm. Yes, I like my paint pen in the wheel well, makes sure no one eff's anything up at the track if I have a buddy help me dial in the car in the pits.
6: Note the tick marks I have on the adjuster arms, makes it easy to not lose track of how much you've turned it and gives you a reference for how much a complete turn changes the camber. Mine is about .7* for every complete turn.
7: Adjust the camber to what you want and again, re-essemble everything, roll the car forwards and back on to the plates and re-measure.
That should just about do it for camber adjustments. If I missed something I'll be happy to have it edited. If you have any questions about adjusting your camber or about track stuff, feel free to PM me and I'll try to get back to you quickly.
Last edited by Bearcat94; 11-21-2011 at 11:43 PM. Reason: fixed pic

The following users liked this post:
Dino81 (11-25-2011)
11-21-2011, 10:06 PM
#2
Race Director
iTrader: (8)
Good info!!
I think I'll stick to heading to the shops for now heheh (it's getting cold!!).
I think I'll stick to heading to the shops for now heheh (it's getting cold!!).
 11-21-2011, 10:36 PM
#4

I like what you're doing, but I see a problem. When you adjust the camber on any wheel, you will affect the toe at that corner. How are you adjusting your toe after you adjust the camber?

 11-22-2011, 12:16 AM
#6
 11-22-2011, 08:39 AM
#9

As for the rear, with all those links.....who knows.
11-22-2011, 10:53 AM
#11
$120 and $145 respectively.
You can get one of these and stick it to your rotor through the wheel for $20. You will have to calibrate it by zeroing it on a perfectly vertical (plumb) surface first. Or zero it on one rotor, and compare the side-to-side difference by sticking it onto the other rotor.
http://www.summitracing.com/parts/SNG-61800/
11-22-2011, 11:06 AM
#12
Suzuka Master
$120 and $145 respectively.
You can get one of these and stick it to your rotor through the wheel for $20. You will have to calibrate it by zeroing it on a perfectly vertical (plumb) surface first. Or zero it on one rotor, and compare the side-to-side difference by sticking it onto the other rotor.
http://www.summitracing.com/parts/SNG-61800/
You can get one of these and stick it to your rotor through the wheel for $20. You will have to calibrate it by zeroing it on a perfectly vertical (plumb) surface first. Or zero it on one rotor, and compare the side-to-side difference by sticking it onto the other rotor.
http://www.summitracing.com/parts/SNG-61800/
Thing is the toe is critical on the TL and every time you change the camber the toe changes. Tires on a race car are usually a consumable .. but for most of us the $265 will cover 3 alignments plus we still have to worry about toe in ..
Great write up tho ..
 11-22-2011, 11:29 AM
#13
Cool ... prolly great if your racing or have coilovers and are changing them all the time ..
Thing is the toe is critical on the TL and every time you change the camber the toe changes. Tires on a race car are usually a consumable .. but for most of us the $265 will cover 3 alignments plus we still have to worry about toe in ..
Great write up tho ..
Thing is the toe is critical on the TL and every time you change the camber the toe changes. Tires on a race car are usually a consumable .. but for most of us the $265 will cover 3 alignments plus we still have to worry about toe in ..
Great write up tho ..

I've been doing alignments in my garage for a couple months now (spent only $40 on tools). It's not as hard as you might think. It all depends on your attention to detail and weather or not you can get over the steep learning curve.
Trust me, DIY alignments open up a whole new door to suspension tuning. Imagine not being held back by having to go get an alignment every time you make a change..........and not having to gamble on weather or not the operator knows what their doing and when the last time the machine was calibrated.
 11-22-2011, 11:33 AM
#14
Suzuka Master
Dude, stop worrying. He's going show us how to do toe next. This wrietup is just the first part.
I've been doing alignments in my garage for a couple months now (spent only $40 on tools). It's not as hard as you might think. It all depends on your attention to detail and weather or not you can get over the steep learning curve.
Trust me, DIY alignments open up a whole new door to suspension tuning. Imagine not being held back by having to go get an alignment every time you make a change..........and not having to gamble on weather or not the operator knows what their doing and when the last time the machine was calibrated.
11-22-2011, 11:53 AM
#15
Cool ... prolly great if your racing or have coilovers and are changing them all the time ..
Thing is the toe is critical on the TL and every time you change the camber the toe changes. Tires on a race car are usually a consumable .. but for most of us the $265 will cover 3 alignments plus we still have to worry about toe in ..
Great write up tho ..
Thing is the toe is critical on the TL and every time you change the camber the toe changes. Tires on a race car are usually a consumable .. but for most of us the $265 will cover 3 alignments plus we still have to worry about toe in ..
Great write up tho ..
The pyrometer is really not needed for street drivers. Aside from the standard tools, you'd only need the $120 Camber tool and the $15 or so for the level. So really after about two alignments, it'll have paid for itself and knowing how much people here change the size/width of there wheel/tire setup and suspension swaps, it'd still be worth it in the end. Then like most of us, after a few years with the same car, we get bored and buy something new and start the process all over again.
11-22-2011, 11:57 AM
#16
It really depends front/rear and camber kit design. Like on my rear camber kit being the single arm on the front upper rear suspension area, if I add negative camber it will toe in if anything.
Just thought I'd give you an example is all.

Thread
Thread Starter
Forum
Replies
Last Post
rockyboy
2G RDX (2013-2018)
170
12-06-2022 02:29 PM