3G TL Jewel eye retrofit 100% done - Full Pics inside
 01-24-2015, 07:27 AM
#41
Former Sponsor
iTrader: (12)
Things you need.
- 4 pin waterproof connectors male/female (2).
- Male ballast connectors (2).
- Male bi-xenon solenoid plugs (2).
- Ebay DRL kit.
- Ground wire.
-
Affix the male plugs from the 4 pin plugs to the power input wire for the LED control. You’ll be using the DRL, Hi beam, low beam and common ground wires from the 5.
Connect four wires to the female 4 pin plug. Use a diode on all three of the positive wires i.e. DRL, Hi beam and low beam.
The ground wire will have a battery terminal connector at the end which would be bolted to the chassis to attain common ground. You can either do this or go the longer route and have three ground wires merging into one, each of those three ground wires will be coming from DRL, Hi beam and low beam. This way you’ll be using both connections on all three of the connectors.
4 pin connectors
http://www.ebay.com/itm/10-Kit-4-Pin...Hot%20|%20eBay
Low beam
Use the following plug for the low beam; this connects directly to the low beam power supply from factory. Positive goes to the low beam wire in female 4 pin connector for low beam. Ground goes to common ground wire.

http://www.ebay.com/itm/SUBARU-WRX-STI-Acura-TL-Mazda-TSX-OEM-BALLAST-HID-PIGTAIL-PLUG-Mitsubishi-GEN2-/331174716186?pt=Motors_Car_Truck_Parts_Accessories&hash=item4d1b8d231a&vxp=mtr%5DSubaru%20WRX%20STI%20Acura%20TL%20Mazda%20TSX%20Ballast%20HID%20Pigtail%20Plug%20Mitsubishi%20Gen2
Hi beam
use the following plug for the hi beam power supply, again the left connector connects directly to the hi beam solenoid power supply from factory. Positive goes to the positive connector in the 4 pin female connector for hi beam. Ground goes to common ground wire.

http://www.ebay.com/itm/04-06-07-08-...0V3%20|%20eBay
DRL
for the drl. Use the following kit.
http://www.ebay.com/itm/LED-Daytime-Running-Light-DRL-Relay-Harness-Auto-Control-On-Off-Switch-kit-C14-/361091550190?pt=Motors_Car_Truck_Parts_Accessories&hash=item5412bbcbee&vxp=mtr
this is the wiring schematic from the auction above. You just need one of these kits by the way.

The shown optional wire would be routed to either the above low beam supply or you can go fancy and attach it to the parking light positive, so that when the parking lights are turned on it turns the DRL off.
The each positive form the DRL kit will go to either side DRL +ve in the female 4 pin connector. The ground will go to common ground.
Good luck.
- 4 pin waterproof connectors male/female (2).
- Male ballast connectors (2).
- Male bi-xenon solenoid plugs (2).
- Ebay DRL kit.
- Ground wire.
-
Affix the male plugs from the 4 pin plugs to the power input wire for the LED control. You’ll be using the DRL, Hi beam, low beam and common ground wires from the 5.
Connect four wires to the female 4 pin plug. Use a diode on all three of the positive wires i.e. DRL, Hi beam and low beam.
The ground wire will have a battery terminal connector at the end which would be bolted to the chassis to attain common ground. You can either do this or go the longer route and have three ground wires merging into one, each of those three ground wires will be coming from DRL, Hi beam and low beam. This way you’ll be using both connections on all three of the connectors.
4 pin connectors
http://www.ebay.com/itm/10-Kit-4-Pin...Hot%20|%20eBay
Low beam
Use the following plug for the low beam; this connects directly to the low beam power supply from factory. Positive goes to the low beam wire in female 4 pin connector for low beam. Ground goes to common ground wire.
http://www.ebay.com/itm/SUBARU-WRX-STI-Acura-TL-Mazda-TSX-OEM-BALLAST-HID-PIGTAIL-PLUG-Mitsubishi-GEN2-/331174716186?pt=Motors_Car_Truck_Parts_Accessories&hash=item4d1b8d231a&vxp=mtr%5DSubaru%20WRX%20STI%20Acura%20TL%20Mazda%20TSX%20Ballast%20HID%20Pigtail%20Plug%20Mitsubishi%20Gen2
Hi beam
use the following plug for the hi beam power supply, again the left connector connects directly to the hi beam solenoid power supply from factory. Positive goes to the positive connector in the 4 pin female connector for hi beam. Ground goes to common ground wire.
http://www.ebay.com/itm/04-06-07-08-...0V3%20|%20eBay
DRL
for the drl. Use the following kit.
http://www.ebay.com/itm/LED-Daytime-Running-Light-DRL-Relay-Harness-Auto-Control-On-Off-Switch-kit-C14-/361091550190?pt=Motors_Car_Truck_Parts_Accessories&hash=item5412bbcbee&vxp=mtr
this is the wiring schematic from the auction above. You just need one of these kits by the way.
The shown optional wire would be routed to either the above low beam supply or you can go fancy and attach it to the parking light positive, so that when the parking lights are turned on it turns the DRL off.
The each positive form the DRL kit will go to either side DRL +ve in the female 4 pin connector. The ground will go to common ground.
Good luck.
Last edited by JnC; 01-24-2015 at 07:32 AM.

The following 2 users liked this post by JnC:
csmeance (03-27-2015),
Steven Bell (01-25-2015)
01-25-2015, 02:29 PM
#43
Team Owner
iTrader: (2)
Join Date: Jan 2008
Location: Kansas City, MO (Overland Park, KS)
Posts: 36,545
Received 6,470 Likes
on
5,162 Posts
^^^ +1
01-25-2015, 09:34 PM
#44
2007 Type S WDP 5AT
Thread Starter
Just ordered it all JNC! Thanks  Im still finishing up final details when I have some time. Ill be off for 2 weeks February 10th on from surgery so that should be the final time needed to button it up to 100% They look epic and wait until I post all full photos
Im still finishing up final details when I have some time. Ill be off for 2 weeks February 10th on from surgery so that should be the final time needed to button it up to 100% They look epic and wait until I post all full photos
01-25-2015, 10:40 PM
#45
Race Director
iTrader: (8)
Good luck with surgery man, rest up well.
01-26-2015, 08:11 PM
#47
Team Owner
iTrader: (2)
Join Date: Jan 2008
Location: Kansas City, MO (Overland Park, KS)
Posts: 36,545
Received 6,470 Likes
on
5,162 Posts
Best of luck on your surgery, Wojo. Anxious to see how your Jewel Eyes turn out.
 02-04-2015, 07:10 PM
#49
Team Owner
iTrader: (2)
Join Date: Jan 2008
Location: Kansas City, MO (Overland Park, KS)
Posts: 36,545
Received 6,470 Likes
on
5,162 Posts
Ok, now I'm anxious.....
The following users liked this post:
skd2k1 (02-26-2015)
02-26-2015, 09:49 PM
#52
Team Owner
iTrader: (2)
Join Date: Jan 2008
Location: Kansas City, MO (Overland Park, KS)
Posts: 36,545
Received 6,470 Likes
on
5,162 Posts
I wish there WAS one.....

The following users liked this post:
vi3tsi06 (02-26-2020)


The following users liked this post:
rockyfeller (02-27-2015)
02-27-2015, 02:36 PM
#60
It would have been awesome if the LED modules sat more flush at an even plane with the turn signals, they stick out too much. But of course that would be impossible because of the huge heat sinks in the rear and already minimized clearance.
Easy for anyone to say though, the amount of work put into this mod outweighs any fair criticism. From afar it looks absolutely amazing! Definitely gives the car an updated 2015 look.
Easy for anyone to say though, the amount of work put into this mod outweighs any fair criticism. From afar it looks absolutely amazing! Definitely gives the car an updated 2015 look.
02-27-2015, 02:42 PM
#61
GOD DAMN
That looks goood!
That looks goood!

The following users liked this post:
2012wagon (02-27-2015)
02-28-2015, 02:06 PM
#64
Team Owner
iTrader: (2)
Join Date: Jan 2008
Location: Kansas City, MO (Overland Park, KS)
Posts: 36,545
Received 6,470 Likes
on
5,162 Posts
Wow...........................just amazing.
 03-09-2015, 07:14 PM
#66
Team Owner
iTrader: (2)
Join Date: Jan 2008
Location: Kansas City, MO (Overland Park, KS)
Posts: 36,545
Received 6,470 Likes
on
5,162 Posts
I had to come back for a 2nd look. We need more pics-especially with these turned on.
03-17-2015, 12:43 AM
#67
2007 Type S WDP 5AT
Thread Starter
UPDATE! Back at finishing them up. Wiring harness is done and the rears are done. I just need to trim the front bezels and seal them up. They will be on the car in 3 weeks with my new rims. I will also have photos showing nighttime illumination and pictures of them at night in all settings
03-17-2015, 09:57 PM
#69
Team Owner
iTrader: (2)
Join Date: Jan 2008
Location: Kansas City, MO (Overland Park, KS)
Posts: 36,545
Received 6,470 Likes
on
5,162 Posts
....worth waiting for!
03-17-2015, 11:09 PM
#70
2007 Type S WDP 5AT
Thread Starter
Its been a long road but also mind I work two full time jobs and this has been the last of my worries. As the nicer weather is slowly starting to arrive its pushing me to get them done. Im putting on my stance sc6 wheels in a few weeks and the lights aswell. Going to be stunning
 party
party
The following users liked this post:
justnspace (03-27-2015)
03-26-2015, 11:50 PM
#72
2007 Type S WDP 5AT
Thread Starter


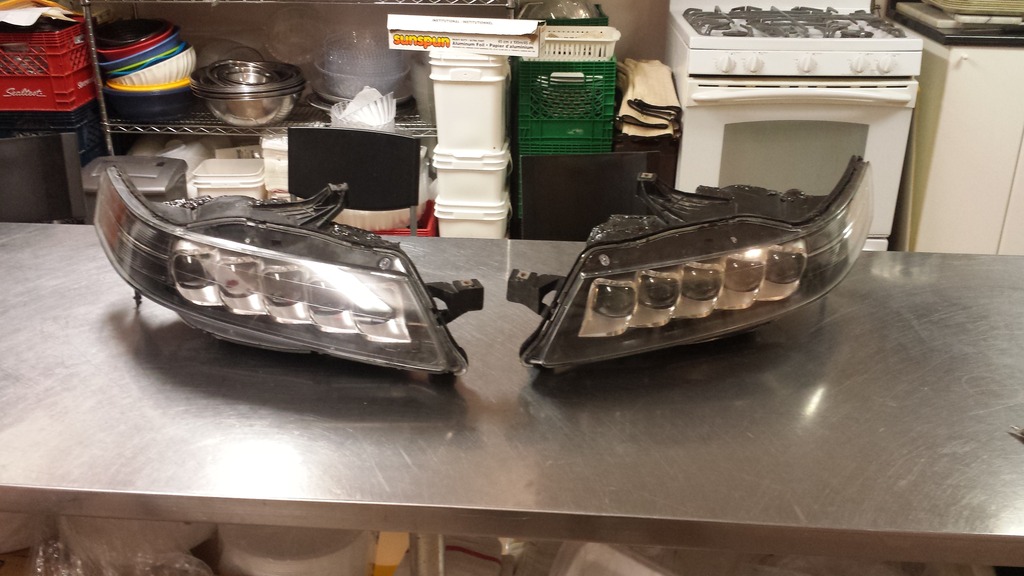
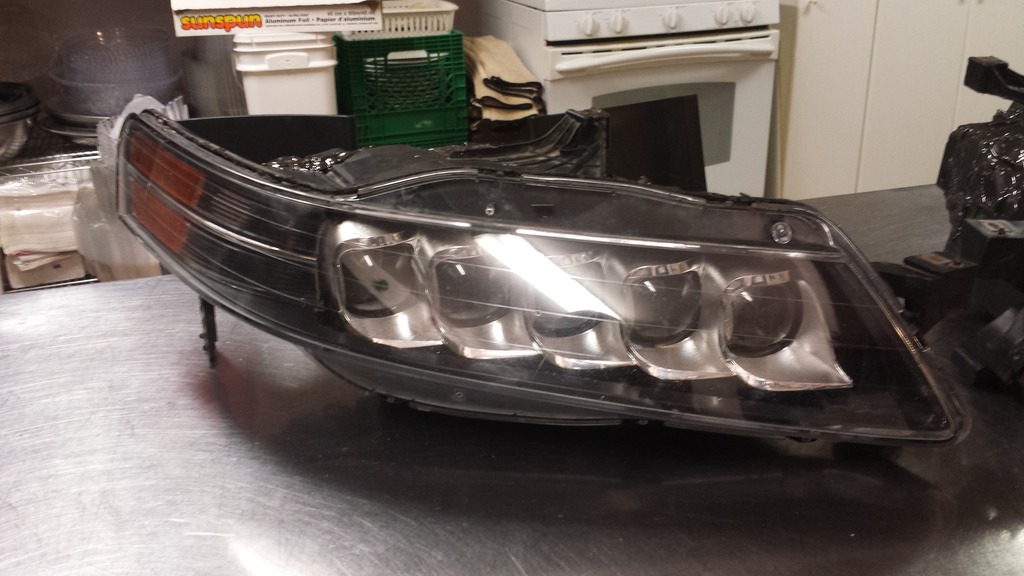
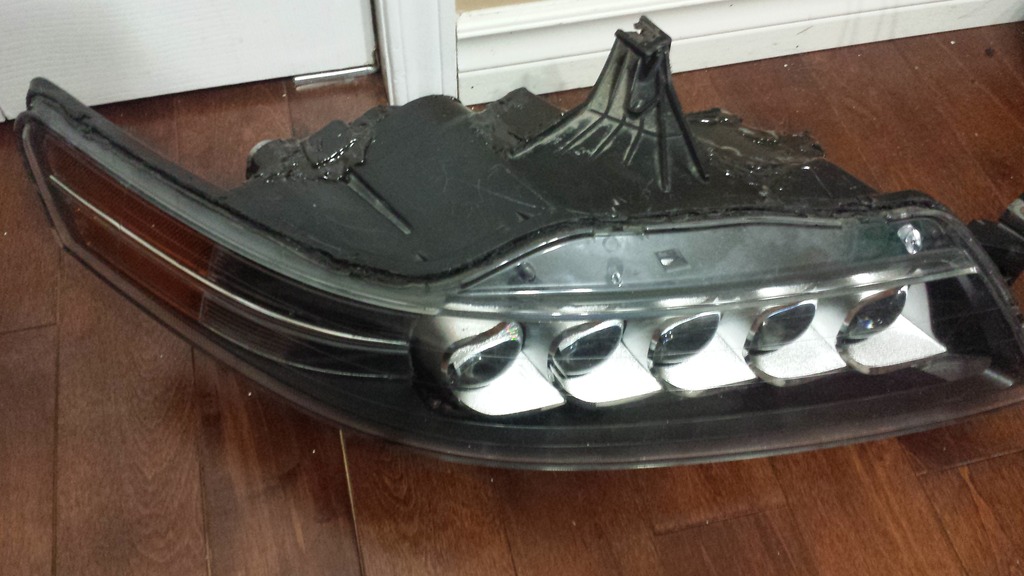
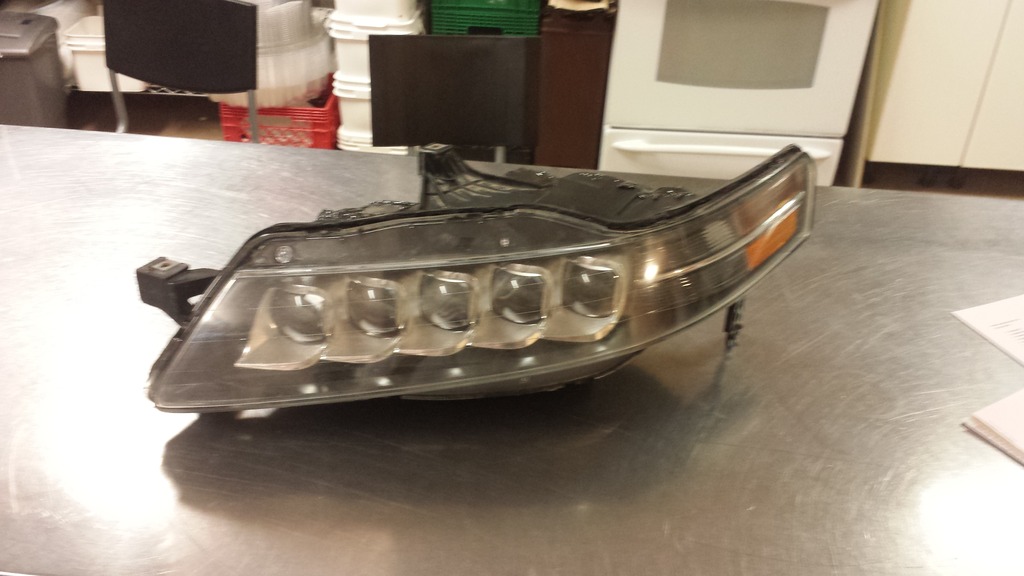
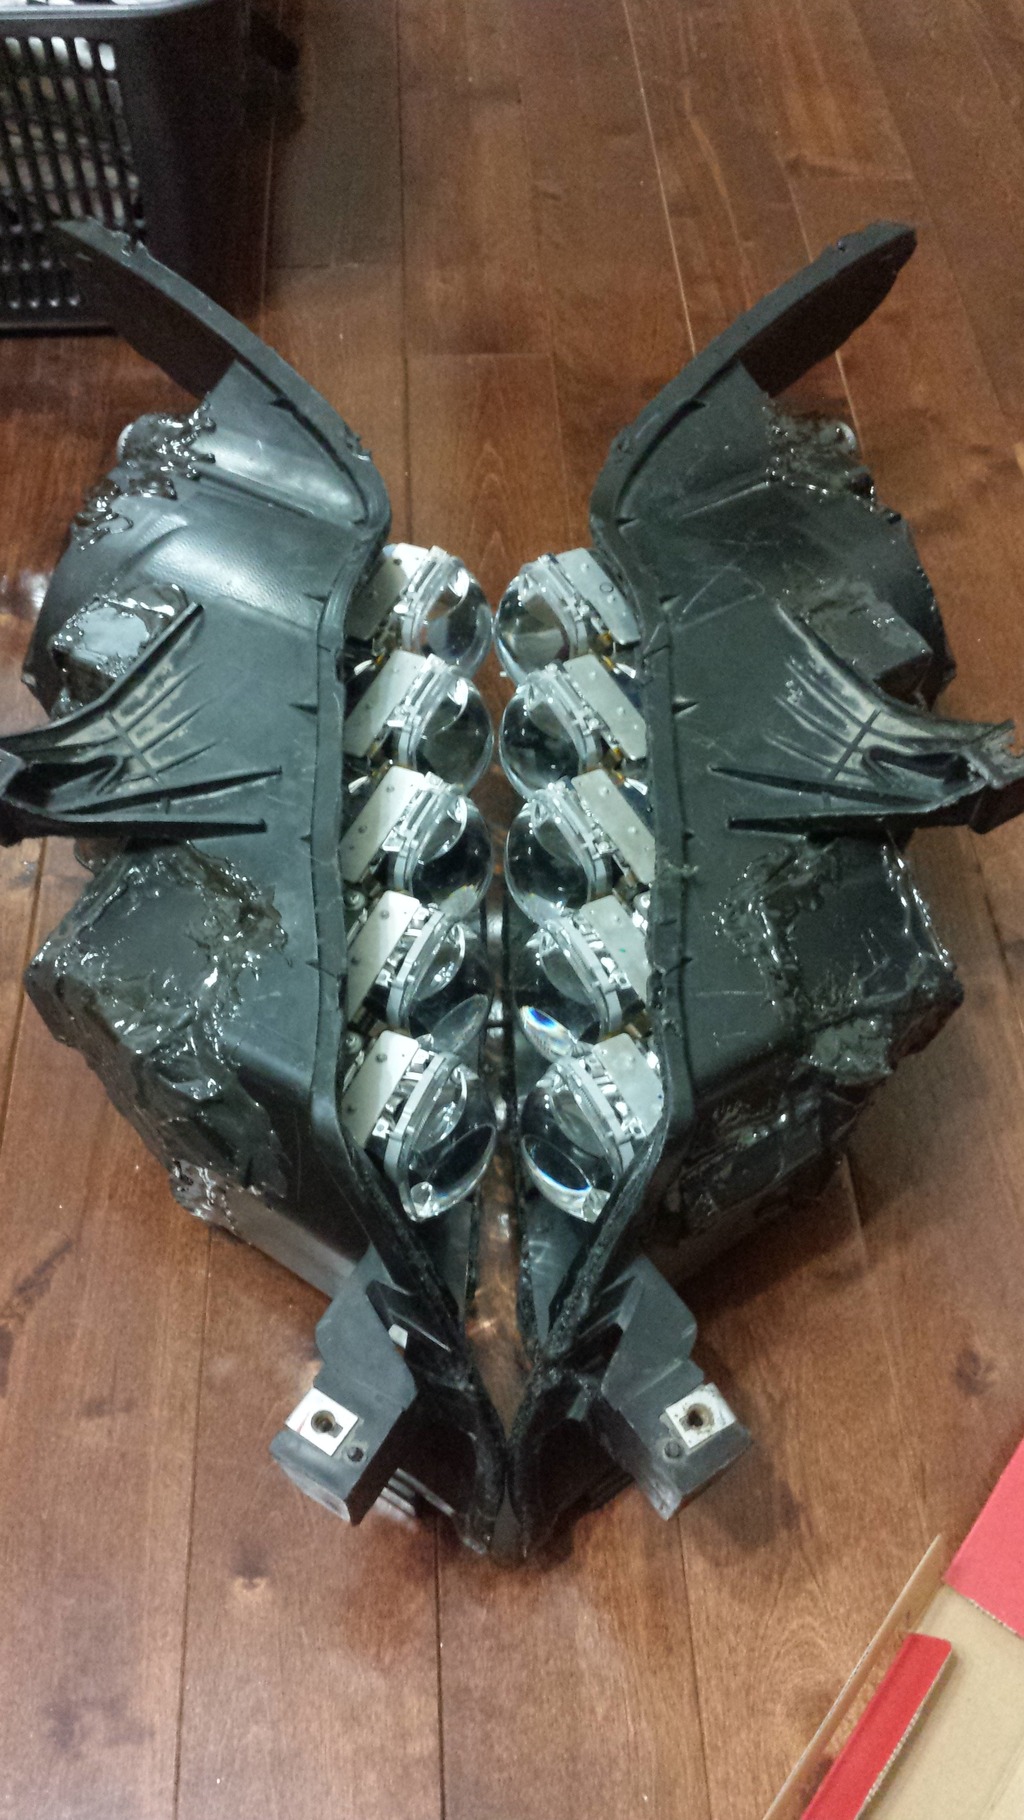
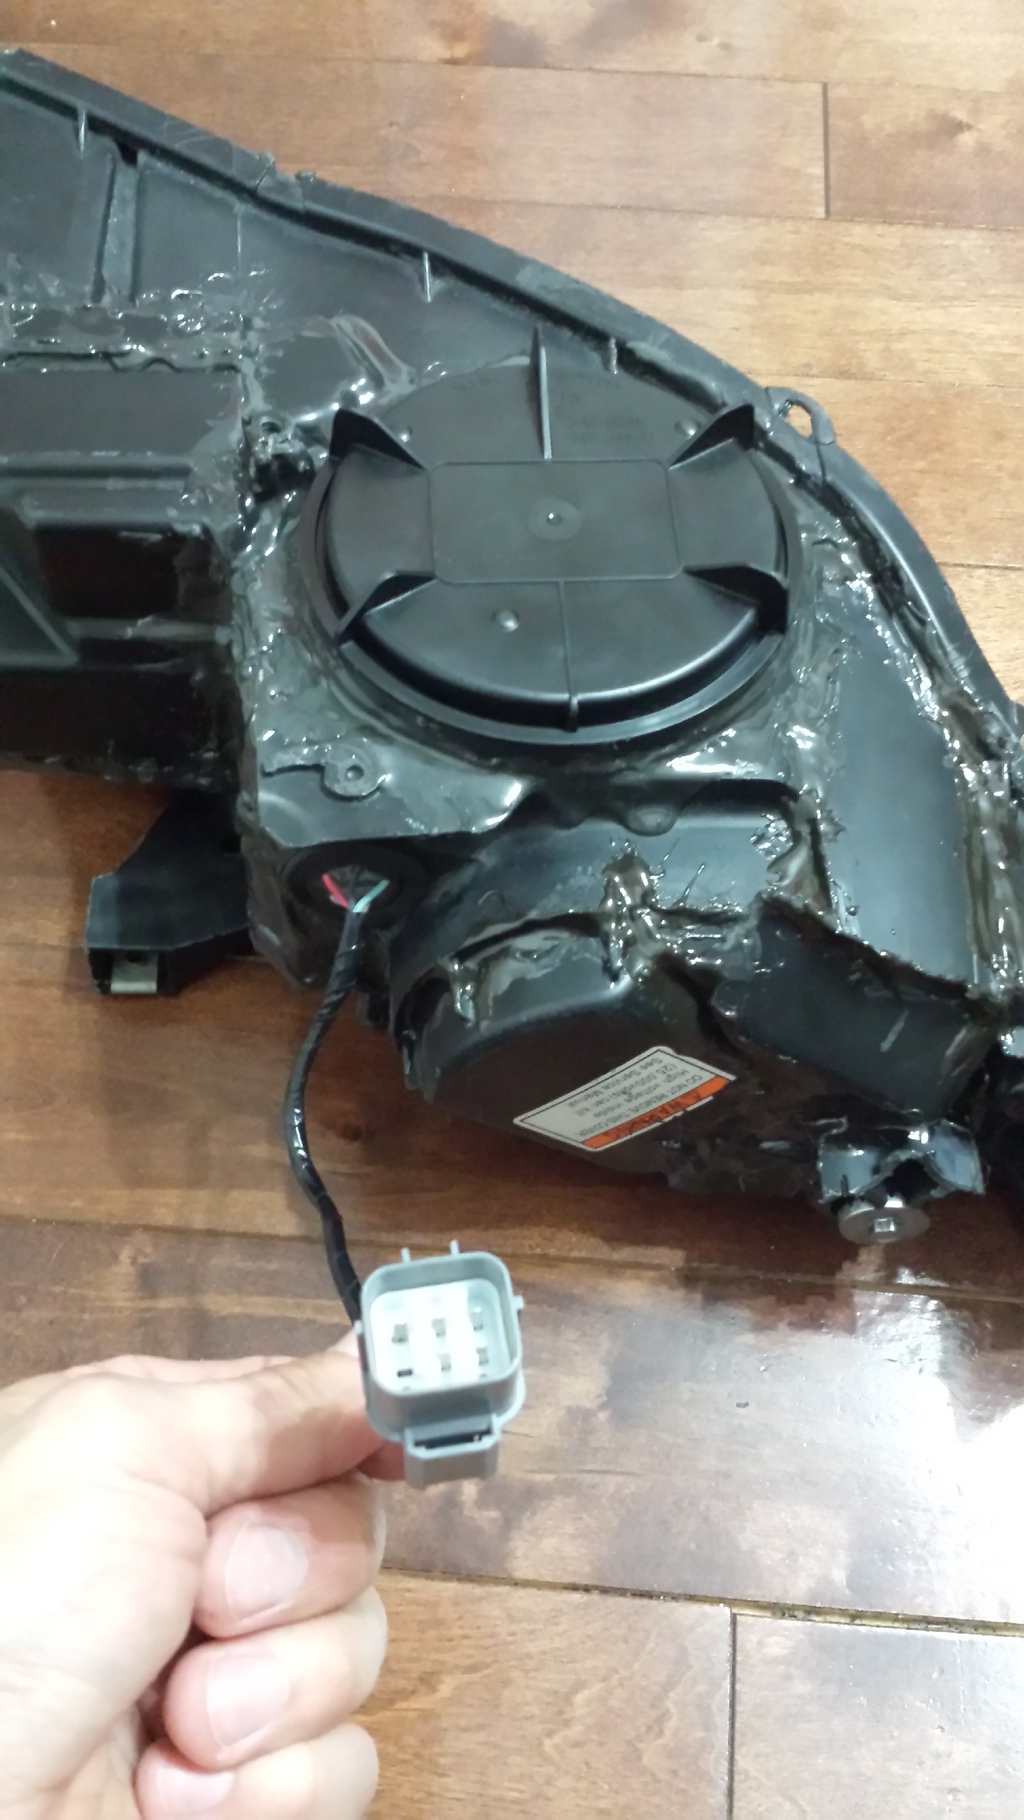
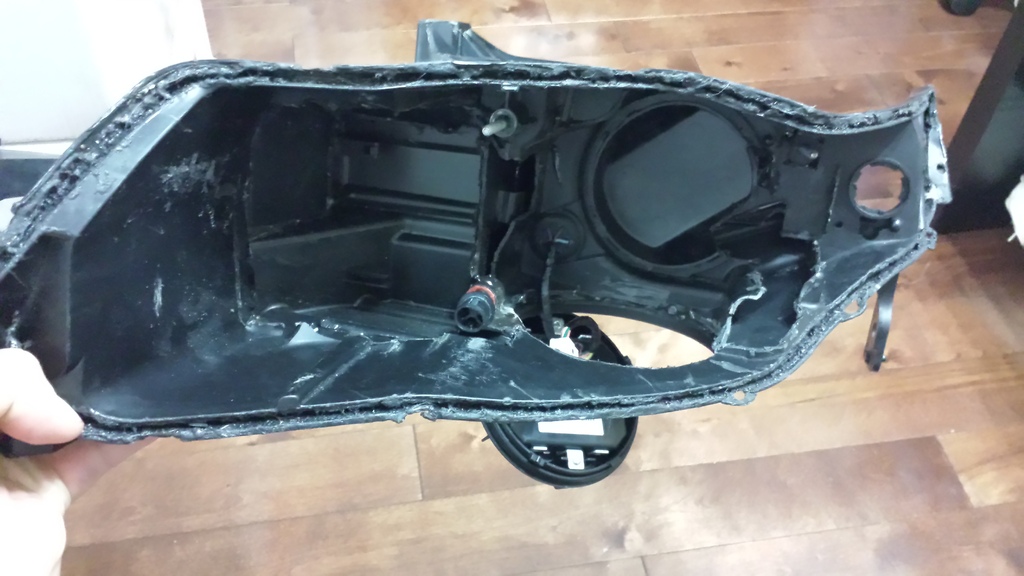
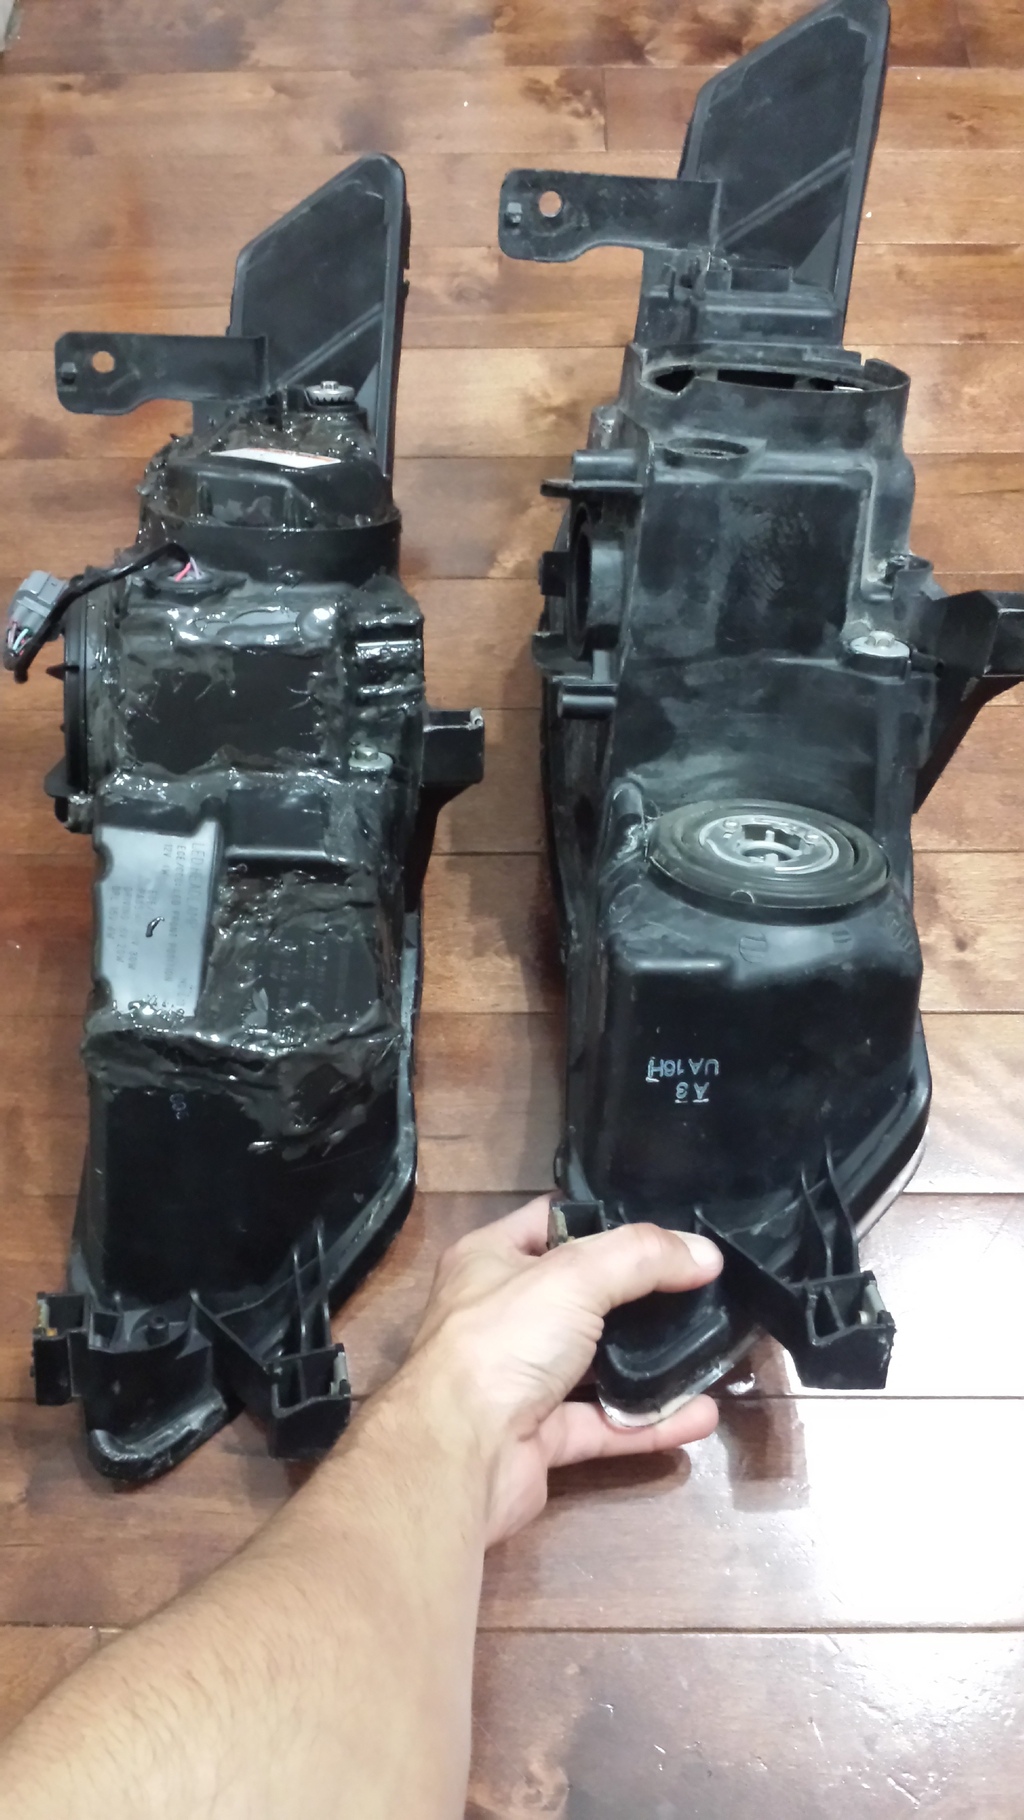
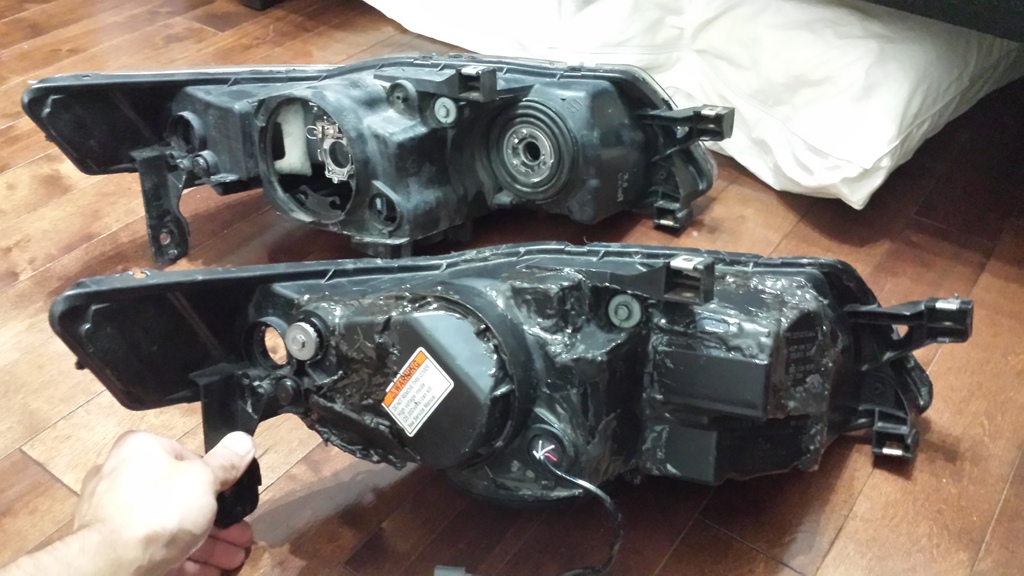
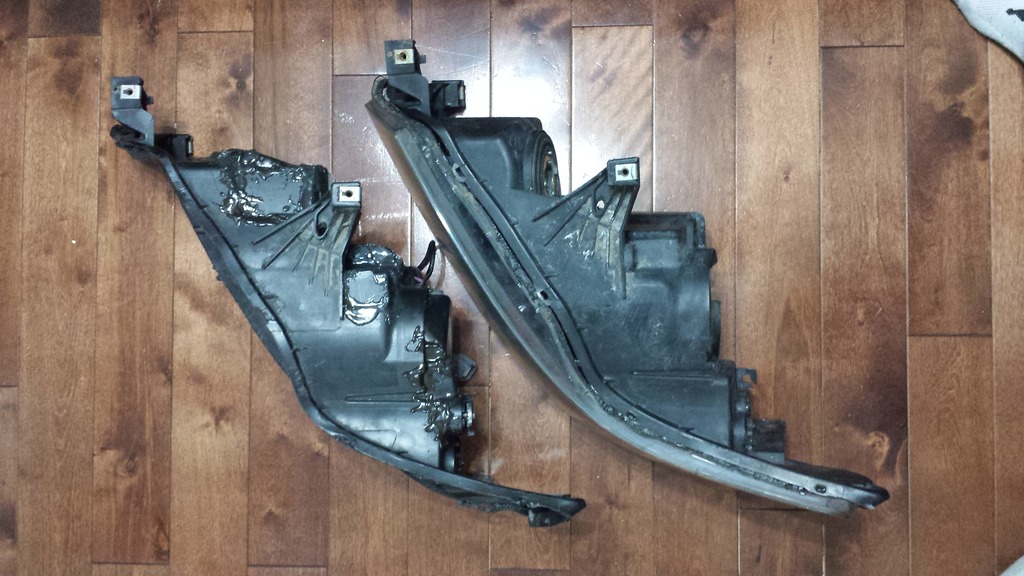
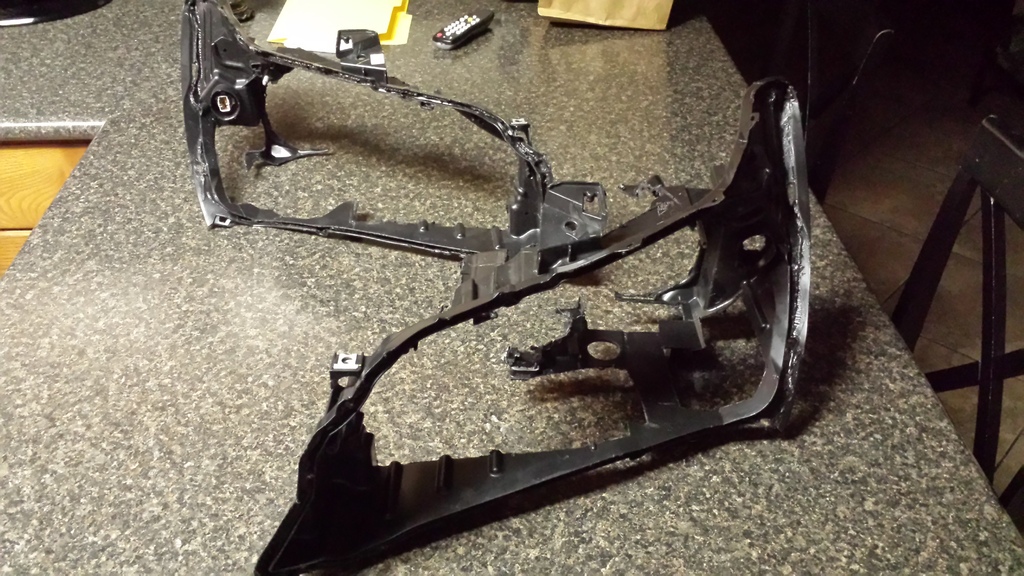
Got my new Stance sc-6 wheels in 19 x 9.5 in graphite and they will be going on in 2 - 3 weeks with the jewel eyes. Figured id post up some comparison pics between the stock 3g light and the jewel eyes. Just to show future users what it actually takes to be able to mold the jewel eyes into our housing. Surprisingly we don't need to extend the back of the housing by much! Its ever so slightly but it does require a lot of cutting! As you can see I used the mdx housing as a donor shell to rebuild my 3g rears. I also used the stock mdx headlight opening and welded it onto the bottom of the 3g housing So I can always access the led driver and change if it ever goes out for some reason. If you guys want any closer pictures or what not just let me know.
The following 3 users liked this post by wojo1988:
 03-27-2015, 10:14 PM
#75
Team Owner
iTrader: (2)
Join Date: Jan 2008
Location: Kansas City, MO (Overland Park, KS)
Posts: 36,545
Received 6,470 Likes
on
5,162 Posts
I think I'm going to have to open my headlights again too.

 04-01-2015, 12:58 AM
#77
2007 Type S WDP 5AT
Thread Starter
DID IT!! After getting the Jewel eyes in August 2014 I slowly began my build and in my free time over the last half of a year I finally finished my project. Ive spent about 50 hours making these and YES they have full adjustment capability while on the car! Ive cut and rewelded 2 mounting tabs that line up with the mounting points in my 3g tl housing and I also added in a new adjustment knob from the MDX lights to allow for side to side adjustment....
So they can be adjusted up and down while on the car and from left to right while off the car if needed. I rebuilt 80% of the rear housing using JB weld..... about 100$ worth. Im just buttoning up the wiring harness to connect it to my factory harness so they are plug and play. My one question would be this, how can I get the drls of the jewel eyes to come on and stay on when I unlock my car with the remote?
Onto the pics!!! Did I mention this was my first retrofit ever???
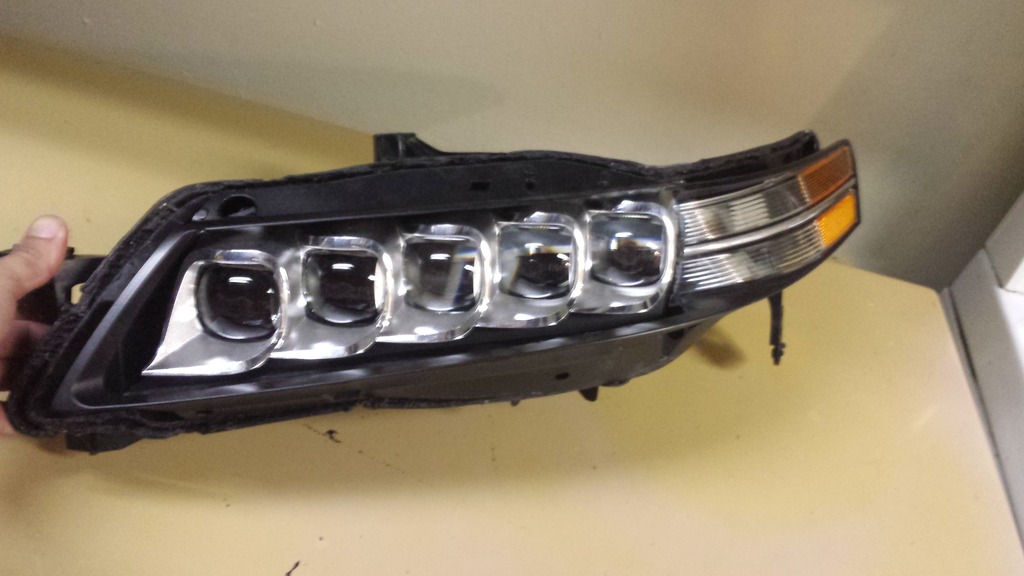


The following 3 users liked this post by wojo1988:
04-01-2015, 01:06 AM
#79
2007 Type S WDP 5AT
Thread Starter
I know a lot of people were disappointed I was taking so long but I don't like to disappoint. They will go on the car in a few weeks when I do my summer changeover