I think i just ruined my new tsx!!!
 06-07-2009, 05:36 PM
#1
Banned
Thread Starter
Join Date: May 2009
Location: Long Beach, CA
Age: 53
Posts: 130
Likes: 0
Received 0 Likes
on
0 Posts
After applying the second coat of polymer, and following the advice and instructions I've been given, my paint job is FILLED with spider webs!!!
If anyone thinks that they can help me, I'd really appreciate any input, either here or through PM or even my private email.
I'm considering selling my equipment and materials, if anyone is interested.
If anyone thinks that they can help me, I'd really appreciate any input, either here or through PM or even my private email.
I'm considering selling my equipment and materials, if anyone is interested.
Last edited by TSXinSouthBayCalifornia; 06-07-2009 at 05:39 PM.
 06-07-2009, 05:42 PM
#3
Banned
Thread Starter
Join Date: May 2009
Location: Long Beach, CA
Age: 53
Posts: 130
Likes: 0
Received 0 Likes
on
0 Posts
I'm EXTREMELY unhappy that my brand new paint job is now FILLED with scratches.
I think I should have listened to the advice of a few friends, that told me not to get a buffer, and try to do this myself.
I think I should have listened to the advice of a few friends, that told me not to get a buffer, and try to do this myself.
06-07-2009, 05:46 PM
#4
Banned
Thread Starter
Join Date: May 2009
Location: Long Beach, CA
Age: 53
Posts: 130
Likes: 0
Received 0 Likes
on
0 Posts
CCBBUUMM,
I used -
8oz Optimum Polish II
8oz Optimum Finish Polish
Four Star Ult. Paint Protectant (Sealant)
UDM Porter Cable buffer
I used -
8oz Optimum Polish II
8oz Optimum Finish Polish
Four Star Ult. Paint Protectant (Sealant)
UDM Porter Cable buffer
06-07-2009, 05:47 PM
#5
Banned
Thread Starter
Join Date: May 2009
Location: Long Beach, CA
Age: 53
Posts: 130
Likes: 0
Received 0 Likes
on
0 Posts
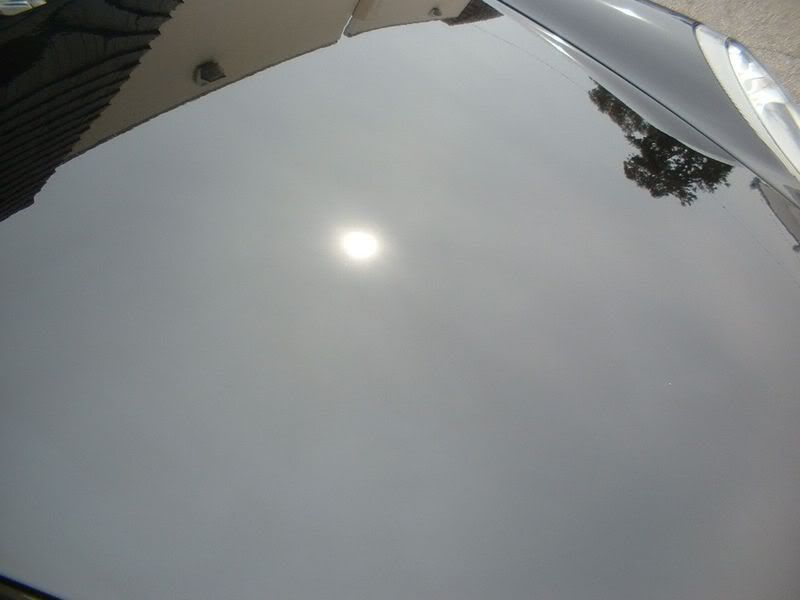
I just tried taking pictures, but I can't get a picture of the webs.... they won't show up in the camera.
I mean I can't get a close up, that shows the spider webs.
They webs only show at a certain angle in the light, and when I try to capture that angle, the light is beaming and washing out the photo.
I mean I can't get a close up, that shows the spider webs.
They webs only show at a certain angle in the light, and when I try to capture that angle, the light is beaming and washing out the photo.
06-07-2009, 05:52 PM
#6
Evil Mazda Driver
Not all is lost, friend, don't fear. These things take time and to expect perfection right out of the gate is being a bit too hard on yourself.
Hopefully Patrick will head in here and help you get things sorted. Didn't you have plans to meet with him?
Hopefully Patrick will head in here and help you get things sorted. Didn't you have plans to meet with him?
06-07-2009, 05:54 PM
#7
Suzuka Master
CCBBUUMM,
I used -
8oz Optimum Polish II
8oz Optimum Finish Polish
Four Star Ult. Paint Protectant (Sealant)
UDM Porter Cable buffer
I used -
8oz Optimum Polish II
8oz Optimum Finish Polish
Four Star Ult. Paint Protectant (Sealant)
UDM Porter Cable buffer
Trending Topics
06-07-2009, 05:57 PM
#8
Banned
Thread Starter
Join Date: May 2009
Location: Long Beach, CA
Age: 53
Posts: 130
Likes: 0
Received 0 Likes
on
0 Posts
Please explain to me then.... PLEASE.
I'm a little pissed, so please excuse me if I'm being emotional, but my brand new paint job is FULL of spider webs.
06-07-2009, 06:00 PM
#9
Banned
Thread Starter
Join Date: May 2009
Location: Long Beach, CA
Age: 53
Posts: 130
Likes: 0
Received 0 Likes
on
0 Posts
I don't know if all these pads have the same color schemes, and I don't know how else to identify them, but the pads I bought were white, black and red.
I used the white with the first polish.
Then I used black with the second finish polish.
And then I used red for the polymer.
And now I've just found a colossal fuckup I made............
When I applied the first coat of polymer, I used the red pad.
Now a week later, applying the second coat, I just found that I got mixed up, and used the BLACK pad!!!!!
I don't know if this is the sole cause of everything, because I already had some spider webs last week, but at this point the paint job looks AWFUL.
I feel like trading the car in......
THAT'S how bad it looks.
I spent a LOT of money on this car, and I'm pretty upset that now my paint has all these scratches in it.
06-07-2009, 06:03 PM
#10
Needs more Lemon Pledge
Stupid question, but did you wash the car before applying/working the polish?
Why don't you outline your entire process...
Why don't you outline your entire process...
06-07-2009, 06:05 PM
#11
Suzuka Master
Slow down .. the pads and combo shouldn't have done that.
Matter of fact they are pretty mild in that combo.
What did you use to remove the polishes? And the sealant?
Have you been washing the pads between uses?
Matter of fact they are pretty mild in that combo.
What did you use to remove the polishes? And the sealant?
Have you been washing the pads between uses?
06-07-2009, 06:06 PM
#12
Detail Cars in Philly in
relax dude, you wont have to trade in your car. outline a full process what you did and used and people will be able to help you. its a brand new car, it can be fixed just as easily as it got messed up
06-07-2009, 06:09 PM
#13
Banned
Thread Starter
Join Date: May 2009
Location: Long Beach, CA
Age: 53
Posts: 130
Likes: 0
Received 0 Likes
on
0 Posts
Yes.
I used "Duragloss" car wash, and a sheepskin mit. I used waffle weave drying towels. All done very gently.
After that, I followed instructions I was given to polish with buffer.
I was told that there was no way I could damage the paint, by using this buffer and polish.
I used the buffer mostly at speed 2 and 3, and applied gently.
I also referred to this link that was shared -
http://www.detailedimage.com/Auto-De...ide/Polishing/
What did I do wrong?!?!?!?!!!!!!!!!!!!!!!!!!!!!!!!!!!!!!!!!!!!!! !!!!
 06-07-2009, 06:12 PM
#14
Banned
Thread Starter
Join Date: May 2009
Location: Long Beach, CA
Age: 53
Posts: 130
Likes: 0
Received 0 Likes
on
0 Posts
I used the microfiber towels to remove the polishes, and I used different towels for the different polishes and the sealant.
I DID wash the pads, but it wasn't easy, because I guess I used too much product, and the pads still had a lot of product in them.
Still though, I soaked them, and then afterwards I put some Ivory soap in, rubbed them a little, and tried to get as much of the leftover product out as I could.
They certainly weren't crystal clear, but they seemed mostly cleaned.
06-07-2009, 06:12 PM
#15
Needs more Lemon Pledge
There is the possibility there was residue on the pads, but probably not...
How long did you work the polish? Did you spot check your work with the polish?
All you need to do is re-polish and the spider webs will be gone... Don't panic.
How long did you work the polish? Did you spot check your work with the polish?
All you need to do is re-polish and the spider webs will be gone... Don't panic.
06-07-2009, 06:15 PM
#16
Banned
Thread Starter
Join Date: May 2009
Location: Long Beach, CA
Age: 53
Posts: 130
Likes: 0
Received 0 Likes
on
0 Posts
Thanks for EVERYBODY who is taking the time to help.
I apologize if I'm being overly emotional..........
Please explain if you would though, isn't my paint fucked up, with scratches all over it?
I mean, if it can be polished out, isn't that going to take layers of my paint off............. meaning that my paint would not be in as good of condition as it would have been prior?
I'm a total "detailing moron", so please break it down for me.
I'm not a dummy in general, but with detailing I'm totally new.
06-07-2009, 06:17 PM
#17
Evil Mazda Driver
Hey bud...let me try to bring things into perspective.
Automotive paint is thin but the swirls you see are so shallow they can't even be felt. When you polish, you are removing only microns of the clearcoat...not enough to make a difference. I'm not sure what Acura's paint depth is but the average new car is around 110-120 microns. You would have to do a LOT of polishing to ruin the paint.
Black is a beast...trust me, I know. We are here to help.
06-07-2009, 06:44 PM
#18
Suzuka Master
There is also a possibility the dealer had someone apply a heavy glaze to it filling swirling that was aquired from lot washing and you polished it off revealing the swirling ..
Also here is one of your problems .. in your post at 4:09 you polished on speed 2-3 .. the instructions you posted a link to says
Step 6: Turn the buffer on a low speed setting (1 ~ 3) and spread the polish evenly through the entire 12" x 12" working area
Step 7: Turn the speed dial of the buffer up to 5 or 6 and start in a corner of your 12" x 12" working area
Step 8: Begin to apply roughly 15 ~ 20 lbs of pressure on the head of the buffer
You can't correct at speed 3 matter of fact at the speed you used and the polish/pad you used I doubt you did much of anything but waste product.
Its obvious you found these instructions but didn't follow them.
I suggest you start over and use the Polish II on an orange pad followed by the same on a white pad both on speed 5.
Also your now refering to scratches when a few posts ago it was swirling.
Stop panicing .. detailing is all about patience.
06-07-2009, 08:10 PM
#20
Former Sponsor

Things very often do not go as planned at the onset. As I have stated many times, if you keep your expectations "realistic", your results will be satisfactory. Ya gotta walk before you run. I actually think learning to walk is easier then learning all the characteristics of 5 pads, 1/2 dozen compounds, 1/2 dozen polishes, glazes, sealants, waxes, microfibers, waffle weaves, low humidity vs. high humidity, in the sun, in the shade, in a hurry or have all day. Black or white, soft or hard, and the almighty ceramiclear.
You can apply polishes and sealants at 2-3, but you cant "polish" at 3. My everyday recommendations are:
And more specific for you:
We are all rootin for ya!!!
You can apply polishes and sealants at 2-3, but you cant "polish" at 3. My everyday recommendations are:
And more specific for you:
- Dissect hood into four areas
- Apply fingernail size amount of Optimum Polish at 12/3/6/9 oclock and center of pad (White since you have it).
- With machine off, rub the face of the pad onto the surface in a circular motion to disperse the polish into the pads pores. This also helps alleviate splattering when the machine is turned on.
- With machine set at 3, turn on and transfer polish to work area from left to right, overlapping at least 50% in a rather fast motion. All I want you to do at this point is spread the polish evenly across that 1/4th of the hood
- Once polish is evenly spread, turn machine off, let it come to a rest on the surface until it stops.
- Turn machine to speed 4 or 5ish (Preferably 5 at this point as you know how it feels when its running, you have done this before)
- Turn machine on and begin your polishing. Add additional (Mild) pressure, not so much as to bog the machine down. When you hear the RPM's ever so slightly lower, your perfect. This time perform a up/down technique (farthest to closest). Start on either the left side or right side of your allocated work area. Again, overlap at least 50%. Your arm motion should be somewhat slow. Maybe 4 seconds per foot. Polish the entire work area, then turn machine off and let it come to a rest.
- Turn machine to speed 6. Go back to your starting point (should always start work from the farthest point away. This keep the cord from rubbing on an area you just polished). With machine flat on surface, turn on and begin polishing again, from left to right (or right to left). Slow arm movement down to about 6 seconds per foot. (The seconds per foot is just a guidline. That can be adjusted depending on clear coat softness, pad, and polish used) Overlap 50% minimum.
- Feel free to run across the entire work area again.
- The beauty of Optimum Polish is its nearly impossible to dry buff with it. It has way adequate lubricating oils.
- Remove product with a clean microfiber towel. It should come off very easy, with no more pressure applied then enough to manipulate the towel. Check you results. If there is swirl minimization, your on the right track. At this point you would decide whether or not you need to move to a more abrasive polish, pad or both. (Or less abrasive). Or adjust to a slower arm movement.
- When you move to the second work area, add about 1/2 the amount of polish you did the first time. Use the same guidlines just given.
We are all rootin for ya!!!
06-08-2009, 12:31 AM
#22
^ +1 NOT claying prior to polishing could explain the additional swirls. Don't worry, man, your paint is no where near ruining. If you don't feel confident trying to tackle this by yourself again, take your car to the free Meguiars classes. They'll show you how to fix it...cake. plus there's free pizza!
ExcelDetail,
I didn't know you were on the forums!? haha. I just got some Charlie's Soap, dressing and leather protectant from you. Thanks for the discount!
ExcelDetail,
I didn't know you were on the forums!? haha. I just got some Charlie's Soap, dressing and leather protectant from you. Thanks for the discount!
06-08-2009, 07:29 AM
#23
Former Sponsor
^ +1 NOT claying prior to polishing could explain the additional swirls. Don't worry, man, your paint is no where near ruining. If you don't feel confident trying to tackle this by yourself again, take your car to the free Meguiars classes. They'll show you how to fix it...cake. plus there's free pizza!
ExcelDetail,
I didn't know you were on the forums!? haha. I just got some Charlie's Soap, dressing and leather protectant from you. Thanks for the discount!
ExcelDetail,
I didn't know you were on the forums!? haha. I just got some Charlie's Soap, dressing and leather protectant from you. Thanks for the discount!
06-08-2009, 10:00 AM
#24
Instructor

i'm interested to see how bad your paint has become. any chance you can take a picture out in the sun? that would be the best way to see the defects you're having trouble with.
06-08-2009, 11:25 AM
#25
Banned
Thread Starter
Join Date: May 2009
Location: Long Beach, CA
Age: 53
Posts: 130
Likes: 0
Received 0 Likes
on
0 Posts
Hey bud...let me try to bring things into perspective.
Automotive paint is thin but the swirls you see are so shallow they can't even be felt. When you polish, you are removing only microns of the clearcoat...not enough to make a difference. I'm not sure what Acura's paint depth is but the average new car is around 110-120 microns. You would have to do a LOT of polishing to ruin the paint.
Black is a beast...trust me, I know. We are here to help.
Automotive paint is thin but the swirls you see are so shallow they can't even be felt. When you polish, you are removing only microns of the clearcoat...not enough to make a difference. I'm not sure what Acura's paint depth is but the average new car is around 110-120 microns. You would have to do a LOT of polishing to ruin the paint.
Black is a beast...trust me, I know. We are here to help.
Portland, thank you!
May I ask, so that I can understand a little better, roughly how many microns of the clear coat are removed, through polishing?
How long do I have, or how many polishes, until the clear coat is no more?
Also, is there a way to re-apply the "clear-coat"? Or is that part of the paint that can't be re-applied?
And I take it that the polymer coat, is not a "clear-coat"?
Thanks very much.
And Patrick has been very available for me to help, but I flipped out and lost it, when I saw all those spider webs...
I mean they didn't seem that bad BEFORE hand...
But one thing I WILL say, is that the paint job looks a LOT clearer than it did before.
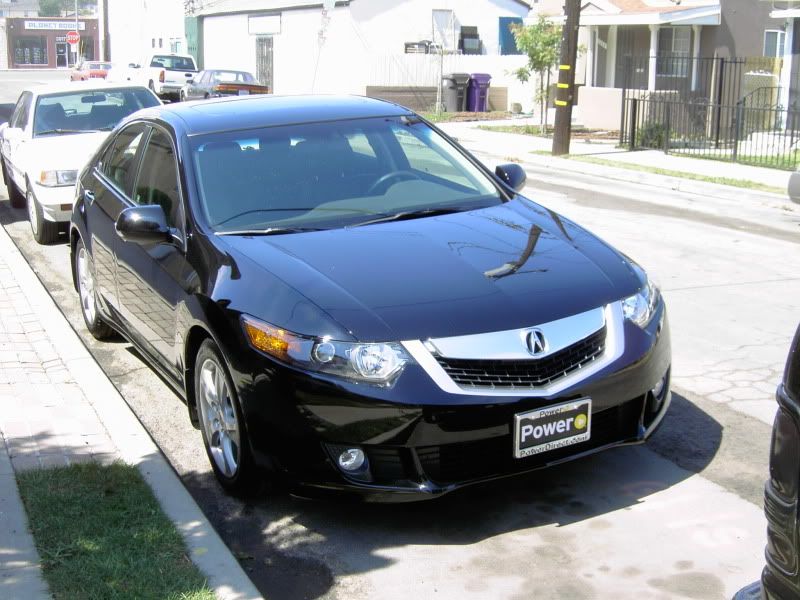
This black paint on the Acura is "Crystal Pearl Black", and in the black are flake crystals of different colors.
You couldn't really see them good before, but now you can.
So on the one hand, it looks a lot nicer....
But on certain angles, you see the spider webs, and it looks like the paint is fucked up.
06-08-2009, 11:30 AM
#26
Banned
Thread Starter
Join Date: May 2009
Location: Long Beach, CA
Age: 53
Posts: 130
Likes: 0
Received 0 Likes
on
0 Posts
There is also a possibility the dealer had someone apply a heavy glaze to it filling swirling that was aquired from lot washing and you polished it off revealing the swirling ..
Thank you for explaining this!!!
I'm a complete idiot, with detailing. I know ZERO, or very little, at this point.
I think I just freaked out, and assumed the worst, when I saw something that I didn't understand.
Also here is one of your problems .. in your post at 4:09 you polished on speed 2-3 .. the instructions you posted a link to says
Step 6: Turn the buffer on a low speed setting (1 ~ 3) and spread the polish evenly through the entire 12" x 12" working area
Step 7: Turn the speed dial of the buffer up to 5 or 6 and start in a corner of your 12" x 12" working area
Step 8: Begin to apply roughly 15 ~ 20 lbs of pressure on the head of the buffer
You can't correct at speed 3 matter of fact at the speed you used and the polish/pad you used I doubt you did much of anything but waste product.
Its obvious you found these instructions but didn't follow them.
I suggest you start over and use the Polish II on an orange pad followed by the same on a white pad both on speed 5.
So you suggest using the polish once, using the orange pad, and then polish a SECOND time, with a white one?
How many microns of clear coat will I be removing? (don't mean to be a puss, but I'm just trying to understand)
Also your now refering to scratches when a few posts ago it was swirling.
I read that swirls are very tiny scratches, so that's why I said that.
Remember I a complete newbie, and seriously, I don't know what the hell I'm talking about.
Stop panicing .. detailing is all about patience.
06-08-2009, 11:31 AM
#27
Banned
Thread Starter
Join Date: May 2009
Location: Long Beach, CA
Age: 53
Posts: 130
Likes: 0
Received 0 Likes
on
0 Posts
06-08-2009, 11:45 AM
#28
Banned
Thread Starter
Join Date: May 2009
Location: Long Beach, CA
Age: 53
Posts: 130
Likes: 0
Received 0 Likes
on
0 Posts
Things very often do not go as planned at the onset. As I have stated many times, if you keep your expectations "realistic", your results will be satisfactory. Ya gotta walk before you run. I actually think learning to walk is easier then learning all the characteristics of 5 pads, 1/2 dozen compounds, 1/2 dozen polishes, glazes, sealants, waxes, microfibers, waffle weaves, low humidity vs. high humidity, in the sun, in the shade, in a hurry or have all day. Black or white, soft or hard, and the almighty ceramiclear.
You can apply polishes and sealants at 2-3, but you cant "polish" at 3. My everyday recommendations are:
And more specific for you:
We are all rootin for ya!!!
You can apply polishes and sealants at 2-3, but you cant "polish" at 3. My everyday recommendations are:
And more specific for you:
- Dissect hood into four areas
- Apply fingernail size amount of Optimum Polish at 12/3/6/9 oclock and center of pad (White since you have it).
- With machine off, rub the face of the pad onto the surface in a circular motion to disperse the polish into the pads pores. This also helps alleviate splattering when the machine is turned on.
- With machine set at 3, turn on and transfer polish to work area from left to right, overlapping at least 50% in a rather fast motion. All I want you to do at this point is spread the polish evenly across that 1/4th of the hood
- Once polish is evenly spread, turn machine off, let it come to a rest on the surface until it stops.
- Turn machine to speed 4 or 5ish (Preferably 5 at this point as you know how it feels when its running, you have done this before)
- Turn machine on and begin your polishing. Add additional (Mild) pressure, not so much as to bog the machine down. When you hear the RPM's ever so slightly lower, your perfect. This time perform a up/down technique (farthest to closest). Start on either the left side or right side of your allocated work area. Again, overlap at least 50%. Your arm motion should be somewhat slow. Maybe 4 seconds per foot. Polish the entire work area, then turn machine off and let it come to a rest.
- Turn machine to speed 6. Go back to your starting point (should always start work from the farthest point away. This keep the cord from rubbing on an area you just polished). With machine flat on surface, turn on and begin polishing again, from left to right (or right to left). Slow arm movement down to about 6 seconds per foot. (The seconds per foot is just a guidline. That can be adjusted depending on clear coat softness, pad, and polish used) Overlap 50% minimum.
- Feel free to run across the entire work area again.
- The beauty of Optimum Polish is its nearly impossible to dry buff with it. It has way adequate lubricating oils.
- Remove product with a clean microfiber towel. It should come off very easy, with no more pressure applied then enough to manipulate the towel. Check you results. If there is swirl minimization, your on the right track. At this point you would decide whether or not you need to move to a more abrasive polish, pad or both. (Or less abrasive). Or adjust to a slower arm movement.
- When you move to the second work area, add about 1/2 the amount of polish you did the first time. Use the same guidlines just given.
We are all rootin for ya!!!
Pat,
I think I just saw the spider webs, and freaked out, and assumed the worst.
Maybe I'm starting my period...

If the paint isn't ruined, then I am happy.
I don't care how long it takes, or what I have to do, because all I want to do is learn how to do this right, so that I can take care of this car.
I spent a LOT of money on it, and I just want to be able to care for it, and also have it looking it's best.
So in addition to bumping up the speed, do you think I should just try with the white pad at this point, before moving onto the orange?
I'd really like to remove as little clear coat as possible, but then again, wtf do I know?!!!!!!
I think getting the UV flashlight as you suggested, will really help me to see what the fuck I'm doing too.
Do they have these at a regular auto parts store?
If you have them, I'll buy from you, because I need more products anyways (interior and tire/wheels stuff), and I wanted to show you the car in person and ask you a few questions about a couple things on it.
I was going to try to hook up with you this weekend, but figured I didn't need to bug you.
Then I saw the spider webs and had a melt down.
 06-08-2009, 11:54 AM
#30
Banned
Thread Starter
Join Date: May 2009
Location: Long Beach, CA
Age: 53
Posts: 130
Likes: 0
Received 0 Likes
on
0 Posts
^ +1 NOT claying prior to polishing could explain the additional swirls. Don't worry, man, your paint is no where near ruining.
Could you please elaborate?
If you don't feel confident trying to tackle this by yourself again, take your car to the free Meguiars classes. They'll show you how to fix it...cake. plus there's free pizza!
Could you please elaborate?
If you don't feel confident trying to tackle this by yourself again, take your car to the free Meguiars classes. They'll show you how to fix it...cake. plus there's free pizza!
Still, I'm interested in learning anything I can.
Can you give the 411 on the "free Meguiars classes"?
06-08-2009, 11:55 AM
#31
Banned
Thread Starter
Join Date: May 2009
Location: Long Beach, CA
Age: 53
Posts: 130
Likes: 0
Received 0 Likes
on
0 Posts
I was having trouble getting an up close shot, that showed the webs.
Any suggestions on getting a good shot?
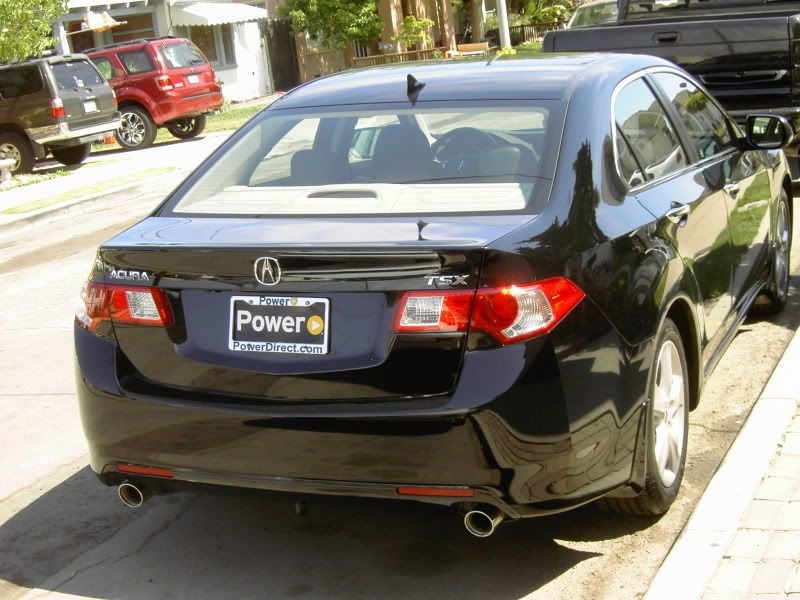
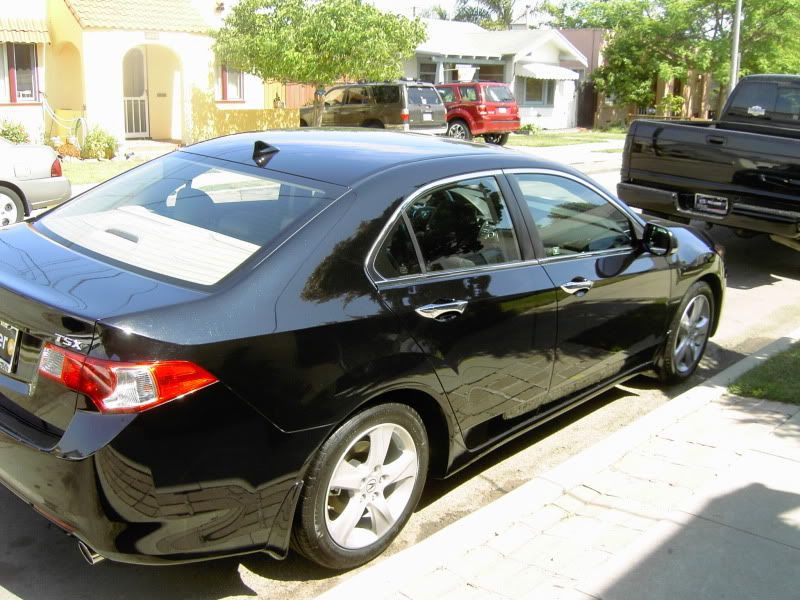
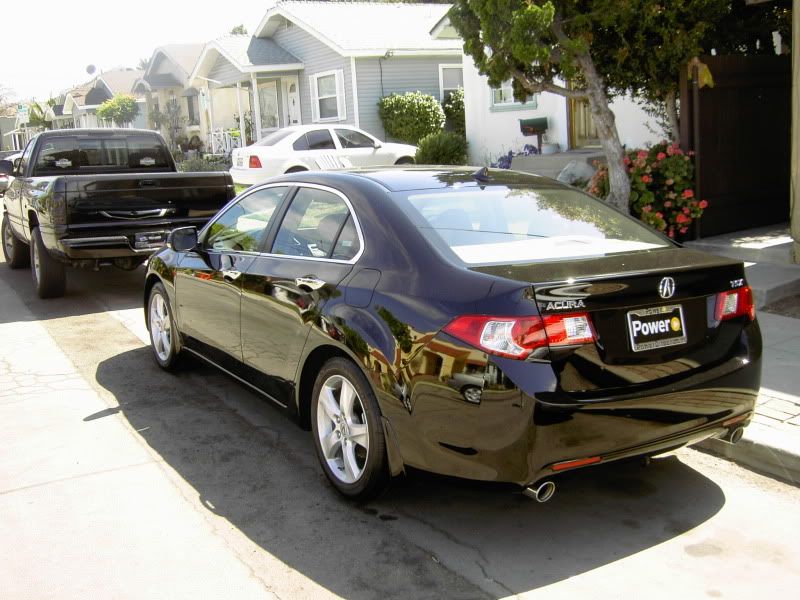
I could post some general pics I just took for the insurance, but they won't really show any close-up details.
06-08-2009, 12:04 PM
#32
Instructor
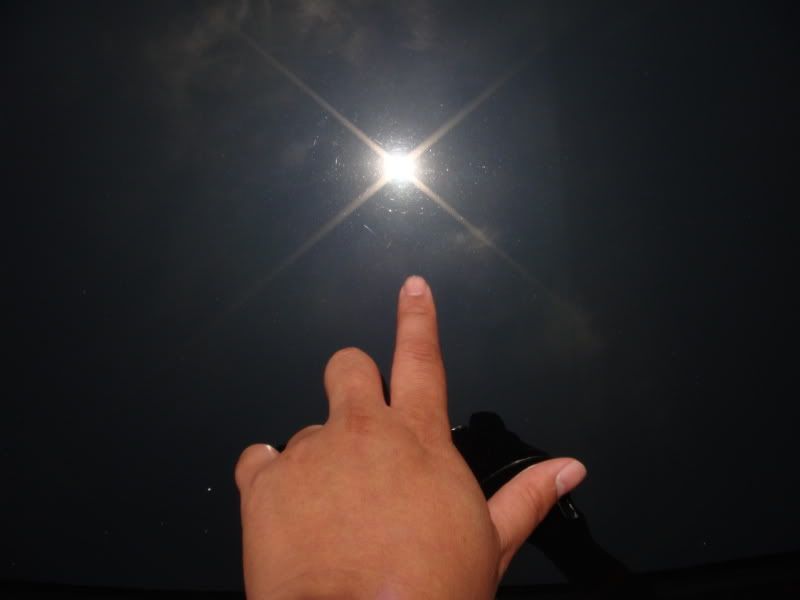
i focused my point and shoot on my fat index finger underneath the sun's reflection which helped capture some defects.


 06-08-2009, 12:11 PM
#34
Banned
Thread Starter
Join Date: May 2009
Location: Long Beach, CA
Age: 53
Posts: 130
Likes: 0
Received 0 Likes
on
0 Posts
Maybe if I had a UV flashlight it'd be better?
06-08-2009, 12:23 PM
#35
Safety Car
Join Date: Apr 2002
Location: The Woodlands, TX
Age: 66
Posts: 3,644
Received 312 Likes
on
198 Posts
Take 2 Midol and check back later 
Seriously, this site is loaded with people who will guide you through this and help you out. My '06 RL has NBP color paint (black) and is a PITA to correct but it can be done. Patience, grasshopper, will bring you great results.
Seriously, this site is loaded with people who will guide you through this and help you out. My '06 RL has NBP color paint (black) and is a PITA to correct but it can be done. Patience, grasshopper, will bring you great results.
06-08-2009, 12:50 PM
#37
Former Sponsor


 06-08-2009, 07:00 PM
#39
Instructor

Do the "spider webs" look like the swirls in Patrick's first picture? I think the poster above has it right - I'm sure they were already there but were just covered up with product, and the polishing just "brought them out". What you were using would be very hard to damage your paint or create the defects you're talking about. - black is a PITA to get perfect and really shows flaws, but when it's completely polished, nothing beats it. I just bought a new black car over the weekend, and could not believe the amount of swirls that were on it at the dealer. 6-8 hours of claying, polishing, etc finally got it looking like the new car that it actually is.
Patrick's instructions above are excellent. Pic a small section and work with his directions, redoing it as needed, until you get it the way you like it. then you can apply that method to the rest of the car. Patience and practice (A lot of each) is all you need. We've all been there (in fact, I still am there - but each time you do it will get easier) - good luck!
Patrick's instructions above are excellent. Pic a small section and work with his directions, redoing it as needed, until you get it the way you like it. then you can apply that method to the rest of the car. Patience and practice (A lot of each) is all you need. We've all been there (in fact, I still am there - but each time you do it will get easier) - good luck!
06-08-2009, 08:12 PM
#40
dude im in the same situation as you because it happen to me also, but i did clay the car..now and used the optimum with an orange pad..and my paint is clear but still hazy im going to try it one more time and see if it removes it. DON'T GIVE UP!