
Interior LED install with pictures!!
 05-12-2007, 08:08 AM
#1
Cablevision Employee
Thread Starter
Interior LED install with pictures!!
So this is my first mod, and after reading about 3 or 4 threads on it, I collaborated everything together and came up with this walk through install.
Here is where I got the lights from:
http://cgi.ebay.com/ebaymotors/Ultra...17249046QQrdZ1
Guy is great he got the bulbs to me from CA to NY in 4 days! They look perfect! Almost 100% pure white, very little tint to them at all, and at night, there is almost none, brighter than original and looks MUCH better. there are 4X LCD which are perfect IMO, because anything less might be to dim, anything more and it shortens life span. I highly recommend them
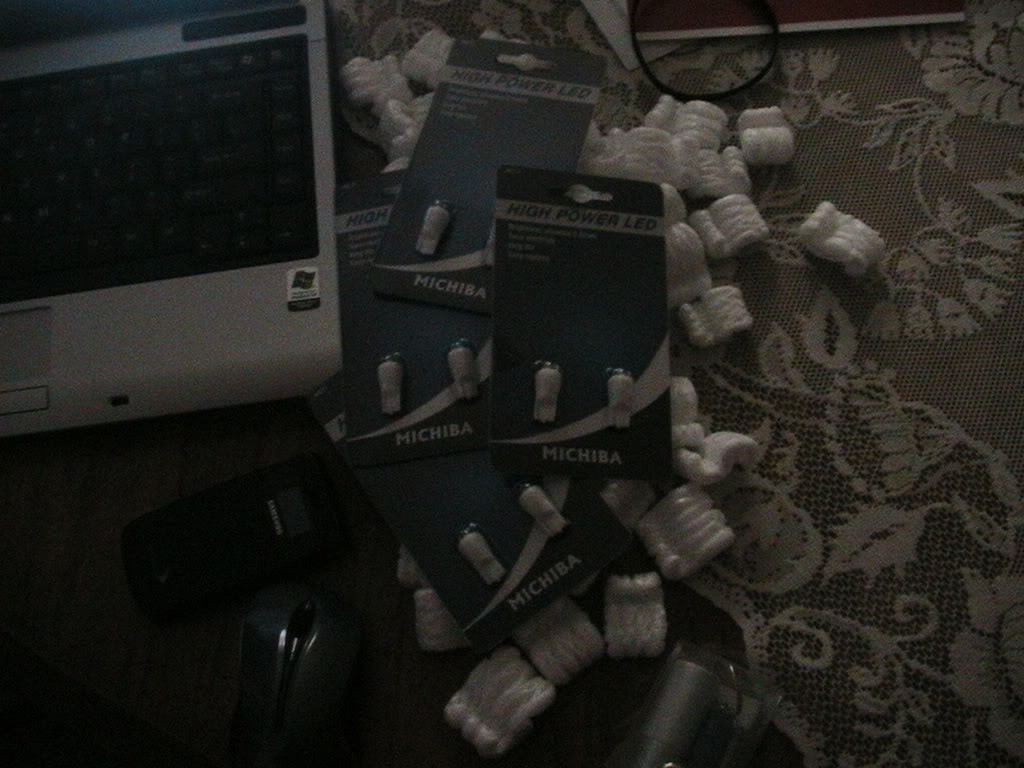
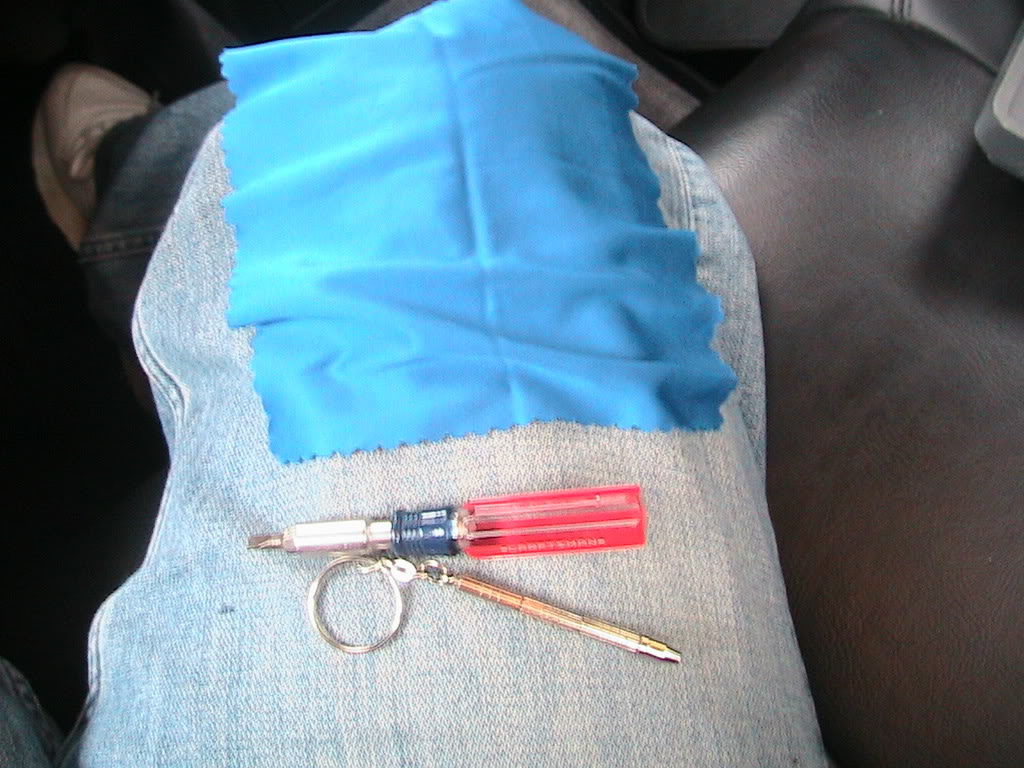
Here is pretty much All I used:
1 small Eyeglasses screwdriver
1 small Eyeglasses lint free cloth
1 small flathead screwdriver
1 pack of scotch tape
1 DVD-A Lincoln Park Reanimation album to listen to while install
Here is a pic of everything except tape:
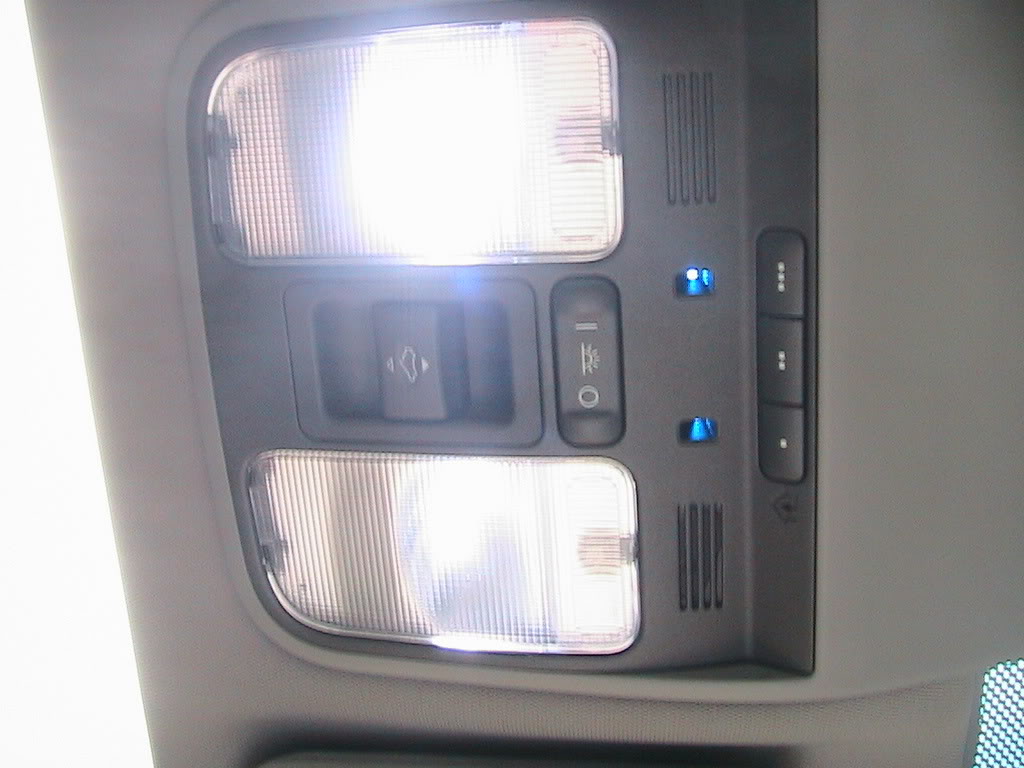
The basic instructions of this install cover all interior lights (dome lights, vanity mirror light, door step lights, courtesy lights)
The following steps apply to (dome, vanity, and courtesy)
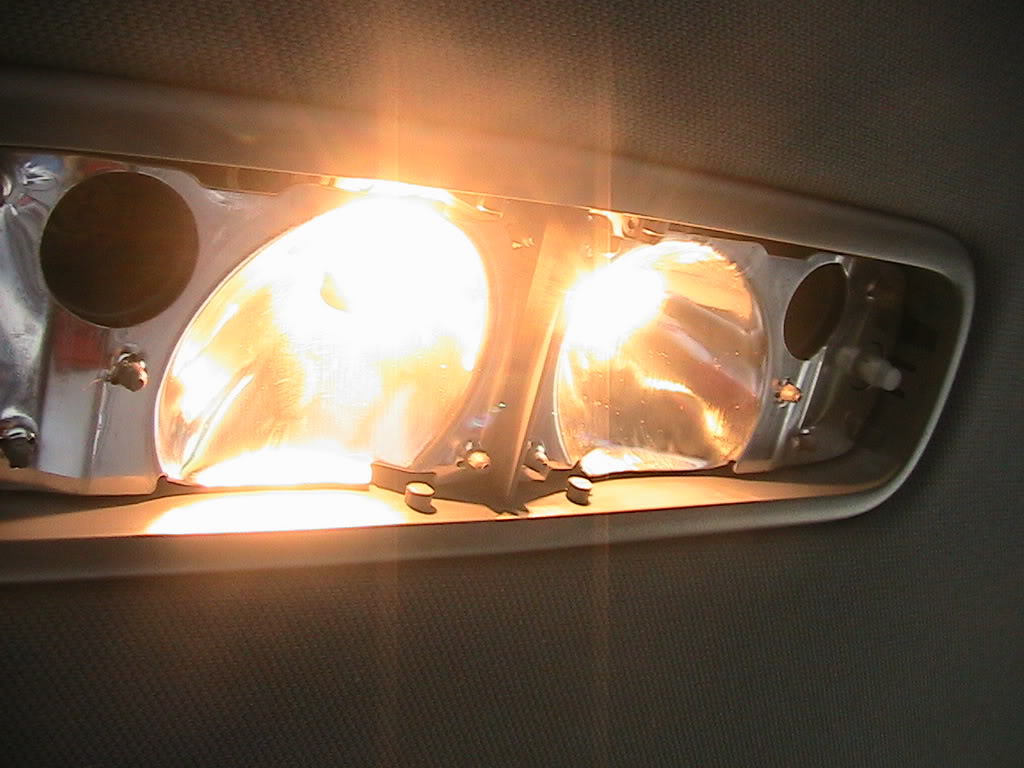
Here is what the lights look like stock..ewwww

The Courtesy and Vanity cover are very easy to remove, just take the smaller screwdriver (flathead) and wedge it between the plastic and the open grove which allows the plastic to slide up and down in order to turn the light on and off manually.
Here is what it looks like open:

Lights on
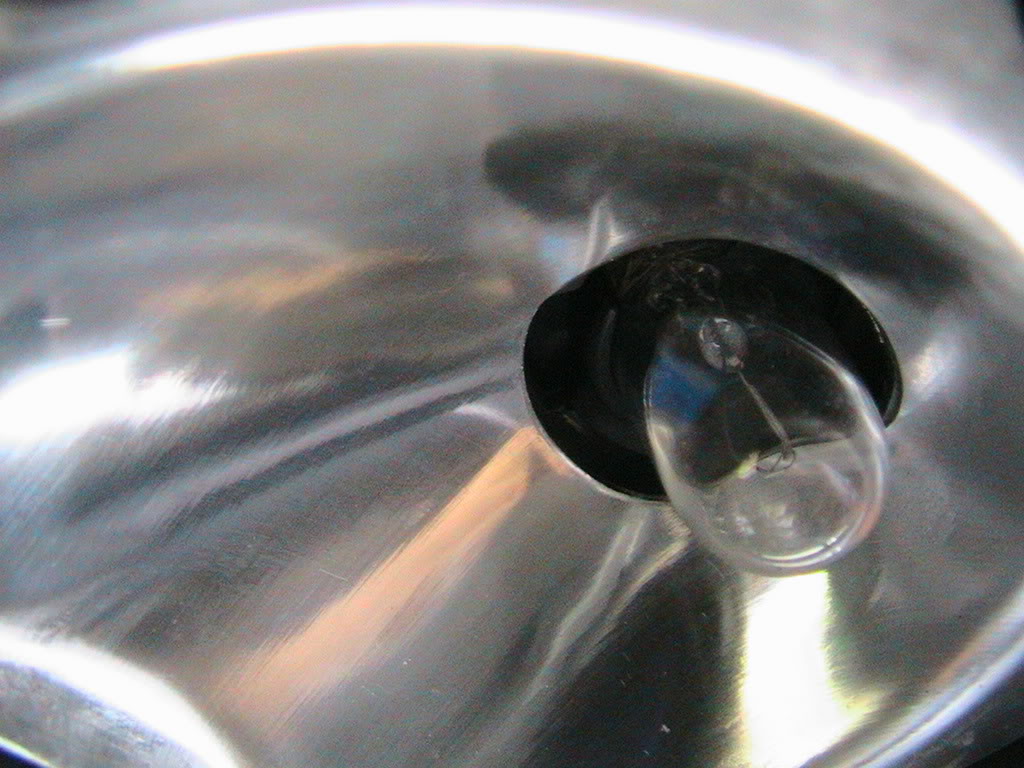
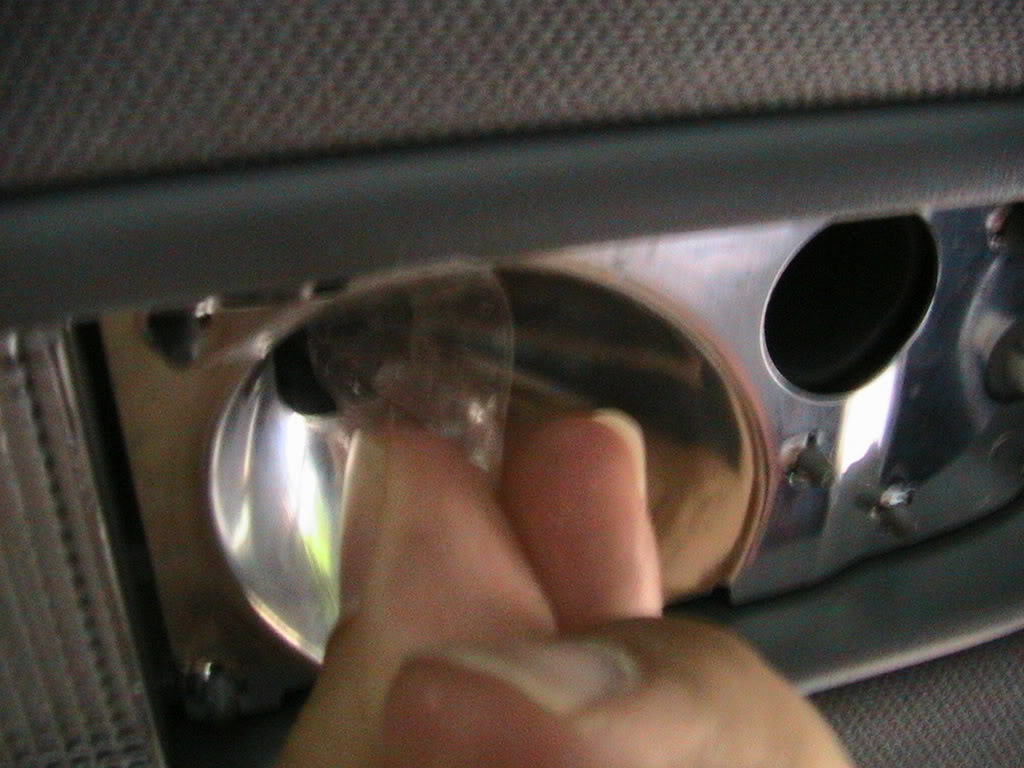
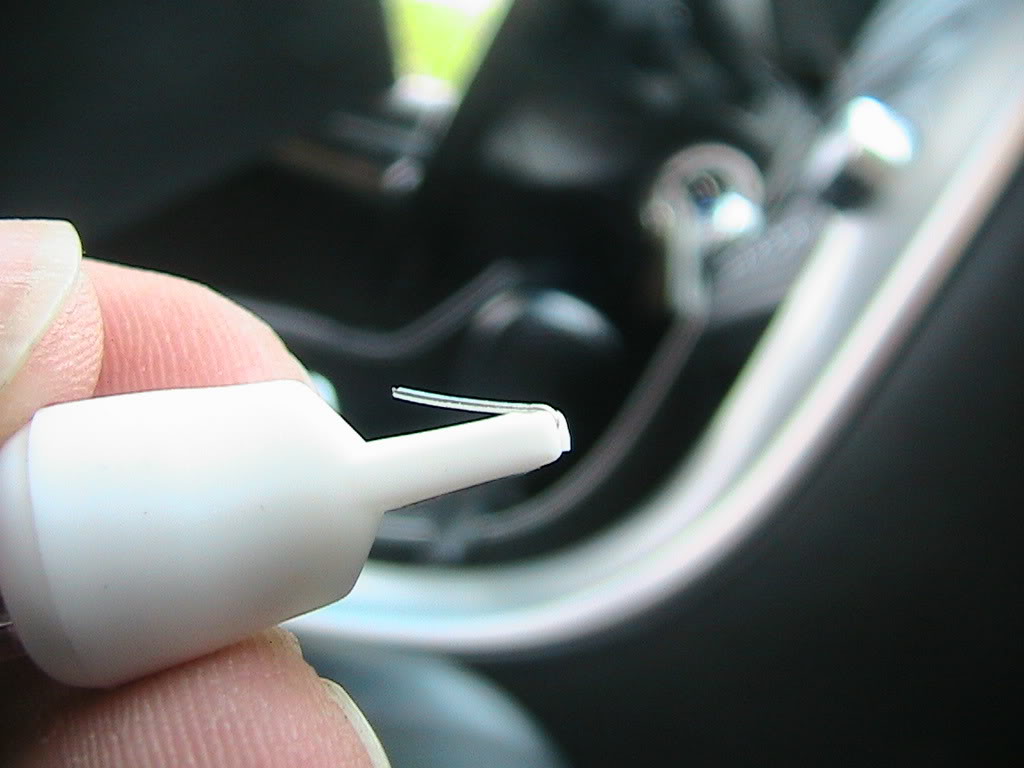
Ok, so taking the bulbs out are tricky, there were a few ways mentioned in previous posts from tweezers, to rubber gloves, I found using tape to wrap around the bulb is the easiest, because as you can see the bulb is in there in a small wedged area:
What I did was take a small strip of scotch tape and taped the two ends together leaving a open loop open which will fit nicely around the bulb. Carefully loop the tape around the bulb and just pat down on it so it sticks to the bulb, leaving the ends that you stuck together sticking out as a tab which you will use to bull the bulb out:
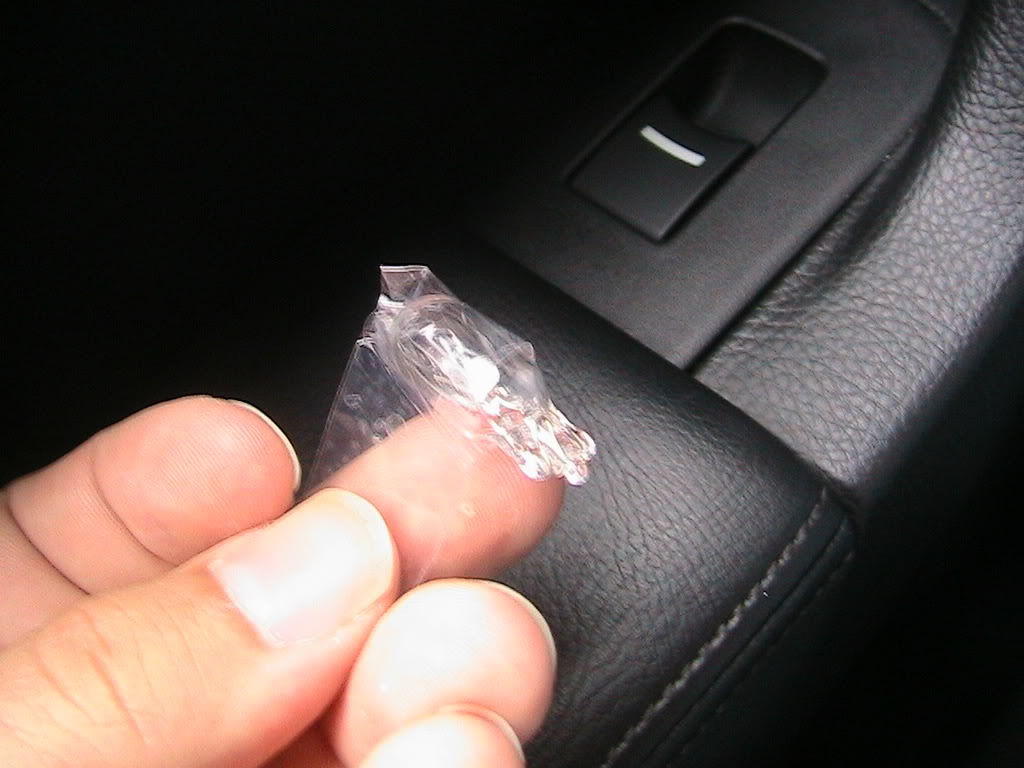
Close up of bulb:
Looping tape around bulb:
Removed bulb:
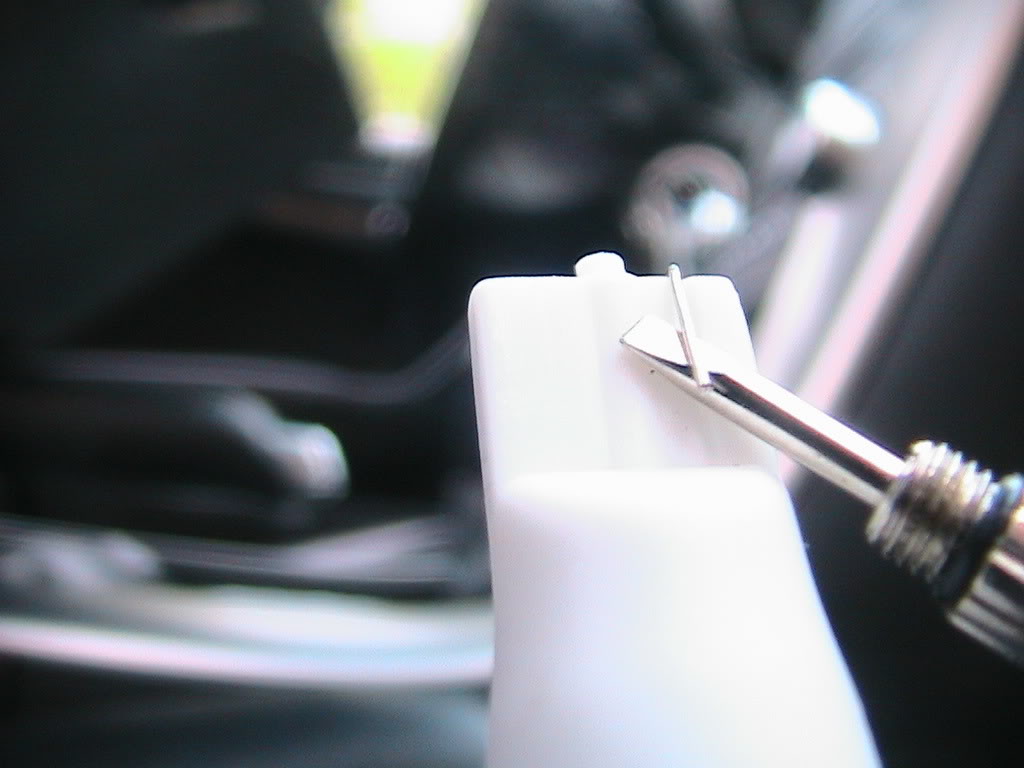
Once the bulb the LCD bulb is very easy to use, now of course nothing after market works as good as OEM, so what I noticed while installing the LED bulbs is that of course all will work after some jiggling and finding a good spot in the socket. Instead of doing that what I did was use the small screwdriver in order to bend the medal contacts up a tad in order to make a sure shot connections with the sockets, also tp prevent them from possibly moving out of place or anything like that while hitting a bump or anything like that while driving. HAving to remove the case just to reposition the LCD would be a big pain in the ass.
Like this:
So once there in and you make sure they work, snap on the covers and all done! Here is a comparison shot of the stock and LCD lights:
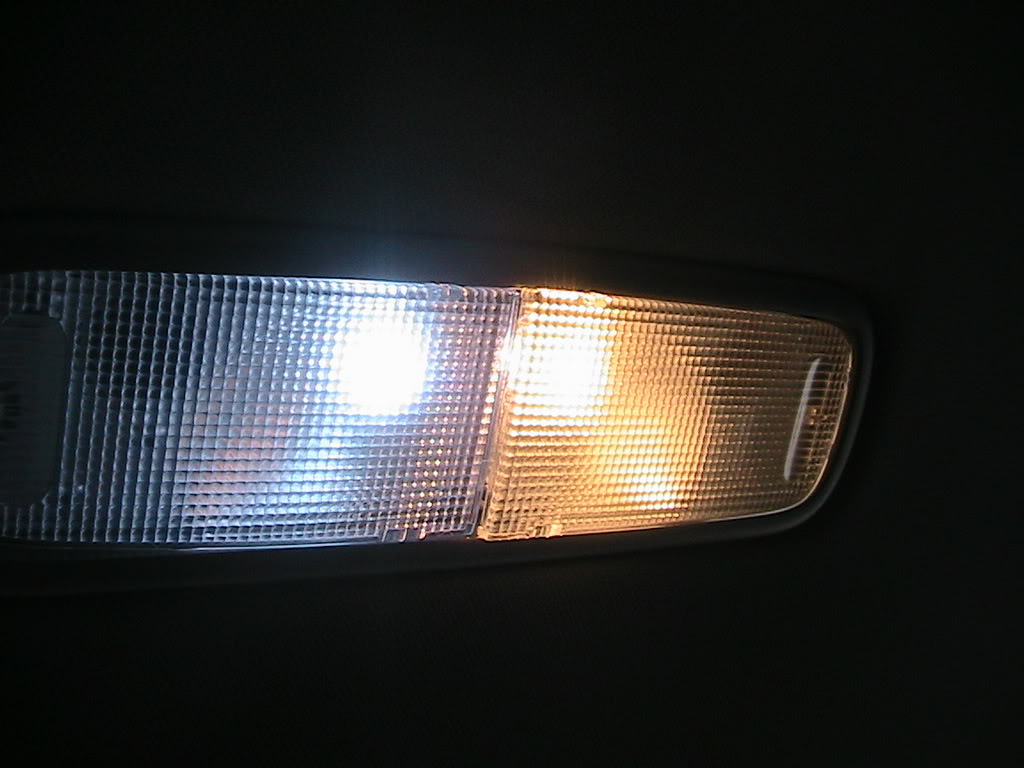
Both LCDs in :
:
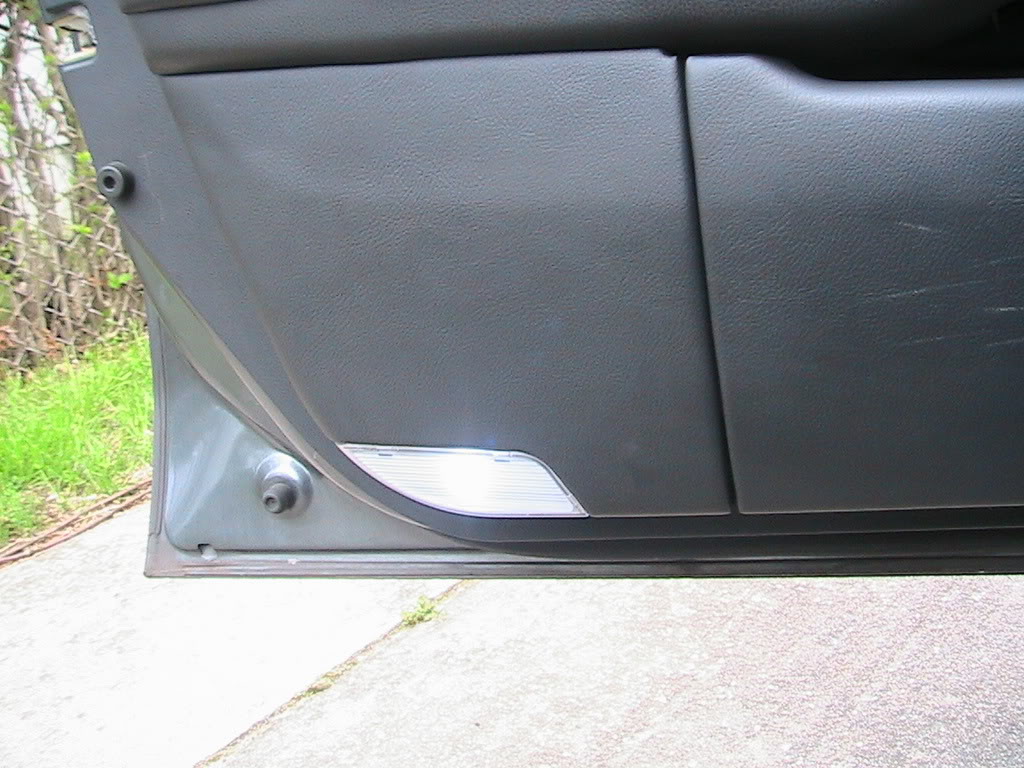
Now the door step lights are VERY easy. The domes require a little more eding but since there is leather surrounding the door light and semi soft plastic around the domes. Use the cloth to cover the tip of the screw drivers in order to pry the covers off as to not scratch or damage the materials.
Door:
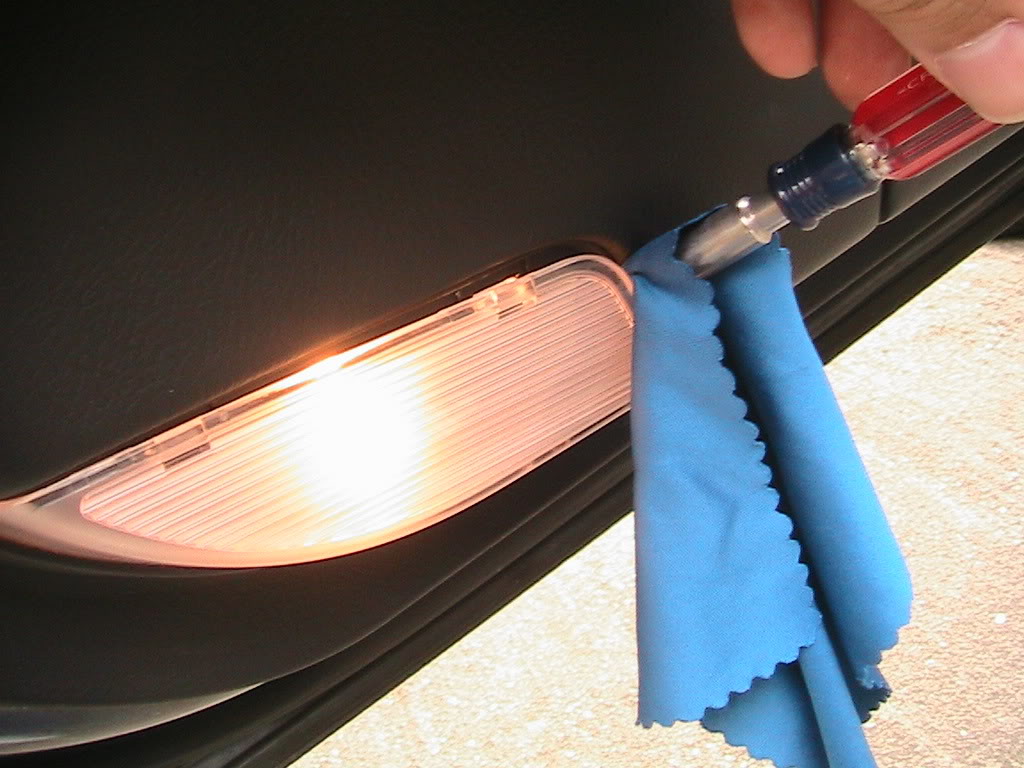
After installed:
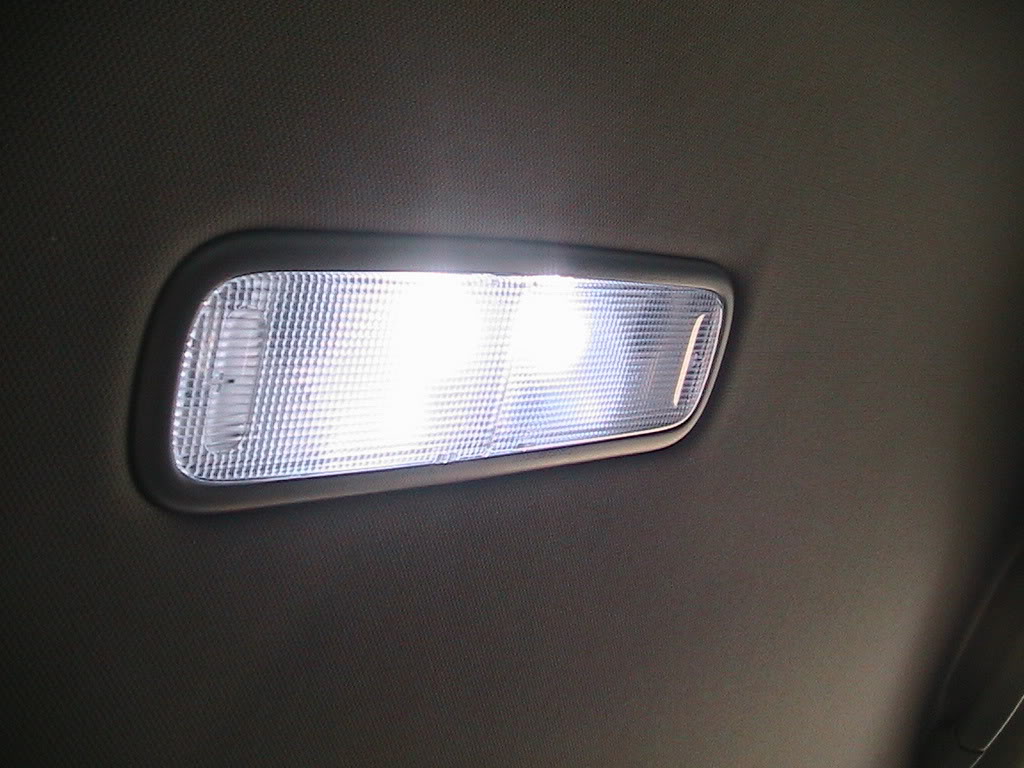
Remember to do the same for domes, here is what they look like after install:
I love the way they look. I was nervous it would look ricey but it dosent! Like I said during the day there is the smallest amount of blue tint, but at night they really look nice!
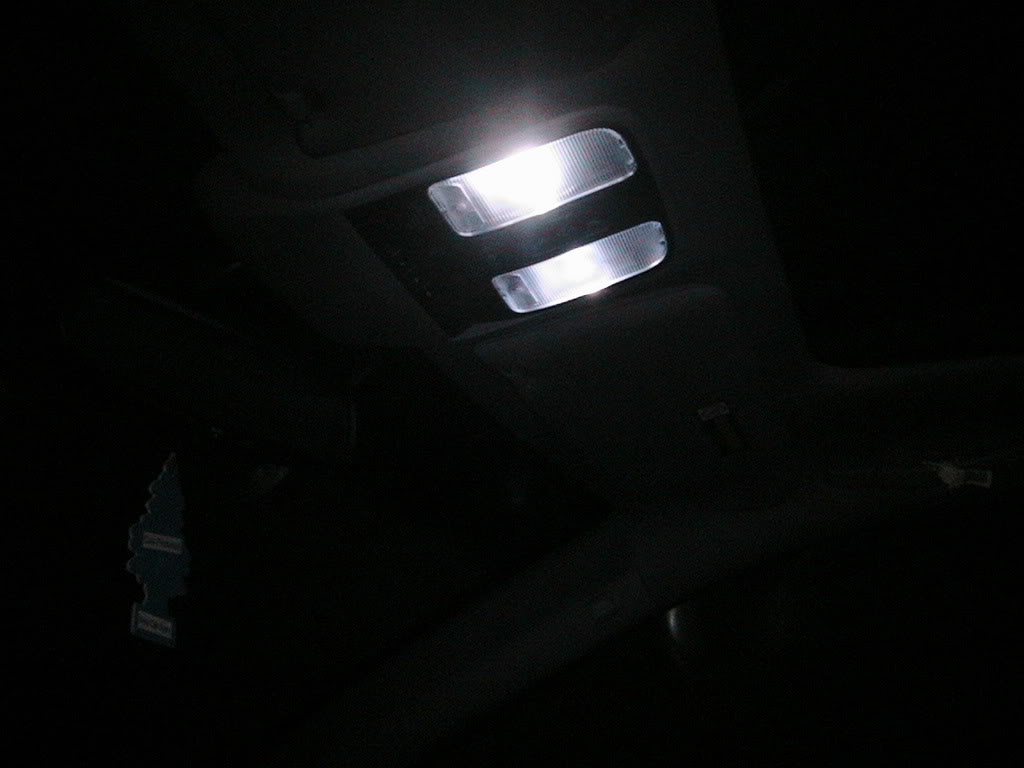
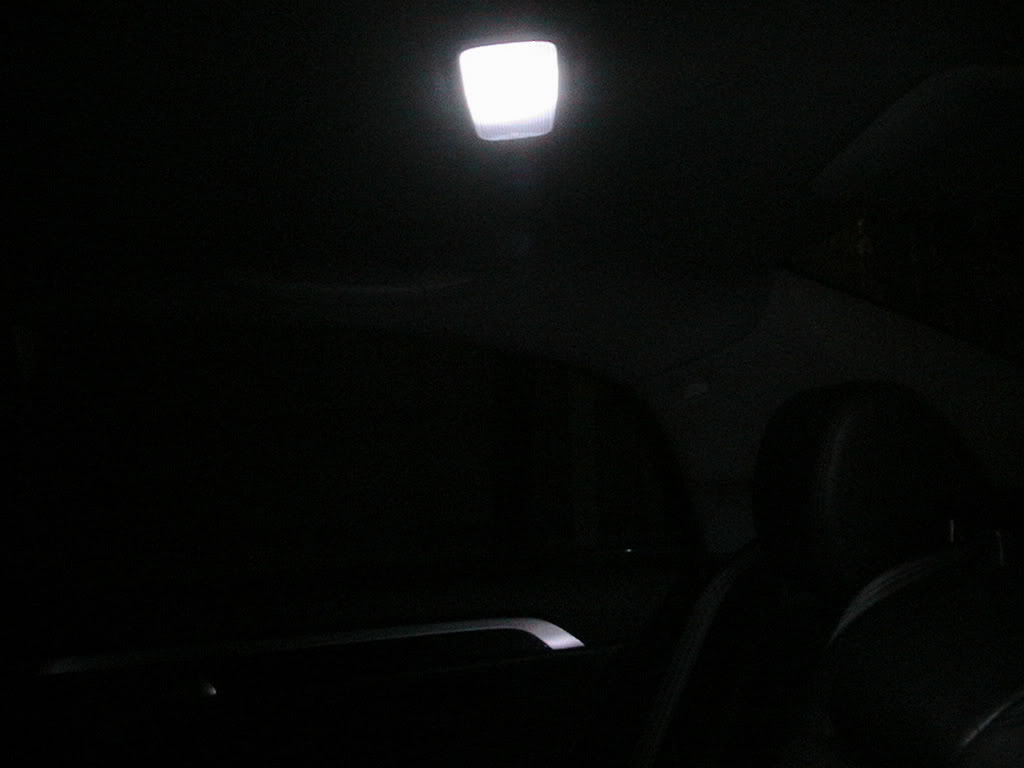
Here are some night shots, the way it reflect off the black leather is GREAT!
Any questions comments or anything feel free to PM me. I know this is a simple install but during my search on this topic I wish there was a guide like this so I made one with pictures.
Here is where I got the lights from:
http://cgi.ebay.com/ebaymotors/Ultra...17249046QQrdZ1
Guy is great he got the bulbs to me from CA to NY in 4 days! They look perfect! Almost 100% pure white, very little tint to them at all, and at night, there is almost none, brighter than original and looks MUCH better. there are 4X LCD which are perfect IMO, because anything less might be to dim, anything more and it shortens life span. I highly recommend them
Here is pretty much All I used:
1 small Eyeglasses screwdriver
1 small Eyeglasses lint free cloth
1 small flathead screwdriver
1 pack of scotch tape
1 DVD-A Lincoln Park Reanimation album to listen to while install
Here is a pic of everything except tape:
The basic instructions of this install cover all interior lights (dome lights, vanity mirror light, door step lights, courtesy lights)
The following steps apply to (dome, vanity, and courtesy)
Here is what the lights look like stock..ewwww
The Courtesy and Vanity cover are very easy to remove, just take the smaller screwdriver (flathead) and wedge it between the plastic and the open grove which allows the plastic to slide up and down in order to turn the light on and off manually.
Here is what it looks like open:
Lights on
Ok, so taking the bulbs out are tricky, there were a few ways mentioned in previous posts from tweezers, to rubber gloves, I found using tape to wrap around the bulb is the easiest, because as you can see the bulb is in there in a small wedged area:
What I did was take a small strip of scotch tape and taped the two ends together leaving a open loop open which will fit nicely around the bulb. Carefully loop the tape around the bulb and just pat down on it so it sticks to the bulb, leaving the ends that you stuck together sticking out as a tab which you will use to bull the bulb out:
Close up of bulb:
Looping tape around bulb:
Removed bulb:
Once the bulb the LCD bulb is very easy to use, now of course nothing after market works as good as OEM, so what I noticed while installing the LED bulbs is that of course all will work after some jiggling and finding a good spot in the socket. Instead of doing that what I did was use the small screwdriver in order to bend the medal contacts up a tad in order to make a sure shot connections with the sockets, also tp prevent them from possibly moving out of place or anything like that while hitting a bump or anything like that while driving. HAving to remove the case just to reposition the LCD would be a big pain in the ass.
Like this:
So once there in and you make sure they work, snap on the covers and all done! Here is a comparison shot of the stock and LCD lights:
Both LCDs in
:Now the door step lights are VERY easy. The domes require a little more eding but since there is leather surrounding the door light and semi soft plastic around the domes. Use the cloth to cover the tip of the screw drivers in order to pry the covers off as to not scratch or damage the materials.
Door:
After installed:
Remember to do the same for domes, here is what they look like after install:
I love the way they look. I was nervous it would look ricey but it dosent! Like I said during the day there is the smallest amount of blue tint, but at night they really look nice!
Here are some night shots, the way it reflect off the black leather is GREAT!
Any questions comments or anything feel free to PM me. I know this is a simple install but during my search on this topic I wish there was a guide like this so I made one with pictures.

The following 3 users liked this post by robbie82:

Trending Topics
05-13-2007, 12:33 AM
#8
Cablevision Employee
Thread Starter
Originally Posted by Knertified
Thanks for the tutorial, I just ordered from the link provided. Should be a nice upgrade. I bet it looks cool when you unlock the doors from the keyfob at night.
05-15-2007, 11:38 PM
#9
Cablevision Employee
Thread Starter
Here is a vid. the night shot didnt come out to well, the video didnt either but im guessing its still better.....lol.....i need a new cam
http://www.youtube.com/watch?v=YV3UvD7ysQM
http://www.youtube.com/watch?v=YV3UvD7ysQM
05-19-2007, 05:02 PM
#10
Instructor

Join Date: Oct 2006
Posts: 107
Likes: 0
Received 0 Likes
on
0 Posts
Robbie, Thanks for the tutorial. I purchased the lights and just finished the install. I wonder if that ebay link goes to you.. jk 
I used a few different flathead screwdrivers to get the job done. That scotch tape idea worked wonderfully. I would have been at it for hours without that tip!
A few of the panels gave me some problems so I wanted to list (before I forget) which side is easiest to pop.
1. Dome Lights: Pop from the farthest side (facing the windsheild). A normal screwdriver worked great.
2. Courtesy lights: You wont be able to get these off without a metal pic of some sort. Popped from the outer sides.
3. Vanity Lights: What a pain in the ?@#. I figured out how to do it after a while. Basically the light is setup like this. Roof -> Metal spacer --> light assembly. On the drivers side, you will want to go in on the right side. On the passanger, you its on the left. Its basically the side you see the lightbulb on when you turn it on. You need to take a screwdriver and shove it in between the metal spacer and the light assembly. Just keep wiggling it back and forth. Eventualy you will make it to the tab which pops the whole thing out. When you put it back in, make sure you bend the plastic tab back a little otherwise it might not stay.
4. Door Lights: This was a pain at first but you want to pop it from the side, not the bottom.
5. Trunk Light? The trunk like looked like the same as the vanity light. I think that could have been replaced but you would need to order a 5th set of bulbs and waste one.
Personally I think the oem bulbs were brighter because the light spreads more. The LED's are more focused. I could care less though because I can't stand the amber light from the oems.
Can't wait to see them at night!
05-22-2007, 06:00 PM
#12
Cruisin'

Join Date: May 2007
Age: 46
Posts: 15
Likes: 0
Received 0 Likes
on
0 Posts
Red LEDS?
Originally Posted by Knertified
They are much brighter at night. Verrry niceee. Car looks sick.
05-23-2007, 10:29 PM
#14
Cablevision Employee
Thread Starter
Originally Posted by Knertified
Robbie, Thanks for the tutorial. I purchased the lights and just finished the install. I wonder if that ebay link goes to you.. jk
I used a few different flathead screwdrivers to get the job done. That scotch tape idea worked wonderfully. I would have been at it for hours without that tip!
A few of the panels gave me some problems so I wanted to list (before I forget) which side is easiest to pop.
1. Dome Lights: Pop from the farthest side (facing the windsheild). A normal screwdriver worked great.
2. Courtesy lights: You wont be able to get these off without a metal pic of some sort. Popped from the outer sides.
3. Vanity Lights: What a pain in the ?@#. I figured out how to do it after a while. Basically the light is setup like this. Roof -> Metal spacer --> light assembly. On the drivers side, you will want to go in on the right side. On the passanger, you its on the left. Its basically the side you see the lightbulb on when you turn it on. You need to take a screwdriver and shove it in between the metal spacer and the light assembly. Just keep wiggling it back and forth. Eventualy you will make it to the tab which pops the whole thing out. When you put it back in, make sure you bend the plastic tab back a little otherwise it might not stay.
4. Door Lights: This was a pain at first but you want to pop it from the side, not the bottom.
5. Trunk Light? The trunk like looked like the same as the vanity light. I think that could have been replaced but you would need to order a 5th set of bulbs and waste one.
Personally I think the oem bulbs were brighter because the light spreads more. The LED's are more focused. I could care less though because I can't stand the amber light from the oems.
Can't wait to see them at night!
As for the ebay link, that guy lives in Japan!!!...lol...

Atman....no voltage problems at all......they should last as long as the stock ones, with the amount of LEDs on that bulb it should last a while. Theres only 3, maybe if there was more. But IMO 3 is perfect....
as Knertified said it looks sick! especially at night, and the girls love it too!
05-23-2007, 11:08 PM
#15
05 TL
Join Date: Sep 2005
Location: San Antonio
Age: 44
Posts: 562
Likes: 0
Received 0 Likes
on
0 Posts
Leds make a huge difference.
I dont know if this is considered thread crapping, but I would like to inform people that Cold Cathode Lights completely rock. I have had them as my license plate light for over a year now with out issues.
The comment that got me on my rant is the use of LEDs for a trunk light. This is my favorite use of the CC light.
.JPG)
Here is the thread:
https://acurazine.com/forums/showthr...0&page=1&pp=25
I dont know if this is considered thread crapping, but I would like to inform people that Cold Cathode Lights completely rock. I have had them as my license plate light for over a year now with out issues.
The comment that got me on my rant is the use of LEDs for a trunk light. This is my favorite use of the CC light.
Here is the thread:
https://acurazine.com/forums/showthr...0&page=1&pp=25
05-23-2007, 11:11 PM
#16
Cablevision Employee
Thread Starter
Originally Posted by Kracker
Leds make a huge difference.
I dont know if this is considered thread crapping, but I would like to inform people that Cold Cathode Lights completely rock. I have had them as my license plate light for over a year now with out issues.
The comment that got me on my rant is the use of LEDs for a trunk light. This is my favorite use of the CC light.
Here is the thread:
https://acurazine.com/forums/showthr...0&page=1&pp=25
 05-24-2007, 06:33 AM
#19
Cruisin'
Join Date: May 2007
Age: 46
Posts: 15
Likes: 0
Received 0 Likes
on
0 Posts
Originally Posted by robbie82
as Knertified said it looks sick! especially at night, and the girls love it too!
05-24-2007, 07:18 AM
#20
Cablevision Employee
Thread Starter
Originally Posted by atman21
Thanks for the reply - and for the great tutorial. I placed my eBay order. If the girls love it, then its a definite must do.
 ........
  --- >
--- >  05-27-2007, 03:54 PM
#21
Cruisin'
Join Date: May 2007
Age: 46
Posts: 15
Likes: 0
Received 0 Likes
on
0 Posts
I got the bulbs!
That same eBay guy got me the bulbs CA-> NJ in about 3 days! Talk about a good seller. I installed them this afternoon with no problems - except the light about the visors was a pain in the neck. Can't wait to check them out in the dark tonight.
Thanks again for the tutorial - helped me complete my first TL mod!!! Hmm, what's next? Well, I need a nice license plate frame. That will be the next order of business.
Thanks again for the tutorial - helped me complete my first TL mod!!! Hmm, what's next? Well, I need a nice license plate frame. That will be the next order of business.
 05-30-2007, 09:17 PM
#24
Originally Posted by atman21
I took delivery of my '07 TL-S last weekend and my first reaction was that the incadescent lights were weak when compared to the great red dash and floor lighting. Has anyone replaced the stock bulbs with similar red bulbs or LEDS?
I would be very careful with Red LEDs in a TL. I installed red LEDs in my old car, which had a tan interior, and I will admit they looked pretty sweet, but they completely defeated the purpose of having lights in the car. Red LEDs are completely useless for a light source when installed in a car. Just a little warning.
06-04-2007, 09:35 PM
#26
8th Gear
Join Date: May 2007
Posts: 8
Likes: 0
Received 0 Likes
on
0 Posts
This will be my first mod on 2005 TL/Nav. I was searching on ebay and I came accross this two
1) 12 LED Pkg (White)
2) UltraBright
Can you guys help me decide on which one should I order? Which one do you have?
Thanks,
1) 12 LED Pkg (White)
2) UltraBright
Can you guys help me decide on which one should I order? Which one do you have?
Thanks,
06-05-2007, 07:16 AM
#27
Cablevision Employee
Thread Starter
Originally Posted by tripflex
Could anybody tell me any part numbers, etc on those LEDs? Are they just exactly the same size as the original bulbs?
Thanks!
Thanks!
06-05-2007, 03:20 PM
#29
Lead Foot
Join Date: May 2007
Location: Orlando, FL
Age: 38
Posts: 47
Likes: 0
Received 0 Likes
on
0 Posts
I purchased the ultra bright ones on Monday from this same user and he sent me an email saying it would take 2-3 business days to ship and then 7-10 business days to receive it. Didn't expect for it to take that long but once i do receive and install them i will post about them :-D
06-05-2007, 09:30 PM
#30
There are actually a ton of other sites out there that sell LEDs. For my old car, I got some from superbrightleds.com and a couple from superlumination.com. Both orders were shipped same day and were received within three days or so. You guys might try looking there, plus they're pretty reasonable on cost. Just my 
06-07-2007, 06:15 PM
#31
Lead Foot
Join Date: May 2007
Location: Orlando, FL
Age: 38
Posts: 47
Likes: 0
Received 0 Likes
on
0 Posts
Just finished installing them, came a lot quicker than i thought. Ordered on Monday and got then today (Thursday). Install was very easy, including the tags lights. Out of all of them the tag lights were the hardest just because you have to take off the cover for the trunk to get to the lights, but even those were just straight pop-out.
Overall, for how much it cost and how little time it took, well worth it.
I'm happy.
Overall, for how much it cost and how little time it took, well worth it.
I'm happy.
06-07-2007, 10:44 PM
#32
Instructor

I cant remove the vanity lense covers. (Those are the ones above the visors correct?) I followed the instructions, I did what Robbie82 said but it feels like if i put anymore pressure into it, the lense would crack.
Im going in between the light assembly and the metal spacer but it wont budge. Should I keep on prying it? Im afraid of breaking it. Now the lense wiggles around alot, but still cant even remove it.
Im going in between the light assembly and the metal spacer but it wont budge. Should I keep on prying it? Im afraid of breaking it. Now the lense wiggles around alot, but still cant even remove it.
06-08-2007, 12:20 AM
#33
Cablevision Employee
Thread Starter
Originally Posted by enzyme
I cant remove the vanity lense covers. (Those are the ones above the visors correct?) I followed the instructions, I did what Robbie82 said but it feels like if i put anymore pressure into it, the lense would crack.
Im going in between the light assembly and the metal spacer but it wont budge. Should I keep on prying it? Im afraid of breaking it. Now the lense wiggles around alot, but still cant even remove it.
Im going in between the light assembly and the metal spacer but it wont budge. Should I keep on prying it? Im afraid of breaking it. Now the lense wiggles around alot, but still cant even remove it.
06-08-2007, 09:32 AM
#35
Lead Foot
Join Date: May 2007
Location: Orlando, FL
Age: 38
Posts: 47
Likes: 0
Received 0 Likes
on
0 Posts
i was gonna put the extra lights in the vanity ones but i decided on the tag light instead...vanity lights don't even get seen that much so i'm not too worried.


 06-09-2007, 01:47 PM
#37
Racer

Join Date: Mar 2007
Location: chiTOWN
Age: 39
Posts: 274
Likes: 0
Received 0 Likes
on
0 Posts
I purchased lights from brian @ tec-toyz, n i purchased those LEDS from superbrightLEDS or w.e autoalumination.com w.e the new ones taht everyone was talking about, and the tec-toyz work 100x times better in the interior.
Also im just curious, I bought an a few lights from superbrightLEDS.com and i put em in my licence plate lights and backuplights, and one they wont stya in perfectly, and one of my licence plate lights is out, do u have any solutions? like bending it would help? gluing? thanks.
Also im just curious, I bought an a few lights from superbrightLEDS.com and i put em in my licence plate lights and backuplights, and one they wont stya in perfectly, and one of my licence plate lights is out, do u have any solutions? like bending it would help? gluing? thanks.
06-10-2007, 04:55 AM
#38
Instructor
Join Date: Apr 2007
Location: Vancouver, BC
Age: 43
Posts: 126
Likes: 0
Received 0 Likes
on
0 Posts
Originally Posted by Knertified
3. Vanity Lights: What a pain in the ?@#. I figured out how to do it after a while. Basically the light is setup like this. Roof -> Metal spacer --> light assembly. On the drivers side, you will want to go in on the right side. On the passanger, you its on the left. Its basically the side you see the lightbulb on when you turn it on. You need to take a screwdriver and shove it in between the metal spacer and the light assembly. Just keep wiggling it back and forth. Eventualy you will make it to the tab which pops the whole thing out. When you put it back in, make sure you bend the plastic tab back a little otherwise it might not stay.
I looked at this thread: https://acurazine.com/forums/showthr...230#post767230
Basically, the driver side's should be on the middle of the right side. I can actually see a little "space" at that location (middle of the right side). So according to the instruction and the instructions and pictures, if I stick a small screw driver in, I'm supposed to reach the "tab" which removes the whole cover.
Here is the problem. I used a very thin metal piece (like the instructions provided) trying to reach for that tab. However, the metal piece goes "right through" without reaching any tabs! It can basically touch the light bulb. I'm 100% sure that the metal piece went between the light housing and the metal ring.
So I'm very confused now. From the pictures and diagrams, I thought there should be a tab the "prevents" my metal piece from reaching the light bulb, so how come I can reach it? Can anyone shed some light on this?
06-10-2007, 05:01 AM
#39
Instructor
Join Date: Apr 2007
Location: Vancouver, BC
Age: 43
Posts: 126
Likes: 0
Received 0 Likes
on
0 Posts
Originally Posted by Knertified
3. Vanity Lights: What a pain in the ?@#. I figured out how to do it after a while. Basically the light is setup like this. Roof -> Metal spacer --> light assembly. On the drivers side, you will want to go in on the right side. On the passanger, you its on the left. Its basically the side you see the lightbulb on when you turn it on. You need to take a screwdriver and shove it in between the metal spacer and the light assembly. Just keep wiggling it back and forth. Eventualy you will make it to the tab which pops the whole thing out. When you put it back in, make sure you bend the plastic tab back a little otherwise it might not stay.
I looked at this thread: https://acurazine.com/forums/showthr...230#post767230
Basically, the driver side's should be on the middle of the right side. I can actually see a little "space" at that location (middle of the right side). So according to the instructions and pictures, if I stick a small screw driver in, I'm supposed to reach the "tab" which removes the whole cover.
Here is the problem. I used a very thin metal piece (like the instructions provided) trying to reach for that tab. However, the metal piece goes "right through" without reaching any tabs! It can basically touch the light bulb. I'm 100% sure that the metal piece went between the light housing and the metal ring.
So I'm very confused now. From the pictures and diagrams, I thought there should be a tab the "prevents" my metal piece from reaching the light bulb, so how come I can reach it? Can anyone shed some light on this?
06-10-2007, 09:26 AM
#40
Safety Car
iTrader: (1)
Join Date: Apr 2007
Location: Northern ILLINOIS
Age: 62
Posts: 4,848
Received 133 Likes
on
129 Posts
THANKYOU SIR Great job. I was looking last night and didn't want to break any clips. I did a search this morning and your thread kicks booty I just need to get the vanity covers off. The kit came with 8 bulbs, to do all interior and trunk you would need 9 bulbs????? Thankyou for a fantastic job brother
I just need to get the vanity covers off. The kit came with 8 bulbs, to do all interior and trunk you would need 9 bulbs????? Thankyou for a fantastic job brother