
G-088: DIY: Clear TailLights


 05-16-2009, 01:40 PM
#122
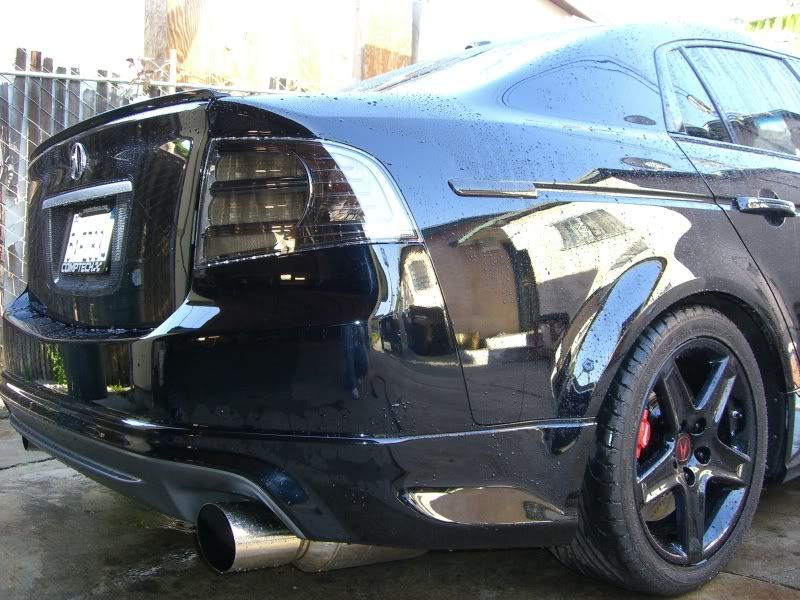
A J35A8 EG civic is in


 09-27-2010, 07:31 PM
#127
7th Gear

Join Date: Apr 2010
Location: Indianapolis
Age: 41
Posts: 7
Likes: 0
Received 0 Likes
on
0 Posts
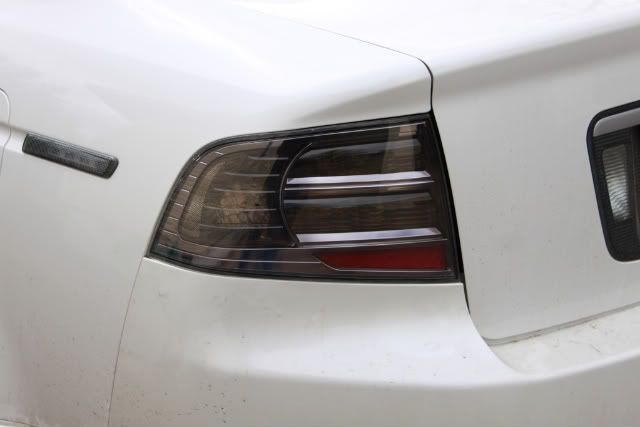
so i am thinking about doing this mod but i have a question. I currently have 07-08 TL tailights on the car and want to paint the red plastic that surrounds the clear and red light areas black.
Can i remove this plastic when i cut open the lights?
Can i remove this plastic when i cut open the lights?

 04-19-2011, 06:43 AM
#132
Here's my contribution the the DIY thread.
First off it's best to tape the front lens and the back openings of the taillight to prevent scratches and debris getting inside them.


When starting to cut into your taillights I stayed right as close to the edge by the lens as possible. Also, when you're cutting make sure to only cut until you start to see the silver bezel, do not cut through it, there are tabs that hold the plastic lenses in place.


This corner is probably the most difficult, take it very slow, when cutting down from the top of the taillight to this corner cut into the side of the taillight, instead of into it so you don't cut into the bezel.


when you're cut are done, I took a flat head screwdriver and went around the taillight and twisted the screwdriver to seperate the two halves.

Now you're going to want to take the two screws out from the back of the taillight.

This screw is where the LED panel is, holding the LED diffuser in.

You're taillights are now seperated

Now this is why you dont want to cut through the silver bezel in your cuts, you can see how the plastic pieces are secured.

First off it's best to tape the front lens and the back openings of the taillight to prevent scratches and debris getting inside them.
When starting to cut into your taillights I stayed right as close to the edge by the lens as possible. Also, when you're cutting make sure to only cut until you start to see the silver bezel, do not cut through it, there are tabs that hold the plastic lenses in place.
This corner is probably the most difficult, take it very slow, when cutting down from the top of the taillight to this corner cut into the side of the taillight, instead of into it so you don't cut into the bezel.
when you're cut are done, I took a flat head screwdriver and went around the taillight and twisted the screwdriver to seperate the two halves.
Now you're going to want to take the two screws out from the back of the taillight.
This screw is where the LED panel is, holding the LED diffuser in.
You're taillights are now seperated
Now this is why you dont want to cut through the silver bezel in your cuts, you can see how the plastic pieces are secured.
04-19-2011, 06:43 AM
#133


When taking the bezel out of the lens start from the left side of the taillight, it takes a little tugging and pulling but it will eventually come out. Also, make sure to smooth out you egdes by taking a sanding wheel bit for your dremel and go along the edges of your lens, and the taillight housing to make sure there is no loose debris. Then put your new parts in slide the bezel back into the lens, put the two screws back in to hold the taillight together, then start sealing them together. After you're done the should be ready to put back in your car.
Last edited by nate_0022; 04-19-2011 at 06:54 AM.
The following users liked this post:
rockstar143 (11-22-2011)
04-20-2011, 03:09 PM
#134
I guess i will contribute mine too!!
https://acurazine.com/forums/3g-tl-2004-2008-93/diy-my-clearing-tails-voyage-775001/
https://acurazine.com/forums/3g-tl-2004-2008-93/diy-my-clearing-tails-voyage-775001/
The following users liked this post:
rockstar143 (11-22-2011)
11-22-2011, 10:33 AM
#135
Well thank you to Nate and Pharon...you 2 have the only 2 posted pictures of how to cut and what to do for a DIY on this...looks like OP moved his pictures (I see he's banned...out of spite?)
I want to give this a whirl...one thing I never liked about the USR ghost tails I bought was the totally clear turn signal diffuser...I wanted to either red it out, or smoke it a little bit. This thread will allow me to do that. Thank you
J.
I want to give this a whirl...one thing I never liked about the USR ghost tails I bought was the totally clear turn signal diffuser...I wanted to either red it out, or smoke it a little bit. This thread will allow me to do that. Thank you
J.
02-26-2016, 12:08 AM
#136
7th Gear

Join Date: Jul 2015
Posts: 7
Likes: 0
Received 0 Likes
on
0 Posts
These lights are TL-S 07 Tail lights outside housing modded with the clear corners and brake light cover/reflectors for the 04-06 TL Tail Lights:

Things You Need:
TL-S 07 TailLights & 04-06 TailLights
Dremel Plastic Cutting Wheel
Plastic Epoxy ... I used 5 bottles
Patience .... evry scratch will show!
Here is the dremel cutting wheel

Here is the epoxy I used, dont mix to much at one time it starys setting up in 7min.

Be carefull when cutting wear eye protection this is my faceshield:

The first cut you will need to make is along the portion of the light the you can see when opening the trunk

This will give you starting points for the sides


Now just cut all the way aroun the light being care full to stay where these cuts are:


Now befrore you do anything unscrew the two screws on the light:

Here is where the patience comes in, be very carefull pulling this apart if you feel that any one part dosent have some wiggle to it you may have to go over your cuts...you should be able to see the red plastic inside the cut. Again every scratch will show so take it easy.
Start with trying to get the trunk edge up and out then slidding the crome trim out of the clear plastic houseing:

Now this is where i got brut on my 05 red tail lights, no need for cutting gently i wasn't keeping them:

This made life a hole lot easier, although i was still carefull not to damage the clear parts i was eventually going to use.
Now after taking the 05 tail light clear parts and putting them together with the 07 tl-s dark crome trim i started sliding the into the tl-s07 clear housing pointy side first:

after you have the trim in place you can screw the back together beging carefull not to move the light, you still have to epoxy it together.


Things You Need:
TL-S 07 TailLights & 04-06 TailLights
Dremel Plastic Cutting Wheel
Plastic Epoxy ... I used 5 bottles
Patience .... evry scratch will show!
Here is the dremel cutting wheel
Here is the epoxy I used, dont mix to much at one time it starys setting up in 7min.
Be carefull when cutting wear eye protection this is my faceshield:
The first cut you will need to make is along the portion of the light the you can see when opening the trunk
This will give you starting points for the sides
Now just cut all the way aroun the light being care full to stay where these cuts are:
Now befrore you do anything unscrew the two screws on the light:
Here is where the patience comes in, be very carefull pulling this apart if you feel that any one part dosent have some wiggle to it you may have to go over your cuts...you should be able to see the red plastic inside the cut. Again every scratch will show so take it easy.
Start with trying to get the trunk edge up and out then slidding the crome trim out of the clear plastic houseing:
Now this is where i got brut on my 05 red tail lights, no need for cutting gently i wasn't keeping them:
This made life a hole lot easier, although i was still carefull not to damage the clear parts i was eventually going to use.
Now after taking the 05 tail light clear parts and putting them together with the 07 tl-s dark crome trim i started sliding the into the tl-s07 clear housing pointy side first:
after you have the trim in place you can screw the back together beging carefull not to move the light, you still have to epoxy it together.
 . Could you help me out?

Thread
Thread Starter
Forum
Replies
Last Post
rp_guy
Member Cars for Sale
9
07-16-2017 07:33 AM