
G-031: [DIY] Accord Fogs with Type-S Grills on '04-'06 TL
 07-11-2011, 08:04 PM
#121
Race Director
Thread Starter
iTrader: (8)
Excellent explanation, NSXCessive.
Indeed, if there were pictures it would be easier to understand, but good nonetheless!
In conclusion, the differences between my DIY is that the switch's illumination comes from a accessory connector, instead of the VSA wires.
The trigger wire (blue) is tapped into the ignition wire, opposed to parking light wires.
That's correct, right?
Btw, I'll get a moderator to edit my wiring post and link your post right at the top of the wiring section.
 07-12-2011, 02:03 PM
#123
Advanced
Excellent explanation, NSXCessive.
Indeed, if there were pictures it would be easier to understand, but good nonetheless!
In conclusion, the differences between my DIY is that the switch's illumination comes from a accessory connector, instead of the VSA wires.
The trigger wire (blue) is tapped into the ignition wire, opposed to parking light wires.
That's correct, right?
Btw, I'll get a moderator to edit my wiring post and link your post right at the top of the wiring section.
Indeed, if there were pictures it would be easier to understand, but good nonetheless!
In conclusion, the differences between my DIY is that the switch's illumination comes from a accessory connector, instead of the VSA wires.
The trigger wire (blue) is tapped into the ignition wire, opposed to parking light wires.
That's correct, right?
Btw, I'll get a moderator to edit my wiring post and link your post right at the top of the wiring section.
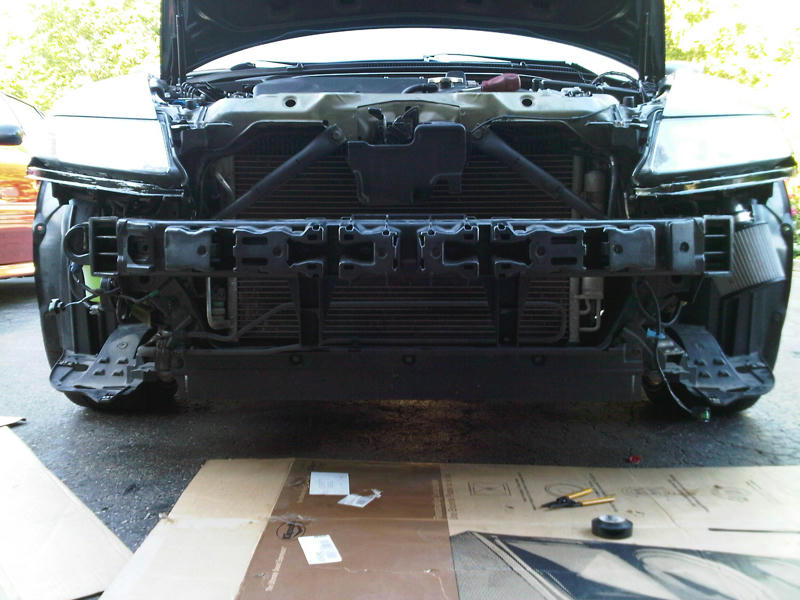
Thanks man I thought I would add to your already great writeup, did some things differently but hey thats what makes it DIY custom work none the less. I was installing A-Spec body kit so was easier for me to remove the bumper off the car. You could install the Fogs without removing but makes life easier to take it off. I would have to say I spent 12+ hrs fitting the fogs, running the wires etc. I'm sure the 2nd time around would be 1/2 that, since the first journey is always a learning experience.
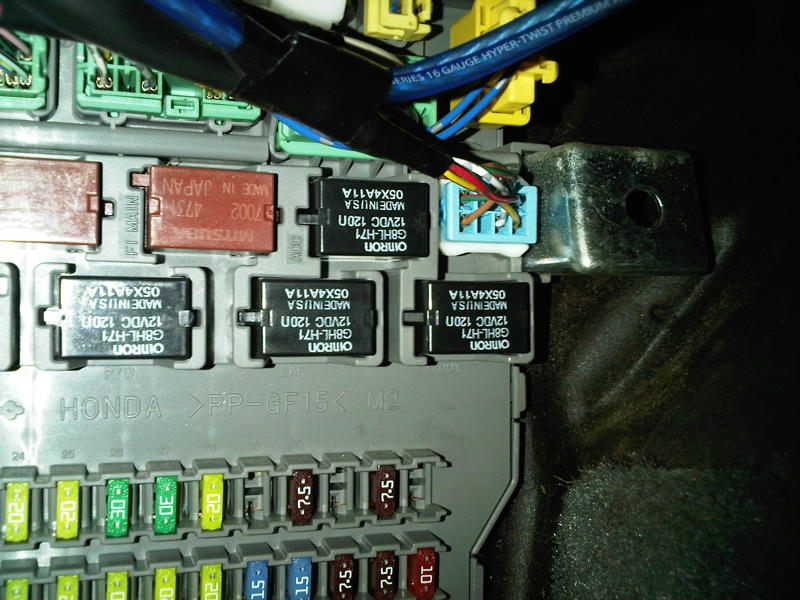
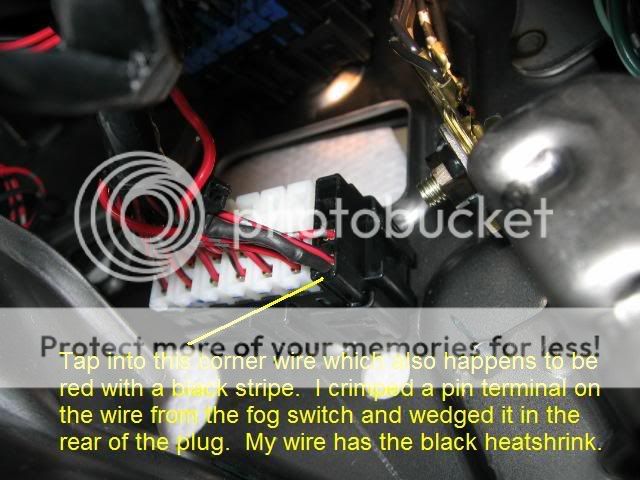
For those of you who want to use the 6-Pin harness and trigger using the parking lights. I checked the repair manual I made a mistake in the previous post its NOT #19 the correct spot is #7. See the pic below you'll have the right idea. Take the BLU from the switch harness and run it to the parking light trigger RED/BLK instead of using an Ignition trigger.
Took some quick snaps with the BB last night to share:
Interior fuse box, and the 6 pin harness connected to #7 no cutting or extra splicing need to illuminate note: if you have an aftermarket alarm you can remove the dummy plug and trigger your parking lights from the RED/BLK pin
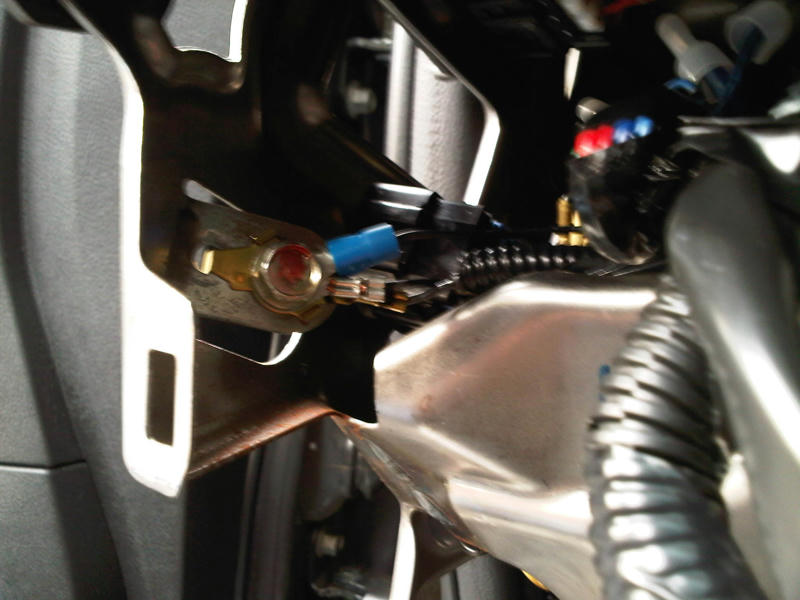
Ground location used for switch harness:
Dummy plug removed this is the 6-Pin accessory harness with a parallel connector for other accessories. In my case Viper Alarm/Autostart parking light trigger.
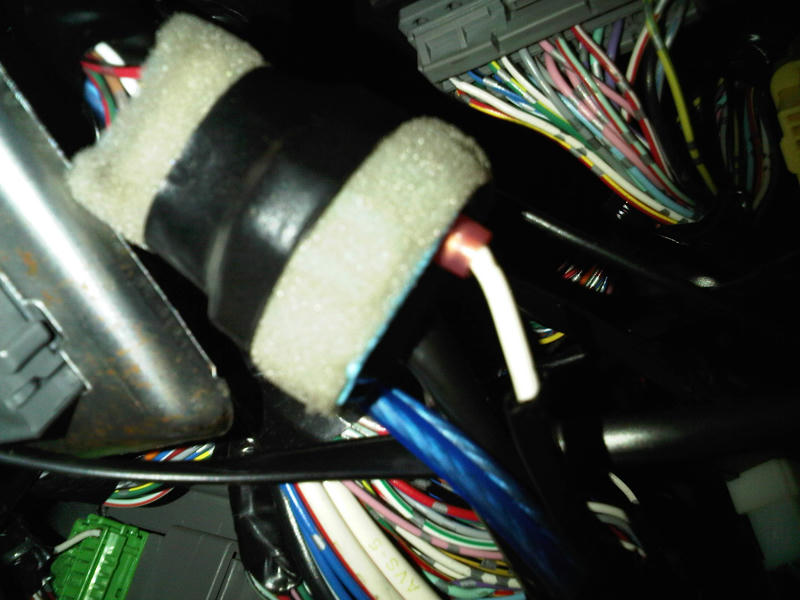
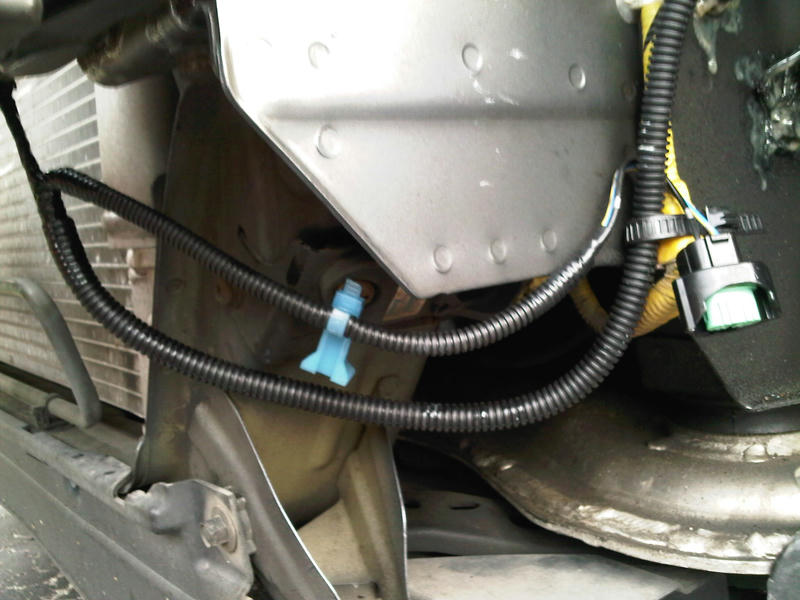
Pass Thru to engine bay using blue speaker wire, you can also see my PLX Afr gauge wiring passing thru the same grommet.

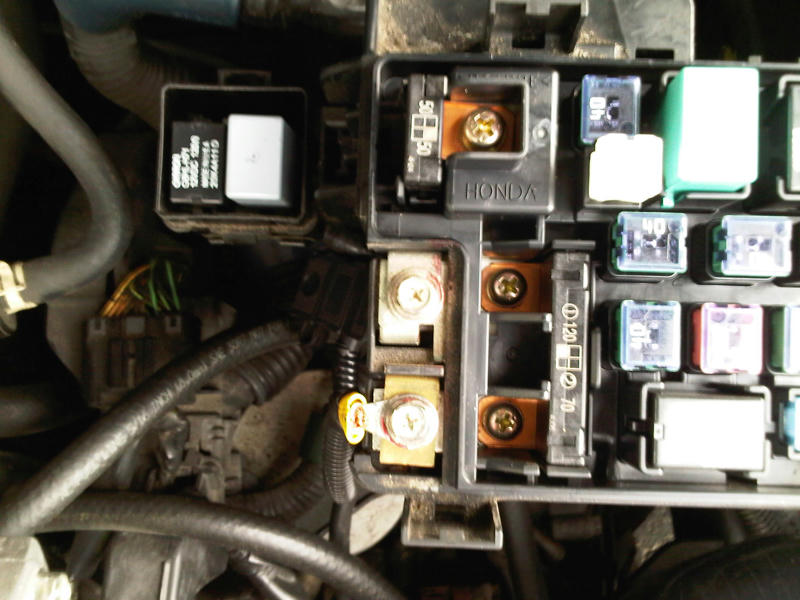
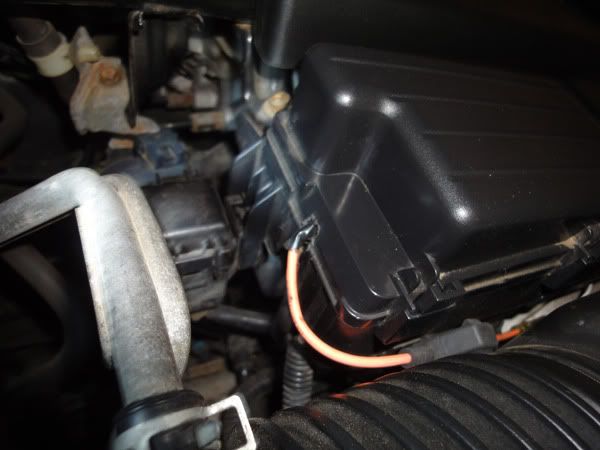
Engine Bay connection to +12 terminal.
Fog harness routing left to right.
Accord Harness Driver side removed grounds and re-taped up. Ground was connected in engine bay removing 2nd gray relay harness.
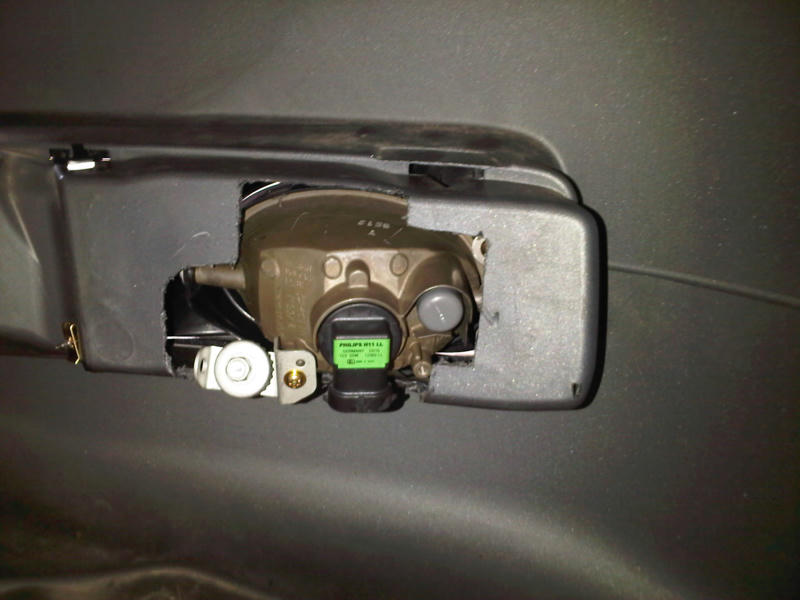
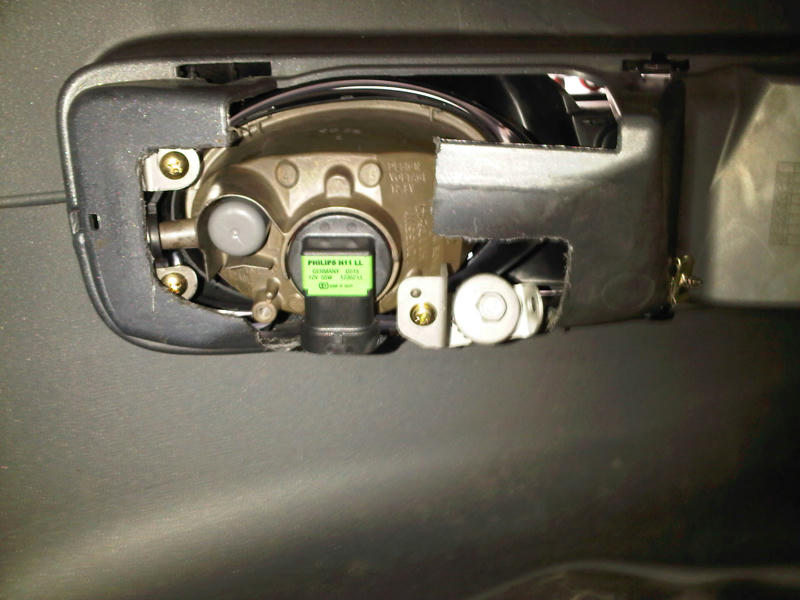
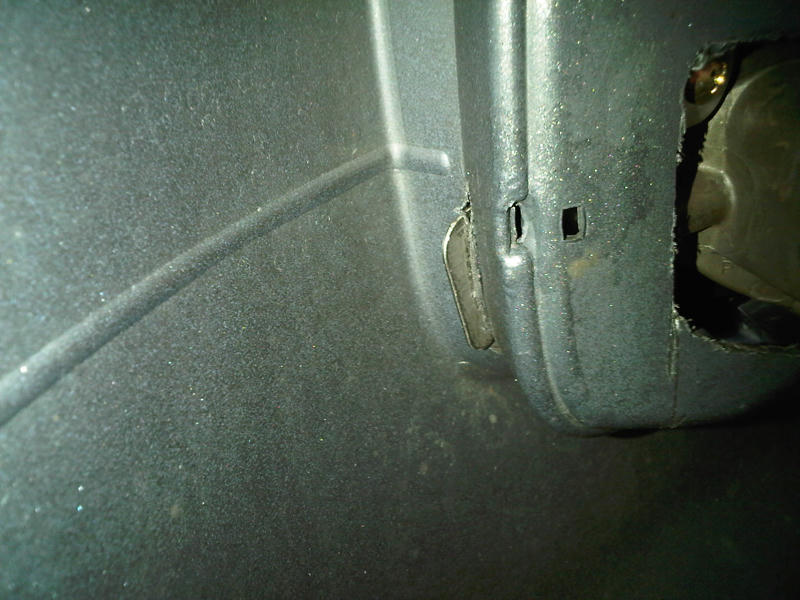
Inside bumper mounting using 1 screw & spring clip, and cut off top tab and used bottom tab to mount Fog housings.
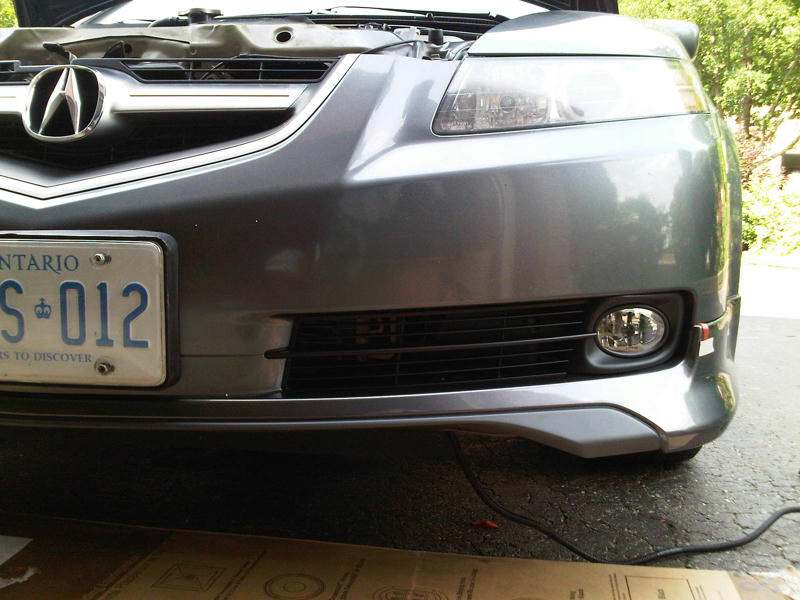
Left & Right Sides + A-Spec lip mockup using custom trimmed base grills, might still need some minor tweaking here and there still.

Last edited by NSXCessive; 07-12-2011 at 02:09 PM.
07-12-2011, 04:23 PM
#124
Race Director
Thread Starter
iTrader: (8)
Thanks for the DIY =)
I just PMed Bearcat, so he'll update my first post =)
The only thing I would do to fix your install is to try making the fogs point inwards more.
All you have to do is keep the inside corner where it is (use as a pivot point), and bring the outside edge out more.
Btw, if you're in the GTA area, come out to the Acurazine TL meet!
https://acurazine.com/forums/eastern-canada-323/acurazine-tl-meet-%40-speedstar-824926/
Last edited by guitarplayer16; 07-12-2011 at 04:26 PM.
07-13-2011, 10:56 AM
#125
Advanced
Thanks for the DIY =)
I just PMed Bearcat, so he'll update my first post =)
The only thing I would do to fix your install is to try making the fogs point inwards more.
All you have to do is keep the inside corner where it is (use as a pivot point), and bring the outside edge out more.
Btw, if you're in the GTA area, come out to the Acurazine TL meet!
https://acurazine.com/forums/showthread.php?t=824926
07-13-2011, 11:41 AM
#126
Race Director
Thread Starter
iTrader: (8)
Waterloo isn't too far from the meet area; about 45 minutes?
Closer to the meet than where I live (2 hours away) =P
Sister lives in Waterloo and goes to Laurier so I go there pretty often =P
07-13-2011, 03:24 PM
#127
Advanced
I made notches in the housing where it would hit the A-Spec lip to bring the outsides flush with the bumper =)
Waterloo isn't too far from the meet area; about 45 minutes?
Closer to the meet than where I live (2 hours away) =P
Sister lives in Waterloo and goes to Laurier so I go there pretty often =P
Waterloo isn't too far from the meet area; about 45 minutes?
Closer to the meet than where I live (2 hours away) =P
Sister lives in Waterloo and goes to Laurier so I go there pretty often =P
Haha I live a few mins away from Laurier and pass by that area everyday. Well if your ever in town message me.
07-13-2011, 10:44 PM
#128
Race Director
Thread Starter
iTrader: (8)
Yes I notched mine as well beside the fog housing, and also cut a slot for the lower tab, you can't really see it from the crap cell pics. I guess we'll see how far out it illuminates with the road with HIDs and then make some more aim adjustments.
Haha I live a few mins away from Laurier and pass by that area everyday. Well if your ever in town message me.
Haha I live a few mins away from Laurier and pass by that area everyday. Well if your ever in town message me.
Waiting for my Nokya Yellows to put in =)
Haha, I'll be around the loo this weekend I believe lmao
07-15-2011, 12:45 PM
#129
Advanced
I'm planning on running 3000k HID's in the fogs still waiting for them to show they are stuck in Canada Post's backlog somewhere? I also changed out the original D2S OEM headlights with 6000k as well, what a PITA to do them even with the entire bumper still off.
Do you have a Blackberry by chance? Eitherway PM me your info man.
07-16-2011, 08:31 PM
#130

in this picture if you use the second to last 7.5 fuse with a add-a-fuse, it will also work as a trigger wire instead of cutting and tapping into the other wires. i was gonna try and figure out which wire was the parking wire but with soo little space i remembered in the audio forum people were using the #32 location as a remote turn on.
07-16-2011, 10:35 PM
#131
Race Director
Thread Starter
iTrader: (8)
in this picture if you use the second to last 7.5 fuse with a add-a-fuse, it will also work as a trigger wire instead of cutting and tapping into the other wires. i was gonna try and figure out which wire was the parking wire but with soo little space i remembered in the audio forum people were using the #32 location as a remote turn on.

Havn't heard of it.
07-18-2011, 04:16 PM
#132
Advanced
in this picture if you use the second to last 7.5 fuse with a add-a-fuse, it will also work as a trigger wire instead of cutting and tapping into the other wires. i was gonna try and figure out which wire was the parking wire but with soo little space i remembered in the audio forum people were using the #32 location as a remote turn on.
If you use the wiring that comes with the Accord Fogs the RED/BLK trigger wire is already there in that switch harness, as well as a bunch of other wires in a parallel extension not sure what 1/2 of them are I guess Honda refers to it as and 'Accessory Harness'.
I tired to keep the wiring as clean and simple like OEM as possible and no cutting required of any other OEM parking light wires doing this way. But good to know that info you listed above as well thanks for the info.
07-20-2011, 10:22 PM
#133
skaiiz tha limit
Join Date: Oct 2008
Location: In my own world.
Posts: 92
Likes: 0
Received 0 Likes
on
0 Posts
dang it, where were you guys back in '08 when I was getting this installed?! lol jk, you guys combined forces to have a GREAT write up, description + pictures are always BEST!
GREAT GREAT WORK!
GREAT GREAT WORK!
07-21-2011, 06:58 AM
#134
that is sick man!! im about to do the same to mine. But i have some questions hoping you can help me with...
Questions:
1)Mine is a 06 TL non type-s and doesnt have an a spec body kit.. so is it still the same thing?i or i should just wait until i install an a spec body kit which i MIGHT get later(still thinking if i should get it or not)
2)I wanna do the grill and the fog light installation by myself..but for the wiring i wanna have my friend to do it...so i was thinking of doing the grill first then bring my car to his shop to do the wiring..do u think it's a good idea or it's better to do everything together?
Thank you so much for your help..cant wait until i do it
07-21-2011, 07:18 AM
#135
skaiiz tha limit
Join Date: Oct 2008
Location: In my own world.
Posts: 92
Likes: 0
Received 0 Likes
on
0 Posts
IMO your better off installing the fog light first then install the kit afterwards.
I Installed my fog light and grill onto the bumper first then ran the wires afterwards. But it REALLY doesnt matter at all, its more of a personal preference. Good luck!
I Installed my fog light and grill onto the bumper first then ran the wires afterwards. But it REALLY doesnt matter at all, its more of a personal preference. Good luck!
07-21-2011, 11:19 AM
#136
Race Director
Thread Starter
iTrader: (8)
that is sick man!! im about to do the same to mine. But i have some questions hoping you can help me with...
Questions:
1)Mine is a 06 TL non type-s and doesnt have an a spec body kit.. so is it still the same thing?i or i should just wait until i install an a spec body kit which i MIGHT get later(still thinking if i should get it or not)
2)I wanna do the grill and the fog light installation by myself..but for the wiring i wanna have my friend to do it...so i was thinking of doing the grill first then bring my car to his shop to do the wiring..do u think it's a good idea or it's better to do everything together?
Thank you so much for your help..cant wait until i do it
Questions:
1)Mine is a 06 TL non type-s and doesnt have an a spec body kit.. so is it still the same thing?i or i should just wait until i install an a spec body kit which i MIGHT get later(still thinking if i should get it or not)
2)I wanna do the grill and the fog light installation by myself..but for the wiring i wanna have my friend to do it...so i was thinking of doing the grill first then bring my car to his shop to do the wiring..do u think it's a good idea or it's better to do everything together?
Thank you so much for your help..cant wait until i do it
If you decide to fit the fog lights right now without a lip, then you'll have to do less trimming. You won't have to make notches or anything to fit the lip.
BUT, if you decide to get the front lip and you already mounted the fogs, you'll have to take out the housing again, and trim the bottom and the outside edge to work with the A-Spec lip.
So cutting once with A-Spec lip = win.
By all means, do what you want. Adding in the A-Spec lip after isn't such a huge hassle; just a little more trimming.
2. You can definitely do everything by yourself.
Fit the housing in and everything, then wiring is last.
Why I don't recommend going to your buddy's shop to wire is because you have to put the front bumper back on.
Putting back on the front bumper made it impossible for me to wire the harness to the fogs, so I had to take my bumper back off, connect the wires, route them, zip tie them, then put the bumper back on.
All my instructions are easy to follow as I'm a noob at wiring also so it should be written from a noobie to noobie lol
Good luck and don't stress it!
07-21-2011, 11:22 AM
#137
Race Director
Thread Starter
iTrader: (8)
Noticed that there wasn't really a detailed Accord fog DIY so I decided to help out the community.
Then came along other great members who contributed to make this the "ultimate" accord fog DIY thread lol
07-21-2011, 04:36 PM
#138
skaiiz tha limit
Join Date: Oct 2008
Location: In my own world.
Posts: 92
Likes: 0
Received 0 Likes
on
0 Posts
 Yup you made it DETAILED
 great for everyone to learn from
 Oh I forgot to mention I have the type-s front lip when installing the accord foglight. damn it was so long ago when I did the lip, I cant remember if I had to trim it or not
 07-21-2011, 04:51 PM
#139
1. I found it easier that I had a front lip because I'll only be cutting once.
If you decide to fit the fog lights right now without a lip, then you'll have to do less trimming. You won't have to make notches or anything to fit the lip.
BUT, if you decide to get the front lip and you already mounted the fogs, you'll have to take out the housing again, and trim the bottom and the outside edge to work with the A-Spec lip.
So cutting once with A-Spec lip = win.
By all means, do what you want. Adding in the A-Spec lip after isn't such a huge hassle; just a little more trimming.
2. You can definitely do everything by yourself.
Fit the housing in and everything, then wiring is last.
Why I don't recommend going to your buddy's shop to wire is because you have to put the front bumper back on.
Putting back on the front bumper made it impossible for me to wire the harness to the fogs, so I had to take my bumper back off, connect the wires, route them, zip tie them, then put the bumper back on.
All my instructions are easy to follow as I'm a noob at wiring also so it should be written from a noobie to noobie lol
Good luck and don't stress it!
one last thing, can u tell me all the tool that u used? I wanna see what my frd has them and if not, i will go get them before I do the project at his garage
Many thanks!!!
07-21-2011, 06:47 PM
#140
Race Director
Thread Starter
iTrader: (8)
Any pictures?

Yea coz i have never done any mod so everything is new to me..take out the bumper..housing..wiring etc...but since u said it should be fine even a noobie is doing it..and i dun think im lol
one last thing, can u tell me all the tool that u used? I wanna see what my frd has them and if not, i will go get them before I do the project at his garage
Many thanks!!!
one last thing, can u tell me all the tool that u used? I wanna see what my frd has them and if not, i will go get them before I do the project at his garage
Many thanks!!!
It was also my very first time using a dremel too.
So yeah, trust me when I say I was a complete noob before this lol
All the tools used was listed in my DIY but off the top of my head:
To fit the housings you'll need:
A dremel (with a sanding bit and cutting disk).
Masking Tape
Screwdrivers
Drill and drillbits (If you're doing the Type-S center grill)
JB Weld
Long screws and big washers (to mount the fogs).
A lot of basic things you have at home...
For wiring you need:
20A mini Fuse
16 Guage wire
butt connectors
Mini In-line fuse
Splice connectors or t-taps
Wire crimps
07-21-2011, 11:06 PM
#141
skaiiz tha limit
Join Date: Oct 2008
Location: In my own world.
Posts: 92
Likes: 0
Received 0 Likes
on
0 Posts
[quote=guitarplayer16;13108341]Ooo how'd the Type-S lip turn out with Accord fogs?
Any pictures?
I have some but there so old and no where to be found. But luckily I kept diggin and diggin and found UNO! sadly its a crappy cell phone photo a couple years back.. I know it doesnt help but its the least I can do since you asked. btw this is the first time I've ever posted a picture of my car
07-21-2011, 11:11 PM
#142
skaiiz tha limit
Join Date: Oct 2008
Location: In my own world.
Posts: 92
Likes: 0
Received 0 Likes
on
0 Posts
and i cant take any more photos of my car to show you "( .. i took the whole car apart and painted everything piece by piece white then installed 07-08 type s front end. So now I finally have a 07-08 front bumper and fog lights with the type s chrome grill.
should of taken more photos of my AM tl. I'll be sure to do so with my WDP tl.
should of taken more photos of my AM tl. I'll be sure to do so with my WDP tl.
07-22-2011, 02:06 AM
#143
Ooo how'd the Type-S lip turn out with Accord fogs?
Any pictures?
Yeah to be honest I had no wiring knowledge prior to this lol
It was also my very first time using a dremel too.
So yeah, trust me when I say I was a complete noob before this lol
All the tools used was listed in my DIY but off the top of my head:
To fit the housings you'll need:
A dremel (with a sanding bit and cutting disk).
Masking Tape
Screwdrivers
Drill and drillbits (If you're doing the Type-S center grill)
JB Weld
Long screws and big washers (to mount the fogs).
A lot of basic things you have at home...
For wiring you need:
20A mini Fuse
16 Guage wire
butt connectors
Mini In-line fuse
Splice connectors or t-taps
Wire crimps

 08-03-2011, 11:18 PM
#145
Race Director
Thread Starter
iTrader: (8)
maddsiick is located in NY and he's done it.
https://acurazine.com/forums/members/maddsiick-190595/
08-04-2011, 08:52 PM
#146
Race Director
Thread Starter
iTrader: (8)
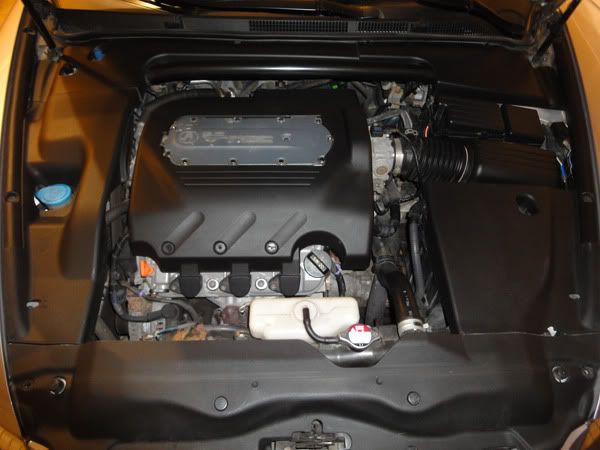
Okay, so I havn't really posted how I organized my wires yet in the engine bay.
So here are the pictures:
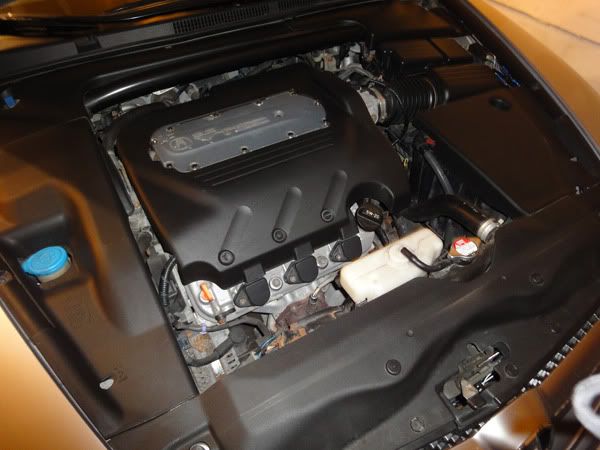
I had to notch out a bit of the fuse box cover for the in-line fuse wire.
In this picture you can see I extended the power wire (blue/red) around 7" to reach the in-line fuse:
The wire on the right is the wire from the firewall.
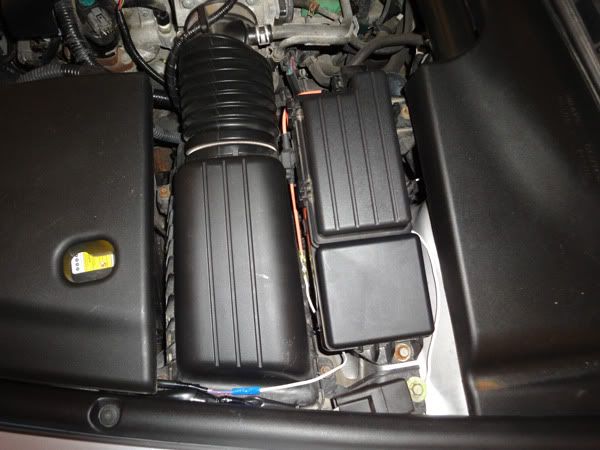
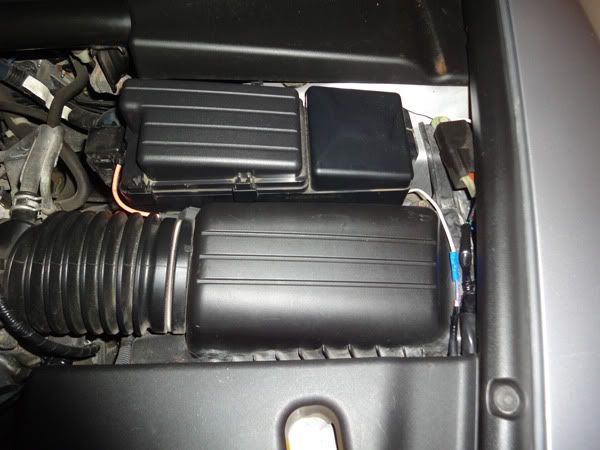
Everything under the covers and organized nicely:
So here are the pictures:
I had to notch out a bit of the fuse box cover for the in-line fuse wire.
In this picture you can see I extended the power wire (blue/red) around 7" to reach the in-line fuse:
The wire on the right is the wire from the firewall.
Everything under the covers and organized nicely:
08-05-2011, 02:43 PM
#147

Has anyone thought about using the stock fogs? I don't use the stock fogs ever because I don't like the way the headlight looks with them on.
Is it the same bulb? Could I just extend the wires down to the accord fogs?
Is it the same bulb? Could I just extend the wires down to the accord fogs?
08-05-2011, 09:35 PM
#148
odds are u.s. cars i believe are 9006 but in essence you could just unplugs those and tap into those wires so you wouldnt have to mess with all that wiring .
08-12-2011, 07:33 PM
#149
Hey man...finally used your wiring diagram to fix my fog switch. Thank you...
of course, as luck would have it...everything went wrong from there. I was putting my seat heater bulbs in and something shorted as I inserted the led bulb in with the screwdriver while the lights were on and I saw a small flash under the shifter area and now every one of those little lights turned off. The VSA, door, mirror, radio buttons, seat heaters. I checked the fuses and they all seem ok. Radio works, interior lighting works, 12v acc outlets front and rear work. Any ideas, please?
of course, as luck would have it...everything went wrong from there. I was putting my seat heater bulbs in and something shorted as I inserted the led bulb in with the screwdriver while the lights were on and I saw a small flash under the shifter area and now every one of those little lights turned off. The VSA, door, mirror, radio buttons, seat heaters. I checked the fuses and they all seem ok. Radio works, interior lighting works, 12v acc outlets front and rear work. Any ideas, please?
08-12-2011, 08:30 PM
#150
Race Director
Thread Starter
iTrader: (8)
Hey man...finally used your wiring diagram to fix my fog switch. Thank you...
of course, as luck would have it...everything went wrong from there. I was putting my seat heater bulbs in and something shorted as I inserted the led bulb in with the screwdriver while the lights were on and I saw a small flash under the shifter area and now every one of those little lights turned off. The VSA, door, mirror, radio buttons, seat heaters. I checked the fuses and they all seem ok. Radio works, interior lighting works, 12v acc outlets front and rear work. Any ideas, please?
of course, as luck would have it...everything went wrong from there. I was putting my seat heater bulbs in and something shorted as I inserted the led bulb in with the screwdriver while the lights were on and I saw a small flash under the shifter area and now every one of those little lights turned off. The VSA, door, mirror, radio buttons, seat heaters. I checked the fuses and they all seem ok. Radio works, interior lighting works, 12v acc outlets front and rear work. Any ideas, please?
I had some bulbs go out while installing new ones and then I said "you got to be kidding me. I put in a new bulb and others burn out? fml"
But then a simple start up and drive around fixed it somehow.
Last edited by guitarplayer16; 08-12-2011 at 08:33 PM.
08-12-2011, 08:40 PM
#151
I didn't drive around, but I may have to give this a try...I did pull the neg on the battery to reset the check engine light I set off by pulling the ignition fuse by accident (with car running) trying to diagnose the lighting issue. I mean, if all the lights went out, it HAS to be something...wtf?!?!?
11-29-2011, 02:41 PM
#152
Intermediate
Im currently doing this mod to my car right now and I have to say... its more difficult than the Zkw-r swap. The hard part is making sure the bezel fits snuggley while making sure it still looks clean.
Im having trouble following the under dash part. I plugged in the 6 pin and grounded it. Im left with the "dummy" 6 pin, a single red wire with a 2 pin connector, switch 5 pin, and a 2 pin green and blue wire.
Im having trouble following the under dash part. I plugged in the 6 pin and grounded it. Im left with the "dummy" 6 pin, a single red wire with a 2 pin connector, switch 5 pin, and a 2 pin green and blue wire.
11-29-2011, 03:33 PM
#153
Race Director
Thread Starter
iTrader: (8)
Im currently doing this mod to my car right now and I have to say... its more difficult than the Zkw-r swap. The hard part is making sure the bezel fits snuggley while making sure it still looks clean.
Im having trouble following the under dash part. I plugged in the 6 pin and grounded it. Im left with the "dummy" 6 pin, a single red wire with a 2 pin connector, switch 5 pin, and a 2 pin green and blue wire.
Im having trouble following the under dash part. I plugged in the 6 pin and grounded it. Im left with the "dummy" 6 pin, a single red wire with a 2 pin connector, switch 5 pin, and a 2 pin green and blue wire.
All you need out of the switch harness is:
The skinny connector that goes to the switch.
The ground wire with a ring terminal on it.
The green wire that connects to the extended wire from the engine bay.
The blue wire for your trigger wire.
Just follow my DIY and you'll be fine =)
11-29-2011, 05:44 PM
#154
Intermediate
Sorry for being a pain in your butt hehe. One last thing, Step #7 demonstrates you hooking up your "new wire" to the switch harness. When you say switch harness is it the green wire from the actually switch or the green wire with the blue wire?
Again thank you sooo much, idk what I would do without you!
Again thank you sooo much, idk what I would do without you!
11-29-2011, 05:55 PM
#155
Race Director
Thread Starter
iTrader: (8)
Sorry for being a pain in your butt hehe. One last thing, Step #7 demonstrates you hooking up your "new wire" to the switch harness. When you say switch harness is it the green wire from the actually switch or the green wire with the blue wire?
Again thank you sooo much, idk what I would do without you!
Again thank you sooo much, idk what I would do without you!
You can see I cut the green wire (the one with the blue wire) in half, and wired together the extended wire. It essentially goes to the switch connector.
As long as you somehow get the extended wire from the engine bay to hook up with the green wire from the swtich connector you're okay lol
No problem.
12-01-2011, 10:56 PM
#157
Race Director
Thread Starter
iTrader: (8)
 12-06-2011, 11:36 PM
#159
Intermediate
Heres mine I finished last week
sorry for poor quality, all I had was an iphone 3g


Overall I love the way they came out and they meet my standards
I know cutoff line starts to "bow" to the right and driver side fog light aimed a little low
sorry for poor quality, all I had was an iphone 3g
Overall I love the way they came out and they meet my standards
I know cutoff line starts to "bow" to the right and driver side fog light aimed a little low
12-07-2011, 06:24 AM
#160
Race Director
Thread Starter
iTrader: (8)
Wow your install came out perfect!
The way they are aimed and projected and everything look wayyy better than mine does.
I've came to the conclusion that people without the front lip have a better aim than those who do.
Great job.
The way they are aimed and projected and everything look wayyy better than mine does.
I've came to the conclusion that people without the front lip have a better aim than those who do.
Great job.
The following users liked this post:
Watermelon913 (12-07-2011)