
F-167: Heater/Water/Coolant Control Valve DIY
 10-07-2009, 12:40 AM
#1
Chapter Leader (Southern Region)
Thread Starter
F-167: Heater/Water/Coolant Control Valve DIY
I thought I'd post up an easy DIY for you guys in time for the upcoming winter. Last winter I noticed a long delay before my heater would kick. My system would blow cold air for minutes no matter the temp setting. I noticed that I was also going low on coolant.
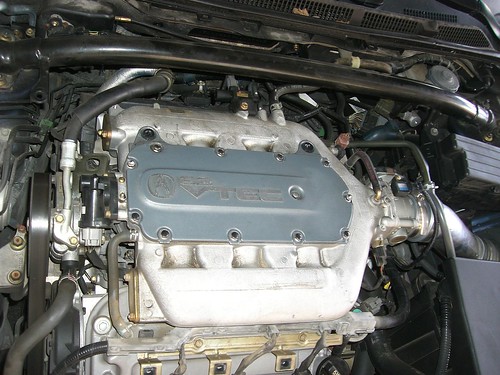
The culprit.. Heater Control Valve.
Highs
Cheap & Easy - 1 hr & $15~30
Lows
Neighbors may be offended by the amount of butt crack you expose while reaching over the block
Tools
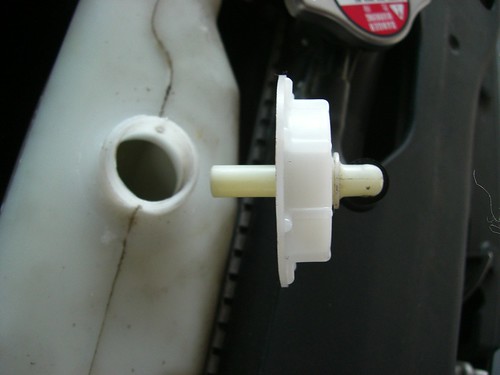
The new cheap ass plastic valve. Pretty simple, Up = Closed, Down = Open. I bought both inlet hoses as well and screw clamps. Didn't use either, original hoses had no cracks or wear & couldn't find the screw clamps at the time, of course I found them the following day.. anyways..

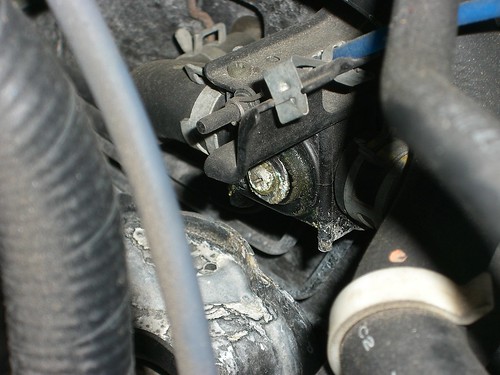
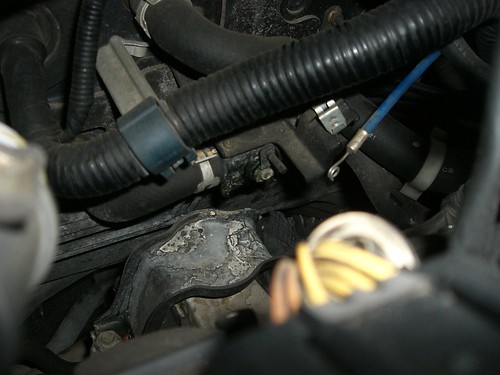
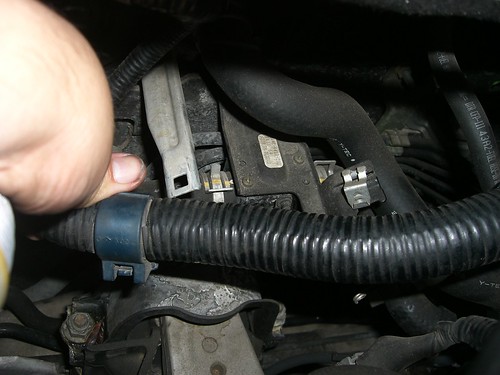
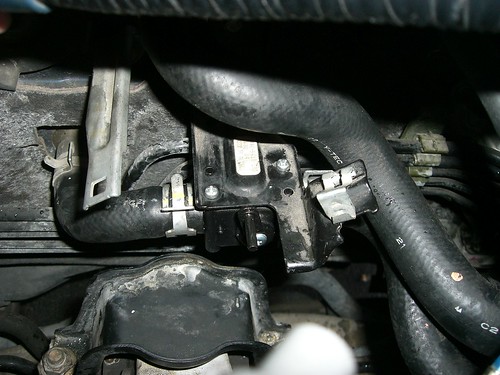
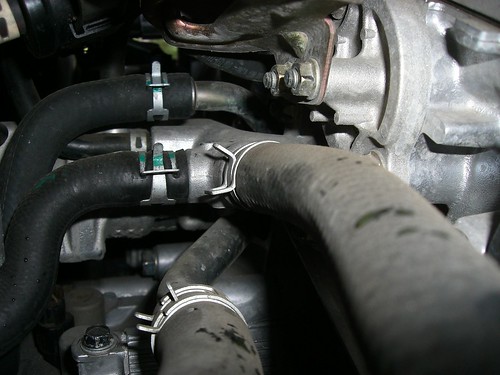
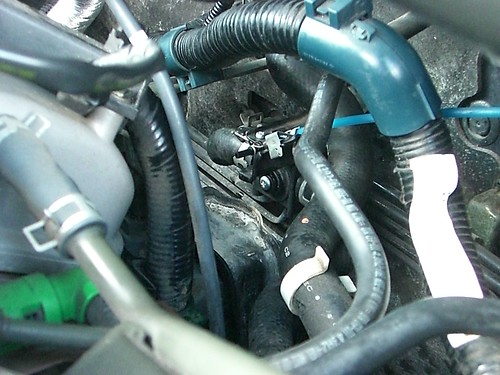
The HCV is located at the rear behind the block on the firewall above the rear mount.
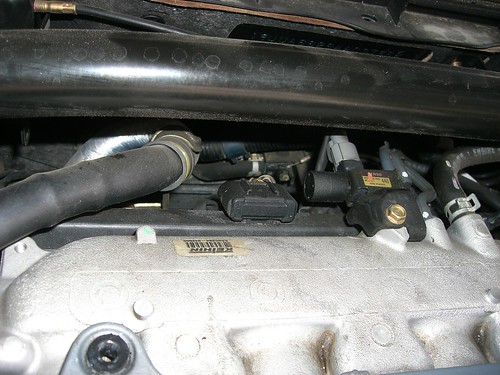
Opposite Angle
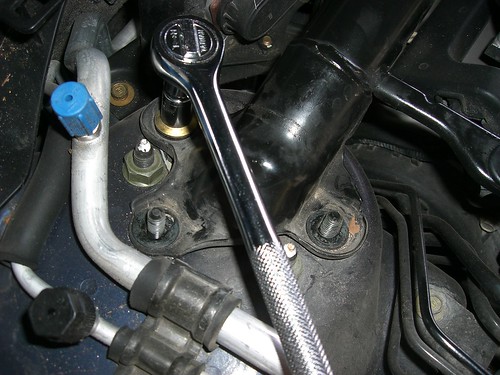
Step 1: Remove Strut Tower
Remove the 6 mounting bolts on the strut tower, they don't have much torque on them (remember that when putting them back). There will also be some connecting bolts to misc assemblies (fuse box, etc).

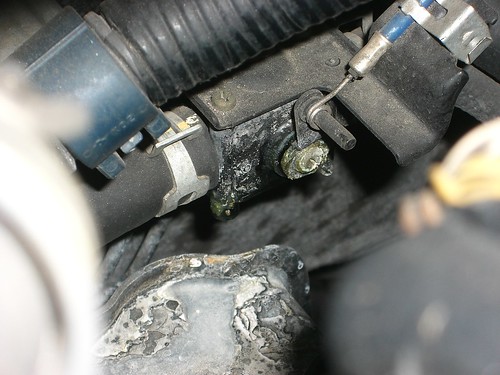
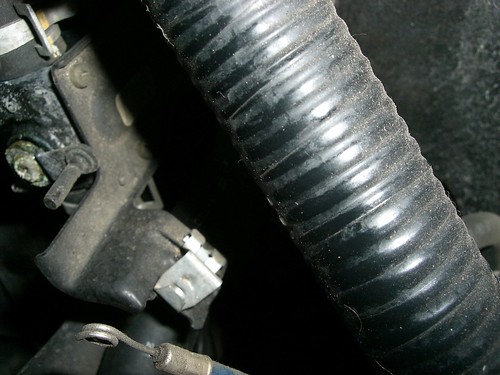
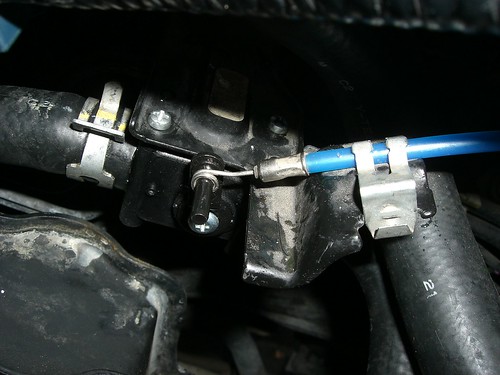
Step 2: Unclip HCV Cable
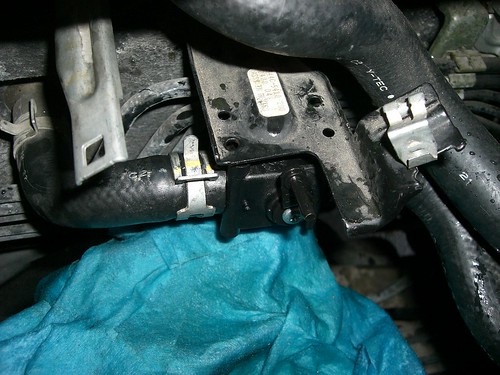
Step 3: Disconnect Electrical Conduit for Access & Unscrew HCV from Bracket
You can either unscrew the HCV from the bracket (2 screws) or you can unbolt the whole bracket / Assy which is attached by a single bolt. I unscrewed the top screws because I knew I was more than likely going to lose the bolt to a black hole.
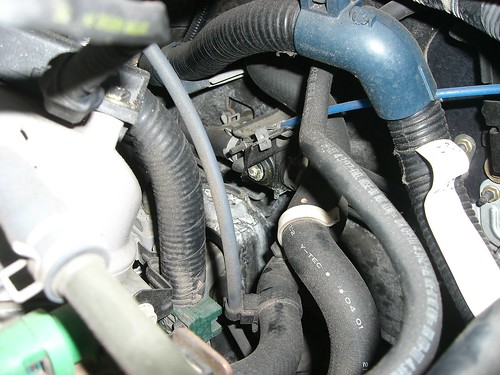
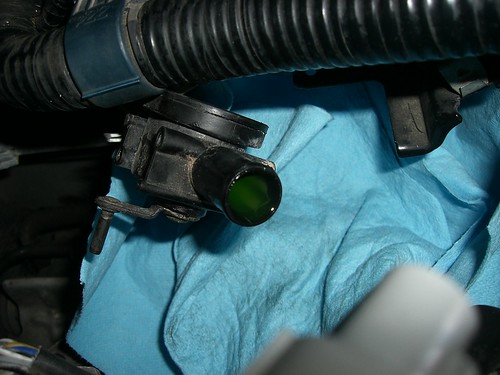
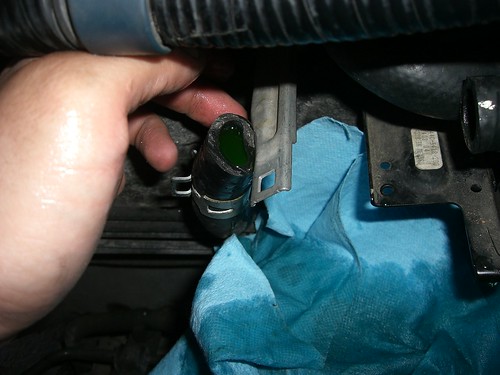
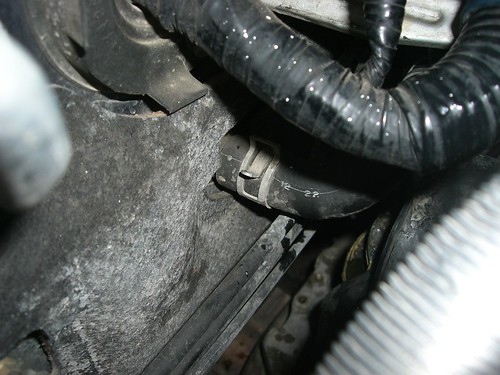
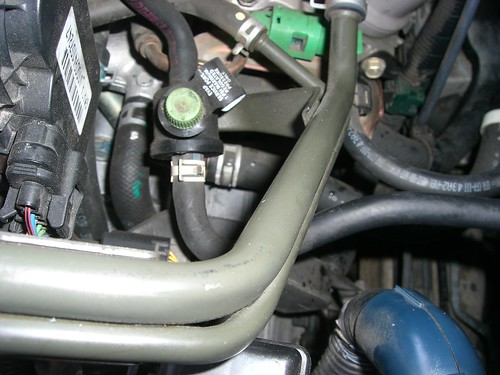
Step 4: Push back Spring clamps with pliers / channel locks & Remove Inlet hoses.
Put a bunch of shop towels down to keep anymore coolant from getting all over the rear mount, brake lines / fuel lines. Check the hoses for any tears or wear. Replacing them while you're in there is recommended. I decided to take the easy route since the hoses looked good and because I couldn't find my screw clamps. Hold the heater inlet hose up to limit the amount of coolant from spilling.
Step 5: Put in the new HCV and secure it
Step 6: Secure the control valve cable with the valve closed
Make sure you push it all the way back before securing the cable.
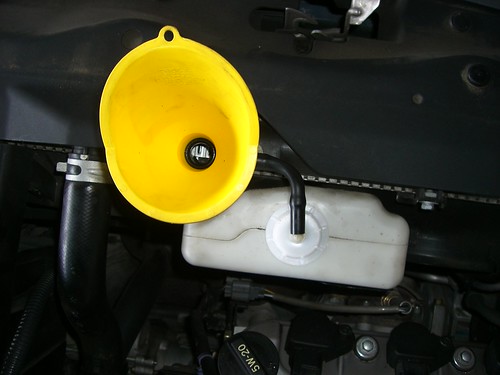
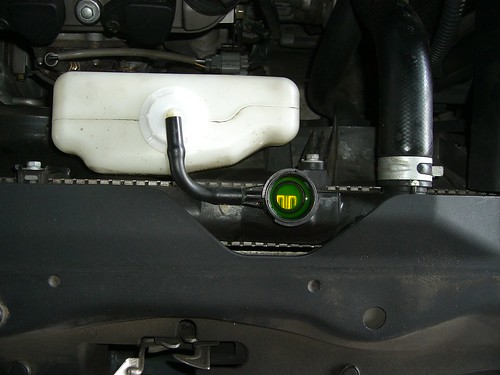
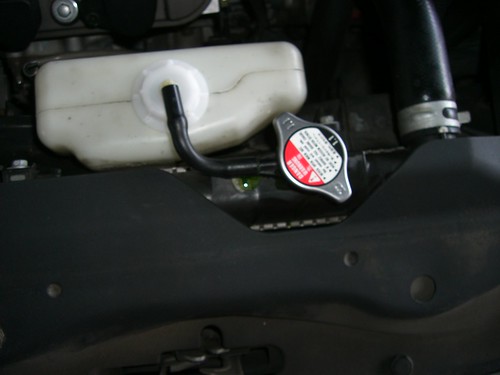
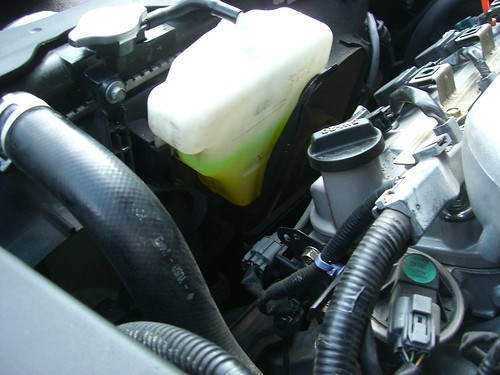
Step 7: Top off the Radiator & Res, Burp the system, check for leaks.
My reservoir cap was cracked.. so I replaced that as well. I filled the reservoir about mid level to account for any air during the burping process. Check the block connection & heater connection along with HCV connections to make sure no leaks are present.
Put radiator cap back on but don't close it off. Start the vehicle and let it get up to op temp, turn on A/C and check the temp gauge, listen for the rad fan to cycle. Turn the car off and use a rag to close off the radiator cap (will be warm / hot). Some coolant may leak from radiator cap in burping process.


Step 8: Put it all back together, don't overtorque the strut tower bolts, should only be ~16 ft.lbs
Check your coolant level & for any leaks after the swap. I hardly lost any coolant in the burping process, which is why my res is at the mid level. Here are some pics a week later. No more leak.

Cliffs: (sorry, I like taking pics)
Hope that helps some of you. Let me know if I left anything out. This is seriously easy and probably not warranted for a pictorial, but I had extra time on my hand while I was banned.
The culprit.. Heater Control Valve.
Highs
Cheap & Easy - 1 hr & $15~30
Lows
Neighbors may be offended by the amount of butt crack you expose while reaching over the block
Tools
- Socket set.. can't remember the exact sockets.. 10mm, 12mm & 14mm should do it.
- Flathead Screwdriver
- Precision Phillips screwdriver
- Pliers / Small Channel Locks
- Shop towels
- Coolant
- Heater Control Valve 79710-SDA-A01
- Hose A (Block to HCV) 79721-SDB-A60 (optional)
- Hose B (HCV to Heater) 79722-SDA-A00 (optional)
- Screw clamps to replace spring clamps (recommended - Harbor Freight ~$10)
The new cheap ass plastic valve. Pretty simple, Up = Closed, Down = Open. I bought both inlet hoses as well and screw clamps. Didn't use either, original hoses had no cracks or wear & couldn't find the screw clamps at the time, of course I found them the following day.. anyways..
The HCV is located at the rear behind the block on the firewall above the rear mount.
Opposite Angle
Step 1: Remove Strut Tower
Remove the 6 mounting bolts on the strut tower, they don't have much torque on them (remember that when putting them back). There will also be some connecting bolts to misc assemblies (fuse box, etc).
Step 2: Unclip HCV Cable
Step 3: Disconnect Electrical Conduit for Access & Unscrew HCV from Bracket
You can either unscrew the HCV from the bracket (2 screws) or you can unbolt the whole bracket / Assy which is attached by a single bolt. I unscrewed the top screws because I knew I was more than likely going to lose the bolt to a black hole.
Step 4: Push back Spring clamps with pliers / channel locks & Remove Inlet hoses.
Put a bunch of shop towels down to keep anymore coolant from getting all over the rear mount, brake lines / fuel lines. Check the hoses for any tears or wear. Replacing them while you're in there is recommended. I decided to take the easy route since the hoses looked good and because I couldn't find my screw clamps. Hold the heater inlet hose up to limit the amount of coolant from spilling.
Step 5: Put in the new HCV and secure it
Step 6: Secure the control valve cable with the valve closed
Make sure you push it all the way back before securing the cable.
Step 7: Top off the Radiator & Res, Burp the system, check for leaks.
My reservoir cap was cracked.. so I replaced that as well. I filled the reservoir about mid level to account for any air during the burping process. Check the block connection & heater connection along with HCV connections to make sure no leaks are present.
Put radiator cap back on but don't close it off. Start the vehicle and let it get up to op temp, turn on A/C and check the temp gauge, listen for the rad fan to cycle. Turn the car off and use a rag to close off the radiator cap (will be warm / hot). Some coolant may leak from radiator cap in burping process.
Step 8: Put it all back together, don't overtorque the strut tower bolts, should only be ~16 ft.lbs
Check your coolant level & for any leaks after the swap. I hardly lost any coolant in the burping process, which is why my res is at the mid level. Here are some pics a week later. No more leak.
Cliffs: (sorry, I like taking pics)
- Step 1: Remove Strut Tower
- Step 2: Unclip HCV Cable
- Step 3: Disconnect Electrical Conduit for Access & Unscrew HCV from Bracket
- Step 4: Push back Spring clamps with pliers / channel locks & Remove Inlet hoses.
- Step 5: Put in the new HCV and secure it
- Step 6: Secure the control valve cable with the valve closed
- Step 7: Top off the Radiator & Res, Burp the system, check for leaks.
- Step 8: Put it all back together, don't overtorque the strut tower bolts, should only be ~16 ft.lbs
Hope that helps some of you. Let me know if I left anything out. This is seriously easy and probably not warranted for a pictorial, but I had extra time on my hand while I was banned.

The following 8 users liked this post by Majofo:
6for2 (09-28-2020),
buckyballs (04-26-2012),
Dafried (05-24-2014),
DeathMetal (09-16-2012),
gertab (05-24-2014),
and 3 others liked this post.
10-07-2009, 10:47 AM
#2
AZ Community Team

Join Date: May 2007
Location: N35�03'16.75", W 080�51'0.9"
Posts: 32,488
Received 7,770 Likes
on
4,341 Posts
Nice!!
FWIW - Strut Tower Bar Nuts are 16 ft-lbs.
Can you clarify what "burping" the HVC system is? You do it with the radiator cap off?
FWIW - Strut Tower Bar Nuts are 16 ft-lbs.
Can you clarify what "burping" the HVC system is? You do it with the radiator cap off?
10-07-2009, 10:54 AM
#3
Chapter Leader (Southern Region)
Thread Starter
^ burping is just letting the coolant cycle and allowing pressure / air to escape out of the top of the radiator. You can burp the system with the radiator cap off but I placed it back on (not closed) to mitigate coolant spillage.
10-08-2009, 11:23 AM
#4
This is a great writeup. Pretty suprised to see such a crudy plastic water valve in there. Even my 89 CRX has a metal one...
BTW: Why are you using that cheap green-crap coolant. Perhaps this is part of the original problem. Nothing but "blue" for me...
BTW: Why are you using that cheap green-crap coolant. Perhaps this is part of the original problem. Nothing but "blue" for me...
10-08-2009, 11:30 AM
#5
Chapter Leader (Southern Region)
Thread Starter
^ yeah.. I used prestone 50/50. Please don't flame me.. lol. I'll definitely change back before next summer. I bought the TL used and I'm not sure if ever the previous owner had the coolant changed but I played it safe and drained the rad & refilled. The old fluid could have definitely eaten through the valve seal, the valve itself still works.
10-08-2009, 08:12 PM
#6
Team Owner

Thank you so much for the info!
Mine is getting very slow to go to hot and I've been loosing a very, very small amount of coolant, maybe an ounce every few months. Mine won't put out any heat unless I put it on high. Anything between hot and cold and it's just cold. I was about to just live with it until I saw this. Thanks again!
Mine is getting very slow to go to hot and I've been loosing a very, very small amount of coolant, maybe an ounce every few months. Mine won't put out any heat unless I put it on high. Anything between hot and cold and it's just cold. I was about to just live with it until I saw this. Thanks again!
10-09-2009, 08:38 PM
#7
Chapter Leader (Southern Region)
Thread Starter
^ Thanks.. you think your issue is the valve as well or do you think it's just minor evaporation somewhere in the system. I was losing a little over a 1/4 gallon a month. I took apart the old valve but couldn't locate where the coolant had eaten through. It's pretty solid for being a cheap plastic valve. It looks like it was seeping around the circular valve orifice where the control lever seats over.
Trending Topics
10-09-2009, 09:58 PM
#8
Team Owner
Just an FYI, part of the reason they spec a no silicate fluid is seal and waterpump compatibility. You may want to think about changing it out sooner rather than later just to avoid the water pump wrecking the timing belt.
Then again, I believe Dexcool was used in the Vue that used the J35. I'm pretty sure that's not a non silicate formula.
I think mine does have a leak because the level didn't change for the first two years I owned the car but now it's getting faster and faster and the heater is taking longer and longer. I never turn the heat on until the engine hits full temp and yesterday it took about 15 seconds to start getting warm air out of the vents.
10-09-2009, 10:51 PM
#9
Chapter Leader (Southern Region)
Thread Starter
Just an FYI, part of the reason they spec a no silicate fluid is seal and waterpump compatibility. You may want to think about changing it out sooner rather than later just to avoid the water pump wrecking the timing belt.
Then again, I believe Dexcool was used in the Vue that used the J35. I'm pretty sure that's not a non silicate formula.
I think mine does have a leak because the level didn't change for the first two years I owned the car but now it's getting faster and faster and the heater is taking longer and longer. I never turn the heat on until the engine hits full temp and yesterday it took about 15 seconds to start getting warm air out of the vents.
Then again, I believe Dexcool was used in the Vue that used the J35. I'm pretty sure that's not a non silicate formula.
I think mine does have a leak because the level didn't change for the first two years I owned the car but now it's getting faster and faster and the heater is taking longer and longer. I never turn the heat on until the engine hits full temp and yesterday it took about 15 seconds to start getting warm air out of the vents.
12-23-2010, 04:44 PM
#11
Chapter Leader (Southern Region)
Thread Starter
About time! 

 09-06-2011, 09:46 AM
#15
Three Wheelin'
just wanted to add that if your local Acura dealer doesnt have this part in stock.
The Accord 03-07 share the same part. Its half the price of what Acura charges.
same part number too
The Accord 03-07 share the same part. Its half the price of what Acura charges.
same part number too
 09-26-2011, 03:52 PM
#17
Chapter Leader (Southern Region)
Thread Starter
10-12-2011, 05:52 AM
#18
Three Wheelin'
bump....
didnt want to start a new thread =(
i just replaced my heat valve and it was working fine afterwards.
Just recently I noticed my "heat" begins to heat around 80.
The other day I sprayed some wd40 on the cable which seemed to have fixed it.
Upon putting temp to 73 i began to feel some heat. Great!
Yesterday, I put on 73 and back to cold.
Should there be some resistance on the lever the cable moves? It feels a bit hard to move. I never adjusted the bolt. Just took it out of its plastic and installed.
I took a look this morning and noticed my coolant level was at min on the res. tank. Radiator is topped off.
any other suggestions?
10-12-2011, 11:44 PM
#19
Early Shifter
iTrader: (2)
I just wanted to add my .02 in regards to this topic.
I am amazed at how fast the heat warms up, after work tonight it was roughly 55 degrees F, not terribly cold but chilly.
I started the car up, smoked a cig while it ran no more than 3 minutes, got in and being set on 70 it was already warm in the car.
Just thought I'd share, pretty neat I think.
I am amazed at how fast the heat warms up, after work tonight it was roughly 55 degrees F, not terribly cold but chilly.
I started the car up, smoked a cig while it ran no more than 3 minutes, got in and being set on 70 it was already warm in the car.
Just thought I'd share, pretty neat I think.
10-13-2011, 11:43 AM
#20
Three Wheelin'
I just wanted to add my .02 in regards to this topic.
I am amazed at how fast the heat warms up, after work tonight it was roughly 55 degrees F, not terribly cold but chilly.
I started the car up, smoked a cig while it ran no more than 3 minutes, got in and being set on 70 it was already warm in the car.
Just thought I'd share, pretty neat I think.
I am amazed at how fast the heat warms up, after work tonight it was roughly 55 degrees F, not terribly cold but chilly.
I started the car up, smoked a cig while it ran no more than 3 minutes, got in and being set on 70 it was already warm in the car.
Just thought I'd share, pretty neat I think.
does the lever on the HCV have a bit of resistance when opening/closing?
10-13-2011, 11:39 PM
#21
10-23-2011, 07:01 PM
#22
i don't know if this write up is horrible, or it's just me. chances are it's just me.
but when i was trying to disconnect the spring clamps from my existing hcv, i noticed the springs were facing DOWN. they were at the UNDERSIDE of the tubing so it was fucking near impossible to get clearance and get pliars to get on the UNDERSIDE of the tube just to grip the clamps.
well after struggling i managed to unclamp it and removing the hose from the existing HCV was also a pain in the ass.
once i removed the hose on the left side of the HCV (while facing towards ur windshield) i noticed coolant started coming out. I thought to myself "OK the DIY said some coolant is gonna come out, this is normal. I remember him saying point the hose upwards to prevent the coolant from coming out"
WELL THANKS FOR MENTIONING THAT THE COOLANT COMES OUT AT A NON-STOP FLOW!
i assumed just a bit was gonna leak and would eventually stop. i had it pointing up right and coolant just kept flowing out like a damn water fountain. I PLACED A TOTAL OF 15 SHEETS OF SHOP TOWELS just to fuckin aborb all the damn coolant that came out. AND IT STILL MANAGED TO LEAK ALOT ONTO MY DRIVEWAY....
so i stuck my thumb in the hose to prevent it from flowing and looking at the other hose that still had the HCV connected.
let me remind you, the clamp for the other hose is also located on the UNDERSIDE of the hose making it near impossible to reach with clamps.
so i'm standing here with my thumb in the hose to clog it from spilling even more and looking at the HCV still connected to the other hose. i moved the trigger on the HCV a slight bit and MORE COOLANT WAS SPILLING OUT FROM THE OTHER END OF THE HOSE.
i thought to myself "fuck that, both ends of the hose are still pushing out coolant theres no way in fuck im going to be able to remove both ends of the hose and reconnect it to my new hcv and re install it without losing ALL of my coolant in my radiator"
i gave up and reconnected everything as is.
i was trying to do this because my HEATER would blow cold air, but my a/c works just fine.
after attempting it, fuck it im just gonna drive around with no heater. so FRUSTRATING

 08-14-2012, 03:29 PM
#25
Chapter Leader (Southern Region)
Thread Starter
Is it HOT or just ambient air temp? Could be a couple issues in your case.
08-29-2012, 01:34 AM
#26
2nd Gear

Join Date: Aug 2012
Posts: 2
Likes: 0
Received 0 Likes
on
0 Posts
AC not blowing cold air, take it to Pep boys if in your area, or a shop that will give a low price diagnostic of the AC, I recently took mine to PEP BOYS everything working expect the Evaporator Expansion Valve. cost with labor and warranty $658.96 quote good for 90 days.
08-29-2012, 01:20 PM
#28
Team Owner
i don't know if this write up is horrible, or it's just me. chances are it's just me.
but when i was trying to disconnect the spring clamps from my existing hcv, i noticed the springs were facing DOWN. they were at the UNDERSIDE of the tubing so it was fucking near impossible to get clearance and get pliars to get on the UNDERSIDE of the tube just to grip the clamps.
well after struggling i managed to unclamp it and removing the hose from the existing HCV was also a pain in the ass.
once i removed the hose on the left side of the HCV (while facing towards ur windshield) i noticed coolant started coming out. I thought to myself "OK the DIY said some coolant is gonna come out, this is normal. I remember him saying point the hose upwards to prevent the coolant from coming out"
WELL THANKS FOR MENTIONING THAT THE COOLANT COMES OUT AT A NON-STOP FLOW!
i assumed just a bit was gonna leak and would eventually stop. i had it pointing up right and coolant just kept flowing out like a damn water fountain. I PLACED A TOTAL OF 15 SHEETS OF SHOP TOWELS just to fuckin aborb all the damn coolant that came out. AND IT STILL MANAGED TO LEAK ALOT ONTO MY DRIVEWAY....
so i stuck my thumb in the hose to prevent it from flowing and looking at the other hose that still had the HCV connected.
let me remind you, the clamp for the other hose is also located on the UNDERSIDE of the hose making it near impossible to reach with clamps.
so i'm standing here with my thumb in the hose to clog it from spilling even more and looking at the HCV still connected to the other hose. i moved the trigger on the HCV a slight bit and MORE COOLANT WAS SPILLING OUT FROM THE OTHER END OF THE HOSE.
i thought to myself "fuck that, both ends of the hose are still pushing out coolant theres no way in fuck im going to be able to remove both ends of the hose and reconnect it to my new hcv and re install it without losing ALL of my coolant in my radiator"
i gave up and reconnected everything as is.
i was trying to do this because my HEATER would blow cold air, but my a/c works just fine.
after attempting it, fuck it im just gonna drive around with no heater. so FRUSTRATING
but when i was trying to disconnect the spring clamps from my existing hcv, i noticed the springs were facing DOWN. they were at the UNDERSIDE of the tubing so it was fucking near impossible to get clearance and get pliars to get on the UNDERSIDE of the tube just to grip the clamps.
well after struggling i managed to unclamp it and removing the hose from the existing HCV was also a pain in the ass.
once i removed the hose on the left side of the HCV (while facing towards ur windshield) i noticed coolant started coming out. I thought to myself "OK the DIY said some coolant is gonna come out, this is normal. I remember him saying point the hose upwards to prevent the coolant from coming out"
WELL THANKS FOR MENTIONING THAT THE COOLANT COMES OUT AT A NON-STOP FLOW!
i assumed just a bit was gonna leak and would eventually stop. i had it pointing up right and coolant just kept flowing out like a damn water fountain. I PLACED A TOTAL OF 15 SHEETS OF SHOP TOWELS just to fuckin aborb all the damn coolant that came out. AND IT STILL MANAGED TO LEAK ALOT ONTO MY DRIVEWAY....
so i stuck my thumb in the hose to prevent it from flowing and looking at the other hose that still had the HCV connected.
let me remind you, the clamp for the other hose is also located on the UNDERSIDE of the hose making it near impossible to reach with clamps.
so i'm standing here with my thumb in the hose to clog it from spilling even more and looking at the HCV still connected to the other hose. i moved the trigger on the HCV a slight bit and MORE COOLANT WAS SPILLING OUT FROM THE OTHER END OF THE HOSE.
i thought to myself "fuck that, both ends of the hose are still pushing out coolant theres no way in fuck im going to be able to remove both ends of the hose and reconnect it to my new hcv and re install it without losing ALL of my coolant in my radiator"
i gave up and reconnected everything as is.
i was trying to do this because my HEATER would blow cold air, but my a/c works just fine.
after attempting it, fuck it im just gonna drive around with no heater. so FRUSTRATING
08-29-2012, 01:52 PM
#29
Chapter Leader (Southern Region)
Thread Starter
I know this is old but geeze. It's just a simple valve. It's just a little coolant. Unless the system still had pressure on it such as not relieving any pressure via the radiator cap, the fluid flow will stop once the fluid level goes below the hoses. The heater core will probably drain down a bit but it's just coolant, no big deal. No reason to give up and drive around with no heater. It sounds like your car was on an incline.


I never saw that post.. shit, that is probably one of the funniest posts I've read in 3G. You can plainly see coolant coming out and I posted pics with shop towels on the rear mount. Less than 10-12 fl oz should leak. It's really not that bad. Those clamps can be a bitch to get to, which is why I recommend replacing them with screw clamps.
I just imagine viet with a finger in the core tube and a finger in the HCV, stretched over the front end, trying to figure out how the fuck he's going to get out of his predicament.
Just made my day.
09-16-2012, 03:33 PM
#30
Fearless DIY Guy
iTrader: (2)
Just a bump because, yes...winter is coming, and I just finished this myself. (LOVE the GoT Reference). FYI: 126k, 2006 6MT.
Ok, so, just a quick heads-up for those with the MDX spacer...this fix is a PAIN IN THE ASS due to the reduction in clearance you'll have to reach the hose clamps for the valve. Even with prudence and pig mats in the noted location, she still was a drippin' from time to time. 10 - 12 oz. is a fairly accurate assessment, IMHO...for this reason, I'd strong recommend towels BENEATH the car as well. But whatever. I didn't care if the whole damn radiator leaked out, a $20 fix for being able to adjust to temps below 81F is worth it!
While my forearms look like I tried to rape a feral cat, it's done...thanks for the AWESOME write-up. Haven't tested the heat, yet...just checked for leaks and called it a day. I'll try it in the morning.
Threads like this are just all the more reason why this forum is above and beyond most!
12-02-2012, 01:17 AM
#31
Instructor

Sorry to bump an old thread.
My car is an 08 TL-s, up here in canada, it's about freezing now 0C (32F) and I typically have to set my heater to 28C (82F) in order to feel warm, sometimes 26C (79F) after awhile. I still get heat, my coolant is topped up, and my engine temp is steady all the time, so I've eliminated any coolant / thermostat issue. Seems like the HCV is the culprit, does that sound about right to everyone?
Regardless, I think I can live with setting my heat a bit higher than usual to get me through the winter, and I'll definitely tackle this one come spring. Thanks for the write up!
12-04-2012, 04:35 PM
#33
Chapter Leader (Southern Region)
Thread Starter
The issue is not the temp being off.. it's not getting up to temp in the first place even after the coolant is warm/hot (i.e. blowing cold air not warm).
12-04-2012, 04:40 PM
#34
Instructor
In your case, it's not getting up to temp because the HCV is not opening at all, causing the air to be cold.
In my case, I suspect it's opening, just not opening nearly as much as it should. I'm going to take a look at it when I get a chance, I read on another site that the screw could be loose and the switch won't be as effective at opening / closing properly.
In my case, I suspect it's opening, just not opening nearly as much as it should. I'm going to take a look at it when I get a chance, I read on another site that the screw could be loose and the switch won't be as effective at opening / closing properly.
12-04-2012, 04:45 PM
#35
Moderator
iTrader: (7)
I wonder if I need to change mine too? my heater works fine but sometimes when it's cold out(socal cold, not canada cold), the heater doesnt get hot until I set it to above 82-83 degrees. I just find it weird that even the 79-80 setting on a cold day doesnt blow hot air out? That's my only issue, the heater blows very hot when its on HI temp, do you think this is the culprit or is my car normal?
10-19-2013, 12:15 PM
#36
Instructor

Thanks for the great write-up. My heater stopped working a few weeks ago and just did this. Started the car up and the heat worked perfect, but just on the passenger side. It gets nice a hot as I turn up the heat, but the drivers side stays cool the entire time.
Any ideas?
Any ideas?
10-21-2013, 08:10 PM
#38
Fearless DIY Guy
iTrader: (2)
Get back in there, give this scan a shot, unplug your battery for 30 minutes (this should reset the code), and let us know how you make out.
 10-22-2013, 02:50 AM
#40
Chapter Leader (Southern Region)
Thread Starter
This valve only diverts coolant to the heater core, it has nothing to do with the air mix control. I'll post info on this later today.

