
DIY: Brake Line Replacement 3G Garage #D-001
 04-11-2008, 10:03 PM
#1
AZ Community Team
Thread Starter

Join Date: May 2007
Location: N35�03'16.75", W 080�51'0.9"
Posts: 32,488
Received 7,770 Likes
on
4,341 Posts
DIY: Brake Line Replacement 3G Garage #D-001
I'll post the full DIY a bit later on, but this is pretty easy.
Even easier here in Redneck Country where we don't replace it, we re-Parr it.
Even easier here in Redneck Country where we don't replace it, we re-Parr it.
 04-11-2008, 10:45 PM
#2
AZ Community Team
Thread Starter
Join Date: May 2007
Location: N35�03'16.75", W 080�51'0.9"
Posts: 32,488
Received 7,770 Likes
on
4,341 Posts
Stainless Steel Brake Line Replacement (2007 TL-S, 5AT)
Purpose: To improve pedal response especially when under heavy use. Long-Term to accompany Slotted Rotors and DOT4 Brake Fluid for improved performance under repeated use (i.e. AutoX, Track, etc). Stock Rubber brake lines will flex when used. As the brake fluid gets hotter, the stock lines flex more. This results in "pedal fade" (not to be confused with fade from rotors/pads that are too hot). SS lines will reduce/eliminate "pedal fade".
Getting Ready:
- First Aid Kit. Seems like I can't change a light bulb in this car with out needing a F'n band-aid. ;
;
- Jack and Stands;
- Safety Glasses;
- Gloves (for the girly-men ) ;
) ;
- 19mm Socket for Wheel Removal;
- 10mm & 17mm Open End Wrench;
- 12mm, 14mm, 15mm Sockets;
- 3 inch Socket Extension;
- Some tool or another to get the GD Clips out;
- Some other tool to get the GD Clips back in;
- Towels;
- Towel and Cleaner (to clean brake fluid off your Calipers and what not when done. This stuff will eat the paint right off those pretty Brembo Calipers if you let it sit too long ) ;
) ;
- Replacement Brake Fluid; New DOT3 Honda/Acura Fluid Recommended (for what you use while changing and bleeding the lines) ;
OK, Here We Go:
Oops. Forgot.
- You need new SS Brake Lines. I got Russell from Excelerate .
.
- OH!! and BEER (for your break and to reward your hard work)
OK, Here We Go (Really):
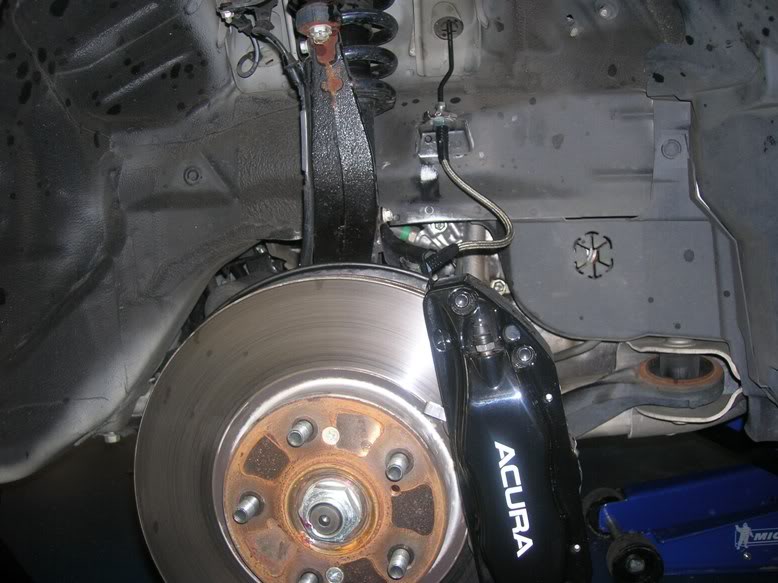
1. Jack the car and remove the wheels. We started with the Fronts.
2. Turn the steering wheel hard left or hard right (depending which side you're on) for easier access.
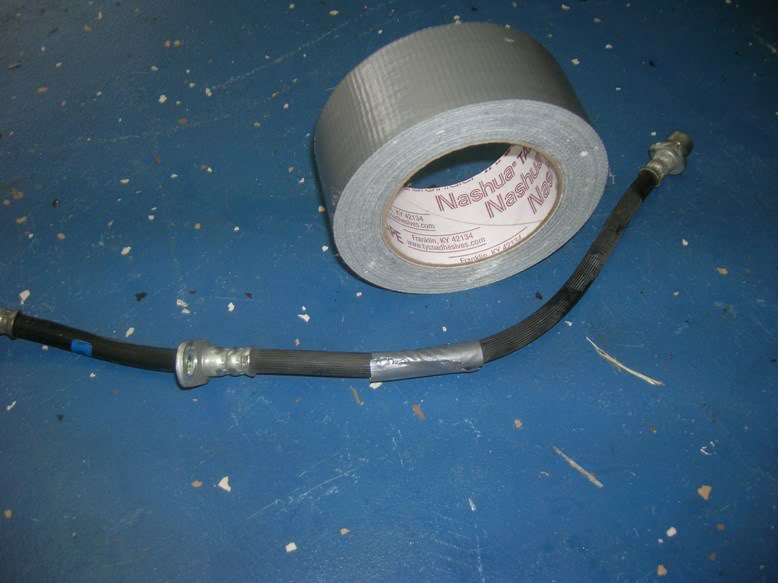
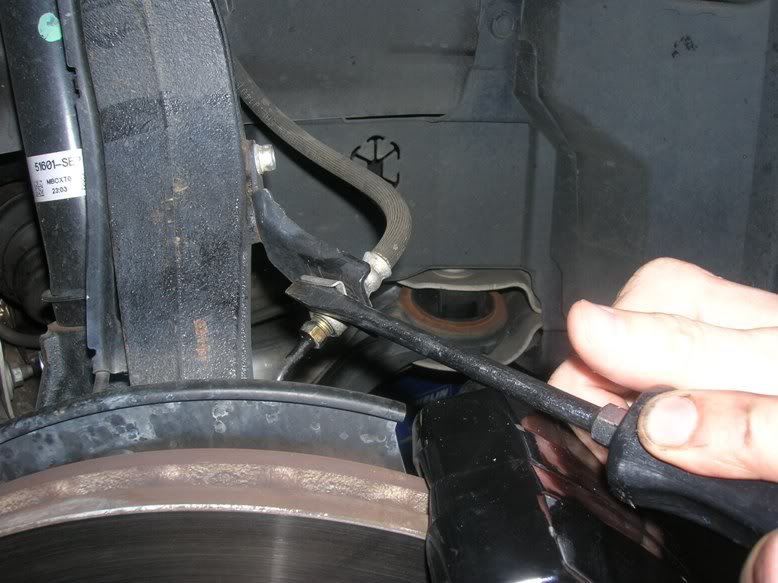
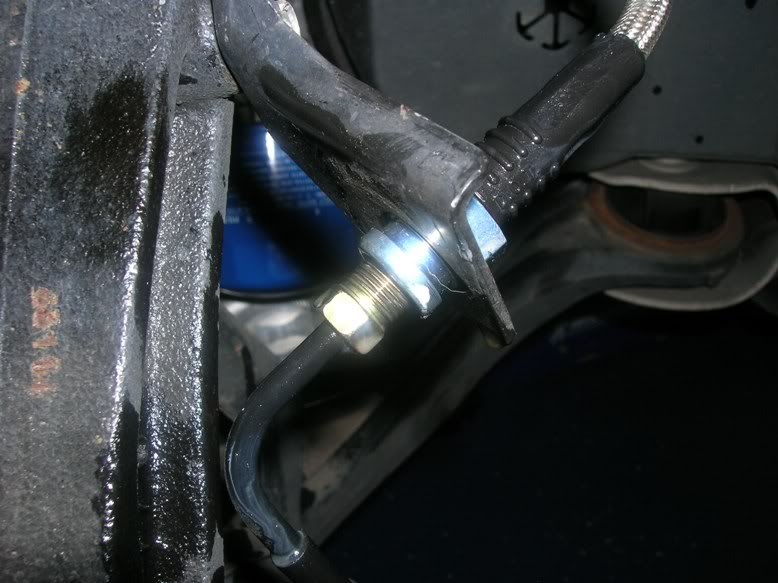
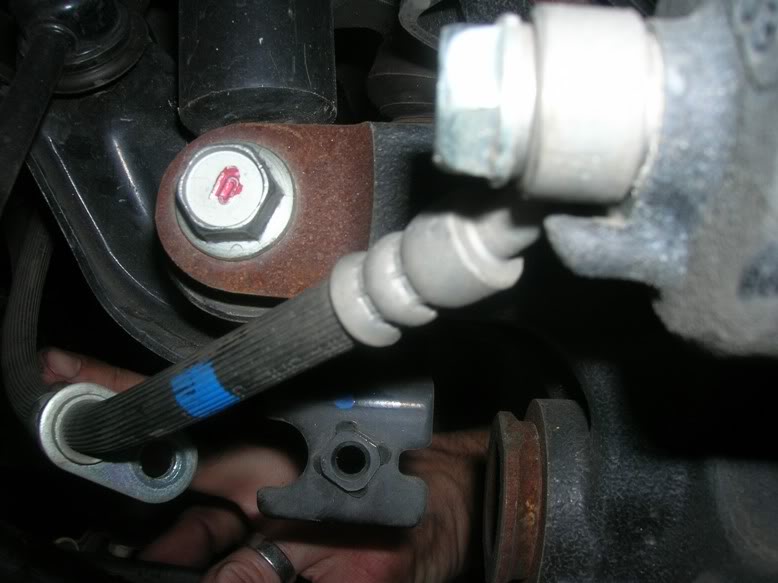
3. Here's what you'll see on the Front (this is the SS line, but Stock looks the same):
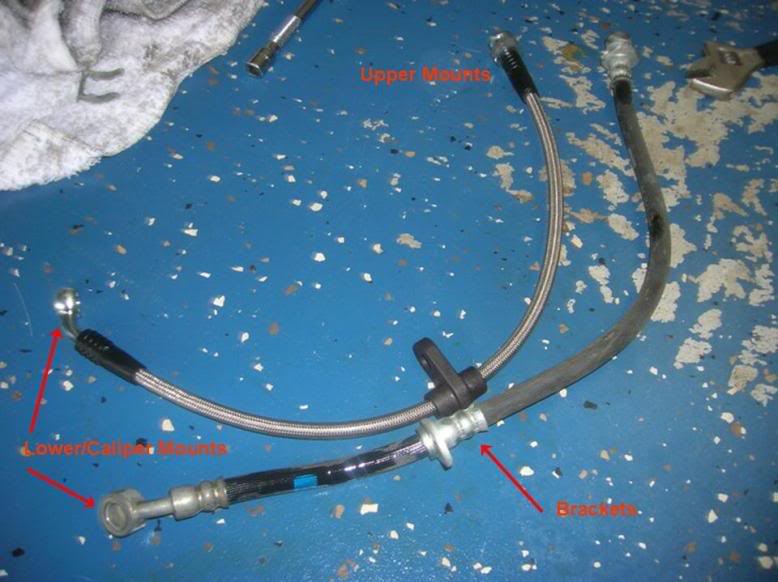
4. Here are the two lines Side-by-Side.
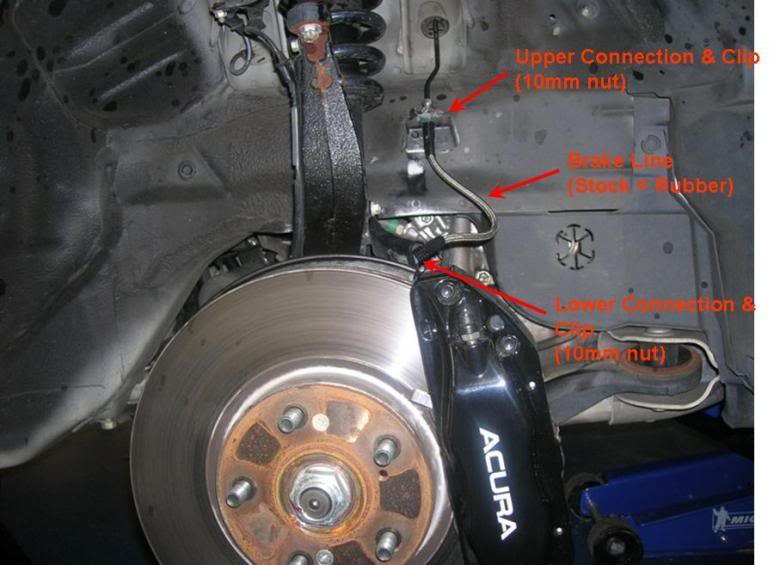
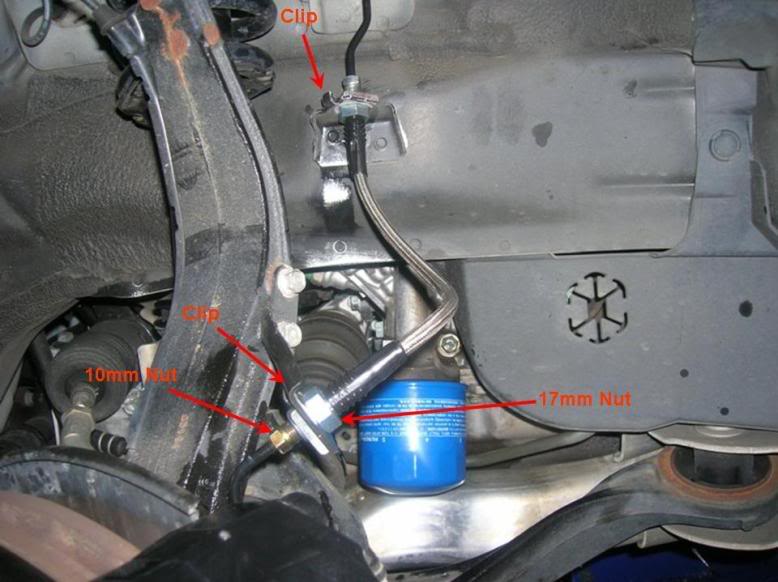
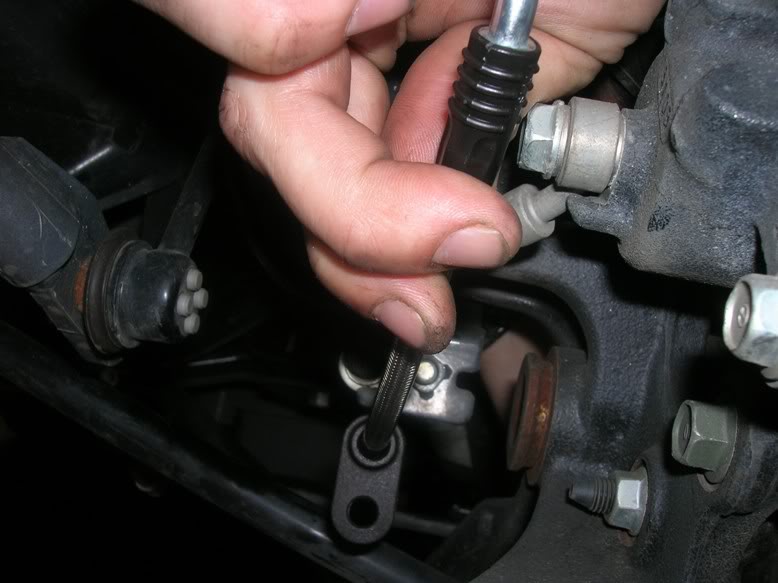
5. Loosen the upper mounting nut and then remove the retaining clip.
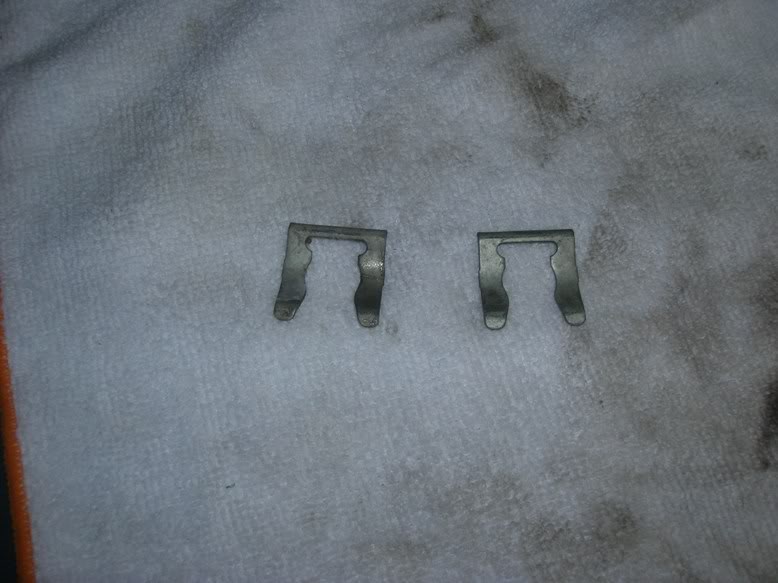
6. Repeat on the lower (Caliper) end. Clips were kind of a bitch to get out just because you've got to get a little leverage on the flange to pop them off and there's not much room. We used every tool we could think of including several screwdrivers and a small pry bar. Here are the Clips (2 on the Fronts; Only 1 on the Rear):
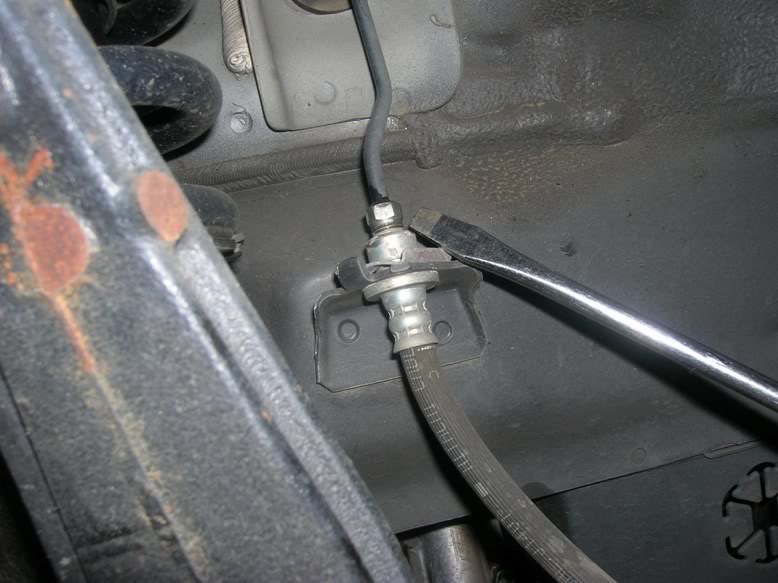
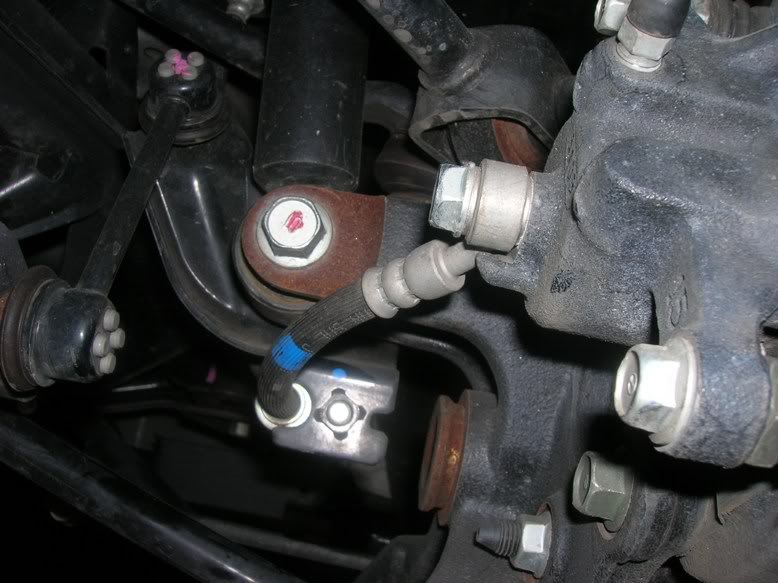
7. Remove the Upper and Lower Mounting nuts and remove the old Brake Line.
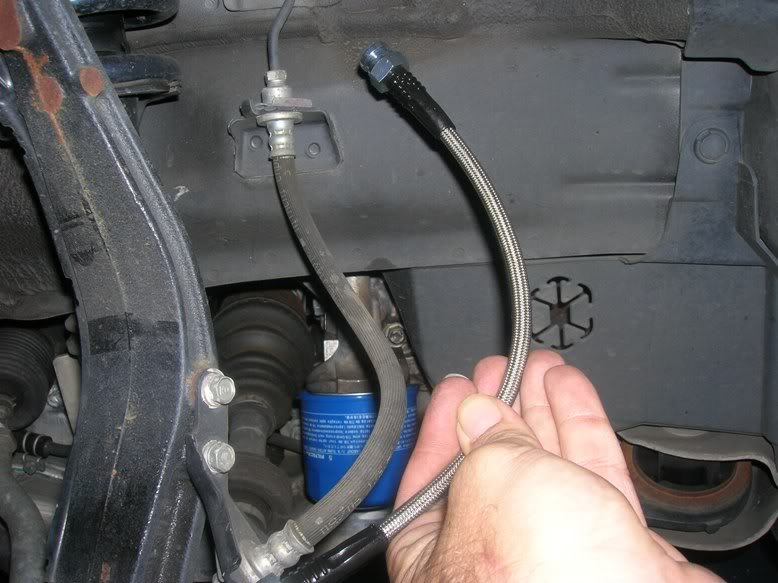
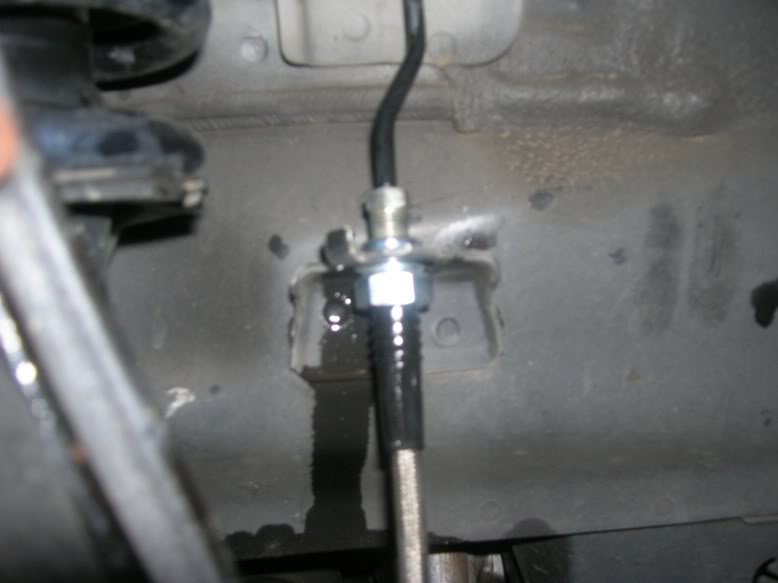
8. Install the new SS Line in the Reverse Order. We used a Flat Head Screw Driver and small plastic/rubber mallet to tap the clips back into place. You'll need a 17mm open end wrench to hold the nut on the new lines while you tighten your connection. Do not over tighten. For Torque Specs, refer to Scans here: https://acurazine.com/forums/showthread.php?t=118283 .
9. Repeat for the other side.
10. Clean up your mess. Put your tires back on and put the car (carefully) on the ground.
11. Break time. Drink Beer. Sorry forgot the pics on this. Hopefully, you know how to open and consume beer (or Pepsi for the Younger Generation). If you've got questions on this step, PM mmade22, he's an expert.
Whew. That was good beer. Gonna go watch the Masters for a while and drink more beer.
Getting Ready:
- First Aid Kit. Seems like I can't change a light bulb in this car with out needing a F'n band-aid.
;- Jack and Stands;
- Safety Glasses;
- Gloves (for the girly-men
) ;- 19mm Socket for Wheel Removal;
- 10mm & 17mm Open End Wrench;
- 12mm, 14mm, 15mm Sockets;
- 3 inch Socket Extension;
- Some tool or another to get the GD Clips out;
- Some other tool to get the GD Clips back in;
- Towels;
- Towel and Cleaner (to clean brake fluid off your Calipers and what not when done. This stuff will eat the paint right off those pretty Brembo Calipers if you let it sit too long
) ;- Replacement Brake Fluid; New DOT3 Honda/Acura Fluid Recommended (for what you use while changing and bleeding the lines) ;
OK, Here We Go:
Oops. Forgot.
- You need new SS Brake Lines. I got Russell from Excelerate
.- OH!! and BEER (for your break and to reward your hard work)
OK, Here We Go (Really):
1. Jack the car and remove the wheels. We started with the Fronts.
2. Turn the steering wheel hard left or hard right (depending which side you're on) for easier access.
3. Here's what you'll see on the Front (this is the SS line, but Stock looks the same):
4. Here are the two lines Side-by-Side.
5. Loosen the upper mounting nut and then remove the retaining clip.
6. Repeat on the lower (Caliper) end. Clips were kind of a bitch to get out just because you've got to get a little leverage on the flange to pop them off and there's not much room. We used every tool we could think of including several screwdrivers and a small pry bar. Here are the Clips (2 on the Fronts; Only 1 on the Rear):
7. Remove the Upper and Lower Mounting nuts and remove the old Brake Line.
8. Install the new SS Line in the Reverse Order. We used a Flat Head Screw Driver and small plastic/rubber mallet to tap the clips back into place. You'll need a 17mm open end wrench to hold the nut on the new lines while you tighten your connection. Do not over tighten. For Torque Specs, refer to Scans here: https://acurazine.com/forums/showthread.php?t=118283 .
9. Repeat for the other side.
10. Clean up your mess. Put your tires back on and put the car (carefully) on the ground.
11. Break time. Drink Beer. Sorry forgot the pics on this. Hopefully, you know how to open and consume beer (or Pepsi for the Younger Generation). If you've got questions on this step, PM mmade22, he's an expert.
Whew. That was good beer. Gonna go watch the Masters for a while and drink more beer.
04-11-2008, 10:46 PM
#3
AZ Community Team
Thread Starter
Join Date: May 2007
Location: N35�03'16.75", W 080�51'0.9"
Posts: 32,488
Received 7,770 Likes
on
4,341 Posts
On to the Rears
Holy crap. I almost forgot about you guys.
Don't worry, I'm fine. I can hold my beer really well. Besides, they're just brakes, what could go wrong?
12. Lift the car, remove the wheels, yada, yada, yada.
13. Turn the steering wheel hard left or hard right (depending which side you're working on) for easier access.
14. Anybody that actually *did* step 13, stop now, put your wheels back on and take your car to a professional, you've had WAY too much beer . For the rest of you:
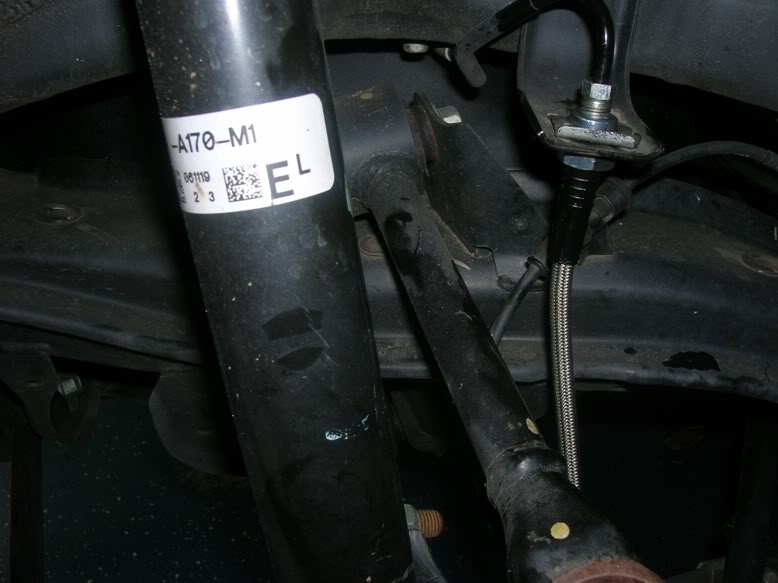
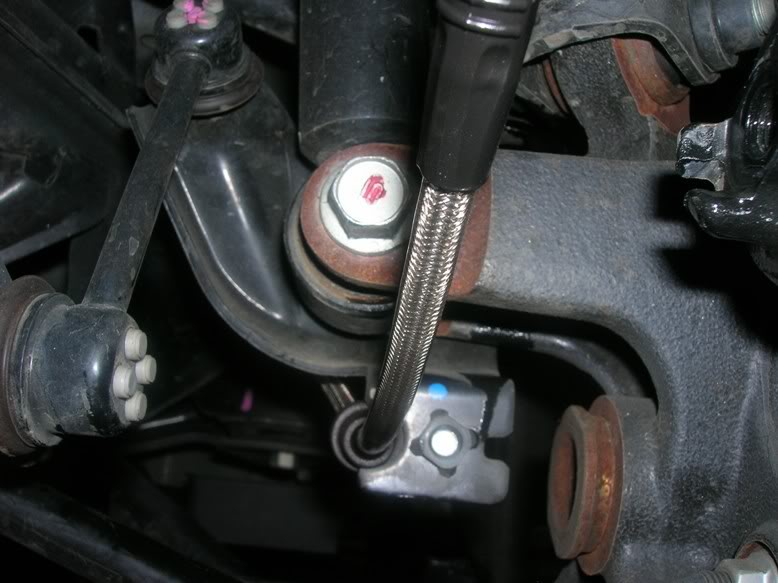
15. Here's what the Rears look like:
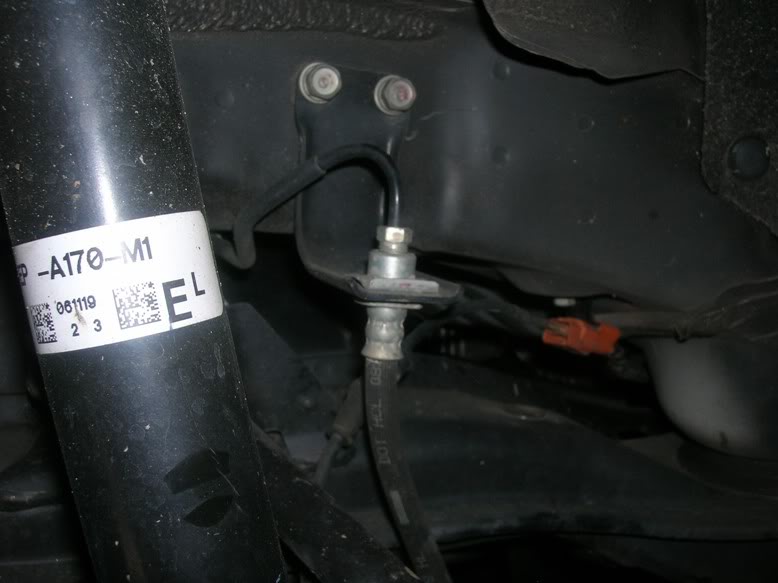
16. Remove the stock bracket (12mm socket with extension)
17. Loosen the upper mounting nut
18. Remove the GD Clip
19. Remove the upper mounting nut.
20. Remove the Lower (Caliper) side bolt and TWO washers
21. Here's what you've got:
22. Loosly Connect the new brake line to the upper mounting nut.
23. Loosly connect the lower mounting bolt with NEW washers:
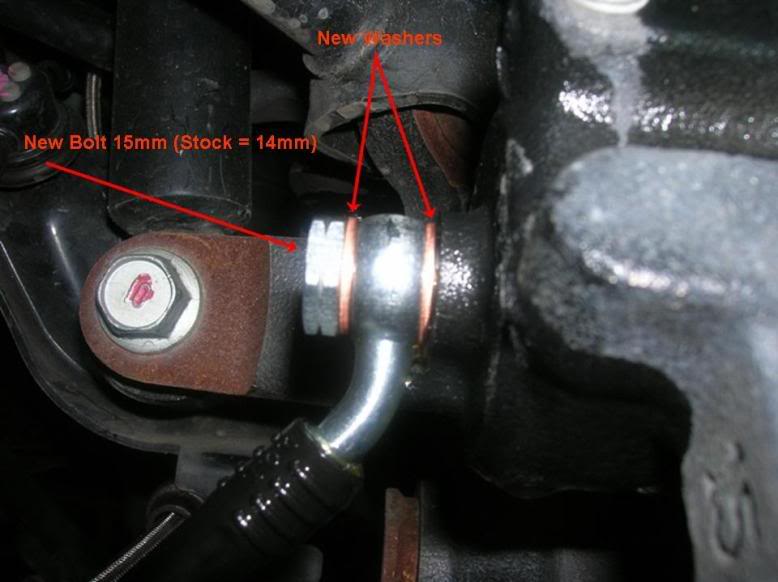
24. Connect the Bracket on the new line:
25. Replace the GD Clip and Tighten everything up. Torque Specs here: https://acurazine.com/forums/showthread.php?t=118283
26. Repeat for the other side.
27. Clean up your mess. Put your tires back on and put the car (carefully) on the ground.
28. Break time again. Drink more beer. Sorry forgot the pics on this one too. Hopefully, you know how to open and consume beer (or Pepsi for the Younger Generation). If you've got questions on this step, PM mmade22, he's an expert.
29. After you sober up, Bleed your brakes as recommended by the manufacturer. Look here for scans/DIY: https://acurazine.com/forums/showthread.php?t=118283
30. Drive it. Carefully at first, make sure everything feels OK, no leaks, no strange noises, no pulling under braking, etc.
First impressions - brakes engage the rotor with slightly less pedal application. I assume this is because the "slack" in the stock rubber hose expansion is gone. Very sublte difference. Should be a big help when the brakes are getting hot though.
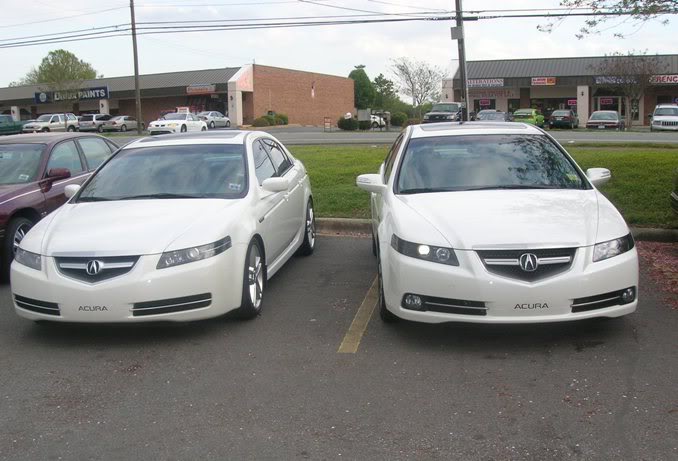
Tons and Tons of Props to mmade22 for his help and continued use of his garage and tools. 
Here's his ride now, sitting pretty on H&R Sports, Koni Yellow's and RJ's:
Don't worry, I'm fine. I can hold my beer really well. Besides, they're just brakes, what could go wrong?
12. Lift the car, remove the wheels, yada, yada, yada.
13. Turn the steering wheel hard left or hard right (depending which side you're working on) for easier access.
14. Anybody that actually *did* step 13, stop now, put your wheels back on and take your car to a professional, you've had WAY too much beer
. For the rest of you:15. Here's what the Rears look like:
16. Remove the stock bracket (12mm socket with extension)
17. Loosen the upper mounting nut
18. Remove the GD Clip
19. Remove the upper mounting nut.
20. Remove the Lower (Caliper) side bolt and TWO washers
21. Here's what you've got:
22. Loosly Connect the new brake line to the upper mounting nut.
23. Loosly connect the lower mounting bolt with NEW washers:
24. Connect the Bracket on the new line:
25. Replace the GD Clip and Tighten everything up. Torque Specs here: https://acurazine.com/forums/showthread.php?t=118283
26. Repeat for the other side.
27. Clean up your mess. Put your tires back on and put the car (carefully) on the ground.
28. Break time again. Drink more beer. Sorry forgot the pics on this one too. Hopefully, you know how to open and consume beer (or Pepsi for the Younger Generation). If you've got questions on this step, PM mmade22, he's an expert.
29. After you sober up, Bleed your brakes as recommended by the manufacturer. Look here for scans/DIY: https://acurazine.com/forums/showthread.php?t=118283
30. Drive it. Carefully at first, make sure everything feels OK, no leaks, no strange noises, no pulling under braking, etc.
First impressions - brakes engage the rotor with slightly less pedal application. I assume this is because the "slack" in the stock rubber hose expansion is gone. Very sublte difference. Should be a big help when the brakes are getting hot though.
Tons and Tons of Props to mmade22 for his help and continued use of his garage and tools.
Here's his ride now, sitting pretty on H&R Sports, Koni Yellow's and RJ's:
The following 3 users liked this post by Bearcat94:
04-12-2008, 12:17 PM
#5

In my experience- for the upper place where the line connect to the cars line and the CLIP, loosen the upper nut slightly first
THEN
a flatblade screwdriver is used to gently pry the clip outwards- it will try and resist- if you pre-treat it with wd or similar product- resistance will be futile!!
Now put the beer down, take a channel lock- adjustable pliers of good size and grab the clip and leverage out
OR
get the clip between one inside of the tool and the other side against the bracket- so you squeeze it loose from its track.
Looking at the new lines before you start will show you how clip A fits in slot B
To install- push in place as far as able, rubber mallet or small block of wood against clip and tap straight in with a small hammer- GENTLY
Brake Bleed order is LF, driver front, then clockwise around the car
LF RF RR LR- critical you do it this order for Acura TL
I use DOT4 synthetic fluid, meets dot3 and dot4 and is fine for the TL
Wheel lug torque after car is on the ground- 80 foot pounds
The SS line is a flexible Teflon liner/core that is wrapped in braided stainless steel and covered in plastic.
The following users liked this post:
shamal (03-08-2015)
04-12-2008, 08:53 PM
#6
200,000 mile club
Join Date: Jul 2007
Location: Charlotte, NC
Age: 48
Posts: 1,774
Likes: 0
Received 35 Likes
on
15 Posts
Jim, you are the man. Madd props to you the writer that you are on the great DIY. I have to say, it was a great investment. You forgot to mention, you need to warn your passengers that when testing the brakes to warn them before you slam on the brakes and send them face first into the dash! Great job Jim and I think we need to do keg stands next time instead of drinking one beer at a time. Good job! CAI is the next DIY next weekend. The tools are ready and cleaned up for that install.
04-13-2008, 07:39 PM
#7
AZ Community Team
Thread Starter
Join Date: May 2007
Location: N35�03'16.75", W 080�51'0.9"
Posts: 32,488
Received 7,770 Likes
on
4,341 Posts
Originally Posted by mmade22
.... You forgot to mention, you need to warn your passengers that when testing the brakes to warn them before you slam on the brakes and send them face first into the dash! ....
CAI is the next DIY next weekend. The tools are ready and cleaned up for that install.
CAI is the next DIY next weekend. The tools are ready and cleaned up for that install.
Sorry about that, J. It never occured to me that *I* knew when I was going to slam on the brakes, but you didn't.
I kept wondering why you were calling me names and picking your glasses up off the floor. lol.
All is well with the install - no leaks, no funny noises for feelings.
Not sure when the CAI will go in (not even sure if it shipped yet) but I'll let you know.
01TL4TL - you are exactly correct, loosen the nut, then pop the clips.
Trending Topics
 11-23-2011, 01:31 AM
#11
AZ Community Team
Thread Starter
Join Date: May 2007
Location: N35�03'16.75", W 080�51'0.9"
Posts: 32,488
Received 7,770 Likes
on
4,341 Posts
Well, you'll have to bleed them when you're done anyhow. I don't think we did anything to remove fluid before starting. But if you're changing fluid, it's not a bad idea. I think some would still leak out though.
Did not spill much really, but some did drip down one of the calipers. Cleaned it as quickly as possible, but it still ruined some paint.
 10-20-2013, 12:54 PM
#13
having a lot of trouble with this, want to know if i can get any insight. It seems that the 10mm nuts on ALL of the brake pipes are seized or something because none of them will move at all. Have treated them with PB blast several times now but still nothing happens. I also have been using a flare nut wrench as you probably should but absolutely nothing is working. My front drivers side lines are pretty stripped at this point and i'm at a total loss as to what to do..
10-20-2013, 01:03 PM
#14
having a lot of trouble with this, want to know if i can get any insight. It seems that the 10mm nuts on ALL of the brake pipes are seized or something because none of them will move at all. Have treated them with PB blast several times now but still nothing happens. I also have been using a flare nut wrench as you probably should but absolutely nothing is working. My front drivers side lines are pretty stripped at this point and i'm at a total loss as to what to do..
07-07-2014, 09:26 AM
#17
When you break it, turn it in burst to quickly break it without bending the steel line.
 07-18-2015, 03:36 PM
#19
Intermediate

I'm about to do this to my 06 AT. Thanks for the write-up!
Is there anyone in SoCal (Irvine area) that's willing to meet up and help? I'm willing to pay for the time if u have a garage and your own tools.
Is there anyone in SoCal (Irvine area) that's willing to meet up and help? I'm willing to pay for the time if u have a garage and your own tools.


Thread
Thread Starter
Forum
Replies
Last Post
mada51589
3G TL Problems & Fixes
79
05-03-2022 08:54 PM
Skirmich
2G TL (1999-2003)
37
09-15-2015 06:41 PM
asahrts
Member Cars for Sale
0
09-04-2015 05:55 PM