
DIY: Blacked/Cleared Headlights 3G Garage #G046
 01-20-2006, 02:28 AM
#1
I'm in
Thread Starter
DIY: Blacked/Cleared Headlights 3G Garage #G046
Finally got around to blacking/clearing out my headlights. At first I didn't want to touch them since I didn't want to deal with sealing them back up. But it actually turned out pretty easy.
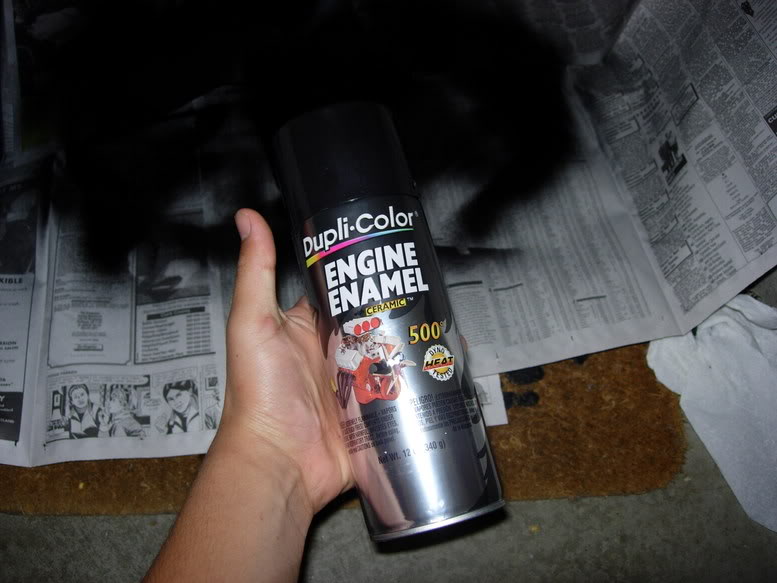
First you need to decide what color your going to paint the chrome, or if your just going to remove the amber to leave them clear. I decided to remove the amber and paint the chrome a glossy black. I purchased it from a Autozone. Make sure that you get heat resistant paint, I used engine paint.
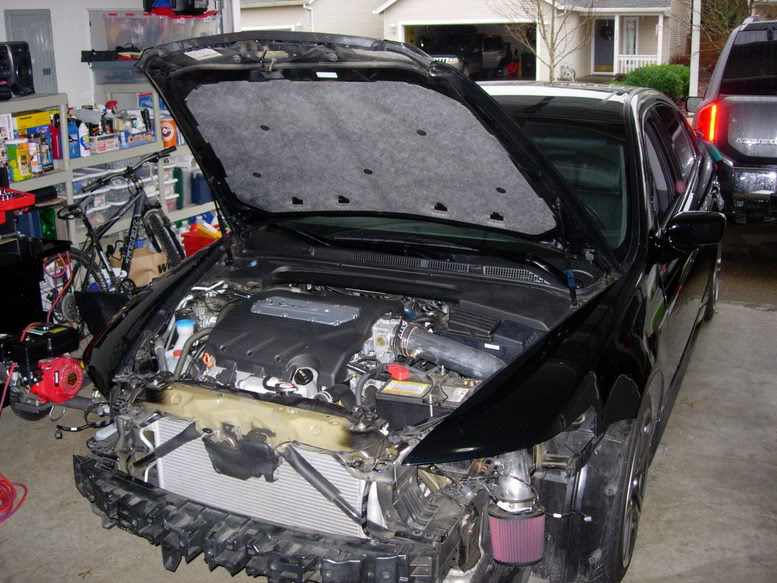
As most of you know, you need to remove the front bumper in order to take out the headlights you can find those instructions in this thread.
Once you have removed the headlights you need to bake them!
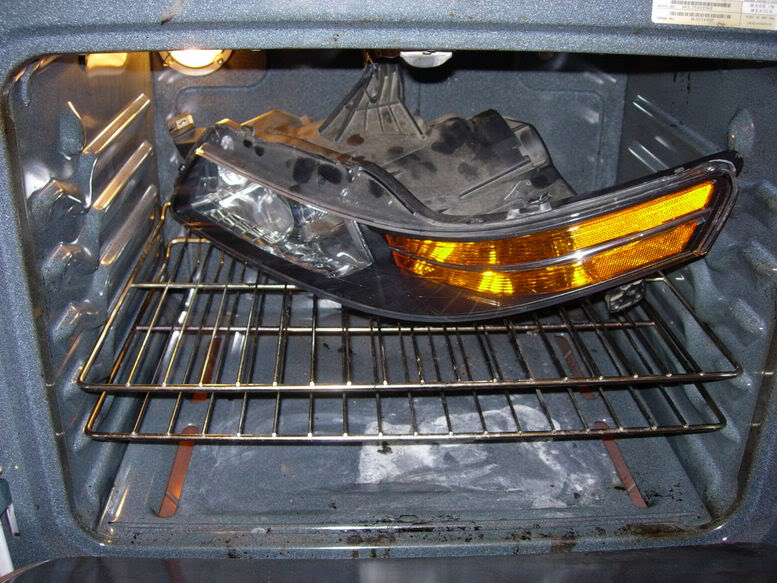
I stuck the ENTIRE headlight housing as well as all the HID componets. Make sure you don't pre-heat, 20 minutes at 200 degrees. Once they are out you might need gloves to remove it. Begin in the inner corner and pull till it opens. It should come off fairly easy.
Now depending if you are going to remove the amber you need to break the plastic holding it in place......
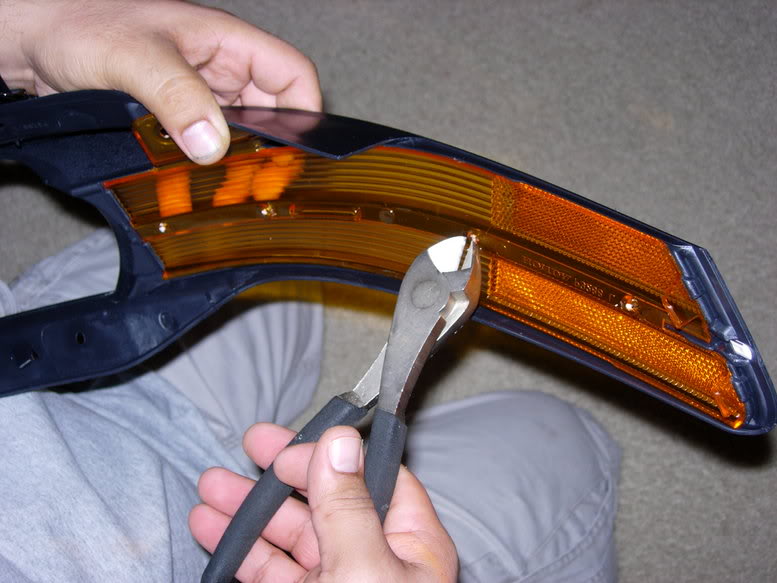
Doing this will loosen the chrome line. So what I did was I used epoxy to hold in place. Now I have my housing that needs to be painted....
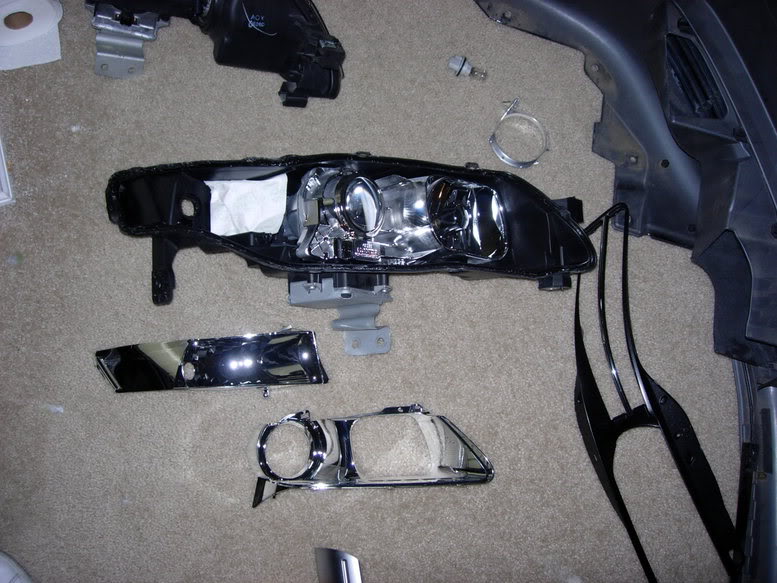
I painted about 5 to 7 coats and let it dry 15 minutes between each coat.
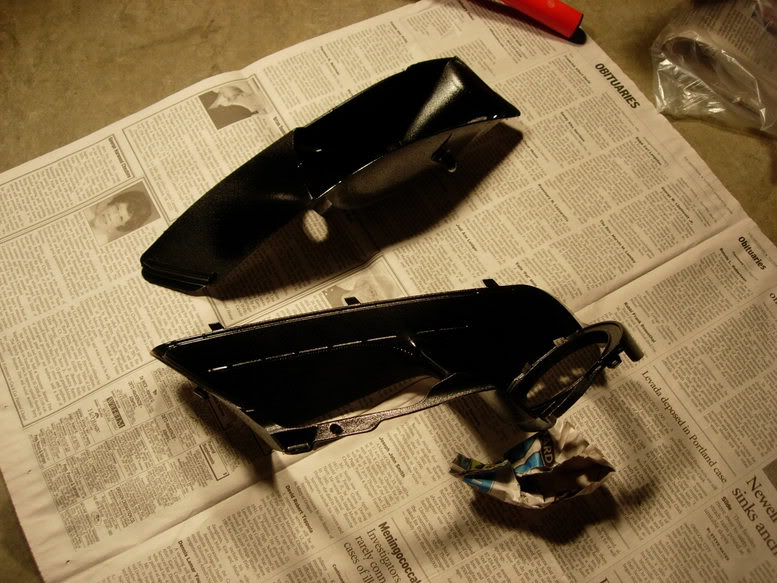
After I let them cure for about 2 hours I began to put back together the lights.
Now to seal them back up. I purchased some black heat resistant silicone from Autozone. With a caulking gun I put a little silicone in the wedge in the housing where the lens sits. Then I put the lense on and positioned it to be flush and for all the clips to clipped. Since I'm very picky, I took my time to make sure everything was nice and even. Once I finished this I baked the headlights till the oven was pre-heated to 200 degrees. Once I took it out again, I positioned the lens to be even. Once I did that, With my finger I applied the silicone all around the edge of where the lens and housing meets. So far I have not had any moisture get in, and I hope it doesn't.
When you have complete one headlight do the other.
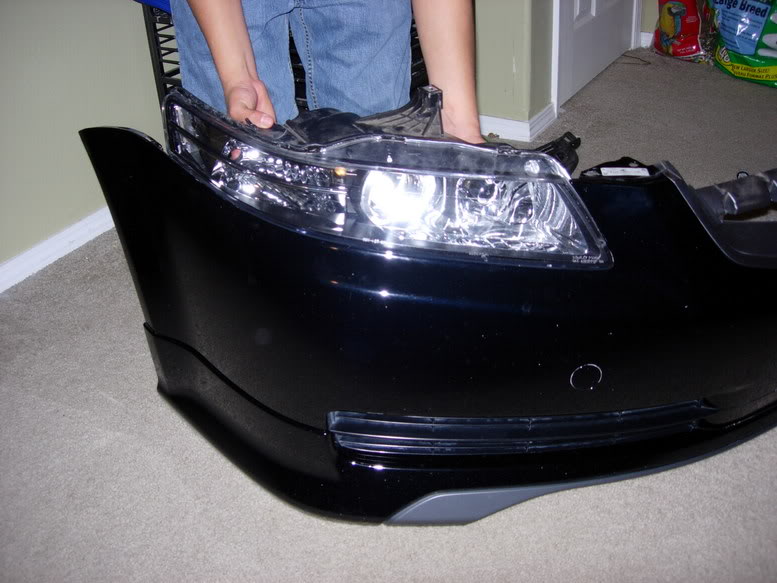
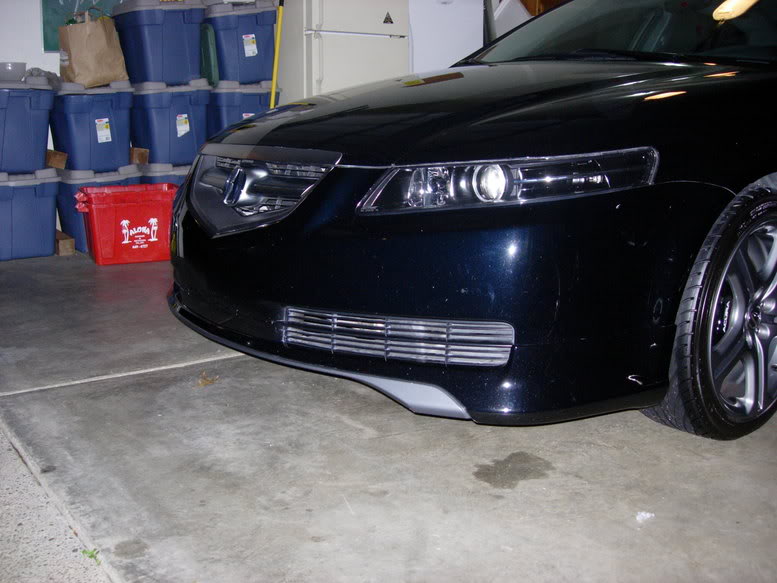
Before I began this project I was not so sure on what color to paint it. I thought about leaving it chrome like this
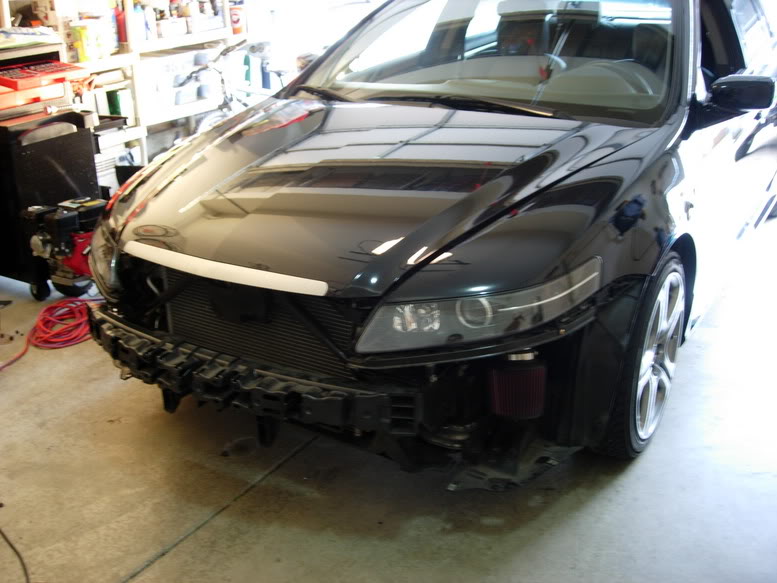
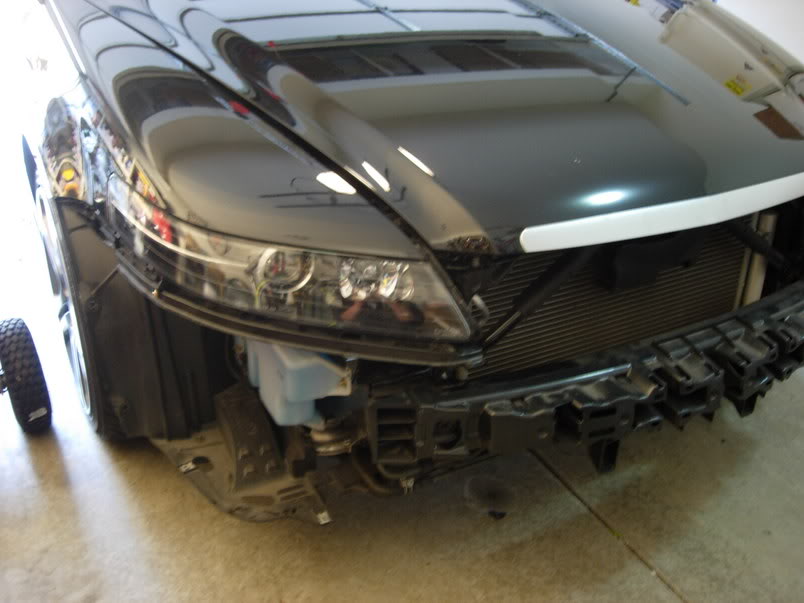
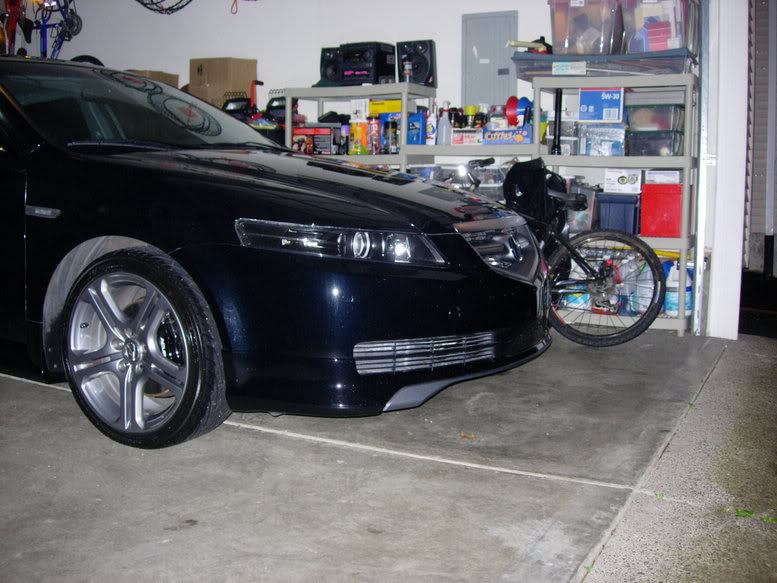
I'm glad that I didn't leave it chrome because it turned out like this....
This project was pretty simple. I find that removing the bumper is really easy, especially with the instructions. I still need to change my foglights and turn signals. Any suggestions? I was looking at these blue Nokiya bulbs..... I will have a another thread of some pictures of my car and of the lights. When done well you know but the car back together and enjoy!
Tell me what you all think.........
More pictures to come.......
First you need to decide what color your going to paint the chrome, or if your just going to remove the amber to leave them clear. I decided to remove the amber and paint the chrome a glossy black. I purchased it from a Autozone. Make sure that you get heat resistant paint, I used engine paint.
As most of you know, you need to remove the front bumper in order to take out the headlights you can find those instructions in this thread.
Once you have removed the headlights you need to bake them!
I stuck the ENTIRE headlight housing as well as all the HID componets. Make sure you don't pre-heat, 20 minutes at 200 degrees. Once they are out you might need gloves to remove it. Begin in the inner corner and pull till it opens. It should come off fairly easy.
Now depending if you are going to remove the amber you need to break the plastic holding it in place......
Doing this will loosen the chrome line. So what I did was I used epoxy to hold in place. Now I have my housing that needs to be painted....
I painted about 5 to 7 coats and let it dry 15 minutes between each coat.
After I let them cure for about 2 hours I began to put back together the lights.
Now to seal them back up. I purchased some black heat resistant silicone from Autozone. With a caulking gun I put a little silicone in the wedge in the housing where the lens sits. Then I put the lense on and positioned it to be flush and for all the clips to clipped. Since I'm very picky, I took my time to make sure everything was nice and even. Once I finished this I baked the headlights till the oven was pre-heated to 200 degrees. Once I took it out again, I positioned the lens to be even. Once I did that, With my finger I applied the silicone all around the edge of where the lens and housing meets. So far I have not had any moisture get in, and I hope it doesn't.
When you have complete one headlight do the other.
Before I began this project I was not so sure on what color to paint it. I thought about leaving it chrome like this
I'm glad that I didn't leave it chrome because it turned out like this....
This project was pretty simple. I find that removing the bumper is really easy, especially with the instructions. I still need to change my foglights and turn signals. Any suggestions? I was looking at these blue Nokiya bulbs..... I will have a another thread of some pictures of my car and of the lights. When done well you know but the car back together and enjoy!
Tell me what you all think.........
More pictures to come.......

The following 15 users liked this post by PPLAPW:
2Morrow (11-06-2011),
ACC LIKE U KNO (04-29-2012),
Acura818z (06-13-2011),
AyFeltaTL (06-26-2012),
bduncan5 (02-25-2014),
and 10 others liked this post.

 01-20-2006, 02:15 PM
#5
Racer
Join Date: Nov 2004
Location: NYC
Age: 37
Posts: 286
Likes: 0
Received 0 Likes
on
0 Posts
Blacked-out headlights on a black car  Looks good bro, thanks for the informative pics and and info it will really halpe me out in the future. now...more pix plzzzz
edit by mod Ron A: Quote removed because that's a lot of pictures and they are just a little ways up towards the top of this page.
Looks good bro, thanks for the informative pics and and info it will really halpe me out in the future. now...more pix plzzzz edit by mod Ron A: Quote removed because that's a lot of pictures and they are just a little ways up towards the top of this page.
 01-20-2006, 03:28 PM
#7
Youse Gots Sacked
Join Date: Nov 2004
Location: Morristown, NJ
Age: 36
Posts: 2,930
Likes: 0
Received 4 Likes
on
4 Posts
Originally Posted by ewbuster
How does cleared headlights look on the silver TL's?
on the other hand its about preference....sometimes a silver TL can look great with blacked out headlights and tints...and black rims and smoked tails...it depends how u set up ur car
The following users liked this post:
IntactACK (08-26-2012)
Trending Topics
01-20-2006, 06:17 PM
#9
I'm in
Thread Starter
Thanks for all the comments. Also thanks to teh Jatt since thats the first car I saw with smoked lights, then it was Lokius......
I will for sure post more and better pics. I'm glad on how it came out. Also taking my bumper off was good because before it was slightly off, but now its perfect....
I will for sure post more and better pics. I'm glad on how it came out. Also taking my bumper off was good because before it was slightly off, but now its perfect....
 01-21-2006, 11:13 AM
#12
Advanced
Join Date: Dec 2005
Posts: 78
Likes: 0
Received 0 Likes
on
0 Posts
let us know if you end up having any problems with your lights... i think thats holding me back cause i know guys with rsx that did it and they got condisation and the front of the headlight would get a wierd film like on it you could see little spots on them
01-22-2006, 12:50 AM
#15
One on the right for me
that looks awesome...im glad you had so many pics in the write up...i might consider it now.
if you do get condensation, like my friend did when he baked his headlights, just do it again in the oven and reseal them...hopefully second times a charm
if you do get condensation, like my friend did when he baked his headlights, just do it again in the oven and reseal them...hopefully second times a charm
 01-22-2006, 01:17 PM
#19
Racer
Join Date: Nov 2004
Location: NYC
Age: 37
Posts: 286
Likes: 0
Received 0 Likes
on
0 Posts
Thanks for the pics PPLAPW. I thought you were just being sarcastic about takin pics at that time. lol But those last two pics convinced me that I really want to do this. Now if I can get the courage to take my bumper off and cook the headlights. lol 
01-22-2006, 02:12 PM
#20
I'm in
Thread Starter
Originally Posted by aznbo187
Nice! I love it.
When you placed them in the oven for 20 minutes, were you able to get the front cover off the headlight with one heating session per light, or did you have to put it back and re-heat it several times?
When you placed them in the oven for 20 minutes, were you able to get the front cover off the headlight with one heating session per light, or did you have to put it back and re-heat it several times?
 01-22-2006, 08:36 PM
#22
Chief
Join Date: Nov 2004
Location: Mission Valley, CA
Age: 49
Posts: 296
Likes: 0
Received 0 Likes
on
0 Posts
PLAPW- Thanks for the write up and pictures. Once I saw this I said to myself I have to do this. I had the stock lights with the smoked Rockblocker film and liked it at first but at night when I would turn on my headlamps the output of the lights was drastically reduced. I wasted the $49.95 and rip the stuff off and then pulled the car apart and blackened out the headlamps. I will post some pics tomorrow when I take them during the day.
Unlike your headlamps the only thing that is different is that the ring around the projectors are completely black. I did not remove that part of the light and leave it silver. I have a WDP so I like it a lot better that way. I kind of stripped some of the silver off of the silver strip on the sides since I got some over spray on them but good thing I had some silver touch up paint handy to fix it. Unless your right up on it being very picky to see it it isn't that noticibale.
Unlike your headlamps the only thing that is different is that the ring around the projectors are completely black. I did not remove that part of the light and leave it silver. I have a WDP so I like it a lot better that way. I kind of stripped some of the silver off of the silver strip on the sides since I got some over spray on them but good thing I had some silver touch up paint handy to fix it. Unless your right up on it being very picky to see it it isn't that noticibale.
01-23-2006, 01:45 AM
#25
Safety Car
I think he means don't pre-heat. Put the light in, turn to 200, set timer for 20 mins. I think it looks great PPLAPW,good job. Wish I had the sack to try this on my 06, but I just can't bring myself to try. If I knew of a northern Cali shop that had done it before I would definately have it done.
01-23-2006, 12:15 PM
#27
Chief
Join Date: Nov 2004
Location: Mission Valley, CA
Age: 49
Posts: 296
Likes: 0
Received 0 Likes
on
0 Posts
aznbo187- I wouldn't say it would affect the lease if you plan on purchasing new headlamps before you turn the car back in. I know that the dealer would make you pay for the change and would not take the loss on that since it would depreciate the car to an extent.
01-23-2006, 06:22 PM
#29
I'm in
Thread Starter
Originally Posted by XjoEnX
ill be attempting this project soon. what do you guys think: smoke the housing for the projector and fog lights but leave the amber alone? i kinda like the amber on my nbp
01-24-2006, 01:54 PM
#33
I'm in
Thread Starter
Ka0tik- I'm planing on posting pics when I either put LEDs or just a different bulb.
ilililililililililil- Do you mean the yellow reflector? If yes then you do. All you can see is a white bulb that I need to change so it can be noticed.
ilililililililililil- Do you mean the yellow reflector? If yes then you do. All you can see is a white bulb that I need to change so it can be noticed.
01-25-2006, 08:57 AM
#34
Team Anthracite Member
PPLAPW,
Let me know what you chose to replace your turn signals with. I'm still undecided after clearing and blacking out my headlights. I bought some cheap silver/amber bulbs but they aren't bright at all. I have LEDs too, but need resistors and haven't tried them yet. Let us know what you chose for bulbs. Thanks!
Let me know what you chose to replace your turn signals with. I'm still undecided after clearing and blacking out my headlights. I bought some cheap silver/amber bulbs but they aren't bright at all. I have LEDs too, but need resistors and haven't tried them yet. Let us know what you chose for bulbs. Thanks!
01-29-2006, 03:08 AM
#36
4th Gear

Join Date: Dec 2005
Age: 36
Posts: 4
Likes: 0
Received 0 Likes
on
0 Posts
wow u r good man !! i was thinking to clear head light and change it to all blue but than i m afraid to mess up ... so yea thank u for the direction..... cus all the ppl i ask outside they do not ganrantee to do it ... thanks
01-31-2006, 04:51 AM
#37
Intermediate

Join Date: Jan 2006
Age: 46
Posts: 26
Likes: 0
Received 0 Likes
on
0 Posts
Originally Posted by TL-CrAzIe-05
Looks great!!! What type of paint did you use to color the inside with??? Was it painted on w/ a brush or a spray can. Thanks.
01-31-2006, 04:55 AM
#38
Intermediate
Join Date: Jan 2006
Age: 46
Posts: 26
Likes: 0
Received 0 Likes
on
0 Posts
Originally Posted by XjoEnX
ill be attempting this project soon. what do you guys think: smoke the housing for the projector and fog lights but leave the amber alone? i kinda like the amber on my nbp
01-31-2006, 01:54 PM
#39
I'm in
Thread Starter
Originally Posted by ndnboy
Looks great man,Did it change your light output in any way, I'm not sure if I trust myself to do even the smallest thing to my car w/o messing something else up...past experiences, i wish i could find them as replacemnt part, so far no luck... yor lights really look nice though man
No this did not change my light output for the HID, if you noticed in the pics I left chrome around the fog lights, I left that like that to maintain the reflectiveness. However the turn signal bulb is weak. Since there is no amber its just a dull white. I soon will be changing this to LED or just a better bulb.