When you click on links to various merchants on this site and make a purchase, this can result in this site earning a commission. Affiliate programs and affiliations include, but are not limited to, the eBay Partner Network.
Since I haven't seen any DIY for the middle AC and Radio console led mod I decided to make one since all my led burnt out on the AC and Radio one by one which bugged the crap out of me, so I been busy lately doing a lot of led mods with the help of Deathmetals DIY guides for cup holder, heated seat, doors and some helpful questions answered by Deathmetal. This is also my first DIY so enjoy. If you decide to do this mod its at your own risk, I'll be happy to help if needed.
Tools
-Solder
-Flux
-Screw driver
-Flat head
For the color you can choose what you want, I went with blue and white.
-10 blue 3mm led bulb
-10 560ohm resistor
-5 white 3mm led blub
-5 1k ohm resistor
-10 blue, 10 white PLcc-2 Surface Mount Leds
(extras always good in case you mess up)
-15 SMD resistors 1k ohm 1% part# 660-SG73P2ETTD1001F
(extras always good in case you mess up)
heres the SMD leds I ordered from Oznium.com, SMD resistors from mouser.com, and 50X each white and blue 3mm flat head led from ebay.
this is how the unit should look like after removal, to make it easier to work, you should take the unit off of the bracket which is holding by 6 screws on each side.
step 3
since the AC is the easiest to work on first you would need to remove the bulbs with a flat head and using deathmetals method of making an led with resistors. make 8 total of the colors you want.
how the bulbs look like after you take them off from the AC unit
the one I made
step 4
after you finish making the led housing with resistor stick it in the slot and use a flat head to twist it in, top is positive and bottom is negative for all the holes.
step 5
now that the AC is done time to work on the radio which is more of the hard part because of soldering
first you would need to remove 4 screw that I circled in red, then you slowly pull the plastic away from the frame. For the top screws its cover with some kind of fabric so you need to peel it off or just make a hole thru the fabric to unscrew the screw.
This is how it looks like after you pull it away from the frame, I decided to remove the knobs by pulling it straight out.
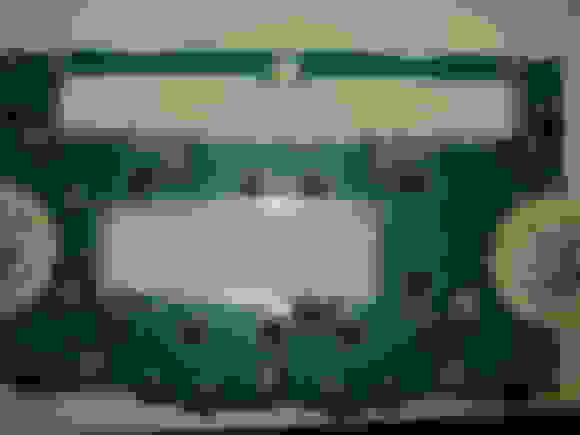
this is the part you will be using to desolder and solder the leds and resistor, first you would need to remove all the screws thats holding the board down, no need to remove the screw holding the CD part.
step 6
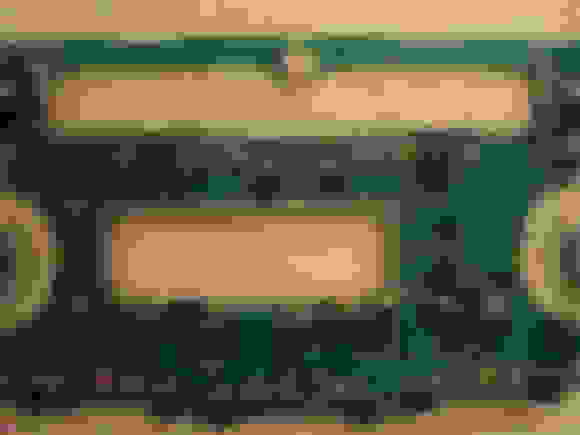
now that you have separated everything time to heat up the solder, we will do the leds first since its easier. this is how the board look like up close. you would need to desolder he leds from the board. when you solder the new led you can follow the chart of which is negative and positive.
heres the original bulb and I already marked which is negative and positive for you.
the finished product
step 7
time to solder the resistors, i circled which resistors need to be replaced with the 1k ohm. As you can see I forgot to take a picture before but heres the picture after its soldered on with the new resistors
step 8
After your all done test it before you put everything back together and enjoy your new interior look.
Here's the finished product which I didn't instal it back yet. took me a good 3-4 hours testing which is negative and soldering which took forever since I accidentally ripped off a led from the board so I have to make an alternative route for the negative side for one of the leds.
Here's also some led mod I did also with the help of deathmetals DIY guides
steering wheel with vsa controls and passenger door.
heres the cup holders and since I did the front i went ahead and did the back, since there was no DIY for the rear cup and you would like to do that mod you can message me and I can tell you how I did it.
Still many more LED mods to do like, trunk LEDs, under body led when door opens or unlocks, and led for the foot are for front of rear.
Thanks, took me a bit to finally did the AC and radio park since it involves the board and soldering so much. I'm glad I went ahead and did it even though I ran into some problems but all figured out. Now I got a fresh new looking console since all my bulbs did burn out.
Oh yeah, since everything was blue led I just changed out the security blinking to blue also on the radio and the door. Something different hah
Last edited by Steven Bell; 11-18-2012 at 01:24 PM.
Reason: Merged Posts
Thanks seemed hard but was really simple when you get into it.
Originally Posted by Bruce Banner
Man, that's pimpy.
BTW what is a flux?
Bad with explaining it hah so here's what i found on eHow.com
Flux: Flux helps to reduce oxidation of the metals during the soldering process which helps make a stronger join. It also acts as a wetting agent to help the solder flow around the join being made.
trust me I'm not that good either at it, but once you start it and take your time it will turn out really well.
Originally Posted by Turbocoop
Looks great dude, this is a mod that I definitely need to do. Those cupholders look great
Thanks yeah, have to do the back cup holder also or else it wont look right for me to have front blue and the back with non. post some pictures when you get them done and good luck.
some of my a/c buttons are out too just wondering tho what if i wanna stick with the stock bulbs?i guess its just a direct replacement with no soldering involve am I right?
some of my a/c buttons are out too just wondering tho what if i wanna stick with the stock bulbs?i guess its just a direct replacement with no soldering involve am I right?
yes, for the bulbs around the ac unit is replaced with bulbs you can get from oemacuraparts site.
Originally Posted by luder917
So you replaced the smd resistors on BACK of the board? I was hoping someone would figure out how to do this. Thank you.
That's right, you would need to replace the SMD resistors if you use other colors to be on the safe side. Resisters are in the back of the board and the SMDs are in the front.
oh ok thanx for the reply,also as for the fuse do they run on a seperate fuse?coz I just noticed that some of the buttons on the ac and the accel and decel buttons for the cruise control all went out at the same time..now i got a feeling that those share the same fuse I hope im right.
oh ok thanx for the reply,also as for the fuse do they run on a seperate fuse?coz I just noticed that some of the buttons on the ac and the accel and decel buttons for the cruise control all went out at the same time..now i got a feeling that those share the same fuse I hope im right.
Fuse probably went out, the fuse should be on your passenger kick panel. pull it out and read which fuse it is, there is also a fuse box in your engine area.
Originally Posted by 24no7
Nice!! now that it is all done, you are more than welcome to start with my car.
I wouldn't mind haha it would probably take me less then a day since I know what to tackle first and what is what now, after my first attempt it was pretty easy now. Right now I'm doing a tablet Mod on my car, fixing the interior first then it goes to outside.
Sweet brotha!!! looking forward to seeing inf the table in action
Thanks hopefully I dont mess things up, I tend to mess things up during the process haha but eventually ill get it right or buy a new part which I wouldn't want to do.
Followed the guide and I can't be more satisfied. I went 1k ohmz on it and they aren't as bright as the leds in the climate control. This isn't necessarily bad since it is a little distracting driving at night. They are bright enough to have a little contrast. I will post pictures later.
heidono that looks great man! I know this is a year old, but can you (or anyone else out there) comment about the hot spots of the surface mount LEDs? Did you simply replace the same number of OEM bulbs wit LED bulbs OR did you add additional LED bulbs? I know that manypeople have said that when you only replace the OEM ones that the brightness of the bulbs don't quite reach all of the buttons, hence, creating hot spots. Your results however seem to look great. Here is an example of what I am talking about as seen on Esper.ice's page:

 11-10-2012, 06:07 AM

 , so I been busy lately doing a lot of led mods with the help of Deathmetals DIY guides for cup holder, heated seat, doors and some helpful questions answered by Deathmetal. This is also my first DIY so enjoy
 . If you decide to do this mod its at your own risk
 , I'll be happy to help if needed
 .
.


 .
.