
A-122: DIY - 105k Service: Timing Belt, Water Pump, Spark Plugs, Thermostat *PICS*
 02-29-2012, 07:34 PM
#321
Instructor
Sure, it is part SER 3970. Click the link below and enter 3970 in the search to view it online.
http://ecatalograck.genpt.com/pdfcat...Code=teq10flx#
Yes, it definitely confuses people at those places. As for the service, it's really quite easy. My 2 cents, if something is in the way, take it out (ie. get that engine mount out of the way as soon as possible). If I were to do it again, I think I could turn it around in about 5 hours total. Now that's without doing the valve clearance check but that DIY is on hold until my gasket sets come in (probably slated for this weekend).
Hope that helps.
 02-29-2012, 11:00 PM
#322

This might be a ridiculous question but is the drive belt the same thing as the serpentine belt? The dealer replaced the serpentine belt under warranty at 80k, should i replace it again for the 105 service?
03-01-2012, 11:26 AM
#323
Yeah, it's the same thing. I would not replace it unless it was stretched. You can check this by inspecting the belt tensioner. There is an arrow on the arm that moves and it must point within a window on the base that attaches to the motor. I believe this check is outlined in your owners manual.
03-06-2012, 02:14 PM
#324

Hi team, in addition to doing the TB kit (Gates TCKWP329) and Thermostat (Gates 33992). I am planning to do the Driver Belt (Gates K060841) as well. Is it worth to just replace the drive belt Idler Pulley (Gates 36112) and drive belt Tensioner (Gates 38332) as well?
03-06-2012, 02:28 PM
#325
I would say it's not nearly as important. You can always replace that stuff later without having to go through too much trouble. If the spring is still really stiff and the bearings feel smooth and have no play, just re-use them.
The following users liked this post:
JD TL-S (03-19-2015)
03-18-2012, 08:50 PM
#326
Team, need help on the CP removal.
CP Tool + Breaker bar won't budge.
Want to try to starter bump, can you guys help with the following questions:
1. Do I need the spark plugs installed?
2. Do I still need to CP Tool to remove the CP in this case? Just break bar on CP bolt wedged forward is enough? I suppose if I manage to get the CP bold loose, I would have to re-adjust all the timing marks?
3. Just pulling the fuel pump fuse (#8) is enough? Someone mentions something about disabling the ignition switch, is that necessary?
I have now stuck half way, your help is very very much appreciated!
03-18-2012, 11:45 PM
#328
Hi team,
So I went ahead and gave the starter blip a try. Here is what I did:
1. Wedged breaker bar onto CP bolt (forward agains the floor)
2. Remove Fuel Injector fuse (#8 15A fuse under the hood)
3. Re-connect battery
4. I installed the motor mount back on (this was more just to be safe)
I tapped the starter, the CP didn't turn, and the car dies right away. The power after that.
Disconnected and reconnected the battery, all the electricity is back.
I have no clue what is the reason behind the power outage nor why the CP wasn't turning. Can the various experts on this thread give me some advise? Is it possibly because my battery doesn't have enough juice?
Thanks in advance.
03-19-2012, 09:51 AM
#330
I didn't have any luck with the starter bump method either. It just stalled the starter. I had to get mine off with lots of muscle.
If you still can't get it, take it to someone who can. Have them remove the bolt and put it back on. It should come off much easier now when you try it.
If you still can't get it, take it to someone who can. Have them remove the bolt and put it back on. It should come off much easier now when you try it.
The following users liked this post:
JD TL-S (03-19-2015)
03-19-2012, 10:19 AM
#331
Race Director
Team, need help on the CP removal.
CP Tool + Breaker bar won't budge.
Want to try to starter bump, can you guys help with the following questions:
1. Do I need the spark plugs installed?
2. Do I still need to CP Tool to remove the CP in this case? Just break bar on CP bolt wedged forward is enough? I suppose if I manage to get the CP bold loose, I would have to re-adjust all the timing marks?
3. Just pulling the fuel pump fuse (#8) is enough? Someone mentions something about disabling the ignition switch, is that necessary?
I have now stuck half way, your help is very very much appreciated!
CP Tool + Breaker bar won't budge.
Want to try to starter bump, can you guys help with the following questions:
1. Do I need the spark plugs installed?
2. Do I still need to CP Tool to remove the CP in this case? Just break bar on CP bolt wedged forward is enough? I suppose if I manage to get the CP bold loose, I would have to re-adjust all the timing marks?
3. Just pulling the fuel pump fuse (#8) is enough? Someone mentions something about disabling the ignition switch, is that necessary?
I have now stuck half way, your help is very very much appreciated!
Did you see post #202? That may help. I think the push button guys pull the fuel injector fuse. If you have a key, you can just bump it with a key turn but I'd still pull the fuse. Also, read earlier in the thread, I posted a link to the crank pulley thread that has some discussion of the bump method.
I had to use all of my 190lbs on the end of an 8' cast iron breaker bar and it bent the bar (see posts #203-204) before the bolt finally popped.
Next time I do this, I'm just going to the base auto hobby shop and use their 1" gun to pop it lose, then re-tighten it and drive home to finish the job. I think this may be your best option now.
Last edited by nfnsquared; 03-19-2012 at 10:25 AM.
03-19-2012, 07:28 PM
#332
Hi team, finally got the CP bolt off. I had to a couple of blips first, it didn't budge. But I figured it probably help to break some level of surface tension, so I went back to the breaker bar afterwards, sure enough, it was enough to break it free. Fuew...
Took all the covers off, some of the cavities to remove the bolts were tighter than I anticipated.
Now I am ready to remove the TB, but I can't figure out where the battery tie goes...
I know it is possibly not need for TB removal, but since I will likely need it anyway during the TB install, I wanted to figure out where it it actually goes.
I looks at Mojofo's photo, however, I still couldn't figure where the battery tie actually screws into... Can someone help? Also, did you guys actually filed down the tip as the gates kit suggested?
Thanks
03-19-2012, 08:20 PM
#333
Cruisin'

first off, yes, file down the sharp edge of the battery tie-down. just a little bit is enough. second, yes, it may not be necessary to do this to get the timing belt off but it will be to get the new belt on. lastly, there is an eye-let bracket just below the rear cam gear. i was only able to see it clearly from underneath the car. you know you're in the ball-park if your hand keeps hitting an electrical connection plug for a sensor (it may be the vtec solenoid or vtec oil pump sensor). i had to unplug the sensor connections from each other and disconnect one of the 2 connector ends from the bracket it was attached to to keep from cutting my hand up more. in short, look just below the rear cam gear at about the 5 o'clock position. the tie-down will be at about a 10 to 4 o'clock position once you start the threads in.
hope that helps.
hope that helps.
03-20-2012, 05:56 PM
#334
Finally was able to find the battery tie-down location.
Was able to proceed forward, installing the actual timing belt now.
As I was installing the TB (counter-clockwise from the CP), while keeping it snug up until the rear cam, I think the tension was pulling the rear cam and casing it to rotate about 45 deg. I am not really sure what to do to get the TDC mark lined back up on the rear cam, I try to manually turn the rear cam, but it seemed to be tensioned by the engine itself.
What is the best way to get the TDC mark lined back up on the rear cam? Do I take a leveraged wrench and just manually rotate it back to TDC alignment? If so, do i turn clockwise or counter-clock wise? (I have a 2006 TL)
Much appreciated!
03-20-2012, 06:17 PM
#335
Chapter Leader (Southern Region)
Thread Starter
If you're installing a new hydraulic tensioner.. the battery tie down part is useless.
03-20-2012, 06:21 PM
#336
Chapter Leader (Southern Region)
Thread Starter
Rock the rear cam back from which it came to get TDC (cw). Don't pull the pin or remove the tie down until all the marks are in place.
03-20-2012, 07:18 PM
#337
Finally was able to find the battery tie-down location.
Was able to proceed forward, installing the actual timing belt now.
As I was installing the TB (counter-clockwise from the CP), while keeping it snug up until the rear cam, I think the tension was pulling the rear cam and casing it to rotate about 45 deg. I am not really sure what to do to get the TDC mark lined back up on the rear cam, I try to manually turn the rear cam, but it seemed to be tensioned by the engine itself.
What is the best way to get the TDC mark lined back up on the rear cam? Do I take a leveraged wrench and just manually rotate it back to TDC alignment? If so, do i turn clockwise or counter-clock wise? (I have a 2006 TL)
Much appreciated!
Was able to proceed forward, installing the actual timing belt now.
As I was installing the TB (counter-clockwise from the CP), while keeping it snug up until the rear cam, I think the tension was pulling the rear cam and casing it to rotate about 45 deg. I am not really sure what to do to get the TDC mark lined back up on the rear cam, I try to manually turn the rear cam, but it seemed to be tensioned by the engine itself.
What is the best way to get the TDC mark lined back up on the rear cam? Do I take a leveraged wrench and just manually rotate it back to TDC alignment? If so, do i turn clockwise or counter-clock wise? (I have a 2006 TL)
Much appreciated!
Now if you were to keep rolling the cam around to complete a full turn, you would definitely end up pressing the valves into the piston dome on cylinder #1 (the rear cylinder closest to the belt). That piston is currently sitting at top-dead-center.

 03-20-2012, 07:55 PM
#338
2004 NBP TL 6MT

I am curious if any one knows the purpose for the Honda HDS crank position sensor reset/learn procedure at the end of timing belt replacement procedure in Honda service manual.
I do not have the equipment to perform this listed learn procedure and wondering the purpose, so I can understand if it is necessary or not. Also, if it has an effect on the way the engine operates going forward.
Recently completed Tbelt replacement successfully, no problems, no leaks, etc. Been driving car for couple days. Please advise if you know of its purpose. Thanks.
03-20-2012, 11:58 PM
#339
Guys, I was able to get the rear cam aligned rocking back and forth as suggested.
I am in deep trouble now, I installed everything back up to the drive belt tensioner.
I tightened the tensioner down and was attempting to install the drive belt. I used a 14mm socket on the tensioner to push forward into car hoping the it was move the pulley forward to slip on the belt. When I did that, the nut just simply came loose. So I thought I just didn't have it tight enough. Against my better judgement, I tightened it some more, to a point where I didn't think make sense anymore. So I stop and wanted to remove the tensioner to study what I was doing wrong. However, in doing so, I am afraid I have striped the nut. OMG. What do I do?
The space it tight, so I don't think I can get a gator grip in there. PLEASE HELP!!!!
03-21-2012, 01:04 AM
#340
Chapter Leader (Southern Region)
Thread Starter


For one, don't try to mess with it anymore. If you're talking about the center securing bolt for the drivebelt auto tensioner, then get a bolt extractor like this one found at harbor freight:

Remove that sucker and call Honda / Acura up and get a replacement bolt. Also, only use 6 point sockets and the correct size to avoid doing this again and take your time. I've been through this enough to learn my lesson. In the scheme of things.. this is minor. Keep us updated.
The following users liked this post:
JD TL-S (03-19-2015)
03-21-2012, 01:19 AM
#341
Hi Majofo, first off, I bow down to you!
I don't know what this forum would be w/o you!
I am going to go to Sear to buy the bolt extractor (similar to the ones you suggested from Harbor).
Let's assume that I can get the bolt out and replaced (feeling pretty defeated at the moment, but with you as my guide, I think I can remain upbeat).
I want to understand what I did wrong w/ the tensioner. There was a little plastic sleeve behind the tensioner bolt from the original tensioner. I just assumed that I had to reuse it in the same way it was on the old one. What exactly is it for and what exactly do I need to do with this when I am installing the new tensioner? Do I need to screw the plastic sleeve all the way into the tensioner recess before starting to bolt onto the engine? I have a feeling this was the culprit..
03-21-2012, 01:47 AM
#342
Chapter Leader (Southern Region)
Thread Starter
I've yet seen a bolt that couldn't be extracted. Shouldn't be too bad, especially since you had it out earlier.
Murphy's Law, what can go wrong, will go wrong. He exists and it's proven.
Murphy's Law, what can go wrong, will go wrong. He exists and it's proven.
03-21-2012, 01:48 AM
#343
Chapter Leader (Southern Region)
Thread Starter
Even if the extractor doesn't work, and it should.. and even though that space is tight.. there are other options as well, but we'll cross that bridge if we need to.
03-21-2012, 12:17 PM
#344
6th Gear

Join Date: Mar 2012
Posts: 6
Likes: 0
Received 0 Likes
on
0 Posts
HEEEEELLLLLPPPPP!!!! Crank mark??
I too decided to tackle this project. It is my first timing belt ever. Upon the reinstallation (for the third time!) of my auto tensioner, I broke the bolt. Two days later I have successfully lowered the engine, drilled, tapped , helicoiled, and reinstalled eveything. It will not start now.
I experienced the touchy rear cam, and lined it up perfectly. My front a rear cams are perfect together. But I am confused on the crank pully. There is some confusion on what TDC is. On the gear itself there is a small arrow pointing up towards the mark on the engine block. But On the top edge of the pully there are Three dots in a row and a white dot off to the side. From reading online and watching youtube it has been stated that the lone dot it TDC, however, if I set that to TDC the arrow on the gear is at about 1 or 2pm. In your photos it shows tha arrow on the gear (which also happens to be where the key is on the gear) as TDC. Which mark do I use?
Side note: I filled with fear over removing the auto tensioner bolt again. it was scary putting it back as the helicoil was not as deep as I would prefer, and the edge of the hole is a little reamed. Al I know is that I will never drop that engine again. Putting the rear engine mount bolt back in tore me up. What a chore.
03-21-2012, 12:48 PM
#345
takin care of Business in
iTrader: (5)
Join Date: Jan 2008
Location: Kansas City, MO
Age: 40
Posts: 30,994
Received 4,732 Likes
on
4,064 Posts
thats why if you dont know your shit you take it to the dealer....like i did !!!
03-21-2012, 12:51 PM
#346
One on the right for me
^ -  or at least a shop that knows how to do it. I used to not mind doing timing belts, etc. but now its so much easier to drop it off and pick up the car a few hours later. I'll save the wrenching for other projects/vehicles
or at least a shop that knows how to do it. I used to not mind doing timing belts, etc. but now its so much easier to drop it off and pick up the car a few hours later. I'll save the wrenching for other projects/vehicles
03-21-2012, 01:13 PM
#347
Chapter Leader (Southern Region)
Thread Starter
I too decided to tackle this project. It is my first timing belt ever. Upon the reinstallation (for the third time!) of my auto tensioner, I broke the bolt. Two days later I have successfully lowered the engine, drilled, tapped , helicoiled, and reinstalled eveything. It will not start now.
I experienced the touchy rear cam, and lined it up perfectly. My front a rear cams are perfect together. But I am confused on the crank pully. There is some confusion on what TDC is. On the gear itself there is a small arrow pointing up towards the mark on the engine block. But On the top edge of the pully there are Three dots in a row and a white dot off to the side. From reading online and watching youtube it has been stated that the lone dot it TDC, however, if I set that to TDC the arrow on the gear is at about 1 or 2pm. In your photos it shows tha arrow on the gear (which also happens to be where the key is on the gear) as TDC. Which mark do I use?
Side note: I filled with fear over removing the auto tensioner bolt again. it was scary putting it back as the helicoil was not as deep as I would prefer, and the edge of the hole is a little reamed. Al I know is that I will never drop that engine again. Putting the rear engine mount bolt back in tore me up. What a chore.
I experienced the touchy rear cam, and lined it up perfectly. My front a rear cams are perfect together. But I am confused on the crank pully. There is some confusion on what TDC is. On the gear itself there is a small arrow pointing up towards the mark on the engine block. But On the top edge of the pully there are Three dots in a row and a white dot off to the side. From reading online and watching youtube it has been stated that the lone dot it TDC, however, if I set that to TDC the arrow on the gear is at about 1 or 2pm. In your photos it shows tha arrow on the gear (which also happens to be where the key is on the gear) as TDC. Which mark do I use?
Side note: I filled with fear over removing the auto tensioner bolt again. it was scary putting it back as the helicoil was not as deep as I would prefer, and the edge of the hole is a little reamed. Al I know is that I will never drop that engine again. Putting the rear engine mount bolt back in tore me up. What a chore.

1.. You dropped the subframe to remove a bolt?
B.. You helicoiled the block?
3.. Are you working on a 3G TL? Follow my pics.. not a lot of logic goes into this one.
D.. Derp?
5..
03-21-2012, 02:42 PM
#348
6th Gear
Join Date: Mar 2012
Posts: 6
Likes: 0
Received 0 Likes
on
0 Posts
serious
Seriously, I need some advice no critics. Does anyone know what TDC is on the crank pulley? Is it the white dot on the edge of the pulley or the arrow on the crank gear behind the pulley? it's a 2003 MDX.
03-21-2012, 02:49 PM
#349
Chapter Leader (Southern Region)
Thread Starter

Well I do own a '03 X.

Take a picture.. CP mark should be same.
03-21-2012, 03:52 PM
#350
Hi Mofojo,
Thanks to your advise. I was finally able to remove the auto tensioner bolt with a set of extractor bought from sears. I am in such a relieved that which word can not described... :-)
Now as far as the auto tensioner installation. Can you please teach me how to put the auto tensioner together before the install. There is a small plastic nut that came off the back side (facing the engine) of the original tensioner. My question is am I supposed to screw in the plastic nut into the recess of the back side of the auto-tensioner before bolting into the engine? I think the plastic nut is what allows us to manually torque the tensioner bak to remove the belt. But again, the design doesn't make perfect sense because it the is threaded inside the tensioner recess as well...
Also, what is the torque spec for the auto-tensioner? I find that after I tightened it (hand tightened because my 1/2" torque wrench wouldn't fit. When I try to test it out by torque it back, the bolt simply comes off. Am I doing this wrong?
Thanks a bunch!!!
03-21-2012, 04:17 PM
#351
6th Gear
Join Date: Mar 2012
Posts: 6
Likes: 0
Received 0 Likes
on
0 Posts
centers don't line up
They are not the same. The imprinted arrow on the gear does not match the white dot on the edge of the crank wheel. If I line up the white dot at TDC, makes the imprinted arrow on the gear set to 1 or 2PM. Doesn't make sense. Is the dot on the edge of the gear even relevant? Or should I look at the little arrow/triangle that I see on the gear, and line it up with the center mark on the engine block? Thanks for the quick replies, i'm almost ready to tackle it again...aaaauuugggghhhhhh. Last try before it goes to the shop.
03-21-2012, 04:20 PM
#352
Chapter Leader (Southern Region)
Thread Starter
Soo.. You don't remember if the CP mark was lined up before you removed the CP?
03-21-2012, 04:20 PM
#353
Chapter Leader (Southern Region)
Thread Starter
I can tell you for sure later tonight.. I'll check the manual. Please paypal me before then. 
03-21-2012, 04:34 PM
#354
The arrow on the crank timing belt cog lines up with the mark on the aluminum engine block.
The single mark on the large black steel crank pulley lines up with the arrow on the plastic timing belt cover.
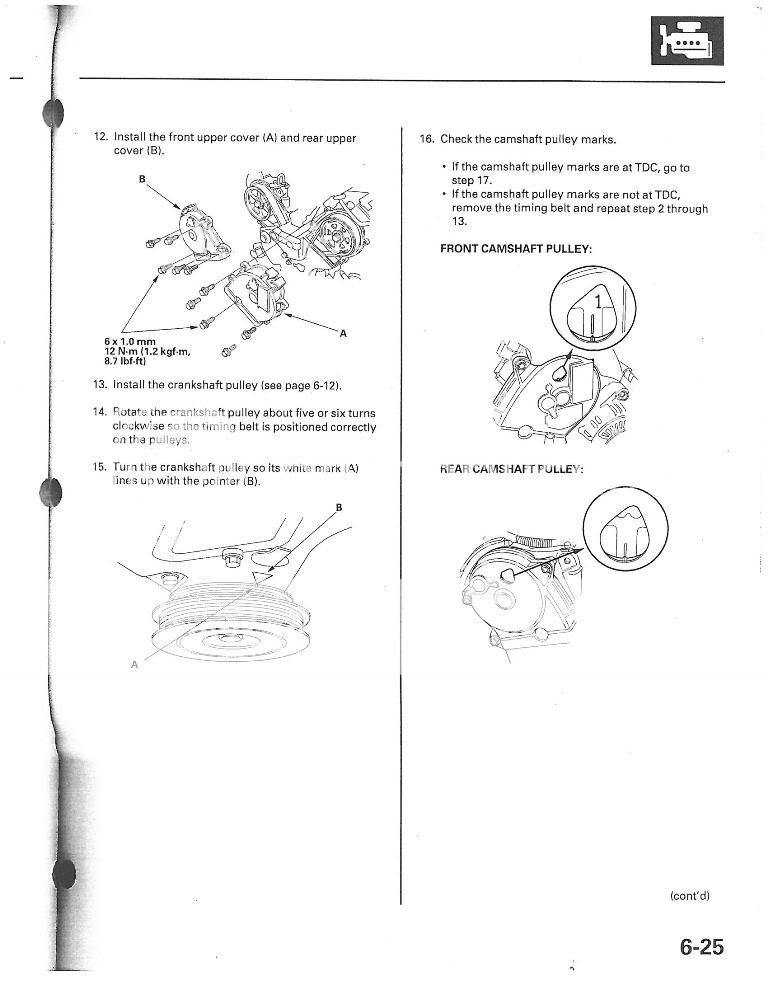
These marks are NOT interchangable. You cannot line up the timing belt cog with the mark on the timing cover, and you cannot line up with the large crank pulley with the mark on the block. And I certainly hope you didn't spin the crank around a full turn without the timing belt hooked up. This can potentially damage any valves that sit at or near max lift.
BTW: These pics are from an 03 Pilot. But they should be similar enough to get the point across.
The single mark on the large black steel crank pulley lines up with the arrow on the plastic timing belt cover.
These marks are NOT interchangable. You cannot line up the timing belt cog with the mark on the timing cover, and you cannot line up with the large crank pulley with the mark on the block. And I certainly hope you didn't spin the crank around a full turn without the timing belt hooked up. This can potentially damage any valves that sit at or near max lift.
BTW: These pics are from an 03 Pilot. But they should be similar enough to get the point across.
Last edited by 94eg!; 03-21-2012 at 04:38 PM.
03-21-2012, 04:40 PM
#355
Chapter Leader (Southern Region)
Thread Starter
I thought he was saying the cog lines up but the cp doesn't line with the pointer? 
amsohio.. are you saying you line up the cog with the block or the cover?
amsohio.. are you saying you line up the cog with the block or the cover?
03-21-2012, 04:59 PM
#356
Well that would be impossible. The cog and pulley are both keyed to the crankshaft and cannot be installed at any other angle. You can't really put them on wrong. My guess is he's aligning/aligned the wrong thing to the wrong mark and then installed the belt.
03-21-2012, 05:00 PM
#357
Chapter Leader (Southern Region)
Thread Starter
That's what I'm so confused about.. hence my Derp comment.
 03-21-2012, 05:15 PM
#359
6th Gear
Join Date: Mar 2012
Posts: 6
Likes: 0
Received 0 Likes
on
0 Posts
What i did
I originally lined up the mark on the cog (gear) with the marks on the engine. This determines where the pulley will go. It ran like crap. I watched a youube video and he points out that there are four dots on the top edge of pully. The stand alone white dot is tdc. I tried that and it will not start.
I did not turn crank a full revolution without the belt on.
I have rear cam on the line perfectly, along with the front cam at tdc #1. I will try the arrows again on the cog. The pulley location will be determind by this.
If my belt falls on the high point of a gear notching, should i turn a little clokwise or counter clockwise to get it to fit? Btw, typing on an ipad suks.
03-21-2012, 06:41 PM
#360
After lining up your three gears with the marks BEHIND (not the belt cover), move the belt into position and slip it over the crank. thread it up the front side of the engine over the idler bearing and pull it tight to get it onto the front cam gear. It should be nice & tight and kinda "snap" into the gear teeth on the front cam gear.
Now thread the belt around the water pump and up over the rear cam gear. Try not to bump or yank the rear cam gear, or it will snap forward (as we all know) and you will have to start all over.
Once the belt is over the rear cam, thread it down over the tensioner bearing. There is not much slack in the belt so you may have to slide the belt half-way off the crank & rear cam pulleys to make it work. After that, install your tensioner and pull the pin.
The whole idea of this order is to get all of the belt slack between the rear cam gear and the crank pulley. This way when you pull the pin on the tensioner, it will take up all that slack.
Now get to work!
Once your done, slip the lower timing cover on (1 or 2 bolts) followed by the crank pulley. Then install the big bolt. Now turn the engine over two full rotations your ratchet and line up the lone TDC mark on the large crank pulley with the arrow on the plastic timing cover. At this point your front cam should perfectly line up with the #1 mark, and your rear cam should perfectly line up with it's mark. If that is the case, you've done it right.
Last edited by 94eg!; 03-21-2012 at 06:46 PM.